Partner P340S 2014: GENERAL CUTTING INSTRUCTIONS
GENERAL CUTTING INSTRUCTIONS: Partner P340S 2014
B
occasionally be necessary to adjust and
A
C
tighten it. New chain will require adjustment
after about 5 minutes of operation.
AUTOMATIC OILER
Fig. 10
Your chain saw is equipped with an
automatic clutch driven oiler system. The
SAW CHAIN / BAR LUBRICATION
oiler automatically delivers the proper
Adequate lubrication of the saw chain is
amount of oil to the bar and chain. As the
essential at all times to minimize friction with
engine speed increases, so does the oil flow
the guide bar.
to the bar pad. There is no flow adjustment.
Never starve the bar and chain of oil.
The oil reservoir will run out at approximately
Running the saw with too little oil will
the same time as the fuel supply runs out.
decrease cutting efficiency, shorten saw
WARNING: Don't put pressure on
chain life, cause rapid dulling of chain, and
the saw when reaching the end of the cut.
cause excessive wear of bar from
The pressure may cause the bar and chain
overheating. Too little oil is evidenced by
to rotate. If the rotating chain strikes some
smoke, bar discoloration or pitch build-up.
other object, a reactive force may cause
NOTE: Saw chain stretches during use,
moving chain to strike the operator.
particularly when it is new, and it will
GENERAL CUTTING INSTRUCTIONS
FELLING
GENERAL GUIDELINES FOR FELLING
Felling is the term for cutting down a tree.
TREES:
Small trees up to 6-7 inches (15-18cm) in
Normally felling consists of 2 main cutting
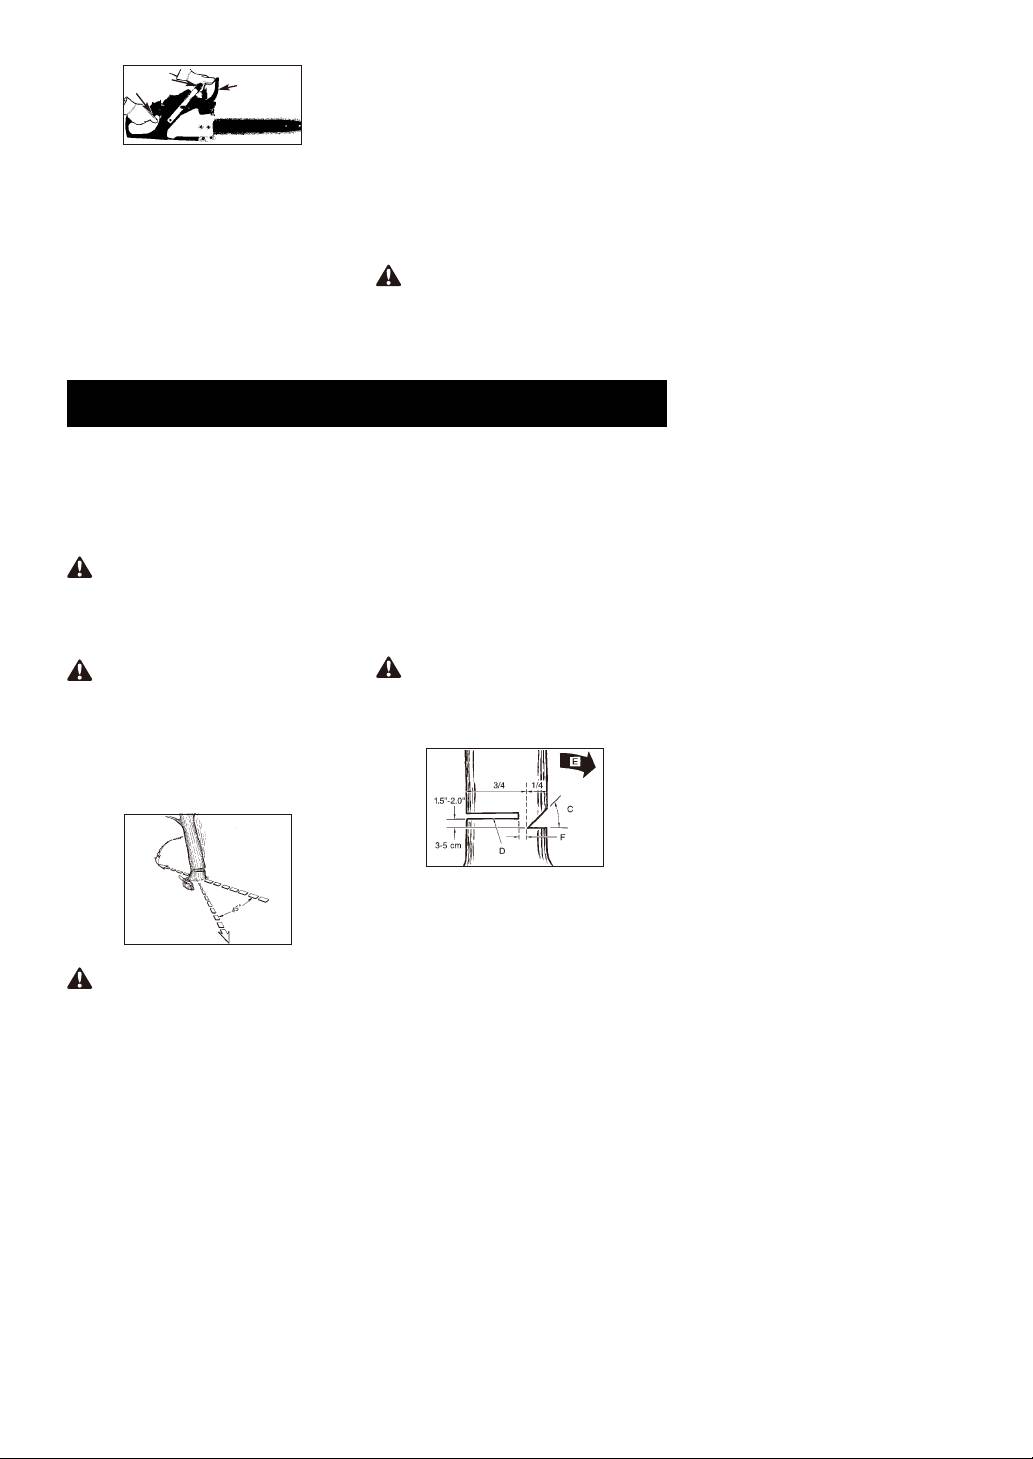
diameter are usually cut in a single cut.
operations, notching (C) and making the
Larger trees require notch cuts. Notch cuts
felling cut (D).
determine the direction the tree will fall.
Start making the upper notch cut (C) on the
side of the tree facing the felling direction
FELLING A TREE:
(E). Be sure you don t make the lower cut
too deep into the trunk.
WARNING: A retreat path (A) should
be planned and cleared as necessary before
The notch (C) should be deep enough to
cuts are started. The retreat path should
create a hinge (F) of sufficient width and
extend back and diagonally to the rear of the
strength. The notch should be wide enough
expected line of fall, as illustrated in
to direct the fall of the tree for as long as
Fig.11A.
possible.
CAUTION: If felling a tree on sloping
WARNING: Never walk in front of a
ground, the chain saw operator should keep
tree that has been notched.
on the uphill side of the terrain, as the tree is
Make the felling cut (D) from the other side of
likely to roll or slide downhill after it is felled.
the tree and 1.5 - 2.0 inches (3-5 cm) above
the edge of the notch (C) (Fig.11B)
NOTE:Direction of fall (B) is controlled by the
notching cut. Before any cuts are made,
consider the location of larger branches and
natural lean of the tree to determine the way
the tree will fall.
B
Fig. 11B
A
Never saw completely through the trunk.
Always leave a hinge. The hinge guides the
tree. If the trunk is completely cut through,
control over the felling direction is lost.
Fig. 11A
Insert a wedge or felling lever in the cut well
before the tree becomes unstable and starts
WARNING: Do not cut down a tree
to move. This will prevent the guidebar from
during high or changing winds or if there is a
binding in the felling cut if you have
danger to property. Consult a tree
misjudged the falling direction. Make sure no
professional. Do not cut down a tree if there
bystanders have entered the range of the
is a danger of striking utility wires; notify the
falling tree before you push it over.
utility company before making any cuts.
-- 9 --
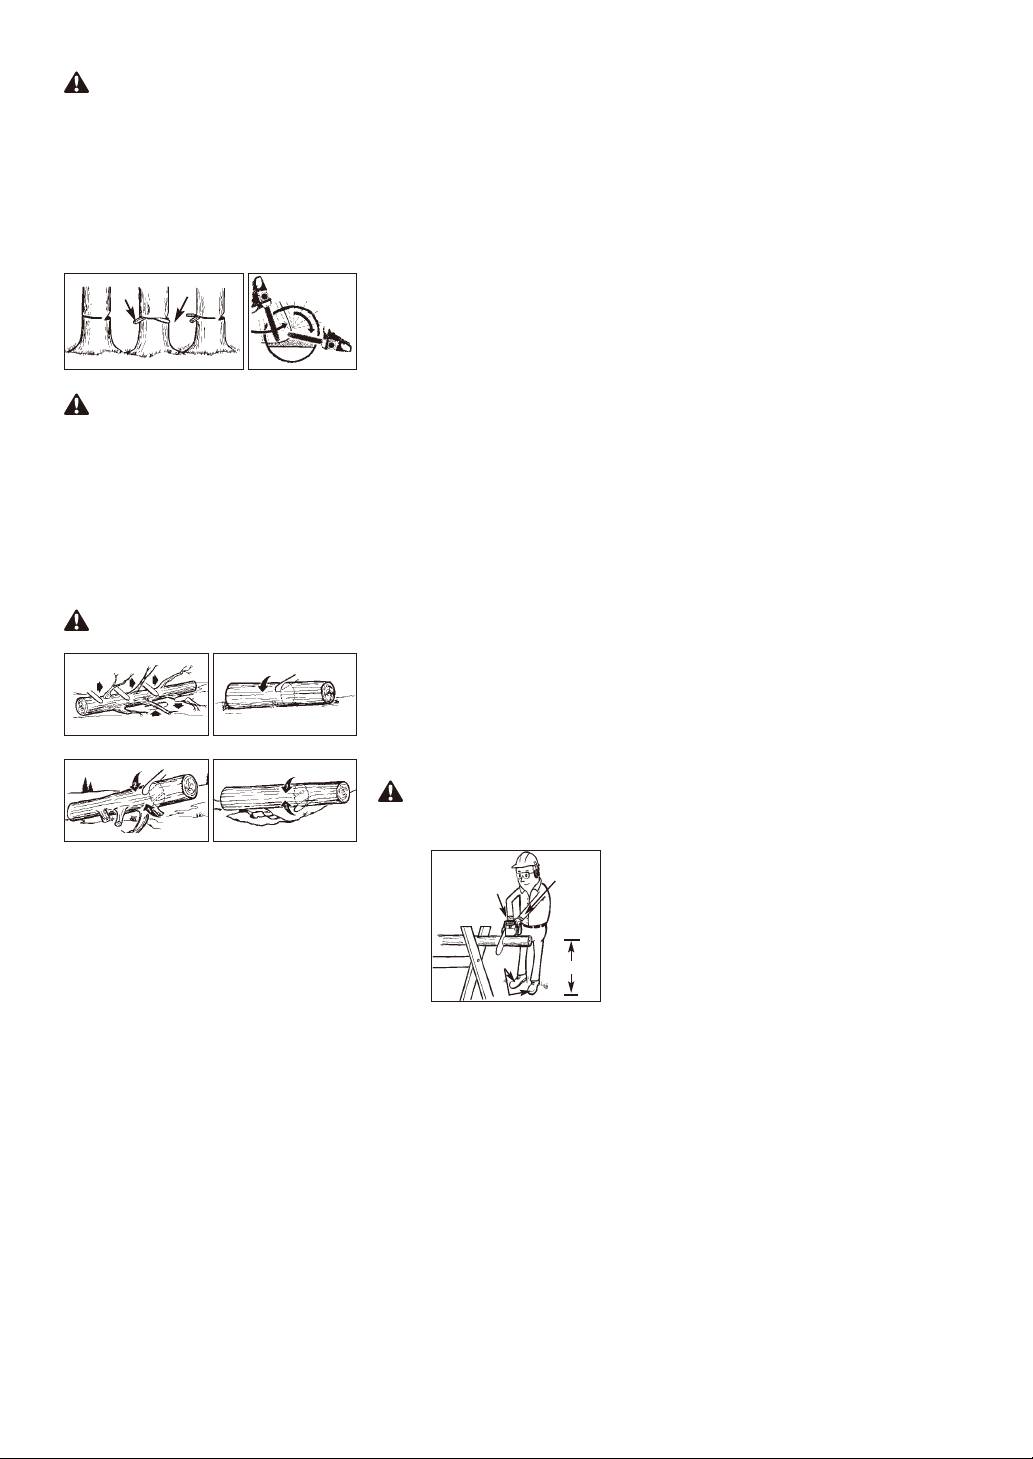
BUCKING
WARNING: Before making the final
Bucking is cutting a fallen log into lengths.
cut, always recheck the area for bystanders,
Make sure you have a good footing and
animals or obstacles.
stand uphill of the log when cutting on
FELLING CUT:
sloping ground. If possible, the log should
be supported so that the end to be cut off is
1. Use wooden or plastic wedges (A) to
not resting on the ground. If the log is
prevent binding the bar or chain (B) in the
supported at both ends and you must cut in
cut. Wedges also control felling
the middle, make a downward cut halfway
(Fig.11C).
through the log and then make the
2. When diameter of wood being cut is
undercut. This will prevent the log from
greater than the bar length, make 2 cuts
pinching the bar and chain. Be careful that
as shown (Fig.11D).
the chain does not cut into the ground when
bucking as this causes rapid dulling of the
A
B
chain.
When bucking on a slope, always stand on
the uphill side.
1. Log supported along entire length: Cut
from top (overbuck), being careful to
avoid cutting into the ground (Fig. 13A).
Fig. 11DFig. 11C
2. Log supported on 1 end: First, cut from
bottom (underbuck) 1/3 diameter of log to
WARNING: As the felling cut gets
avoid splintering. Second, cut from above
close to the hinge, the tree should begin to
(overbuck) to meet first cut and avoid
fall. When tree begins to fall, remove saw
pinching (Fig. 13B).
from cut, stop engine, put chain saw down,
3. Log supported on both ends: First,
and leave area along retreat path (Fig.11A).
overbuck 1/3 diameter of log to avoid
LIMBING
splintering. Second, underbuck to meet
first cut and avoid pinching (Fig. 13C).
Limbing a tree is the process of removing
the branches from a fallen tree. Do not
NOTE: The best way to hold a log while
remove supporting limbs (A) until after the
bucking is to use a sawhorse. When this is
log is bucked (cut) into lengths (Fig.12).
not possible, the log should be raised and
Branches under tension should be cut from
supported by the limb stumps or by using
the bottom up to avoid binding the chain
supporting logs. Be sure the log being cut is
saw.
securely supported.
BUCKING USING A SAWHORSE
WARNING: Never cut tree limbs
while standing on tree trunk.
For personal safety and ease of cutting, the
correct position for vertical bucking is
essential (Fig.14).
VERTICAL CUTTING:
A. Hold the saw firmly with both hands and
A
keep the saw to the right of your body
while cutting.
Fig. 12
Fig. 13A
B. Keep the left arm as straight as possible.
C. Keep weight on both feet.
CAUTION: While the saw is cutting,
be sure the chain and bar are being properly
lubricated.
Fig. 13B
Fig. 13C
B
A
C
600mm
Fig. 14
-- 10 --
Оглавление
- IDENTIFICATION (WHAT IS WHAT?)
- SAFETY RULES
- KICKBACK SAFETY PRECAUTIONS
- IMPORTANT SAFETY
- FUEL AND LUBRICATION
- OPERATION
- GENERAL CUTTING INSTRUCTIONS
- MAINTENANCE INSTRUCTIONS
- DECLARATION OF CONFORMITY
- TECHNICAL DATA SHEET
- ОПИСАНИЕ ДЕТАЛЕЙ ИНСТРУМЕНТА
- ПРАВИЛА ТЕХНИКИ БЕЗОПАСНОСТИ
- МЕРЫ ПРЕДОСТОРОЖНОСТИ ДЛЯ ПРЕДОТВРАЩЕНИЯ ОТСКОКА
- ВАЖНЫЕ СВЕДЕНИЯ, КАСАЮЩИЕСЯ БЕЗОПАСНОСТИ
- ТОПЛИВО И СМАЗКА
- ЭКСПЛУАТАЦИЯ
- ОБЩИЕ ИНСТРУКЦИИ ПО ПИЛЕНИЮ
- ИНСТРУКЦИИ ПО ТЕХНИЧЕСКОМУ ОБСЛУЖИВАНИЮ
- ДЕКЛАРАЦИЯ О СООТВЕТСТВИИ СТАНДАРТАМ
- ТЕХНИЧЕСКИЕ ХАРАКТЕРИСТИКИ
- IDENTIFIERING (VAD ÄR VAD?)
- SÄKERHETSREGLER
- SÄKERHETSÅTGÄRDER MOT KAST
- VIKTIG SÄKERHET
- BRÄNSLE OCH SMÖRJNING
- ANVÄNDNING
- ALLMÄNNA SÅGNINGSANVISNINGAR
- UNDERHÅLLSINSTRUKTIONER
- FÖRSÄKRAN OM ÖVERENSSTÄMMELSE
- TEKNISKT DATABLAD
- IDENTIFIKASJON (HVA ER HVA?)
- SIKKERHETSREGLER
- SIKKERHETSFORANSTALTNINGER FOR TILBAKESLAG
- VIKTIG SIKKERHET
- DRIVSTOFF OG SMØRING
- DRIFT
- GENERELLE INSTRUKSJONER FOR KUTTING
- INSTRUKSJONER FOR VEDLIKEHOLD
- SAMSVARSERKLÆRING
- TECHNICAL DATA SHEET
- IDENTIFICERING (HVAD ER HVAD?)
- SIKKERHEDSREGLER
- SIKKERHEDSFORANSTALTNINGER VEDRØRENDE TILBAGESLAG
- VIGTIGE SIKKERHEDSOPLYSNINGER
- BRÆNDSTOF OG SMØRING
- BETJENING
- GENERELLE VEJLEDNINGER TIL SAVNING
- VEDLIGEHOLDELSESANVISNINGER
- TEKNISK DATAARK
- TUNNISTUS (MIKÄ ON OLEELLISTA?)
- TURVAOHJEET
- TAKAPOTKUJEN TURVALLISUUSVAROTOIMENPITEET
- TÄRKEÄ TURVALLISUUS
- POLTTOAINE JA VOITELU
- KÄYTTÖ
- YLEISIÄ SAHAUSOHJEITA
- HUOLTO-OHJEET
- TEKNISTEN TIETOJEN LEHTI
- IDENTYFIKACJA (CO TO JEST?)
- ZASADY BEZPIECZEŃSTWA
- ŚRODKI BEZPIECZEŃSTWA DOTYCZĄCE ODBIĆ
- WAŻNE INSTRUKCJE DOTYCZĄCE BEZPIECZEŃSTWA
- PALIWO I SMAROWANIE
- OPERACJE
- OGÓLNE INSTRUKCJE CIĘCIA
- INSTRUKCJE KONSERWACJI
- DEKLARACJA ZGODNOŚCI
- ARKUSZ DANYCH TECHNICZNYCH
- IDENTIFIKACE (CO JE CO?)
- BEZPEČNOSTNÍ PRAVIDLA
- BEZPEČNOSTNÍ ZÁSADY PROTI ZPĚTNÉMU RÁZU
- DŮLEŽITÉ INFORMACE O BEZPEČNOSTI
- PALIVO A MAZÁNÍ
- POUŽITÍ
- OBECNÉ POKYNY PRO ŘEZÁNÍ
- POKYNY PRO ÚDRŽBU
- PROHLÁŠENÍ SHODY
- TECHNICKÉ ÚDAJE
