Panasonic AW-RC600E: Connections
Connections: Panasonic AW-RC600E
11 (E)
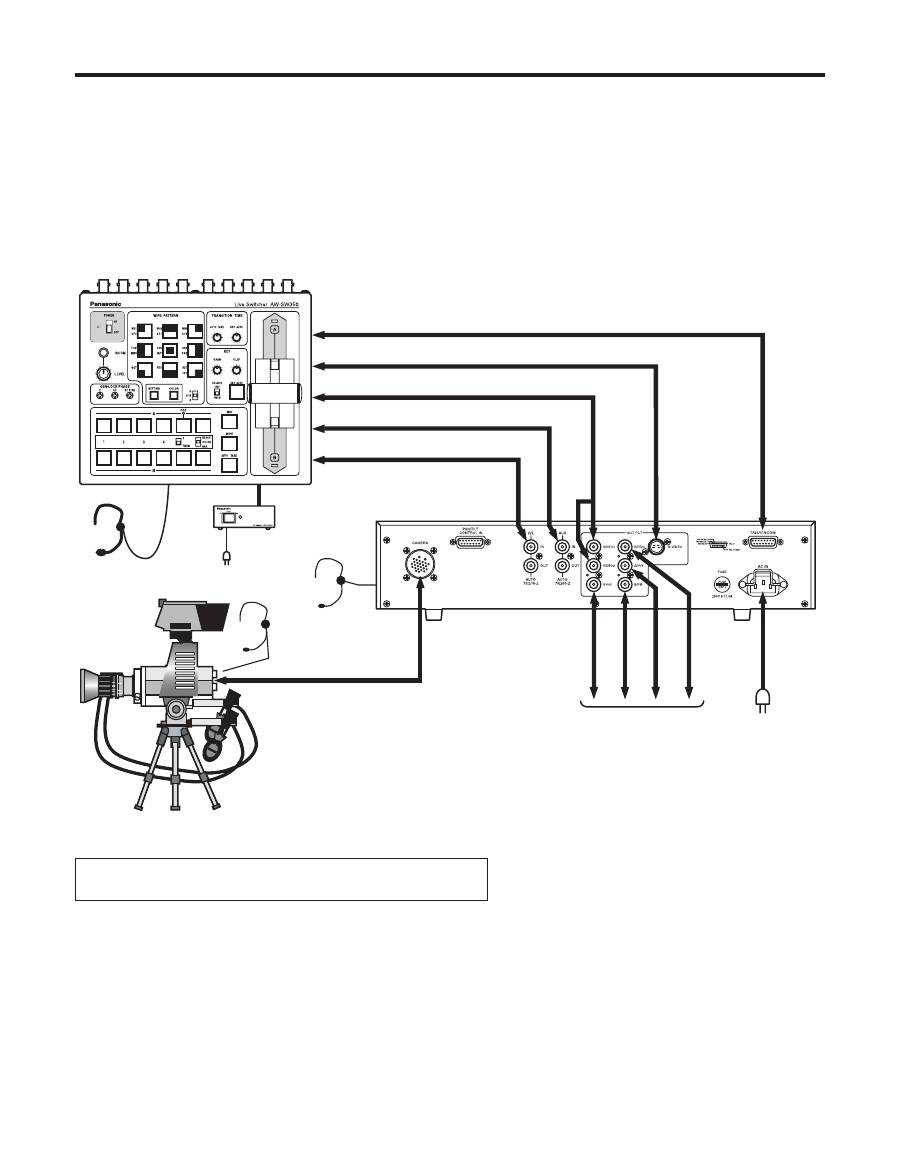
Connections
Before proceeding with the connections, ensure that the power to all the devices is off.
Be absolutely sure to use the AW-CA50A26 RCU cable to connect the RCU to the camera.
When extending the cable, use the extension-use studio cable (WV-CA26U15, WV-CA26U30 or WV-CA26U100) and
extension-use joint connector (WV-CA26T26).
The maximum length to which the cable can be extended is 300 m (for a camera body and lens).
When using the studio card (AW-PB305) and attaching a viewfinder, it can be extended up to 100 m.
When the power switch of the RCU is set to ON, the power indicator LED lights up, and the camera is controlled from the
RCU.
Notes:
When the R/G/B, Y/PR/PB and Y/C signals are used, select the required signals using the camera’s menu.
When using the S-Video signals, select Y/C using the camera’s menu.
Furthermore, use either the S-Video connector or
BNC connectors, and leave the other connectors unconnected.
The S-Video connector and BNC connectors cannot be used at the same time.
Connect either the VIDEO OUT BNC connector or S-Video connector to the AW-SW350 live switcher.
Use an intercom headset suited to all the devices.
Fabricate the TALLY & INCOM cables without mixing up the signals.
Remote control unit
AW-RC600
AC adapter
AW-PS505A
Live switcher
AW-SW350
Convertible camera + lens +
electronic viewfinder
The AW-PB305 studio card and viewfinder installation bracket are
required to connect an electronic viewfinder to a convertible camera.
Headset
AC 220 to 240 V
Supplied AC cable
TALLY&INCOM
VIDEO IN (S-VIDEO)
To VIDEO IN
To PGM OUT or PVW OUT
To BB OUT
TALLY&INCOM cable
S-VIDEO cable
BNC coaxiale cable
To RGB monitor, etc.
RCU cable
AW-CA50A26
50-pin connector
of camera
AC 220 to 240 V
BNC coaxiale cable
BNC coaxiale cable
Headset
Headset
Оглавление
- ContentsIntroductionAccessories
- Precautions for use
- Parts and their functions
- Connections
- Operating procedure
- Adjustment
- Menu item setting
- Rack mounting
- Appearance
- Specifications
- Sicherheitshinweise
- InhaltEinleitungZubehör
- Vorsichtsmaßnahmen zum Gebrauch
- Teile und ihre Funktionen
- Anschlüsse
- Bedienungsverfahren
- Einstellung
- Einstellung von Menüposten
- Rack-einbau
- Aussehen
- Technische Daten
- Consignes de sécurité
- Table des matièresIntroductionAccessoires
- Précautions d’utilisation
- Les commandes et leurs fonctions
- Raccordements
- Utilisation
- Réglages
- Réglage des options du menu
- Installation en rack
- Aspect extérieur
- Fiche technique
- Precauzioni per la sicurezza
- SommarioIntroduzioneAccessori
- Precauzioni per l’uso
- Parti e loro funzioni
- Collegamenti
- Funzionamento
- Regolazioni
- Configurazione delle voci di menu
- Montaggio su rack
- Aspetto
- Dati tecnici
- Precauciones de seguridad
- ÍndiceIntroducciónAccesorios
- Precauciones para la utilización
- Partes y sus funciones
- Conexiones
- Procedimiento de operación
- Ajuste
- Ajuste de los elementos del menú
- Montaje en estantería
- Apariencia
- Especificaciones
- Меры предосторожности
- СодержаниеВведениеПринадлежности
- Меры предосторожности во время использования
- Компоненты и их функции
- Соединения
- Рабочая процедура
- Регулировка
- Установка пунктов меню
- Монтаж в стойку
- Внешний вид
- Технические характеристики
