GermanMAESTRO SW 10009: инструкция
Раздел: Авто, мото оборудование и транспорт
Тип: Автомобильная Колонка
Инструкция к Автомобильной Колонке GermanMAESTRO SW 10009

SW 10009
Herzlichen Glückwunsch!
Mit dem Kauf eines Lautsprechers von GermanMAESTRO haben Sie sich
für ein technisch und qualitativ hochwertiges "Made in Germany" Produkt
entschieden. GermanMAESTRO wünscht Ihnen viel Spaß mit Ihrem
System. Sollten Sie Fragen zu anderen GermanMAESTRO Produkten
haben, freuen wir uns über eine Mail an
info@german-maestro.de
oder Ihren persönlichen Anruf unter
+49 6261 638-0
.
Congratulations!
By purchasing a loudspeaker from GermanMAESTRO, you have
decided on a "Made in Germany" product of the highest techni-
cal quality. GermanMAESTRO wishes you great enjoyment with
your System. Should you have any questions about this sys-
tem or other GermanMAESTRO products, please send us an
e-mail at
info@german-maestro.de
or call us personally on
+49 6261 638-0
.
Félicitations!
Vous venez d’acquérir en achetant un haut-parleur de GermanMAESTRO
un produit fabriquer en Allemagne de grande valeur sur le plan technique
et qualitatif. GermanMAESTRO vous souhaite beaucoup de plaisir avec
votre système. Si vous avez des questions concernant ce système ou l’un
des autres produits de la maison GermanMAESTRO, veuillez nous écrire
à l’adresse
info@german-maestro.de
ou nous téléphoner personnelle-
ment au
+49 6261 638-0
.
¡Enhorabuena!
Al comprar un altavoz de la marca GermanMAESTRO ha escogi-
do un producto "Made in Germany" de alta calidad y nivel técnico.
GermanMAESTRO le desea que disfrute de su Sistema. Si desea hacer
alguna consulta sobre producto GermanMAESTRO, puede ponerse en
contacto con nosotros por correo electrónico
info@german-maestro.de
o telefónicamente, en el número
+49 6261 638-0
.
Congratulazioni!
Comprando un altoparlante della ditta GermanMAESTRO Lei ha scelto
un prodotto "Made in Germany" ai massimi livelli sia per la sua quali-
tà che per la sua tecnica. GermanMAESTRO Le augura buon diverti-
mento con il Suo sistema. Nel caso Lei abbia ancora delle domande in
merito ad altri prodotti realizzati dalla GermanMAESTRO, saremo ben
lieti di poter rispondere ad una Sua email inviata al seguente indirizzo
info@german-maestro.de
oppure a una Sua telefonata al seguente
numero
+49 6261 638-0
.
Примите наши сердечные поздравления!
Купив комплект автомобильных громкоговорителей категории Hi-Fi фирмы
GermanMAESTRO Вы выбрали высококачественное в техническом отношении
изделие. Фирма GermanMAESTRO желает Вам приятного времяпровождения с
Вашей системой. Если у Вас появятся вопросы по этой системе или по другим
изделиям фирмы GermanMAESTRO, будем рады получить от Вас письмо по
электронной почте info@german-maestro.de или услышать Вас по телефону +49
6261 638-0.
Jahre Garantie
years warranty
ans Garantie
años Garantía
anni Garanzia
года Сpoк Гapaнтии
3
Bitte bewahren Sie Ihren Kaufbeleg für Garantiezwecke auf.
Please keep your purchasing slip for warranty reasons.
Veuillez conserver le reçu de caisse pour la garantie.
Por favor conserve su comprobante de compra a efectos de garantía.
Conservate la ricevuta di acquisto ai fini della garanzia.
гоxpаните, пожалуйста чек для случаев, требующих предоставления гарантии.
MAESTRO Badenia
Akustik & Elektronik GmbH
Neckarstr. 20
D-74847 Obrigheim
Germany
Phone +49 (0) 62 61 - 6 38-0
Fax
+49 (0) 62 61 - 6 38-129
E-Mail info@german-maestro.de
Website www.german-maestro.de
Einbauanleitung
Installation Manual
Directiones de installation
Instrucciones de instalación
Istruzioni di montaggio
Инструкция по yстанoвкеа

Allgemeines General Généralités Indicaciones generales Informazioni generali Oбщие рeкомендации
Bitte beachten Sie beim Einbau und Betrieb der Lautsprecher gel-
tende gesetzliche Sicherheitsbestimmungen und Unfallverhütungs-
vorschriften. Schützen Sie Ihre Lautsprecher beim Einbau und
Betrieb vor Beschädigung, Spritzwasser und Überlastung.
Klemmen Sie, soweit technisch möglich und vertretbar, während der
Montage die Minusklemme der Fahrzeugbatterie ab, um mögliche
Kurzschlüsse zu vermeiden. Berühren Sie bitte nicht die empfindli-
che Oberfläche der Tieftonmembrane. Verwenden Sie niemals die
Lautsprecherchassis als Schneide- oder Bohrvorlage. Achten Sie
vor der Montage des Lautsprechers darauf, dass beim Einbau hin-
ter der Auflage keine Hindernisse die erforderliche Einbautiefe beein-
trächtigen. Verwenden Sie ein Zuleitungskabel von guter Qualität und
ausreichendem Kabelquerschnitt.
Please observe any prevailing legal safety and accident pre-
vention requirements when installing and using the loudspea-
kers. Always protect your loudspeakers during installation and
use against damage, spray water and overloading. Take care to
observe the correct polarity when wiring up the loudspeakers. If
it is technically unobjectionable, disconnect the minus terminal of
the vehicle battery during installation in order to avoid possible
short-circuits. Please do not touch the delicate surface of the woo-
fer membrane. Never use the loudspeaker chassis itself as a cutting
or drilling template. Please make sure when fitting the loudspea-
kers behind fascia panelling that there are no obstacles behind it to
prevent the required installation depth. Use wiring cable of good quality
and with an adequate cable cross-section.
Veuillez respecter lors du montage et de l’utilisation du haut-parleur
les directives de sécurité légales ainsi que les règlements de préven-
tion des accidents. Protégez vos haut-parleurs lors du montage et de
l’utilisation de toute dégradation, projection d’eau et surcharge. Si pos-
sible, débranchez pendant le montage la borne moins de la batterie du
véhicule afin d’éviter tout court-circuit éventuel. Veuillez ne pas tou-
cher la surface sensible de la membrane des graves. N’utilisez jamais
le châssis du haut-parleur pour couper ou percer dessus. Veillez, avant
de monter le haut-parleur derrière le support, à ce que la pro-fondeur
de montage nécessaire soit disponible (pas d’obstacle). Utilisez un
câble d’alimentation de bonne qual té et avec une section suffisante.
Durante el montaje y funcionamiento del altavoz tenga en cuenta las
correspondientes normas de seguridad y las disposiciones de preven-
ción de accidentes. Durante el montaje y su funcionamiento, proteja
su altavoz contra daños, salpicaduras de agua y sobrecarga. Durante
el montaje, desemborne la borna negativa de la batería del vehículo
para evitar cortocircuitos. No toque la superficie sensible de la mem-
brana de graves. No utilice nunca el chasis del altavoz como plantil-
la para cortar o taladrar. Antes de montar el alt voz, asegúrese de que
detrás del sopo te no hay ningún obstáculo que pueda reducir la pro-
fundidad necesaria durante el montaje. Utilice un cable conduc-tor de
buena calidad y con un corte transversal de cable adecuado.
Durante il montaggio e l’impiego degli altoparlanti voglia rispettare
le norme di legge in vigore in merito alla sicurezza e le norme antin-
fortuni. Durante il montaggio ed il funzionamento si raccomanda di
proteggere l’ altoparlante da danni, spruzzi d’acqua e sovraccarico.
Staccare durante il montaggio il morsetto meno della batteria del
veicolo, per evitare eventuali corti circuiti. Si prega di non toccare la
sensibile membrana delle basse ed alte frequenze. Non utilizzare mai
il complesso portante dell’altoparlante radio come base di taglio o di
foratura. Prima di iniziare il montaggio dei componenti dell’altopar-
lante radio fare attenzione che durante l’installazione dietro il sup-
porto non ci siano elementi d’intralcio che possano limitare la profon-
dità necessaria del montaggio. Si raccomanda di utilizzare un cavo di
alimentazione di buona qualità e con una sufficiente sezio-ne.
При установке и во время эксплуатации громкоговорителей выполняйте
действующие предписания закона по вопросам безопасности и правила
техники безопасности. Предохраняйте Ваши громкоговорители при
установке и дальнейшей эксплуатации от повреждений, воды и перегрузок.
Во избежание короткого замыкания, отсоедините на время монтажа
минусовую клемму автомобильной батареи. Не прикасайтесь, пожа-
луйста, к чувствительной поверхности мембран высоких и низких частот. Не
используйте ни в коем случае корпус громкоговорителя в качестве шаблона для
резки или сверления. Перед монтажом громкоговорителя обратите внимание на
то, чтобы во время установки за опорной поверхностью какие-либо препятствия
не могли негативно сказаться на глубине монтажа. Используйте токоподводящий
кабель хорошего качества и имеющий достаточное сечение.
SW 10009
2
1

Einbauhinweise Installation Instructions Instructions de montage Indicaciones de instalación Istruzioni per il montaggio Инструкция по cборке
Art.-Nr
.
90-8199
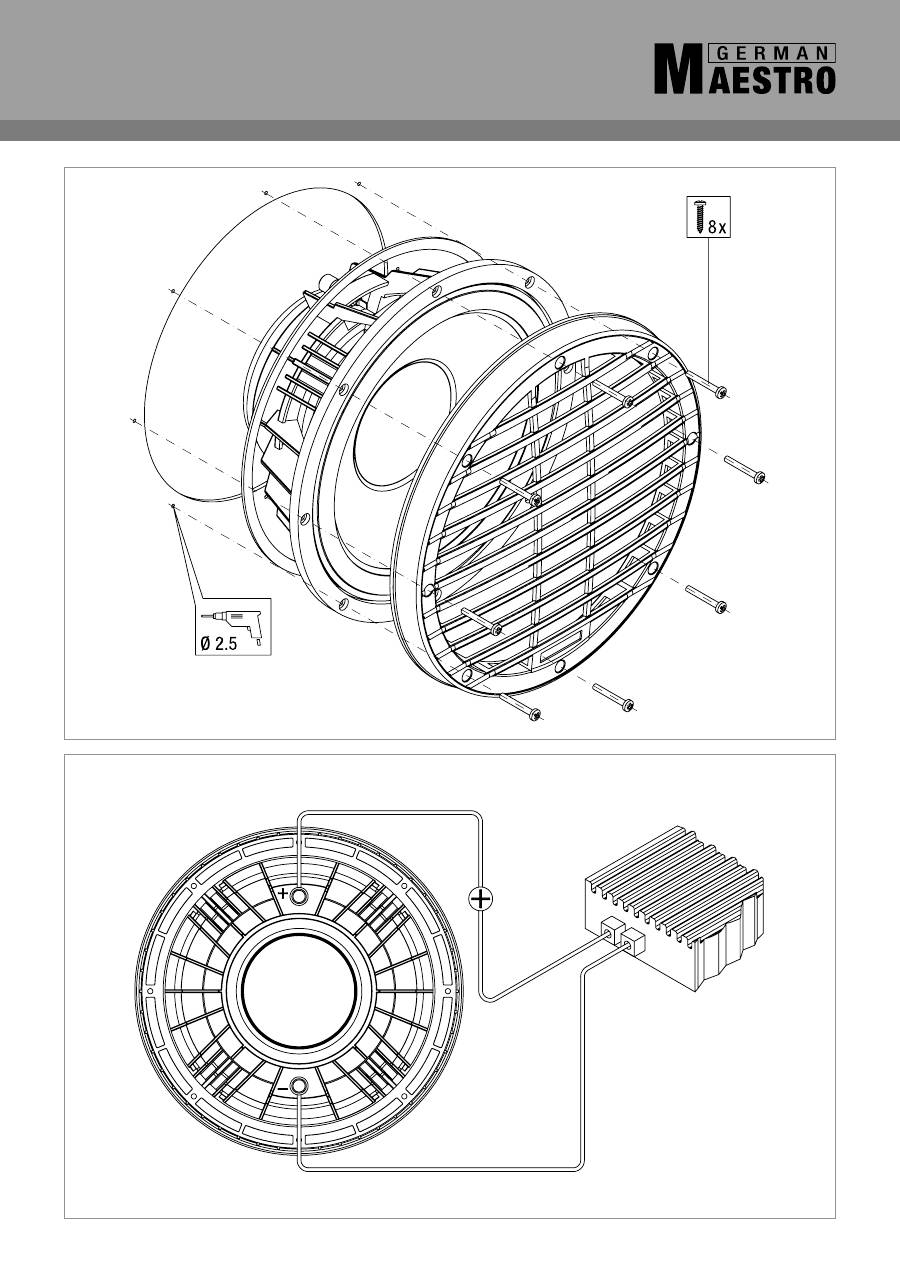
Die Einbaufläche muss eben sein. Für die korrekte Ausführung der
Einbauöffnung nehmen Sie bitte die beiliegende, selbstklebende
Einbauschablone zu Hilfe. Die Montage des Lautsprechers muss
generell “dicht” erfolgen. Das heißt, es darf keine Feuchtigkeit auf
die Rückseite des Lautsprechers gelangen. Verwenden Sie immer die
beiliegende Dichtung. Fixieren Sie die selbstklebende Schablone an
der nach den genannten Kriterien ausgesuchten Stelle. Danach
Einbauöffnung und Bohrlöcher sorgfältig herstellen. Einbautiefe
beachten. Verkleidung entlang der vorgegebenen Linie sorgfältig
ausschneiden und an den angegebenen Punkten bohren (Bohrer
Ø 2,5 mm). Dichtung auf Lautsprecherflanschrückseite aufkleben.
Kabelverbindung zum Lautsprecher herstellen, auf gleiche Polung ach-
ten. Befestigen Sie den Lautsprecher mit den beiliegenden Schrauben.
Schrauben gleichmäßig anziehen und nicht überdrehen. Nach dem
Anschluss des SW 10009 an Ihre Elektronik-Komponente führen Sie
einen Hörtest – mit geringem Lautstärkepegel – durch.
The installation surface must be level. To cut out the installation ope-
ning correctly, please use the self-adhesive installation template pro-
vided. The installation of the loudspeakers should be “watertight”,
i.e. no moisture or damp must be allowed to get onto the back of
the loudspeakers. Always use the special sealing ring provided.
Fit the self-adhesive template in the selected position. Then
carefully cut out the installation aperture and drill the fixing holes.
Take care to observe the correct installation depth. Carefully cut
out the panelling along the line of the template, and drill the holes
at the points indicated (drill diameter 2.5 mm). Fix the sealing ring
to the rear side of the loudspeaker flange. Make the cable connec-
tions to the loudspeaker, taking care to observe the correct pola-
rity. Insert the loudspeaker unit into the opening and fix it in place
using the screws supplied. Use only the original screws supplied.
Tighten the screws carefully and evenly. Do not overtighten. After
connecting the SW 10009 loudspeaker to your sound system
(radio/amplifier) and fixing it in place with the rustproof screws provi-
ded, carry out a listening test. Please carry out the first listening test at
a low volume setting.
La surface de montage doit être plane. Pour pratiquer une ouvertu-
re correcte en vue du montage, veuillez utiliser le pochoir auto-col-
lant ci-joint. Le montage du haut-parleur sera généralement réa-
lisé de manière “étanche”, ce qui veut dire que toute infiltration
d’humidité dans la paroi arrière du haut-parleur est interdite. Utilisez
toujours le joint fourni à cet effet. Fixez le pochoir autocollant à
l’emplacement choisi en fonction des critères mentionnés. Pratiquez
ensuite soigneusement l’ouverture de montage et les trous néces-
saires. Attention à la profondeur de montage. Découpez soigneuse-
ment le revêtement le long de la ligne spécifiée et faites des trous aux
endroits indiqués (perceuse Ø 2,5 mm). Collez le joint à l’arrière de la
bride du haut-parleur. Reliez les câbles au haut-parleur, attention à ce
que la polarité soit correcte. Fixez le haut-par leur avec les vis fournies.
Serrez les vis de manière régulière sans forcer. Une fois le SW 10009
branché sur vos composants électroniques, procédez à un test acous-
tique – à bas volume.
La superficie de montaje debe estar a nivel. Para una realización cor-
recta de la apertura del montaje, utilice como ayuda la plantilla autoad-
hesiva adjunta. El montaje del altavoz debe realizarse generalmente de
una manera “estanca”. Es decir, no debe penetrar nada de humedad
en la parte posterior del altavoz. Utilice siempre la impermeabilización
adjunta. Pegue la plantilla autoadhesiva en el lugar elegido según los
criterios mencionados. Seguidamente reali-ce con cuidado la apertura
de montaje y la perforación. Tenga en cuenta la profundidad de monta-
je. Cortar con cuidado el revestimiento a lo largo de la línea especifica-
da y perforar en los puntos indicados (broca Ø 2,5 mm). Pegar la imper-
meabilización en el reborde de la parte posterior del altavoz. Realice el
empalme de los cables al altavoz, tener en cuenta la igualdad de la
polaridad. Fije el altavoz con los tornillos incluidos. Apretar los tornil-
los uniformemente y no atornillar en exceso. Después de la conexión
del SW 10009 a su componente electrónico realice un test de audio –
con nivel de sonoridad reducido.
La superficie di montaggio deve essere piana. Per una corretta ese-
cuzione dell’apertura di montaggio si prega di voler utilizzare la sagoma
allegata autoadesiva. Il montaggio degli altoparlanti deve essere gene-
ralmente “a tenuta”, cioè la parte posteriore degli altoparlanti non deve
assolutamente venire a contatto con dell’umidità. Utilizzare pertanto
sempre la guarnizione allegata. Fissare la sago-ma autoadesiva sul punto
scelto secondo i criteri sopra indicati, quindi eseguire con precauzione
l’apertura ed i fori per il montaggio. Fare attenzione alla profondità di
montaggio. Ritagliare con caute-la il rivestimento lungo la linea indicata
e forare nei punti stabiliti (punta del trapano Ø 2,5 mm). Incollare la guar-
nizione sulla flangia posteriore dell’altoparlante. Connettere il cavo con
l’altoparlante, fare attenzione alla stessa polarità. Fissare l’altoparlante
con le viti allegate. Stringere le viti senza serrare eccessivamente.
Dopo aver collegato SW 10009 alla Sua componente elettronica
effettuare un test acustico con un livello di intensità acustica moderato.
Поверхность, предназначенная для монтажа, должна быть ровной. Для
правильного исполнения монтажного отверстия воспользуйтесь прилагае-
мым, самоприклеивающимся шаблоном. Монтаж громкоговорителя должен
выполняться, как правило, „герметично“. Это значит, что на обратную
сторону громкоговорителя не должна попадать влага. Всегда используйте
прилагаемое уплотнение. Зафиксируйте самоприклеивающийся шаблон
в месте, выбранном в соответствии с названными критериями. После
этого тщательно выполнить монтажное отверстие и отверстия для винтов
крепления. Учитывайте монтажную глубину. Тщательно проделать вырез в
кожухе по заданной линии и просверлить в указанных точках (сверло
Ø
2,5
мм). Наклеить уплотнение на фланце громкоговорителя с обрат-
ной стороны. Выполнить кабельное соединение с громкоговорителем
– следить за правильной полярностью. Закрепите громкоговоритель
с помощью прилагаемых нержавеющих винтов. Винты равномерно
затянуть, но не допускать перекручивания. После подключения
SW 10009 к Вашему электронному устройству опробуйте его работу на слух – с
незначительным уровнем громкости.
SW 10009
