Bebe Confort Duo thermometer: инструкция
Раздел: Детские товары
Тип:
Инструкция к Bebe Confort Duo thermometer

Made in China / Fait en Chine / Fabricado : China
www.bebeconfort.com
FABRICANT : MICROLIFE CORPORATION, 9F, 431, RuiGuang Road,
NeiHu, Taipei 114, Taiwan, R.O.C
EC
REP
/ MANDATAIRE : MICROLIFE AG, Espenstrasse 139,
9443 Widnau, Switzerland
IMPORTATEUR : MAGNIEN SAS, Z.A les Béthunes,
9 rue du Rapporteur 95310 ST OUEN L’AUMONE
MA IB IFR 100 bebe 1911
Microlife Corporation Taipei - TW
Dual thermometer : forehead and ear
3200 0142
modèle - model : IFR 100
FR : Notice d’utilisation
IT : I Consigli di utilizzo.
NL : Gebruiksaanwijzing.
ES : Instrucciones de uso.
PT : Conselhos de utilização.
EN : Instructions for use
RU : Инструкция по эксплуатации
Forehead measurement
A
B
C
Veuillez lire attentivement les instructions avant d’utiliser ce produit.
Prima di utillizzare l’apparecchio leggere attentamente le istruzioni per l’uso.
Lees alvorens deze instrumenten te gebruiken de instructies aandachtig door.
Lea atentamente las instrucciones antes de utilizar este dispositivo.
Leia atentamente este manual de instruções antes de utilizar o dispositivo.
Read the instructions carefully before using this device.
Перед использованием прибора внимательно прочтите данное руководство.
Ear measurement
A
B
C
Partie appliquée du type BF.
Parte tipo BF applicata.
Geleverd onderdeel type BF.
Pieza aplicada tipo BF.
Peça aplicada tipo BF.
Type BF applied part.
Класс защит ы BF.


FR : THERMOMÈTRE DUO : AURICULAIRE / FRONTAL
Ce thermomètre est un produit de haute qualité utilisant la technologie la plus récente et testé selon les normes internationales. Grâce à sa technologie
unique, ce thermomètre assure pour chaque mesure une lecture stable, sans interférence de la chaleur environnante. L’appareil effectue un autocon-
trôle à chaque mise en marche pour toujours garantir des mesures conformes à la précision annoncée.
Ce thermomètre se destine à des mesures périodiques et à la surveillance de la température corporelle à domicile. Il est conçu pour des personnes
de tous les âges.
Ce thermomètre, qui a été testé cliniquement, s’est avéré précis et sûr lorsque les consignes du mode d’emploi sont bien respectées.
Merci de prendre connaissance de ce mode d’emploi avant utilisation et de le conserver soigneusement.
① Embout thermosensible / Capuchon détachable
② Bouton START
③ Ecran
④ Bouton ON/OFF (marche/arrêt)
⑤ Couvercle du logement de la pile
⑥ Tous les segments sont afchés
⑦ Mémoire
⑧ Prêt à mesurer
⑨ Mesure effectuée
⑩ Indicateur de température de surface
⑪ Signal d’usure de la pile
⑫ Commutation Celsius - Fahrenheit
⑬ Mode mémoire
⑭ Rappel des 12 dernières mesures
⑮ Température mesurée trop élevée
⑯ Température mesurée trop basse
⑰ Température ambiante trop élevée
⑱ Température ambiante trop basse
⑲ Signal d’erreur
⑳ Aucun afchage
㉑ Pile déchargée
㉒ Remplacer la pile
1. LES AVANTAGES DE CE THERMOMÈTRE
Utilisation multiple (large étendue de mesure)
Ce thermomètre a la particularité d’offrir une large étendue de mesure, de 0 à 100.0 °C (32.0 à 212.0 °F). L’appareil peut être utilisé comme un
thermomètre frontal ou auriculaire pour mesurer la température corporelle, mais aussi pour mesurer la température de surface des éléments suivants :
• Température de surface du lait dans un biberon
• Température de surface d’un bain pour bébé
• Température ambiante
Sans embout
Ce thermomètre est plus convivial et plus économique étant donné qu’il n’exige pas d’embout.
Mesure en quelques secondes
La technologie infrarouge innovante permet la mesure de la température auriculaire en seulement 1 seconde et la température frontale en seulement
3 secondes.
Précis et able
Grâce au mode d’assemblage de la sonde, à son capteur à rayons infrarouges perfectionné, cet instrument offre une mesure de la température
aussi précise que sûre.
Agréable et facile d’utilisation
• Forme ergonomique qui rend l’utilisation du thermomètre simple et facile.
• Ce thermomètre peut être utilisé sans perturber la vie quotidienne. Une prise de température pendant le sommeil d’un enfant est possible.
• Ce thermomètre fournit des mesures rapides et est par conséquent agréable d’utilisation pour les enfants.
Afchage automatique de la mémoire
Le thermomètre afche automatiquement la dernière mesure pendant 2 secondes lorsqu’il est mis en route.
Appel multiple de mesures
Les utilisateurs ont la possibilité d’appeler les 12 dernières mesures enregistrées quand l’appareil est en mode mémoire, ce qui permet de mieux
suivre les variations de température.
Sûr et hygiénique
• Pas de risque de verre cassé et d’ingestion de mercure.
• Totalement sûr pour la prise de température des enfants.
• Un nettoyage de l’extrémité thermosensible avec un chiffon en coton imbibé d’alcool rend l’emploi de ce thermomètre complètement hygiénique.
Signal de èvre
10 bips courts et un rétroéclairage rouge de l’écran LCD signalent que la température peut être supérieure à 37,5 °C.
2. IMPORTANTES PRÉCAUTIONS D’EMPLOI
• Ne jamais plonger cet instrument dans l’eau ou un autre liquide. Pour le nettoyage, se référer aux instructions de la section «Nettoyage et désin-
fection».
• N’utilisez pas l’instrument si vous pensez qu’il est endommagé ou remarquez quelque chose de particulier.
• N’ouvrez jamais l’instrument.
• La présence de cérumen dans le canal auditif peut abaisser articiellement la température mesurée. Le canal auditif doit donc être bien propre
pour permettre une mesure précise.
• Un phénomène physiologique de base appelé vasoconstriction est susceptible de se produire au début de l’état fébrile. Il se caractérise par une peau
relativement froide qui peut se traduire par une lecture anormalement basse en cas d’utilisation d’un thermomètre frontal.
• Si la température mesurée ne concorde pas avec l’état du patient ou si elle est anormalement basse, répétez la mesure toutes les 15 minutes ou
contrôlez-la en prenant la température corporelle de base.
• Cet instrument comprend des éléments sensibles et doit être traité avec précaution. Respectez les conditions de stockage et d’emploi indiquées à
la section «Caractéristiques techniques»!
• Ne laissez jamais les enfants utiliser l’instrument sans surveillance. Certaines de ses parties sont si petites qu’elles peuvent être avalées.
• Il convient de le protéger contre:
− des températures extrêmes
− des chocs et chutes
− les saletés et la poussière
− des rayons solaires directs
− la chaleur et le froid
• Si vous comptez ne pas utiliser l’instrument pendant une période prolongée, prenez soin de retirer la pile.
AVERTISSEMENT : L’utilisation de cet instrument ne peut dispenser de consulter le médecin. Cet instrument N’EST PAS étanche! Ne JAMAIS le
plonger dans un liquide.

3. COMMENT CE THERMOMÈTRE MESURE LA TEMPÉRATURE
Ce thermomètre mesure la température frontale et auriculaire.
Mesure frontale
Le thermomètre mesure l’énergie infrarouge émise par la peau du front au-dessus de la zone sourcilière et les tissus avoisinants. Cette énergie est
recueillie par la lentille puis convertie en une indication de température. Les lectures de température obtenues par balayage au dessus de la zone
sourcilière fournissent une précision maximale.
Mesure auriculaire
Ce thermomètre mesure l’énergie infrarouge émise par la membrane du tympan et les tissus avoisinants. Cette énergie est recueillie par la lentille
puis convertie en une indication de température. La mesure afchée obtenue directement du tympan (membrane tympanique) donne la température
auriculaire la plus juste. Les mesures prises sur le tissu environnant du canal de l’oreille génèrent une lecture de la température plus basse, ce qui
peut entraîner un mauvais diagnostic de la èvre.
Pour éviter une mesure inexacte
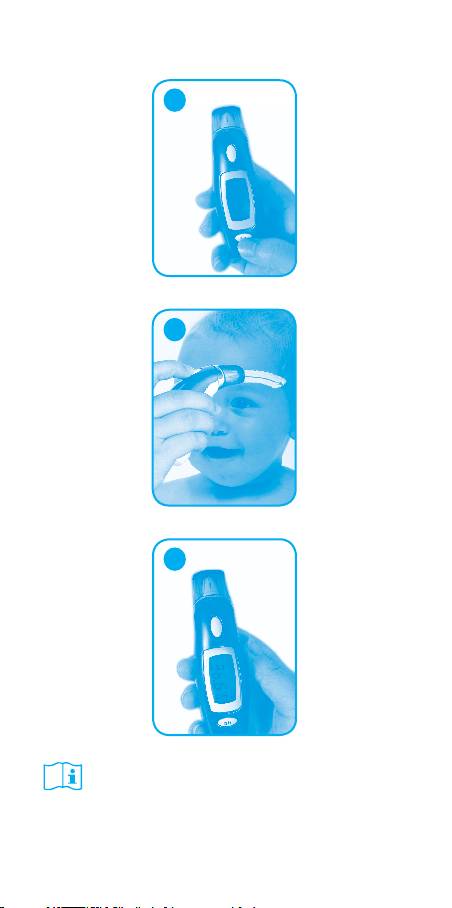
1. Activer le thermomètre en appuyant sur le bouton ON/OFF ④
2. Après le premier bip (symbole de l’échelle de température clignotant), redresser le canal auriculaire en tirant doucement le milieu de l’oreille vers
l’arrière et vers le haut.
3. Bien introduire l’extrémité thermosensible ① dans le canal de l’oreille. Appuyer sur le bouton START ② et garder l’extrémité dans l’oreille jusqu’au
bip qui signale la n de la mesure.
Mesure de la température d’un liquide / ambiante
• Pour mesurer une température domestique (de surface, d’un liquide ou la température ambiante), retirer le capuchon de l’extrémité du thermomètre
• Toute température mesurée en dehors de la plage 32°C-42.2°C est considérée automatiquement par le thermomètre comme étant une température
domestique
• Distance de mesure: 5cm maximum de la surface à mesurer
Mesure de la température d’un liquide :
• La température en surface d’un liquide peut être très différente de la température au cœur du biberon, du bain ou de la soupe. Pour éviter tout incident,
il est nécessaire de bien mélanger tous les liquides avant de procéder à la mesure.
• En cas de mesure à travers un récipient (ex: biberon), prendre en compte l’inertie du récipient.
• Prendre la température le plus rapidement possible pour éviter la formation de condensation sur la lentille du thermomètre
• Ne jamais plonger le thermomètre dans le liquide, il n’est pas étanche.
Température ambiante :
• Prendre la température au centre de la pièce, éloigné des sources de chaleur (radiateur, cheminée), de froid (fenêtre) et à l’abri de tous courant d’air.
• N’orientez pas la lentille vers une source de lumière importante.
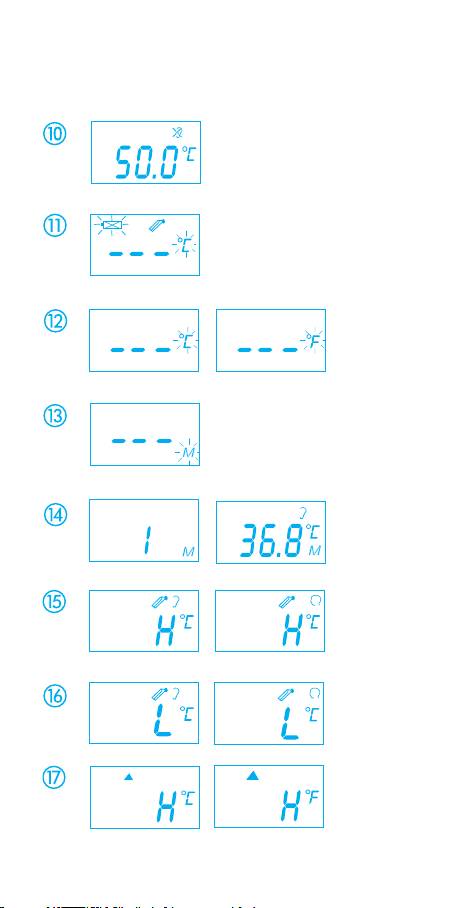
4. AFFICHAGE DE CONTRÔLE ET SYMBOLES
• Tous les segments sont afchés ⑥: Appuyer sur le bouton ON/OFF ④ pour allumer l’appareil; tous les segments sont afchés pendant 2 secondes.
• Mémoire ⑦ : La dernière mesure sera afchée automatiquement pendant 2 secondes.
• Prêt à mesurer ⑧ : L’appareil est prêt pour la mesure, le symbole «°C» ou «°F» clignote pendant que le symbole du mode de prise de température
(auriculaire ou frontal) est afché.
• Mesure effectuée ⑨ : La température est afchée à l’écran ③ avec le symbole «°C» ou «°F» et le symbole du mode de prise de température.
L’appareil est prêt pour la mesure suivante lorsque «°C» ou «°F» clignote à nouveau.
• Indicateur de température de surface ⑩ : Un symbole «oreille barrée» s’afche à l’écran ③ quand la température auriculaire mesurée est en dehors
de la plage 32,0 - 42,2 °C (89,6 - 108,0 °F).
• Signal d’usure de la pile ⑪ : Quand l’appareil est allumé, le symbole pile continue de clignoter pour rappeler à l’usager de la changer.
5. PASSAGE DU MODE FRONTAL AU MODE AURICULAIRE
Pour passer du mode frontal au mode auriculaire, retirez le capuchon ① de l’extrémité du thermomètre. L’appareil bascule immédiatement en mode
auriculaire. Le symbole «oreille» s’afche à l’écran et «°C» ou «°F» clignote pour indiquer que l’appareil est prêt à mesurer.
Pour revenir au mode frontal, remettez le capuchon ① sur l’extrémité du thermomètre, l’appareil bascule immédiatement en mode frontal. Le symbole
«tête» s’afche à l’écran et «°C» ou «°F» clignote pour indiquer que l’appareil est prêt à mesurer.
6. INSTRUCTIONS D’UTILISATION
1. Appuyer sur le bouton ON/OFF ④. L’écran ③ s’allume et tous les segments s’afchent pendant 2 secondes.
2. La dernière mesure s’afche à l’écran pendant 2 secondes avec le symbole «M» ⑦.
3. Quand le symbole «°C» ou «°F» clignote, un bip est émis. Le thermomètre est alors prêt à prendre la température ⑧.
Mesure frontale
• Placez la sonde doucement sur la zone de mesure, environ 1 cm au-dessus du centre du sourcil. Si cette zone est couverte de cheveux, de sueur ou
est sale, veuillez d’abord la dégager et la laver an d’améliorer la précision de lecture.
• Pressez le bouton START une fois et relâchez-le. Commencez à déplacer l’instrument à partir d’une hauteur de 1 cm au-dessus du centre du
sourcil vers la zone temporale. Un bip long retentira au bout de 3 secondes pour conrmer la n de la mesure. Si le mouvement de la sonde est
trop lent pour atteindre la tempe avant l’émission du bip long, répétez la mesure comme décrit ci-dessus, mais déplacez la sonde un peu plus
rapidement cette fois-ci.
• Lisez la température enregistrée sur l’écran LCD.
NOTE:
• Les patients et le thermomètre devraient rester dans une pièce à conditions stables pendant au moins 30 minutes.
• Ne prenez pas de mesures pendant ou immédiatement après l’allaitement d’un bébé.
• N’utilisez pas le thermomètre dans un environnement très humide.
• Les patients ne devraient pas boire, manger ou faire de l’exercice avant/pendant la prise de température.
• Avant de placer la sonde du thermomètre sur la zone de mesure, veillez à la propreté de la surface d’application. Celle-ci ne doit pas être couverte
de cheveux ou de sueur.
• Ne déplacez pas l’instrument de la zone à mesurer avant le retentissement du bip de n.
• Prenez toujours la température au même endroit étant donné que les lectures peuvent varier selon les endroits.
• 10 bips courts et un rétroéclairage rouge de l’écran LCD signalent que la température peut être supérieure à 37,5 °C.
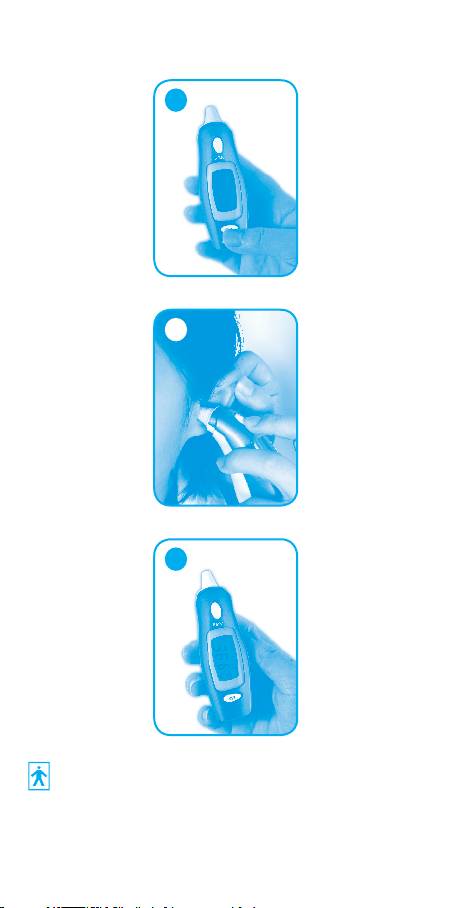
Mesure auriculaire
• Redresser le canal de l’oreille en tirant l’oreille vers le haut puis en arrière pour donner une bonne vue sur le tympan.
- Enfant de moins de 1 an - tirer le pavillon de l’oreille tout droit et en arrière.
- Enfant de plus de 1 an et adulte - tirer le pavillon de l’oreille vers le haut et en arrière. Veuillez aussi vous référer aux instructions succinctes
indiquées avant!
• Pendant que l’oreille est tirée, insérer bien l’extrémité thermosensible dans le conduit (max. 1 sec.) et appuyer immédiatement sur le bouton START
②. Le relâcher à l’émission d’un bip. Ce signal sonore conrme la n de la prise de température
• Retirer le thermomètre de l’oreille. La température mesurée s’afche ⑨.
NOTE:
• Pour obtenir de nouvelles mesures précises, veuillez attendre au minimum 30 secondes après 3-5 prises de température effectuées à la suite.
• Les dépôts de cérumen sur l’extrémité thermosensible peuvent dégrader la précision des lectures de température ou propager des infections
d’un utilisateur à l’autre. C’est pourquoi il est important d’utiliser une extrémité propre avant toute mesure. Pour le nettoyage, se référer à la section
«Nettoyage et désinfection».
• Après avoir nettoyé l’extrémité thermosensible ① avec de l’alcool, attendre 5 minutes avant de prendre la prochaine mesure an de permettre au
thermomètre d’atteindre sa température de fonctionnement de référence.

• Pour un enfant, la meilleure position est, allongé à plat, la tête sur le côté, l’oreille face au plafond. S’il s’agit d’un enfant plus âgé ou d’un adulte,
il faut se placer derrière lui, légèrement sur son côté.
• Toujours prendre la température dans la même oreille car les mesures varient d’une oreille à l’autre.
• Attendre quelques minutes après le réveil pour prendre la température.
• Dans les situations suivantes, il est recommandé de prendre 3 fois la température dans la même oreille et de ne retenir que la température la
plus élevée:
1. Nouveau-nés les 100 premiers jours.
2. Enfants de moins de 3 ans avec une décience du système immunitaire et pour qui la présence ou
l’absence de èvre est un élément critique.
3. Lorsque l’utilisateur apprend à se servir du thermomètre pour la première fois et jusqu’à ce qu’il se soit
sufsamment familiarisé avec celui-ci pour obtenir des mesures homogènes.
4. Mesure anormalement basse.
7. COMMUTATION CELSIUS - FAHRENHEIT
Ce thermomètre peut indiquer la température en Fahrenheit ou en Celsius. Pour passer de l’échelle °C à l’échelle °F, éteindre l’appareil, appuyer sans
relâcher sur le bouton START ② pendant 5 secondes; Quand on cesse d’appuyer sur le bouton START ② après 5 secondes, l’échelle (symbole «°C»
ou «°F») s’afche en clignotant ⑫. Basculer l’échelle entre °C et °F en appuyant à nouveau sur le bouton START ②. Lorsque le choix de l’échelle a été fait,
attendre 5 secondes et l’appareil va passer automatiquement à la position prise de température.
8. COMMENT APPELER 12 MESURES EN MODE MÉMOIRE
Ce thermomètre peut afcher les 12 dernières mesures.
• Mode mémoire ⑬: Presser le bouton START ② pour accéder au mode mémoire en position OFF. Le symbole Mémoire «M» clignote.
• Mesure 1 - dernier résultat ⑭: Presser puis relâcher le bouton START ② pour appeler la dernière mesure. Afche 1 juste avec symbole mémoire.
• Mesure 12 - afchage successif : Presser puis relâcher le bouton START ② pour appeler successivement les 12 dernières mesures mémorisées.
En pressant et en relâchant le bouton START ② après l’afchage des 12 dernières mesures, on redémarre la boucle à partir de la mesure 1.
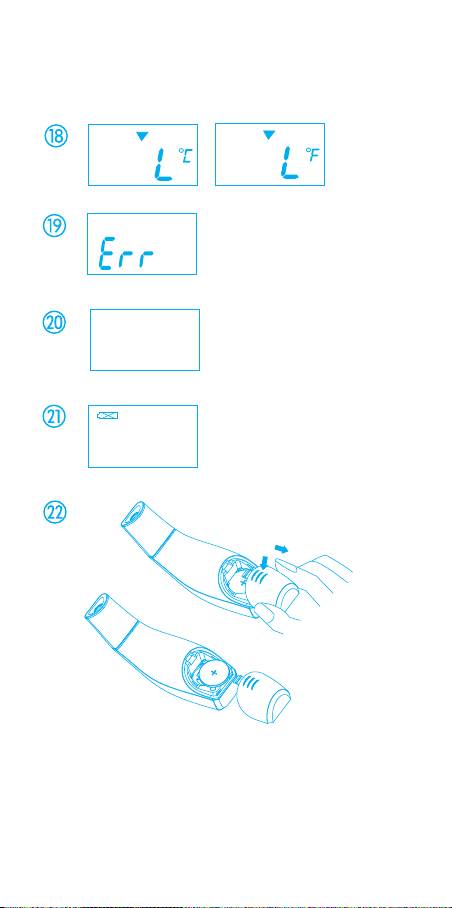
9. MESSAGES D’ERREURS
• Température mesurée trop élevée ⑮
:
Afche «H» quand la température mesurée dépasse 100,0 °C (212,0 °F) en mode auriculaire ou 42,2 °C
(108,0 °F) en mode frontal.
• Température mesurée trop basse ⑯: Afche «L» quand la température mesurée est inférieur à 0 °C (32,0 °F) en mode auriculaire ou 34,0 °C
(93,2 °F) en mode frontal.
• Température ambiante trop élevée ⑰: Afche «H» et « » quand la température ambiante est supérieure à 40,0 °C (104,0 °F).
• Température ambiante trop basse ⑱: Afche «L» et « » quand la température ambiante est inférieure à 5,0 °C (41,0 °F) en mode auriculaire
ou 16 °C (60.8 °F) en mode frontal.
• Signal d’erreur ⑲
: Dysfonctionnement de l’appareil.
• Aucun afchage ⑳
: Vérier la bonne mise en place de la pile ainsi que le respect de la polarité (<+> et <->).
• Signal pile usée ㉑
: Si l’écran n’afche que le symbole pile, en continu, remplacer immédiatement la pile.
10. NETTOYAGE ET DÉSINFECTION
Utiliser un chiffon doux ou un chiffon en coton imbibé d’alcool (70% isopropyl) pour nettoyer la surface du thermomètre et l’extrémité thermosensible.
S’assurer qu’aucun liquide n’entre à l’intérieur. Ne jamais utiliser d’agent abrasif, diluant ou benzène et ne jamais plonger l’appareil dans l’eau ou un
autre liquide. Prendre soin de ne pas rayer la lentille de l’extrémité thermosensible et l’écran d’afchage.
11. REMPLACEMENT DE LA PILE
Cet instrument est fourni avec une pile lithium de type CR2032. Remplacer par une nouvelle pile CR2032 lorsque le symbole pile clignotant s’afche à
l’écran ㉑. Enlever le couvercle de la pile en le faisant glisser dans le sens indiqué. Retirer la pile usée et insérer une pile neuve ㉒.
Les piles et instruments électroniques doivent être éliminés en conformité avec les prescriptions locales, séparément des ordures
ménagères.
12. CARACTÉRISTIQUES TECHNIQUES
Etendue de mesure : Mode auriculaire: 0-100,0 °C (32-212,0 °F). Mode frontal: 34-42,2 °C (93,2-108,0 °F).
Résolution : 0.1 °C / °F.
Précision : Laboratoire : ±0.2 °C, 32.0 - 42.2 °C. (±0.4 °F, 89.6 - 108.0 °F).
Afchage : Ecran LCD (à cristaux liquides), 4 chiffres + symboles spéciaux.
Signaux sonores :
• L’appareil est allumé et prêt pour la mesure: 1 bip bref.
• Effectuez une mesure complète : 1 bip long (1 s) - la lecture est inférieure à 37,5 °C (99,4 °F); 10 bips courts - la lecture est supérieure ou égale
à 37,5 °C (99,4 °F).
• Erreur système ou dysfonctionnement : 3 bips courts.
Mémoire :
• Auto-afchage de la dernière température mesurée.
• Afchage de 12 mesures en mode mémoire.
Rétroéclairage :
• L’écran est éclairé 4 secondes en VERT à la mise sous tension de l’instrument.
• L’écran est éclairé en VERT pendant 5 secondes à la n d’une mesure si la lecture est inférieure à 37,5 °C (99,4 °F).
• L’écran est éclairé en ROUGE pendant 5 secondes à la n d’une mesure si la lecture est supérieure ou égale à 37,5 °C (99,4 °F).
Température de fonctionnement : Mode auriculaire: 5-40,0 °C (41-104,0 °F). Mode frontal: 16-40,0 °C (60,8-104,0 °F).
Humidité relative 15-95 % max.
Température de stockage : -25 °C à +55 °C (-13 °F à 131 °F). Humidité relative 15-95 % max.
Arrêt automatique : 1 minute environ après la n de la mesure.
Pile : CR2032 Pile (X1) 3V - au moins 1000 mesures.
Dimensions : 107 x 50 x 34 mm.
Poids : 55 g (avec pile), 52 g (sans pile).
13. GARANTIE
Ce produit est garanti pendant une période de deux ans à compter de la date d’achat. Aucun dommage occasionné par une mauvaise manipulation
n’est couvert par la garantie. Les piles et l’emballage sont également exclus de la garantie. Tout autre sinistre exclu. Toujours joindre la preuve d’achat
à toute déclaration de sinistre et l’adresser à Dorel dont les adresses gurent sur cette notice.
Référence à la norme EN 12470-5; ASTM E1965; IEC 60601-1; IEC 60601-1-2 (EMC).
Cet appareil est conforme aux exigences de la directive relative aux appareils médicaux 93/42/CEE.
Sous réserve de modications techniques.

IT : TERMOMETRO DUO : AURICOLARE / FRONTALE
Il suo nuovo termometro Bébé Confort è uno strumento di altissima qualità che utilizza una tecnologia innovativa testata in conformità alle norma-
tive internazionali. Grazie alla sua tecnologia, unica ed originale, questo termometro può fornire misurazioni stabili e libere da interferenze della
temperatura esterna. Lo strumento svolge automaticamente ad ogni accensione una procedura di autocalibrazione per garantire una misurazione
sempre accurate. Questo termometro Bébé Confort è stato progettato per la misurazione o il monitoraggio, saltuario o periodico, della temperatura
corporzea a domicilio. Può essere utilizzato da persone di ogni età.
Questo termometro è clinicamente testato ed è stato provato essere sicuro ed accurato se utilizzato in conformità a quanto riportato
in questo manuale d’istruzioni.
①
Sensore di misurazione / Coperchio sagomato removibile
②
Tasto START
③
Display a cristalli liquidi
④
Tasto ON/OFF (0/1)
⑤
Coperchio vano batterie
⑥
Segmenti del display
⑦
Memoria
⑧
Pronto per misurare
⑨
Misurazione completata
⑩
Indicazione della temperatura superciale
⑪
Indicatore di batterie quasi scariche
⑫
Impostazione in gradi Celsius o Fahrenheit
⑬
Modalità richiamo
⑭
Richiamo delle ultime 12 misurazioni
⑮
Temperatura troppo alta
⑯
Temperatura troppo bassa
⑰
Temperatura ambiente troppo alta
⑱
Temparatura ambiante troppo bassa
⑲
Segnalazione d’errore
⑳
Display vuoto
㉑
Batterie scariche
㉒
Sostituzione della batterie
1. VANTAGGI DI QUESTO TERMOMETRO
Usi differenziati (Ampia gamma di misurazioni)
Questo termometro offre un’ampia gamma di misurazioni da 0° C a 100° C (32.0° F a 212.0°F) e quindi può essere utilizzato per misurare la
temperatura corporea o quella super ciale di alcuni oggetti come per esempio:
• la temperatura super ciale del latte dei biberon;
• la temperatura super ciale dell’acqua per il bagnetto del bambino.
Senza copri sonda
Questo termometro è stato studiato per migliorare la facilità d’uso da parte dell’utente e ridurre i costi di gestione in quanto non necessita di
copri sonda.
La misurazione è una questione di secondi
L’innovativa tecnologia ad infrarossi di questo termometro permette di rilevare la temperatura all’orecchio in 1 secondo e la temperatura frontale
in 3 secondi.
Preciso ed af dabile
La tecnologia costruttiva della sonda, che utilizza un sensore ad infrarossi avanzato, assicura ad ogni misurazione un elevato grado di precisione
ed af dabilità.
Delicato e facile da usare
• Il design ergonomico consente un utilizzo semplice ed intuitivo del termometro.
• Questo termometro è idoneo per misurare la temperatura quando il bambino dorme.
• Questo termometro è veloce e piace ai bambini.
Visualizzazione automatica dell’ultima misurazione
Per comprendere immediatamente l’andamento della temperatura viene mostrato automaticamente, per 2 secondi ad ogni accensione del ter-
mometro, l’ultimo valore misurato.
Lettura delle misurazione memorizzate
È possibile visualizzare le ultime 12 misurazioni entrando nella funzione di richiamo delle memorie e consentendo all’utente una chiara panoramica
sulle variazioni della temperatura.
Sicuro ed igienico
• Senza rischio di venire a contatto con vetri rotti o di ingestione accidentale di mercurio
• Completamente sicuro per l’utilizzo sui bambini
• La pulizia della sonda può essere effettuata con un panno di cotone leggermente imbevuto con alcool rendendo questo termometro comple-
tamente sicuro per tutta la famiglia.
Allarme febbre
10 brevi segnali acustici (beep) ed il display retroilluminato di colore rosso avviseranno il paziente che la temperatura misurata è uguale o maggiore
di 37,5° C: allarme febbre.
2. ISTRUZIONI IMPORTANTI SULLA SICUREZZA
• Questo strumento deve essere utilizzato solo per gli scopi previsti da questo manuale, ovvero come termometro. Il produttore non sarà respon-
sabile di danni procurati da un uso improprio del prodotto.
• Non immergere mai questo strumento in acqua o altri liquidi. Per la pulizia seguire quanto indicato nella sezione “10. Pulizia e disinfezione”
di questo manuale.
• Non utilizzare lo strumento se danneggiato o se funziona in modo anomalo.
• Non aprire mai lo strumento.
• La presenza di cerume nelle orecchie può essere la causa di temperature basse. Assicurarsi che le orecchie del paziente siano pulite.
• Una condizione siologica chiamata vasocostrizione può intervenire nelle prime fasi della febbre causando un effetto detto “pelle fredda”. La
temperatura misurata sulla fronte durante questa fase può essere insolitamente bassa.
• Se la temperatura misurata non rispecchia lo stato del paziente o è insolitamente bassa, ripetere le misurazioni ogni 15 minuti o confrontare i
risultati con un altro strumento di misurazione.
• Questo strumento è fabbricato con componenti delicati e va trattato con cura. Utilizzarlo osservando scrupolosamente
le condizioni operative e di immagazzinaggio come descritto nella sezione “13. Speci che tecniche.
• Assicurarsi che i bambini non utilizzino lo strumento senza la supervisione di un adulto. Alcune parti sono così piccole da poter essere ingerite.
• Proteggere lo strumento da:
- acqua e umidità;
- temperature estreme;
- urti e cadute;
- sporcizia e polvere;
- raggi solari;
- caldo e freddo.
• Se lo strumento non dovesse essere utilizzato per lunghi periodi, rimuovere le batterie.
ATTENZIONE: La misurazione della temperatura con questo strumento non da alcuna valutazione terapeutica che deve essere espressa solo dal
proprio medico curante. Questo strumento non è resistente all’acqua: non immergerlo mai nei liquidi.

3. COME FUNZIONA QUESTO TERMOMETRO
Questo termometro misura la temperatura frontale e auricolare.
Misurazione della temperatura frontale
Questo termometro misura l’energia ad infrarossi irraggiata dalla pelle nell’area superiore alle sopracciglia. Questa energia è canalizzata attra-
verso una lente e convertita in un valore di temperatura. La misurazione della temperatura attraverso rilevazioni multiple effettuate nell’area
superiore al sopracciglio assicurano un’elevata accuratezza ed af dabilità.
Misurazione della temperatura auricolare
Questo termometro misura l’energia ad infrarossi irraggiata dal timpano e dai tessuti circostanti. La pelle nell’area superiore alle sopracciglia.
Questa energia è canalizzata attraverso una lente e convertita in un valore di temperatura. La misurazione della temperatura rilevata direttamente
sul timpano (membrana timpanica) assicurano una misurazione accurata ed af dabile. La misurazione effettuata sui tessuti circostanti del canale
auricolare può generare una misurazione bassa ed indurre in un errore diagnostico.
Come evitare una misurazione errata
1. Premere il tasto ON/OFF (0/I) ④
per accendere il termometro.
2. Dopo aver sentito un segnale sonoro (la «°C» o la «°F» lampeggeranno sul display), raddrizzare il canale auricolare prendendo gentilmente con
due dita l’orecchio (ca. nella metà) e tirarandolo indietro e verso l’alto.
3. Inserire la sonda ① nel canale auricolare, premere il tasto START ② e tenerla inserita no a quando un beep indicherà che la misurazione
è terminata.
Rilevamento della temperatura di un liquido o ambiente:
• Per rilevare la temperatura domestica (supercie, liquido o temperatura ambiente), ritirare il cappuccio dall’estremità del termometro
• TQualsiasi tempeartura rilevata al di la dell’ intervallo 32°C-42.2°C viene automaticamente considerata dal termometro come temperatura
domestica
• Distanza: 5cm massimo dalla supercie da rilevare
Rilevamento della temperatura di un liquido
• La temperatura di supercie di un liquido può essere molto differente dalla temperatura all’interno del biberon, del bagnetto o della pappa. Per
evitare qualsiasi incidente, mescolare bene tutti i liquidi prima di procedere al rilevamento della temperatura.
• In caso di rilevamento attraverso un recipiente ( ad es. un biberon), tenere conto dell’inerzia del recipiente.
• Prendere la temperatura il più rapidamente possibile per evitare la formazione di condensa sulla lente del termometro
• Non immergere mai il termometro nel liquido, non è a tenuta stagna.
Temperatura ambiente:
• Prendere la temperatura al centro della stanza, lontano da fonti di calore (termosifoni, caminetto), o di freddo (nestra) e al riparo dalle correnti
d’aria.
• Non dirigere la lente verso una fonte troppo luminosa.
4. FUNZIONI DI CONTROLLO E SIMBOLOGIA
• Visualizzazione di tutti i segmenti del display ⑥ : premere il tasto ON/OFF (0/I) ④ per accendere il termometro; tutti i segmenti del display
verranno automaticamente visualizzati per ca. 2 sec.
• Memoria ⑦ : l’ultima misurazione effettuata verrà automaticamente visualizzata per ca. 2 sec. ad ogni accensione del termometro
• Pronto per misurare ⑧ : quando il termometro è pronto per la misurazione, la «°C» o la «°F» lampeggeranno ③ e l’icona della misurazione
frontale o auricolare verrà visualizzata sul display.
•Misurazione completata ⑨ : la temperatura verrà visualizzata e la «°C» o la «°F» resteranno sse sul display ③ per alcuni secondi. Il termometro
sarà pronto per una nuova misurazione quando le icone «°C» e «°F» torneranno a lampeggiare.
• Indicatore di temperatura super ciale ⑩ : l’icona di un orecchio barrato apparirà sul display ③
quando la misurazione in modalità auricolare
è al di fuori del range di 32 ~ 42,2 °C (89.6 ~ 108.0 °F).
• Indicatore di batterie quasi scariche ⑪ : quando il termometro verrà acceso lampeggerà sul display il simbolo delle batterie ad indicare
all’utilizzatore di sostituirle quanto prima.
5. IMPOSTAZIONE DELLA MODALITÀ TEMPERATURA FRONTALE O AURICOLARE
Per cambiare la modalità di misurazione della temperatura da frontale ad auricolare rimuovere il coperchio sagomato removibile ① dalla sonda del
termometro. Il termometro passerà immediatamente in modalità auricolare. L’icona della modalità auricolare sarà visualizzata sul display mentre
«°C» o «°F» lampeggeranno ad indicare che il termometro è pronto per una nuova misurazione.
Per ritornare alla modalità di misurazione frontale, inserire il coperchio sagomato removibile ① sulla sonda ed il termometro passerà immedia-
tamente alla modalità frontale. L’icona della modalità frontale sarà visualizzata sul display mentre «°C» o «°F» lampeggeranno ad indicare che il
termometro è pronto per una nuova misurazione.
6. INDICAZIONI PER L’USO
1. Premere il tasto ON/OFF (0/I) ④. Il display ③ verrà attivato e visualizzerà tutti i segmenti per ca. 2 sec.
2. L’ultima misurazione verrà automaticamente visualizzata per ca. 2 sec. con l’icona «M» ⑦.
3. La «°C» o la «°F» lampeggianti ed un breve segnale sonoro (beep) indicheranno che il termometro è pronto per la misurazione ⑧.
Misurazione frontale
Posizionare delicatamente la sonda a ca. 1 cm al di sopra del sopracciglio in posizione centrale. Se la fronte è coperta da capelli, sudore o sporcizia,
rimuove questi ostacoli per migliorare la precisione della misurazione. Premere brevemente il tasto START e muovere regolarmente il termometro
dal centro della fronte all’area della tempia (ca. 1 cm. al di sopra dell’arcata sopracciliare). Dopo ca. 3 secondi un lungo beep indicherà che la
misurazione è terminata. Se l’area della tempia non è stata raggiunta prima del beep, ripetere la misurazione come descritto precedentemente ma
muovere il termometro un pò più velocemente. Leggere la temperatura misurata sul display a cristalli liquidi.
IMPORTANTE
• Prima della misurazione, pazienti e termometro devono restare nello stesso ambiente e nelle stesse condizioni, per almeno 30 minuti.
• Non misurare la temperatura corporea durante l’allattamento o immediatamente dopo.
• Non utilizzare il termometro in un ambiente molto umido.
• Il paziente non dovrebbe bere, mangiare o fare esercizio sico prima o mentre si misura la temperatura.
• Prima di posizionare il termometro nell’area di misurazione rimuovere capelli, sudore o sporcizia.
• Non muovere il termometro dall’area di misurazione prima di aver sentito il segnale sonoro che indica il termine della misurazione.
• Effettuare la misurazione nella stessa area in quanto la temperatura varia al variare del punto di misurazione.
• 10 brevi segnali acustici (beep) ed il display retroilluminato di colore rosso avviseranno il paziente che la temperatura misurata è uguale o
maggiore di 37,5° C: allarme febbre.
Misurazione auricolare
• Raddrizzare il canale auricolare prendendo gentilmente con due dita l’orecchio (ca. nella metà) e tirandolo indietro e verso l’alto per avere
una chiara visione del timpano
- Per neonati di età inferiore ad 1; anno tirare l’orecchio all’indietro
- Per i bambini di età superiore ad 1 anno e gli adulti: tirare l’orecchio verso l’alto e poi all’indietro
Per una comprensione più immediata fare riferimento alle istruzioni brevi in prima pagina.
• Con l’orecchio delicatamente tirato, inserire tranquillamente la sonda nel canale auricolare (1 sec. max.) e immediatamente premere il tasto
START ②. Rilasciare il tasto e aspettare il beep che indicherà il termine della misurazione.
• Rimuovere la sonda dal canale auricolare e leggere la temperatura misurata sul display a cristalli liquidi ⑨.
IMPORTANTE
Per effettuare misurazioni accurate, attendere almeno 30 sec. dopo aver effettuato 3-5 misurazioni consecutive.
• L’accumulo di cerume sulla sonda può essere causa di misurazioni poco accurate o veicolo di trasmissione di infezioni su altri pazienti. E’ quindi
importantissimo che la sonda sia pulita ad ogni misurazione. Per pulire la sonda fare riferimento a quanto indicato nella
sezione 10 «Pulizia e disinfezione».

• Dopo aver pulito il sensore della sonda ① con alcool, aspettare 5 minuti prima di effettuare una nuova misurazione per poter consentire al
termometro di raggiungere la corretta temperatura d’esercizio.
• Per i neonati di età inferiore ad 1 anno, si consiglia di sdraiarli girando la testa in maniera tale che l’orecchio sia orientato in direzione dell’opera-
tore. Per i bambini di età superiore ad 1 anno e gli adulti è meglio stare dietro leggermente orientati verso l’orecchio.
• Effettuare sempre la misurazione nello stesso orecchio in quanto la temperatura potrebbe variare da orecchio ad orecchio.
• Dopo aver dormito, aspettare alcuni minuti prima di misurare la temperatura.
• Nelle seguenti situazioni Vi raccomandiamo di effettuare almeno tre rilevazioni nello stesso orecchio prendendo la più elevata come riferimento:
1. nei primi 100 giorni dalla nascita;
2. bambini di età inferiore a 3 anni e con problemi al sistema immunitario dove la presenza o assenza di febbre è un elemento critico;
3. quando l’utilizzatore sta imparando o non ha ancora esperienza suf ciente nell’utilizzo di questo termometro o ha dei dubbi sulle misurazioni
effettuate;
4. quando le misurazioni sono ritenute troppo basse.
7. IMPOSTAZIONE GRADI CELSIUS O FAHRENHEIT
Questo termometro può misurare la temperatura in gradi Celsius o Fahrenheit. Per passare da «°C» a «°F», a termometro spento, tenere premuto
il tasto START ② per ca. 5 secondi. L’icona che rappresenterà la scala di misurazione in uso («°C» o «°F») lampeggerà sul display ⑫. Premere
nuovamente il tasto START ② per passare da «°C» a «°F» o viceversa. Quando la scala di misurazione è stata scelta, aspettare ca. 5 secondi ed
il termometro passerà nella modalità «pronto per la misurazione».
8. COME RICHIAMARE LE 12 MISURAZIONI MEMORIZZATE
Questo termometro può richiamare le ultime 12 misurazioni.
• Modalità richiamo memorie ⑬
:a termometro spento, premere il tasto START ② L’icona della memoria «M» lampeggerà.
• Memoria 1 – ultima misurazione ⑭
: premere brevemente il tasto START ② per richiamare l’ultima misurazione che sarà contraddistinta
dal numero 1.
• Memoria 12 – misurazioni in successione: : premendo successivamente il tasto START ② verranno richiamate consecutivamente le ultime 12
misurazioni. Dopo aver visualizzato tutte le misurazioni in memoria ripartirà la sequenza dall’ultima misurazione contraddistinta dal numero 1.
9. MESSAGGI D’ERRORE
• Temperatura troppo alta ⑮
:
viene visualizzata la lettera «H» quando la temperatura misurata è superiore a 42,2 °C (108,0 °F) nella modalità
frontale o 100 °C (212 °F) nella modalità auricolare.
• Temperatura troppo bassa ⑯: viene visualizzata la lettera «L» quando la temperatura misurata è inferiore a 34,0 °C (93.2 °F) nella modalità
frontale o 0 °C (32 °F) nella modalità auricolare.
• Temperatura ambiente troppo alta ⑰: Viene visualizzata la lettera «H» con il simbolo « » quando la temperatura ambiente è superiore a
40,0 °C (104.0 °F).
• Temperatura ambiente troppo bassa ⑱: Viene visualizzata la lettera «L» con il simbolo« » quando la temperatura ambiente è inferiore a 16,0
°C (60.8 °F) nella modalità frontale o 5 °C (41.0 °F) nella modalità auricolare
• Segnalazione d’errore ⑲: lo strumento ha un malfunzionamento.
• Display vuoto ⑳: controllare se le batterie sono state inserite correttamente e se la polarità («+» e «-») corrisponde a quanto riportato nell’al-
loggiamento del vano batterie.
• Batterie scariche ㉑: se l’icona « » è l’unica indicazione sul display sostituire immediatamente le batterie.
10. PULIZIA E DISINFEZIONE
La pulizia della sonda e del termometro può essere effettuata con un panno di cotone leggermente imbevuto con alcool (alcool isopropilico 70%).
Assicurarsi che nessun liquido penetri all’interno del termometro. Non utilizzare mai sostanze abrasive come solventi o immergere il termometro
in sostanze liquide. Non graf are la super cie o la sonda del termometro.
11. SOSTITUZIONE DELLE BATTERIE
Questo strumento è alimentato con 1 batterie al litio tipo CR2032. La batteria va sostituita quando l’icona « » lampeggia sul display ㉑.
Aprire lo sportello del vano batterie facendo slittare verso il basso l’apposito coperchio ㉒.
Sostituire la batteria con una nuova.
Le batterie e gli apparecchi elettrici devono essere smaltiti attenendosi alle normative vigenti sui ri uti speciali e non con i ri uti
domestici.
12. SPECIFICHE TECNICHE
Range di misurazione: Modalità frontale: 34,0 - 42,2 °C (93.2 – 108.0 °F) - Modalità auricolare: 0 - 100 °C (32.2 – 212.0 °F)
Risoluzione: 0,1 °C / °F
Precisione di misurazione: ± 0,2 °C, 32,0 ~ 42,0 °C (± 0.4 °F, 89.6 ~ 108.0 °F)(in laboratorio)
Display: Display a Cristalli Liquidi (LCD), 4 numeri più simboli
Segnali acustici:
• Il termometro è acceso e pronto per la misurazione: 1 beep corto
• La misurazione è stata completata: 1 beep lungo (1 sec.) se la temperatura è inferiore 37,5 °C (99.5 °F), 10 beep corti se la misurazione è
uguale o superiore a 37,5 °C (99.5 °F).
• Errore di sistema o malfunzionamento: 3 beep corti.
Memorie:
• Visualizzazione automatica dell’ultima misurazione
• Visualizzazione delle ultime 12 misurazioni in modalità memoria Retroilluminazione
Display:
• Il display sarà retroilluminato di colore verde per 4 sec. quando il termometro è acceso.
• Il display sarà retroilluminato di colore verde per 5 sec. quando la temperatura misurata è inferiore 37,5 °C (99.5 °F).
• Il display sarà retroilluminato di colore rosso per 5 sec. quando la temperatura misurata è uguale o superiore a 37,5 °C (99.5 °F).
Temperatura d’esercizio: Modalità frontale: 16 – 40 °C (60.8 – 104.0 °F) 15 – 95% umidità relativa massima
Modalità auricolare: 5 – 40 °C (41.0 – 104.0 °F)
Temperatura d’immagazzinaggio: - 25 - +55°C / -13 – +131°F 15 – 95% umidità relativa massima
Spegnimento automatico: ca. 1 minuto dall’ultima misurazione
Batterie: Batteria CR2032 (X1) 3 Volt – minimo 1000 misurazioni
Dimensioni: 107 x 50 x 34 mm
Peso: 55 g (con batterie), 52 g (senza batterie)
13. GARANZIA
Questo prodotto è garantito per una durata di 2 anni a partire dalla data di acquisto. Eventuali danni derivati da un cattivo utilizzo non sono
coperti da garanzia. La pila, l’imballaggio e altri sinistri sono anch’essi esclusi dalla garanzia. Allegare sempre la prova d’acquisto a qualunque
dichiarazione di sinistro da inviare a Dorel agli indirizzi riportati nelle presenti istruzioni.
Normative di riferimento EN 12470-5; ASTM E1965; IEC 60601-1; IEC 60601-1-2 (EMC).
Lo strumento è conforme ai requisiti della Direttiva 93/42/CEE.
Con riserva di apportare modiche tecniche.

NL : DUO THERMOMETER : IN HET OOR / TEGEN HET VOORHOOFD
Deze thermometer is een hoogwaardig product dat gebruik maakt van de meest recente technologie en is getest volgens de internationale
normen. Met behulp van deze thermometer wordt de temperatuur stabiel gemeten zonder invloed van de omgevingstemperatuur.
Het apparaat voert bij het aanschakelen automatisch een zelftest uit waardoor een nauwkeurigheidsnorm gegarandeerd kan worden. Deze
thermometer is bestemd voor huishoudelijk gebruik, voor het periodiek opnemen en het opvolgen van de lichaamstemperatuur, de thermometer
is geschikt voor alle leeftijdsgroepen.
De thermometer is klinisch getest, goed en veilig bevonden indien de gebruiksinstructies strikt worden opgevolgd.
Lees de gebruiksaanwijzing aandachtig voor u het apparaat in gebruik neemt. Bewaar de gebruiksaanwijzing zorgvuldig als referentie
voor een later gebruik.
①
Temperatuurgevoelige punt / afneembaar kapje
②
Toets Start
③
Scherm
④
Toets ON/OFF (aan/uit)
⑤
Deksel van het batterijcompartiment
⑥
Alle segmenten worden weergegeven
⑦
Geheugen
⑧
Klaar om te meten
⑨
Meting uitgevoerd
⑩
Temperatuurindicatie van het oppervlak
⑪
Ladingsignaal van de batterij
⑫
Omschakelen Celsius / Fahrenheit
⑬
Geheugenfunctie
⑭
De 12 laatste meetwaarden weergeven
⑮
De gemeten temperatuur is te hoog
⑯
De gemeten temperatuur is te laag
⑰
De omgevingstemperatuur is te hoog
⑱
De omgevingstemperatuur is te laag
⑲
Foutsignaal
⑳
Geen weergave
㉑
Batterij leeg
㉒
De batterij vervangen
1. VOORDELEN VAN DEZE THERMOMETER
Veelvoudig gebruik (breed meetbereik)
Deze thermometer heeft een uitzonderlijk breed meetbereik, van 0 tot 100, 0°C (32.0 tot 212,0°F). De thermometer kan worden gebruikt als
oorthermometer of voorhoofdthermometer voor het meten van de lichaams¬temperatuur. Tevens kan de thermometer gebruikt worden voor het
meten van de oppervlaktetemperatuur van de volgende elementen :
- Oppervlaktetemperatuur van de melk in de zuiges.
- Oppervlaktetemperatuur van het badwater in het babybad.
- Kamer temperatuur.
Zonder mondstuk
Deze thermometer is gebruikersvriendelijker en economisch omdat hij geen mondstuk heeft.
Meetresultaat binnen enkele seconden
Dankzij de innovatieve infrarood technologie wordt de oortemperatuur binnen slechts 1 seconde nauwkeurig gemeten, voorhoofdtemperatuur
wordt binnen 3 seconden gemeten.
Nauwkeurig en betrouwbaar
Dankzij de assemblage van de voeler en de hoogwaardige infrarood sensor meet dit apparaat de temperatuur nauwkeurig en veilig
Aangenaam en eenvoudig te gebruiken
• Ergonomische vormgeving die het gebruik van de thermometer simpel en eenvoudig maakt.
• Deze thermometer kan worden gebruikt zonder de dagelijkse activiteiten te verstoren. De temperatuur kan worden opgenomen terwijl het kind
slaapt. Deze thermometer meet snel en is daarom uitermate gebruiksvriendelijk voor kinderen.
Automatische weergave van het geheugen
Bij het aanschakelen zal de thermometer automatisch de laatste meetwaarde gedurende 2 seconden weergeven.
Meerdere meetwaarden weergeven
Wanneer de geheugenfunctie is ingeschakeld kan de gebruiker de laatste 12 opgenomen meetwaarden oproepen waardoor de temperatuurvers-
chillen eenvoudig opgevolgd kunnen worden.
Veilig en hygiënisch
• Geen gebroken glas en opname van kwik.
• Volledig veilig voor het opnemen van de temperatuur bij kinderen.
• De temperatuurgevoelige sonde kan met behulp van een katoenen doek en alcohol gereinigd worden voor een optimaal hygiënisch gebruik.
Koortssignaal
10 korte pieptonen en een rode achtergrondverlichting van het LCD scherm geven aan dat de temperatuur hoger kan zijn dan 37,5°C.
2. BELANGRIJKE VOORZORGSMAATREGELEN BIJ GEBRUIK
• Het apparaat nooit onderdompelen in water of een andere vloeistof. Voor het schoonmaken volgt u de instructies van de paragraaf «Schoon-
maken en ontsmetten».
• Gebruik het apparaat niet wanneer u denkt dat het is beschadigd of als u iets bijzonders opmerkt.
• Het apparaat nooit openen.
• De aanwezigheid van oorwas in het oorkanaal kan de gemeten temperatuur kunstmatig lager maken. Het oorkanaal moet dus schoon zijn
voor een nauwkeurige meting.
• Er kan zich aan het begin van de koorts een fysiologisch verschijnsel voordoen dat vasoconstrictie heet. Dit wordt gekenmerkt door een tamelijk
koude huid die kan leiden tot een abnormaal lage temperatuur in geval u de thermometer op het voorhoofd gebruikt.
• Als de opgenomen temperatuur niet overeenkomt met de toestand van de patiënt of als hij abnormaal laag is, neemt u de temperatuur elke 15
minuten op of controleert u deze door de lichaamstemperatuur te meten.
• Dit apparaat bevat gevoelige onderdelen en moet voorzichtig worden behandeld. Volg de opslag- en gebruiksvoorwaarden die worden vermeld
in de paragraaf «Technische eigenschappen» !
• Laat kinderen nooit het apparaat gebruiken zonder toezicht. Sommige onderdelen zijn zo klein dat ze kunnen worden ingeslikt.
• Het apparaat moet worden beschermd tegen:
− extreme temperaturen
− stoten en vallen
− vuil en stof
− directe zonnestraling
− hitte en koude
• Als u het apparaat gedurende langere tijd niet gebruikt, dient u de batterij te verwijderen.
WAARSCHUWING: Het gebruik van dit apparaat maakt het raadplegen van een arts niet overbodig. Het apparaat is NIET waterdicht! NOOIT
onderdompelen in een vloeistof.

3. HOE MEET DEZE THERMOMETER DE TEMPERATUUR?
Deze thermometer meet de temperatuur van het voorhoofd en de temperatuur in het oorkanaal.
Temperatuur opnemen van het voorhoofd
De thermometer meet de infrarode energie die wordt uitgestraald door de huid van het voorhoofd boven de wenkbrauwen en het aan-grenzende
weefsel. Deze energie wordt opgevangen door de lens en vervolgens omgezet in een temperatuurindicatie. De aangegeven temperatuur, gemeten
door het scannen van het gebied boven de wenkbrauwen, levert een maximale precisie.
Temperatuur meten in het oorkanaal
De thermometer meet de infraroodstraling die wordt uitgestraald door het trommelvlies en het aangrenzende weefsel. Deze energie wordt opge-
vangen door de lens en vervolgens omgezet in een temperatuurindicatie. De weergave van deze meting, direct tegenover het trommelvlies, levert
de meest nauwkeurige oortemperatuur op. Metingen verricht op het aangrenzende weefsel van het oorkanaal leveren een lagere meetwaarde op,
wat kan leiden tot een onjuiste diagnose van de koorts.
Ga als volgt te werk om nauwkeurig te meten
1. Schakel de thermometer aan door op de knop ON/OFF ④ te drukken.
2. Na de eerste pieptoon (pictogram van de knipperende temperatuurladder maakt u het oorkanaal recht door het midden van het oor zachtjes
naar achter en naar boven te trekken
3. Breng de temperatuurgevoelige punt ① op de juiste manier in het oorkanaal. Druk op de knop START
② en laat de punt in het oor totdat de
pieptoon aangeeft dat de meetcyclus is voltooid.
De temperatuur van een vloeistof of omgeving meten
• Verwijder het dopje van de punt van de thermometer om een temperatuur binnenshuis op te nemen (oppervlakte, vloeistof of kamertem-
peratuur )
• Elke temperatuur die wordt gemeten buiten het bereik van 32°C-42.2°C wordt automatisch door de thermometer beschouwd als een huis-
temperatuur.
• Meetafstand: maximum 5 cm van het te meten oppervlak .
De temperatuur van een vloeistof meten
• Oppervlakte temperatuur van een vloeistof kan enorm verschillen van de interne temperatuur van bv. een zuiges, een badje, soep of pap. Om
ongevallen te voorkomen, moeten vloeistoffen goed gemengd worden voordat de temperatuur gemeten wordt.
• Als men de temperatuur wil opnemen via een reservoir of container (bijv.: zuiges), dient u rekening te houden met de samenstelling/dikte
van het reservoir/container.
• Neem de temperatuur zo snel mogelijk op om condensvorming te voorkomen op de lens van de thermometer.
• De thermometer nooit in vloeistof onderdompelen, hij is niet waterdicht.
Omgevingstemperatuur meten
• Meet de omgevingstemperatuur in het midden van het vertrek, uit de buurt verwarmingselementen (radiator, open haard enz.) en uit de tocht.
• Richt de lens niet op een sterke lichtbron.
4. WEERGAVE VAN BEDIENINGSELEMENTEN EN PICTOGRAMMEN
• Alle segmenten worden weergegeven ⑥
Druk op de knop ON/OFF
④ om het apparaat aan te zetten;alle segmenten worden gedurende 2
seconden weergegeven.
• Geheugen
⑦
: het laatste meetresultaat wordt automatisch weergegeven gedurende 2 seconden.
• Klaar om te meten ⑧
: het apparaat is klaar om de temperatuur op te nemen, het symbool «°C» of «°F» knippert zolang het pictogram van het
temperatuur opnemen (oor of voorhoofd) wordt weergegeven.
• Meting uitgevoerd
⑨
: De temperatuur wordt weergegeven op het scherm ③ met het symbool «°C» of «°F» en het pictogram van de tempera-
tuuropname functie. Het apparaat is klaar om de volgende temperatuur op te nemen wanneer «°C» of «°F» opnieuw knippert.
• Temperatuurindicatie van het oppervlak
⑩
: een pictogram «doorgestreept oor» verschijnt op het scherm ③ wanneer de gemeten oortempe-
ratuur buiten het bereik van 32,0°C - 42,2°C (89,6 - 108,0 °F).
• Signaal bij zwakke batterijen ⑪ wanneer het apparaat aan staat, knippert het pictogram batterij continu om de gebruiker te waarschuwen dat
de batterijen bijna leeg zijn en zo spoedig mogelijk vervangen dienen te worden.
5. OMSCHAKELEN FUNCTIE VOORHOOFDTEMPERATUUR NAAR OORTEMPERATUUR
Voor het omschakelen van voorhoofdtemperatuur naar oortemperatuur meten: verwijder het dopje
①
aan de punt van de thermometer. Het
apparaat schakelt dan onmiddellijk over naar de oorthermometer functie. Het pictogram «oor» verschijnt op het scherm en «°C» of «°F» knippert
om aan te geven dat het apparaat klaar is om de temperatuur op te nemen. Als u terug wilt schakelen naar voorhoofdthermometer, plaatst u het
dopje ① terug op de punt van de thermometer; Het pictogram «hoofd» verschijnt op het scherm en «°C» of «°F» knippert om aan te geven dat
het apparaat klaar is om te meten.
6. GEBRUIKSAANWIJZING
1. Druk op de knop ON/OFF ④. Scherm ③
gaat branden en alle segmenten worden gedurende 2 seconden weergegeven.
2. De laatste meting verschijnt gedurende 2 seconden op het scherm met het symbool «M»
⑦.
3. Wanneer het symbool «°C» of «°F» knippert, klinkt er een pieptoon. De thermometer is dan klaar om de temperatuur op te nemen ⑧.
Temperatuur opnemen van het voorhoofd
• Plaats de voeler voorzichtig op het gebied waarvan u de temperatuur wilt opnemen, ongeveer 1 cm boven het midden van de wenkbrauwen.
Indien dit gebied is afgedekt met haar, of bedekt is met zweet of vuil, verwijdert u het haar en maakt u het gebied schoon voor een betere
meetnauwkeurigheid.
• Druk een keer op de knop START en laat de knop weer los. Beweeg het apparaat op 1 cm hoogte boven het midden van de wen-kbrauwen
naar de slapen toe. Er klinkt een lange pieptoon na 3 seconden om te bevestigen dat de meetcyclus is voltooid. Als de voeler te langzaam wordt
verplaatst naar de slapen voor de lange pieptoon, neemt u de temperatuur nogmaals op maar verplaatst u de voeler iets sneller.
• Lees de temperatuur af van het LCD scherm.
OPMERKING:
• De patiënten en de thermometer verblijven idealiter in een vertrek met stabiele condities gedurende minstens 30 minuten.
• De temperatuur niet opnemen tijdens of onmiddellijk na de borstvoeding van de baby.
• De thermometer niet gebruiken in een omgeving die zeer vochtig is.
• De patiënten mogen idealiter niet drinken, eten of oefeningen doen voor of tijdens het meten van de temperatuur.
• Voordat u de voeler van de thermometer op het te meten gebied plaatst, controleert u of dit oppervlak schoon is. Het mag niet afgedekt zijn
met haar of zweet.
• Haal het apparaat niet weg van het te meten gebied voordat de pieptoon klinkt die het einde van de meetcyclus aangeeft.
• Neem de temperatuur altijd op dezelfde plaats op omdat de meetwaarden zouden kunnen verschillen afhankelijk van de gebieden.
• 10 korte pieptonen en een rode achtergrondverlichting van het LCD scherm geven aan dat de temperatuur hoger kan zijn dan 37,5 °C.
Temperatuur opnemen in het oor
• Het oorkanaal recht maken door het oor zachtjes naar boven en naar achter te trekken zodat de punt zich tegenover het trommelvlies bevindt.
- Kind van minder dan 1 jaar - de oorschelp recht naar achter trekken.
- Kind ouder dan 1 jaar en volwassenen - de oorschelp naar boven en naar achter trekken. Volg tevens de beknopte instructies die eerder
werden vermeld!
• Wanneer het oor naar achter is getrokken, brengt u de temperatuurgevoelige punt in het oorkanaal (max. 1 sec.) en drukt u onmiddellijk op de
knop START ②. Deze weer loslaten zodra u de pieptoon hoort.
• Dit geluidsignaal bevestigt dat de meetcyclus is voltooid.
• Haal de thermometer uit het oor. De gemeten temperatuur wordt weergegeven
⑨.
OPMERKING:
• Ga als volgt te werk voor nauwkeurige meetresultaten: wacht minstens 30 seconden na 3-5 keer achtereenvolgens de temperatuur te hebben
opgenomen.
• Oorwas op de temperatuurgevoelige punt kan de meetnauwkeurigheid nadelig beïnvloeden of infecties overdragen tussen gebruikers onderling.
Daarom moet men een schone punt gebruiken telkens wanneer men de temperatuur opneemt. Voor het schoonmaken, raadpleegt u de paragraaf
«Schoonmaken en ontsmetten».
• Nadat u de temperatuurgevoelige punt ① hebt schoongemaakt met alcohol, wacht u 5 minuten voordat u opnieuw de temperatuur opneemt,
zodat de thermometer weer kan dalen tot de bedrijfstemperatuur.

• Voor kinderen is de beste positie een liggende positie met het hoofd naar een kant gedraaid en het oor naar het plafond. Bij oudere kinderen of
volwassenen, moet men achter de persoon staan enigszins aan de zijkant.
• Neem de temperatuur altijd in hetzelfde oor op omdat de meetwaarden kunnen variëren van het ene oor op het andere.
• Wacht enkele minuten nadat de persoon wakker is om de temperatuur op te nemen.
• In de volgende situaties wordt aanbevolen om de temperatuur 3 keer op te nemen in hetzelfde oor en alleen de hoogst gemeten temperatuur
te gebruiken:
1. Pasgeborenen tijdens de eerste 100 levensdagen.
2. Kinderen beneden 3 jaar met immuun deciënties waarvoor de aanwezigheid of afwezigheid van koorts een kritisch element is.
3. Wanneer de gebruiker leert om de thermometer voor het eerst te gebruiken en totdat hij/zij hem goed genoeg kent om homogene meetwaarden
te krijgen.
4. Abnormaal laag meetresultaat.
7. OMSCHAKELFUNCTIE CELSIUS - FAHRENHEIT
Deze thermometer kan de temperatuur aangeven in Fahrenheit of in Celcius. Als u wilt overschakelen van de °C schaal naar de °F schaal, schakelt
u het apparaat uit. Druk gedurende 5 seconden op de knop START ② zonder de knop los te laten. Wanneer de knop START ② na 5 seconden
niet meer wordt ingedrukt, verschijnt een knipperende schaalaanduiding (symbool «°C» of «°F») ⑫ Omschakelen tussen °C en °F door opnieuw
de knop START ② in te drukken. Wanneer u de gewenste schaal hebt gekozen, wacht u 5 seconden en het apparaat schakelt weer automatisch
over naar de functie temperatuur opnemen.
8. GEHEUGENFUNCTIE: WEERGAVE VAN DE LAATSTE 12 MEETWAARDEN
Deze thermometer kan de 12 laatste meetwaarden weergeven.
• Geheugenfunctie ⑬: Druk op de knop START ② om toegang te krijgen tot de geheugenfunctie in de UIT stand. Het symbool geheugen
«M» knippert.
• Meetwaarde 1-het laatste resultaat ⑭
: knop START ② indrukken en weer loslaten om de laatste meetwaarde weer te geven. Weergave 1
met alleen het symbool geheugen.
• Meetwaarde 12: de meetwaarden worden achtereenvolgens weergegeven: knop START ② indrukken en weer loslaten om de laatste 12
opgeslagen meetwaarden achtereenvolgens weer te geven. Door de knop START ② in te drukken en weer los te laten na de weergave van de 12
laatste meetwaarden, wordt de cyclus opnieuw gestart vanaf meetwaarde 1.
9. FOUTMELDINGEN
• De gemeten temperatuur is te hoog ⑮
:
Verschijnt «H» wanneer de gemeten temperatuur hoger is dan 100,0 °C (212,0 °F) met de oorthermo-
meter of 42,2 °C (108,0 °F) met de voorhoofdthermometer.
• De gemeten temperatuur is te laag ⑯: Verschijnt «L» wanneer de gemeten temperatuur lager is dan 0 °C (32,0 °F) met de oorthermo¬meter
of 34,0 °C (93,2 °F) met de voorhoofdthermometer.
• De omgevingstemperatuur is te hoog ⑰: Verschijnt «H» met« » wanneer de omgevingstemperatuur hoger is dan 40,0 °C (104,0 °F)
• De omgevingstemperatuur is te laag ⑱: Verschijnt «L» met « » wanneer de omgevingstemperatuur lager is dan 5,0 °C (41,0 °F) met de
oorthermometer of 16 °C (60.8 °F) met de voorhoofdthermometer.
• Foutsignaal ⑲: Storing van het apparaat.
• Geen weergave ⑳: Controleer of de batterij is geïnstalleerd met inachtneming van de polariteit (<+> en <->).
• Signaal lage batterijlading ㉑: Als alleen het pictogram batterij continu wordt weergegeven moet u deze onmiddellijk vervangen.
10. SCHOONMAKEN EN ONTSMETTEN
Gebruik hiervoor een zachte doek of katoenen doek doordrenkt met alcohol (70% isopropyl) om de buitenkant van de thermometer en van
de temperatuurgevoelige punt schoon te maken. Zorg dat er geen vocht binnendringt. Gebruik nooit schuurmiddelen, verdunningsmiddelen of
benzeen en dompel het apparaat nooit onder in water of in een andere vloeistof. Let op dat er geen krassen terecht komen op de lens van de
temperatuurgevoelige punt en het display.
11. BATTERIJ VERVANGEN
Dit apparaat wordt standaard geleverd met een lithium CR2032 batterij. Vervangen met een nieuwe CR2032 batterij wanneer het pictogram
batterij knippert op het scherm ㉑. Verwijder het dekplaatje van het batterijcompartiment. Verwijder de lege batterij en installeer de nieuwe
batterij ㉒.
Gebruikte batterijen en elektronische apparatuur moeten op een speciaal milieu inzamelpunt gedeponeerd worden in overeenstemming
met de plaatselijke regelgeving.
12. TECHNISCHE EIGENSCHAPPEN
Meetbereik:
oorthermometer: 0-100,0 °C (32-212,0 °F)
voorhoofdthermometer: 34-42,2 °C (93,2-108,0 °F)
Resolutie: 0.1 °C / °F
Precisie: Laboratorium: ±0.2 °C, 32.0 - 42.2 °C (±0.4 °F, 89.6 - 108.0 °F)
LCD-scherm (Liquid Crystal Display) 4 cijfers + speciale symbolen
Geluid-signalen:
• Het apparaat is klaar om te meten: 1 korte pieptoon
• Een volledige meetcyclus uitvoeren: 1 lange pieptoon (1 sec.) - het meetresultaat is lager dan 37,5 °C (99,4 °F); 10 korte pieptonen - het
meetresultaat is hoger dan of gelijk aan 37,5 °C (99,4 °F).
• Systeemfout of storing: 3 korte pieptonen.
Geheugen:
• Automatische weergave van de laatste temperatuur die werd gemeten
• Weergave van 12 meetwaarden met het apparaat in de geheugenfunctie
Achtergrondverlichting:
• Het scherm wordt 4 seconden lang GROEN wanneer het apparaat wordt aangezet.
• Het scherm wordt GROEN gedurende 5 seconden na het meten als het meetresutaat lager is dan 37,5 °C (99,4 °F).
• Het scherm wordt ROOD gedurende 5 seconden na het meten als het meetresultaat hoger is dan of gelijk is aan 37,5 °C (99,4 °F).
Bedrijfs-temperatuur:
oorthermometer: 5-40,0 °C (41-104,0 °F)
voorhoofdthermometer: 16-40,0 °C (60,8-104,0 °F); 15-95 % relatieve maximum vochtigheid
Opslag- temperatuur: -25 °C tot +55 °C (-13 °F tot 131 °F); 15-95 % relatieve maximum vochtigheid
Automatische uitschakeling:
ongeveer 1 minuut nadat de meetcylcus is voltooid.
Batterij: CR2032 batterij (1X) 3V - minstens 1000 meetcyclussen
Afmetingen: 107 x 50 x34 mm 55 g (met batterij), 52 g (zonder batterij)
13. GARANTIE
De garantie op dit product bedraagt twee jaar gerekend vanaf de aankoopdatum. Geen enkele schade die door een slechte hantering wordt
veroorzaakt, wordt door de garantie gedekt. De batterijen en de verpakking worden eveneens van de garantie uitgesloten. Iedere andere schade
is uitgesloten. Voeg altijd het bewijs van aankoop bij elke verklaring van schade en richt het aan Dorel waarvan de adressen op deze gebruik-
saanwijzing vermeld staan.
Voldoet aan de volgende normen EN 12470-5; ASTM E1965; IEC 60601-1; IEC 60601-1-2 (EMC).
Dit apparaat komt overeen met de normen van het Medical Device Directive 93/42/EEC.
Technische wijzigingen voorbehouden.

ES : TERMÓMETRO DÚO : FRONTAL / AURICULAR
Este termómetro es un producto de gran calidad que integra la tecnología más avanzada y ha sido probado de conformidad con los estándares
internacionales. Gracias a la tecnología única que incorpora, este termó-metro permite realizar las mediciones con total estabilidad y sin inter-
ferencias del calor. Cada vez que lo ponga en marcha, el termómetro realizará una prueba automática para garantizar la precisión especíca de
las mediciones.Este termómetro está diseñado para la medición y el seguimiento periódico de la temperatura corporal en el hogar y puede ser
usado por personas de cualquier edad.
Este termómetro ha sido clínicamente probado y ha demostrado ser seguro y preciso si se utiliza de acuerdo con las instrucciones de este manual.
Lea atentamente estas instrucciones antes de utilizarlo y consérvelo cuidadosamente.
①
Sensor de medición / Tapa removible
②
Botón START (Inicio)
③
Pantalla
④
Botón ON/OFF (Encendido/Apagado)
⑤
Tapa del compartimento de la batería
⑥
Todos los segmentos en pantalla
⑦
Memoria
⑧
Listo para la medición
⑨
Medición terminada
⑩
Indicador de Temperatura de Supercie
⑪
Indicador de batería baja
⑫
Cambiar de Celsius a Fahrenheit
⑬
Modo recuperación
⑭
Recuperar las 12 últimas mediciones
⑮
Temperatura demasiado alta
⑯
Temperatura demasiado baja
⑰
Temperatura ambiente demasiado alta
⑱
Temperatura ambiente demasiado baja
⑲
Pantalla de error
⑳
Pantalla en blanco
㉑
Batería descargada
㉒
Sustitución de la batería
1. LAS VENTAJAS DE ESTE TERMÓMETRO
Usos múltiples (amplio nivel de medición)
Este termómetro ofrece un amplio nivel de medición, desde 0°C a 100.0°C (32.0°F a 212.0°F). Por lo tanto, este termómetro para la frente y el
oído, también se puede utilizar para medir la temperatura corporal o bien para medir la temperatura de las supercies como en los siguientes
casos :
• Temperatura de la supercie de la leche en un biberón.
• bebé.Temperatura de la supercie del agua para el baño de un bebé.
• Temperatura ambiente.
Sin funda protectora
Este termómetro no requiere el uso de ninguna funda protectora, por lo tanto, es más sencillo de utilizar y resulta más económico.
Medición en cuestión de segundos
La innovadora tecnología de infrarrojo permite medir la temperatura en el oído en sólo 1 segundo y en la frente en sólo 3 segundos.
Preciso y able
El montaje único de la sonda, que integra un sensor de infrarrojos de alta tecnología, garantiza la precisión y abi-lidad de cada una de las
mediciones.
Fácil y cómodo de utilizar
• El diseño ergonómico facilita el uso del termómetro.
• Este termómetro incluso se puede emplear para medir la temperatura de un niño mientras duerme sin interrumpir el sueño.
Muestra automáticamente la memoria en pantalla
Cuando se enciende el dispositivo, la última medición aparecerá en la pantalla durante dos segundos.
Recuperación de múltiples mediciones
Es posible volver a consultar las últimas 12 mediciones al entrar en modo de recuperación, lo que permite realizar un seguimiento ecaz de las
posibles variaciones de temperatura.
Seguro e higiénico
• Se elimina el riesgo de romper cristales o de ingerir mercurio.
• Totalmente seguro para utilizarlo con niños.
• La sonda de medición se puede limpiar con un algodón humedecido en alcohol, de modo que el termómetro se puede utilizar para toda la
familia con total higiene.
Alarma en caso de ebre
Cuando el dispositivo emite 10 pitidos cortos y se enciende la luz LCD de fondo, el dispositivo indica al paciente que la temperatura es superior
a 37.5 °C.
2. INSTRUCCIONES IMPORTANTES DE SEGURIDAD
• No sumerja este dispositivo en el agua o en ningún otro líquido. Si desea más información sobre la limpieza del dispositivo, consulte el apartado
«Limpieza y desinfección».
• No utilice el dispositivo si cree que puede estar roto o detecta alguna anomalía.
• Nunca abra el dispositivo.
• La cera acumulada en el canal auditivo puede reducir la temperatura de medición. Por lo tanto, es importante que se asegure de que el oído
del usuario esté limpio.
• Un efecto siológico básico, llamado vasoconstricción, puede ocurrir en la fase temprana de la ebre, resultando en un efecto de piel fría, por lo
que la temperatura registrada usando un termómetro de frente puede ser sospechosamente baja.
• Si el resultado de la medición no correspondiera con el estado del paciente o si fuese sospechosamente baja, repita la medición cada 15 minutos
o contraste el resultado tomando otra medición de la temperatura corporal interna.
• El dispositivo está integrado por componentes sensibles y se debe tratar con cuidado. Respete las indicaciones de almacenamiento y funciona-
miento que se describen en el apartado «Especicaciones técnicas»!
• Asegúrese de que los niños no utilicen el dispositivo sin supervisión, puesto que podrían tragarse algunas de las piezas más pequeñas.
• Proteja el dispositivo de:
− Temperaturas extremas
− Impactos y caídas
− Contaminación y polvo
− Luz directa del sol
− Calor y frío
• Si no va a utilizar el dispositivo durante un periodo largo de tiempo, extraiga la batería.
ADVERTENCIA: el uso de este dispositivo no está destinado a sustituir las consultas con su médico. Este dispositivo NO es resistente al agua.
No lo sumerja en ningún líquido.
3. MÉTODO DE MEDICIÓN DE ESTE TERMÓMETRO
Este termómetro mide la temperatura en la frente y el oído.

Medición en la Frente
El termómetro mide la energía infrarroja irradiada por la piel situada encima de la región de la ceja y el tejido circundante. Esta energía es
recogida por las lentes y convertida en un valor de temperatura. Las lecturas de temperatura obtenidas escaneando encima de la zona de la
ceja proporcionan la mayor precisión.
Medición en el Oído
El termómetro mide la energía infrarroja que emite el tím-pano y el tejido alrededor. Los lentes absorben esta energía y la convierten en un valor
de temperatura. Las mediciones obtenidas directamente del tímpano (membrana del tímpano) garantizan una temperatura más precisa del
oído. Las mediciones obtenidas de los tejidos colindantes al canal del oído generan mediciones inferiores y pueden proporcionar diagnósticos
erróneos de la temperatura.
Para evitar una medición poco precisa
1. Pulse el botón ON/OFF ④ para poner en marcha el termómetro.
2. Cuando el dispositivo emita un pitido (y el icono de nivel de temperatura parpadee), nivele el canal del oído tirando suavemente de la parte media
de la oreja hacia atrás y hacia arriba, para tener acceso directo al tímpano.
3. Coloque la sonda ① rmemente en el conducto audi-tivo, pulse el botón START
② y mantenga la sonda dentro del oído hasta que el termó-
metro emita un pitido para señalizar que la medición ha terminado.
Medición de la temperatura ambiental o de líquidos
• Para medir una temperatura doméstica (ambiental o de una supercie o líquido), retire el capuchón del extremo del termómetro.
• El termómetro considera automáticamente que toda temperatura que se salga del intervalo 32 °C-42,2 °C es doméstica.
• Distancia de medición: 5 cm como máximo de la supercie de medición.
Medición de la temperatura de un líquido
• La temperatura supercial de un líquido puede ser muy distinta de la temperatura en el centro del biberón, del baño o de la sopa. Para evitar
accidentes, debe mezclar bien todos los líquidos antes de proceder a la medición.
• Si va a realizar la medición a través de un recipiente (p.ej., un biberón) tenga en cuenta la inercia de éste.
• Tome la temperatura lo más rápidamente posible para evitar que se forme condensación en la lente del termómetro.
• No sumerja el termómetro dentro del líquido, ya que no es estanco.
Temperatura ambiente
• Tome la temperatura en el centro de la habitación, lejos de fuentes de calor (radiadores o chimeneas) y de frío (ventanas), y al abrigo de
cualquier corriente de aire.
• No oriente la lente hacia fuentes de luz intensas.
4. CONTROLES EN PANTALLAS E ICONOS
• Todos los segmentos en pantalla ⑥: pulse el botón ON/OFF ④ para encender el dispositivo. Todos los segmentos aparecerán en la pantalla
durante dos segundos.
• Memoria ⑦: la última medición aparecerá en la pantalla automáticamente durante dos segundos.
• Listo para la medición ⑧
: el dispositivo estará listo para medir la temperatura cuando el icono del «°C» o del «°F» parpadee; mientras que el
icono del modo (oído o frente) se muestra en la pantalla.
• Medición terminada ⑧ : la medición aparecerá en la pantalla ③ con el icono «°C» o «°F» y el icono del modo seleccionado. Cuando este icono
empiece a parpadear, el dispositivo estará listo para realizar otra medición.
• Indicador de temperatura de supercie
⑩
: un icono de un oido-cruzado aparecerá en la pantalla
③ cuando la lectura en el modo de oido este
fuera del rango 32.0 - 42.2°C (89.6 - 108.0°F)
.
• Indicador de batería baja ⑪
: si el icono de batería parpadea cuando enciende el dispositivo, deberá susti-tuir la batería.
5. CAMBIANDO DE MODO ENTRE FRENTE Y OIDO
Para cambiar de modo de frente a oído, quite la tapa removible ① de la punta del termómetro. El dispositivo cambiará inmediatamente al
modo de oído. El icono de oído será mos-trado en la pantalla y el icono «°C» o «°F» parpadeará para indicar que el dispositivo está listo para
realizar la medición.
Para cambiar nuevamente a modo de frente, coloque la tapa removible ① en la punta del termómetro y el dispositivo inmediatamente cambiará
al modo de frente. El icono de frente se mostrará en la pantalla y el icono «°C» o «°F» parpadeará para indicar que el dispositivo esta listo para
realizar la medición.
6. INSTRUCCIONES DE USO
1. Pulse el botón ON/OFF ④. La pantalla ③
se activará y aparecerán todos los segmentos durante dos segundos
.
2. La última medición aparecerá automáticamente en la pantalla durante dos segundos con el icono «M»
⑦.
3. Cuando el icono «°C» o «°F» aparezca en la pantalla, el dispositivo emitirá un pitido que le indicará que puede empezar a utilizarlo ⑧.
Medición en la Frente
• Coloque el extremo de medición en la región situada aproximadamente 1 cm encima del centro de la ceja. Si la región de la ceja está cubierta
de pelos, sudor o suciedad, se deberá despejar para mejorar la precisión de la lectura
• Presione el botón INICIO una vez y suéltelo. Comience a mover el instrumento de forma constante desde 1 cm encima del centro de la ceja
hasta la zona de la sien. Al cabo de 3 segundos, se emite un pitido o bip largo, indicativo de que la medición ha nalizado. Si el desplazamiento del
extremo de medición es demasiado lento como para alcanzar la zona de la sien antes de que suene el pitido largo, repita la medición tal como se
ha descrito antes, simplemente moviendo el extremo de medición un poco más deprisa esta vez.
• Lea la temperatura registrada en la pantalla LCD.
NOTA:
• El paciente y el termómetro deben permanecer durante al menos 30 minutos en condiciones ambientales constantes..
• No tome ninguna medición durante o inmediatamente después de dar de mamar a un bebé.
• No use el termómetro en ambientes muy húmedos.
• Los pacientes no deben beber, comer ni hacer ejercicio antes/durante la toma de medición.
• Antes de colocar el extremo de medición del termómetro en el área de medición, elimine la suciedad, los pelos o el sudor.
• No quite el dispositivo de medición de la región de medi-ción antes de escuchar el pitido de nalización.
• Tome la temperatura siempre en el mismo sitio de la frente, puesto que las lecturas de temperatura pueden variar entre un sitio y otro.
• Cuando el dispositivo emite 10 pitidos cortos y se enciende la luz LCD de fondo, el dispositivo indica al paciente que la temperatura es superior
a 37.5 °C.
Medición en el Oído
• Nivele el conducto auditivo tirando suavemente de la parte media de la oreja hacia atrás y hacia arriba para acceder bien al tímpano.
- Con niños de menos de un año, tire de la oreja hacia atrás.
- hacia arriba y hacia atrás. Con niños de más de un año o adultos, tire de la oreja !
• Mientras tira suavemente de la oreja, introduzca la sonda cómodamente en el canal auditivo (máx. un segundo) y pulse inmediatamente el
botón START.
• Retire el termómetro del oído. En la pantalla aparecerá el nivel de temperatura de la medición
i
.
NOTA:
• Para que las mediciones sean precisas, espere como mínimo 30 segundos después de haber realizado de tres a cinco mediciones continuas.
• Si se acumula cera en la sonda del dispositivo, las medi-ciones podrían resultar menos precisas o provocar infec-ciones cruzadas entre los
distintos usuarios. tanto, asegúrese de que la sonda esté limpia antes de realizar una medición. Para limpiar la sonda, siga las instrucciones que
se incluyen en el apartado «Limpieza y desinfección».
• Después de limpiar el sensor de medición
a
con alcohol, espere cinco minutos antes de volver a realizar una medición para que el dispositivo
alcance de nuevo la temperatura de funcionamiento de referencia.
• La mejor manera de utilizar el dispositivo con un niño pequeño es recostarlo con la cabeza de lado, de modo que el oído quede hacia arriba. Con
niños mayores o con adultos, el mejor modo es colocarse de pie detrás y al lado del paciente.
• Mida siempre la temperatura en el mismo oído, ya que los resultados pueden variar de un oído a otro.
• Si la persona ha estado durmiendo, espere unos minutos antes de tomar la temperatura.
• En las situaciones que se presentan a continuación, se recomienda tomar tres veces la temperatura en el mismo oído y utilizar como válida
la más elevada :
1. Niños acabados de nacer durante los primeros 100 días.

2. Niños menores de tres años con un sistema inmunitario debilitado, para los cuales la ebre pueda resultar muy grave.
3. Cuando el usuario esté aprendiendo a utilizar el termómetro por primera vez y hasta que se haya familiarizado con el dispositivo y pueda
obtener unos resultados uniformes.
4. En caso de que el resultado de la medición sea sorprendentemente bajo.
7. CAMBIAR DE CELSIUS A FAHRENHEIT
Este termómetro puede mostrar los resultados de la medición de temperatura en grados Fahrenheit o Celsius. Para pasar de ºC a ºF, apague
el dispositivo y, a continuación mantenga pulsado el botón START ②
durante cinco segundos; Trans-curridos estos segundos, en la pantalla
⑫
empezará a parpadear el icono de escala de medición correspondiente («°C» o «°F» ). Para cambiar de ºC a ºF o viceversa, pulse el botón
START ②. Cuando haya seleccionado la escala que preera, espere cinco segundos y el dispositivo se activará automáticamente en el modo
«listo para la medición».
8. CÓMO RECUPERAR LAS ÚLTIMAS 12 MEDI-CIONES DE LA MEMORIA
Este termómetro permite recuperar las 12 últimas medi-ciones de temperatura.
• Modo recuperación ⑬
: pulse el botón START ②
para entrar en el modo recuperación cuando el dispositivo esté apagado. El icono de memoria
«M» parpadeará en la pantalla.
• Medición 1 - la última medición ⑭
: pulse una vez el botón START ②
para recuperar la última medición. En la pantalla aparecerá sólo una
medición con el icono de memoria.
• Medición 12 - mediciones sucesivas : pulse una vez el botón START ②
para visualizar la primera medición memorizada y vuelva a pulsarlo
consecutivamente para acceder a las últimas 12 mediciones memorizadas.
Si pulsa una vez el botón START ②
después de haber consultado las últimas 12 mediciones, la secuencia volverá a empezar a partir de la
primera medición.
9. MENSAJES DE ERROR
• Temperatura demasiado alta ⑮
:
cuando la tempera-tura sea superior a 100.0°C (212.0°F) en el modo de oído o 42.2°C (108.0°F) en el modo
de frente, en la pantalla aparecerá el icono «H».
• Temperatura demasiado baja ⑯: cuando la temperatura sea inferior a 0°C (32.0°F) en el modo de oído o 34.0°C (93.2°F) en el modo de frente,
en la pantalla aparecerá el icono «L».
• Temperatura ambiente demasiado alta ⑰: cuando la temperatura ambiente sea superior a 40.0°C (104.0°F), en la pantalla aparecerán los
iconos «H» y« ».
• Temperatura ambiente demasiado baja ⑱: cuando la temperatura ambiente sea inferior a 5.0°C (41.0°F) en el modo de oído o 16°C (60.8°F)
en el modo de frente, en la pantalla aparecerán los iconos «L» y « ».
• Pantalla de error ⑲: aparecerá cuando el sistema no funcione correctamente.
• Pantalla en blanco ⑳: compruebe que la batería está colocada correctamente y con los polos (<+> et <->) en la dirección correcta.
• Indicador de fallo de batería ㉑: si el icono de la batería es el único que aparece en la pantalla, deberá sustituir la batería inmediatamente.
10. LIMPIEZA Y DESINFECCIÓN
Para limpiar la supercie del termómetro y la sonda de medición, utilice un paño de algodón o algodón humedecido en alcohol (70% isopropílico).
Asegúrese de que no entre líquido en el interior del termómetro. No utilice nunca productos de limpieza abrasivos, disolventes o benceno y no
sumerja el dispositivo en agua ni en ningún líquido de limpieza. Tenga cuidado de no rayar la supercie de las lentes de la sonda ni la pantalla.
11. SUSTITUCIÓN DE LA BATERÍA
Este dispositivo incluye una batería de litio de tipo CR2032. Cuando el símbolo de la batería parpadee en la pantalla ㉑
deberá sustituirla por
otra batería CR2032. Abra la tapa de la batería deslizándola en la dirección indicada. Extraiga la batería usada y coloque una batería nueva ㉒.
Les piles et instruments électroniques doivent être éliminés en conformité avec les prescriptions locales, séparément des ordures
ménagères.
12. ESPECIFICACIONES TÉCNICAS
Nivel de medición : Modo de Oído: 0-100.0 °C (32-212.0 °F). Modo de Frente: 34-42.2 °C (93.2-108.0).
Resolución : 0.1 °C / °F.
Precisión : laboratorio : ±0.2 °C, 32.0 - 42.2 °C. (±0.4 °F, 89.6 - 108.0 °F).
Pantalla : pantalla LCD, 4 dígitos más iconos especiales.
Sonido :
• El dispositivo está encendido y listo para ser utilizado cuando emite un pitido corto.
• Lleve a cabo la medición: Sonará 1 pitido o bip largo (1 seg.) si la lectura es inferior a 37.5°C (99.4°F), y sonarán 10pitidos o bips cortos si la
lectura es igual o superior a 37.5°C (99.4°F).
• Error del sistema o fallo de funciona-miento: Suenan 3 pitidos o bips cortos.
Memoria :
• Muestra automática de la última medición de temperatura.
• Recuperación de las 12últimas mediciones en modo recuperación.
Luz de fondo :
• Cuando encienda el dispositivo, la luz de la pantalla será VERDE durante 4segundos.
• Cuando termine de realizar una medi-ción con un resultado inferior a 37.5ºC (99.4ºF), la luz de la pantalla será VERDE durante
5 segundos.
• Cuando termine de realizar una medición con un resultado igual o superior a 37.5ºC (99.4ºF), la luz de la pantalla será ROJA durante 5 segundos.
Temperatura de funcionamiento : Modo de Oído: 5-40,0 °C (41-104,0 °F). Modo de Frente: 16-40,0 °C (60,8-104,0 °F);
15-95 % de humedad relativa máxima
Temperatura de almacenamiento : -25 °C à +55 °C (-13 °F à 131 °F); 15-95 % de humedad relativa máxima
Apagado automático : aproximadamente un minuto después de la última medición.
Batería : batería CR2032 (X1) 3V - como mínimo 1000 mediciones.
Tamaño : 107 x 50 x 34 mm.
Peso : 55 g (con batería), 52 g (sin batería).
13. GARANTÍA
Este producto está garantizado durante un periodo de dos años a partir de la fecha de compra. Cualquier daño causado por un manejo indebido no
será cubierto por la garantía. Las baterías y el envase también quedan excluidos de la misma. Todas las demás reclamaciones por daños quedan
excluidos. Conserve el justicante de compra y en caso de accidente remítalo a Dorel, cuyas direcciones aparecen en este folleto.
Referencia a la norma EN 12470-5; ASTM E1965; IEC 60601-1; IEC 60601-1-2 (EMC).
Este dispositivo esta en conformidad con los requerimientos de la Directiva de Dispositivos Médicos 93/42/EEC.
Reservado el derecho a realizar modicaciones técnicas.

PT : TERMÓMETRO DUPLO : FRONTAL / AURICULAR
Este termómetro é um produto de elevada qualidade, que utiliza a mais recente tecnologia e foi testado de acordo com as normas internacionais.
Graças à sua tecno-logia única, este termómetro proporciona, em todas as medições, uma leitura da temperatura estável, não sujeita a inter-
ferências provocadas pelo calor. Um teste de funcionamento é activado automaticamente de cada vez que se liga o termómetro, para garantir
a precisão das medições. Este termómetro destinase à medição e monitorização regulares da temperatura corporal, para utilização doméstica.
Pode ser utilizado em pessoas de todas as idades.
Este termómetro foi clinicamente testado, tendo sido comprovada a respectiva segurança e precisão, quando utilizado de acordo com
as instruções de funcionamento apresentadas neste manual.
Por favor tome conhecimento deste modo de utilização antes de o utilizar e conserve-o cuidadosamente.
Sensor de medição / Tampa amovível
①
Botão START
②
Mostrador
③
Botão ON/OFF
④
Tampa do compartimento da pilha
⑤
Indicação de todos os segmentos
⑥
Memória
⑦
Pronto a efectuar a medição
⑧
Medição terminada
⑨
Indicação da temperatura da superfície
⑩
Indicador de pilha fraca
⑪
Alternar entre Celsius e Fahrenheit
⑫
Modo de visualização
⑬
Visualização das últimas 12 leituras
⑭
Temperatura medida demasiado elevada
⑮
Temperatura medida demasiado baixa
⑯
Temperatura ambiente demasiado elevada
⑰
Temperatura ambiente demasiado baixa
⑱
Indicação de erro
⑲
Mostrador em branco
⑳
Pilha descarregada
㉑
Substituição da pilha
㉒
1. VANTAGENS DE UTILIZAR ESTE TERMÓMETRO
Múltiplas utilizações (ampla gama de medições)
Este termómetro possui a funcionalidade de uma ampla gama de medições, que varia entre 0 °C e 100 °C (32 °F e 212 °F); este termómetro
pode ser usado como termómetro de testa e de ouvido para medir a temperatura corporal, como também para medir a temperatura da superfície
dos seguintes elementos :
• Temperatura do leite no biberão do bebé
• Temperatura do banho do bebé
• Temperatura ambiente
Sem cobertura protectora da sonda
Este termómetro é mais acessível em termos de utilização e é também mais económico, uma vez que não requer uma cobertura de protecção
da sonda.
Medição em apenas alguns segundos
A sua tecnologia inovadora de infravermelhos permite medir a temperatura no ouvido em apenas 1 segundo e na testa em somente 3 segundos.
Preciso e ável
A construção e montagem únicas da sonda, bem como o sensor de infravermelhos tecnologicamente avançado, garantem a precisão e abilidade
de cada medição.
Simples e fácil de utilizar
• O design ergonómico permite uma utilização simples e fácil do termómetro.
• Este termómetro pode ser utilizado mesmo enquanto as crianças dormem, não sendo necessário interromper a sua rotina.
• Este termómetro é rápido de utilizar, pelo que se torna menos incómodo para as crianças.
Memória automática
Sempre que ligar o aparelho, este indica a última leitura efectuada durante 2 segundos.
Visualização de múltiplas leituras
As últimas 12 leituras poderão ser visualizadas pelo utilizador, bastando para tal aceder ao modo de visualização, sendo assim possível monito-
rizar ecazmente as variações de temperatura.
Seguro e higiénico
• Sem risco de se partir ou de ingestão de mercúrio.
• Completamente seguro para utilização em crianças.
• A sonda pode ser limpa com um toalhete de algodão embebido em álcool, permitindo que este termómetro possa ser utilizado por toda a
família com total higiene.
Alarme de febre
37.5 °C.doente para o facto de poder ter uma temperatura acima de 10 breves sinais sonoros e o piscar do visor LCD alertam o.
2. INSTRUÇÕES DE SEGURANÇA IMPORTANTES
• Nunca mergulhe este instrumento em água ou em qualquer outro líquido. Para efectuar a limpeza, siga as instruções descritas na secção
«Limpeza e Desinfecção».
• Não utilize o aparelho, caso esteja danicado ou se detectar qualquer irregularidade.
• Nunca abra o aparelho.
• A presença de cera no canal auditivo pode alterar os valores da medição (mais baixos). Por este motivo, deverá assegurarse de que o canal
auditivo do doente está limpo.
• Pode ocorrer um efeito siológico básico chamado vasoconstrição nas fases iniciais da febre, o que provoca um efeito de refrescamento da pele,
pelo que a temperatura registada utilizando um termómetro de testa pode ser invulgarmente baixa.
• Se o resultado da medição não for consistente com os sintomas do doente ou se for invulgarmente baixo, repita a medição de 15 em 15 minutos
ou verique de novo o resultado utilizando um método diferente de medição da temperatura nuclear do corpo.
• Este aparelho possui peças sensíveis e tem de ser manu-seado com cuidado. Respeite as condições de acondici-onamento e funcionamento,
descritas na secção «Espe-cicações técnicas»!
• Certique-se de que não deixa o aparelho ao alcance das crianças; algumas peças são muito pequenas e podem ser engolidas.
• Proteger contra:
− temperaturas extremas
− impactos e quedas
− contaminação e poeiras
− luz directa do sol
− calor e frio
• de tempo, deverá retirar a pilha.Se o aparelho não for utilizado durante um longo período.
AVISO : água! NUNCA o mergulhe em líquidos.a ida ao médico. Este instrumento NÃO é à prova de A utilização deste instrumento não substitui.
3. COMO ESTE TERMÓMETRO MEDE A TEMPERATURA
Este termómetro mede a temperatura na testa e no ouvido.

Medição na testa
Este termómetro mede a energia de infravermelhos irradiada pela pele por cima da zona da sobrancelha e do tecido circundante. Esta energia é
recolhida através da lente e convertida num valor de temperatura.
Medição no ouvido
Este termómetro mede a energia de infravermelhos irradiada do tímpano e do tecido circundante. Esta energia é recolhida através da lente e
convertida num valor de temperatura. A medição obtida directamente da membrana do tímpano assegura a obtenção da temperatura mais
precisa do ouvido. As medições efectuadas no tecido circundante do canal auditivo geram leituras mais baixas, pelo que um eventual estado
febril poderá não ser detectado.
Para evitar medições incorrecta
1. Ligue o termómetro pressionando o botão ON/OFF ④
2. Após ouvir um sinal sonoro (e visualizar o ícone de escala da temperatura a piscar), endireite o canal auditivo, puxando levemente o meio da
orelha para trás e para cima.
3. Introduza a sonda ①
rmemente no canal auditivo, pressione o botão START
② e mantenha a sonda no ouvido até ouvir o sinal sonoro
indicador de que a medição está terminada.
Medição da temperatura de um líquido/ambiente
• Para medir uma temperatura doméstica (de uma superfície, de um líquido ou a temperatura ambiente), retirar a tampa da extremidade do
termómetro
• Qualquer temperatura medida fora do intervalo 32°C-42,2°C é considerada automaticamente pelo termómetro como sendo uma temperatura
doméstic
• Distância de medição: 5 cm máximo da superfície a medir
Medição da temperatura de um líquido
• A temperatura à superfície de um líquido pode ser muito diferente da temperatura dentro do biberão, do banho ou da sopa. Para evitar qualquer
incidente, é necessário misturar bem os líquidos antes de proceder à medição
• Em caso de medição através de um recipiente (ex.: biberão), ter em conta a inércia do recipiente
• Medir a temperatura o mais rapidamente possível para evitar a formação de condensação na lente do termómetro
• Nunca mergulhar o termómetro no líquido uma vez que não é estanque
Temperatura ambiente
• Medir a temperatura no centro da peça, longe de fontes de calor (aquecedor, lareira), de frio (janela) e ao abrigo de correntes de ar.
• Não orientar a lente para uma fonte de luz importante
4. INDICAÇÕES DE CONTROLO E SÍMBOLOS
• Indicação de todos os segmentos ⑥
: Pressione o botão ON/OFF ④
para ligar o aparelho; todos os segmentos serão indicados no mostrador
durante 2segundos.
• Memória ⑦
: A última medição é automaticamente indicada no mostrador durante 2 segundos.
• Pronto a efectuar a medição ⑧
: O termómetro está pronto a efectuar a medição, o ícone «°C» ou «°F» continua a piscar enquanto o símbolo
do modo de medição (ouvido ou testa), aparece.
• Medição terminada ⑨
: A leitura é indicada no mostrador ③
acom o ícone «°C» ou «°F» e o símbolo do modo de medição xo. O termómetro
está pronto para a próxima medição assim que o símbolo «°C» ou «°F» começarem de novo a piscar.
• Indicação da temperatura da superfície ⑩
O símbolo do ouvido, riscado, aparecerá no visor ③
quando a temperatura medida no modo de
ouvido não estiver entre 32.0 - 42.2°C (89.6 - 108.0°F)
.
• Indicador de pilha fraca ⑪ : Enquanto o aparelho estiver ligado, o ícone da pilha piscará para lembrar o utilizador que é necessário substituir
a pilha.
5. ALTERNAR ENTRE O MODO DE MEDIÇÃO NA TESTA E NO OUVIDO
Para alternar entre o modo de medição na testa e no ouvido, retire a tampa destacável ①
da extremidade do termómetro. O termómetro passa
imediatamente para o modo de ouvido, aparecendo o símbolo do ouvido no visor e «°C» ou «°F» começarão a piscar para indicar que o termómetro
está pronto a ser utilizado.
Para voltar ao modo de medição na testa, coloque a tampa amovível ①
na extremidade do termómetro. O símbolo da medição na testa aparece no
visor e o símbolo «°C» ou «°F» aparecem a piscar indicando que o termómetro está pronto para efectuar a medição.
6. INSTRUÇÕES DE UTILIZAÇÃO
1. Pressione o botão ON/OFF ④. O mostrador ③
é activado indicando todos os segmentos durante 2 segundos.
2. A última medição efectuada será indicada no mostrador automaticamente durante 2 segundos, sendo apresen-tado o ícone «M» ⑦.
3. Quando o ícone «°C» ou «°F» estiver a piscar e ouvir um sinal sonoro, o termómetro está pronto a efectuar a medição ⑧.
Medição na testa
• Coloque a sonda com cuidado na zona, a aproximadamente 1 cm acima do centro da sobrancelha. Se a zona da sobrancelha estiver tapada
pelo cabelo, apresentar suor ou sujidade, retire previamente o obstáculo de modo a melhorar a precisão da medição. • Pressione o botão START
uma vez e depois solte-o. Movi-mente o instrumento de medição rmemente, a 1cm acima do centro da sobrancelha, em direcção à zona das
têmporas. Será emitido um sinal sonoro longo após 3 segundos para conrmar que a medição está concluída. Se o movimento da sonda for
demasiado lento para alcançar a zona das têmporas antes de soar o sinal sonoro longo, repetir a medição conforme indicado atrás e deslocar a
sonda um pouco mais rapidamente desta vez.
• Ler a temperatura registada no visor LCD.
NOTA:
• Os doentes e o termómetro devem estar numa posição estacionária durante, pelo menos, 30 minutos.
• Não medir a febre enquanto estiver a amamentar ou imediatamente após a amamentação.
• Não use o termómetro em ambientes com uma grande percentagem de humidade.
• Os doentes não devem beber, comer ou fazer exercício enquanto tiram a temperatura.
• Antes de colocar a sonda do termómetro na zona de medição, remover eventual sujidade, cabelo e suor.
• Não retire o instrumento da zona de medição antes de ouvir o sinal sonoro que assinala o nal da medição.
• Meça sempre a temperatura no mesmo local, uma vez que os valores da temperatura variam conforme o local onde a mesma é medida.
• 10 breves sinais sonoros e o piscar do visor LCD alertam o doente para o facto de poder ter uma temperatura acima de 37.5 °C.
Medição no ouvido
• Endireite o canal auditivo puxando a orelha para cima e para trás, para obter uma visão clara do tímpano.
- Nas crianças com menos de 1 ano: puxe a orelha para trás na horizontal.
- Nas crianças com mais de 1 ano e nos adultos: puxe a orelha para cima e para trás. Consulte também as indicações resumidas na capa
do folheto!
• Enquanto segura com cuidado a orelha, introduza correc-tamente a sonda no canal auditivo (máx. 1 segundo) e pressione imediatamente
o botão START ②.
• Retire o termómetro do canal auditivo. O mostrador indica a medição de temperatura efectuada ⑨.
NOTA:
• Após 3-5 medições contínuas, deve aguardar pelo menos 30 segundos, a m de assegurar medições precisas e correctas.
• A acumulação de cera na sonda pode provocar leituras de temperatura menos precisas, existindo ainda o risco de contágio de infecções entre
os utilizadores. Por este motivo, é essencial que seja utilizada uma sonda limpa em cada medição. Para efectuar a limpeza, siga as instruções
descritas na secção «Limpeza e Desin-fecção».
• Após ter limpo o sensor de medição ①
com álcool, é necessário aguardar 5 minutos antes de efectuar a medição seguinte, para permitir que o
termómetro atinja a respectiva temperatura de referência.
• Nos bebés é preferível deitá-los de costas, com a cabeça colocada ligeiramente de lado, de forma que o ouvido que virado para cima. Nas
crianças mais crescidas ou nos adultos, a pessoa que efectua a medição deve colocar-se de pé atrás do doente, ligeiramente de lado.
• Meça sempre a temperatura no mesmo ouvido, uma vez que as leituras da temperatura podem diferir no lado direito e no lado esquerdo.
• Após o doente ter estado a dormir, deve aguardar alguns minutos antes de medir a temperatura no ouvido.
• Nos seguintes casos, é recomendado medir três vezes a temperatura no mesmo ouvido e considerar somente a leitura mais elevada:

1. Recém-nascidos, até aos primeiros 100 dias de vida.
2. Crianças com menos de três anos, com um sistema imunitário frágil, quando é muito importante deter-minar se têm ou não febre.
3. Na primeira utilização ou quando o utilizador está pouco familiarizado com o termómetro e até utilizá-lo de forma consistente.
4. Se a temperatura medida for invulgarmente baixa.
7. ALTERNAR ENTRE CELSIUS E FAHRENHEIT
Este termómetro pode indicar medições de temperatura em Fahrenheit ou em Celsius. Para alternar entre °C e °F no mostrador, desligue o apa-
relho, pressione e mantenha pressionado o botão START ②
durante 5 segundos; decorridos os 5 segundos, a escala de medição actual (o ícone
«°C» ou «°F») será apresentada a piscar no mostrador ⑫. Alterne a escala de medição entre °C e ° F pressionando novamente o botão START
②
. 5 segundos depois de a escala de medição pretendida ter sido seleccionada, o aparelho entrará automaticamente no modo de medição.
8. COMO VISUALIZAR AS 12 LEITURAS GUARDADAS NO MODO MEMÓRIA
Este termómetro memoriza as últimas 12 leituras.
• Modo de visualização ⑬
: Pressione o botão START ②
para aceder ao modo de visualização das últimas medições quando o aparelho estiver
desligado. O ícone de memória «M» começa a piscar.
• Leitura 1 - a última leitura ⑭
: Pressione e solte o botão START ②
para visualizar a última leitura. Indi-cação 1 apenas em conjunto com
o ícone de memória.
• Leitura 12 - leitura em sequência : Pressione e solte o botão START ②
sucessivamente para visualizar a sequência das últimas leituras de
medição, até ao máximo de 12 leituras.
Pressionar e soltar o botão START ②
após as 12 últimas leituras terem sido visualizadas terá como consequência a apresentação da sequência
indicada desde a leitura número 1.
9. MENSAGENS DE ERRO
• Temperatura medida demasiado elevada ⑮
:
Apre-senta «H» quando a temperatura medida é superior a 100.0°C (212.0°F) no modo de
medição no ouvido ou 42.2°C (108.0°F) no modo de medição na testa.
• Temperatura medida demasiado baixa ⑯
: Apre-senta «L» quando a temperatura medida é inferior a 0°C (32.0°F) no modo de medição no
ouvido ou 34.0°C (93,2°F) no modo de medição na testa.
• Temperatura ambiente demasiado elevada ⑰
: Apresenta «H» juntamente com « » quando a tempera-tura ambiente é superior a 40°C
(104°F).
• Temperatura ambiente demasiado baixa ⑱
: Apre-senta « » juntamente com «» quando a temperatura ambiente é inferior a 5.0°C (41.0°F)
no modo de medição no ouvido ou 16°C (60.8°F) no modo de medição na testa.
• Indicação de erro ⑲
: Problema de funcionamento do sistema.
• Mostrador em branco ⑳
: Verique se a pilha está correctamente colocada. Verique também a polaridade (<+> e <->) das pilhas.
• Indicação de pilha descarregada ㉑
: Se o único símbolo indicado no mostrador for o ícone de pilha sem estar a piscar, as pilhas deverão ser
substituídas imedi-atamente.
10. LIMPEZA E DESINFECÇÃO
Utilize um algodão ou um toalhete embebido em álcool (isopropílico a 70%) para limpar todo o termómetro incluindo a sonda. Assegure-se de que
não entra qualquer líquido para o interior do termómetro. Nunca utilize produtos de limpeza abrasivos, diluentes ou benzina para limpar o termó-
metro e nunca o mergulhe em água ou em qualquer outro líquido para limpeza. Tenha cuidado para não riscar a lente da sonda nem o mostrador.
11. SUBSTITUIÇÃO DA PILHA
Este instrumento é fornecido com uma pilha de lítio, tipo CR2032. Substitua por uma nova pilha CR2032 quando o símbolo da pilha for apresen-
tado a piscar no mostrador ㉑. Retire a tampa do compartimento da pilha, fazendo-a deslizar na direcção indicada. Retire a pilha e substitua-a
por uma nova pilha ㉒.
As pilhas e aparelhos electrónicos têm de ser eliminados em conformidade com os regulamentos locais aplicáveis, uma vez que
não são considerados resíduos domésticos.
12. ESPECIFICAÇÕES TÉCNICAS
Gama de medição : Modo de medição no ouvido: 0-100,0 °C (32-212,0 °F). Modo de medição na testa: 34-42,2 °C (93,2-108,0 °F).
Resolução : 0.1 °C / °F.
Precisão da medição : Laboratório : ±0.2 °C, 32.0 - 42.2 °C. (±0.4 °F, 89.6 - 108.0 °F).
Visor : Visor de cristais líquidos (LCD, Liquid Crystal Display), 4 dígitos e ícones especiais.
Acústica :
• O aparelho está ligado e pronto a efectuar a medição: 1 sinal sonoro breve.
• Medição terminada: 1 sinal sonoro longo (1 seg.) se a leitura for inferior a 37.5°C (99.4°F), 10 sinais sonoros breves, se a leitura for igual ou
superior a 37.5°C (99.4°F).
• Erro ou problema de funcionamento do sistema: 3 sinais sonoros breves.
Memória :
• Indicação automática da última tempe-ratura medida.
• Visualização de 12 resultados de leituras guardados no modo Memória.
Luz de fundo :
• Acende-se uma luz VERDE no mostrador durante 4 segundos, quando o dispositivo é ligado.
• Acende-se uma luz VERDE no mostrador durante 5 segundos, quando a medição da temperatura tiver terminado com uma leitura inferior
a 37,5 °C (99,4 °F).
• Acende-se uma luz VERMELHA no mostrador durante 5 segundos, quando a medição da temperatura tiver termi-nado com uma leitura igual
ou superior a 37,5 °C (99,4 °F).
Temperatura de funcionamento : Modo de medição no ouvido: 5-40,0 °C (41-104,0 °F). Modo de medição na testa: 16-40,0 °C (60,8-104,0 °F).
15-95 % de humidade máxima relativa
Temperatura de acondicionamento: : -25 °C a +55 °C (-13 °F à 131 °F). 15-95 % de humidade máxima relativa
Desligar automático : Aproximadamente 1 minuto após a última leitura.
Pilha : Pilha 3V (X1) CR2032 - mínimo 1000 medições.
Dimensões : 107 x 50 x 34 mm.
Poids : 55 g (com pilha), 52 g (sem pilha).
13. GARANTIE
Este produto tem uma garantia de dois anos a contar da data da compra. Quaisquer danos provocados por utilização incorrecta não serão
abrangidos pela garantia. As pilhas e embalagens estão igualmente excluídas da garantia. Estão excluídas todas as restantes reclamações
decorrentes de danos. Anexe sempre a prova de compra a qualquer declaração de sinistro e enviar à Dorel cujas moradas constam deste paneto.
Conforme norma EN 12470-5; ASTM E1965; IEC 60601-1; IEC 60601-1-2 (EMC).
Este dispositivo está em conformidade com as exigências da Norma de Dispositivos Médicos 93/42/EEC.
O fabricante reserva-se o direito de proceder a alterações técnicas.

EN : DUAL THERMOMETER : FOREHEAD / EAR
This thermometer is a high quality product incor-porating the latest technology and tested in accordance with international standards. With its
unique technology, this thermometer can provide a stable, heat-interference-free reading with each measurement. The instrument performs a
self-test every time it is switched on to always guarantee the specied accuracy of measurements. This thermometer is intended for the periodic
measurement and monitoring of human body temperature in the home. It is intended for use on people of all ages.
This thermometer has been clinically tested and proven to be safe and accurate when used in accordance with its operating ins-
truction manual
Please carefully read this guide before using the thermometer and keep it in a safe place for reference.
①
Measuring Sensor / Removable Cap
START Button
②
Display
③
ON/OFF Button
④
Battery Compartment Cover
⑤
All Segments displayed
⑥
Memory
⑦
Ready for Measurement
⑧
Measurement complete
⑨
Surface Temperature Indication
⑩
Low Battery Indication
⑪
Changing between Celsius and Fahrenheit
⑫
Recall Mode
⑬
Recall the last 12 Readings
⑭
Measured Temperature too high
⑮
Measured Temperature too low
⑯
Ambient Temperature too high
⑰
Ambient Temperature too low
⑱
Error Function Display
⑲
Blank Display
⑳
Flat Battery
㉑
Replacing the Battery
㉒
1. THE ADVANTAGES OF THIS THERMOMETER
Multiple Uses (Wide Range Measurement)
This thermometer offers a wide measurement range feature from 0°C to 100.0°C (32.0°F to 212.0°F), meaning the unit can be used as a forehead
or an ear thermometer to measure body temperature or it can be used to measure surface temperature of the following :
• Milk surface temperature in a baby’s bottle
• Surface temperature of a baby’s bath
• Ambient temperature
Probe Cover Free
This thermometer is more user-friendly and more cost-effective since a probe cover is not required.
Measurement in a matter of seconds
The innovative infrared technology allows measurement of ear temperature in only 1 second and forehead temperature in only 3 seconds.
Accurate and reliable
The unique probe assembly construction, incorporating an advanced infrared sensor, ensures that each measurement is accurate and reliable.
Gentle and Easy to Use
• The ergonomic design enables simple and easy use of the thermometer.
• This thermometer can even be used on a sleeping child, thereby causing no disruption.
• This thermometer is quick, therefore child-friendly.
Auto-Display Memory
The last reading is automatically displayed for 2 seconds when the unit is switched ON.
Multiple Reading Recall
temperature variations.entering the recall mode, enabling efcient tracking of Users will be able to recall the last 12 readings when.
Safe and Hygienic
• No risk of broken glass or mercury ingestion.
• Completely safe for use on children.
• Cleaning of the probe can be done with an alcohol-moistened cotton tissue, making this thermometer completely hygienic for use by the
whole family.
Fever Alarm
10 short beeps and a red LCD backlight alert the patient that he/she may have a temperature above 37.5 °C.
2. IMPORTANT SAFETY INSTRUCTIONS
• Never immerse this instrument in water or other liquids. For cleaning please follow the instructions in the «Cleaning and Disinfecting» section.
• Do not use the instrument if you think it is damaged or notice anything unusual.
• Never open the instrument.
• Earwax in the ear canal may cause a lower temperature reading. Therefore it is important to ensure the subject’s ear canal is clean.
• A basic physiological effect called vasoconstriction can occur in the early stages of fever, resulting in a cool skin effect. The recorded tempera-
ture using a forehead thermometer can, therefore, be unusually low.
• If the measurement result is not consistent with the patient’s nding or unusually low, repeat the measurement every 15 minutes or double check
the result by another core body temperature measurement.
• This instrument comprises sensitive components and must be treated with caution. Observe the storage and operating conditions described
in the «Technical Specications» section!
• Ensure that children do not use the instrument unsupervised; some parts are small enough to be swallowed.
• Protect it from:
− extreme temperatures
− impact and dropping
− contamination and dust
− direct sunlight
− heat and cold
• If the instrument is not going to be used for a prolonged period the battery should be removed.
WARNING : Use of this instrument is not intended as a substitute for consultation with your physician. This instrument is NOT waterproof so
do not immerse in liquids.
3. HOW THIS THERMOMETER MEASURES TEMPERATURE
This thermometer measures forehead and ear temperature.

Forehead measurement
This thermometer measures infrared energy radiated from the skin above the eyebrow area and the surrounding tissue. This energy is collected
through the lens and converted to a temperature value. Temperature readings obtained by scanning above the eyebrow area will provide the
greatest accuracy.
Ear measurement
This thermometer measures infrared energy radiated from the eardrum and the surrounding tissue. This energy is collected through the lens and
converted to a temperature value. The measured reading obtained directly from the eardrum (Tympanic Membrane) ensures the most accurate ear
temperature. Measurements taken from the surrounding tissue of the ear canal generate lower readings and may result in misdiagnosis of fever.
To avoid an inaccurate measurement
1. Switch on the thermometer by pressing the ON/OFF button
④
2. After one beep is heard (and the temperature scale icon is ashing), straighten the ear canal by gently pulling the middle of the ear back and up.
3. Place the probe ①
rmly into the ear canal, press the START button
②
and keep the probe in the ear until the thermometer beeps to signal
the completion of the measurement.
Measurement of a liquid/ambient temperature
• To measure a household temperature (surface, liquid or ambient), remove the cap from the end of the thermometer
• Any temperature measured outside the 32°C-42.2°C range is automatically recognised by the thermometer as being a household temperature
• Measurement distance: 5cm maximum from the surface to be measured
Measurement of the temperature of a liquid
• The temperature on the surface of a liquid can be very different from that in the middle of the bottle, the bath or the soup. To avoid any accidents,
you must thoroughly stir all liquids before proceeding to the measurement.
• In the case of measurement through a container (bottle for example), take into account the inertia of the container.
• Measure the temperature as quickly as possible to avoid the formation of condensation on the thermometer lens.
• Never submerge the thermometer in the liquid; it is not waterproof.
Ambient temperature
• Measure the temperature in the middle of the room away from heating sources (radiator, replace), from cold (window) and away from draughts.
• Do not point the lens towards a strong light source.
4. CONTROL DISPLAYS AND SYMBOLS
• All segments displayed ⑥
: Press the ON/OFF button ④
to turn on the unit; all segments will be shown for 2 seconds.
• Memory ⑦
: The last reading will automatically be shown on the display for 2 seconds.
• Ready for measurement ⑧
: When the unit is ready for measurement, the «°C» or «°F» icon will keep ashing while the mode icon (ear or
forehead) will be displayed.
• Measurement complete ⑨
: The reading will be shown on the display ③ with the «°C» or «°F» icon and the mode icon steady. The unit is ready
for the next measurement as soon as the «°C» or «°F» icon is ashing again.
• Surface temperature indication ⑩
: A crossed-ear icon will appear on the display ③
when the reading in the ear mode is outside the range
32.0 - 42.2°C (89.6 - 108.0°F).
• Low battery indication ⑪
: When the unit is turned on, the battery icon will keep ashing to remind the user to replace the battery.
5. CHANGING BETWEEN FOREHEAD AND EAR MODE
To change from forehead to ear mode, take off the removable cap ①
from the thermometer tip. The device will immediately switch to ear mode.
The ear icon will be shown on the display and the «°C» or «°F» icon will ash to indicate that the device is ready for measurement.
To change back to the forehead mode, place the removable cap ①
on the thermometer tip and the device will immedi-ately switch back to fore-
head mode. The forehead icon will be shown on the display and the «°C» or «°F» icon will ash to indicate that the device is ready for measurement.
6. DIRECTIONS FOR USE
1. Press the ON/OFF button ④. The display ③
is activated to show all segments for 2 seconds.
2. The last measurement reading will automatically be shown on the display for 2 seconds with the «M» icon ⑦.
3. When the «°C» or «°F» icon is ashing, a beep sound is heard and the thermometer is ready for measurement
⑧.
Forehead measurement
• Place the probe gently onto the area approximately 1cm above the center of the eyebrow. If the eyebrow area is covered with hair, sweat or dirt,
please remove the obstacle beforehand to improve the reading accuracy.
• Press the START button once and release it. Start to move the instrument steadily from 1 cm above the center of the eyebrow to the temple
area. A long beep sound will emit after 3 seconds to acknowledge the completion of measurement. If the probe movement is too slow to reach the
temple area before the long beep sound is heard, repeat the measurement as described above, but simply move the probe a little quicker this time.
• Read the recorded temperature from the LCD display.
NOTE:
• Patients and thermometer should stay in steady-state room condition for at least 30 minutes.
• Don’t take a measurement while or immediately after nursing a baby.
• Don’t use the thermometer in high humidity environments.
• Patients should not drink, eat, or exercise before/while taking the measurement.
• Before placing the thermometer probe onto the measurement area, remove dirt, hair, or sweat.
• Don’t move the measurement device from the measuring area before hearing the termination beep.
• Always take the temperature in the same location, since temperature readings may vary according to location.
• 10 short beeps and a red LCD backlight alert the patient that he/she may have a temperature above 37.5 °C.
Ear measurement
• Straighten the ear canal by pulling the ear up and back to give a clear view of the eardrum.
- For children under 1 year; pull the ear straight back.
- For children of 1 year to adult; pull the ear up and back. Also refer to the short instructions at the front!
• While gently pulling the ear, insert the probe snugly into the ear canal (max. 1 sec.) and immediately press the START button
②. Release the
button and wait for the beep sound that conrms the end of measurement.
• Remove the thermometer from the ear canal. The display shows the measured temperature ⑨.
NOTE:
• To ensure accurate readings, wait at least 30 sec. after 3-5 continuous measurements.
• Accumulation of ear wax on the probe can result in less accurate temperature readings or cross infection between users. Therefore, it is
essential that the probe is clean before each measurement. For cleaning, follow the instructions in the «Cleaning and Disinfecting» section.
• After cleaning the measuring sensor ①
with alcohol, wait 5 minutes before taking the next measurement, in order to allow the thermometer
to reach its operating reference temperature.
• For an infant, it is best to have the child lying at with his/her head sideways so the ear is facing upwards. For an older child or adult, it is best
to stand behind and slightly to the side of the patient.
• Always take the temperature in the same ear, since the temperature readings may be different from ear to ear.
• Wait for a few minutes to take the ear temperature after sleeping.
• In the following situations it is recommended that three temperatures in the same ear be taken and the highest one taken as the reading:
1. New born infants in the rst 100 days.
2. Children under three years of age with a compromised immune system and for whom the presence or absence of fever is critical.
3. When rst-time users are learning how to use the thermometer until they have familiarized themselves with the instrument and obtain
consistent readings.
4. If the measurement is surprisingly low.

7. CHANGING BETWEEN CELSIUS AND FAHRENHEIT
This thermometer can display temperature measurements in either Fahrenheit or Celsius. To switch the display between °C and °F, simply turn
OFF the unit, press and hold the START button ②. This thermometer can display temperature measurements in either Fahrenheit or Celsius.
To switch the display between °C and °F, simply turn OFF the unit, press and hold the START button ② for 5 seconds; after 5 seconds, the
current measurement scale («°C» or «°F» icon) will be ashing on the display ⑫. Change the measurement scale between °C and °F by pressing
the START button ②. When the measurement scale has been chosen, wait for 5 seconds and the unit will automatically enter the «ready for
measuring» mode.
8. HOW TO RECALL 12 READINGS IN MEMORY MODE
This thermometer can recall the last 12 readings.
• Recall mode ⑬
: Press the START button ②
to enter Recall mode when power is off. The memory icon «M» will ash.
• Reading 1 - the last reading ⑭
: Press and release the START button ②
o recall the last reading. Display 1 alone with memory icon.
• Reading 12 - readings in succession : Press and release the START button ②
consecutively to recall the last 12 readings in succession.
Pressing and releasing the START button ②
after the last 12 readings have been recalled will resume the above sequence from reading 1.
9. ERROR MESSAGES
• Measured temperature too high ⑮
: Displays «H» when measured temperature is higher than 100.0°C (212.0°F) in the ear mode or 42.2°C
(108.0°F) in the forehead mode.
• Measured temperature too low ⑯
: Displays «L» when measured temperature is lower than 0°C (32.0°F) in the ear mode or 34.0°C (93.2°F)
in the forehead mode.
• Ambient temperature too high ⑰
: Displays «H» in conjunction with the « » when ambient temperature is higher than 40.0°C (104.0°F).
• Ambient temperature too low ⑱
: Display «L» in conjunction with the « » when ambient temperature is lower than 5.0°C (41.0°F) in the ear
mode or 16°C (60.8°F) in the forehead mode.
• Error function display ⑲
: The system has a malfunction.
• Blank display ⑳
: Check if the battery has been loaded correctly. Also check polarity (<+> and <->) of the battery.
• Flat battery indication ㉑
: If the steady battery icon is the only symbol shown on the display, the battery should be replaced immediately.
10. CLEANING AND DISINFECTING
Use an alcohol swab or cotton tissue moistened with alcohol (70% Isopropyl) to clean the thermometer casing and the measuring probe. Ensure
that no liquid enters the interior of the thermometer. Never use abrasive cleaning agents, thin-ners or benzene for cleaning and never immerse the
instru-ment in water or other cleaning liquids. Take care not to scratch the surface of the probe lens and the display.
11. BATTERY REPLACEMENT
This instrument is supplied with one lithium battery, type CR2032. Replace with a new CR2032 battery when the ashing battery symbol appears
on the display ㉑. Remove the battery cover by sliding it in the direction shown. Remove the battery and replace with a new one ㉒.
Batteries and electronic instruments must be disposed of in accordance with the locally applicable regulations,
not with domestic waste.
12. TECHNICAL SPECIFICATIONS
Measurement range : Ear Mode: 0-100.0 °C (32-212.0 °F). Forehead Mode: 34-42.2 °C (93.2-108.0 °F).
Resolution : 0.1 °C / °F.
Measurement accuracy : Laboratory : ±0.2 °C, 32.0 - 42.2 °C. (±0.4 °F, 89.6 - 108.0 °F).
Display : Liquid Crystal Display, 4 digits plus special icons.
Acoustic :
• The unit is turned ON and ready for the measurement: 1 short beep.
• Complete the measurement: 1 long beep (1 sec.) if the reading is less than 37.5°C (99.4°F), 10 short «beep» sounds, if the reading is equal
to or greater than 37.5°C (99.4°F).
• System error or malfunction: 3 short «bi» sounds.
Memory :
• Auto-Display the last measured temperature.
• 12 readings recall in the Memory Mode.
Backlight :
• The display light will be GREEN for 4 seconds, when the unit is turned ON.
• The display light will be GREEN for 5 seconds, when a measurement is completed with a reading less than 37.5°C (99.4°F).
• The display light will be RED for 5seconds, when a measurement is completed with a reading equal to or higher than 37.5°C (99.4°F).
Operating temperature : Ear Mode: 5-40.0 °C (41-104.0 °F). Forehead Mode: 16-40.0 °C (60.8-104.0 °F); 15 - 95 % relative maximum humidity
Storage temperature : -25°C to +55°C (-13°F to 131°F); 15 - 95 % relative maximum humidity
Automatic Switch-off : Approx. 1 minute after last measurement has been taken.
Battery : CR2032 Battery (X1) 3V - at least 1000 measurements.
Dimensions : 107 x 50 x 34 mm.
Weight : 55g (with battery), 52g (w/o battery).
13. WARRANTY
This product is warranted for a two-year period from the purchase date. However, this warranty does not apply to damages, in particular, resulting
from non-compliance with this guide, incorrect manipulations, shocks or inappropriate installation of the battery. It does not apply either to the
battery or the package.
Conforms to standard EN 12470-5; ASTM E1965; IEC 60601-1; IEC 60601-1-2 (EMC).
This device complies with the requirements of the Medical Device Directive 93/42/EEC. Technical alterations reserved.

RU : ДВОЙНОЙ ТЕРМОМЕТР DUO : ЛОБОВОЙ / УШНОЙ
Данный термометр является высококачест- венным изделием, созданным с применением новейших технологий, испытанным в соответствии
с международными стандартами. Благодаря применению уникальной технологии, данный термометр способен при каждом измерении
обеспечить точные показания температуры, не зависящие от внешнего теплового воздействия. Для обеспечения необходимой точности
измерения, прибор проводит самотестирование при каждом включении.
Данный термометр предназначен для периодических измерений и отслеживания температуры тела в домашних условиях. Применение прибора
не имеет возрастных ограничений.
Данный термометр прошел клинические испытания и по их результатам признан соответствующим критериям безопасности и точности, при
условии соблюдения указаний Руководства по эксплуатации.
Пожалуйста, изучите данное руководство по эксплуатации перед использованием термометра. Сохраните это руководство.
Измерительный датчик / Съемный наконечник
①
Кнопка START
②
Дисплей
③
Кнопка ВКЛ/ВЫКЛ
④
Крышка батарейного отсека
⑤
Отображение всех элементов
⑥
Память
⑦
Готовность к измерению
⑧
Измерение завершено
⑨
Индикация температуры поверхности
⑩
Индикатор разряда батареи
⑪
Переключение со шкалы Цельсия на шкалу Фаренгейта
⑫
Режим воспроизведения
⑬
Воспроизведение 12 последних результатов
⑭
Измеренная температура слишком высокая
⑮
Измеренная температура слишком низкая
⑯
Температура окружающей среды слишком высокая
⑰
Температура окружающей среды слишком низкая
⑱
Отображение ошибки
⑲
Пустой дисплей
⑳
Разряженная батарея
㉑
Замена батареи
㉒
1. ПРЕИМУЩЕСТВА ИСПОЛЬЗОВАНИЯ ДАННОГО ТЕРМОМЕТРА
Многоцелевое использование (широкий диапазон измерения)
Термометр имеет широк ий диапазон измерения от 0 °C до 100,0 °C (от 32,0 °F до 212,0 ° F); что позвол яет использовать его как в каче стве лобного и
ушного термометра для измерения температуры тела, так и для измерения температуры поверхностей :
• Температуры поверхности молока в детской бyтылoчке
• Температуры поверхности воды в детской ванне
• Температуры окружающей среды
Отсутствие необходимости в защитных колпачках
Этот термометр более легок в обращении и более экономичен, поскольку не требует использования специальных защитных колпачков.
Измерение температуры всего за несколько секунд
Новейшая технология измерения инфракрасным датчиком позволяет проводить измерение в ушной раковине всего лишь за 1 секунду и на лбу
всего лишь за 3 секунды.
Точность и надежнос ть
Уникальная конструкция прибора со встроенным щупом, содержащим новейший датчик инфракрасного излучения, обеспечивает точные и
надежные результаты измерений.
Удобс тво и простота в использовании
• Эргономичный дизайн делает процедуру использования термометра простой и удобной.
• Температу ра может быть измерена даже у спящего ребенка, не тревожа его.
• Температура измеряется быстро, что особенно удобно для детей.
Автоматическое отображение показаний памяти
После включения прибор автоматически показывает значение последнего измерения в течение 2 секунд.
Воспроизведение нескольких последних результатов
Можно просмотреть последние 12 результатов измерений, войдя в режим воспроизведения, что позволяет более эффективно проследить
температурные изменения.
Безопасность и гигиеничность
• Отсутствие опаснос ти ранения осколками стекла или заглатывания рту ти.
• Полная безопасность при использовании для детей.
• Очистку щупа можно производить при помощи смоченной спиртом хлопчатобумажной ткани, что позволяет обеспечить полную гигиену при
использовании прибора всей семьей.
Предупреждение о повышенной температуре
10 коротких звуковых сигналов и красная подсветка ЖКД предупреж дают пациен та о том, что у него может быть температура выше 37,5 °C.
2. ВАЖНЫЕ УКАЗАНИЯ ПО БЕЗОПАСНОСТИ
• Никогда не погружайте термометр в воду или другие жидкости. При очистке следуйте инструкциям, приведенным в разделе «Очистка и
дезинфекция».
• Не используйте прибор, е сли Вам к ажется, что он поврежден, или ес ли Вы заметили что-либо необычное.
• Никогда не вскрывайте прибор.
• Присутст вие серы в ушном канале может привес ти к пониженным показ аниям температ уры. Поэтому очень важно уб едиться в том, что ушной
канал пациента свободен от серы.
• Общий физиологический эффект, называемый вазоконстрикцией, может происходить на ранних стадиях повышения температуры, приводя к
эффекту поверхностного охлаждения, результат измерения температуры лобным термометром может быть подозрительно низким.
• Если результат измерения температуры не соответствует самочувствию пациента или является подозрительно низким, повторяйте измерения
каждые 15 минут или дважды проверяйте результат другим способом измерения температуры внутри тела.
• В состав прибора входят чувствительные компоненты, требующие осторожного обращения. Ознакомьтесь с условиями хранения и
эксплуатации, описанными в разделе «Технические характеристики»!
• Позаботьтесь о том, чтобы дети не могли использовать при бор без пр исмотра, поскольк у некоторые его мелкие час ти могу т быть проглочены.
• Оберегайте прибор от:
− экстремальных температур
− ударов и падений
− загрязнения и пыли
− прямых солнечных лучей
− жары и холода
• Если приб ор не будет использоватьс я в течение длите льного периода времени, то из него следует выну ть батарею.
ПРЕДУПРЕЖДЕНИЕ : Использование прибора не заменяет необходимости консультации у врача. Прибор НЕ является водонепроницаемым!
Пожалуйста, ни при каких условиях не погружайте его в жидкос ть.

3. ПРОЦЕДУРА ИЗМЕРЕНИЯ ТЕМПЕРАТУРЫ ДАННЫМ ТЕРМОМЕТРОМ
Этот термометр позволяет проводить измерение на лбу и в ушной раковине.
Измерение на лбу
Термометр измеряет энергию инфракрасного излучения кожи в надбровной области и окружающих тканей. Эта энергия концентрируется с
помощью линзы и преобразуется в значение температуры. Показания температуры, полученные путем сканирования надбровной области,
обладают высочайшей точностью.
Измерение в ушной раковине
Термометр измеряет энергию инфракрасного излучения, излучаемую барабанной перепонкой и окружающими тканями. Эта энергия
улавливается с помощью линзы и преобразуется в температурное значение. Измеренное значение, полученное непосредственно с барабанной
перепонки, обеспечивает наиболее точное измерение температуры в ухе.
Значения, полученные с окружающих ушной канал тканей,дают более низкий уровень температур и могут привести к ошибочному диагнозу
повышенной температуры.
Во избежание неточностей измерения
1. Включите термометр нажатием кнопки ВКЛ/ВЫКЛ ④
2. Услышав короткий звуковой сигнал (после чего иконка температурной шкалы замигает), выпрямите ушной канал, аккуратно потянув за
середину уха назад и вверх.
3. Точн о помес тите щу п ① прям о в ушной канал, наж мите кн опку STAR T ② и удерж ивайте щуп в у хе до тех по р, пока зву ковой си гнал термом етра
не извес тит о том, что измер ение завершено.
Измерение температуры жидкости/воздуха
• Для измерения температуры в доме (поверхности, жидкости или воздуха) необходимо снять колпачок термометра
• Любая температура, измеренная вне диапазона 32°C-42.2°C автоматически рассматривается термометром как температура в доме
• Расстояние при измерении: не более 5 см от поверхности, температура которой измеряется
Измерение температуры жидкости
• Температура верхнего слоя жидкости может отличаться от температуры средних слоев в бутылочке, в ванночке или в супе. Поэтому перед
измерением температуры следует хорошо перемешать жидкость.
• При измерении через сосуд (например, бутылочка), следует учитывать инерцию сосуда.
• Во избежание появления конденсата на линзе термометра, измерение температуры следует проводить как можно быстрее.
• Термометр не является герметичным и его нельзя помещать в жидкость.
Температура воздуха
• Измеряйте температуру посредине комнаты, вдали от источников тепла (обогреватели, камин) и холода (окно) и в месте без сквозняков.
• Не поворачивайте линзу термометра к источнику света.
4. ИНДИКАЦИЯ И СИМВОЛЫ УПРАВЛЕНИЯ
• Отображение всех элементов ⑥: Нажмите кнопку ВКЛ/ВЫКЛ ④ для вк лючения прибора, в течение 2 секунд будут отображ аться все сегменты.
• Память ⑦: В течение 2 секунд автоматически будет отображатьс я последнее измеренное значение.
• Готовность к использованию ⑧: Прибор готов к использованию, отображенная иконка «°C» или «°F» продолжает мигать в то время как символ
режима (ухо или лоб) горит пос тоянно.
• Измерение завершено ⑨: Значение отобразится на дисплее ③ с «°C» или «°F» и символом режима. Прибор будет снова готов к следующему
измерению, как только иконка «°C» или «°F» начнет мигать.
• Индикация температуры поверхности ⑩: Иконка перечеркнутое ухо появится на дисплее ③ если значение измерения в ушной раковине
выходит з а пределы 32,0 - 42,2 °C (89,6 - 108,0 °F).
• Индикация разряда батареи ⑪: При включенном приборе иконка батареи будет непрерывно мигать, напоминая пользователю о
необходимости замены батареи.
5. ПЕРЕКЛЮЧЕНИЕ РЕЖИМОВ ИЗМЕРЕНИЯ НА ЛБУ И В УШНОЙ РАКОВИНЕ
Чтобы изменить режим с измерения на лбу на измерение в ушной раковине, снимите съемный наконечник ① с верхней части термометра.
Прибор немедленно переключится в режим измерения в ушной раковине. Когда на дисплее появится иконка ухо и будет мигать иконка «°C»
или «°F», прибор готов к использованию.
Чтобы вернуться в режим измерения на лбу, наденьте съемный 1 колпачок на наконечник термометра, и прибор немедленно переключится в
режим измерения на лбу. Когда на дисплее появится иконк а лоб и будет мигат ь иконка «°C» или «°F», прибор готов к использованию.
6. УКАЗАНИЯ ПО ИСПОЛЬЗОВАНИЮ
1. Нажмите кнопку ВКЛ/ВЫК Л ④. Дисплей 3 активир- уетс я и в течение ③ секунд отображает все элемен ты.
2. Данные последнего измерения отображаютс я на дисплее автоматически в течение 2 секунд со значком «M» ⑦.
3. Прибор готов к использованию, когда иконка «°C» или «°F» непрерывно мигает и прозвучал сигнал готовности ⑧.
Измерение на лбу
• Аккуратно приложите щуп к участку приблизительно на 1 см выше середины брови. Если надбровная область покрыта волосами, потом или
грязью, пожалуйста, сначала удалите помехи, чтобы уве личить точность показ аний.
• Нажмите кнопку START один раз и отпустите. Начните плавно перемещать инструмент из точки, расположенной в 1 см над серединой брови,
в височную область. Через 3 секунды прозвучит длинный сигнал, подтверждающий завершение измерения. Если щуп перемещался слишком
медленно и не достиг височной области к моменту сигнала, повторите измерение, как описано выше, но на этот раз перемещайте щуп немного
быстрее.
• Считайте показание температуры с ЖК-дисплея.
ВНИМАНИЕ:
• Пациенты должны хотя бы на протяжении 30 минут находиться в помещении с неизменными условиями.
• Не измеряйте температ уру во время или сразу после кормлени я грудного ребенка.
• Не пользуйтесь термометром в условиях повышенной влажности.
• Перед измерением температуры или во время него пациент не должен принимать пищи, пить или выполнять физическую работу.
• Перед размещением дат чика температуры в области измерения удалите грязь, волосы и пот.
• Не убирайте измери тельное устройство из области измерени я до выдачи сигнала о завершении.
• Всегда измеряйте температ уру в одном и том же мес те, так как показания могут различатьс я в разных мес тах.
• 10 коротких звуковых сигналов и красная подсветк а ЖКД предупреждают пациента о том, что у него может быть температура выше 37,5 °C.
Измерение в ушной раковине
• Выпрямите ушной канал, потянув ухо вверх и назад, чтобы открыть доступ к барабанной перепонке.
- Для детей до года: Потяните у хо точно наза д.
- Для детей от года и взрослых: Потяните ухо вверх и назад. Кроме того, руководствуйтесь, пожалуйста, краткими указаниями на передней
панели!
• Аккуратно потянув за ухо, плотно вставьте щуп в ушной канал (макс. 1 сек) и немедленно нажмите кнопку START ②. Отпустите кнопку и ждите
звукового сигнала. Этот сигнал обозначает завершение измерения
• Выньте термометр из ушного канала. Дисплей отображает измеренную температуру ⑨.
ВНИМАНИЕ:
• Для обеспечения точности показаний, после 3-5 измерений, сделанных подряд, необходимо подождать не менее 30 ceкyнд.
• Скопление ушной серы на щупе может привести к снижению точности показаний температуры и переносу инфекции между лицами,
использующими прибор. Поэтому чрезвычайно важно для каждого измерения использовать чистый щуп. Для очистки следуйте инструкциям
в разделе «Очис тка и дезинфекция».
• После очистки измерительного сенсора ① спиртомнеобходимо, перед выполнением следующего измерения, подождать 5 минут для того,
чтобы термометр принял исходную рабочую температуру.
• При измерении температуры у младенцев, лучше всего положить ребенка на плоскую поверхность и наклонить голову набок, так чтобы ухо
было направлено вверх. Проводя измерение температ уры у детей старшего возраста и взрос лых, лучше с тоять с зади и чу ть сбок у от пациента.
• Всегда измеряйте температ уру в одном и том же у хе, поскольку показания температ уры в левом и правом у хе могу т быть различны.
• Для измерения температуры после сна подождитепожалуйста, несколько минут.
• В следующих с лучаях рекомендуетс я трижды замерять температуру в одном и том же ухе, и за правильное принимать наибольшее из

измеренныхзначений :
1. Для младенцев в первые 100 дней жизни.
2.Для детей до трех лет с ослабленной иммунной системой, а также для тех, для кого наличие или отсутствие повышенной температуры имеет
особую важность.
3. Для тех, кто только знакомится с прибором, изучает принцип его действия и получает при измерениях похожие, но не абсолютно идентичные
результаты.
4. Если измеренная температура подозрительно низкая.
7. ВОЗМОЖНОСТЬ ПЕРЕКЛЮЧЕНИЯ МЕЖДУ ШКАЛАМИ ЦЕЛЬСИЯ И ФАРЕНГЕЙТА
Термометр способен отображать результаты измерений температуры по шкале Фаренгейта либо по шкале Цельсия. Для переключения дисплея
между °C и °F, просто выключите прибор, нажмите и удерживайте кнопку START ② в течение 5 секунд; через 5 секунд, можно будет увидеть
мигающую текущую измерительнуюшкалу (иконка «°C» или «°F» ) на дисплее ⑫. Повторнымнажатием кнопки START шкала измерения снова
переключается между °C и °F ②. После выбора шкалы измерения подождите 5 секунд, и прибор автоматическиперейдет в режим готовности
к измерению.
8.ВОСПРОИЗВЕДЕНИЕ ПОСЛЕДНИХ 12 РЕЗУЛЬТАТОВ ИЗМЕРЕНИЙ В РЕЖИМЕ ПАМЯТИ
Термометр может воспроизводить последние .
• Режим воспроизведения ⑬: Нажмите кнопку START ② для перехода в режим воспроизведения, когда термометр выключен. Иконка памяти
«M» мигает.
• Результат 1 - последний результат ⑭: Нажмите и отпустите кнопку START ② для вызова последнего результата. На дисплее вместе с иконкой
памяти з амигает 1.
• Результат 12 - последовательное считывание : Нажимайте и отпускайте кнопку START ② для последовательного воспроизведения до 12
последних результатов.
Нажимая и отпуская кнопку START ② после воспроизведения последних 12 результатов, можно еще раз просмотреть их последовательность
начиная с результата 1.
9. СООБЩЕНИЯ ОБ ОШИБКАХ
• Измеренная температура слишком высокая ⑮ : Отображается символ «H», если измеренная температура выше 100,0°C (212,0°F) в режиме
измерения в ушной раковине или 42,2°C (108,0°F) в режиме измерения на лбу.
• Измеренная температура слишком низкая ⑯: Отображаетс я символ «L», если измеренная температура ниже 0°C (32,0°F) в реж име измерения
в ушной раковине или 34,0°C (93,2°F) в реж име измерения на лбу.
• Температура окружающей среды слишком высокая ⑰ : Символ «H» вместе с символом « » отображаются, если температура окружающей
сре ды выше 40,0°C (104,0°F).
• Температура окружающей среды слишком низкая ⑱ : Символ «L» вместе с символом « » отображаются, если температура окружающей
сре ды ниже 5,0°C (41,0°F) в режиме измерения в ушной раковине или 16°C (60,8°F) в ре жиме измерения на лбу.
• Отображение ошибки ⑲ : При неполадке системы.
•Пустой дисплей
⑳
: Пожалуйста, проверьте правильность ус тановки батареи. Проверьте также полярность (<+> и <->) батареи.
• Индикация разрядившейся батареи ㉑
: Если на дисплее не отображается ничего, кроме постоянного символа батареи, то батарею следует
незамедлительно заменить.
10. ДЕЗИНФЕКЦИЯ И ОЧИСТКА
Для очистки корпуса термометра и измерительного щупаиспользуйте тампон или хлопковую ткань, смоченные в спиртовом растворе
(70%-раствор изопропилового спирта). Убедитесь, что внутрь термометра не попадаетжидкость. Никогда не используйте для очистки
абразивные чистящие средства, растворители или бензол, и никогда не погружайте прибор в воду или иные чистящие жидкости. Старайтесь не
поцарапать поверхнос ти линзы щупа и дисп лея.
11. ЗАМЕНА БАТАРЕИ
При бор пос тавл яетс я с одной ли тиево й батар ейкой ти па CR2032. З амена б атарей ки на нову ю типа CR 2032 прои зводит ся при п оявле нии на дис плее
мигающего символа батарейки ㉑. Снимите крышку отсека для батарей в направлении, показанном на рисунке. Выньте батарею и замените её
новой ㉒.
Батареи и электронные приборы следует утилизировать в соответствии с принятыми нормами и не выбрасывать вместе с
бытовыми отходами.
12. ТЕХНИЧЕСКИЕ ХАРАКТЕРИСТИКИ
Диапазон измерений : Режим измерения в ушной раковине: 0-100,0 °C (32-212,0 °F)Режим измерения на лбу: 34-42, 2 °C (93,2-108,0 °F).
Минимальный шаг индикации : 0.1 °C / °F.
Точность измерений : Лабораторная : ± 0,2°C, 32,0 ~ 42,2°C (±0,4° F, 89,6~108,0°F) .
Дисплей : иконками специальными со знака4, исплейд ристаллическийкидкоЖ.
Звуковые сигналы :
• Прибор включен и готов к измерению : 1короткий звуковой сигнал.
• Завершение измерения: 1длинный сигнал (1 сек.), если значение меньше 37,5°C (99,4°F), 10коротких звуковых сигналов, если значение равно
или выше 37,5°C (99,4°F).
• Системная ошибка или неисправность: 3коротких звуковыхсигнала.
Память :
• Автоматическое отображение последней измеренной температуры.
• Воспроизве дение 12 пос ледних результатов в режиме памяти .
Подсветка :
• При включении прибора дисплей засветится ЗЕЛЕНЫМ цветом на 4секунды.
• При завершении измерения с полученным значением меньше 37,5°C (99,4°F) дисп лей засв етится ЗЕЛЕНЫМ цветом на 5сек унд.
• При завершении измерения с полученным значением, равным или превышающим 37,5°C (99,4°F), дисплей засветится КРАСНЫМ цветом на
5секунд.
Диапазон рабочих температур : Режим и змерения в ушной раковине: 5-40,0 °C (41-104,0 °F) Режим измерения на лбу: 16-40,0 °C (60,8-104,0 ° F);
максимальная относительная влажность 15-95 %.
Температурахранения : от -25 °C до +55 °C (от -13 °F до 131 °F); максимальна я относительна я влажность 15-95 %.
Автоматическое выключение : Прибор отключается приблизительно через 1 минуту после выполнения последнего измерения.
Батарея : CR2032 Батаре я (X1) V3 - не менее1000 измерений .
Размеры : 107 x 50 x 34 мм.
Масса : 55 г (с батареей), 52 г (без батареи).
13. ГАРАНТИЯ
На данный продукт распространяется гарантия в течении 2 лет со дня совершения покупки. Тем не менее, данная гарантия не действительна
для повреждений, связанных с несоблюдением инструкции по эксплуатации, неправильного использования, а также вследствие ударов и
неправильной замены батарейки. Также гарантия не распрос траняетс я ни на батарейки, ни на упаковку.
Термометр выполнен в соответс твии с нормой EN 12470-5; ASTM E1965; IEC 60601-1; IEC 60601-1-2 (EMC).
Данный прибор соответствует требованиям директивы ЕЭС о медицинском оборудовании 93/42/EEC.
Право на внесение технических изменений сохраняется.
