American Power Conversion UPA9: инструкция
Раздел: Профоборудование
Тип: Аппарат
Инструкция к Аппарату American Power Conversion UPA9

UPA9
Universal Power Adapter
User’s Guide
Guía del usuario
Manuel d’utilisation
Gebrauchsanweisung
Guida dell’utente
Manual do Utilizador
Gebruikershandleiding
Brugervejledning
Användarmanual
Brukerhåndbok
Kullan›m K›lavuzu
∂Á¯ÂÈÚ›‰ÈÔ ÃÚ‹ÛÙË
PouÏívateºská príruãka
UÏivatelská pfiíruãka
Podr´cznik u˝ytkownika
êÛÍÓ‚Ó‰ÒÚ‚Ó ‰Îfl ÔÓθÁÓ‚‡ÚÂÎfl

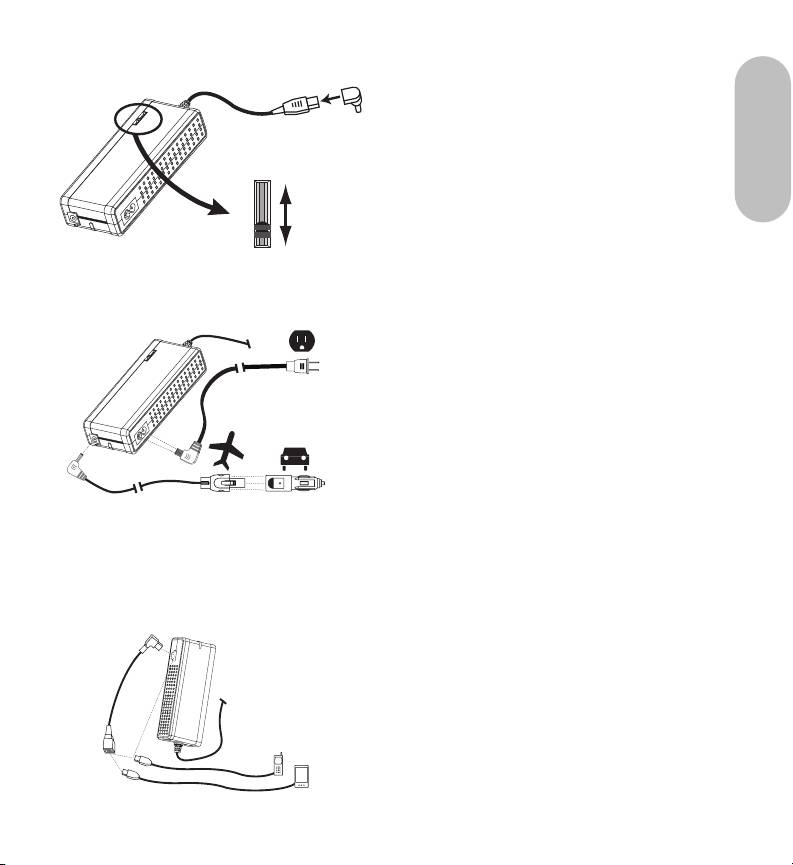
Directions for Use:
1. Select Voltage, Connect to notebook
Select the correct voltage setting and notebook adapter
tip for your notebook computer using the “Compatibility
Guide.” Use a pen to slide the UPA’s voltage selector to
the appropriate voltage. Attach the correct notebook
English
20V
adapter tip to the UPA’s output cord, then connect to your
19V
18V
notebook’s input power jack.
16V
15V
Note
: Changing the voltage selector while equipment is
12V
being powered will cause the UPA to shut off. If this
happens, unplug UPA from power source. Slide the voltage selector to desired voltage setting. Wait
10 seconds, and reconnect to power source.
Note
: Save the extra tips supplied with your UPA for potential future use.
2. Attach Input Cable
For automobile or airplane use: insert the
AIR/AUTO
input cable
into the top of the UPA.
Note
: the AUTO tip
snaps onto the AIR tip. Depress tab on AIR tip and pull
apart to separate.
For AC outlet use: insert the
AC input cable
into the side
of the UPA. Attach appropriate APC international plug
adapter (if required) onto the AC input cable for your
outlet type. The UPA can use power from
100-127 V and 220-240 V AC outlets.
Plug input cable into power source. The UPA’s white LED will light, and the unit will immediately be
supplying power.
Attention
: It is normal for the UPA to become very warm to the touch when powering larger notebook
computers or when used for extended periods in warm places. The UPA will automatically shut off if it gets
too hot, preventing damage. If this occurs, the UPA will automatically restart after it has cooled. Allow it to
cool before handling. For optimum performance, always use the UPA with adequate ventilation.
3. Charge and Power mobile devices
To charge or power one (1) mobile device (phone, PDA,
MP3 player, etc.), plug the device’s USB charging cable
(sold separately) into the USB charging port on the side
of the UPA. To power two (2) mobile devices, insert the
USB splitter cable into the UPA and then plug both
mobile devices into the splitter cable.
Note
: USB charging cables made by other manufacturers
will also work with APC’s UPA.
1

Warranty
The standard warranty is 2 years from the date of purchase. APC will replace the original with an APC
factory qualified unit. APC will ship a replacement once the defective unit is received or will cross-ship a
replacement upon the provision of a valid credit card. APC pays ground freight transportation to return
product to the customer. Please fill out the warranty card included or registration online at:
http://www.apc.com/support/inter_warranty/.
Service
Do not return product to the place of purchase under any circumstances. Consult Troubleshooting to solve
common problems. If you are still having trouble, make sure you have the date of purchase, model number
and serial number from the back of the adapter before calling APC Customer Support.
APC Customer Support
On-line technical support www.apc.com/support
USA & Canada 1-800-800-4272, Worldwide +1-401-789-5735
No user serviceable parts inside. Unplug the input power cable to disconnect power from the UPA. This
product is intended for indoor use only. This product is intended for continuous operation.
This device complies with Part 15 of the FCC rules. Operation is subject to the following two conditions:
1. This device may not cause harmful interference.
2. This device must accept any interference received including interference that may cause undesired
operation.
Specifications
Input Voltage DC: 11-16 V
AC: 100-127 V, 50/60 Hz; 220-240 V, 50/60 Hz
Output Voltage 12 V, 15 V, 16 V, 18 V, 19 V, 20 V. See rear of UPA for output power ratings.
Weight 0.85 lbs., including AC input cord
2

Troubleshooting
Problem Probable Cause Solution
LED lights when
The UPA voltage selector was
Unplug UPA from power source, select
plugged in, but computer
not properly set.
correct voltage setting (see “Compatibility
operates on battery.
Guide”), plug UPA back in.
LED does not light when
The fuse inside the UPA’s AUTO
Unscrew the tip of the AUTO power
plugged into a car.
power adapter plug is ’blown’.
adapter plug and replace the fuse.
LED has turned off;
UPA voltage selector was
Unplug UPA from power source, wait 10
computer operates on
changed while the UPA was in
seconds, plug UPA back in.
battery.
use.
The UPA has protected the
notebook from a voltage spike.
LED has turned off;
The computer required more
UPA will automatically restart once it has
computer operates on
power than the UPA could
cooled. Try to place the UPA in a cooler
battery and UPA is hot to
provide. UPA is located in a
area, with better air circulation (i.e.:
the touch.
place where it can not dissipate
outside of a Notebook Case). You can also
heat adequately.
change the power management properties
of your notebook to a lower power mode.
3
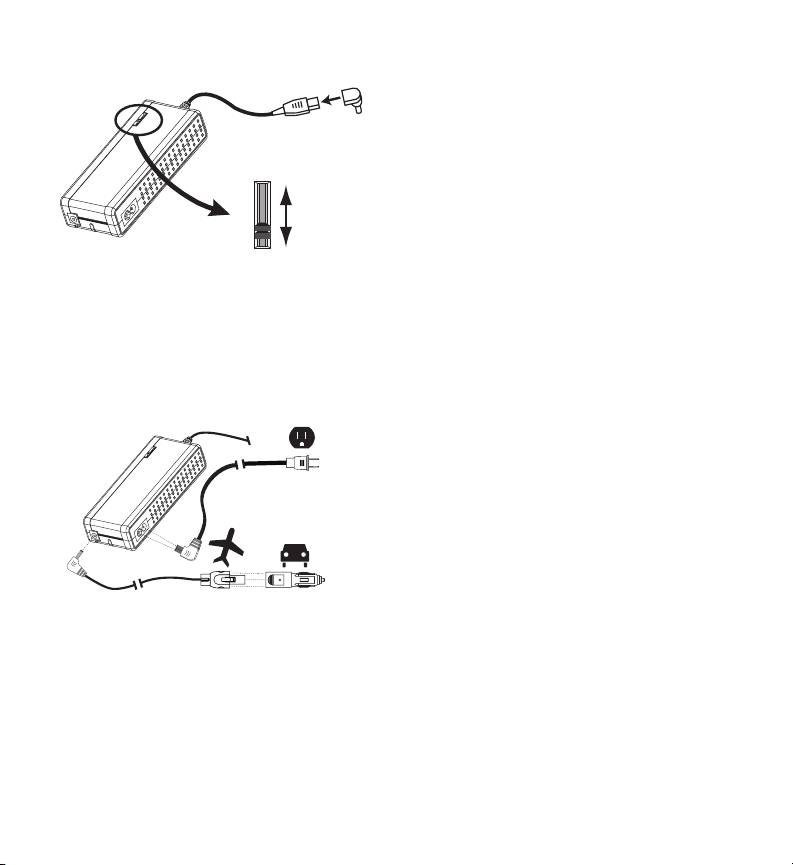
Instrucciones de uso:
1. Selección del voltaje y conexión
al ordenador portátil
Seleccione el ajuste de voltaje correcto y el extremo
adaptador para ordenador portátil correspondiente a su
modelo de ordenador; consulte para ello la “Guía de
20V
compatibilidad”. Utilice una pluma para deslizar el
19V
18V
selector de voltaje del adaptador de alimentación
16V
universal (UPA) hasta la posición de voltaje correcta.
15V
12V
Conecte el extremo adaptador adecuado para su
ordenador al cable de salida del adaptador. Luego,
conéctelo al enchufe de alimentación de entrada de su ordenador.
Nota
: Si la posición del selector de voltaje se cambia mientras el equipo recibe alimentación eléctrica, el
adaptador se apagará. Si esto ocurre, desenchufe el adaptador de la fuente de alimentación eléctrica.
Deslice el selector de voltaje hasta la posición de nivel deseada. Espere 10 segundos y luego vuelva a
conectar el adaptador a la fuente de alimentación eléctrica.
Nota
: Conserve los extremos adaptadores incluidos con el adaptador, en caso de que necesite utilizarlos
más adelante.
2. Conexión del cable de entrada
Para uso en automóviles o aviones: Inserte el
cable de
entrada para aviones/automóviles
en la parte superior
del adaptador.
Nota
: El extremo adaptador para
automóviles se coloca a presión en el extremo adaptador
para aviones. Presione la lengüeta del extremo adaptador
para aviones y tire para separar los componentes.
Para uso con una toma de corriente alterna: Inserte el
cable de entrada de corriente alterna
en el lateral del
adaptador. Coloque el adaptador de enchufe internacional APC apropiado (si se requiere) en el cable de
entrada de corriente alterna correspondiente al tipo de toma de electricidad que desea utilizar. El
adaptador puede utilizarse con tomas de corriente alterna de 100 a 127 V y de 220 a 240 V.
Enchufe el cable de entrada en la fuente de alimentación. El LED de color blanco del adaptador se
encenderá y la unidad comenzará a suministrar electricidad inmediatamente.
Atención
: Es normal que el adaptador se ponga muy caliente al tacto al alimentar ordenadores portátiles
grandes o al utilizarlo por períodos prolongados en lugares calientes. A fin de prevenir daños, el adaptador
se apagará automáticamente si se calienta excesivamente. Si esto sucede, la unidad se reiniciará
automáticamente una vez que se haya enfriado. Deje que se enfríe antes de manipularla. Para obtener un
rendimiento óptimo, utilícela siempre con una ventilación adecuada.
4
