Alpine CDE-171R_CDE-171RM_CDE-171RR: Installation
Installation: Alpine CDE-171R_CDE-171RM_CDE-171RR
01.00CDE171R-QRG.book Page 18 Wednesday, September 19, 2012 10:26 AM
Installation
• When making connections to the vehicle’s electrical
•
Wenn Sie Anschlüsse an das elektrische System des
• Lors de la connexion des câbles au système électrique du
system, be aware of the factory installed components (e.g.
Fahrzeugs vornehmen, berücksichtigen Sie bitte alle
véhicule, il faut être conscient des composants installés en
on-board computer). Do not tap into these leads to
werkseitig bereits installierten Komponenten (z. B. Bord-
usine (tel qu’un ordinateur de bord). Veillez à ne pas vous
Computer). Zapfen Sie nicht die Leitungen solcher
provide power for this unit. When connecting the
raccorder à ces fils pour alimenter l’appareil. Lorsque
Komponenten an, um dieses Gerät mit Strom zu versorgen.
CDE-171R/CDE-171RR/CDE-171RM/CDE-170R/
vous raccordez le CDE-171R/CDE-171RR/CDE-171RM/
Wenn Sie das CDE-171R/CDE-171RR/
CDE-170RR/CDE-170RM to the fuse box, make sure the
CDE-170R/CDE-170RR/CDE-170RM au boîtier à
CDE-171RM/CDE-170R/CDE-170RR/CDE-170RM an den
fuse for the intended circuit of the CDE-171R/
fusible, assurez-vous que le fusible du circuit désigné
Sicherungskasten anschließen, achten Sie darauf, dass die
CDE-171RR/CDE-171RM/CDE-170R/CDE-170RR/
pour le CDE-171R/CDE-171RR/CDE-171RM/
Sicherung für den Stromkreis, an den Sie das CDE-171R/
CDE-170RM has the appropriate amperage. Failure to do
CDE-170R/CDE-170RR/CDE-170RM possède
CDE-171RR/CDE-171RM/CDE-170R/
so may result in damage to the unit and/or the vehicle.
CDE-170RR/CDE-170RM anschließen wollen, einen
l’ampérage approprié. Sinon, vous risquez
When in doubt, consult your Alpine dealer.
geeigneten Ampere-Wert aufweist. Andernfalls kann es zu
d’endommager l’appareil et/ou le véhicule. En cas de
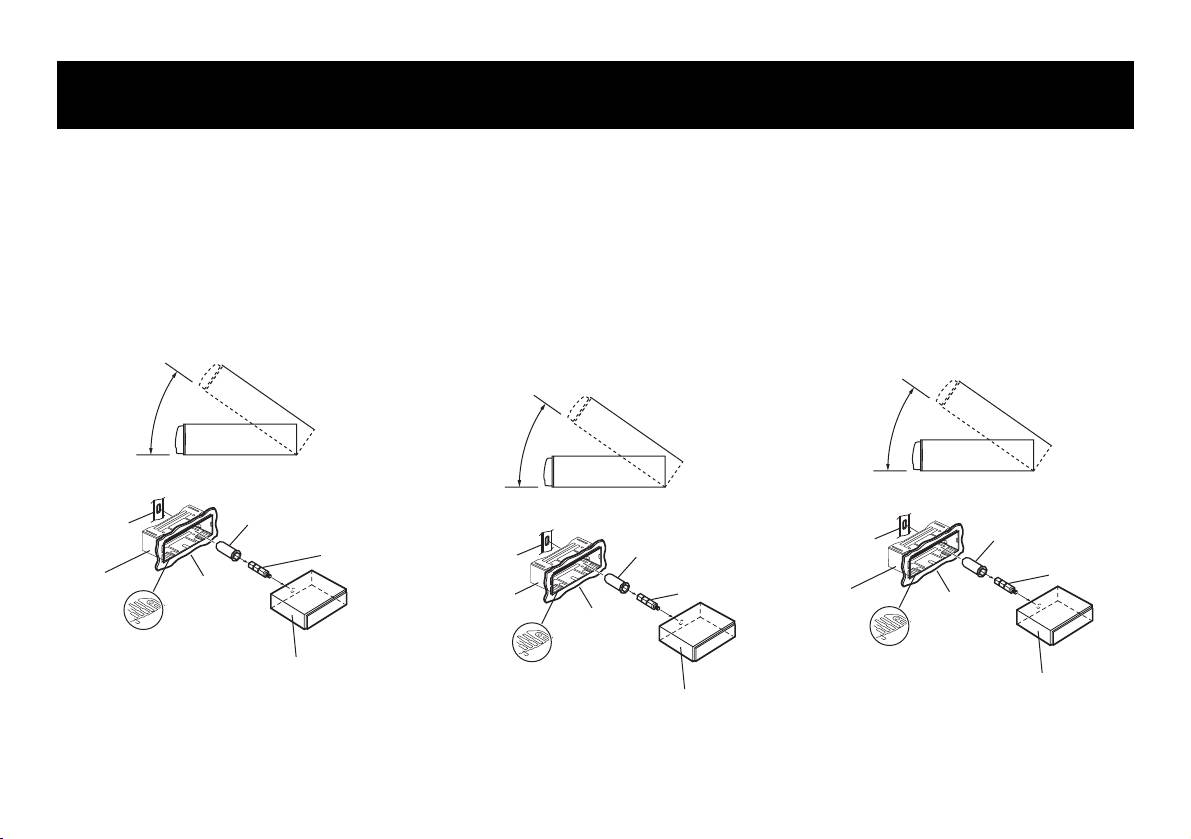
• The main unit must be mounted within 35 degrees of the
Schäden am Gerät und/oder am Fahrzeug kommen. Wenden
doute, consultez votre revendeur Alpine.
horizontal plane, back to front.
Sie sich im Zweifelsfall bitte an Ihren Alpine- Händler.
• L’unité principale doit être fixée à moins de 35 degrés du
• Der Einbauwinkel des Gerätes sollte weniger als 35 Grad
plan horizontal, de l’arrière vers l’avant.
betragen.
Less than 35°
Moins de 35°
Weniger als 35°
1
1
Rubber Cap
1
Capuchon de
Bracket
(Included)
Gummikappe
caoutchouc (fourni)
Support
Boulon à tête
Hex Bolt
(beiliegend)
Halterung
Sechskant-
hexagonale
(Included)
Stiftschraube
(fourni)
Mounting
Dashboard
(beiliegend)
Gaine de
Sleeve
Einbaurahmen
montage
Tableau de
(Included)
(beiliegend)
Armaturenbrett
(fournie)
bord
Pressure Plates*
Plaques de compression*
This unit
Druckplatten*
Cet appareil
* If the installed mounting sleeve is loose in the dashboard,
Dieses Gerät
the pressure plates may be bent slightly to remedy the
* Si la gaine de montage installée n’épouse pas bien la
problem.
* Wenn der angebrachte Einbaurahmen lose im
forme du tableau de bord, les plaques de compression
Armaturenbrett sitzt, können die Druckplatten leicht
peuvent être légérement pliées pour remédier au
gebogen werden, um das Problem zu beheben.
probléme.
18
01.05CDE171R-QRG.fm
ALPINE CDE-171R 68-21627Z69-A (EN/DE/FR)
01.00CDE171R-QRG.book Page 19 Wednesday, September 19, 2012 10:26 AM
2
2
2
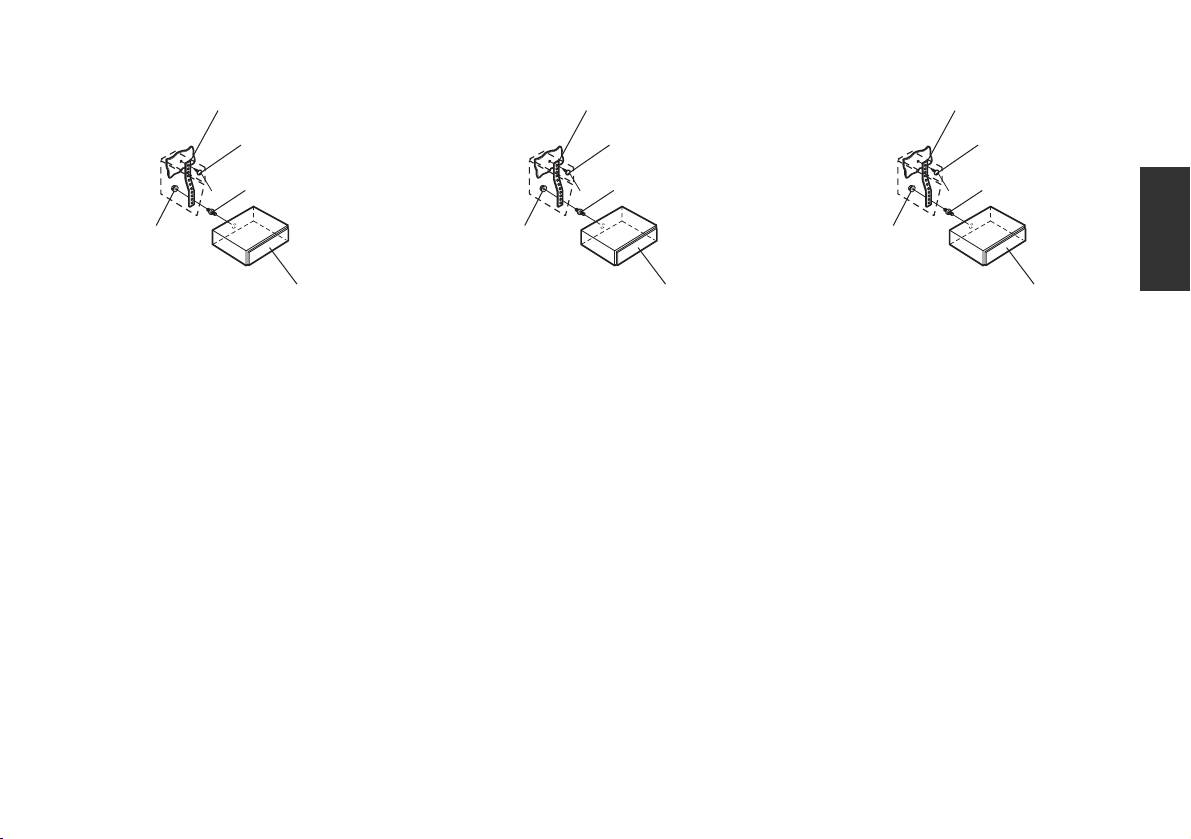
Metal Mounting Strap
Befestigungsstrebe
Attache de montage en métal
Screw
Schraube
Vis
Bolt Stud
Stiftschraube
Filetage de boulon
*
*
*
Hex Nut (M5)
Sechskantmutter (M5)
Ecrou à six pans
(M5)
This unit
Dieses Gerät
Cet appareil
When your vehicle has the Bracket, mount the long
Falls Ihr Fahrzeug mit einer Stützhalterung
Si votre véhicule possède un support, installez le
hex bolt onto the rear panel of the CDE-171R/
versehen ist, drehen Sie die lange
long boulon à tête hexagonale sur le panneau
CDE-171RR/CDE-171RM/CDE-170R/CDE-170RR/
Sechskantschraube in die Rückseite des
arrière du CDE-171R/CDE-171RR/CDE-171RM/
CDE-170RM and put the Rubber Cap on the hex
CDE-171R/CDE-171RR/CDE-171RM/CDE-170R/
CDE-170R/CDE-170RR/CDE-170RM et placez le
bolt.
CDE-170RR/CDE-170RM und stecken danach die
capuchon de caoutchouc sur le boulon.
Gummikappe auf den Schraubenkopf.
• For the screw *, provide a proper screw to the chassis
• Pour la vis *, procurez-vous une vis appropriée à
installing location.
• Als Schraube* verwenden Sie eine geeignete Schraube für
l’emplacement d’installation du châssis.
die Chassis-Gehäusebefestigung.
3
3
3
Slide the CDE-171R/CDE-171RR/CDE-171RM/
Insérez le CDE-171R/CDE-171RR/CDE-171RM/
CDE-170R/CDE-170RR/CDE-170RM into the
Schieben Sie das CDE-171R/CDE-171RR/
CDE-170R/CDE-170RR/CDE-170RM dans le tableau
dashboard. This ensures that the unit is properly
CDE-171RM/CDE-170R/CDE-170RR/CDE-170RM in
de bord. De cette façon, l’appareil sera
locked and will not accidentally come out from the
das Armaturenbrett. Der Rastmechanismus sorgt
convenablement fixé et il ne risquera pas de
dashboard.
für einen wackelfreien Sitz und verhindert, dass
tomber accidentellement du tableau de bord.
das Gerät aus Versehen aus dem Armaturenbrett
gezogen wird.
19
01.05CDE171R-QRG.fm
ALPINE CDE-171R 68-21627Z69-A (EN/DE/FR)
Оглавление
- Getting Started / Vorbereitungen / Mise en route
- Radio
- CD/MP3/WMA/AAC
- USB memory (Optional) / USB-Speicher (Option) / Clé USB (en option)
- iPod/iPhone (Optional) (CDE-171R/CDE-171RR/ CDE-171RM only) / iPod/iPhone (Option) (nur CDE-171R/CDE-171RR/CDE-171RM) / iPod/iPhone (en option) (CDE-171R/CDE-171RR/CDE-171RM uniquement)
- Specifications / Technische Daten / Spécifications
- Installation
- Connections / Anschlüsse / Raccordements
- Primeros pasos / Operazioni preliminari / Komma igång
- Radio
- CD/MP3/WMA/AAC
- Memoria USB (opcional) / Memoria USB (opzionale) / USB-minne (tillval)
- iPod/iPhone (opcional) (sólo CDE-171R/ CDE-171RR/CDE-171RM) / iPod/iPhone (opzionale) (solo CDE-171R/CDE-171RR/ CDE-171RM) / iPod/iPhone (tillval) (endast CDE-171R/CDE-171RR/CDE-171RM)
- Especificaciones / Caratteristiche tecniche / Tekniska data
- Instalación / Installazione / Installation
- Conexiones / Collegamenti / Anslutningar
- Aan de slag / Приступая к работе / Czynności wstępne
- Radio / Радио / Radio
- CD/MP3/WMA/AAC
- USB-geheugen (optioneel) / Память USB (приобретается дополнительно) / Pamięć USB (opcja)
- iPod/iPhone (optioneel) (enkel CDE-171R/CDE-171RR/ CDE-171RM) / iPod/iPhone (приобретается дополнительно) (только CDE-171R/CDE-171RR/CDE-171RM) / iPod/iPhone (opcja) (tylko model CDE-171R/CDE-171RR/CDE-171RM)
- Specificaties / Технические характеристики / Dane techniczne
- Installatie / Установка / Instalacja
- Aansluitingen / Соединения / Złącza
