Braun 2838: instruction
Class: Beauty, health, sport, tourism, hobbies
Type: Electric Shaver/Razor
Manual for Braun 2838

4
cruZer
body&face
2838
e
c
a
F
&
y
d
o
B
2838
4
y
r
r
d
e
&
Z
t
u
e
r
w
c
Type 5730
www.braun.com/register
5730423_Cruzer2838_S1.indd 15730423_Cruzer2838_S1.indd 1 11.10.2006 15:09:01 Uhr11.10.2006 15:09:01 Uhr

Braun Infolines
English 6, 58
GB
0800 783 70 10
Français 10, 58
IRL
1 800 509 448
Polski 14, 59
F
0 810 309 780
âesk˘ 18, 60
Slovensk˘ 22, 61
B
0 800 14 592
Magyar 26, 62
PL
0 801 127 286
Hrvatski 30, 62
0 801 1 BRAUN
Slovenski 34, 63
TR
0212 - 473 75 85
Türkçe 38
RUS
+ 7 495 258 62 70
êÛÒÒÍËÈ 42, 64
ì͇ªÌҸ͇ 46, 66
UA
+ 38 044 417 24 15
57, 51
HK
852-25249377
(Audio Supplies
Company Ltd.)
Internet:
www.braun.com
Braun GmbH
Frankfurter Straße 145
61476 Kronberg/Germany
5-730-423/00/I-07/M
GB/F/PL/CZ/SK/H/HR/SLO/TR/
RUS/UA/Arab
5730423_Cruzer2838_S2.indd 15730423_Cruzer2838_S2.indd 1 04.01.2007 8:33:56 Uhr04.01.2007 8:33:56 Uhr

1
7
2
10
3
4a
4
7
4b
e
c
a
F
6
8
&
y
d
o
B
4
r
e
Z
u
r
c
5
9
11
5730423_Cruzer2838_S3.indd 15730423_Cruzer2838_S3.indd 1 11.10.2006 15:13:25 Uhr11.10.2006 15:13:25 Uhr
a
1
1
2
2
1
b
90°
90°
c
2
1
d
180°
5730423_Cruzer2838_S4.indd 15730423_Cruzer2838_S4.indd 1 11.10.2006 15:14:15 Uhr11.10.2006 15:14:15 Uhr
oi
l
e
2
1
f
1
2
g
h
i
5730423_Cruzer2838_S5.indd 15730423_Cruzer2838_S5.indd 1 11.10.2006 15:15:24 Uhr11.10.2006 15:15:24 Uhr

English
Our products are designed to meet the highest standards of
quality, functionality and design. We hope you entirely enjoy
your new Braun shaver.
Warning
Your shaver is provided with a special cord set with an
integrated Safety Extra Low Voltage power supply. Do not
exchange or manipulate any part of it. Otherwise there is risk
of electric shock.
For usage in other body areas, please make sure that the
skin is stretched.
For hygienic reasons, do not share this appliance with other
persons.
Description
1 Foil protection cap
2 Shaver foil
3 Cutter block
4 Rotating styler
4a Wide shaper (28 mm)
4b Narrow shaper (14 mm)
5 Charging light
6 On/off switch
7 Trimming attachment
8 Beard length selector
9 Special cord set
10 Short beard attachment
11 Charging stand
Charging
The best environmental temperature for charging is between
15 °C and 35 °C. Do not expose the shaver to temperatures
higher than 50 °C for extended periods of time.
•
Using the special cord set, connect the shaver to an
electrical outlet with the motor switched off.
•
When charging for the first time, leave the shaver to
charge continuously for 4 hours. The green charging light
(5) shows that the shaver is being charged. When the
battery is fully charged, the charging light intermittently
blinks on and off. This indicates that the battery maintains
its full capacity.
•
A full charge provides 30 minutes of cordless shaving time
depending on your beard growth.
•
Once the shaver is completely charged, discharge the
shaver through normal use. Then recharge to full capacity.
Subsequent charges will take about 1 hour.
6
5730423_Cruzer2838.indd 65730423_Cruzer2838.indd 6 04.01.2007 9:14:46 Uhr04.01.2007 9:14:46 Uhr

•
Maximum battery capacity will only be reached after
several charging/discharging cycles.
•
5-minute quick charge is sufficient for a shave.
Shaving
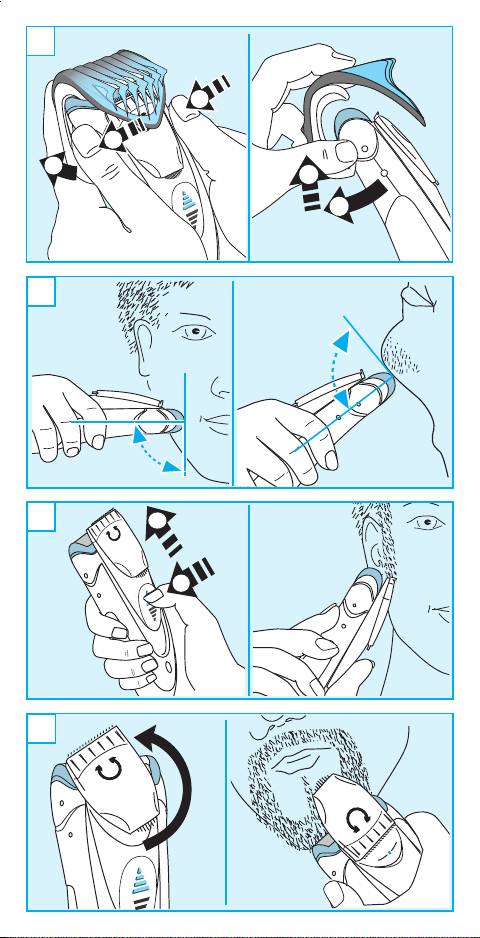
First, remove the trimming attachment (7): Using your
thumbs, press against the side clips of the trimming
attachment so that they swing off in the direction of the
arrows (a). Activate the on/off switch (6). The floating foil
frame automatically adapts to your skin surface for a close,
smooth shave.
For best results:
•
Always shave before washing your face.
•
At all times, hold the shaver at right angles (90°) to the
skin (b).
•
Stretch the skin and shave against the direction of beard
growth.
•
For pre-shaving after a few days of not having shaved, use
the wide shaper (4a) to pre-cut long hairs. For a close,
smooth shave, finish with the foil.
•
To maintain 100% shaving performance, replace your foil
and cutter block at least every 18 months or when worn.
This appliance is suitable for use in a bath or shower.
When using it in the shower, we recommend
applying shaving foam or gel.
Using the rotating styler (4)
The wide shaper (4a) evenly cuts and trims large areas (c). It
is ideal for shaping sideburns, moustaches and partial short
beards. The wide shaper is provided with safety rips and a
gliding strip for less irritation and easy gliding. Press the blue
stripes to push up the rotating styler (4).
While stretching the skin, guide the wide shaper against the
direction of hair growth.
The narrow shaper (4b) precisely defines lines and edges (d),
being ideal for precise contouring.
To use the narrow shaper, push up the styler and turn it 180°.
Frequent use of the styler will reduce the battery capacity.
Using the trimming attachments (7) and (10)
•
The trimming attachment (7) is ideal for beard trimming
and keeping it at a constant length.
7
5730423_Cruzer2838.indd 75730423_Cruzer2838.indd 7 04.01.2007 9:14:47 Uhr04.01.2007 9:14:47 Uhr

•
Place the trimming attachment onto the shaver foil (2) and
press it against the shaver housing until it snaps into place
with a click.
•
Press the beard length selector (8) (e) and slide it up in
order to set the desired beard length (length settings from
top to bottom 1.2 mm, 2.8 mm, 4.4 mm, 6 mm). Push up
the styler (4).
•
Activate the on/off switch and trim against hair growth by
guiding the transparent comb part over the skin.
•
The short beard attachment (10) is perfectly suited for
creating a stubble look and maintaining it. Attach the
short beard attachment the same way as the trimming
attachment (7). Push up the styler and use the appliance
as shown in illustration (f). The short beard attachment
ensures an optimum usage angle.
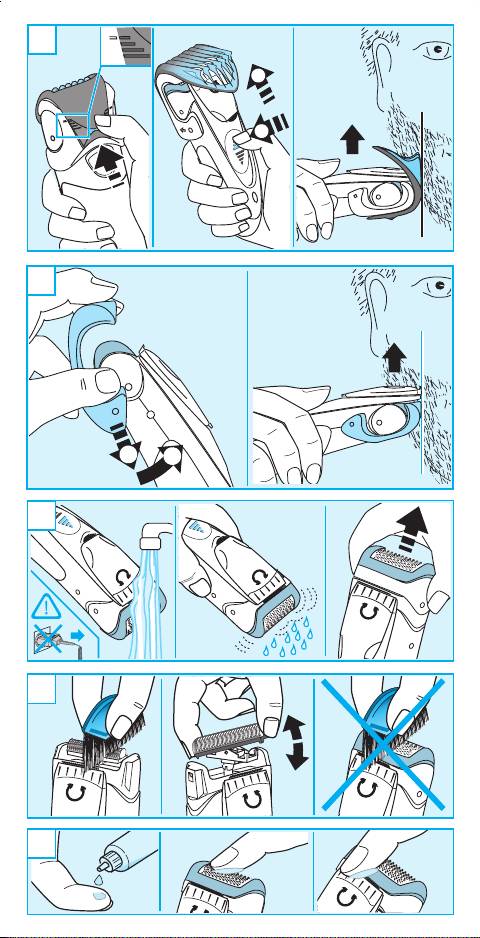
Cleaning
Regular cleaning ensures better shaving performance.
Rinsing the shaving head after each shave under running
water is an easy and fast way to keep it clean:
•
Switch the shaver on (cordless) and rinse the shaving head
under hot running water (g). A natural based soap may
also be used provided it contains no particles or abrasive
substances. Rinse off all foam and let the shaver run for a
few more seconds.
•
Next, switch off the shaver, remove the shaver foil and the
cutter block. Then leave the disassembled shaving parts
to dry.
•
If you regularly clean the shaver under water, then once a
week apply a drop of light machine oil onto the long hair
trimmer and shaver foil (i).
Alternatively, you may clean the shaver using the brush
provided (h):
•
Switch off the shaver. Remove the shaver foil.
•
Using the brush, clean the cutter block and the inner area
of the shaver head. However, do not clean the shaver foil
with the brush as this may damage the foil.
Keeping your shaver in top shape
Replacing the shaving parts
To maintain 100% shaving performance, replace your foil
and cutter block at least every 18 months or when worn.
Change both parts at the same time for a closer shave with
less skin irritation.
(Shaver foil and cutter block: 2000 series)
8
5730423_Cruzer2838.indd 85730423_Cruzer2838.indd 8 04.01.2007 9:14:48 Uhr04.01.2007 9:14:48 Uhr

Preserving the batteries
In order to maintain the optimum capacity of the
rechargeable batteries, the shaver has to be fully discharged
(by shaving) every 6 months approximately. Then recharge
the shaver to full capacity.
Environmental notice
This product contains rechargeable batteries. In the
interest of protecting the environment, please do not
dispose of the product in the household waste at the
end of its useful life. Disposal can take place at a
Braun Service Centre or at appropriate collection
points provided in your country.
Subject to change without notice.
This product conforms to the European Directives
EMC 89/336/EEC and Low Voltage 73/23/EEC.
For electric specifications, see printing on the
special cord set.
9
5730423_Cruzer2838.indd 95730423_Cruzer2838.indd 9 04.01.2007 9:14:48 Uhr04.01.2007 9:14:48 Uhr

Français
Nos produits sont conçus pour satisfaire aux plus hautes
exigences en matière de qualité, fonctionnalité et design.
Nous espérons que vous serez pleinement satisfait de votre
nouveau rasoir Braun.
Attention
Votre rasoir est fourni avec un adaptateur basse tension.
Par conséquent, vous ne devez modifier ou manipuler aucun
de ses composants afin d’éviter tout risque d’électrocution.
Pour une utilisation sur des autres parties du corps,
assurez-vous que votre peau soit tendue. Pour des raisons
d’hygiène, ne pas partager ce produit avec d’autre personne.
Description
1 Capot de protection de la grille
2 Grille de rasage
3 Bloc-couteaux
4 Tondeuse rotative
4a Tondeuse large (28mm)
4b Tondeuse étroite (14mm)
5 Témoin lumineux de charge
6 Interrupteur marche / arrêt
7 Sabot
8 Accessoire hauteur de coupe
9 Cordon d’alimentation
10 Accessoire « barbe de 3 jours »
11 Chargeur sur pied
Mise en charge du rasoir
La température environnante idéale pour la mise en charge
doit être comprise entre 15 °C et 35 °C.
Ne pas exposer le rasoir à une température supérieure à
50 °C pendant trop longtemps.
•
A l’aide du cordon d’alimentation, branchez le rasoir arrêté
à une prise de courant.
•
Lors de la première mise en charge, laissez le rasoir
charger en continu pendant 4 heures. Le témoin lumineux
de charge (5) s’allume, indiquant que le rasoir est en
train de charger. Quand la batterie est complètement
rechargée, le témoin de charge se met alors à clignoter.
•
Une pleine charge procure environ 30 mn de rasage sans
fil. Cette durée varie toutefois selon votre type de barbe.
•
Une fois le rasoir complètement rechargé, utilisez-le sans
fil jusqu’à ce qu’il soit complètement déchargé. Puis
rechargez-le à nouveau complètement. Les mises en
charge suivantes prendront environ 1 heure.
10
5730423_Cruzer2838.indd 105730423_Cruzer2838.indd 10 04.01.2007 9:14:49 Uhr04.01.2007 9:14:49 Uhr

•
La capacité maximum de la batterie ne sera atteinte
qu’après plusieurs cycles de charge/décharge.
•
Recharge rapide en 5 minutes valable pour un rasage.
Rasage
Retirez le sabot (7) de la façon suivante : Avec vos 2 pouces,
poussez les 2 clips du sabot dans la direction des flèches (a)
afin de les dégrafer. Appuyez sur l’interrupteur de mise en
marche (6). La grille flottante s’adapte à votre peau pour un
rasage doux et précis.
Les astuces pour un rasage parfait:
•
Nous vous recommandons de vous raser avant de vous
laver le visage car la peau a tendance à légèrement gonfler
lorsqu’elle est humide.
•
Tenez le rasoir perpendiculairement (90°) à la peau (b).
•
Tendez votre peau et rasez-vous dans le sens contraire de
la pousse du poil.
•
Pour vous pré-raser lorsque votre barbe est trop longue,
nous vous conseillons d’utiliser la tondeuse large (4a) pour
pré-couper les poils les plus longs. Pour un rasage de plus
près et plus en douceur continuez votre rasage avec la
grille.
•
Pour conserver 100% de la performance de votre rasoir,
remplacez la grille et le bloc-couteaux tous les 18 mois.
Cette appareil peut être utilisé dans le bain ou sous
la douche. Lorsque vous l’utilisez sous la douche, il
est recommandé de s’appliquer une mousse ou un
gel à raser sur le visage avant le rasage.
Utilisation de la tondeuse rotative (4)
La tondeuse large (4a) permet d’égaliser et de tailler les poils
sur les zones les plus larges (c).
Elle est idéale pour tailler les pattes, les moustaches et la
barbe. La tondeuse large est fournie avec un accessoire anti-
coupure et une bande glissante pour moins d’irritation et une
glisse optimale.
Appuyez sur le bouton bleu pour faire coulisser la tondeuse
(4) vers le haut.
Pendant que vous tendez votre peau, guider la tondeuse.
La tondeuse étroite (4b) est idéale pour délimiter précisé-
ment les contours de la barbe. Pour utiliser la tondeuse
étroite, faites la coulisser puis tourner de 180° (d).
L’utilisation fréquente de la tondeuse réduit d’autant
l’autonomie de la batterie.
11
5730423_Cruzer2838.indd 115730423_Cruzer2838.indd 11 04.01.2007 9:14:50 Uhr04.01.2007 9:14:50 Uhr

Utilisation du sabot (7) et (10)
•
Le sabot (7) est idéal pour tailler la barbe et conserver une
longueur constante dans votre barbe.
•
Placez le sabot sur la grille du rasoir (2) et appliquez-le sur
le corps du rasoir jusqu’à entendre « clic » pour l’agrafer.
•
Sélectionnez la hauteur de coupe souhaitée (différentes
hauteurs de coupe : 1,2mm / 2,8mm / 4,4mm / 6mm) en
utilisant l’accessoire hauteur de coupe (8) (e). Puis faites
glisser la tondeuse rotative (4).
•
Mettez en marche et taillez la barbe dans le sens opposé
de la pousse du poil en maintenant le peigne transparent
contre la peau.
•
L’accessoire « barbe de 3 jours » (10) est parfait pour avoir
et maintenir constamment une barbe de 3 jours. Attachez
l’accessoire « barbe de 3 jours » de la même façon que le
sabot (7). Faites coulisser la tondeuse rotative et utilisez
l’appareil comme vous le montre précédemment l’illustra-
tion (f). L’accessoire « barbe de 3 jours » vous assure un
angle de rasage optimum.
Nettoyage
Un nettoyage régulier assure une meilleure performance de
rasage. Le nettoyage de la tête du rasoir à l’eau courante
après chaque rasage est un moyen efficace et rapide pour
le garder propre :
•
Mettez en marche le rasoir (sans le fil) et rincez la tête du
rasoir sous l’eau chaude (g). Vous pouvez utiliser un peu
de savon doux naturel qui ne contient ni particules ni
substance abrasives. Rincez la mousse et laissez le rasoir
en marche pendant quelques secondes.
•
Ensuite, arrêtez le rasoir puis enlevez la grille du rasoir et
le bloc couteau, et laissez sécher.
•
Si vous nettoyez régulièrement votre rasoir sous l‘eau
courante, appliquez une goutte d‘huile sur la tondeuse et
la grille du rasoir (i) toutes les semaines.
Vous pouvez également nettoyer le rasoir à sec en utilisant
la brossette (h) :
•
Arrêtez le rasoir et enlevez la grille.
•
A l’aide de la brossette, nettoyez le bloc couteau et la tête
du rasoir. Cependant, ne nettoyez pas la grille de rasage
avec la brossette, cela risque de l’abîmer.
12
5730423_Cruzer2838.indd 125730423_Cruzer2838.indd 12 04.01.2007 9:14:50 Uhr04.01.2007 9:14:50 Uhr

Entretien du rasoir
Remplacement des pièces de rasage
Pour conserver 100% de la performance de votre rasoir,
remplacez la grille et le bloc-couteaux tous les 18 mois.
Changez les 2 pièces en même temps pour vous assurer
d’un rasage de plus près avec moins d’irritations.
(Références Grille et bloc-couteau : 2000 series)
Entretien de la batterie
Afin de conserver la capacité maximum de la batterie
rechargeable, le rasoir doit être complètement déchargé (en
se rasant) environ tous les 6 mois. Puis rechargez le rasoir à
sa pleine capacité.
Respect de l’environnement
Ce produit contient des batteries rechargeables. Afin
de protéger l’environnement, ne jetez jamais l’appareil
dans les ordures ménagères à la fin de sa durée de
vie. Remettez-le à votre centre service agréé Braun ou
déposez-le dans des sites de récupération appropriés
conformément aux réglementations locales ou nationales
en vigueur.
Sujet à toute modification sans préavis.
Cet appareil est conforme aux normes Européennes
fixées par les Directives 89/336/EEC et la directive
Basse Tension 73/23/EEC.
Voir les spécifications électriques mentionnées sur
l’adaptateur basse tension.
13
5730423_Cruzer2838.indd 135730423_Cruzer2838.indd 13 04.01.2007 9:14:51 Uhr04.01.2007 9:14:51 Uhr

Polski
Nasze wyroby spełniają najwyższe wymagania dotyczące
jakości, funkcjonalności i wzornictwa.
Życzymy satysfakcji z użytkowania nowej golarki marki
Braun.
Ostrzeżenie
Golarka jest dostarczana wraz ze specjalnym kablem
wyposażonym w wbudowany zasilacz dostarczający
bezpieczne, niskie napięcie. Elementów kabla nie wolno
wymieniać ani modyfikować, ponieważ grozi to porażeniem
prądem elektrycznym.
Korzystając z golarki do golenia innych części ciała, należy
pamiętać, aby naciągnąć skórę.
Ze względów higienicznych golarki powinna używać tylko
jedna osoba.
Opis
1 Ochronna osłona na folię golącą
2 Folia goląca
3 Blok ostrzy tnących
4 Obrotowa końcówka do modelowania
4a Szeroka końcówka do modelowania (28 mm)
4b Wąska końcówka do modelowania (14 mm)
5 Kontrolka ładowania
6 Wyłącznik
7 Nasadka do przystrzygania
8 Przycisk do ustawiania długości zarostu
9 Specjalny kabel sieciowy
10 Nasadka do krótkiego zarostu
11 Baza do ∏adowania
Ładowanie
Ładowanie akumulatorów powinno przebiegać w tempera-
turze otoczenia od 15 °C do 35 °C.
Golarki nie należy wystawiać na długotrwałe działanie
temperatur powyżej 50 °C.
•
Wyłączoną golarkę należy podłączyć do gniazdka
sieciowego przy użyciu specjalnego kabla.
•
Pierwsze ładowanie akumulatorów powinno trwać
nieprzerwanie 4 godziny. Podczas ładowania świecie się
zielona kontrolka (5). Gdy akumulatory zostaną całkowicie
naładowane, kontrolka gaśnie (może migać). Oznacza to,
że akumulatory są całkowicie naładowane.
•
W zależności od częstotliwości golenia, golarka z
całkowicie naładowanymi akumulatorami może pracować
bez zasilania sieciowego do 30 minut.
14
5730423_Cruzer2838.indd 145730423_Cruzer2838.indd 14 04.01.2007 9:14:52 Uhr04.01.2007 9:14:52 Uhr

•
Po zakończeniu ładowania, akumulatory należy
rozładować poprzez normalne użytkowanie golarki.
Następnie należy całkowicie naładować akumulatory.
Każde kolejne ładowanie trwa około 1 godziny.
•
Pełną pojemność akumulatorów uzyskuje się dopiero po
kilku cyklach ładowania/rozładowania.
•
5-minutowe szybkie ładowanie wystarcza na jednorazowe
golenie.
Golenie
Najpierw należy zdjąć nasadkę do przystrzygania (7):
Kciukami naciśnij boczne zaciski nasadki do przystrzygania
tak, aby odchyliły się w kierunku oznaczonym na rysunku
strzałkami (a). Włącz golarkę włącznikiem (6). Sprężysta folia
automatycznie dopasuje się do powierzchni Twojej skóry,
zapewniając dokładne i płynne golenie.
Aby osiągnąć najlepsze efekty:
•
Należy zawsze golić się przed umyciem twarzy.
•
Golarkę należy przez cały czas trzymać przy skórze pod
odpowiednim kątem (90°) (b).
•
Skórę należy naciągnąć i golić pod włos.
•
W ramach wstępnego golenia po kilku dniach przerwy w
goleniu należy użyć szerokiej końcówki do modelowania
(4a), aby wstępnie skrócić długie włosy. Pozostały zarost
można dokładnie i płynnie zgolić folią.
•
Aby zapewnić 100 proc. skuteczność golenia, folię i
głowicę golarki należy wymieniać minimum co 18 miesięcy
lub gdy części te zużyją się.
Urządzenie jest przystosowane do użytku podczas
kąpieli lub pod prysznicem. W przypadku używania
golarki pod prysznicem zalecamy nałożyć na skórę
piankę lub żel do golenia.
Korzystanie z obrotowej końcówki do modelowania (4)
Szeroka końcówka do modelowania (4a) równomiernie
skraca i przystrzyga większe obszary zarostu (c).
Idealnie nadaje się do modelowania baków, wąsów i krótkich
bródek. Szeroka końcówka do modelowania posiada
zapewniający bezpieczeństwo kształt ostrza i specjalny
pasek zapobiegający podrażnieniom i ułatwiający płynne
ruchy. Aby wysunąć obrotową końcówkę (4), naciśnij
niebieską strzałkę.
Naciągnij skórę i zacznij przycinać zarost prowadząc golarkę
pod włos.
15
5730423_Cruzer2838.indd 155730423_Cruzer2838.indd 15 04.01.2007 9:14:52 Uhr04.01.2007 9:14:52 Uhr

Wąska końcówka do modelowania (4b) pozwala precyzyjnie
wymodelować linie i krawędzie (d), przez co idealnie nadaje
się do dokładnego modelowania zarostu.
Aby użyć wąskiej końcówki, wysuń szeroką końcówkę i obróć
ją o 180°.
Częste używanie z końcówki do modelowani (4) zmniejszy
czas działania golarki bez zasilania po naładowaniu
akumulatorów.
Korzystanie z nasadek do przystrzygania (7) i (10)
•
Nasadka do przystrzygania (7) idealnie nadaje się do
przystrzygania brody i regularnego utrzymywania jej
w odpowiedniej długości.
•
Załóż nasadkę do przystrzygania na folię golącą (2) i
dociśnij ją do obudowy golarki aż zablokuje się we
właściwym położeniu.
•
Naciśnij przycisk ustawiania długości zarostu Press (8)
(e) i przesuń go w górę, aby ustawić pożądaną długość
zarostu (dostępne ustawienia długości zarostu od
największej do najmniejszej: 1,2 mm, 2,8 mm, 4,4 mm,
6 mm). Wysuń końcówkę do modelowania (4).
•
Włącz golarkę i zacznij przystrzygać zarost pod włos,
przesuwając przeźroczystą nasadkę grzebieniową po
skórze.
•
Nasadka do krótkiego zarostu (10) idealnie nadaje się do
pielęgnacji i utrzymywania krótkiego zarostu. Aby użyć tej
nasadki, zamocuj ją w podobny sposób, jak nasadkę do
przystrzygania (7), wysuń końcówkę do modelowania i
zacznij przystrzygać zarost tak, jak przedstawiono to na
rys. (f). Nasadka do krótkiego zarostu zapewnia golenie
pod optymalnym kątem.
Czyszczenie
Regularne czyszczenie zapewnia lepsze efekty golenia.
Opłukanie głowicy golącej pod bieżącą wodą po każdym
goleniu pozwala w łatwy i szybki sposób utrzymać golarkę
w czystości:
•
Włącz golarkę (przy wyłączonym zasilaniu z sieci) i opłucz
głowicę golącą pod strumieniem gorącej wody (g). Do
mycia golarki można także użyć mydła z naturalnymi
składnikami pod warunkiem, że nie zawiera ono żadnych
drobnych cząstek stałych ani środków ścierających. Spłucz
resztki piany i odczekaj kilka sekund, zanim wyłączysz
golarkę.
•
Następnie wyłącz golarkę, zdejmij folię i blok ostrzy
tnących, a potem poczekaj aż rozłożone części wyschną.
16
5730423_Cruzer2838.indd 165730423_Cruzer2838.indd 16 04.01.2007 9:14:53 Uhr04.01.2007 9:14:53 Uhr

•
Jeśli regularnie czyścisz golarkę pod bieżącą wodą, raz na
tydzień nasmaruj trymer do długich włosów i folię golącą
niewielką ilością lekkiego oleju do maszyn do szycia (i).
Ewentualnie możesz także oczyścić golarkę dołączoną do
zestawu szczoteczką (h):
•
Wyłącz golarkę i zdejmij folię golącą.
•
Oczyść szczoteczką blok ostrzy tnących oraz wnętrze
głowicy golarki. Folii golącej nie należy czyścić
szczoteczką, ponieważ grozi to jej uszkodzeniem.
Konserwacja
Wymiana części golących
Aby zapewnić 100 proc. skuteczność golenia, folię i głowicę
golarki należy wymieniać minimum co 18 miesięcy lub
gdy części te zużyją się. Obie części należy wymienić
jednocześnie, co zapewni dokładniejsze golenie i zmniejszy
ryzyko podrażnień skóry.
(Folia goląca i blok ostrzy tnących: seria 2000)
Użytkowanie akumulatorów
Aby utrzymać optymalną pojemność akumulatorów, należy je
całkowicie rozładować (poprzez golenie) w przybliżeniu raz
na 6 miesięcy. Następnie, akumulatory należy ponownie
całkowicie naładować.
Uwagi dotyczàce ochrony Êrodowiska
Urzàdzenie to wyposa˝one jest w baterie przystoso
wane do wielokrotnego ∏adowania. Aby zapobiec
zanieczyszczaniu Êrodowiska, pod koniec okresu
eksploatacji produktu nie wyrzucaj go do kosza na
Êmieci. Mo˝esz pozostawiç go w punkcie serwisowym marki
Braun lub jednym ze specjalnych punktów zajmujàcych si´
zbiórkà zu˝ytych produktów w wybranych miejscach na
terenie kraju.
Zastrzega si´ mo˝liwoÊç wprowadzania zmian.
Produkt ten spe∏nia wymogi dyrektywy EMC
89/336/EEC oraz dyrektywy 73/23 EEC dotyczàcej
elektrycznych urzàdzeƒ niskonapi´ciowych.
Dane elektryczne mo˝na znale˝ç na tabliczce znamionowej
specjalnego zestawu sieciowego.
17
5730423_Cruzer2838.indd 175730423_Cruzer2838.indd 17 04.01.2007 9:14:53 Uhr04.01.2007 9:14:53 Uhr

Ćeský
Naše výrobky jsou navrženy tak, aby splňovaly nejvyšší
nároky na kvalitu, funkčnost a design. Doufáme, že budete se
svým novým holicím strojkem Braun plně spokojeni.
Upozornění
Tento holicí strojek je vybaven speciálním přívodem s integro-
vaným bezpečnostním síťovým adaptérem. Proto nesmíte
žádnou jeho část měnit, ani ji rozebírat. Jinak by mohlo dojít
k úrazu elektrickým proudem.
Při použití na různých partiích těla dbejte na to, abyste drželi
pokožku napjatou.
Z hygienických důvodů nepoužívejte tento strojek spolu
s jinými osobami.
Popis
1 Ochranný kryt planžety
2 Holicí planžeta
3 Břitový blok
4 Otočný tvarovač
4a Široká lišta tvarovače (28 mm)
4b Úzká lišta tvarovače (14 mm)
5 Kontrolky nabíjení
6 Spínač zapnutí/vypnutí
7 Zastřihovací nástavec
8 Volič délky vousu
9 Speciální síťový přívod
10 Nástavec pro krátký vous
11 Stav nabití
Nabíjení
Optimální teplota prostředí pro nabíjení je 15 °C až 35 °C.
Nevystavujte holicí strojek teplotám vyšším než 50 °C po
delší dobu.
•
Pomocí speciálního síťového přívodu připojte holicí strojek
k zásuvce elektrické sítě, přičemž motor strojku musí být
vypnutý.
•
Při prvním nabíjení nechejte strojek nabíjet nepřetržitě
4 hodiny. Zelená kontrolka nabíjení (5) ukazuje, že se
holicí strojek nabíjí. Když je baterie plně nabita, kontrolka
nabíjení začne přerušovaně blikat. To indikuje, že baterie
je nabita na plnou kapacitu.
•
Plné nabití umožňuje až 30 minut holení bez síťového
přívodu, v závislosti na vzrůstu vousů.
•
Pokud je strojek plně nabitý, používejte jej, dokud se zcela
nevybije. Pak jej opět nabijte na plnou kapacitu. Následná
nabíjení trvají přibližně 1 hodinu.
18
5730423_Cruzer2838.indd 185730423_Cruzer2838.indd 18 04.01.2007 9:14:53 Uhr04.01.2007 9:14:53 Uhr

•
Maximální kapacita baterie bude dosažena až po několika
cyklech nabití/vybití.
•
5-minutové rychlonabíjení je dostatečné pro oholení.
Holení
Nejprve sejměte zastřihovací nástavec (7): Palci zatlačte proti
bočním klipsům zastřihovacího nástavce, takže se uvolní ve
směru šipek (a). Zapněte spínač zapnutí/vypnutí (6).
Pohyblivý rámeček holicí planžety se automaticky
přizpůsobuje povrchu obličeje, a zajišťuje tak perfektní,
hladké oholení.
Pro optimální výsledky:
•
Holte se vždy před tím, než si budete mýt obličej.
•
Vždy držte holicí strojek v pravém úhlu (90°) k pokožce (b).
•
Pokožku napněte a holte se proti směru růstu vousů.
•
Chcete-li nejprve zkrátit vous, pokud jste se několik dní
neholili, použijte širokou lištu tvarovače (4a) pro zastřižení
dlouhých vousů, a pak se teprve oholte dohladka holicí
planžetou.
•
Aby se udržel 100% holicí výkon, vyměňte holicí planžetu
a břitový blok nejpozději každých 18 měsíců, nebo jakmile
se opotřebují.
Tento strojek je vhodný pro použití ve vaně nebo
sprše. Při použití ve sprše doporučujeme použít pěnu
nebo gel na holení.
Použití otočného tvarovače (4)
Široká lišta tvarovače (4a) rovnoměrně zastřihuje větší partie
(c). Je ideální pro tvarování kotlet, kníru a částečně krátkých
vousů. Tento široký tvarovač je vybaven ochrannými zoubky
a kluzným páskem pro menší podráždění a snadné klouzání
po pokožce. Zatlačte na modré proužky, aby se otočný
tvarovač (4) vysunul.
Napínejte pokožku a veďte širokou lištu tvarovače proti
směru růstu vousů.
Úzká lišta tvarovače (4b) přesně definuje linie a okraje (d),
takže je ideální pro přesné tvarování kontur.
Abyste tuto úzkou lištu mohli použít, vysuňte tvarovač a
otočte jej o 180°.
Časté použití tvarovače (4) snižuje kapacitu baterií.
Použití zastřihovacích nástavců (7) a (10)
•
Zastřihovací nástavec (7) je ideální pro zastřihování
plnovousu a udržování jeho délky.
19
5730423_Cruzer2838.indd 195730423_Cruzer2838.indd 19 04.01.2007 9:14:54 Uhr04.01.2007 9:14:54 Uhr

•
Nasaďte zastřihovací nástavec na holicí planžetu (2) a
namáčkněte jej proti tělu holicího strojku, až zaklapne na
svém místě.
•
Stiskněte volič délky vousu (8) (e) a posunutím nahoru
nastavte požadovanou délku vousu (nastavení délky od
shora dolů 1,2 mm, 2,8 mm, 4,4 mm, 6 mm). Vysuňte
tvarovač (4).
•
Zapněte spínač zapnutí/vypnutí a zastřihujte vousy proti
směru jejich růstu tak, že vedete průhlednou část hřebenu
po pokožce.
•
Nástavec pro krátký vous (10) se perfektně hodí pro
vytvoření a udržování vzhledu «strniště». Nasaďte
nástavec pro krátký vous stejným způsobem, jako
zastřihovací nástavec (7). Vysuňte tvarovač a použijte
strojek, jak je znázorněno na obrázku (f). Nástavec pro
krátký vous zajišťuje optimální úhel při zastřihování.
Čištěni
Pravidelné čištění zajišťuje lepší holicí výkon. Opláchnutí
holicí hlavy po každém holení představuje snadný a rychlý
způsob, jak udržovat strojek v čistotě:
•
Zapněte holicí strojek (bez síťového přívodu) a opláchněte
holicí hlavu pod horkou tekoucí vodou (g). Můžete také
použít přírodní mýdlo, pokud neobsahuje žádné částečky
nebo abrazivní substance. Opláchněte všechnu pěnu a
nechejte holicí strojek několik sekund běžet.
•
Pak holicí strojek vypněte, sejměte holicí planžetu a břitový
blok. Nechejte rozebrané holicí díly vyschnout.
•
Pokud holicí strojek pravidelně umýváte pod vodou,
aplikujte jednou týdně kapku jemného oleje pro šicí stroje
na zastřihovač dlouhých vousů a holicí planžetu (i).
Alternativně můžete holicí strojek čistit pomocí přiloženého
kartáčku (h):
•
Vypněte holicí strojek. Sejměte holicí planžetu.
•
Pomocí kartáčku vyčistěte břitový blok a vnitřní prostor
holicí hlavy. Kartáčkem však nečistěte holicí planžetu,
neboť by se tím mohla poškodit.
Udržování holicího strojku ve špičkové formě
Výměna holicích dílů
Aby se udržel 100% holicí výkon, vyměňte holicí planžetu a
břitový blok každých 18 měsíců, nebo jakmile se opotřebují.
Oba tyto díly vyměňujte současně, abyste dosáhli hladšího
oholení a menšího podráždění pokožky.
(Holicí planžeta a břitový blok: série 2000)
20
5730423_Cruzer2838.indd 205730423_Cruzer2838.indd 20 04.01.2007 9:14:54 Uhr04.01.2007 9:14:54 Uhr
