Braun Multiquick 5 K 700 black: instruction
Class: Small Household Appliances
Type: Food Processor
Manual for Braun Multiquick 5 K 700 black
92266253_K700_S01.indd 1
21.05.12 14:16
Stapled booklet, 210 x 297 mm, 116 pages (incl. 8 pages cover), 1/1c = black

Deutsch
6, 111
English
12, 111
Français
18, 111
Español
24, 111
Português
30, 111
Italiano
36, 112
Nederlands
42, 112
Dansk
48, 112
Norsk
54, 112
Svenska
60, 112
Suomi
66, 112
Polski
72, 112
Türkçe 78
Ελληνικά
84, 113
Русский
90, 113
Українська
96, 114
110, 105
Braun GmbH
Frankfurter Straße 145
61476 Kronberg/Germany
www.braun.com
92266253/V-12
DE/UK/FR/ES/PT/IT/NL/DK/NO/SE/FI/
PL/TR/GR/RU/UA/Arab
Braun Infolines
DE / AT
00 800 27 28 64 63
00 800 BRAUNINFOLINE
CH
08 44 - 88 40 10
UK
0800 783 7010
IE
1 800 509 448
FR
0 800 944 802
BE
0 800 14 592
ES
901 11 61 84
PT
808 20 00 33
IT
(02) 6 67 86 23
NL
0 800-445 53 88
DK
70 15 00 13
NO
22 63 00 93
SE
020 - 21 33 21
FI
020 377 877
PL
801 127 286
801 1 BRAUN
TR
0 800 261 63 65
RU
8 800 200 20 20
UA
0 800 505 000
HK 852-25249377
(Audio Supplies Company Ltd.)
www.service.braun.com
92266253_K700_S02.indd 1
21.05.12 14:19
8 9 7 14 2 1 3 6 13 5 4 10 12 11a 11 23 22 16 17 18 19 20 21 15
e
b
a
d
c
K700-750 KURTZ DESIGN 30.03.10
4
92266253_K700_S04.indd 1
21.05.12 14:17
e
b
a
d
c
K 700
(a)
(b)
(c)
(d)
(e)
K 700 Format 184 x 198 mm KURTZ DESIGN 03.02.10
5
92266253_K700_S05.indd 1
21.05.12 14:22

6
Deutsch
Unsere Produkte werden hergestellt,
um höchste Ansprüche an Qualität,
Funktionalität und Design zu erfüllen.
Wir wünschen Ihnen mit Ihrem neuen
Braun Gerät viel Freude.
Lesen Sie bitte die Gebrauchsanwei-
sung sorgfältig und vollständig, bevor
Sie das Gerät in Betrieb nehmen.
Vorsicht
•
Die Schneiden der Messer
l
/
n
sind sehr scharf!
Die Messer nur am Knauf anfassen.
Nach Gebrauch immer erst das Mes-
ser aus den Behältern
7
/
j
nehmen
und erst dann das verarbeitete Gut
ausleeren.
• Die Netzspannung muss mit der
Spannungsangabe auf der Boden -
platte des Gerätes übereinstimmen.
Nur an Wechselspannung anschließen.
• Dieses Gerät gehört nicht in Kinder-
hände.
• Kinder oder Personen mit einge-
schränkten physischen, sensorischen
oder geistigen Fähigkeiten dürfen
dieses Gerät nicht benutzen, es sei
denn, sie werden durch eine für ihre
Sicherheit zuständige Person beauf-
sichtigt. Wir empfehlen außerdem, das
Gerät außer Reichweite von Kindern
aufzubewahren sowie sicherzustellen,
dass Kinder nicht mit dem Gerät
spielen.
• Das Gerät ist nur zum Gebrauch
im Haushalt und zur Verarbeitung
der angegebenen Mengen bestimmt.
• Keines der Teile im Mikrowellen-Herd
verwenden.
• Achten Sie darauf, dass Sie mit
den Fingern nicht an die laufenden
Antriebe kommen. Versehen Sie den
jeweils freien Antriebsplatz mit der
Schutzabdeckung
m
, da nach dem
Einschalten beide Antriebe gleichzeitig
laufen.
• Gerät nicht unbeaufsichtigt arbeiten
lassen.
• Braun Geräte entsprechen den ein-
schlägigen Sicherheitsbestimmungen.
Reparaturen und das Auswechseln der
Anschlussleitung dürfen nur autori-
sierte Fachkräfte vornehmen. Durch
un sach gemäße Reparaturen können
er hebliche Gefahren für den Benutzer
entstehen.
• Aufbewahrung des Gerätes nur bei
abgeschaltetem Motor und bei gezo-
genem Netzstecker.
Technische Daten
• Spannung/Leistung: siehe Typenschild
auf der Bodenplatte des Gerätes.
• Betriebsdauer und max. Füllmenge:
siehe Verarbeitungsangaben.
Gerätebeschreibung
Die Braun Multiquick 5 mit dem 2-Topf-
System erfüllt höchste Ansprüche beim
Kneten, Rühren, Mischen, Mixen, Hacken
und Zerkleinern, Schneiden, Raspeln
und Reiben. Für eine optimale Verarbei-
tung stehen Ihnen zwei verschiedene
Arbeitsbehälter zur Verfügung: die Uni-
versalschüssel
7
und der Zerkleinerer/
Mixer
j
.
Somit haben Sie beim Zerkleinern, Mixen
oder Pürieren die Wahl zwischen einem
großen und einem kleinen Arbeits-
behälter. Praktisch ist außerdem das
mögliche Zuarbeiten vom kleinen Behäl-
ter in den großen (z. B. Nüsse hacken für
Nusskuchenteig). Es kann immer nur ein
Arbeitsbehälter betrieben werden.
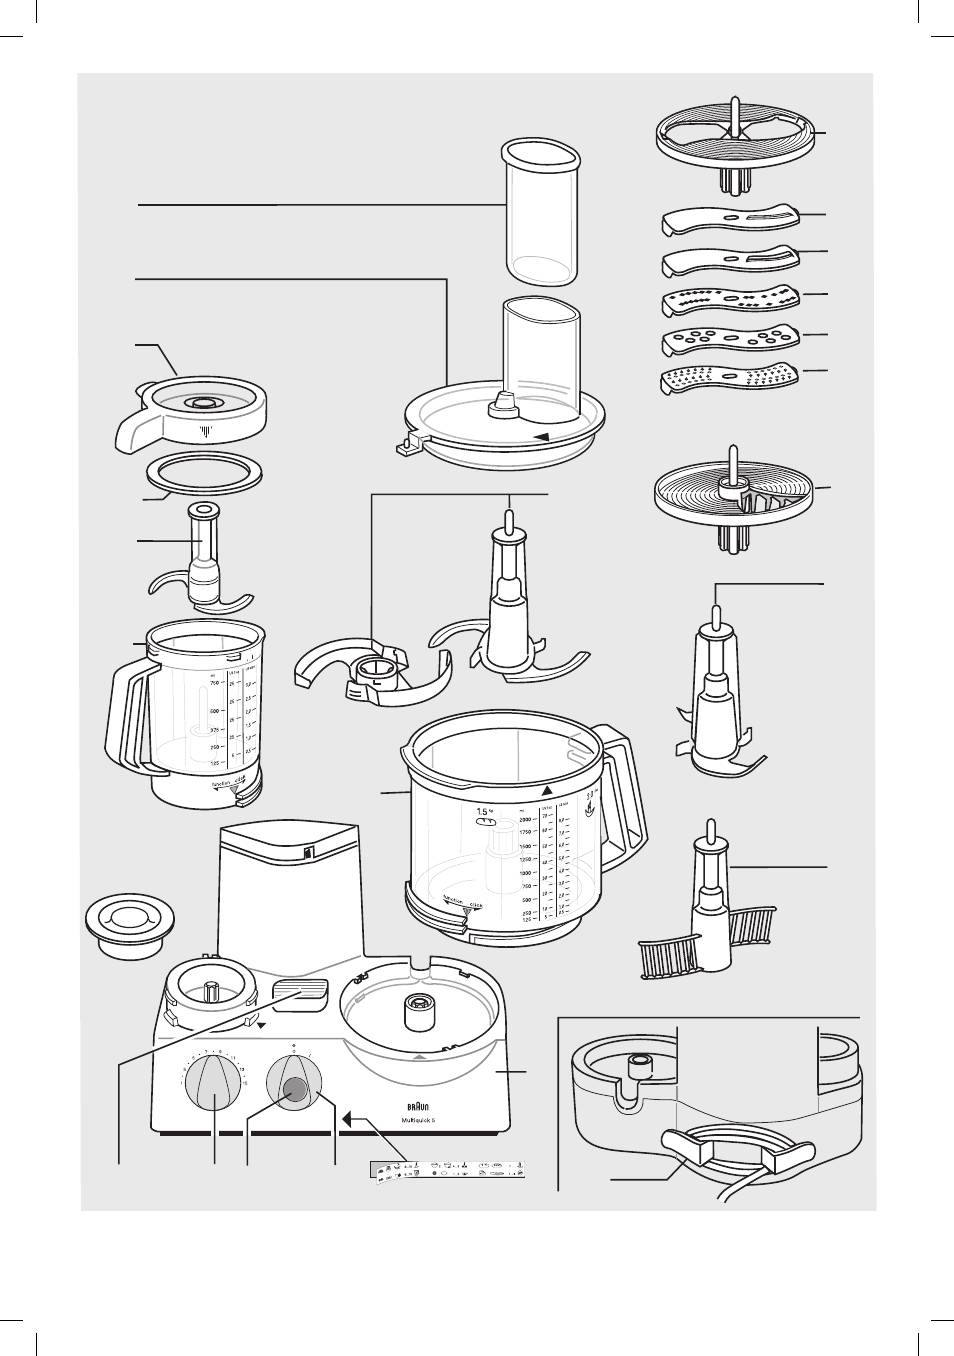
1
Motorblock
2
Kabelaufwicklung
3
Ein-/Ausschalter
(Ein = «I», Aus = «O»)
4
Momentschaltung «
P
»
5
Stufenloser Geschwindigkeits regler
(1-15)
6
Sicherheitsriegel
(verhindert das gleichzeitige Betrei-
ben beider Arbeitsbehälter)
7
Universalschüssel (2 l Füllmenge)
8
Deckel für Universalschüssel
7
9
Stopfer für Deckel
8
j
Zerkleinerer/Mixer für kleine Mengen
(0,75 l Füllmenge)
q
Deckel für Zerkleinerer/Mixer
j
ß
11a
Dichtungsring für Deckel
q
l
Messer für Zerkleinerer/Mixer
j
m
Schutzabdeckung für den freien
Antriebsplatz
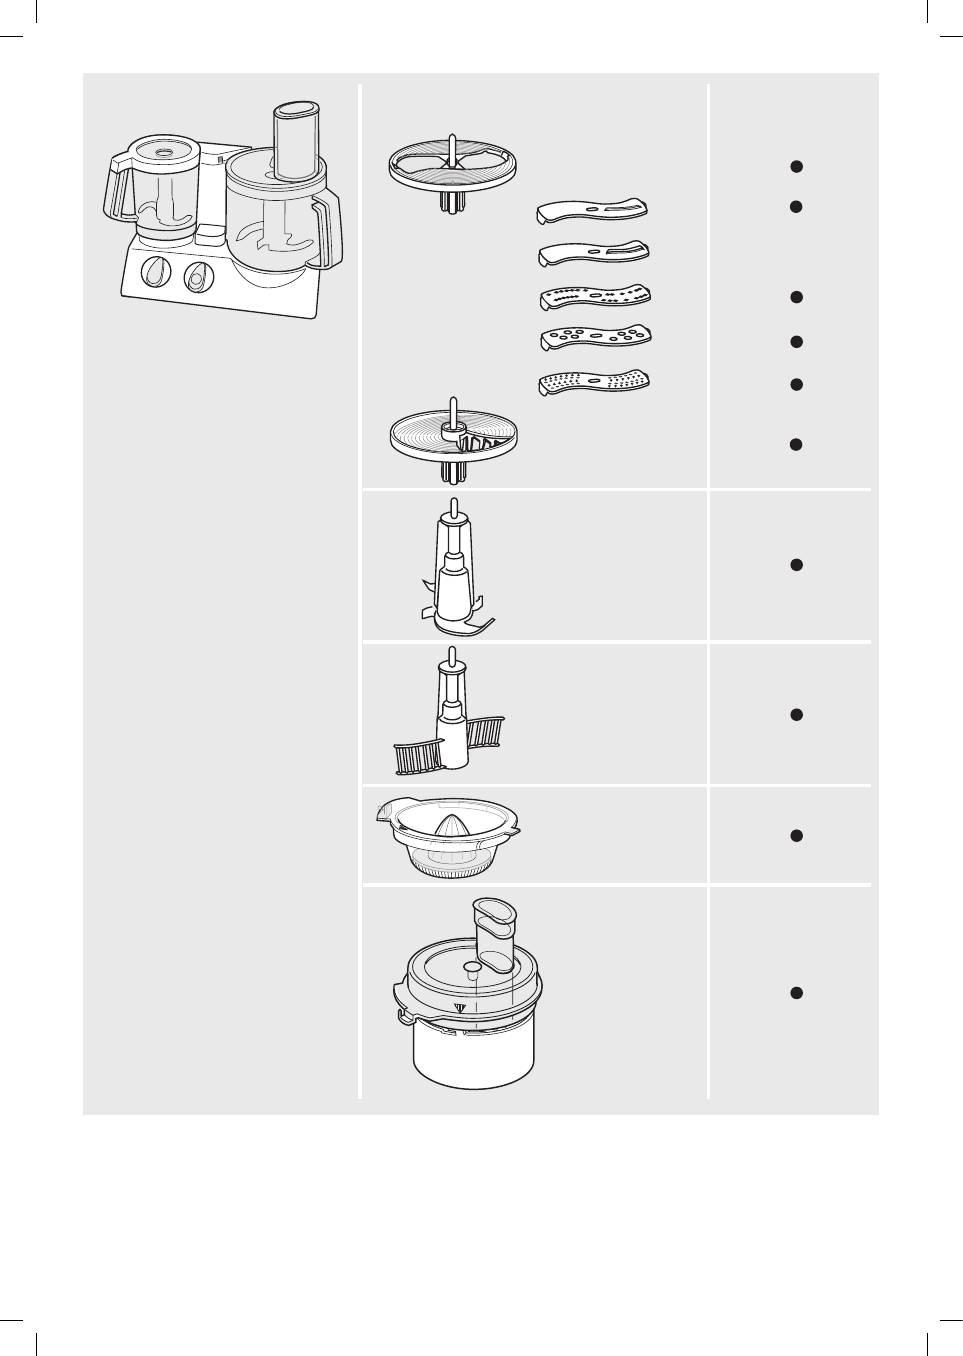
Arbeitseinsätze
für die Universalschüssel
7
(wichtig: Nicht alle Arbeitseinsätze
gehören bei allen Modellen zur serien-
mäßigen Ausstattung.)
n
Messer für Universalschüssel
7
mit Messerschutz
o
Einsatzträger
p
Feiner Schneideinsatz – a
q
Grober Schneideinsatz – b
r
Feiner Raspeleinsatz – c
s
Grober Raspeleinsatz – d
t
Reibeinsatz – e
u
Pommes-frites-System
v
Knethaken
w
Quirl
Hinweis: Reinigen Sie vor dem Erstge-
brauch alle Teile wie unter «Reinigung»
beschrieben.
Überlastungsschutz
Um Schäden durch Überhitzung zu
vermeiden, ist dieses Gerät mit einem
automatischen Sicherheitsschalter ver-
sehen, der bei Bedarf die Stromzufuhr
unterbricht. Stellen Sie in diesem Fall
den Schalter
3
auf «O» und lassen Sie
das Gerät ca. 15 Minuten abkühlen,
bevor Sie es wieder einschalten.
Momentschaltung «
P
»
Die Momentschaltung
4
ist z. B. für
folgende Verarbeitungen hilfreich:
• Hacken von empfindlichen und wei-
chen Gütern, z. B. Eier, Zwiebeln oder
Petersilie.
• Vorsichtiges Unterheben von Mehl in
Teige, ohne deren schaumige Struktur
zu zerstören.
• Einarbeiten von Eischnee oder Sahne
in feste Massen.
Die Momentschaltung «
P
»
be tätigen
Sie durch Drücken der blauen Taste
4
bei Schalterstellung «O».
Die Geschwindigkeit können Sie vorab
durch Einstellen des Geschwindigkeits-
reglers
5
wählen. Beim Loslassen der
Taste
4
schaltet das Gerät ab.
Empfohlene
Geschwindigkeitsbereiche
für einzelne Arbeitseinsätze
Die Geschwindigkeitsbereiche sind mit
dem stufenlosen Geschwindigkeitsregler
5
zu wählen. Es empfiehlt sich, zuerst
die Geschwindigkeit zu wählen und erst
dann das Gerät einzuschalten (Ein-/Aus-
schalter
3
), um gleich mit der gewün-
sch ten Geschwindigkeit arbeiten zu
können.
Arbeitseinsätze Geschwindigkeit
Knethaken 7
Messer
l
und
n
6 - 15
Quirl bei Eiweiß
4 - 5
Quirl bei Sahne
2
Schneid-, Reib-, Raspeleinsätze 1 - 8
Pommes-frites-System
1 - 2
(siehe auch Geräte-Sticker)
Arbeiten
mit dem 2-Topf-System
Es kann immer nur ein Arbeitsbehälter
betrieben werden.
Der nicht benutzte Arbeitsbehälter
– muss sich in angehobener Position
befinden (Pfeil auf Pfeil)
– kann auch weiter in Pfeilrichtung
«click» gedreht und dort eingerastet
werden.
Wenn die Pfeilmarkierungen überein-
stimmen, kann der Arbeitsbehälter abge-
nommen werden. Aus Sicherheitsgrün-
den muss der freie Arbeitsplatz dann
mit der Schutzabdeckung
m
versehen
werden.
Doppeltes Sicherheitssystem
Der Motor lässt sich nur einschalten,
wenn der jeweilige Arbeitsbehälter mit
Deckel richtig eingerastet ist. Wird der
Deckel während des Betriebs geöffnet,
schaltet sich das Gerät automatisch ab,
auch wenn der Schalter
3
noch auf «I»
steht. Um unbeabsichtigtes Einschalten
zu vermeiden, drehen Sie den Schalter
auf «O».
92266253_K700_S06-116.indd 6
21.05.12 14:10
7
Aufsetzen der
Arbeitsbehälter
Die Universalschüssel
7
wird auf dem
großen Antriebsplatz des Motorblocks
1
betrieben, der Zerkleinerertopf
j
auf
dem kleinen.
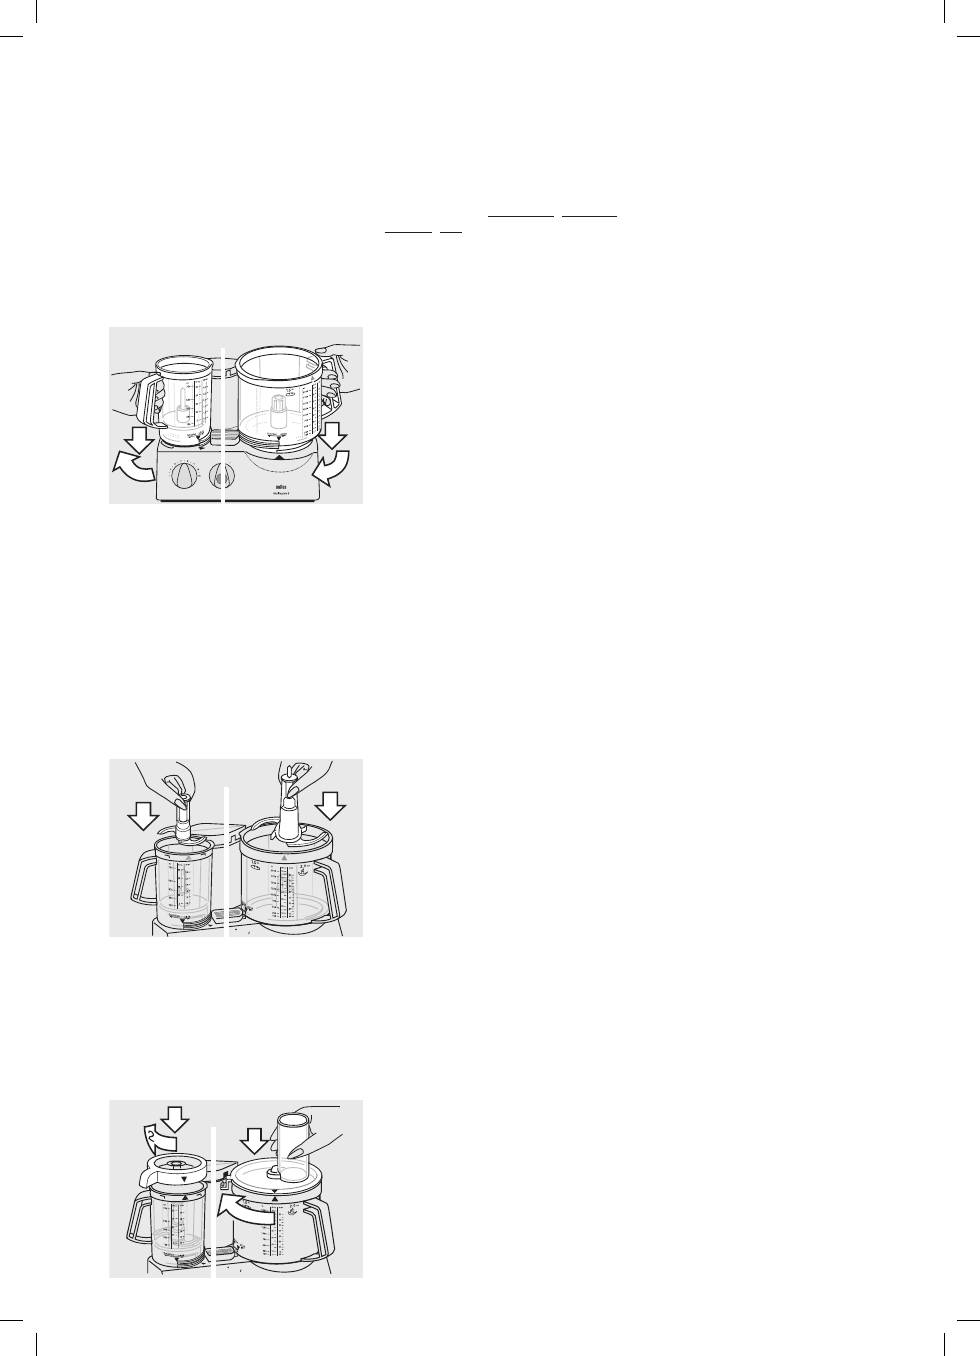
1. Setzen Sie den betreffenden Arbeits-
behälter bei ausgeschaltetem Motor so
auf den jeweiligen Antriebsplatz, dass die
Pfeilmarkierungen auf dem Motorblock
und dem Arbeitsbehälter übereinstim-
men (A).
1
2
1
2
A
pulse
off/0
B
pulse
off/0
1
1
2
C
Dann drehen Sie den Arbeitsbehälter in
Pfeilrichtung «function» bis zum
Anschlag. Der Arbeitsbehälter bewegt
sich dabei nach unten.
Der Arbeitsbehälter auf dem anderen
Antriebsplatz muss sich in angehobe -
ner Position befinden. Ist der andere
Antriebsplatz frei, versehen Sie ihn mit
der Schutzabdeckung
m
.
2. Den gewünschten Arbeitseinsatz
(siehe Beschreibung im Folgenden) bis
zum Anschlag in den Arbeitsbehälter
einsetzen (B).
Beim Einsetzen des Messers
l
in den
Zerkleinerertopf
j
ist darauf zu achten,
dass das Messer hörbar einrastet.
3. Den Deckel so auf den Arbeitsbehäl -
ter setzen, dass der Pfeil auf dem Deckel
mit dem Pfeil auf dem Arbeitsbehälter
übereinstimmt (C).
Drehen Sie den Deckel dann im Uhrzei-
gersinn, bis sich die Nase am Deckel
in die Sicherheitsverschlussöffnung am
Motorblock
1
schiebt und hörbar ein -
rastet.
Hinweis: Der Deckel
q
für den Zerklei-
nerertopf
j
darf nur mit eingesetztem
Dichtungsring
ß
11a
aufgesetzt werden.
Abnehmen der
Arbeitsbehälter
Bei ausgeschaltetem Gerät den Deckel
gegen den Uhrzeigersinn drehen und
abnehmen. Den Arbeitsbehälter in Pfeil-
richtung «click» nach oben drehen, bis
die Pfeilmarkierungen auf dem Gerät
und dem Arbeitsbehälter übereinstim-
men. Arbeitsbehälter abnehmen.
Bei Entnahme des Messers aus dem
Arbeitsbehälter fassen Sie das Messer
am Knauf und ziehen Sie es heraus.
Vorsicht: Die Schneiden der Messer
sind sehr scharf!
Für das Messer
n
wird ein Messer -
schutz mitgeliefert. Falls Sie das Messer
nicht benutzen, setzen Sie es in den
Messerschutz.
Reinigung
Immer erst das Gerät ausschalten und
den Netzstecker ziehen.
Den Motorblock
1
nur mit einem feuch-
ten Tuch reinigen.
Alle Teile können in der Spülmaschine
gereinigt werden. Falls nötig, reinigen
Sie alle Teile vor dem Spülen gut mit
einem Spatel und einer Bürste.
Bei farbstoffreichen Gütern (z. B. Karot-
ten) können Kunststoffteile beschlagen.
Mit Speiseöl abwischen, bevor diese
Teile gereinigt werden.
Beim Deckel
q
des Zerkleinerers
j
ist
zum Reinigen zunächst der Dichtungs-
ring
ß
11a
herauszunehmen und nach dem
Reinigen wieder einzusetzen. Der Dich-
tungsring kann von beiden Seiten
verwendet werden.
Verwenden Sie keine scharfen Gegen-
stände zum Reinigen.
Vorsicht beim Reinigen der Arbeits-
einsätze und Messer – diese sind sehr
scharf!
Arbeiten in der
Universalschüssel
7
Setzen Sie beim Arbeiten mit der Uni-
versalschüssel die benötigten Arbeitsein-
sätze ein, bevor Sie Zutaten einfüllen.
1. Kneten
Zum Kneten kann sowohl der Knethaken
v
als auch das Messer
n
verwendet
werden. Beste Ergebnisse erzielen Sie
mit dem Knethaken, da dieser speziell
für die Zubereitung von Hefe-, Nudel-
und Mürbeteig konstruiert wurde.
Hefeteig (Brot/Kuchen)
Max. 500 g Mehl plus Zutaten
Geschwindigkeit 7, 1 ½ Minuten
Geben Sie zuerst das Mehl, dann die
übrigen Zutaten – außer der Flüssigkeit
– in die Universalschüssel
7
. Deckel
8
aufsetzen und einrasten, Geschwindig-
keit 7 einstellen und Motor einschalten.
Dann die erforderliche Flüssigkeit bei
laufendem Motor durch den Einfüll-
schacht im Deckel zugießen.
Bei der Verwendung des Messers
n
zum Kneten dürfen Zutaten, die nicht
stark zerkleinert werden sollen (wie z. B.
Rosinen, Zitronat und Mandeln) erst
nach dem Knetvorgang von Hand unter-
geknetet werden. Dazu den Teig aus der
Universalschüssel nehmen.
Nudelteig
Max. 500 g Mehl plus Zutaten
Geschwindigkeit 7, ca. 1 ½ Minuten
Geben Sie zuerst das Mehl, dann die
übrigen Zutaten – außer der Flüssigkeit –
in die Universalschüssel
7
.
Die erforderliche Flüssigkeitsmenge bei
laufendem Motor durch den Einfüll-
schacht im Deckel
8
zugießen.
Geben Sie nach der Ballenbildung des
Teiges keine Flüssigkeit mehr zu, da der
Teig die Flüssigkeit dann nicht mehr
gleichmäßig aufnehmen kann.
Mürbeteig
Max. 500 g Mehl plus Zutaten
Geschwindigkeit 7, ca. 1 Minute
Geben Sie zuerst das Mehl, dann die
übrigen Zutaten in die Universalschüssel.
Verwenden Sie keine zu harte, aber auch
keine zu weiche Butter. Deckel
8
aufset-
zen und einrasten, Geschwindigkeit 7
einstellen und Motor einschalten.
Sobald sich ein Ballen bildet, darf nur
noch kurz weitergeknetet werden, denn
durch zu langes Kneten wird der Teig zu
weich.
92266253_K700_S06-116.indd 7
21.05.12 14:10

8
2. Rühren
Zubereitung von Rühr- und Biskuitteig
mit dem Messer
n
Der Knethaken
v
ist für die Zubereitung
von Rühr- und Biskuitteig nicht geeignet.
Max. 500 g Mehl plus Zutaten
Rührteig
(auf 2 Arten)
Geschwindigkeit/Zeit
a) Zucker, Fett, Eier
schaumig schlagen 6 / ca. 1 Min.
dann Milch zugießen 6 / ca. 15 Sek.
und Mehl vorsichtig
mit der Momentstufe 15 / ca. 10-15 x
unterheben. «
P
»
b) Alle Zutaten außer
Flüssigkeit in die
Universalschüssel
geben.
15 / ca. 1 Min.
Flüssigkeit bei laufendem Motor
durch die Deckelöffnung zugießen.
Zutaten wie Rosinen zuletzt von Hand
unterrühren.
Biskuitteig
Geschwindigkeit/Zeit
Eier und ggfs. Wasser
schaumig schlagen
15 / ca. 2 Min.
Zucker hinzufügen
15 / ca. 4 Min.
Mehl vorsichtig
mit der Momentstufe
unterheben
8 / 5 x «
P
»
evtl. Kakao
hinzufügen.
8 / 3 x «
P
»
3. Mixen
Mixen von Suppen, Shakes usw. mit
dem Messer
n
Maximale Füllmenge 2 l
Geschwindigkeit ca. 10
(sonst kann es zum Überlaufen
kommen)
Zur Herstellung von Shakes das Obst in
Stücken einfüllen. Deckel
8
aufsetzen
und einrasten. Mit Geschwindigkeit 15
das Obst vorpürieren, dann Flüssigkeit
bei Geschwindigkeit 10 zugeben und fer -
tigmixen. Beim Mixen von Milch sollten
Sie beachten, dass diese aufschäumt.
Entsprechend weniger Milch verwenden.
4. Hacken
Hacken in der Universalschüssel
7
mit dem Messer
n
Hinweis: Zur Verarbeitung größerer
Mengen sollten Sie die Universalschüs-
sel
7
verwenden. Für die Verarbeitung
kleinerer Mengen empfehlen wir den
Zerkleinerer/Mixer
j
mit dem Messer
l
.
• Setzen Sie den gewünschten Einsatz
wie abgebildet (D) in den Einsatzträger
o
und rasten Sie ihn ein. Um den Ein-
satz zu entnehmen, drücken Sie das
unten herausstehende Ende des Ein-
satzes nach oben.
5. Schneiden, Raspeln und Reiben
Produkt
Max.
Vor-
Geschwin- Schalter-
Einschalt-
Menge
bereitung
digkeit
stellung
zeiten/-vorgänge
Brötchen
4 St.
geviertelt
15
l
45 Sekunden
trocken
Eiswürfel
28 St.
ganz
15
I
1 Minute (Schnee)
Äpfel
700 g
geviertelt
8
I
15 Sekunden
Schokolade 400 g
gebrochen
15
I
15 Sekunden grob
gekühlt
30 Sekunden fein
Eier
8 St.
ganz
6
«
P
»
8 mal
Käse (weich) 400 g
3 cm-Würfel
15
I
20 Sekunden
Käse (hart)
700 g
3 cm-Würfel
15
I
60-70 Sekunden
Fleisch
700 g
gewürfelt
15
I
40 Sekunden
Karotten
700 g
in Stücken
15
I
10 Sekunden
Zwiebeln
700 g
geviertelt
15
«
P
»
10 - 13 mal
Verarbeitungsbeispiele
Die Verarbeitungszeiten sind Richtwerte, die u. a. von der Beschaffenheit des Gutes,
der Verarbeitungsmenge und dem gewünschten Feinheitsgrad abhängen.
D
a
E
1
F
2
• Dann den Einsatzträger
o
auf die
Antriebsachse in der Universalschüs-
sel setzen (E).
• Deckel
8
aufsetzen und einrasten,
Geschwindigkeit wählen und das Gut
bei ausgeschaltetem Motor in den Ein-
füllschacht geben. Wir empfehlen, bei
ausgeschaltetem Gerät nachzufüllen.
• Nie bei laufendem Gerät in den Einfüll-
schacht greifen. Immer den Stopfer
9
zum Nachschieben nehmen (F).
Hinweis: Bei saftigen und weichen
Gütern erhalten Sie besonders gute
Ergebnisse, wenn Sie eine niedrige
Geschwindigkeit wählen. Harte Güter
sollten mit einer höheren Geschwindig-
keit verarbeitet werden.
Die Universalschüssel nicht überfüllen.
Feiner Schneideinsatz – a
p
Geschwindigkeit 1 - 2
Verarbeitungsbeispiele: Gurken, Kraut,
rohe Kartoffeln, Karotten, Zwiebeln,
Radieschen.
92266253_K700_S06-116.indd 8
21.05.12 14:10

9
Mixen und Pürieren
Produkt
Vor-
Geschwin- Schalter-
Einschalt-
bereitung
digkeit
stellung
zeiten/-vorgänge
Mixgetränke
Früchte zerkleinern
und vorpürieren.
Milch zugeben.
15
I
ca. 30 Sekunden
Babynahrung
in Stücken
15
P
10 mal
(z. B. Obst,
I
10 Sekunden
Gemüse)
Mayonnaise
1 Ei, Gewürze, Senf
15
I
30-45 Sekunden
mit Essig mischen.
Öl langsam durch
die Deckelöffnung
zufließen lassen.
Remouladen-
1 Ei, Gewürze, Senf
15
I
30-45 Sekunden
sauce
mit Essig mischen.
Öl langsam durch
die Deckelöffnung
zufließen lassen.
Ei (geviertelt), Gurke
zugeben.
6
P
3-5 mal
Avocado-Dip
1 Knoblauchzehe
15
I
5 Sekunden
zerkleinern,
2 reife Avocados
(geviertelt, entkernt),
1 EL Zitronensaft,
1 EL Olivenöl,
150 ml Joghurt,
½ TL Zucker,
Salz, Pfeffer zugeben.
15
I
ca. 45 Sekunden
Mit dem Messer
l
können Sie kleinere
Mengen hacken, mixen, pürieren und
rühren. Der Zerkleinerertopf ist hervor-
ragend für die Zubereitung von Mousse,
Aufstrichen und Dips geeignet.
Maximale Füllmenge:
750 ml Flüssigkeit
Achtung:
Das Messer
l
ist sehr scharf.
Wichtig: Die maximale Verarbeitungszeit
im Zerkleinerer beträgt 1 Minute.
Flüssigkeiten können länger verarbeitet
werden.
Nicht zerkleinert werden dürfen:
Schokolade, harte Gewürze, Kaffee-
bohnen.
Alle Zutaten bei ausgeschaltetem Gerät
und eingesetztem Messer in den Zerklei-
nerer geben.
Den Deckel mit eingesetztem Dich-
tungsring
ß
11a
aufsetzen und einrasten.
Flüssigkeiten können Sie bei laufendem
Motor nur durch die Öffnung im Deckel
q
zugießen. Beim Mixen von Milch soll-
ten Sie beachten, dass diese aufschäumt.
Entsprechend weniger Milch verwenden.
Nach Gebrauch immer zuerst das Mes-
ser aus dem Zerkleinerer nehmen und
erst dann das verarbeitete Gut ausleeren.
Dieses Gerät darf am Ende seiner Dieses
Arbeiten im Zerkleinerer/Mixer
j
Hacken
Produkt
Max.
Vor-
Geschwin- Schalter-
Einschalt-
Menge
bereitung
digkeit
stellung
zeiten/-vorgänge
Karotten
150 g
in Stücken
6
P
7 mal
Zwiebeln
100 g /
geviertelt
6
P
6-8 mal
1
½ St.
Petersilie
30 g /
ohne Stiele
15
I
5-10 Sekunden
½ Bund
Knoblauch
1 Zehe
ganz
15
I
5 Sekunden
Fleisch
250 g
gewürfelt
15
I
15 Sekunden
(mager)
Verarbeitungsbeispiele
Die Verarbeitungsbeispiele sind Richtwerte, die u.a. von Gut, Menge und
Feinheitsgrad abhängen.
Grober Schneideinsatz – b
q
Geschwindigkeit 1 - 2
Verarbeitungsbeispiele:
Gurken, Kohlrabi, rohe Kartoffeln, Zwie-
beln, Bananen, Tomaten, Champignons,
Sellerie.
Feiner Raspeleinsatz – c
r
Geschwindigkeit 3 - 6
Verarbeitungsbeispiele:
Käse (weich und mittelhart), Gurken,
Karotten, rohe Kartoffeln, Äpfel.
Grober Raspeleinsatz – d
s
Geschwindigkeit 3 - 6
Verarbeitungsbeispiele:
Käse (weich und mittelhart), Gurken,
Kohlrabi, rote Bete, Karotten, rohe
Kartoffeln, Äpfel, Kohl.
Reibeinsatz – e
t
Geschwindigkeit 8 - 15
Verarbeitungsbeispiele:
rohe Kartoffeln (z. B. für Kartoffelpuffer
und Klöße), Meerrettich, Parmesankäse
(hart).
Pommes-frites-System
u
Setzen Sie das Pommes-frites-System
auf die Antriebsachse und setzen Sie
den Deckel
8
auf. Bei abgeschaltetem
Motor pro Arbeitsgang am besten 3-4
Kartoffeln (je nach Größe) in den Einfüll-
schacht im Deckel legen.
Geschwindigkeit 1 - 2 einstellen und das
Gerät einschalten. Nachfüllen nur bei
ausgeschaltetem Motor. Stopfer
9
mit
leichtem Druck ansetzen.
6. Schlagen mit dem Quirl
w
Geschwindigkeit/Zeit
Biskuitteig
Max. 280 - 300 g Mehl
plus Zutaten
Eier und ggfs. Wasser
schaumig schlagen
5 / ca. 2 Min.
Zucker hinzufügen
5 / ca. 2 Min.
Mehl vorsichtig
unterheben
1 / ca. 30 Sek.
Eiweiß
Minim. 2 Eiweiß
4 - 5 / ca. 4 Min.
Max. 6 Eiweiß
4 - 5 / ca. 6 Min.
Sahne
Minim. 0,15 - 0,2 l
2 / ca. 1 -2 Min.
Max. 0,4 l
2 / ca. 3,5 - 4 Min.
Bei Verwendung von haltbarer (ultra-
hocherhitzter) Sahne sollte die Sahne
vor der Verarbeitung mehrere Stunden
bei ca. 4 °C gekühlt werden.
92266253_K700_S06-116.indd 9
21.05.12 14:10
10
Geschwin- Schalter-
Einschalt-
digkeit stellung zeiten
Pfannkuchenteig
240 g Mehl
Mehl, Eier, Salz und
6
I
45-60 Sek.
375 ml Milch
die Hälfte der Milch
2 Eier
einfüllen, restliche
Salz
Milch im Lauf zugeben.
Sahne schlagen
200 ml Sahne
6
I
30 Sek.
Rühren von kleinen Teigmengen
Der Zerkleinerer/Mixer ist ausschließlich für die unten aufgeführte Teigart mit den
angebebenen Maximalmengen geeignet:
a
b
c
d
e
f
2
1
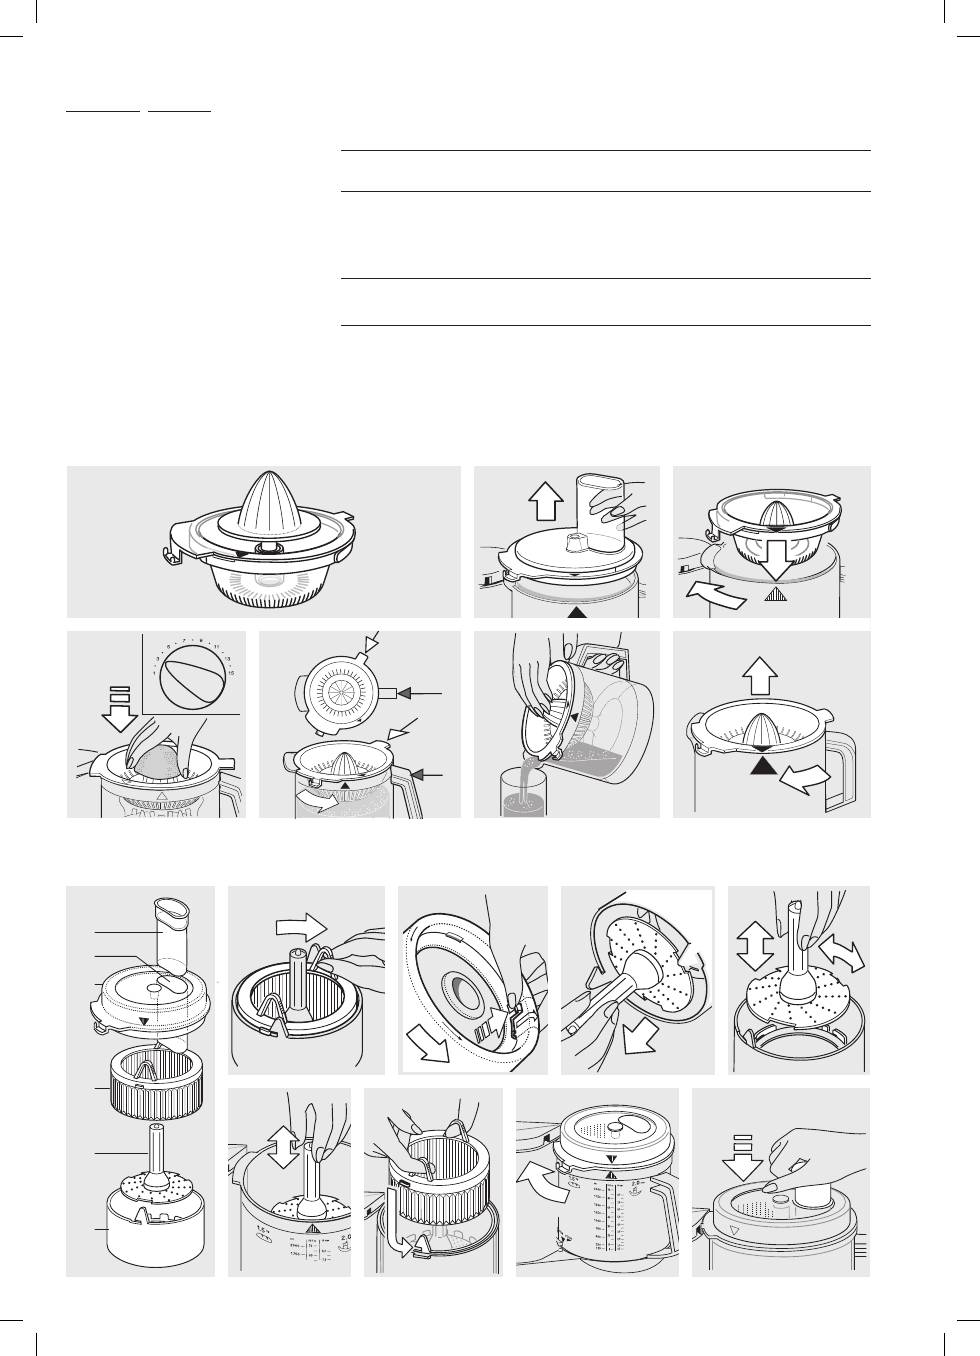
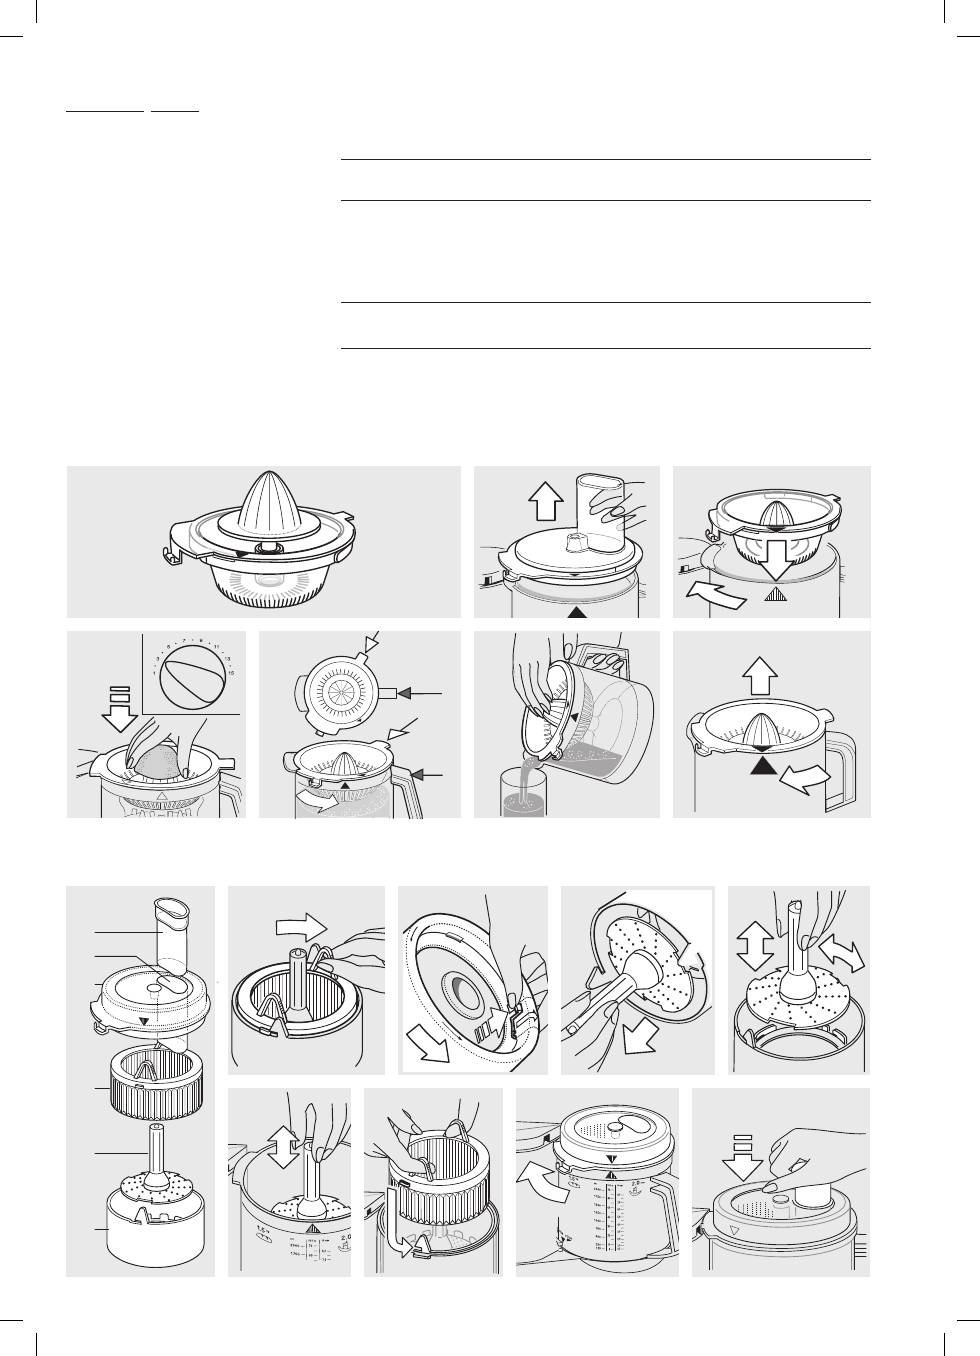
Sonderzubehör
Braun Zitruspresse PJ 600
Type 3200, Geschwindigkeitseinstellung: 1 - 3
1
a
e
f
g
h
b
c
d
P
u
ll
b
u
tt
o
n
•
T
ir
e
r
le
b
o
u
to
n
Ta
ste
zie
hen
op
en
•
o
u
v
rir
•
ö
ffn
en
3
2
5
4
6
Braun Saftzentrifuge/Feinreibwerk SJ 600
Type 3200
Vanille-Honig-Pflaumen
(als Pfannkuchen-Füllung oder
Brotaufstrich)
(verwenden Sie den Zerkleinerer
j
bei
Geschwindigkeit 15)
Füllen Sie 100 g cremigen Honig und
100 g Pflaumen in den Zerkleinerer
j
und mixen Sie 10 Sekunden, fügen Sie
dann 50 ml Wasser (mit Vanille-Aroma)
hinzu und mixen Sie noch 3 Sekunden
weiter.
92266253_K700_S06-116.indd 10
21.05.12 14:10

Deckel
4
gegen den Uhrzeigersinn
drehen und von der Universalschüssel
Ihrer Braun Multiquick abnehmen.
Nehmen Sie dann die Feinreibscheibe
2
aus der Universalschüssel.
Reinigung
Sie können alle Teile bis 65 °C in der
Spülmaschine reinigen. Trester sowie
Reibrückstände sollten Sie vor dem
Spülen nicht antrocknen lassen.
Bei farbstoffreichen Gütern (z.B.
Karotten) können Kunststoffteile
beschlagen; vor dem Spülen mit
Speiseöl sauberwischen.
11
Dieses Gerät darf am Ende seiner
Lebensdauer nicht mit dem
Hausmüll entsorgt werden.
Die Entsorgung kann über den
Braun Kundendienst oder lokal
verfügbare Rückgabe- und
Sammelsysteme erfolgen.
Änderungen vorbehalten.
Gerätebeschreibung (SJ 600)
1
Saftring
2
Feinreibscheibe
3
Tresterring
4
Deckel
5
Einfüllschacht
6
Stopfer
Vor dem Erstgebrauch
Nach dem Auspacken nehmen Sie das
Gerät auseinander und reinigen Sie alle
Teile. Zum Auseinandernehmen gehen
Sie bitte wie folgt vor:
• Tresterring
3
im Uhrzeigersinn entrie-
geln (a) und herausnehmen.
• Die Taste im Boden des Saftringes
1
bis zum Anschlag ziehen (b).
• Den Saftring
1
bei gezogener Taste
gegen den Uhrzeigersinn drehen (b),
bis sich die Feinreibscheibe
2
aus der
Halterung löst.
• Dann die Feinreibscheibe
2
an ihrem
Schaft aus dem Saftring
1
entfernen
(c).
Zusammensetzen
• Universalschüssel der Braun Multiquick
(ohne Messereinsatz)
7
auf den
Motorblock setzen und einrasten.
Zum Reiben:
• Verwenden Sie bitte lediglich die
Feinreibscheibe
2
(e).
Zum Entsaften:
• Feinreibscheibe
2
so in den Saftring
1
einsetzen, dass die Ausschnitte am
Rand der Feinreibscheibe über die
Haltehaken im Saftring gleiten (d).
• Feinreibscheibe
2
am Schaft leicht
niederdrücken und im Uhrzeigersinn
bis zum Einrasten drehen (d).
• Durch Drehen am Schaft der Feinreib-
scheibe prüfen, ob diese richtig ein-
gerastet ist: Der Schaft darf sich nicht
mehr drehen lassen.
• Tresterring
3
einsetzen. Dabei die bei-
den Laschen des Tresterringes in die
Schlitze des Saftringes einschieben (f).
• Setzen Sie die zusammengesetzte
Saftzentrifuge (bzw., wenn Sie reiben
möchten, nur die Feinreibscheibe) auf
die Antriebsachse in der Universal-
schüssel.
• Deckel
4
so auf die Universalschüssel
aufsetzen, dass der Pfeil auf dem
Deckel mit dem Pfeil auf der Universal-
schüssel übereinstimmt. Dann den
Deckel im Uhrzeigersinn drehen, bis
sich die Nase am Deckel in die Sicher-
heitsverschlussöffnung am Motorblock
schiebt und am Anschlag hörbar ein-
rastet (g). Zum Abnehmen den Deckel
gegen den Uhrzeigersinn drehen.
Entsaften
Maximalkapazität: 500 g, höchstens
jedoch, bis der Tresterraum mit Trester
voll ist. Sie können sowohl Obst als auch
Gemüse entsaften.
• Obst und Gemüse vorbereiten:
Erst waschen bzw. schälen. Steinobst
entsteinen. Zitrusfrüchte sowie Obst
und Gemüse mit Schale, die nicht zum
Verzehr geeignet ist, bitte gründlich
schälen (z. B. Rote Bete und Kiwi).
Kernobst (z. B. Äpfel) kann mit der
Schale entsaftet werden.
• Geschwindigkeitseinstellung:
Wählen Sie auf Ihrer Braun Multiquick
die Geschwindigkeitseinstellung 7–8.
• Saftbereitung:
Schalten Sie den Motor Ihrer Braun
Multiquick ein. Füllen Sie dann das
vorbereitete Obst oder Gemüse in den
Einfüllschacht
5
und drücken Sie es
mit dem Stopfer
6
herunter.
Vorsicht: Verwenden Sie immer den
Stopfer (h) und greifen Sie nie bei
laufendem Gerät mit den Händen in
den Einfüllschacht
5
.
Bitte das Gerät nicht überfüllen.
• Auseinandernehmen:
Motor auschalten.
Deckel
4
entgegen dem Uhrzeigersinn
drehen und von der Universalschüssel
Ihrer Braun Multiquick abnehmen.
Gehen Sie dann bitte vor, wie unter
«Vor dem Erstgebrauch» beschrieben.
Nehmen Sie die Teile aus der Univer-
salschüssel; bei festem Trester ziehen
Sie den entriegelten Tresterring
3
an
den Griffösen aus dem Saftring
1
(f).
Reiben
Das Feinreibwerk eignet sich besonders
zum sehr feinen Reiben von hartem Käse
(z. B. Parmesan und Schweizer Sprintz),
Meerrettich (z. B. Sahnemeerrettich),
Äpfeln und Karotten (z. B. für Babykost).
Wichtig: Das Feinreibwerk ist nicht zum
Reiben von Schokolade geeignet.
• Das zu reibende Gut vorbereiten:
Obst und Gemüse bitte zuerst
waschen bzw. schälen. Kerne und
Kerngehäuse entfernen. Bei Käse die
Rinde entfernen. Zerkleinern Sie das zu
verarbeitende Gut so, dass es in den
Einfüllschacht
5
passt.
• Geschwindigkeitseinstellung:
Wählen Sie auf Ihrer Braun Multiquick
die Geschwindigkeitseinstellung 7–14.
Hinweis: Harte Güter sollten mit
höherer Geschwindigkeit verarbeitet
werden.
• Reiben:
Schalten Sie den Motor Ihrer Braun
Multiquick ein. Füllen Sie dann das
vorbereitete Gut in den Einfüllschacht
5
und drücken Sie es mit dem Stopfer
6
herunter.
Vorsicht: Verwenden Sie immer den
Stopfer (h) und greifen Sie nie bei
laufendem Gerät mit den Händen in
den Einfüllschacht
5
.
• Auseinandernehmen:
Motor ausschalten.
92266253_K700_S06-116.indd 11
21.05.12 14:10

12
English
Our products are engineered to meet
the highest standards of Quality,
functionality and design. We hope you
thoroughly enjoy your new Braun
appliance.
Please read the use instruc tions
carefully before first use.
Important
•
The blades
l
/
n
are very
sharp!
Take hold of the blades by the knob
only. After use, always first remove the
blades from the bowls
7
/
j
before
removing the processed food.
• Make sure that your voltage corre-
sponds to the voltage printed on
the bottom of the appliance. Connect
to alternating current only.
• Keep the appliance out of the reach
of children.
• This appliance is not intended for
use by children or persons with
reduced physical, sensory or mental
capabilities, unless they are given
supervision by a person responsible
for their safety. In general, we recom-
mend that you keep the appliance
out of reach of children. Children
should be supervised to ensure that
they do not play with the appliance.
• This appliance was constructed for
household use only to process the
listed quantities.
• Do not use any parts in the microwave
oven.
• Make sure to avoid touching the
running drives with your fingers. Put
on the protective cover
m
whenever a
drive place is not in use, since both
drives rotate simultaneously when
switching on the appliance.
• Do not allow the appliance to operate
unsupervised.
• Braun electric appliances meet appli-
ca ble safety standards. Repairs or the
replacement of the mains cord must
only be done by authorised service
personnel. Faulty, unqualified repair
work may cause considerable hazards
to the user.
• Switch the appliance off and discon-
nect it from the outlet before storing it.
Specifications
• Voltage/wattage: See typeplate on
the bottom of the appliance.
• Operating time and max. capacity:
See processing instructions.
Description
The Braun Multiquick 5 with the 2-bowl
system meets highest demands for
kneading, mixing, blending, chopping,
slicing, shredding and grating, both
simply and quickly.
To obtain best results, two different
working bowls are available: a large
food processor bowl
7
and a small
chopper bowl
j
.
Thus, for chopping, puréeing or mixing
you can choose between the large and
the small working bowl. Moreover, you
can use the small bowl to prepare the
food which then can be further pro ces-
sed in the large bowl (e.g. to chop nuts
for a nut cake dough). Only one bowl
can be operated at a time.
1
Motor block
2
Cord storage
3
Motor switch (on = «I», off = «O»)
4
Pulse mode «
P
»
5
Variable speed regulator (1-15)
6
Safety lock (avoids simultaneous
operation of both working bowls)
7
Food processor bowl (2 l capacity)
8
Lid for food processor bowl
7
9
Pusher for lid
8
j
Chopper/mixer bowl for small
tquanti ties (0.75 l capacity)
q
Lid for chopper bowl
j
ß
11a
Seal ring for lid
q
l
Blade for chopper bowl
j
m
Protective cover for motor drive
when bowl has been taken off
Attachments for food processor
bowl
7
(Important: Not all attachments will be
included in the standard equipment of all
models).
n
Blade for food processor bowl
7
with protective cover
o
Insert carrier
p
Fine slicing insert – a
q
Coarse slicing insert – b
r
Fine shredding insert – c
s
Coarse shredding insert – d
t
Grating insert – e
u
French-fries system
v
Kneading hook
w
Whipping attachment
Note: Before using the food processor
for the first time, clean all parts as
described under «Cleaning».
Overload protection
In order to avoid damages caused by
overload, this appliance is equipped with
an automatic security switch which
shuts off the current supply if necessary.
In such case, turn the motor switch
3
back to «off/0» and wait approx. 15 min-
utes to allow the motor to cool off before
switching on the appliance again.
Pulse mode «
P
»
The pulse
4
mode is for example useful
for the following applications:
• Chopping delicate and soft food, e.g.,
eggs, onions or parsley.
• Carefully folding flour into dough or
batter to maintain the creaminess.
• Adding whipped eggs or cream to
more solid food.
The pulse mode «
P
» is acti vated
by pressing the blue knob
4
on the
motor switch
with switch set ting «O».
Before activating the pulse mode, set
the desired speed with the speed regu-
lator
5
. When releasing the pulse knob
4
, the appliance is switched off.
Recommended speed ranges
for individual attach ments
Set the speed range by means of the
variable speed regulator
5
. It is recom-
mended to first select the speed and
then switch on the appliance in order to
work with the desired speed right from
the beginning.
Attachments
Speed range
Kneading hook
7
Blade
l
and
n
6 - 15
Whipping attachment:
– egg-whites
4 - 5
– cream
2
Slicing, grating and
shredding inserts
1 - 8
French-fries system
1 - 2
(please also refer to product printing)
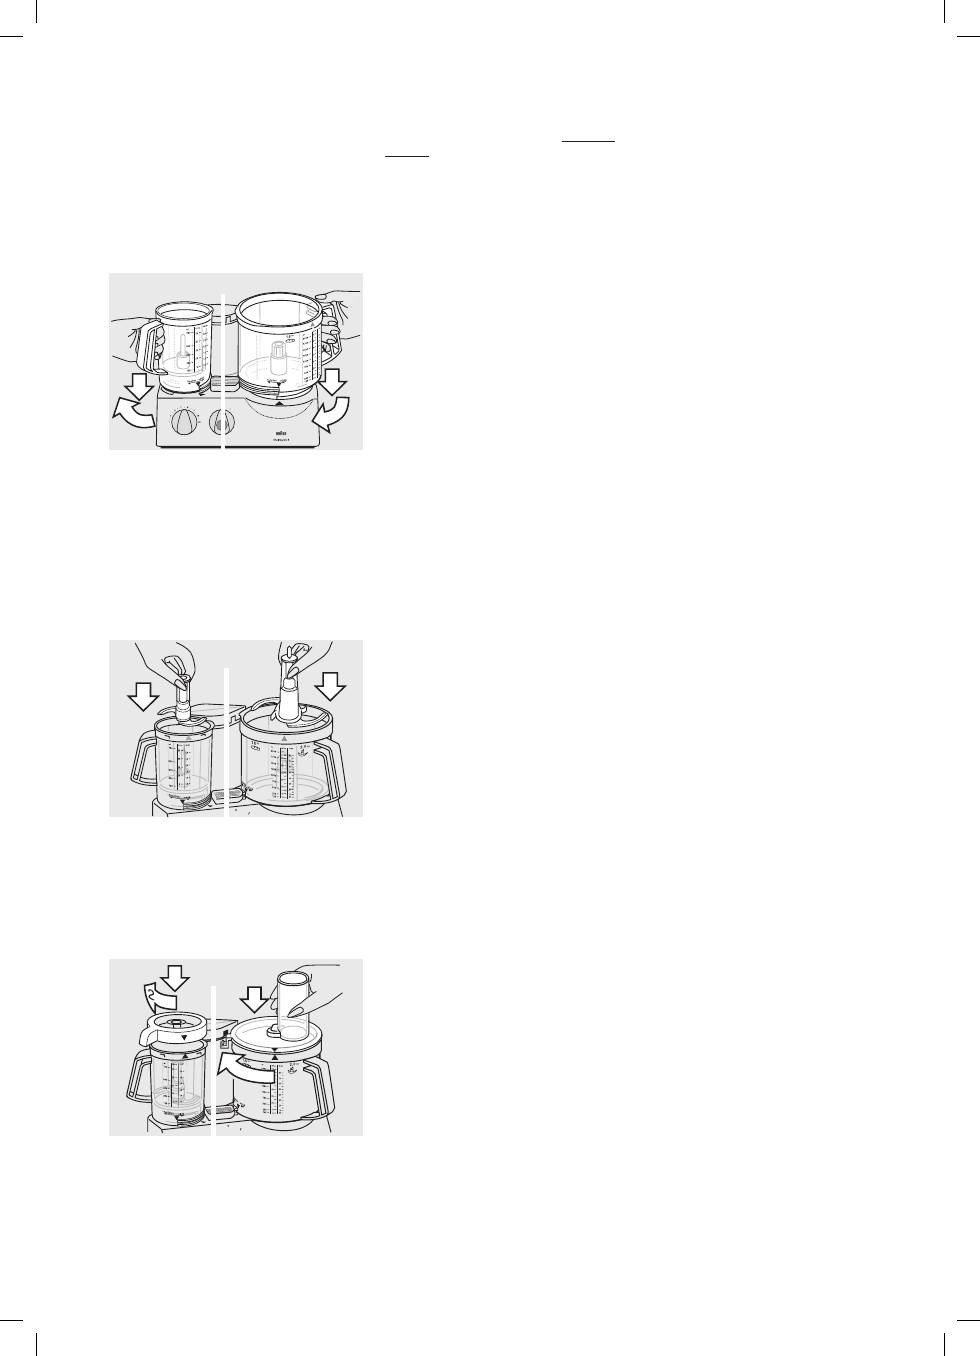
Working with the 2-bowl
system
Only one working bowl can be
operated at a time.
The working bowl which is not used
must be in the upper position or addi-
tionally, can be turned in the «click»
direction where it is locked in place.
When the arrow markings are aligned,
the bowl can be taken off. For safety
reasons, always put the protective cover
m
onto the free drive shaft after a bowl
has been taken off.
Double safety feature
The appliance can only be switched on
when the desired working bowl with lid
is properly engaged. If the lid is opened
during operation, the motor switches off
automatically. As in this case the motor
switch
3
is still on «I», turn it back to
«O» to avoid switching on the motor
accidentally.
92266253_K700_S06-116.indd 12
21.05.12 14:10
13
Attaching the working bowls
The food processor bowl
7
is operated
on the large drive place of the motor
block
1
. The chopper bowl
j
is opera t-
ed on the small dirve place.
1. With the motor switched off, place
the respective bowl onto its drive place
matching the arrow on the bowl with
the arrow on the motor block (A).
1
2
1
2
A
pulse
off/0
B
pulse
off/0
1
1
2
C
Then turn the bowl in the «function»
direction until the lower fixed stop is
reached. The bowl on the other drive
place must be in the lifted position.
If the other drive place is free, put on
the protective cover
m
.
2. Put the attachment needed (see
instructions for each of the attachments)
onto the drive shaft of the bowl and
push it down as far as it will go (B).
When inserting the blade
l
onto the
chopper bowl
j
, push it down until it
audibly snaps in place.
3. Put the lid onto the bowl matching
the arrow on the lid with the arrow on
the bowl (C).
N.B.
When attaching the lid
q
of the chopper
bowl
j
, it must be provided with the
seal ring
ß
11a
.
Removing the working bowls
Switch off the appliance. Turn the lid
anti-clockwise and lift it off. Then turn
the bowl in the «click» direction until the
arrow on the bowl matches the arrow on
the motor block and lift off the bowl.
When removing the blade from a bowl,
take hold of it by the knob and pull it off.
Caution: The blades are very sharp.
The blade
n
comes with a protective
cover. If not in use, store the blade on
the protective cover.
Cleaning
First, always switch off the motor and
unplug the appliance. Clean the motor
block
1
with a damp cloth only.
All parts can be cleaned in the dish-
washer. If necessary, clean all parts
thoroughly with a spatula or a brush
before rinsing them.
Color-intensive food (e.g. carrots) may
leave stains on the plastic parts; wipe
them off with cooking oil before cleaning
with water.
For cleaning the lid
q
, first remove the
seal ring
ß
11a
. Put the seal ring back in
place after cleaning. You can use the
seal ring from both sides.
Do not use sharp objects for cleaning
purposes.
Clean the blades and the inserts very
carefully – they are very sharp.
Using the food processor
bowl
7
When using the food processor bowl,
always insert the required attachments
before adding ingredients.
1. Kneading
For kneading you can use the kneading
hook
v
or the blade
n
. For best results,
we recommend using the kneading
hook which is specially designed for
making yeast dough, pasta and pastries.
Yeast dough (bread/cake)
Max. 500 g flour plus other ingredients
Speed 7, 1 ½ minutes
Pour the flour into the food processor
bowl, then add the other ingredients –
except liquids.
Put on the lid
8
and lock in place.
Then choose speed 7 and switch the
appliance on.
Add liquids by pouring them through
the filling tube of the lid while the motor
is running.
When kneading with the blade
n
, do
not add ingredients like raisins, candied
peel, almonds, etc. which are not
supposed to be cut. These have to be
added manually after having taken the
kneaded dough out of the food proces-
sor bowl.
Pasta dough
Max. 500 g flour plus other ingredients
Speed 7, 1 ½ minutes
Pour the flour into the food processor
bowl, then add the other ingredients –
except liquids.
Pour the required amount of liquid
through the filling tube in the lid when
the motor is running.
Do not add any liquid after the dough
has formed into a ball as then the liquid
will no longer be absorbed evently.
Pastries
Max. 500 g flour plus other ingredients
Speed 7, approx. 1 minute
Pour flour into the food processor bowl,
then add the other ingredients. For best
results, be butter used must not be too
hard, nor too soft.
Put on the lid
8
and lock in place.
Choose speed 7 and switch on the
appliance.
Stop kneading the dough shortly after
a ball has formed. Otherwise the pastry
dough will become too soft.
Then turn the lid clockwise guiding its
nose into the safety lock opening of the
motor block
1
until it audibly snaps in
place.
92266253_K700_S06-116.indd 13
21.05.12 14:10
14
2. Mixing
For mixing cake dough or sponges
use the blade
n
.
The kneading hook
v
is not suitable for
mixing cake doughs or sponges.
Max. 500 g flour plus other ingredients
Cake mixture
(2 methods)
Speed / Time
a) Cream butter with
sugar end eggs
6 / ca. 1 min
pour in milk and
6 / ca. 15 secs
carefully fold in
15 / ca. 10-15 x
flour with pulse
«
P
»
mode.
b) Pour all ingredients
except liquids into
the food processor
bowl.
15 / ca. 1 min
Add required liquids through the
filling tube of the lid while the motor
is running. Finally add ingredients like
raisins manually.
Sponge
Speed/Time
Cream eggs and
water (if required)
15 / ca. 2 mins
and sugar
15 / ca. 4 mins
fold in flour with
pulse mode
8 / 5 x «
P
»
add cocoa powder
8 / 3 x «
P
»
3. Blending
Use the blade
n
for blending soups,
shakes, etc.
Maximum capacity 2 l
Speed 10
(otherwise the bowl may overflow)
For milk-shakes, pour coarsely chopped
fruit into the food processor bowl.
Put on the lid
8
and lock in place.
With speed 15, blend fruit first, then add
liquid at speed 10 and finish blending.
When blending milk, please not that it
will froth. Use smaller Quantities.
4. Chopping
Chopping in the food processor bowl
with the blade
n
Note: For processing larger quantities,
use the food processor bowl
7
with
blade
n
. For processing smaller quanti-
ties, we recommend to use the chopper
bowl
j
with blade
l
.
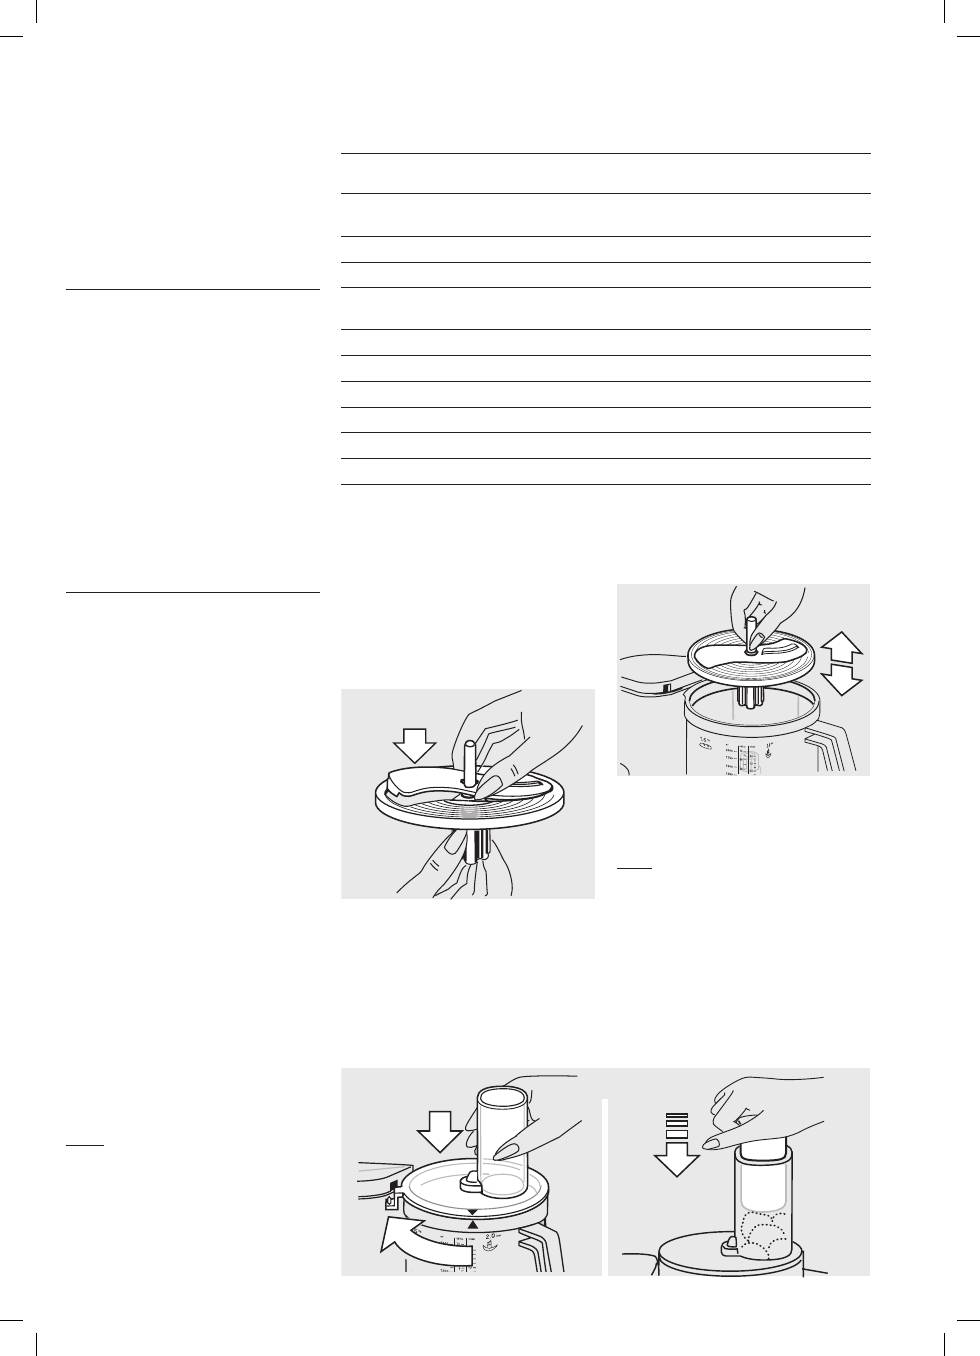
• Place the insert you want to use into
the insert carrier
o
as shown in (D)
and snap into position. In order to
remove the insert, push up the insert
end that protrudes at the bottom of
the insert carrier.
5. Slicing, shredding, grating
Product
Max.
Preparation
Speed
Mode
Time/pulses
amount
Hard bread 4
quartered
15
I
45 secs
rolls
Ice cubes
28
whole
15
I
1 minute (snow)
Apples
700 g
quartered
8
I
15 secs
Chocolate
400 g
broken
15
I
coarse 15 secs
cool
fine 30 secs
Eggs
8
whole
6
P
8 x
Cheese (soft) 400 g
3-cm cubes
15
I
20 secs
Cheese (hard) 700 g
3-cm cubes
15
I
60-70 secs
Meat
700 g
in cubes
15
I
40 secs
Carrots
700 g
in pieces
15
I
10 secs
Onions
700 g
quartered
15
P
10 - 13 x
Processing examples
The processing times are approximate and depend on the quality, the amount of
food to be processed and the required degree of fineness.
D
a
E
1
F
2
• Put the assembled slicer/shredder
onto the drive shaft of the food pro-
cessor bowl (E).
• Put on the lid
8
and lock in place. Set
the speed and fill the food to be pro-
cessed into the filling tube while the
motor is switched off. Refilling should
be done with the motor switched off.
• Never reach into the filling tube when
the motor is running. Always use the
pusher
9
(F).
N.B.: When processing juicy or soft
food, you will obtain better results at a
lower speed. Hard food should be
processed at a higher speed. Do not
overload the food processor bowl.
Fine slicing insert – a
p
Speed 1 - 2
Processing examples: cucumbers,
cabbage, raw potatoes, carrots, onions,
radishes.
92266253_K700_S06-116.indd 14
21.05.12 14:10

15
Blending
Product
Preparation
Speed
Switch
Time/pulses
position
Mixed drinks Chop fruit before
approx.
processing. Add milk.
15
l
30 seconds
Baby food
Chopped
15
P
10 x
(e.g. fruit,
I
10 seconds
vegetable)
Mayonnaise
Blend 1 egg, seasoning, 15
l
30-45 seconds
mustard and vinegar.
Slowly pour in oil
through lid opening.
Tartar
Blend 1 egg, seasoning, 15
I
30-45 seconds
mustard and vinegar.
Slowly pour in oil
through lid opening.
Add quartered egg
and vinegar.
6
P
3-5 x
Avocado
Chop 1 clove garlic,
15
I
5 seconds
add 2 ripe avocados
(quartered, w/o stone),
1 tbsp. lemon juice,
1 tbsp. olive oil,
150 ml yogurt,
½ tsp. sugar,
salt, pepper.
15
l
ca. 45 seconds
The blade
l
can be used for chopping,
blending, puréeing and mixing smaller
quantities. The chopper bowl is perfectly
suited for preparing mousse, pastes or
dips.
Maximum capacity: 750 ml liquid.
Caution:
The blade
l
is extremely sharp.
Important: The maximum processing
time in the chopper bowl is 1 minute.
Liquids can be processed longer.
Chocolate, hard spices and coffee beans
may not be chopped.
Whith the motor switched off, insert the
blade
l
in the chopper bowl
j
, then
place all ingredients into the chopper
bowl.
Liquids can be poured through the
opening in the lid
q
when the motor is
running.
Put the lid
q
with the seal ring
ß
11a
onto
the chopper bowl and close it as
de scribed earlier. After use, always
remove the blade from the chopper bowl
first and then empty the processed food.
When blending milk, please note that it
will froth. Use smaller quantities.
Using the chopper bowl
j
Chopping
Product
Max.
Preparation
Speed
Switch
Time/pulses
amount
position
Carrots
150 g
in pieces
6
P
7 x
Onions
100 g /
quartered
6
P
6-8 x
1
½ onion
Parsley
30 g /
withouth
15
l
5-10 seconds
½ bunch stems
Garlic
1 clove
whole
15
I
5 seconds
Meat (lean) 250 g
quartered
15
l
15 seconds
Processing examples
The processing times are approximate and depend on the quality and amount of
food to be processed and the degree of fineness required.
Coarse slicing insert – b
q
Speed 1 - 2
Processing examples: cucumbers,
kohlrabi, raw potatoes, onions, bananas,
tomatoes, mushrooms, celery.
Fine shredding insert – c
r
Speed 3 - 6
Processing examples: cheese (soft to
medium), cucumbers, carrots, raw pota-
toes, apples.
Coarse shredding insert – d
s
Speed 3 - 6
Processing examples: cheese (soft to
medium), cucumbers, kohlrabi, beet-
root, carrots, raw potatoes, apples,
cabbage.
Grating insert – e
t
Speed 8 - 15
Processing examples: raw potatoes
(e.g. for potatoe pancakes), horseradish,
parmigiano cheese (hard).
French-fries system
u
Place the French-fries system onto the
drive shaft, put on the lid
8
and lock in
place. For best results, place 3 - 4 pota-
toes (depending on size) in the filling
tube of the lid
8
while the motor is
switched off.
Set speed to 1 - 2 and switch on the
appliance. Before filling in a new load,
switch the motor off. Use the pusher
9
to apply slight pressure when pushing
the potatoes into the filling tube.
6. Whipping with the
whipping attachment
w
Speed/Time
Whipping sponges
Max. 280-300 g flour
plus ingredients
Cream eggs and
water (if required)
5 / ca. 2 mins
add sugar
5 / ca. 2 mins
fold in flour
1 / ca. 30 secs
Whipping egg-whites
Min.: 2 egg-whites
4-5 / ca. 4 mins
Max.: 6 egg-whites
4-5 / ca. 6 mins
Whipping cream
Min.: 0.15-0.2 l
2/ca. 1-2 mins
Max.: 0.4 l
2/ca. 3.5-4 mins
Before whipping sterilized cream, keep
the cream cool for several hours (at 4 °C
approx.).
92266253_K700_S06-116.indd 15
21.05.12 14:10
16
Speed
Switch
Time
position
Pancake mixture
240 g flour
Mix the flour, eggs,
6
I
45-60 sec.
375 ml milk
salt and half of the milk,
2 eggs
add rest of the milk
salt
while te motor is
running.
Whipping cream
200 ml cream
6
l
30 secs.
Mixing smaller dough quantities
The chopper bowl is only suitable for processing the following dough type;
the recipe reflects maximum quantities:
a
b
c
d
e
f
2
1
1
a
e
f
g
h
b
c
d
P
u
ll
b
u
tt
o
n
•
T
ir
e
r
le
b
o
u
to
n
Ta
ste
zie
hen
op
en
•
o
u
v
rir
•
ö
ffn
en
3
2
5
4
6
Special accessories
Braun Citrus press PJ 600
Type 3200, Speed: 1 - 3
Braun Juice Extractor/Fine Grating Attachment SJ 600
Type 3200
Vanilla-Honey-Prunes
(as a pancake stuffing or spread)
(use the chopper bowl
j
, speed 15)
Fill 100 g creamy honey and 100 g
prunes into the chopper bowl and chop
10 seconds, then add 50 ml water
(vanilla-flavoured) and resume chopping
for 3 seconds.
92266253_K700_S06-116.indd 16
21.05.12 14:10

Cleaning
All parts can be cleaned in the dish-
washer at temperatures up to 65 °C.
Pulp and other residues should not
become dry before the appliance is
cleaned. The appliance may discolour
when processing food with high degree
of pigments (e.g. carrots); use vegetable
oil to clean it, before cleaning with
detergents or in the dishwasher.
17
Please do not dispose of the
product in the household waste
at the end of its useful life.
Disposal can take place at a
Braun Service Centre or at
appropriate collection points
provided in your country.
Subject to change without notice.
Description (SJ 600)
1
Juicer drum
2
Fine grating disc
3
Strainer basket
4
Cover
5
Filling tube
6
Pusher
Before the first use
After unpacking the appliance, please
disassemble it and clean all parts. To
disassemble the appliance proceed as
follows:
• Unlock the strainer basket
3
by turning
it clockwise (a) and wash all parts by
hand.
• Pull the key in the bottom of the juicer
drum
1
as far as it will go (b).
• Turn the juicer drum
1
anti-clockwise
with the key in the bottom of the juicer
drum pulled (b) – until the fine grating
disc
2
is unlocked.
• Then pull the fine grating disc
2
by its
shaft out of the juicer drum
1
(c).
Assembling
• Attach the food processor bowl of your
Braun Multiquick (without the blade) to
the motor block and lock it in place.
For grating:
• Use the fine grating disc
2
only (e).
For juice extracting:
• Insert the fine grating disc
2
into the
juicer drum
1
so that the cut-out
sections in the rim of the fine grating
disc slide over the holding studs in the
juicer drum (d).
• Push the fine grating disc
2
by its
shaft slightly down and turn it clock-
wise until it clicks in (d).
• Check by trying to turn the shaft of the
fine grating disc
2
whether the grating
disc is properly locked. If it is, the shaft
cannot be turned.
• Insert the strainer basket
3
into the
juicer drum
1
, and ensure that both
tabs fit into the notches of the drum (f).
• For juice extracting set the assembled
juice extractor on the food processor
bowl drive shaft of your Braun
Multiquick. If you want to grate, set the
fine grating disc
2
only on the drive
shaft of the food processor bowl.
• Place the cover
4
on the Braun
Multiquick food processor bowl so that
the arrow on the cover matches the
arrow on the food processor bowl.
Then turn the cover clockwise until the
nozzle on the cover is in the safety
lock on the motor block of your Braun
Multiquick system and audibly snaps
into place (g). To remove, turn the
cover anti-clockwise.
Extracting juice
Maximum capacity: 500 g or when the
pulp space is full. You can extract juice
from fruits, as well as from vegetables.
• Preparing fruits or vegetables:
First wash or peel the food. Fruits
with pits should always have the pits
removed first. Citrus fruits, as well as
fruits with skin and vegetables (e.g. red
beets and Kiwi-fruits) should be thor-
oughly peeled. Seed fruits (e.g. apples)
can be processed with peels and cores.
• Speed selection:
Please select the setting 7–8 on your
Braun Multiquick.
• Extracting:
Turn on the motor of your Braun
Multiquick. Fill the prepared fruits or
vegetables into the filling tube
5
and
push it down with the pusher
6
(h).
Caution: Always use the pusher. Never
reach into the filling tube while the
motor is running!
Do not overload the appliance.
• Disassembling:
Turn off the motor of your Braun
Multiquick. Turn the cover
4
anti-
clockwise and remove it from the food
processor bowl. Then proceed as
described in the section «Before the
first use». Remove all parts from the
food processor bowl of your Braun
Multiquick. If the fruit pulp is very
dense, pull the disengaged strainer
basket
3
out of the juicer drum
1
by
using the pull rings (f).
Grating
The fine grating device is designed for
very fine grating of food such as hard
cheese (e.g. Italian parmigiano cheese or
Swiss sprintz cheese), horse-radish (e.g.
for horse-radish cream), apples and
carrots (e.g. for baby food).
Important: The fine grating disc is not
suited for grating chocolate.
• Preparing the food for grating:
Fruits and vegetables should be
washed first or peeled. Seeds and
cores should be removed. Cut off the
crust from cheese. The food should be
cut small enough to fit into the filling
tube
5
.
• Speed selection:
Please select the setting 7–15 on your
Braun Multiquick.
Note: Hard food should be grated at
higher speeds.
• Grating:
Turn on the motor of your Braun
Multiquick. Fill the prepared food into
the filling tube
5
and push it down
with the pusher
6
(h).
Caution: Always use the pusher. Never
reach into the filling tube while the
motor is running!
• Disassembling:
Turn off the motor of your Braun
Multiquick. Turn the cover
4
anti-clock -
wise and remove it from the food pro-
ces sor bowl. Then remove the fine grat-
ing disc
2
from the food processor bowl.
92266253_K700_S06-116.indd 17
21.05.12 14:10

18
Français
La conception de nos produits leur
permet d’offrir les plus hauts standards
de qualité, de fonctionnalité et de design.
Nous espérons que vous prendrez plaisir
à utiliser votre nouvel appareil Braun.
Veuillez lire le mode d’emploi
soigneuse ment avant d’utiliser
l’appareil pour la première fois.
Important
•
Les couteaux
l
/
n
sont très
acérés!
Les tenir par le manche uniquqement.
Après utilisation, retirer toujours des
bols
7
/
j
les cauteaux, puis les ali-
ments travaillés.
• S’assurer que la tension correspond
bien á celle indiquée sur la plaque de
fond de l’appareil. Brancher sur un
courant alternatif uniquement.
• Garder l’appareil hors de portée des
enfants.
• Cet appareil n’est pas destiné à des
enfants ou à des personnes aux
capacités mentales, sensorielles et
physiques réduites à moins qu’elles ne
soient sous la surveillance d’un adulte
responsable de leur sécurité.
Il convient de surveiller les enfants
pour s’assurer qu’ils ne jouent pas
avec l’appareil. Conserver hors de
portée des enfants.
• Cet appareil es conçu pour un usage
domestique uniquement et pur
tra vailler les quantités indiquées.
• Ne mettre aucune pièce de cet appa-
reil au micro-ondes.
• Eviter de toucher les pignons d’entrai-
nement avec les doigts. Poser le capot
de protection
m
à chaque fois qu’un
des bols n’est pas dans son logement
car les entrainements tournent simulta-
nément dès que l’on branche l’appa-
reil.
• Ne pas laisser l’appareil en marche
sans surveillance.
• Les appareils électriques Braun
répondent aux normes de sécurité en
vigueur. Leur réparation ou le change-
ment du cordon d’alimentation doivent
être effectués uniquement par les
Centres Service Agréés Braun (C.S.A.
– voir liste sur le 3615 Braun). Des
réparations effectuées par du person-
nel non qualifié peuvent causer acci-
dents ou blessures à l’utilisateur.
• Arrêter et débrancher l’appareil avant
de le ranger.
Précisions
• Tension/puissance: voir la plaque
d’identification sous l’appareil.
• Temps d’utilisation et capacité maxi-
male: voir les instructions d’utilisation.
Description
Le Braun Multiquick 5 avec son système
à 2 bols convient aux plus exigeants
pour pétrir, mixer, mélanger, hacher,
émincer et râper, aussi simplement que
rapidement. Pour obtenir les meilleurs
résultats, 2 bols de travail sont disponi-
bles: un grand bol universel
7
et un petit
bol hachoir
j
.
Ainsi, pour hacher, réduire en purée ou
mélanger, on peut utiliser le grand ou le
petit bol de travail. On peut également
utiliser le petit bol pour préparer des ali-
ments qui pourront ensuite être travaillés
dans le grand bol (par exemple, hacher
des noix pour une pâte à gateau). On ne
peut faire fonctionner qu’un seul bol à la
fois.
1
Bloc-moteur
2
Rangement du cordon
3
Commutateur de mise en route
(marche = «I», arrêt = «O»)
4
Mode intermittent «
P
»
5
Variateur de vitesses (1-15)
6
Sûreté (évite l’utilisation simultanée
des 2 bols)
7
Bol universel (contenance 2 L)
8
Couvercle du bol universel
7
9
Poussoir pour le couvercle
8
j
Bol hachoir/mixeur pour les petites
quantités (contenance 0,75 L)
q
Couvercle du bol hachoir/mixeur
j
ß
11a
Anneau d’étanchéité du couvercle
q
l
Couteau du bol hachoir/mixeur
j
m
Protection du pignon d’entrainement
lorsque le bol a été retiré
Accessoires pour le bol universel
7
(Important: tous les accessoires ne sont
pas inclus dans l’équipement de base
des différents modèles).
n
Couteau pour le bol universel
7
avec sa protection
o
Porte-disques
p
Disque éminceur fin – a
q
Disque éminceur gros – b
r
Disque á râper fin – c
s
Disque á râper gros – d
t
Disque á gratter – e
u
Système coupe-frites
v
Crochet-pétrisseur
w
Fouet
Note : Avant la première utilisation du
combiné culinaire, nettoyer toutes ses
parties comme indiqué dans le para -
gra phe «Nettoyage».
Protection contre la
surcharge
Pour éviter tout accident dû à une
surcharge, cet appareil est équipe d’un
disjoncteur de sécurité qui coupe le
courant si nécessaire. Dans ce cas,
repositionner le commutateur
3
sur
«O» et attendre environ 15 minutes avant
de le remettre en marche pour permettre
le refroidissement du moteur.
Mode intermittent «
P
»
Le mode intermittent
4
est utilisé par
exemple pour les préparations suivantes:
• Hacher des aliments délicats et ten-
dres (oeufs, oignons ou persil).
• Ajouter délicatement la farine dans une
pâte pour en garder le velouté.
• Additionner des oeufs ou de la crème
battus à un aliment plus solide.
Le mode intermittent «
P
» est activé
lorsqu’on appuie sur le bouton bleu
du commutateur
4
en posi tion « O ».
Avant d’actionner le mode intermittent,
sélectionner la vitesse choisie au moyen
du variateur de vitesses
5
. En libérant le
bouton
4
, l’appareil s’arrête.
Vitesses conceillées pour
l’utilisation de chacun des
accessoires
Les différentes vitesses sont sélection-
nées à l’aide du variateur de vitesses
5
.
Il est recommandé de sélectionner
d’abord la vitesse souhaitée et de ne
mettre qu’ensuite l’appareil en marche
afin de pouvoir travailler dès le début
avec la vitesse souhaitée.
Accessoires Vitesses
Crochet pétrisseur
7
Couteau
l
et
n
6 - 15
Fouet – blancs en neige
4 - 5
– crème
2
Disques éminceurs et râpes
1 - 8
Système coupe-frites
1 - 2
(se référer également aux
indications marquées sur l’appareil)
Utilisation avec le système
à 2 bols
Un seul bol peut être utilisé à la fois.
Le bol qui n’est pas utilisé doit être
placé en position haute ou éventuelle-
ment peut être laissé dans son logement
s’il est bien bloqué.
Lorsque les flèches sont alignées, le bol
peut également être retiré. Par sécurité,
lorsqu’un bol a été enlevé, poser
toujours le couvercle de protection
m
sur
le pignon d’entraine ment libéré.
Double sécurité
L’appareil ne peut être mis en route que
lorsque le bol de travail choisi, avec son
couvercle, a été correctement mis en
place. Si pendant le fonctionnement, le
couvercle n’est pas bien bloqué, le
moteur s’arrête automatiquement. Dans
ce cas, le commutateur
3
étant encore
sur « I », le positionner sur « O » pour
éviter que l’appareil ne se mette en route
accidentellement.
92266253_K700_S06-116.indd 18
21.05.12 14:10

19
Mise en place des bols de
travail
Le bol universel
7
travaille sur le grand
logement du bloc-moteur
1
, le bol
hachoir
j
sur le petit logement.
1. Moteur arrêté, placer le bol corres-
pondant sur son pignon d’entrainement
tout en vérifiant que la flèche du bol
vieut bien se placer sur la flèche du
bloc-moteur (A).
1
2
1
2
A
pulse
off/0
B
pulse
off/0
1
1
2
C
Puis tourner le bol dans la direction
« function » jusqu’à ce qu’il atteigne le
cran de bloquage. Le bol de l’autre loge-
ment doit être placé en position haute.
Si son logement est vide, poser le cou-
vercle de protection
m
.
2. Poser l’accessoire désiré (voir les ins-
tructions pour chacun des accessoires)
sur le pignon d’entraînement du bol et
l’enfoncer aussi bas que possible (B).
Lorsque l’on place le couteau
l
dans le
bol hachoir
j
, le pousser vers le bas
jusqu’à entendre un clic de blocage.
3. Poser le couvercle sur son bol en
vérifiant que la flèche du couvercle se
positionne bien sur la flèche du bol (C).
NB: Placer toujours le couvercle
q
sur le bol hachoir
j
avec l’anneau
d’étanchéité
ß
11a
.
Démontage des bols de
travail
Arrêter l’appareil. Tourner le couvercle
dans le sens contraire des aiguilles
d’une montre et l’enlever. Tourner le bol
dans la direction du « click » jusqu’à ce
que la flèche du bol vienne se placer sur
la flèche du bloc-moteur et l’enlever.
Lorsqu’on retire le couteau du bol, le
tenir par la tête et soulever.
Attention : les lames sont très
acérées.
La lame
n
est livrée avec un couvercle
de protection. Lorsqu’elle n’est pas
utilisée, toujours la conserver munie de
son couvercle de protection.
Nettoyage
Avant toute chose, toujours arrêter le
moteur et débrancher l’appareil.
Nettoyer le bloc-moteur
1
uniquement
avec un chiffon humide.
Toutes les pièces vont au lave-vaisselle.
Si nécessaire, les nettoyer avec une
spatule ou une brosse avant le rinçage.
Les aliments colorants (carottes par
exemple) peuvent tacher les parties en
plastique; les essuyer avec de l’huile de
cuisine avant de les nettoyer à l’eau.
Pour nettoyer le couvercle
q
, retirer
d’abord l’anneau d’étanchéité
ß
11a
t
puis le
replacer après nettoyage. L’anneau
d’étanchéité peut être utilisé indifférem-
ment sur ses deux faces. Ne pas utiliser
d’objets coupants pour le nettoyage.
Nettoyer les couteaux et les acces-
soires avec précaution, ils sont très
acérés.
Utilisation du bol universel
7
Lors de l’utilisation du bol universel,
placer tout d’abord les accessoires
avant d’incorporer les ingrédients.
1. Pétrir
Pour le pétrissage de la pâte, utiliser le
crochet pétrisseur
v
ou le couteau
n
.
Pour de meilleurs résultats, il est con-
seillé d’utiliser le crochet pétrisseur,
conçu spécialement pour les pâtes lour-
des, les pâtes alimentaires et les pâtisse-
ries.
Tourner le couvercle dans le sens des
aiguilles d’une montre jusqu’à ce que
son bec verseur se place dans l’ouver-
ture du bloquage de sécurité du bloc-
moteur
1
en faisant entendre un click
de blocage.
Pâtes lourdes (pain/gâteaux)
Maximum 500 g de farine plus les
ingrédients complémentaires
Vitesse 7 pendant 1 ½ minute
Verser la farine dans le bol universel
7
,
ajouter les autres ingrédients sauf les
liquides. Poser le couvercle
8
et blo-
quer. Positionner sur la vitesse 7 et met-
tre en route. Ajouter les liquides en les
versant dans la cheminée du couvercle
pendant que le moteur tourne.
En pétrissant à l’aide du couteau
n
, ne
pas ajouter d’ingrédients tels que raisins
secs, écorces confites, amandes, etc.
qui ne doivent pas être coupés. Ils doi-
vent être ajoutés à la main après avoir
retiré le couteau du bol.
Pâtes alimentaires
Maximum 500 g de farine plus les
ingrédients complémentaires
Vitesse 7 pendant 1 ½ minute
Verser la farine dans le bol universel
7
,
ajouter les autres ingrédients sauf les
liquides. Verser la quantité nécessaire
de liquide par la cheminée du couvercle
8
pendant que le moteur tourne. Ne
plus ajouter de liquide lorsque la pâte a
formé une boule car il ne serait plus
absorbé uniformément.
Pâte à tartes
Maximum 500 g de farine plus les
ingrédients complémentaires
Vitesse 7 pendant 1 minute environ
Verser la farine dans le bol universel et
ajouter les autres ingrédients. Pour de
meilleurs résultats, le beurre utilisé ne
doit être ni trop dur ni trop mou.
Placer le couvercle
8
et bloquer.
Positionner sur la vitesse 7 et mettre en
route.
Arrêter de pétrissage de la pâte dès
qu’une boule s’est formée sinon la pâte
à tartes deviendrait trop molle.
92266253_K700_S06-116.indd 19
21.05.12 14:10

20
2. Mélanger
Pour mélanger la pâte à gateaux ou
pâte à biscuits, utiliser le couteau
n
.
Le crochet pétrisseur
v
ne convient
pas pour mélanger les pâtes à gateaux
ou les pâtes souples.
Maximum 500 g de farine plus les
ingrédients complementaires.
Pâte à gâteaux
(2 méthodes)
Vitesse/Durée
a) Battre le beurre avec
du sucre et des oeufs, 6 / ca. 1 mn
ajouter le lait
6 / ca. 15 sec
et recouvrir de farine
avec le mode
15 / ca. 10-15 x
intermittent «
P
»
b) Verser tous les ingré-
dients sauf les liquides,
dans le bol universel 15 / ca. 1 mn
Ajouter les liquides nécessaires par
la cheminée du couvercle pendant
que le moteur tourne. Mettre les
in gré dients tels que raisins secs à la
main.
Biscuit de Savoie
(ou pâtes souples)
Vitesse/Durée
Battre les oeufs
(et l’eau si nécessaire) 15 / ca. 2 mn
ajouter le sucre
15 / ca. 4 mn
verser la farine avec
le mode intermittent
8 / 5 x «
P
»
ajouter la noix
de coco en poudre
8 / 3 x «
P
»
3. Mixer
Utiliser le couteau
n
pour mixer les
soupes, les liquides, etc.
Capacité maximale : 2 L
Vitesse 10 (respecter la contenance,
sinon le bol pourrait déborder)
Pour les milk-shakes, verser les fruits
grossièrement coupés dans le bol uni-
versel. Placer le couvercle
8
et bloquer.
Avec la vitesse 15, mixer d’abord les
fruits puis ajouter le liquide en vitesse 10
et terminer le mélange.
Lorsqu’on mixe le lait, ne pas oublier
qu’il peut mousser. Utiliser de plus
petites quantités.
4. Hacher
Hacher dans le bol universel
7
avec
le couteau
n
Note : Pour travailler des quantités
importantes, utiliser le bol universel
7
avec le couteau
n
. Pour travailler des
quantités plus petites, il est recom-
mandé d’utiliser le bol hachoir
j
avec le
couteau
l
.
• Poser le disque à utiliser sur le porte-
disques
o
(D); le mettre en place
d’un coup sec. Pour le retirer, pousser
vers le haut le dessous du disque qui
dépasse du support-disques.
5. Émincer, râper, gratter
Aliment
Quantité Préparation
Vitesse
Mode
Durée
maximale
Pain dur
4
en morceaux
15
I
45 sec
Cubes de glace 28
entiers
15
I
1 mn (pilés)
Pommes
700 g
en quartiers
8
I
15 sec
Chocolat dur
400 g
cassé
15
I
épais 15 sec
fin 30 sec
Oeufs
8
entiers
6
P
8 x
Fromage
400 g
cubes de 3 cm 15
I
20 sec
(pâte molle)
Fromage
700 g
cubes de 3 cm 15
I
60-70 sec
(pâte dure)
Viandes
700 g
en cubes
15
I
40 sec
Carottes
700 g
en morceaux
15
I
10 sec
Oignons
700 g
en quartiers
15
P
10 - 13 x
Exemples d’utilisation
Les temps d’utilisation sont approximatifs et dépendent de la qualité et de la quantité
des aliments ainsi que du degré de finesse désiré.
D
a
E
1
F
2
• Placer l’éminceur ou la râpe sur
l’entrainement du bol universel (E).
• Poser le couvercle
8
et bloquer.
Sélectionner la vitesse et verser les ali-
ments dans la cheminée pendant que
le moteur est arrêté. Le remplissage ne
doit être effectué que lorsque l’appareil
est à l’arrêt.
• Ne jamais introduire les doigts dans la
cheminée pendant que le moteur
tourne mais utiliser toujours le pous-
soir
9
(F).
NB: Si l’on travaille des aliments juteux
ou tendres, on obtiendra de meilleurs
résultats avec une vitesse basse; on uti-
li sera par contre une vitesse basse; on
utilisera par contre une vitesse plus
élevée pour les aliments durs. Ne jamais
surcharger le bol universel.
92266253_K700_S06-116.indd 20
21.05.12 14:10

21
Mixer
Aliment
Préparation
Vitesse
Position du
Durée
commutateur
Boissons mixées Hacher le fruit avant utili- 15
l
30 sec
sation. Ajouter le lait.
environ
Aliments pour
Hachés
15
P
10 x
bébé
l
10 sec
(fruits, légumes)
Mayonnaise
Mélanger 1 oeuf,
15
l
30-45 sec
l’assaisonnement, mou-
tarde et vinaigre. Verser
lentement l’huile par
l’ouverture du couvercle.
Tartare
Mélanger 1 oeuf,
15
I
30-45 sec
l’assaisonnement, mou-
tarde et vinaigre. Verser
lentement l’huile par
l’ouverture du couvercle.
Ajouter 1 oeuf en quar-
tiers et du vinaigre.
6
P
3-5 x
Crème d’avocat Hacher 1 gousse d’ail.
15
I
5 sec
Ajouter 2 avocats mûrs
(en quartiers et sans
le noyau),
1 cuillère à soupe de jus
de citron,
1 cuillère à soupe d’huile
d’olive,
150 ml. de yaourt,
½ cuillère à café de
sucre, sel, poivre.
15
I
ca. 45 sec
Utilisation du bol hachoir
j
Hacher
Aliment
Quantité
Préparation
Vitesse
Position du
Durée
maximale
commutateur
Carrotes
150 g
en morceaux 6
P
7 x
Ongions
100 g /
en quartiers 6
P
6-8 x
1
½ oignon
Persil
30 g / ½ botte sans tiges
15
l
5-10 sec
Ail
1 gousse
entière
15
I
5 sec
Viandre
250 g
en quartiers 15
l
15 sec
(maigre)
Exemples d’utilisation
Les temps d’utilisation sont approximatifs et dépendent de la qualité et de la quantité
des aliments ainsi que du degré de finesse désiré.
Disque éminceur tranches fines – a
p
Vitesse 1 - 2
Utilisation pour : concombres, choux,
pommes de terres crues, carottes,
oignons, radis.
Disque éminceur
tranches
épaisses – b
q
Vitesse 1 - 2
Utilisation pour : concombres, coux-
raves, pommes de terre crues, oignons,
bananes, tomates, champignons, céleris.
Disque à râper – râpe fin – c
r
Vitesse 3 - 6
Utilisation pour : fromages (à pâte molle
ou moyennement dure), concombres,
carottes, pommes de terre crues,
pommes.
Dis
q
ue à râper – râpe épaisse – d
s
Vitesse 3 - 6
Utilisation pour : fromages (à pâte molle
ou moyennement dure), concombres,
choux-raves, betteraves, carottes, pom-
mes de terre crues, pommes, choux.
Disque à gratter – e
t
Vitesse 8 - 15
Utilisation pour : pommes de terre crues
(par exemple pour crèpes de pommes
de terre), raifort, parmesan (fromage
dur).
Système coupe-frites
u
Placer le système coupe-frites sur le
pignon d’entrainement, poser le cou -
ver cle
8
et bloquer. Pour de meilleurs
résultats, placer 3 ou 4 pommes de terre
(suivant leur taille) dans la cheminée du
couvercle
8
pendant que le moteur est
arrêté.
Positionner sur la vitesse 1-2 et mettre
l’appareil en marche. Arrêter le moteur
avant de remplir à nouveau la cheminée.
Utiliser le poussoir
9
avec de légères
pressions pour pousser les pommes de
terre dans la cheminée.
6. Fouetter
w
Vitesse / Durée
Mélanger les pâtes souples
Maximum 280-300 g
de farine plus ingré-
dients complémentaires
fouetter les oeufs
(et l’eau si nécessaire) 5 / ca. 2 mn
ajouter le sucre
5 / ca. 2 mn
verser dans la farine 1 / ca. 30 sec
Monter les blancs en neige
mimimum 2 blancs
4-5 / ca. 4 mn
maximum 6 blancs
4-5 / ca. 6 mn
Fouetter la crème
mimimum 0,15-0,2 L 2 / ca. 1-2 mn
maximum 0,4 L
2 / ca. 3 ½-4 min
Avant de battre la crème fleurette, la
garder au froid plusieurs heures (à 4 °C
environ).
Le couteau
l
peut être utilisé pour
hacher, mixer, réduire en purée et
mélan ger de petites quantités. Le bol
hachoir est parfaitement adapté pour la
prépara tion de mousses (par exemple
guaca mole, tarama), mayonnaises ou
sauces épaisses.
Capacité maximale: 750 ml de liquide.
Attention : Le couteau
l
est extrême-
ment acéré.
Important : Le temps d’utilisation du bol
hachoir est d’une minute maximum.
Mais les liquides peuvent être travaillés
plus longtemps.
Chocolat, épiques durs et café ne peu-
vent pas être hachés.
Pendant que le moteur est arrêté, placer
le couteau
l
dans le bol hachoir
j
puis
ajouter tous les ingrédients. Les liquides
peuvent être versés par l’ouverture du
couvercle
q
pendant que le moteur
tourne. Lorsqu’on mixe le lait, ne pas
oublier qu’il peut mousser. Utiliser de
plus petites quantités.
Placer le couvercle
q
avec l’anneau
d’étanchéité
ß
11a
sur le bol hachoir et fer-
mer comme indiqué plus haut. Après
utilisation, retirer toujours le couteau du
bol hachoir avant les aliments travaillés.
92266253_K700_S06-116.indd 21
21.05.12 14:10
