Sony VPL-HW55ES: Maintenance
Maintenance: Sony VPL-HW55ES
US
20
Tools you need to get started:
•
Projector Lamp LMP-H202 (optional)
•
Standard Phillips screwdriver
•
Cloth (for scratch protection)
The lamp used for the light source has a
certain lifespan. When the lamp dims, the
color balance of the picture becomes
strange, or “Please replace the Lamp/Filter.”
appears on the screen, the lamp may be
exhausted. Replace the lamp with a new one
without delay.
Use an LMP-H202 Projector Lamp as the
replacement lamp.
The air filter is supplied with the LMP-H202
Projector Lamp. When you replace the lamp,
it is also time to replace the air filter.
Whenever you replace the lamp, be sure to
replace the air filter with a new one. Also
clean the ventilation holes (intake).
• The lamp remains hot after the projector is
turned off with the
?
/
1
(ON/STANDBY)
switch. If you touch the lamp, you may burn
your fingers. When you replace the lamp,
wait for at least 1 hour for the lamp to cool.
• Do not touch the surface of the lens. If you
touch it, wipe off the fingerprints with a soft
cloth.
• Pay special attention to replacing the lamp
when the projector is installed on the ceiling.
• When removing the lamp unit, make sure it
remains horizontal, then pull straight up. Do
not tilt the lamp unit. If you pull out the lamp
unit while tilted and if the lamp breaks, the
pieces may scatter, causing injury.
• When you remove the air filter, be careful not
to let any dust fall into the projector.
• Replacing the air filter is crucial to maintain
the good performance of the projector or to
prevent malfunction to it. When a warning
message for replacing the air filter appears,
replace the air filter immediately.
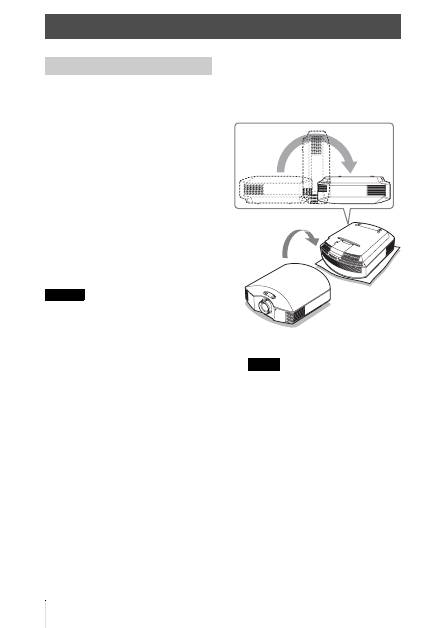
1
Turn off the projector and unplug the
AC power cord.
2
When setting the projector on a flat
surface such as a desk etc., put a cloth
to prevent the surface from being
scratched. Reverse the projector as
illustrated, then place it on the cloth.
• When the lamp is damaged the broken
pieces of the lamp may become
scattered, if you do not reverse the
projector. This may cause injury.
• Be sure that the projector is placed on a
stable surface.
Maintenance
Replacing the Lamp
Caution
Notes
21
US
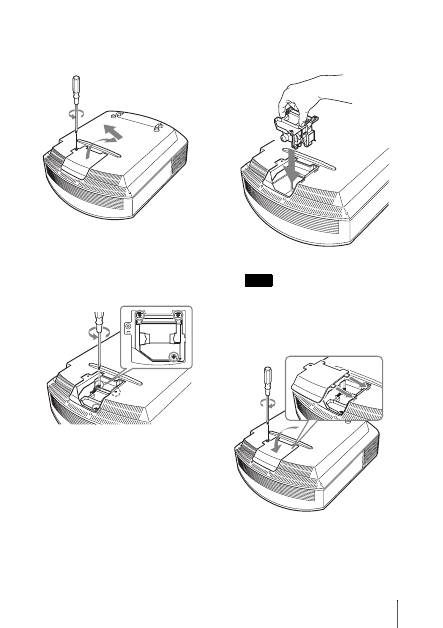
3
Loosen the screw on the lamp cover
with a Philips screwdriver, and then
open the lamp cover.
4
Loosen the 3 screws on the lamp with
the Phillips screwdriver. Hold up the
handle, then pull the lamp straight out.
5
Hold the handle of the new lamp and
push it in securely until it reaches the
end, and then tighten the 3 screws.
Be careful not to touch the optical block
inside the unit.
6
Close the lamp cover, then tighten the
screws.
Note
US
22
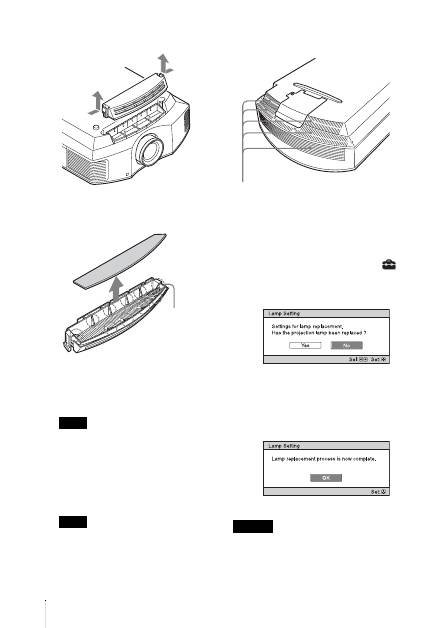
7
Remove the filter holder.
8
Remove the air filter.
9
Attach the new air filter so that it fits
into each claws (10 positions) on the
filter holder.
Attach the air filter aligning it with the
shape of the filter holder.
Also, do not touch the fan after removing
the air filter that is set deep inside the
projector.
10
Attach the filter holder.
The projector will not turn on unless the
filter holder is securely closed.
11
Wipe dust off the ventilation holes
(intake) with a soft cloth.
12
Place the project back on its original
position.
13
Turn on the projector, then select the
desired setting item on the Setup
menu. The menu screen below will be
appeared.
Tip
If “Settings Lock” is set to “Level B,” set to
“Off” once.
14
Select “Yes”.
Do not put your hands into the lamp
replacement slot, and do not allow any liquid or
other objects into the slot to avoid electrical
shock or fire.
Note
Note
Claws
Caution
Ventilation holes (intake)
23
US
• Be sure to use an LMP-H202 Projector Lamp
for replacement. If you use lamps other than
the LMP-H202, the projector may
malfunction.
• Be sure to turn off the projector and unplug
the power cord before replacing the lamp,
then check the ON/STANDBY lamp has
already been turned off.
• The projector will not turn on unless the lamp
is securely installed in place.
• The projector will not turn on unless the lamp
cover is securely closed.
• To cancel a message displayed on the screen,
press either the button on the remote control
or the one on the control panel on the
projector.
Disposal of the used lamp
For the customers in the USA
Lamp in this product contains mercury.
Disposal of these materials may be
regulated due to environmental
considerations. For disposal or
recycling information, please contact
your local authorities or the
Telecommunications Industry
Association (www.eiae.org).
When “Please clean the filter.” appears on
the screen, you should clean the air filter.
The air filter should be cleaned every 1,500
hours. This value varies depending on the
environment or how the projector is used.
1,500 hours are approximate.
After washing the air filter with a mild
detergent solution, dry it in a shaded place.
• When you clean the air filter, make sure you
do not damage it.
For details on how to attach and remove the
air filter, see “Replacing the Lamp” Steps 7
to 10. (page 22)
• When you remove the air filter, be careful not
to let any dust fall into the projector.
• Cleaning the air filter is crucial to maintain
the good performance of the projector or to
prevent malfunction to it. When a warning
message for cleaning the air filter appears,
clean the air filter immediately.
Notes
Note
The lamp contains mercury. The disposal
rules for used fluorescent tubes depend on
where you live. Follow the waste disposal
policy in your area.
Cleaning the Air Filter
Notes
Оглавление
- About the Quick Reference Manual
- WARNING
- Precautions
- Notes on Installation and Usage
- Preparing Step 1
- Installing the Unit Step 2
- Connecting the Unit Step 3
- Selecting the Menu Language Step 4
- Projecting Step 5
- Error Handling
- Maintenance
- A propos du Guide de référence rapide
- AVERTISSEMENT
- Précautions
- Remarques sur l’installation et l’utilisation
- Préparation Etape 1
- Installation de l’appareil Etape 2
- Raccordement de l’appareil
- Sélection de la langue du menu Etape 4
- Projection Etape 5
- Gestion des erreurs
- Entretien
- Acerca del Manual de referencia rápida
- ADVERTENCIA
- Precauciones
- Notas sobre la instalación y el uso
- Preparación Paso 1
- Instalación de la unidad Paso 2
- Conexión de la unidad Paso 3
- Selección del idioma del menú Paso 4
- Proyección Paso 5
- Gestión de errores
- Mantenimiento
- Informationen zur Kurzreferenz
- WARNUNG
- Vorsichtsmaßnahmen
- Hinweise zu Installation und Gebrauch
- Vorbereitung Schritt 1
- Installieren des Geräts Schritt 2
- Anschließen des Geräts
- Wählen der Menüsprache Schritt 4
- Projizieren Schritt 5
- Störungsbehebung
- Wartung
- Informazioni sulla Guida rapida all’uso
- AVVERTENZA
- Precauzioni
- Note sull’installazione e sull’utilizzo
- Preparazione Punto 1
- Installazione dell’unità Punto 2
- Collegamento dell’unità
- Selezione della lingua del menu Punto 4
- Proiezione Punto 5
- Gestione degli errori
- Manutenzione
- О документе Краткое справочное руководство
- ПРЕДУПРЕЖДЕНИЕ
- Меры предосторожности
- Примечания по установке и эксплуатации
- Подготовка Шаг 1.
- Установка устройства Шаг 2.
- Подключение устройства Шаг 3.
- Выбор языка меню Шаг 4.
- Проецирование Шаг 5.
- Устранение ошибок
- Техническое обслуживание
