Midland G9: инструкция
Раздел: Бытовая, кухонная техника, электроника и оборудование
Тип: Рация
Характеристики, спецификации
Инструкция к Рации Midland G9
Prodotto o importato da:
CTE INTERNATIONAL s.r.l.
Via. R.Sevardi 7- 42124 Reggio Emilia Italia
L’uso di questo prodotto può essere soggetto a restrizioni nazionali (per l’uso in Italia in modalità PMR446,
Midland G9
è richiesta l’autorizzazione generale (come da D.L. 259 del 01/08/03 art. 99 comma 3; All. 25 art. 36). Prima
dell’uso leggere attentamente le istruzioni. Se il prodotto contiene batterie: non gettare nel fuoco, non
disperdere nell’ambiente dopo l’uso, usare gli appositi contenitori per la raccolta.
Produced or imported by:
CTE INTERNATIONAL s.r.l.
”
Manuale d`uso
Via. R.Sevardi 7 42124 Mancasale Reggio Emilia Italy
”
User manual
Imported by:
”
Dedienungsanleitung
ALAN UK
Unit 2, Callenders, Paddington Drive, Churchward Park, Swindon, Wiltshire, SN5 7YW - UK
”
Manual de instrucciones
The use of this transceiver can be subject to national restrictions. Read the instructions carefully before
”
Manuel d`utilisation
installation and use. if the product contains batteries: do not throw the battery into re.
To disperse after use, throw into the appropriate containers.
”
Manual de instruções
”
Οδηγίες χρήσης
Importado por:
ALAN COMMUNICATIONS, SA
”
Руководство пользователя
C/Cobalt, 48 - 08940 Cornellà de Llobregat Barcelona España
Tel: +34 902 384878 Fax: +34 933 779155 Web site: www.midland.es
El uso de este transceptor puede estar sujeto a restricciones nacionales. Lea atentamente las instrucciones
antes de usar el equipo. si el producto contiene pilas o baterías no las tire al fuego ni las disperse en el
ambiente después de su uso, utilice los contenedores apropiados para su reciclaje.
Vertrieb durch:
ALAN ELECTRONICS GmbH
Daimlerstraße 1K - D-63303 Dreieich Deutschland
Die Benutzung dieses Handfunkgerätes ist von den landesspezischen Bestimmungen abhängig.
Vor Benutzung Bedienungsanleitung beachten. Bei Verwendung von Batterien beachten Sie bitte die
Umweltbestimmungen. Batterien niemals ins offene Feuer werfen, und nur in dafür vorgesehene
Sammelbehälter entsorgen.
www.midlandradio.eu
|

• INFORMAZIONE AGLI UTENTI
• Tous les articles présentant ce symbole sur le corps,
Ai sensi dell’art. 13 del decreto legislativo 25 luglio
l'emballage ou le manuel d'utilisation de celui-
2005, n.151 “Attuazione delle Direttive 2002/95/
ci ne doivent pas être jetés dans des poubelles
CE, 2002/96/CE e 2003/108/CE, relative alla
normales mais être amenés dans des centres de
riduzione dell’uso di sostanze pericolose nelle
traitement spécialisés. Là, les différents matériaux
apparecchiature elettriche ed elettroniche, nonché
seront séparés par caractéristiques et recyclés,
allo smaltimento dei rifiuti”.
permettant ainsi de contribuer à la protection de
• Il simbolo del cassonetto barrato riportato
l'environnement.
sull’apparecchiatura indica che il prodotto alla
• Todos os artigos que apresentem este símbolo no
ne della propria vita utile deve essere raccolto
seu corpo, embalagem ou manual de instruções,
separatamente dagli altri riuti. L’utente dovrà,
não devem ser eliminados juntamente com o lixo
pertanto, conferire l’apparecchiatura giunta a ne
normal mas sim conduzidos para contentores
vita agli idonei centri di raccolta differenziata dei riuti
de eliminação de resíduos especializados.
elettronici ed elettrotecnici, oppure riconsegnarla al
Aqui, os diversos materiais serão divididos por
rivenditore al momento dell’acquisto di una nuova
características e reciclados, realizando assim
apparecchiatura di tipo equivalente, in ragione di
uma importante contribuição para a protecção
uno a uno. L’adeguata raccolta differenziata per
ambiental.
l’avvio successivo dell’apparecchiatura dismessa
•
Όλα τα προϊόντα στα οποία εμφανίζεται το ακόλουθο
al riciclaggio, al trattamento e allo smaltimento
σύμβολο στο σώμα, τη συσκευασία ή το εγχειρίδιο
ambientalmente compatibile contribuisce ad
χρήσης τους, δεν πρέπει να εναποθέτονται στους
evitare possibili effetti negativi sull’ambiente e
κοινούς κάδους απορριμάτων αλλά να προσκομίζονται
sulla salute e favorisce il riciclo dei materiali di
στα ειδικά κέντρα αποκομιδής. Εκεί, τα διάφορα
cui è composta l’apparecchiatura. Lo smaltimento
υλικά θα πρέπει να διαχωρίζονται ανάλογα με τα
abusivo del prodotto da parte dell’utente comporta
χαρακτηριστικά και τα ανακυκλούμενα υκλικά,
l’applicazione delle sanzioni amministrative di cui
συμμετέχοντας έτσι ουσιαστικά στην προστασία του
al dlgs. n.22/1997 (articolo 50 e seguenti del dlgs.
περιβάλλοντος.
n.22/1997).
• Zużyte towary oznaczone tym znakiem mogą
• All articles displaying this symbol on the body,
stanowić zagrożenie dla środowiska naturalnego,
packaging or instruction manual of same, must
dlatego nie należy ich wyrzucać tylko oddać spr-
not be thrown away into normal disposal bins but
zedawcy, który przekaże je do przedsiębiorstwa
brought to specialised waste disposal centres.
zajmującego się utylizacja odpadów.
Here, the various materials will be divided
• Alle artikels die dit symbool weergeven op de
by characteristics and recycles, thus making
behuizing, verpakking of instructiehandleiding
an important contribution to environmental
ervan, mogen niet weggegooid worden in normale
protection.
vuilnisemmers maar moeten naar speciale
• Alle Artikel, die auf der Verpackung oder der
afvalverwerkingscentra gebracht worden. Hier
Gebrauchanweisung dieses Symbol tragen, dürfen
worden de verschillende materialen verdeeld
nicht in den normalen Mülltonnen entsorgt werden,
volgens eigenschappen en recyclage waardoor
sondern müssen an gesonderten Sammelstellen
een belangrijke bijdrage aan de milieubescherming
abgegeben werden. Dort werden die Materialien
wordt geleverd.
entsprechend ihrer Eigenschaften getrennt und,
• Alla artiklar som är märkta med denna symbol
Con la presente, CTE International dichiara che l’apparato è conforme ai requisiti essenziali della
um einen Beitrag zum Umweltschutz zu liefern,
eller som har den på sitt emballage eller sin
wiederverwertet.
bruksanvisning får inte kastas som vanligt
direttiva RTTE 1999/5/CE; la dichiarazione di conformità è consultabile sul sito internet
• Todos los artículos que exhiban este símbolo en
hushållsavfall, utan måste lämnas in för lämplig
www.midlandredio.eu
el cuerpo del producto, en el embalaje o en el
återvinning. Då delas de olika materialen upp och
manual de instrucciones del mismo, no deben
återanvänds, vilket innebär ett viktigt bidrag för
CTE International herewith declares that the product complies with the essential requirements of
ser desechados junto a los residuos urbanos
skydd av miljön.
EC Directive 99/05/EC; the declaration of conformity of the device can be consulted onto
normales sino que deben ser depositados en
• Kaikki tuotteet, joissa on tämä merkintä tuotteessa
www.midlandradio.eu
los centros de recogida especializados. En estos
itsessään, sen pakkauksessa tai käyttöoppaassa,
centros, los materiales se dividirán en base a sus
tulee hävittää ainoastaan tarkoitukseen
características y serán reciclados, para así poder
varatuissa kierrätyskeskuksissa. Siellä eri
Par la prèsente CTE International dèclare que l’appareil est conforme aux exigences essentielles
contribuir de manera importante a la protección y
materiaalit erotellaan ominaisuuksiensa ja
de la directive R&TTE 1999/5/CE ; la dèclaration de conformitè est consultable sur le site internet
conservación del medio ambiente.
kierrätystapansa mukaan, millä on tärkeä merkitys
www.midlandredio.eu
ympäristönsuojelussa.
www.midlandradio.eu
www.midlandradio.eu
www.midlandradio.eu
Настоящим CTE International заявляет, что данный продукт соответствует требованиям
директивы ЕС 99/05/EC; с декларацией соответствия вы можете ознакомиться на сайте
www.midlandradio.eu

MIDLAND G9
ITALIANO
Grazie per aver scelto i prodotti Midland! L’apparato Midland G9 è un ricetrasmettitore che può essere utilizzato
senza licenza, in quasi tutta Europa.
Come previsto da dl 259 del 01/08/2003 e da nota 101C del PNF, gli apparati PMR446 sono soggetti ad una
dichiarazione d’utilizzo e ad un contributo annuo. Per ottenere la modulistica e le modalità di ottenimento
dell’autorizzazione generale contattate l’Ispettorato Territoriale nel vostro capoluogo di regione o visitate il sito web del
Ministero delle Comunicazioni (www.urpcomunicazioni.it oppure www.urpcomunicazioni.it/ispettorati).
L’utilizzo dell’apparato è consentito solamente dopo aver inviato la pratica all’Ispettorato Territoriale.
Raccomandiamo di conservare una copia di tale pratica.
L’apparato Midland G9 grazie all’utilizzo delle tecnologie più avanzate nel campo della radiocomunicazione
ed alla sua robusta struttura meccanica è decisamente la soluzione più afdabile ed ideale per la gestione
professionale di team di lavoro, per la comunicazione con più persone all’interno di cantieri, di edici e nelle
manifestazioni sportive.
Midland G9 è disponibile in due modelli:
versione BiBanda (PMR446/LPD) ›
versione E solo banda PMR446 ›
Questo manuale comprende entrambe le versioni, segnalando quali sono le funzionalità speciche per
ciascuna versione.
Dotazione
N° 1 apparato Midland G9 ›
N° 1 caricatore da tavolo singolo ›
N° 1 adattatore da muro ›
N° 4 batterie ricaricabili AA da 1800mAh NiMH ›
N° 1 clip da cintura ›
Copertura/portata
Le prestazioni dei ricetrasmettitori dipendono dalle condizioni ambientali ed atmosferiche. Fattori ambientali quali
alture, edici, alberi, fogliame possono diminuire la copertura.
Le prestazioni ottimali si ottengono in campo aperto mentre la portata si potrà ridurre, per esempio all’interno di
un’automobile o di un edicio. Tipicamente la copertura in città, in presenza di edici è di 1 o 2 Km. In campo
aperto, ma con presenza di alberi, case, fogliame, la copertura è di 4-6 Km. In campo aperto, a vista e senza
nessun tipo d’interferenza, come per esempio in montagna, la copertura può essere anche superiore ai 12 Km.
Batterie e vano batteria
E’ possibile utilizzare le batterie ricaricabili fornite con l’apparato, oppure 4 batterie AA alcaline. Per aprire il vano
batteria, spingere la linguetta verso il basso, e rimuovere il coperchio sollevandolo. Dopo aver inserito il pacco
batteria o le batterie richiudere il vano batteria e riportate la linguetta nella posizione di chiusura.
Attenzione, nel caso si utilizzi le batterie ricaricabili è opportuno porre le radio in ricarica prima
dell’utilizzo.
Avvertenze
BATTERIE › - Osservate tutte le precauzioni sull’utilizzo delle batterie descritte nel cap “Ricarica delle
batterie”.
NON APRITE LA RADIO PER NESSUN MOTIVO › , la meccanica ed elettronica di precisione di cui é composto
l’apparato richiede esperienza e strumentazione; per lo stesso motivo non va assolutamente riallineata la
radio, che é già stata tarata in fabbrica per le massime prestazioni. L’apertura del ricetrasmettitore da parte di
personale non autorizzato farà decadere automaticamente la garanzia.
Non utilizzate alcool, solventi o abrasivi per pulire l’apparecchio. › Utilizzate solo un panno morbido e pulito
leggermente inumidito con acqua. Nei casi più tenaci utilizzate un blando detergente.
1
CARATTERISTICHE
Nuova funzionalità “doppio PTT per alta o bassa potenza” › : Midland G9 introduce il PTT doppio, grazie al
quale è possibile scegliere se trasmettere in alta o bassa potenza. Grazie a questa caratteristica è possibile
utilizzare l’alta potenza in trasmissione solo quando è veramente necessario, ottimizzando così il consumo
delle batterie.
Nuova funzionalità “Chiamata d’emergenza”. Midland G9 › introduce una nuova funzione “innovativa
ed importante”: il canale dedicato alle emergenze. Normalmente la comunicazione via radio avviene
tra due o più utenti che sono in quel momento sintonizzati sullo stesso canale, per cui non è possibile
comunicare con persone che sono su canali differenti o trasmettere su più canali contemporaneamente.
Grazie alla nuova funzione “Emergenza” è possibile invece controllare costantemente il canale dedicato alle
emergenze; in questo modo coloro che sono in possesso di un Midland G9 potranno comunicare normalmente
sul canale impostato ed allo stesso tempo ricevere o trasmette eventuali comunicazioni d’EMERGENZA sul
canale dedicato per questo scopo. É sufciente tenere premuto il tasto EMG per 3 secondi ed un segnale
di emergenza verrà inviato a tutte le radio in portata, che verranno sintonizzate automaticamente sul canale
“EC” (Emergency Channel) anche se si trovavano su un altro canale.
Nuova funzionalità “controllo portata”: › con la semplice pressione di un tasto potete vericare se ci sono
radio in portata.
Nuova funzionalità “Vox TalkBack”: › Se la radio dovesse trasmettere costantemente in VOX, la trasmissione
viene automaticamente interrotta dopo 20” per dare la possibilità di parlare anche ad altri utenti sintonizzati
su quel canale.
Caratteristiche principali
Potenza: 500mW (PMR446); 10mW (LPD) ›
Temperatura operativa: da -20° a +55° C ›
38 toni CTCSS/104 codici DCS ›
Doppio PTT: alta/bassa potenza ›
Chiamata d’emergenza ›
Controllo Portata ›
VOX regolabile su 3 livelli, con “TalkBack” ›
VibraCALL ›
Blocco tastiera ›
Auto power save: risparmio automatico batterie ›
Indicatore di batteria scarica ›
Dual Watch ›
CALL con 5 melodie ›
SCAN ›
Monitor ›
Out of Range ›
Roger beep: tono di ne chiamata ›
Alta/Bassa potenza ›
Display LCD retroilluminato ›
Alimentazione tramite 4 batterie AA NiMH (o con pacco batteria da 800mAh) ›
Presa accessori 2 Pin ›
Versioni:
G9 Dual band (PMR446/LPD) ›
24 canali PMR446 (8+16 pre-registrati)/69 canali LPD
G9E (solo PMR446) ›
24 canali PMR446 (8+16 pre-registrati)
2
DESCRIZIONE DELLE PARTI
ITALIANO
Display
Il vostro ricetrasmettitore utilizza un display LCD (a cristalli liquidi) per informarvi costantemente del suo stato
operativo. I simboli ed i parametri che possono apparire di volta in volta sono i seguenti:
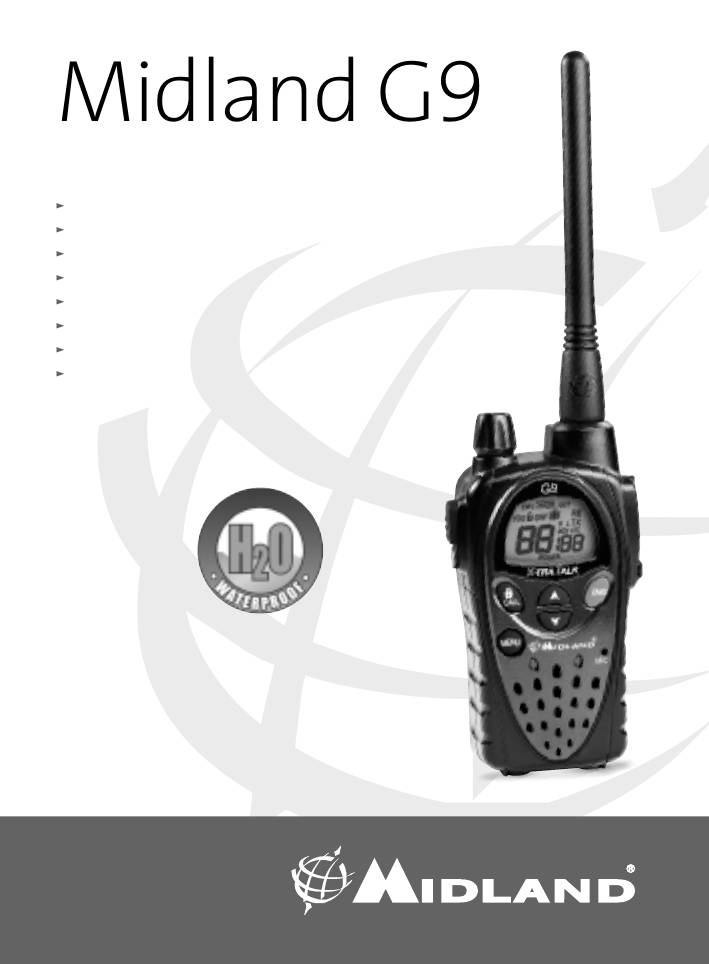
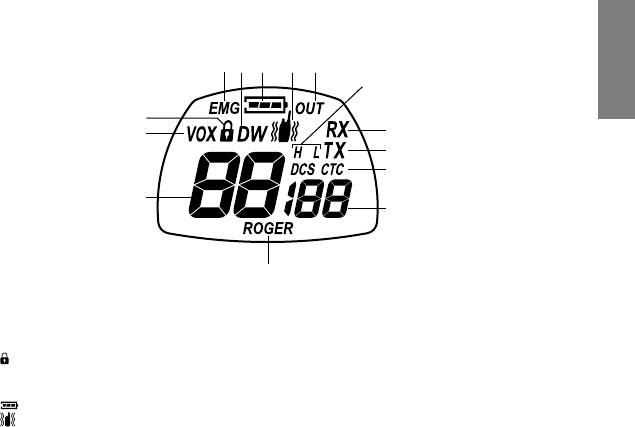
1. CANALE Queste due grandi cifre indicano il numero del canale selezionato
2. VOX Indica l’attivazione della funzione VOX;
3.
3
4 6 8 7
3
11
2
9
5
10
12
13
1
14
21
17
18
19
20
CALL
22
23
24
15
MENU
EMG
16
Il simbolo del lucchetto indica il blocco della tastiera attivo.
4. EMG Compare quando la funzione Emergenza è attiva.
5. DW Compare quando la funzione Dual Watch è attiva.
6.
4 6 8 7
3
11
2
9
5
10
12
13
1
14
21
17
18
19
20
CALL
22
23
24
15
MENU
EMG
16
Il simbolo della batteria indica lo stato di carica del pacco batteria o delle
batterie AAA.
7.
4 6 8 7
3
11
2
9
5
10
12
13
1
14
21
17
18
19
20
CALL
22
23
24
15
MENU
EMG
16
Indica la funzione VibraCALL attiva.
8. OUT Indica il superamento della distanza massima di ricezione Out of Range.
9. RX Appare sul display, quando il ricetrasmettitore è in ricezione.
10. TX Compare durante la trasmissione (pulsante PTT premuto);
11. H(High)/L(Low) Indica la selezione della bassa o dell’alta potenza di trasmissione.
La potenza di trasmissione del PTT grande segue questa selezione.
12. CTCSS/DCS Queste due icone indicano il tipo di tono sub audio selezionato.
13. Toni CTCSS/DCS Queste tre piccole cifre indicano il codice dei toni CTCSS/DCS selezionati
(1-38 / 1-104)
14. ROGER Compare, quando la funzione Roger Beep è attiva.
4 6 8 7
3
11
2
9
5
10
12
13
1
14
20
19
21
17
18
CALL
22
23
24
15
MENU
EMG
16
4 5 6 8
7
11
3
2
9
10
12
1
13
14
Descrizione dell’apparato radio
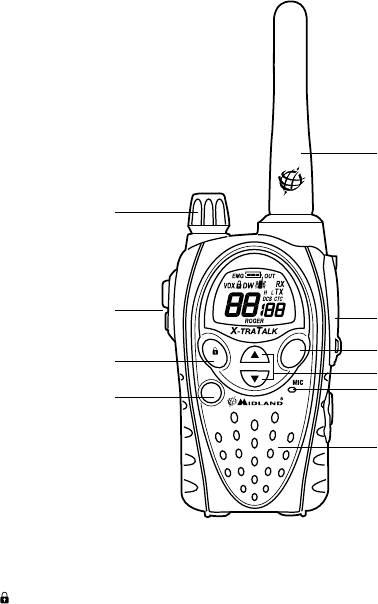
Fate riferimento all’immagine nella pagina seguente per identicare tutte le principali parti dell’apparato:
15. Altoparlante integrato In questo punto si trova l’altoparlante per la ricezione audio.
16. Pulsante MENU La pressione di questo pulsante permette di entrare nel MENU di
congurazione della radio.
17. Pulsante CALL/
4
4 6 8 7
3
11
2
9
5
10
12
13
1
14
21
17
18
19
20
CALL
22
23
24
15
MENU
EMG
16
Serve ad inviare un segnale di chiamata sul canale in uso, oppure tenendolo
premuto per circa 5 secondi per attivare il blocco della tastiera.
18. Pulsante PTT (premere per parlare). Sono disponibili 2 pulsanti PTT, uno grande e uno
più piccolo identicato con la parola “boost” in rosso. La pressione del PTT
grande porta l’apparato in trasmissione in bassa oppure alta potenza (in base
alla selezione fatta a menu: H oppure L), mentre la pressione del PTT piccolo
(boost) trasmette sempre in alta potenza.
19. Manopola VOLUME Accende /spegne l’apparecchio e regola il VOLUME audio di ricezione.
20. ANTENNA Serve a ricevere e trasmettere i segnali radio.
21. Presa Accessori (sotto la protezione) Consente il collegamento a dispositivi esterni quali: cufe,
microfoni, caricatori, ecc (2 pin).
22. Pulsante EMG Consente l’immediata attivazione delle funzioni d’EMERGENZA e Controllo
Portata.
23. Pulsanti ▲▼ Servono per scorrere le varie impostazioni all’interno del MENU
24. Microfono integrato In questo punto si trova il microfono per la trasmissione
4 6 8 7
3
11
2
9
5
10
12
1
13
14
20
19
18
21
EMG
22
CALL
17
23
MENU
24
16
15

Accensione/spegnimento
Per accendere il ricetrasmettitore, ruotare la manopola VOLUME in senso orario sino a sentire uno scatto
meccanico.
ITALIANO
Per spegnere il ricetrasmettitore, ruotare la manopola in senso antiorario.
Selezione della Banda PMR466 o LDP (solo per la versione BiBanda)
Midland G9 versione BiBanda è un apparato inizialmente congurato sulla banda PMR446.
Per passare alla banda LPD, è sufciente tenere premuto a lungo il tasto MENU nchè il display mostra il canale
1. Per tornare alla banda PMR446 tenete premuto il tasto MENU nchè il display mostra “P1”.
! Questa procedura disabilita la funzione “
EMG” (Emergenza) quindi se cambiate banda ricordatevi di
riattivare dal MENU la funzione Emergenza (vedi capitolo “Funzione chiamata Emergenza”).
Selezione di un canale
Premere il tasto MENU, sul Display inizierà a lampeggiare il n° del canale. Selezionare il canale desiderato
utilizzando i tasti ▲▼. Premere PTT per confermare, oppure attendere 5 secondi.
In base al modello si può scegliere tra i seguenti canali:
versione BiBanda: › PMR446 da P1 a P8 e da 9p a 24p (pre-registrati) / LPD da 1 a 69.
versione E solo PMR446: › da P1 a P8 e da 9p a 24p (pre-registrati)
! Il canale P8 è stato dedicato di Default alla funzione “Emergenza” quindi consigliamo di non utilizzarlo
per non interferire con questa funzionalità.
Visualizzare il canale/tono dei canali pre-registrati
Per visualizzare momentaneamente il canale PMR446 e il subtono utilizzato nei canali pre-registrati, è sufciente
posizionarsi sul canale voluto (da 9p a 24p) e tenere premuta la freccia giù per 3 sec.
Trasmissione e ricezione
Per trasmettere tenere premuto indifferentemente uno dei due pulsanti PTT. Attendere una frazione di secondo
e parlare con tono normale a circa 5 cm di distanza in direzione del microfono del ricetrasmettitore; il display
visualizzerà TX
Rilasciare il tasto PTT al termine della conversazione.
Quando l’apparecchio é in ricezione (pulsante PTT rilasciato) riceverete automaticamente qualsiasi comunicazione.
Il display visualizzerà RX.
! Per default sia il tasto grande del PTT che quello piccolo, trasmettono in Alta potenza, essendo da
menu congurata come Alta potenza (H – High).
! Se si utilizza un accessorio esterno, il PTT presente sull’accessorio segue la stessa funzionalità del
PTT grande.
Regolazione VOLUME
Ruotare la manopola VOLUME no ad ottenere il livello desiderato.
Tasto “CALL”
Premendo il tasto CALL verrà inviato un segnale sonoro di avviso chiamata a tutti gli utenti sullo stesso canale.
Sono disponibili diverse suonerie selezionabili tramite MENU.
Tasto “Emergenza”
Quando la funzione emergenza è attiva, (EMG lampeggiante sul display) tenendo premuto il tasto EMG per 3
secondi si invia la chiamata di emergenza agli altri G9.
La funzione Emergenza è già attivata di default.
Premendo due volte il tasto
EMG viene inviata una richiesta di risposta a tutte le radio in portata (funzione
Controllo Portata)
Blocco tastiera
Mantenere premuto il tasto CALL/
5
4 6 8 7
3
11
2
9
5
10
12
13
1
14
21
17
18
19
20
CALL
22
23
24
15
MENU
EMG
16
per circa 5 secondi. Il simbolo che appare sul display
4 6 8 7
3
11
2
9
5
10
12
13
1
14
21
17
18
19
20
CALL
22
23
24
15
MENU
EMG
16
indica la sua
attivazione. Solo i tasti PTT,
EMG e CALL/
4 6 8 7
3
11
2
9
5
10
12
13
1
14
21
17
18
19
20
CALL
22
23
24
15
MENU
EMG
16
rimangono attivi. Per la disattivazione, tenere premuto nuovamente
il tasto CALL/
4 6 8 7
3
11
2
9
5
10
12
13
1
14
21
17
18
19
20
CALL
22
23
24
15
MENU
EMG
16
per circa 5 secondi.
Funzione MON (Monitor)/Squelch
La funzione Monitor consente di escludere temporaneamente lo squelch automatico per ricevere eventuali
segnali estremamente deboli che altrimenti non sarebbero stati ricevuti.
Per attivare la funzione Monitor, tenere premuto per circa 2 secondi contemporanea-mente entrambi i pulsanti
▲▼. Per disattivare questa funzione premere nuovamente per circa 2 secondi entrambi i tasto ▲▼, (oppure
spegnere e riaccendere la radio).
! Questa funzione può essere attivata solo se la funzione “Emergenza” non è attiva.
! Con la funzione MON attiva, è normale che la radio abbia sempre un costante rumore di fondo.
Scansione di tutti i canali
SCAN esegue la scansione di tutti i canali e in presenza di un segnale in ricezione si arresta. La scansione
riprende dopo cinque secondi dal cessare del segnale. Questa funzione è utile per controllare quali canali sono
liberi.
Per eseguire la scansione dei canali, premere per 2 sec il pulsante ▲: Midland G9 inizia ad eseguire la scansione
dei canali. Per fermare la scansione, premete il tasto PTT, il vostro ricetrasmettitore tornerà sul canale in uso al
momento in cui è stata fatta partire la scansione.
! Questa funzione può essere attivata solo se la funzione “Emergenza” non è attiva.
Tasto Funzione “MENU”
Le seguenti funzioni si selezionano premendo il tasto “MENU”:
Selezione canale ›
Impostazione toni CTCSS ›
Impostazione toni DCS ›
Impostazione Alta/Bassa potenza (solo sulla banda PMR446) ›
Funzione VOX ›
Funzione Vibra › CALL
Impostazione suonerie ›
Roger Beep ›
Beep tastiera ›
Canale Emergenza ›
Funzione Dual Watch ›
Out of Range ›
Selezione di un canale
Premere il tasto MENU, sul Display inizierà a lampeggiare il n° del canale. Selezionare il canale desiderato
utilizzando i tasti ▲▼. Premere PTT per confermare, oppure attendere 5 secondi.
In base al modello si può scegliere tra i seguenti canali:
versione BiBanda: › PMR446 da P1 a P8 e da 9p a 24p (pre-registrati) / LPD da 1 a 69.
versione E solo PMR446 › : da P1 a P8 e da 9p a 24p (pre-registrati)
! Il canale P8 è stato dedicato alla funzione “Emergenza” quindi consigliamo di non utilizzarlo per non
interferire con questa funzionalità.
Impostazione toni CTCSS/DCS
I toni CTCSS e DCS sono dei codici che possono essere aggiunti ai canali per crearne uno personale. Per ogni
canale si possono aggiungere no a 38 codici CTCSS e 104 codici DCS diversi. L’implementazione di questi
codici può essere fatta sui seguenti canali:
Versione BiBanda: solo sugli 8 canali principali PMR446 (da P1 a P8) e sui 69 LPD.
Versione E solo PMR446: solo sugli 8 canali principali PMR446 (da P1 a P8)
Per entrambe le versioni, i canali pre-registrati da 9p a 24p non possono essere modicati.
Procedimento per l’attivazione dei 38 toni CTCSS:
Accendere l’apparato. ›
Selezionare il canale desiderato premendo il pulsante › MENU e i tasti ▲▼.
Premere nuovamente il tasto › MENU sino a visualizzare sul display la scritta CTC e il codice del tono lampeg-
giante a destra (“of”=nessun codice - condizione di default).
Selezionare il tono CTCSS desiderato premendo i tasti ▲▼. ›
Per confermare l’impostazione, premere il tasto PTT oppure attendere circa 5 secondi.
6

Procedimento per la disattivazione del tono CTCSS:
Per non utilizzare i toni CTCSS:
Selezionare il canale desiderato ›
ITALIANO
Premere il tasto › MENU sino a visualizzare sul display il codice del tono CTCSS lampeggiante a destra;
Selezionare “ › of” tramite i tasti ▲▼.
Procedimento per l’attivazione dei 104 toni DCS:
Accendere l’apparato. ›
Selezionare il canale desiderato, premendo il pulsante › MENU e i tasti ▲▼.
Premere nuovamente il tasto › MENU sino a visualizzare sul display la scritta DCS e il codice del tono lampeg-
giante a destra (“of”=nessun codice - condizione di default).
Selezionare il tono DCS desiderato premendo i tasti ▲▼. ›
Per confermare l’impostazione, premere il tasto PTT oppure attendere circa 5 secondi.
! Di fabbrica, il canale P8 con tono DCS 50 (P850) è riservato alla funzione Emergenza (canale EC).
Consigliamo quindi di non utilizzarlo!!!
Procedimento per la disattivazione del tono DCS:
Per non utilizzare i toni DCS:
Selezionare il canale desiderato ›
Premere il tasto › MENU nchè il display mostra il canale desiderato, ed il codice del tono DCS lampeggia a
destra;Selezionare “of” tramite i tasti ▲▼.
Funzione Alta - Bassa potenza (solo banda PMR446)
Per selezionare la potenza, premere il pulsante MENU sino a visualizzare sul display, Pr, utilizzando i tasti ▲▼
selezionare L (low) per la bassa potenza H (high) per l’alta potenza. Premere PTT per confermare, oppure
attendere 5 secondi.
Con le batterie completamente cariche, l’alta potenza é di 500 mW (ERP), mentre quella bassa é di 10mW
(ERP).
Sui Canali LPD (solo versione G9 Bibanda) la potenza è sempre di 10mW (ERP).
La selezione dell’alta o bassa potenza da menu modica anche la modalità con cui il doppio PTT funziona.
Canali PMR446: Se dal Menu è selezionata la voce “Alta potenza” (H-High), il PTT grande ed il PTT piccolo
trasmettono entrambi alla massima potenza. Se invece dal menu è selezionata la voce “Bassa potenza”
(L-Low), il PTT grande trasmette a bassa potenza ed il PTT piccolo trasmette alla massima potenza.
Canali LPD: quando si utilizzano i canali LPD (solo per versione G9 Bibanda) la funzione Alta-Bassa potenza non
è disponibile, quindi i due PTT trasmetteranno sempre alla massima potenza.
! ATTENZIONE: Per ottimizzare il consumo delle batterie, e quindi utilizzare l’alta
potenza solo quando veramente serve (utilizzando il pulsante PTT “boost”), è
necessario congurare la potenza di trasmissione da menu in Bassa (L-Low).
Per default la congurazione da menu è sempre Alta (H-High), quindi ricordatevi di cambiare questo
parametro.
Funzione VOX
Questa funzione permette di attivare la comunicazione senza premere il tasto PTT.
E’ sufciente parlare e la comunicazione viene attivata.
La sensibilità è regolabile su 3 livelli e attivabile con o senza accessori. Il quarto livello disponibile attiva la
funzione Vox con TalkBack.
Nel caso in cui uno dei due apparati trasmette ininterrottamente per più di 20 secondi, Vox TalkBack ne interrompe
la trasmissione per dieci secondi, liberando il canale e concedendo così all’altro utente la possibilità di parlare.
Per attivare questa funzione, premere il pulsante MENU, sino a che apparirà sul display VOX, utilizzando i tasti
▲▼ selezionare la sensibilità:
Of: Disattivato; ›
1: Alta ›
2: Media ›
3: Bassa ›
4: Talk Back › (con sensibilità Alta)
premere PTT per confermare, oppure attendere 5 secondi
Per disattivare la funzione VOX seguire le indicazioni sopra riportate selezionando la voce oF.
7

Funzione Vibra-CALL
Midland G9 è dotato del dispositivo “Vibra-CALL”, ovvero la possibilità di attivare la vibrazione al momento della
ricezione del “TONO DI CHIAMATA”
Per attivare questa funzione premere il tasto MENU, sino a visualizzare sul display
8
4 6 8 7
3
11
2
9
5
10
12
13
1
14
21
17
18
19
20
CALL
22
23
24
15
MENU
EMG
16
; premendo i tasti ▲▼si
può inibire o attivare la funzione (on: Attiva oF:Disattiva);
Confermare premendo il tasto PTT oppure attendere 5 secondi.
Funzione CALL
Midland G9 ha la possibilità di inviare 5 diversi toni di chiamata. Per farlo occorre premere il tasto CALL/
4 6 8 7
3
11
2
9
5
10
12
13
1
14
21
17
18
19
20
CALL
22
23
24
15
MENU
EMG
16
.
I toni possono essere selezionati nel seguente modo:
premere il tasto › MENU, sino a visualizzare sul display “CA” con il numero del tono attivo.
Premendo i tasti ▲▼si possono ascoltare/selezionare le 5 melodie pre-impostate; ›
Confermare premendo › PTT oppure attendere 5 secondi.
Funzione ROGER BEEP (Tonalità di conferma ne conversazione)
Al rilascio del tasto PTT, quindi alla ne di ogni trasmissione, viene emessa una tonalità, che indica al vostro
interlocutore che può iniziare a parlare.
Nel Midland G9 questa funzione è disattivata di default.
Premere il tasto MENU, sino a visualizzare sul display “rb of”;
Con i tasti ▲▼ selezionare “on” e sul Display comparirà “rb on”;
Premere il tasto PTT oppure attendere 5 secondi per confermare la programmazione.
Per disattivarlo ripetere la procedura indicata selezionando “rb of”
Beep Tastiera
Questa funzione, se attiva, genera un beep audio ogni volta che si preme un tasto.
Nel caso si desideri escludere il beep audio, è possibile farlo operando nel seguente modo:
Premere il tasto › MENU, sino a visualizzare sul display “bP on”.
Premendo i tasti ▲▼ fare in modo che il display mostri “ › bP of”.
Confermare premendo il tasto › PTT oppure attendere 5 secondi.
In questo modo tutte le volte che si preme un tasto non si sentirà alcun suono.
Per riattivarla ripetere la procedura indicata selezionando “bP on”
Funzione chiamata Emergenza
Questa funzione utilizza un canale dedicato alle chiamate d’emergenza e permette di parlare a tutti i G9 in portata,
anche se su canali diversi.
Tenendo premuto il tasto
EMG, in automatico la radio si sposta dal canale in uso a quello dedicato all’emergenza,
identicato con “EC” e contemporaneamente viene inviato un tono audio. Tutte le radio in portata con la funzione
Emergenza attiva, verranno automaticamente spostate sul canale “EC”. Ora tutti possono parlare sullo stesso
canale.
! Quando la radio si trova sul canale d’emergenza (EC sul display) non è possibile utilizzare le
funzionalità del MENU. Solo i tasti PTT e CALL sono attivi.
Le radio torneranno sul canale in uso dopo un minuto dall’invio dell’ultima trasmissione. È possibile ritornare
immediatamente al canale in uso premendo il tasto
EMG. In questa condizione è possibile utilizzare tutte le
funzioni del MENU.
Attivazione - Disattivazione
All’accensione dell’apparato la funzione EMERGENZA è attiva per default, è sempre possibile disattivarla/
attivarla operando nel seguente modo:
Premere il tasto › MENU sino a visualizzare sul display EC on.
Con i tasti ▲▼ selezionare › EC of. Confermare premendo il tasto PTT oppure attendere 5 secondi.
! Quando la funzione emergenza è attiva (
EMG lampeggiante sul display) le seguenti funzioni non sono
utilizzabili: Scan, Monitor, Dual Watch, Out of Range.
Cambio canale di emergenza
Per default il canale d’emergenza preimpostato è il P8 DCS 50; è però possibile scegliere un qualunque altro
canale in base alle proprie esigenze.
Ricordatevi di cambiare il canale anche sulle altre radio!!

Con la funzione emergenza attiva (EMG lampeggiante sul display)
Premere il tasto › MENU sino a visualizzare sul display EC on.
Premere ancora › MENU (sul display compare of) e con i tasti ▲▼ selezionare il canale desiderato
ITALIANO
Premere il tasto › PTT oppure attendere 5 secondi per conferma.
Per impostare nuovamente il canale di emergenza di default (P8 DCS 50) con la funzione Emergenza attiva (EMG
lampeggiante sul display):
Premere il tasto › MENU sino a visualizzare sul display EC on.
Premere ancora › MENU e selezionare of
Premere il tasto › PTT oppure attendere 5 secondi per conferma.
! Se decidete di dedicare un altro canale qualunque alla funzione Emergenza, ricordatevi di non utilizzarlo
anche per la normale comunicazione. Questo per evitare interferenze con la funzione Emergenza.
Funzione Controllo portata
Questa funzione permette di vericare manualmente in ogni momento se esiste almeno un’altra radio raggiungibile
in portata.
Premendo due volte il tasto
EMG viene inviata una richiesta di risposta, sul canale in quel momento in uso, a
tutte le radio in portata.
Se almeno una radio risponde, viene generato un tono audio sulla propria radio. Se nemmeno una radio risponde
(quindi nessuna radio in portata), non viene generato alcun tono audio.
! Questa funzione può essere utilizzata solo se la funzione “Out of Range” non è attiva.
Funzione DUAL WATCH
Questa funzione permette di monitorare costantemente in ricezione un secondo canale oltre a quello in uso.
Attivazione - Disattivazione
Premere il tasto › MENU ripetutamente sino a visualizzare sul display DW of.
Con i tasti ▲▼ selezionare il secondo canale che si desidera monitorare. ›
Premere il tasto › PTT oppure attendere 5 secondi per conferma. Il display mostrerà alternativamente il canale
in uso e il secondo canale selezionato.
Per interrompere il Dual Watch, è sufciente premere il tasto MENU.
Quando la radio riceverà un segnale su uno dei due canali monitorati, la funzione “Dual Watch” viene
momentaneamente sospesa, permettendo la trasmissione e la ricezione sul canale in quel momento in uso. Dopo
5 secondi, se non viene effettuata nessuna attività di trasmissione o ricezione, la funzione Dual Watch riprende.
! Questa funzione può essere attivata solo se la funzione “Emergenza” non è attiva.
Funzione Out-of-Range
Grazie a questa funzione è possibile vericare se una coppia di apparati rimane sempre in portata. Dal momento
in cui due radio vengono accoppiate, automaticamente si trasmettono a vicenda un codice di controllo ogni 30
secondi. Non appena questa trasmissione si interrompe ed uno dei due apparati non riceve il codice di controllo
per più di 2 volte consecutive, l’icona OUT inizierà a lampeggiare sul display e la radio emetterà un suono di
avviso.
! Questa funzione può essere attivata solo se la funzione “Emergenza” non è attiva.
Attivazione - Disattivazione
Attivare su entrambe le radio la funzione Out of Range:
premere il tasto › MENU sino a visualizzare sul display “OUT” e “Or of”, selezionare quindi con ▲▼ “Or on”
(attivato)
Spegnere entrambe le radio ›
Riaccendere entrambe le radio contemporaneamente ›
Per disattivare la funzione premere il tasto MENU sino a visualizzare sul display “OUT” e “Or on”, selezionare
quindi con ▲▼ “Or of” (disattivato).
Confermare le impostazioni con il pulsante PTT o attendere 5 secondi.
Illuminazione del display
Se l’illuminazione ambientale non é sufciente per leggere bene il display, premendo il pulsante EMG una volta
(brevemente), così da illuminarlo per circa 5 secondi. Tutte le volte che viene usato il pulsante MENU, il display
si illumina automaticamente.
9

Risparmio energia
La funzione di risparmio automatico di energia consente di ridurre i consumi no al 50%; se la radio non riceve
alcun segnale per più di 7 secondi la funzione viene attivata automaticamente.Quando le batterie sono scariche,
apparirà sul Display l’icona
10
4 6 8 7
3
11
2
9
5
10
12
13
1
14
21
17
18
19
20
CALL
22
23
24
15
MENU
EMG
16
: occorre sostituire le batterie al più presto o provvedere alla loro ricarica.
! Questa funzionalità è attiva solo quando la funzione “
EMG” è disattiva.
Ricarica delle batterie
1) Inserite la spina del cavo di ricarica in una presa di alimentazione di rete CA e l’altra estremità nella presa della
vaschetta di ricarica. Sono necessarie 12/14 ore per una carica completa.
2) Inserite il ricetrasmettitore nella vaschetta in modo che si innesti saldamente al suo interno. Il led rosso di
ricarica presente sulla parte frontale della vaschetta si accende.
3) Al termine della carica, estraete il ricetrasmettitore dalla vaschetta e scollegate la spina del cavo di ricarica
dalla presa di alimentazione di rete CA.
! Non sovraccaricate le batterie! Quando le batterie sono completamente cariche, il processo di carica
non si blocca automaticamente. Non dimenticate quindi di staccare al più presto il ricetrasmettitore
dal caricabatteria non appena é trascorso il tempo necessario, diversamente potreste danneggiare le
batterie e/o il ricetrasmettitore.
! Non cercate di caricare batterie alcaline o comunque batterie non ricaricabili. Accertatevi che nel
vano batterie dell’apparecchio, con il caricabatterie collegato, siano inserite esclusivamente batterie
ricaricabili NI-MH o il pacco batteria fornito in dotazione! Le batterie alcaline non sono ricaricabili.
Batterie non idonee possono perdere liquido, esplodere o anche bruciare e causare gravi danni!
! L’utilizzo di un caricabatterie non originale puó causare danni al vostro apparecchio o causare
esplosioni e lesioni personali.
! Non gettate mai le batterie nel fuoco, né avvicinatele a sorgenti di calore: possono causare esplosioni
e lesioni personali. Smaltite le batterie esclusivamente seguendo le normative locali.
! Non mescolate assieme batterie vecchie e nuove e/o di tipo diverso e/o utilizzate in modo diverso.
GARANZIA
- Il consumatore è titolare di diritti secondo la legislazione nazionale applicabile disciplinante la vendita dei beni
di consumo e la garanzia lascia impregiudicati tali diritti ;
- La durata della garanzia è di mesi 24 a decorrere dalla data di acquisto o dalla data della ricevuta rilasciata
dal rivenditore ; per farla valere l’utente deve presentare lo scontrino d’acquisto assieme al box dell’apparato
acquistato ;
- La garanzia copre l’apparecchio nella totalità delle sue parti esclusi i TRANSISTORS nali e comprende sia
il materiale che la manodopera necessaria per le riparazioni ;
- La garanzia non copre i difetti causati dall’uso o collegamento del Prodotto con accessori o/e software non
prodotti o forniti dal Produttore o da un uso del prodotto diverso da quello per cui il prodotto medesimo è stato
realizzato. Essa non è valida in caso di apertura, modica o riparazione da parte di soggetti diversi dai centri
autorizzati o in caso di riparazioni effettuate con ricambi non autorizzati.
- Nulla sarà dovuto all’acquirente per il tempo durante il quale l’apparecchio sarà rimasto inattivo né egli potrà
pretendere risarcimenti o indennizzi per spese sostenute come pure per danni diretti o indiretti derivanti
dall’uso dell’apparecchio.
Con la presente, CTE International dichiara che l’apparato è conforme ai requisiti essenziali della direttiva RTTE
1999/5/CE; la dichiarazione di conformità è consultabile sul sito internet www.midlandredio.eu

MIDLAND G9
ENGLISH
Thanks for choosing Midland! Midland G9 is a portable transceiver that is free use in almost all European
countries.
Combining the latest technology in radio communication along with a sturdy mechanical frame, the Midland
G9 makes the ideal and effective solution for the professionals who need to stay in touch with colleagues in
construction sites and buildings.
Midland G9 is available in two versions:
Dual Band (PMR446/LPD) ›
E version (PMR446 only) ›
This manual is referred to both models and you will nd highlighted the differences between the two versions.
Content
N° 1 › Midland G9
N° 1 Single desktop charger ›
N° 1 Wall adaptor ›
N° 4 1800 mAh AA NiMH rechargeable batteries ›
N° 1 Belt clip ›
Coverage/range
The maximum range depends on terrain condition and is obtained during use in an open space.
The only limitation to maximum possible range are environmental factors such as blockage caused by trees,
buildings, or other obstructions. Inside a car or a metallic constructions, the range can be reduced. Normally the
coverage in the city, with buildings or other obstructions is about 1 or 2 Km. In open space but with obstructions
like trees, leaves or houses the maximum possible range is about 4-6 Km. In open space, without obstructions
and in sight, like for example in mountain, the coverage can be more than 12 Km.
Batteries and battery compartment
The transceiver accepts the supplied rechargeable batteries or 4 AA alkaline batteries. To open the battery
compartment: with the back of the radio facing you, unhook the battery holder in the lower part of the radio and
gently slide the cover. Insert the battery observing the polarity and place the cover again.
Attention: the batteries must be recharged before the rst use.
Warnings
BATTERIES › - Strictly follow all the warnings on the batteries stated at chapter “Battery recharge”.
DO NOT OPEN THE RADIO FOR ANY REASON › ! The radio’s precision mechanics and electronics require
experience and specialized equipment; for the same reason, the radio should under no circumstances be re-
aligned as it has already been calibrated for maximum performance. Unauthorized opening of the transceiver
will void the warranty.
Do not use detergents, alcohol, solvents, or abrasives to clean the equipment. › Just use a soft, clean
cloth. If the radio is very dirty, slightly dampen the cloth with a mixture of water and a neutral soap.
11
FEATURES
New “Dual PTT” feature for high or low output power. Midland G9 › is equipped with a Dual PTT key. Than-
ks to this brand new feature, it is possible to use the high power only when it is really necessary, enabling in
this way a high reduction of the battery consumption.
New “Emergency CALL” feature. Midland G9 › introduces an innovative and important feature: the channel
dedicated to the emergencies. Radio communications usually happen between two or more users which
are tuned on the same channel: it’s not possible to transmit or receive to/from different channels. But thanks
to the “Emergency” function, you can also keep a check on the Emergency channel: all users having a
Midland G9 can communicate on the tuned channel and at the same time can receive/transmit Emergency
messages on the dedicated channel. Simply keep pressed the EMG button for 3 seconds and an emergency
CALL will be sent to all the G9 within the range: they will be automatically tuned on the “EC” channel (Emer-
gency Channel).
New “Manual Out of range” feature: › just press twice the EMG button and you will verify whether there are
some radios within the range of your equipment.
New “Vox TalkBack” feature: › if one radio is continuously transmitting in VOX, the Vox TB will automatically
stop the transmission after 20” to allow the transmission to the other users as well.
Main characteristics
Power: 500mW (PMR446); 10mW (LPD) ›
Operating temperature: from -20° to +55° C ›
38 CTCSS tones/104 DCS codes ›
Dual PTT key: high/low output power ›
Emergency CALL ›
Out of range control ›
VOX adjustable in 3 levels and with “TalkBack” ›
VibraCALL ›
Keypad lock ›
Auto power save: automatic current economy circuit ›
Low battery indicator ›
Dual Watch ›
CALL with 5 selectable melodies ›
SCAN ›
Monitor ›
Out of Range ›
Roger beep ›
High/Low power ›
LCD Display with backlight ›
Power supply: 4 AA NiMH rechargeable batteries (or an optional 800 mAh NiMH battery pack) ›
2pin accessory plug ›
Versions:
G9 Dual band (PMR446/LPD) ›
24 PMR446 channels (8+16 pre-set)/69 LPD channels
G9E (PMR446 only) ›
24 PMR446 channels (8+16 pre-set)
12
DESCRIPTION OF THE CONTROLS AND FUNCTIONS
Display
Your Midland G9 keeps you constantly updated about its operational status through a Liquid Crystal Display
(LCD). The symbols and their corresponding parameters that may appear, according to the operational status of
the device, are described as follows:
ENGLISH
1. CHANNEL These two large digits indicate the selected channel
2. VOX VOX function activated
3.
13
4 6 8 7
3
11
2
9
5
10
12
13
1
14
21
17
18
19
20
CALL
22
23
24
15
MENU
EMG
16
This symbol appears when the keypad lock is activated
4. EMG Emergency function activated
5. DW Dual Watch activated
6.
4 6 8 7
3
11
2
9
5
10
12
13
1
14
21
17
18
19
20
CALL
22
23
24
15
MENU
EMG
16
Indicates the battery status
7.
4 6 8 7
3
11
2
9
5
10
12
13
1
14
21
17
18
19
20
CALL
22
23
24
15
MENU
EMG
16
Vibra-CALL function activated
8. OUT Indicates if the Automatic Out of Range function looses contact with the other
radios.
9. RX Reception mode
10. TX Indicates the transmission(PTT pressed);
11. H(High) / L(Low) High or low power selection.
The output power of the big PTT depends on your selection.
12. CTCSS/DCS Indicate the type of sub audio tone selected.
13. CTCSS/DCS tone These three small digits indicate the code of the CTCSS/DCS tones
selected (1-38 / 1-104)
14. ROGER Roger Beep activated.
4 6 8 7
3
11
2
9
5
10
12
13
1
14
20
19
21
17
18
CALL
22
23
24
15
MENU
EMG
16
4 5 6 8
7
11
3
2
9
10
12
1
13
14
Radio
Refer to this picture to identify the various parts of the device:
15. Built-in speaker Here is where the speaker is housed.
16. MENU button Press this button to enter the radio’s MENU.
17. CALL/
14
4 6 8 7
3
11
2
9
5
10
12
13
1
14
21
17
18
19
20
CALL
22
23
24
15
MENU
EMG
16
button To send a CALL on the selected channel. If you keep it pressed for about 5 seconds,
the keypad lock is activated.
18. PTT (push to talk) The PTT key has a dual function, as it is composed by 2 parts: the larger and bigger
side of the PTT key, allowes the transceiver to send with high or low power (depending
on the setting of the menu); while the small PTT (Boost) allows the transceiver to
transmit always with high power.
19. VOLUME knob On/off switch for the device and adjusts VOLUME of reception.
20. ANTENNA Receives and transmits radio signals.
21. Accessory socket (under protective cover) To connect to external audio devices such as microphones,
chargers, etc. (2pin type)
22.
EMG button To activate the Emergency and the Manual Out of range functions.
23. ▲▼ buttons To change the setting within the MENU
24. Built-in microphone Here is where sound is picked up by the microphone.
4 6 8 7
3
11
2
9
5
10
12
1
13
14
20
19
18
21
EMG
22
CALL
17
23
MENU
24
16
15

Turning on/off
To turn on the transceiver, turn the VOLUME knob clockwise until you hear it clicks.
To turn off the transceiver, turn the knob counter-clockwise.
Selecting the PMR466 or LDP band (only for the dual band version)
Midland G9 (Dual band) is pre-set at factory on the PMR446 band.
To switch to the LPD band, keep pressed the MENU button until the LPD shows channel ‘1’.
To return to the PMR446 band, keep pressed the MENU button again, until the LCD shows ‘P1’.
! This procedure disables the “
EMG” function; therefore if you change the frequency band, remember
to activate the Emergency function again (see paragraph “Emergency function”).
ENGLISH
Channel selection
Press the MENU button. The number of the channel will start ashing on the display.
Press the scroll buttons ▼▲ till you select the desired channel. Press the PTT button to conrm, or wait for 5
seconds.
According to the version you bought, you can choose amongst the following channels:
Dual band version: › PMR446 from P1 to P8 and from 9p to 24p (pre-set) / LPD from 1 to 69.
E version › (PMR446 only): from P1 to P8 and from 9p to 24p (pre-set)
! Channel P8 has been set at factory for the “Emergency” function; we suggest that you do not use it for
general communications!
Displaying the channel/sub audio tone
To momentarily display the PMR446 channel and the subadio tone used in the pre-set channels, go to the desired
channel (from 9p to 24p) and keep pressed the ▼ for 3 seconds.
Transmission and reception
To transmit keep the PTT button rmly pressed (it is not important what part of it). Wait for a fraction of a second
then speak normally in the direction of the microphone and hold the device at a distance of about 5 cm; TX will
appear on the display.
When you have nished, release the PTT.
When the radio is in reception mode (PTT released) you will automatically receive any communication. RX will
be displayed.
! By default the output power set is “H-high”, so independently on which PTT key you press (small or
big)the sending will be with high power.
! If you use an external microphone, the PTT on it will follow the same PTT setting of the radio.
VOLUME adjustment
Rotate the VOLUME knob till you reach the desired level.
“CALL”
Push the CALL button and you will send an audio signal to the users tuned on the same channel; you can choose
amongst different CALL tones.
“Emergency”
When the Emergency function is enabled (EMG blinks on the display) keep pressed EMG for 3 seconds and you
send an emergency CALL to the other G9 within your range.
The Emergency function is activated by default.
Keypad lock
Keep pressed CALL/
15
4 6 8 7
3
11
2
9
5
10
12
13
1
14
21
17
18
19
20
CALL
22
23
24
15
MENU
EMG
16
for about 5 seconds. and
4 6 8 7
3
11
2
9
5
10
12
13
1
14
21
17
18
19
20
CALL
22
23
24
15
MENU
EMG
16
will be displayed as conrmation. Only PTT, EMG and CALL/
4 6 8 7
3
11
2
9
5
10
12
13
1
14
21
17
18
19
20
CALL
22
23
24
15
MENU
EMG
16
remain active. To disable this function, keep pressed again CALL/
4 6 8 7
3
11
2
9
5
10
12
13
1
14
21
17
18
19
20
CALL
22
23
24
15
MENU
EMG
16
for 5 seconds approx.
MON (Monitor) function / Squelch
The Monitor button is for temporarily excluding (opening) the squelch, in order to listen to signals that are too weak
to keep the squelch permanently opened.
To activate the monitor function, keep pressed for about 2 seconds both ▲▼ at the same time. Follow the same
procedure to deactivate the function, or switch off and on the radio.
! When MON is active, you will probably hear a constant background noise.
! You can activate the Monitor feature only if the “Emergency” function is disabled.
Scanning all the channels
Midland G9 can automatically search for signals throughout the bands by scanning the channels in rapid
sequence. This function is useful to nd out any active channel.
When a signal is detected, the scanning pauses on that channel for 5 seconds.
Press ▲ for 2 seconds: the scanning will start. To stop it, push PTT: the Midland G9 will go back to the channel
from which the scanning originally started.
! You can activate the scanning feature only if the “Emergency” function is disabled.
“MENU” key
The following features can be selected by using the “MENU” button:
Channel selection ›
CTCSS tone setting ›
DCS tone setting ›
High/low power selection (only in the PMR446 band) ›
VOX ›
Vibra › CALL function
CALL › melodies
Roger Beep ›
Keypad Beep ›
Emergency channel ›
Dual Watch function ›
Out of Range ›
Channel selection
Press the MENU button. The number of the channel will start ashing on the display.
Press the scroll buttons ▼▲ till you select the desired channel. Press the PTT button to conrm, or wait for 5
seconds.
According to the version you bought, you can choose amongst the following channels:
Dual band version: › PMR446 from P1 to P8 and from 9p to 24p (pre-set) / LPD from 1 to 69.
E version › (PMR446 only): from P1 to P8 and from 9p to 24p (pre-set)
! Channel P8 has been set at factory for the “Emergency” function; we suggest that you do not use it for
general communications!
CTCSS/DCS tone setting
CTCSS and DCS tones are similar to access codes and enable the radio to communicate only with the users that
are tuned on the same channel and have set the same code. For each channel, you can set up to 38 CTCSS
and 104 DCS tones.
These tones can be set on the following channels:
Dual band version: › only on the 8 main PMR446 channels (from P1 to P8) and on the 69 LPD channels.
E version › (PMR446 only): only on the 8 main PMR446 channels (from P1 to P8)
For both, the pre-set channels from 9p to 24p cannot be modied.
Activating the CTCSS tones:
Turn on the unit. ›
Select the desired channel by pushing the › MENU button and the ▲▼ channels.
Press the › MENU button till the display shows CTC and the CTCSS tone blinks on the right (“of”= no code –
default condition).
Select the desired CTCSS tone by pushing ▲▼. ›
To conrm the setting, push › PTT or wait for 5 seconds.
Deactivating the CTCSS tones:
If you don’t want to use the CTCSS tones, follow these steps:
Select the desired channel ›
16

Press the › MENU key till the display shows the CTCSS tone blinking on the left;
Select “ › of” by means of ▲▼.
Activating the DCS codes:
Turn on the unit. ›
Select the desired channel by pressing › MENU and ▲▼ keys.
Push the › MENU button again till the display shows DCS and the tone code blinks on the right (“of”=no code
– default condition).
Select the desired DCS code by pushing ▲▼. ›
To conrm the setting, press the › PTT or wait for 5 seconds.
! Channel P8 with DCS tone 50 (P850) has been set at factory for the “Emergency” function; do not use
ENGLISH
it for general communications!!
Deactivating the DCS codes:
Select the desired channel. ›
Press the › MENU key till the display shows the channel in use and the DCS code blinks on the right.
Select “ › of” by pushing ▲▼.
Hi/low power selection (only in PMR446 band)
To select the power level, press the MENU button till the display shows Pr. Use ▲▼ to select L (low power) or H
(high power). To conrm your selection, push PTT or wait for 5 seconds.
When the batteries are fully charged, the high power is 500 mW (ERP), while the low is 10mW (ERP).
If your radio has to operate within a short range, you can select the low power and therefore extend the battery
life.
On LPD channels (only for G9 Dual band version) the output power is always 10 mW (ERP).
PMR446 channels: The selection of high or low power inuences the use of the PTT key.
If you choose “H” (high power), by pressing the PTT key, regardless of what part of it, the transceiver transmit
with high power.
If you choose “L” (low power), by pressing the big PTT, the transceiver will transmit with low power; while by
pressing the small PTT it will transmit with high power.
LPD channels: the high/low output power selection is not available on LPD channels; so the two PTT transmit
always with high power (note for G9 Dualband version).
! WARNING: to optimize the battery consumption, it is necessary to set the Output power of the menu
as “L-low”. In this way, pressing the Boost PTT, you send with high power only when you really need.
As by default the Output power is “H-high”; so it is really recommended to change this parameter to
“L-low”.
VOX function
Midland G9 enables hands free conversations through the VOX function: just speak in the direction of the
microphone and the communication will be automatically activated.
The VOX sensitivity can be adjusted in 3 different levels. You can enable the VOX function with or without
accessories.
The fourth level activated is the Vox TalkBack: if one radio is continuously transmitting in VOX, the VOX TB will
automatically stop the transmission after 20 seconds to allow the transmission to the other users as well.
To activate the VOX function press the MENU button till VOX appears on the display.
Use ▲▼ to select the sensitivity levels:
Of: Off; ›
1: High ›
2: Middle ›
3: Low ›
4: Talk Back › (with high sensitivity)
To conrm your selection, press PTT or wait for 5 seconds.
To disable the VOX function, follow the procedure here above indicated and select oF.
17

Vibra-CALL function
Midland G9 is equipped with the “Vibra-CALL” feature, which provides a silent alert for incoming CALLs.
To activate this feature, press the MENU button until the display shows
18
4 6 8 7
3
11
2
9
5
10
12
13
1
14
21
17
18
19
20
CALL
22
23
24
15
MENU
EMG
16
; use the ▼▲ buttons to disable or
enable this feature (on: enables, oF:disables);
Push PTT [11] to conrm or wait for 5 seconds.
CALL feature
Midland G9 can send 5 different CALL tones. To send this audio signal to other users, press the CALL/
4 6 8 7
3
11
2
9
5
10
12
13
1
14
21
17
18
19
20
CALL
22
23
24
15
MENU
EMG
16
key.
To select the CALL tones:
Press MENU, until the display shows “CA” and the active tone code.
By pushing ▲▼ you will hear the 5 pre-set melodies.
Conrm by pressing PTT or wait for 5 seconds.
ROGER BEEP (End transmission tone)
When the PTT button is released, the radio will beep to conrm to other users that your transmission has
nished.
In the Midland G9 this function is factory disabled.
To activate it:
Press the MENU button until the display shows “rb of”; using the scroll buttons ▼▲ select “on” and “rb on” will
be displayed; to conrm the roger beep activation, press PTT or wait for 5 seconds.
Keypad Beep
Everytime a button is pressed, you will hear a beep.
To disable the beeps, follow this procedure:
Press › MENU, till the display shows “bP on”.
Push ▲▼ till “ › bP of” is displayed.
Conrm your selection by pushing › PTT or wait for 5 seconds.
In this way, all beeps and tones are disabled.
To enable the keypad beep, repeat this procedure and select “bP on”
Emergency CALL function
The Midland G9 dedicates a channel to the Emergency calls: all the G9 operating within your range, even if tuned
on different channels, can receive/transmit Emergency messages on that channel.
If you keep pressed the EMG button, the communications automatically switch to the emergency channel (“EC”
on the display). An audio signal will be sent and all the G9 operating within the range will automatically go to the
Emergency channel (“EC”).
If you have disabled this function, you won’t receive/transmit any Emergency CALL.
! When the radio is operating on the Emergency channel (EC displayed), all the buttons except PTT and
CALL are disabled.
The G9 will return to the channel in use after one minute from the last transmission.
To return immediately, push EMG. Now you can use all the MENU functions.
Activating / Deactiving the Emergency feature
When you switch on the unit, the Emergency function is activated, but you can disable and enable it again:
Press MENU till the display shows EC on.
Select EC of by using ▲▼ . Conrm your selection by pushing PTT or wait for 5 seconds.
! When the Emergency function is activated (EMG blinking on the display) the following functions
cannot be used: Scan, Monitor, Dual Watch, Out of Range.
Changing the emergency channel
The emergency channel originally preset is P8 DCS 50; but you can change it according to your needs.
! Important: be sure that the Emergency function is active! (EMG blinking). If you decide to change
the channel dedicated to the Emergency function, do not forget to make the same change to all the
radios!
Press the MENU button until the display shows EC on.
Push MENU again (of displayed) and select the desired channel by means of ▲▼. To conrm press PTT or wait


