Mongoose AMG 850 C: инструкция
Раздел: Авто, мото оборудование и транспорт
Тип: Автосигнализация
Инструкция к Автосигнализации Mongoose AMG 850 C
850
SERIES

ENGLISH 3
ITALIANO 17
РУССКИЙ 31
УКРАЇНСЬКА 45
2

MONGOOSE AMG 850C
Introduction
English
The AMG 850C alarm system has been designed to protect car doors, hood and trunk,
dorm space and the space closed to your car.
TM
To prevent unauthorised access to the system, a KeeLoq
"based radio command
code protection is provided, which will prevent any attempted code interception with
code grabber. Also provided are a built"in Antiscanner feature, which inhibits alarm
system disarming by random code fitting and a Status memory feature, which excludes
alarm system being disarmed by just disconnecting and then connecting the car battery
terminal, since in this case an alarm will be triggered and the engine blocking will persist.
Power supply interruption and recovery with the system disarmed will not trigger an
alarm to avoid problems, for instance, during repair.
If the car is powered off with the alarm system in the Valet mode, a subsequent power"
on will return the alarm system to that state.
To avoid locking the keys inside the car, no change in the door locks status occurs at
the recovery of supply from the car battery.
False alarm can be avoided by the Defective zone bypass feature, which will disable
the faulty sensor until the end of arm cycle once it has triggered 8 alarms.
The other controlled zones and blockings will remain armed.
The programmable feature of Interior light detection allows using AMG 850С with
any type of car.
To enhance the system security properties and the car’s ease of use, AMG 850С is
equipped with the following auxiliary outputs:
" pager connection,
" trunk unlock control,
" power window close while arming,
" power window or external lighting control from remote control.
A standard AMG850C package includes:
Central unit with a complete installation kit.
A two"stage shock sensor, which either issues a short siren chirp or activates a full
alarm depending on the strength of impact upon the car body.
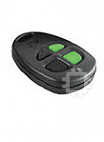
Two remote control transmitters.
A LED indicating the alarm system mode of operation and intended for installation
inside the car.
An Override Switch, which point of installation inside the car you select together
with your installer so that it is both inconspicuous and easy to use.
A complete instruction for controlling all AMG 850C modes and also a memo card
with a shorter description, which you can always take around.
To enhance the security properties of your alarm system you are advised to
purchase an optional two"stage space disturbance sensor, which is able to register any
movement both inside the car and in immediate proximity to it. Your AMG 850C has a
special input to connect such a sensor.
3

Remote control transmitter.
This is a miniature radio transmitter fed from a 12 volt battery (type 23 А), which lasts
for about 1 year of operation. A considerable decrease in the transmitter coverage points
to the need for battery replacement. The transmitter features three control buttons and
an indicator LED. When any button is pushed, the transmitter forms and transmits a
special coded command, which is altered with every new button push to prevent your
code interception with a code grabber.
Control summary
Feature Button 1 Button 2 Button 3 Note
Arm/Disarm Ignition OFF
Door locking Ignition ON
Arm with sensors disabled Ignition OFF
Silent arm/disarm 2 1 Ignition OFF
Silent arm with sensors disabled 2 1 Ignition OFF
Door unlock Ignition ON
Panic 3 sec Ignition OFF
Trunk unlock 3 sec Ignition OFF
Power window/external lighting turn#on 3 sec Ignition OFF
Multifunctional output to control power 3 sec 3 sec
window or external lighting
VALET mode 3 sec 3 sec Alarm system disabled
Two#step unlock Ignition OFF
Anti#hijack 3 sec Ignition ON
Arm/disarm of a second car Ignition OFF
press button briefly
press briefly two times in an interval no longer than 3 seconds
3 sec press and hold button for at least 3 seconds
3 sec press and hold buttons for 3 seconds to activate channel, keep held for the
time required for channel operation but no longer than 30 seconds.
1, 2 order of button pressing
Useful information.
PIN code.
To enhance the secrecy of alarm system control, AMG 850C provides an option to
use a personal PIN code for emergency cancellation of alarm signals, memorisation of
additional transmitters and user functions, or disabling the Anti"hijack feature.
PIN consists of two digits and can have a value from 11 to 99. In the factory the value
«11» is set but we recommend you to change it after installation (see the section «Feature
programming»). This will secure your alarm system against unauthorised disarming.
PIN code is entered using the Emergency disarm button and the ignition key.
4

Emergency disarm.
If the control transmitter is missing or broken, to disarm the system: unlock the door
with a key " an alarm mode will be started " take your seat in the car and turn the ignition
on. With ignition on press the Override Switch as many times and the first digit of the
current PIN code, then turn the ignition off/on and press the Override Switch as many
times as the second digit of your PIN code. Turn the ignition off " the system will disarm.
English
LED indication of system status
Armed blinks slowly
Disarmed out
Arming blinks fast
Valet mode continually lit
DIRECTIONS FOR USE.
Basic security features control
Arm.
To arm the system, press button 1 of the transmitter with ignition off. If the doors,
hood and trunk are closed, the siren will chirp once and the lights will flash once. The
system LED will blink slowly, the door locks will lock (if the car is equipped with lock
blocking actuators). If any door, hood or trunk happen to be open, three chirps and three
flashes will follow.
Arm status.
In the arm status the system monitors the state of all available pin switches of the
doors, hood and trunk, the status of ignition and the status of shock sensor, and also the
space disturbance and other sensors if installed. In addition, engine start is blocked in
this mode. If any guard zone is violated, a 30"second alarm mode is triggered.
Alarm.
Once the alarm mode is started, the siren will chirp and the signal lights will flash for
30 seconds or until cancelled using button 1 of the transmitter.
If the warning zone of shock sensor or the external zone of an additional sensor is
violated, the siren will issue a warning chirp.
Disarm.
To disarm the system, push button 1 of the transmitter, the siren will chirp twice and
the lights will flash twice. The LED will go out, the door locks will unlock (if the car is
equipped with lock blocking actuators). If an alarm mode has been started within the
armed period, there will be four chirps and four flashes at disarm.
If you opted for the Twostep door unlock scheme at setup, the first push of the
button will open only the driver’s door, to unlock the other doors press button 1 again
and hold it for 3 seconds.
5
Panic.
If your press button 1 and hold it down for 3 sec with ignition on, the siren and signal
lights will be started. A repeated push of button 1 will cancel the mode. Activation and
deactivation of Panic does not change the system status, i. e. if armed, the system will
remain armed with doors locked, and if not armed and the doors unlocked, there will be
no arming or door locking.
Silent arm.
If you have to arm the alarm system without audible confirmation, i. e. if you do not
want to disturb people around you with siren chirps, press button 3 of the transmitter
immediately before pressing button 1, the lights will flash once as usual, but the siren
will remain silent. The system LED will blink slowly, the doors will lock (if the car is equipped
with lock blocking actuators). With silent arming audible warnings about open doors,
hood or trunk remain functional, so there is no risk of your leaving the car unlocked.
Silent disarm.
To disarm the system without audible confirmation, press buttons 3 and 1 in the same
sequence, the lights will flash twice, but the siren will remain silent. The LED will go out,
the doors will unlock (if the car is equipped with lock blocking actuators). However, if an
alarm has been started within the guarded period, this will be indicated with usual audible
signals even at Silent disarm.
Arm with sensors disabled.
If it is necessary to disable the dorm sensors at arming, i. e. if passengers or animals
are to be left in the dorm, press button 1 twice. The system will confirm sensor disabling
with an additional chirp and a flash.
Silent arm with sensors disabled.
You can also disable the dorm sensors at silent arming; to do so press button 2 twice.
In this case only an additional flash will confirm sensor disabling.
Additional security features control
Automatic rearm (protection against inadvertent button push).
If neither door, the hood or the trunk have been opened and ignition has not been
turned on within 30 sec after disarm, the system will automatically rearm. Door locking
at rearm can be disabled by programming.
Twostep disarm
If an alarm has been started, then pressing the button once will only cancel the siren
chirps and flashes (if the cause of alarm has been removed, e. g. an open door has been
closed or a shock sensor triggers no more). But if the cause of alarm persists, a repeated
push of the button is needed to cancel the alarm. Full disarming requires a further push
of the button after the alarm is cancelled.
6

Passive arm.
This function can be enabled or disabled by programming at setup.
If the feature is enabled, then turning off the ignition, opening or closing the door, will
cause two flashes of the signal lights and the LED will blink fast. If 30 seconds later all
doors, the hood and the trunk remain closed, the alarm system will be armed and the
doors will lock.
English
If the Passive arm feature is used, the alarm delay mode is activated, which allows you
to take your seat in the car and disarm the system with a PIN code " there will be no
alarm for 10 seconds. Delay duration of up to 20 seconds can be set by programming.
Automatic door lock at ignition turnon.
The electrical door locks automatically lock 10 sec after ignition switch"on, once the
ignition is switched off, the locks will unlock. If any door happens to be open within these
10 sec, there will be no automatic locking to avoid locking in the keys. The function can
be disabled by programming.
Remote control of central lock.
With the ignition on, the door locks can be locked or unlocked at any moment by
pressing the transmitter buttons 1 or 2 respectively.
Antihijack. Protection against robbery.
This function can be enabled or disabled at any time by programming.
If the feature is enabled by programming, it will be activated each time the ignition
turning on follows a door open and closed as well as each time someone opens a door
with ignition turned on and also remotely by pressing button 3 of the transmitter for 3
seconds. Thus, if a robber forces you to leave the car and give him the keys, obey: Anti"
hijack will trigger the alarm and block the engine.
A siren beep will confirm the Anti Hijack activation by switching the ignition on or
remotely, that will be followed by 2"minute pause with the LED flashing slowly. After the
pause, the siren will emit beeps during 30 seconds. After those 30 seconds of siren
signals the signal lights will begin to flash and the engine will be blocked. Starting from
this moment, the engine will be blocked until complete cancellation of Anti"hijack. In a
minute of blocking the engine the alarm system will begin 30"second alarming and will
repeat these 30 second alarming cycles until the ignition is switched off.
If a door is opened with the ignition turned on, this will cause the LED to flash for
30 seconds (but not 2 minutes), after that the above procedure will follow.
From the moment of Anti"hijack activation and until its complete cancellation, all
transmitters will be blocked and the system will not respond to any remote commands.
To cancel Anti"hijack within the 2"minute or 30"second (the second case) pause, enter
the first digit of your PIN code using the override switch. The LED will go out, the system
will revert to normal operation, one flash/beep signal will confirm the Anti Hijack has
been disarmed.
Note: as soon as you turn the ignition off without the Anti Hijack previously disarmed
the alarm system will warn you by double beeps.
To cancel Anti"hijack after the 2"minute or 30"second pause, you have to stop the car
and enter the full code, the same as while emergency disarming. If the full PIN code is
7

used to disarm the Anti Hijack, then there will be no Anti Hijack activation with exception
of remote mode unless you open and close a door with the ignition turned off.
To suspend Antihijack functionality you can use the Valet mode, however, to enable
Valet mode you must first disable Antihijack.
Diagnostic features
Fault warning.
If any door, the hood or the trunk remain unclosed at arming, you will hear 3 audible
signals instead of 1 and the lights will flash 3 times.
Alarm memory.
If an alarm has been activated during the guard period, then at disarming the system
will issue four chirps and four sounds instead of the usual two and will report the cause
of alarm with series of LED flashes within 10 seconds after the first ignition turn"on.
Number of flashes in a series Component involved
2 Dorm sensor
3 Door pin switch «"» or «+»
4 Trunk pin switch «"»
5 Ignition
Interior light detection.
If your car has the interior light delay functionality and interior light detection mode is
enabled by programming, then the door pin switches will be armed only after the light in
the dorm goes out. In this mode there will be no warning about unclosed doors at arming.
Programming enables the mode.
Valet mode.
In this mode all the system’s security features are disabled. You can enable this mode,
for instance, when you leave your car at the service centre, then you will not have to
leave your control transmitter along with the car. This is a 100% warranty against
unauthorised memorisation of new control transmitters with your system.
To enable the mode press buttons 1 and 2 for 3 sec with alarm system disarmed; the
signal lights will flash three times, the system LED will be continually lit. In Valet mode
you retain the option to remotely control the central lock and auxiliary outputs. A repeated
push of the same buttons will return the system to normal operation, which will be reported
by three chirps.
To exit the Valet mode the PIN code can also be used.
Transmitter programming.
A standard AMG 850C package includes 2 remote control transmitters, however, the
alarm system is capable of memorising up to 4 transmitters. You can initialise additional
transmitters using this procedure:
8

1. Turn the ignition on.
2. Enter the first digit of the current PIN code by pressing the Emergency disarm button
as many times.
3. Turn the ignition off/on.
4. Enter the second digit of the set PIN code by pressing the Emergency disarm button
as many times..
English
5. Turn the ignition off/on. If the correct PIN code was entered, the siren will chirp
twice confirming your entering the Transmitter programming mode.
6. Push button 1 of the transmitter. The siren will chip once confirming the transmitter
code recording.
7. Turn the ignition off and press the Emergency disarm button or wait for 15 seconds,
there will be two chirps confirming you have quit Transmitter programming.
CAUTION! If you have enabled Antihijack by programming, then for
memorising new transmitters you should turn on the ignition (1), then first enter
the PIN code to disable Antihijack, then wait for a chirp and a flash confirming
Antihijack disabling, and then without turning the ignition off proceed to
transmitter programming (2) i. e. enter the PIN code once again.
Feature programming.
To change a PIN code value, erase the transmitters you no longer need from the system
memory, or change the settings of programmable features, you should first perform
transmitter programming (see above) using a transmitter already known by the system.
Then proceed as follows:
1. Complete transmitter programming and turn the ignition on.
2. Enter the number of program switches group by pressing the Emergency disarm
button as many times (first digit). A siren chirp will confirm each push of the button.
3. Turn the ignition off/on.
4. Enter the number of switch within the group (second digit) by pressing the
Emergency disarm button as many times. A chirp will confirm each button push.
5. The feature current status is indicated by the system LED, which is lit if the feature is
enabled or is out if it is disabled.
6. To enable a feature press button 1 of the transmitter, to disable it press button 2.
7. To exit the Feature programming mode, turn the ignition off or wait several seconds
for a double siren chirp. To proceed with programming, turn the ignition on without
waiting for a chirp and resume from step 2.
9

Switch function Factory LED lit LED out
default
1"1 Passive arm OFF ON OFF
1"2 Alarm duration 30 sec 30 sec 60 sec
1"3 Door locking at rearm ON ON OFF
1"4 Door locking at ignition turn"on ON ON OFF
1"5 Audible signals confirming command ON ON OFF
execution
1"6 Central lock pulse duration 0.6 s 0.6 s 3.5 s
2"1 Window closing while arming OFF ON OFF
2"2 Pulse duration at power window output 25 s 10 s 25 s
2"3 Delay of alarm from door at passive arm ON ON OFF
2"4 Duration of alarm from door 10 s 10 s 20 s
2"5 Interior light detection OFF ON OFF
2"6 Anti hijack OFF ON OFF
3"1 PIN code setting (11÷99) 1 Button 1 Button 2
A chirp accompanies entering each digit: code value code value
long for tens, short for units. increase decrease
3"2 Erasing the codes of all transmitters " Press buttons 1& 2
except the one being used simultaneously
3"3 Return to factory defaults " Press buttons 1& 2
simultaneously
Troubleshooting
Fault
Action
The system does not respond to remote control or
1. Check whether the car battery is charged.
emergency disarm commands
2. Check the system power circuit fuse and
replace it if necessary.
No optical signals with otherwise normal functioning
Check the signal lights power circuit fuse, replace
of all modes.
if necessary.
Electric door locks do not function.
Check the locks power circuit fuse, replace if
necessary.
The remote control panel LED will not light, the
Replace the control panel cell.
system does not respond to remote control.
For other faults turn to your local service centre.
10

Scope of delivery
English
Mongoose AMG"850 C electronic unit " 1
Main bundle of wires with connectors " 1
Installation kit " 1
LED " 1
Emergency disarm button " 1
Remote control transmitter " 1
Shock sensor " 1
General recommendations
ELECTRONIC MODULE.
The electronic module is installed inside the dorm, away from sources of moisture or
heat. It should be installed in such a way that it could be removed only using special
tools or at least along with one decorative panel. The module is fixed in the selected
location with screws from the kit.
SIREN.
The siren is installed in the engine compartment at least 30cm away from potential
shock zones, away from sources of heat and moisture, and fixed with two screws from
the kit.
EMERGENCY DISARM BUTTON.
The emergency disarm button is fixed on the dashboard so that the driver could reach
it from the driver’s seat. To fix the button, drill a through hole 7mm in diameter and fasten
the button with a nut. Pass the wires to the electronic module and connect them to the
connector in accordance with the Wiring diagram.
LED.
Drill a hole 8mm in diameter in the dashboard or lining panel and fix the LED in it. Pass
the cable to the electronic module and connect it to the connector in accordance with
the Wiring diagram.
SHOCK SENSOR
Install the shock sensor on body metal inside the dorm, as close to the car’s longitudinal
axis as possible. Fasten the sensor with self"tapping screws or stick it with double
adhesive tape.
11

Technical specifications
Supply voltage 10...15 V
Power consumption in arm mode 20 mA
Radio channel frequency 433.92 MHz
0
Operating temperature range "40...+85
С
Upper current limit
" engine blocking circuits 300 mA
" signal light circuits 10 A
" central lock control circuits 15 A
" auxiliary output circuits 300 mA
Transmitter maximum range of coverage 30 m
Installation
Before you get down to connection, select locations in your car for the following
instruments and connections:
direct current source;
current source to be used with ignition on;
lights connection points (positive pulse);
door pin switches;
trunk pin switch;
hood pin switch (install an additional pin switch if necessary);
starter wire;
disconnect the «(« terminal of car battery.
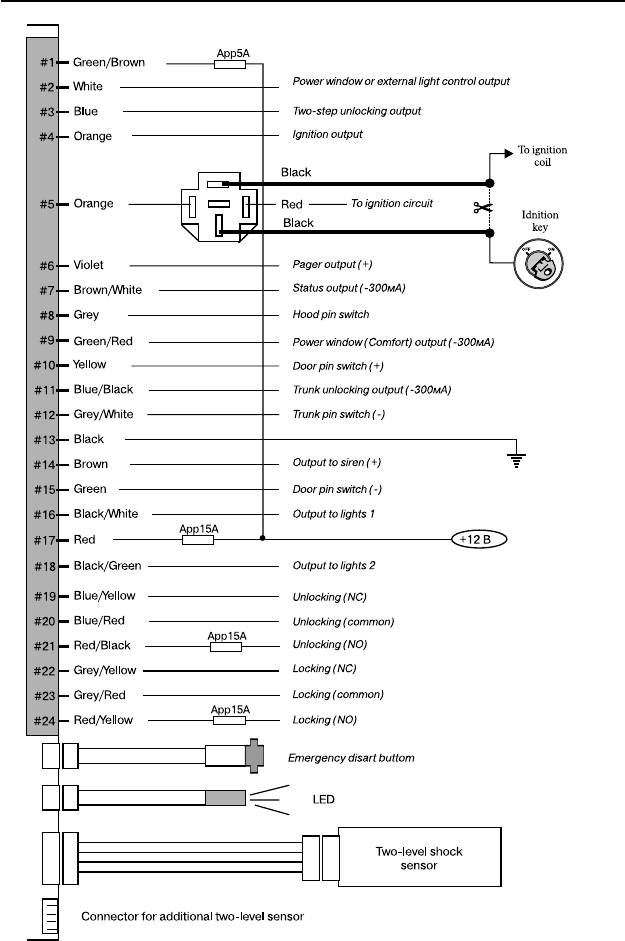
Main 24way connector.
BLACK WIRE
Connect to car body.
GREEN/BROWN WIRE
Electronic module power supply. Connect to 12V direct current source via a 5A fuse.
BLACK/WHITE and BLACK/GREEN WIRES
Relay outputs to lights. One wire is connected to the left side lights circuit, the other "
to the right side lights circuit.
GREEN and YELLOW WIRES
These wires are connected to the door pin switches. The connection layout depends
on whether positive or negative door pin switches are used.
Negative door pin switches:
connect the YELLOW wire to ground, the GREEN wire to the door wire between the
door pin switches and dorm light lamp, on which ground appears at doors opening.
Make sure that the selected wire is connected to all the car’s doors.
Positive door pin switches:
Connect the GREEN wire to the (+) terminal of the 12V power supply, the YELLOW wire
to the door wire between the door pin switches and dorm light lamp, on which 12V appears
at doors opening. Make sure that the selected wire is connected to all the car’s doors.
CAUTION! It is strongly prohibited to use the yellow and green wires simultaneously
as the system trigger inputs, i. e. there must be no simultaneous connection to the positive
and the negative door pin switches.
12

VIOLET WIRE
«+0.3A» output to connect the pager or the klaxon relay.
BLUE/BLACK WIRE
«"0.3A» output of the trunk opening device. If button 2 is pressed for 3 seconds with
ignition off, a 0.5s negative pulse appears on this wire.
BROWN WIRE
English
Pass the wire through the rubber ferrule in the engine compartment partition and
connect it to the siren red wire. Connect the siren black wire to the body.
RED WIRE
Input for lights supply and for selecting the polarity of lights control. Normally
connected to +12V via a 15A fuse.
ORANGE WIRE (Connected to relay).
BROWN/WHITE WIRES
«"0.3A» outputs to connect to the engine blocking relay.
ORANGE WIRE
Connect to ignition power supply.
Caution! This power supply must not be switched off at engine start.
GREY/WHITE WIRE
Connect the wire to any circuit on which ground appears at trunk opening. If there is
no such circuit, install an additional pin switch at which ground will appear at trunk
opening.
GREY WIRE
Connect the wire to any circuit on which ground appears at hood opening. If there is
no such circuit, install an additional pin switch at which ground will appear at trunk
opening.
GREEN/RED WIRE
«"0.3A» output to control closing of windows/hatch, Comfort system and the lights.
When button 3 is pressed for 3 seconds with ignition off in the arm mode, a 10s or 25s
signal appears at this output (See programmed features switches 2.2).
This channel can also be enabled automatically at each system arming (See
programmed features switches).
WHITE WIRE
«"0.3A» output to control auxiliary devices. When buttons 2 and 3 of the transmitter
are pressed simultaneously, a signal appears at this wire and is present until the buttons’
release, but no longer than 30 seconds.
BLUE WIRE
«"0.3A» output to organise two"step doors unlocking. A signal appears at this wire
when button 2 of the transmitter is pressed twice in succession.
Wires for door locking devices.
Mongoose AMG"850 C is supplied with a multifunctional door locking system having
six wires. See the attached diagrams for connection layouts of negative control, positive
control, installation of new actuators and pneumatic actuator.
GREY/RED WIRE "locking relay " common contact
RED/YELLOW WIRE"locking relay " open contact
GREY/YELLOW WIRE"locking relay " closed contact
BLUE/YELLOW WIRE"unlocking relay " closed contact
RED/BLACK WIRE"unlocking relay " open contact
BLUE/RED WIRE"unlocking relay " common contact
13
WIRING DIAGRAM
14
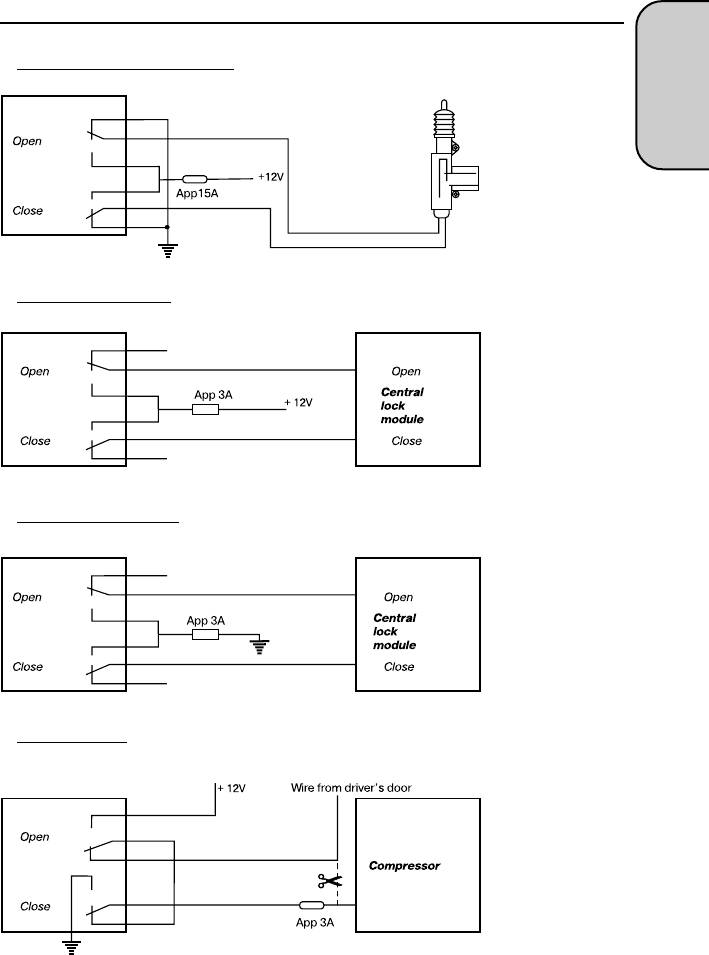
CONNECTION TO CENTRAL LOCK.
Additional electric actuator
English
Positive CL control.
Negative CL control.
Pneumatic CL
(Audi, Mercedes)
15
16

MONGOOSE AMG 850C
Introduzione
L’antifurto AMG 850С e’ progettato per proteggere gli sportelli dell’automobile, la
capotta e il bagagliaio, lo spazio dentro il salotto e attorno la Vs vettura.
Per evitare l’accesso non sanzionato nel sistema e’ prevista la protezione del codice
TM
dei comandi radio, basata sulla tecnologia KeeLoq
; la protezione neutralizza i tentativi
di intrecciare il codice con un code grabber, dispone della funzione antiscan, che non
permette di disattivare l’allarme con una serie di codici randomizzati, e della funzione
della memoria degli status, che non permette di disattivare l’allarme semplicemente
rimuovendo e rimettendo il morsetto della batteria: in questo caso l’allarme scatta e il
motore rimane bloccato.
Con l’antifurto non attivo, si puo’ staccare e riattacare la batteria senza far scattare
l’allarme " per evitare problemi, per esempio, durante la manutenzione.
Se la batteria verra’ staccata nel modo Valet, il suo riattacco riportera’ il sistema allo
stesso status.
Per escludere la possibilita’ di lasciare le chiavi dentro la vettura, rimettendo
l’alimentazione elettrica lo status delle serrature rimane invariato.
Per evitare i falsi allarmi, e’ prevista la funzione del bypass della zona difettosa.
Questa funzione stacchera’ il sensore difettoso, se quello provochi l’allarme 8 volte.
Rimangono attive tutte le altre zone controllate e tutti i blocchi.
Italiano
La funzione programmabile del ritardo della luce nel salotto permette di utilizzare
l’AMG 850С per qualsiasi tipo di automobile.
Per migliorare le caratteristiche protettive e la comodita’ di utilizzo dell’automobile,
l’AMG 850С dispone dei canali supplementari:
" per attacare il pager;
" per gestire la serratura elettrica del bagagliaio;
" per la chiusura automatica dei vetri all’attivazione del sistema;
" per gestire i vetri elettrici e le luci esterni con il portachiavi.
Il kit AMG 850С comprende:
Il comando centrale con tutti i fissaggi indispensabili.
Il sensore del colpo, a due livelli, che attacca il trillo di avvertenza o l’allarme definitivo
" a seconda della forza del colpo sull’automobile.
Due portachiavi di comando remoto.
Il LED di indicazione dei modi, da installare nell’automobile.
Il tasto di disattivazione in emergenza; Lei dovra’ scegliere la posizione di questo
tasto insieme al’installatore, prendendo in considerazione, che il posto deve essere
abbastanza nascosto, ma allo stesso tempo, comodo.
Il manuale completo di gestione dell’AMG 850С, con la descrizione di tutti i modi,
nonche’ una carta di memoria, da portare sempre dietro, con una breve descrizione
della gestione del sistema.
Se Lei vuole migliorare le capacita’ protettive del Suo antifurto, Le consigliamo di
acquistare un sensore volumetrico opzionale, a due livelli; questo sensore potra’
registrare qualsiasi movimento, sia dentro la macchina, sia nelle vicinanze. Il Suo AMG
850С ha un’entrata speciale per allacciare questo sensore.
17

Portachiavi del comando remoto
E’ una microtrasmettente alimentata da una batteria 12 V (tipo 23A), che Le servira’
circa 1 anno. La batteria va cambiata, quando si nota la diminuzione seria della distanza
d’azione. Sul portachiavi si trovano tre tasti di comando e un LED di indicazione.
Premendo uno dei tasti, la trasmettente forma e manda uno dei comandi codificati, il
quale comando cambia con ogni impulso successivo, il che preventa l’intercezione del
codice da un code grabber.
Tabella dei comandi
Funzione Tasto 1 Tasto 2 Tasto 3 Note
Attivare/disattivare la protezione Accensione staccata
Serrare gli sportelli Accensione attaccata
Attivare la protezione con dei sensori inattivi Accensione staccata
Attivare/disattivare la protezione in modo 2 1 Accensione staccata
silenzioso
Attivare la protezione con dei sensori inattivi, 2 1 Accensione staccata
in modo silenzioso
Aprire gli sportelli Accensione attaccata
Panico 3 sec. Accensione staccata
Aprire il bagagliaio 3 sec. Accensione staccata
Chiudere i vetri, gestione delle luci esterne 3 sec. Accensione staccata
Uscire per gestire i vetri e le luci esterne 3 sec. 3 sec.
Modo VALET 3 sec. 3 sec. Protezione staccata
Disserratura a due passi Accensione staccata
Anti Hi#jack 3 sec. Accensione attaccata
Attivare/disattivare la protezione della Accensione staccata
seconda macchina
premere il tasto ad impulso
premere ad impulsi, due volte, entro 3 sec.
3 sec. Premere il tasto e tenerlo premuto non meno di 3 sec.
3 sec. Premere il tasto e tenerlo premuto 3 secondi per attivare il canale, poi tenere
premuto ancora durante il tempo indispensabile per il funzionamento del canale, ma
non oltre 30 secondi.
1, 2 ordine dei tasti da schiacciare.
Informazioni utili
PIN
Per aumentare la segretezza della gestione l’AMG 850С prevede la possibilita’ di
utilizzare un PIN, che permette di disattivare l’allarme in emergenza, di entrare nella
programmazione degli eventuali portachiavi aggiuntivi e funzioni d’utente, di staccare la
funzione Anti Hi"jack (contro la prepotenza).
18

Il PIN si compone di 2 cifre e puo’ essere tra 11 e 99. Alla fabbrica viene installato il
PIN «11», pero’ Le consigliamo di inserire un altro numero del PIN (veda il capitolo
«Programmazione»). Cosi’ Lei potra’ proteggere il Suo sistema contro un eventuale
accesso degli estranei.
Per introdurre il PIN si utilizza il tasto di emergenza e la chiave dell’accensione.
Disattivazione dell’allarme in emergenza
Se il portachiavi non e’ con Lei, oppure non funziona, per disattivare l’allarme e’
necessario fare il seguente: aprire lo sportello con la chiave " si attiva il modo d’allarme,
salire in macchina e attaccare l’accensione. Con l’accensione attiva, premere il tasto
d’emergenza il numero di volte pari alla prima cifra del PIN, poi staccare l’accensione,
riattaccarla e premere il tasto d’emergenza il numero di volte pari alla seconda cifra del
PIN. Staccare l’accensione " il sistema e’ disattivato.
Indicazioni dei LED
Protezione attivata Lampeggia lentamente
Protezione disattivata Spento
Attivazione automatica Lampeggia rapidamente
Modo Valet E’ illuminato sempre
Italiano
REGOLE DELL’UTILIZZO
Gestione dei modi principali di protezione
Attivazione dell’antifurto
Per attivare il sistema, con l’accensione spenta prema il tasto 1 del portachiavi; se
tutti gli sportelli, la cappotta e il bagagliaio sono chiusi, la sirena dara’ un segnale acustico,
e i fari si accenderanno una volta ad impulso. Il LED del sistema comincera’ a lampeggiare
lentamente, le serrature verranno chiuse (se la macchina e’ dotata del sistema del
bloccaggio serrature). Se una delle porte, la capotta o il bagagliaio saranno aperti,
arriveranno tre segnali acustici e i fari si accenderanno tre volte ad impulsi.
Protezione
Nel modo della protezione, il sistema controlla tutti i finecorsa delle porte, capotta,
bagagliaio, accensione e il sensore del colpo, nonche’ il sensore volumetrico e/o altri
dispositivi opzionali. Oltre a cio’, nel modo della protezione l’avviamento del motore e’
bloccato. Se una delle zone della protezione risulta trasgredita, si avvia un allarme di 30
secondi.
Allarme
Nel modo di allarme, arriva la sirena, e lampeggiano i fari entro 30 secondi, se l’allarme
non sia staccato prima con il tasto 1 del portachiavi.
Se verra’ attivato il livello d’avvertenza del sensore del colpo, oppure la zona esterna
del sensore opzionale, la sirena mandera’ un trillo d’avvertenza.
19
Disattivazione dell’antifurto
Per disattivare l’antifurto e’ necessario premere il tasto 1 del portachiavi, la sirena
mandera’ 2 segnali acustici, e i fari si accenderanno 2 volte, ad impulsi. Il LED si
spegnera’, le serrature degli sportelli si apriranno (se l’automobile e’ dotata delle serrature
automatiche). Se, durante il modo di protezione, e’ stato attivato l’allarme, la sirena
mandera’ quattro segnali, e i fari daranno quattro impulsi.
Se, durante l’installazione, ha scelto un sistema di apertura a due passi, premendo il
tasto la prima volta, si apre soltanto lo sportello dell’autista; per aprire gli altri sportelli,
prema il tasto 1 ancora una volta, tenendola premuta 3 secondi.
Panico
Se, con l’accensione spenta, viene premuto e tenuto 3 secondi il tasto 1, si attivera’ la
sirena e i fari. Premendo il tasto 1 ancora una volta stacca l’allarme. L’attivazione e la
disattivazione del Panico non cambia lo status del sistema: rimane nel modo di protezione
se prima si trovava in questo modo (con le serrature chiuse); se la protezione non era
attiva, non diventa attiva neanche dopo il Panico (gli sportelli rimangono aperti).
Messa in protezione nel modo silenzioso
Se e’ necessario attivare la protezione senza la conferma acustica (per non disturbare
le persone con la sirena), prema il tasto 3 del portachiavi, e subito dopo il tasto 1: i fari
daranno 1 colpo, come sempre, ma la sirena rimane muta. Il LED comincera’ a
lampeggiare lentamente, le serrature si chiuderanno (se l’automobile e dotata delle
serrature automatiche). Nel modo silenzioso, comunque rimane l’avvertenza della
chiusura degli sportelli, capotta o bagagliaio, e quindi Lei non rischia di lasciare la
macchina aperta.
Disattivazione della protezione nel modo silenzioso
Per disattivare la protezione senza la conferma acustica, prema i tasti 3 e 1 alla stessa
maniera. I fari daranno due colpi, ma la sirena non suonera. Il LED verra’ spento, le
serrature si apriranno (se l’automobile e dotata delle serrature automatiche). Pero’ se
nel modo della protezione era stato attivato l’allarme, il sistema Glielo comunichera’
con i soliti segnali acustici.
Messa in protezione con dei sensori staccati
Se e’ necessario disattivare i sensori dentro al salotto, come ad esempio, quando si
lasciano nella macchina passeggieri o animali, prema due volte il tasto 1. Il sistema
confermera’ la disattivazione dei sensori con un segnale in piu’, sia acustico, che
luminoso.
Messa in protezione con dei sensori staccati nel modo silenzioso
Si possono staccare i sensori del salotto anche nel modo silenzioso. Per questo
bisogna premere il tasto 3, e dopo due volte il tasto 2. In questo caso la conferma della
disattivazione dei sensori avverra’ soltanto tramite un segnale luminoso.
20


