Midland XTC-100 action camera: инструкция
Раздел: Видео Аудио Фото Оборудование
Тип: Экшн Камера
Инструкция к Экшн Камере Midland XTC-100 action camera
XTC-100 Action Camera
Grazie per aver acquistato XTC-100 Action Camera. XTC-100 è la nuovissima videocamera grandangolo in grado di
registrare ed immortalare i vostri momenti più importanti e divertenti! Facile da utilizzare: con il suo unico comando
(on-off/record), grand’angolo con una visuale di 140° e 2 ore di batteria non vi perderete 1 minuto delle vostre
avventure! Terminata la registrazione, connettete semplicemente la videocamera al vostro computer e scaricate i
video registrati. Più facile di così! Buon divertimento!
Contenuto della confezione
› Midland XTC-100 Action camera
› Micro SD card da 2GB
› 2 batterie AAA alcaline
› Cavo USB
› Supporto montaggio per maschere da sci
› Supporto adesivo per montaggio al casco
› Supporto a slitta da abbinare con il supporto per maschere da sci e/o supporto per casco
› Supporto a cinghia per montaggio al casco da bici
› Supporto per manubrio da bici
Caratteristiche e pulsanti del XTC-100
Caratteristiche:
› Risoluzione 640x480 (4:3)
› Filmati AVI
› 30 frames per secondo
› Grand’angolo di 140°
Guida rapida all’uso
1. Aprite il coperchio del vano batterie ed inserite le batterie facendo attenzione alla polarità. Riposizionate il
coperchio del vano batterie.
2. Aprite la cover di gomma della parte inferiore del dispositivo. Inserite la Micro SD card nell’opportuna direzione.
Chiudete la piccola cover gommosa.
3. Spostate il selettore RECORD in avanti.
La registrazione inizierà dopo 8 secondi circa.
4. Per fermare la registrazione slittate il selettore verso il basso in posizione “off”.
5. Collegate la videocamera al computer e scaricate il video.
Imparando a conoscere XTC-100
Batterie
1. Per inserire le batterie, premete il pulsante posto sul lato destro della
videocamera e rimuovete il coperchio del vano batteria facendolo slittare in
avanti.
2. Inserite 2 batterie AAA facendo attenzione alla polarità di esse.
3. Riposizionate il coperchio del vano batterie
Indicatore stato batterie
Significato
Verde fisso
Batteria carica
Rosso fisso
Batteria parzialmente carica
Rosso lampeggiante
Batteria quasi scarica
Led spento
Batteria scarica
Nota: quando l’indicatore di batteria inizia a lampeggiare rosso, sarebbe opportuno cambiare le batterie in quanto
la telecamera si spegnerà a breve.
Micro SD Card
1. Aprite la cover di gomma posta sulla parte inferiore della videocamera
2. Inserite la Micro SD nell’apposita fessura come mostrato nell’immagine a lato.
3. Chiudete la cover di gomma.
Registrazione
1. Slittate il selettore di registrazione in avanti per accendere la videocamera.
2. L’indicatore di batteria si illuminerà prima rosso, per poi passare a verde, mentre l’indicatore della Micro SD card si
illuminerà di verde.
Dopo circa 8 secondi l’indicatore di registrazione inizierà a lampeggiare rosso,
indicando
che la registrazione è iniziata.
3. Per fermare la registrazione. Spostate il selettore “record” in posizione “off”.
Nota: pur avendo spostato il selettore in posizione “off”, la videocamera continuerà a registrare per altri 3 secondi;
dopodiché si spegnerà definitivamente.
Indicatore stato del SD card
Significato
Verde
Più 1GB di spazio disponibile
Arancione
Da 512 MB a1 GB di spazio disponibile
Rosso
Meno di 512 MB di spazio disponibile o Micro SD card non inserita.
Rosso lampeggiante
Micro SD card non letta correttamente
Verde lampeggiante
Indica che la Micro SD card è stata riformattata
Spazio di memoria
Tempo di registrazione
512 MB
7.5 minuti
1 GB
15 minuti
2 GB
30 minuti.
4 GB
60 minuti
8 GB
120 minuti
16 GB
240 minuti
32 GB
480 minuti
Nota: La videocamera dividerà automaticamente i video in documenti da 2GB di dimensione.
Supporti di montaggio
Montaggio al supporto a slitta
XTC-100, con il suo innovativo design a scanalature può
essere facilmente montato su uno speciale supporto a
slitta. Tale supporto permette una più facile ed efficace
installazione del dispositivo.
Per montare la telecamera al supporto, posizionatela
nell’apposita scanalatura e fatela slittare.
Per staccare la telecamera dal supporto a slitta, tenete
la telecamera con la lente distante da voi e premendo il
pulsante di rilascio tirate il supporto verso di voi.
Questo supporto a slitta può essere abbinato sia al
supporto bi-adesivo da casco che al supporto per
maschera da sci, evitando così di dover rimontare la
telecamera ogni volta.
Una volta montata la telecamera al supporto a slitta
occorre:
1. Montare la telecamera al supporto intercambiabile
più adatto in base a ciò che si desidera filmare.
2. Aggiustare l’inquadratura della videocamera in modo
che non filmi il cielo o il terreno.
Montaggio con supporto a vite
XTC-100 può essere montato sui caschi da bici o sui
manubri delle biciclette tramite due specifici supporti
a vite. Nella parte inferiore del XTC-100 vi è un foro di
fissaggio che permette di montare la telecamera su tali
supporti, inserendo semplicemente la vite di fissaggio
nell’apposito foro e ruotando la telecamera in senso
orario.
Se volete fissare la telecamera al manubrio della vostra
bicicletta o montarla sul casco tramite supporto a
cinghia, dovete:
1. Montare la telecamera sul supporto a vite più adatto
a ciò che si desidera filmare.
2. Assicurarsi che la telecamera sia posizionata nel
modo corretto e che non inquadri cielo o terra.
Sistemi compatibili
XTC-100 è compatibile sia con sistemi operativi Windows che con MAC.
Il formato video è: AVI.
Download dei video
Non c’è bisogno di installare ulteriori software per il collegamento con XTC-100.
Prima di scaricare i video, assicuratevi che le batterie siano nuove o completamente cariche.
Connettete la telecamera alla porta USB usando il cavo in dotazione.
La telecamera viene vista dal PC come una normalissima memoria esterna (chiavetta USB).
Troverete i vostri video salvati nella cartella “DC IM”.
Come riformattare la Micro SD card
La riformattazione della Micro SD card permette di cancellare tutti i file video in un unico istante. Per far ciò occorre che la
micro SD card sia all’interno della stessa telecamera.
1. Posizionate la telecamera in “on” spostando il selettore “record” in posizione di registrazione.
2. Una volta che l’indicatore di batteria si illumina verde, tener premuto il pulsante di riformattazione della Micro SD
card.
3.
Tenete premuto il pulsante di riformattazione finché l’indicatore di registrazione non si spenga e l’indicatore dell’SD
card non lampeggi verde.
4. Spostate il selettore “record” in posizione off.
Nota: la Micro SD card non può essere riformattata se l’indicatore di batteria quasi scarica si accende (rosso
lampeggiante). Assicuratevi che le batterie siano completamente cariche o nuove prima di iniziare il processo di
riformattazione.
Problemi & Soluzioni
Problemi
Soluzioni
Batterie
La telecamera non si accende
Assicuratevi che le batterie siano installate correttamente facendo attenzione alla
polarità.
Assicuratevi che siano nuove o completamente cariche.
Registrazione
La telecamera non registra
Assicuratevi di aver spostato correttamente il selettore “record” (totalmente in
avanti). Se l’indicatore di registrazione non si accende spegnete il dispositivo e
re-installate le batterie.
Verificate che ci sia abbastanza memoria nella Micro SD card.
Micro SD card
La Micro SD card non viene letta
Assicuratevi che la Micro SD card sia stata inserita correttamente.
Connettete la telecamera al computer per verificare che ci sia abbastanza spazio
di memoria
Attendete che si concluda il processo di formattazione
Visualizzazione Video
Il video è lento e si inceppa
Verificate che il cavo USB sia stato inserito correttamente nella presa della telecamera
Rimuovete dispositivi USB al momento non utilizzati
Trasferite i file video sul computer prima di vederli
Download del Video
Trasferimento dati lento
Verificate che il cavo USB sia stato inserito correttamente nella presa della teleca
-
mera. Scollegate e ricollegate il cavo USB
Rimuovete dispositivi USB al momento non utilizzati
Il computer non riconosce la tele-
camera
Assicuratevi che la telecamera collegata al computer abbia il selettore “record” po-
sizionato nella giusta posizione
Assicuratevi che la Micro SD card sia stata inserita correttamente
La Micro SD card potrebbe essere corrotta. Attendete che si concluda il processo
di formattazione
Audio
Disturbi causati dal vento
Applicate del nastro adesivo sul foro del microfono
Garanzia
› Il consumatore è titolare di diritti secondo la legislazione nazionale applicabile disciplinante la vendita dei beni di
consumo e la garanzia lascia impregiudicati tali diritti;
› La durata della garanzia è di mesi 24 a decorrere dalla data di acquisto o dalla data della ricevuta rilasciata dal
rivenditore; per farla valere l’utente deve presentare lo scontrino d’acquisto assieme al box dell’apparato acquistato
;
› La garanzia copre l’apparecchio nella totalità delle sue parti e comprende sia il materiale che la manodopera
necessaria per le riparazioni ;
› La garanzia non copre i difetti causati dall’uso o collegamento del Prodotto con accessori o/e software non prodotti o
forniti dal Produttore o da un uso del prodotto diverso da quello per cui il prodotto medesimo è stato realizzato. Essa
non è valida in caso di apertura, modifica o riparazione da parte di soggetti diversi dai centri autorizzati o in caso di
riparazioni effettuate con ricambi non autorizzati.
›
Nulla sarà dovuto all’acquirente per il tempo durante il quale l’apparecchio sarà rimasto inattivo né egli potrà
pretendere risarcimenti o indennizzi per spese sostenute come pure per danni diretti o indiretti derivanti dall’uso
dell’apparecchio.
Noi, CTE International dichiariamo che il prodotto XTC-100 è conforme ai requisiti essenziali e alle disposizioni della
Direttiva della Compatibilità elettromagnetica 2004/108/CE. È possibile consultare una consultare una copia della
Dichiarazione di Conformità al seguente indirizzo internet:
www.midlandradio.eu
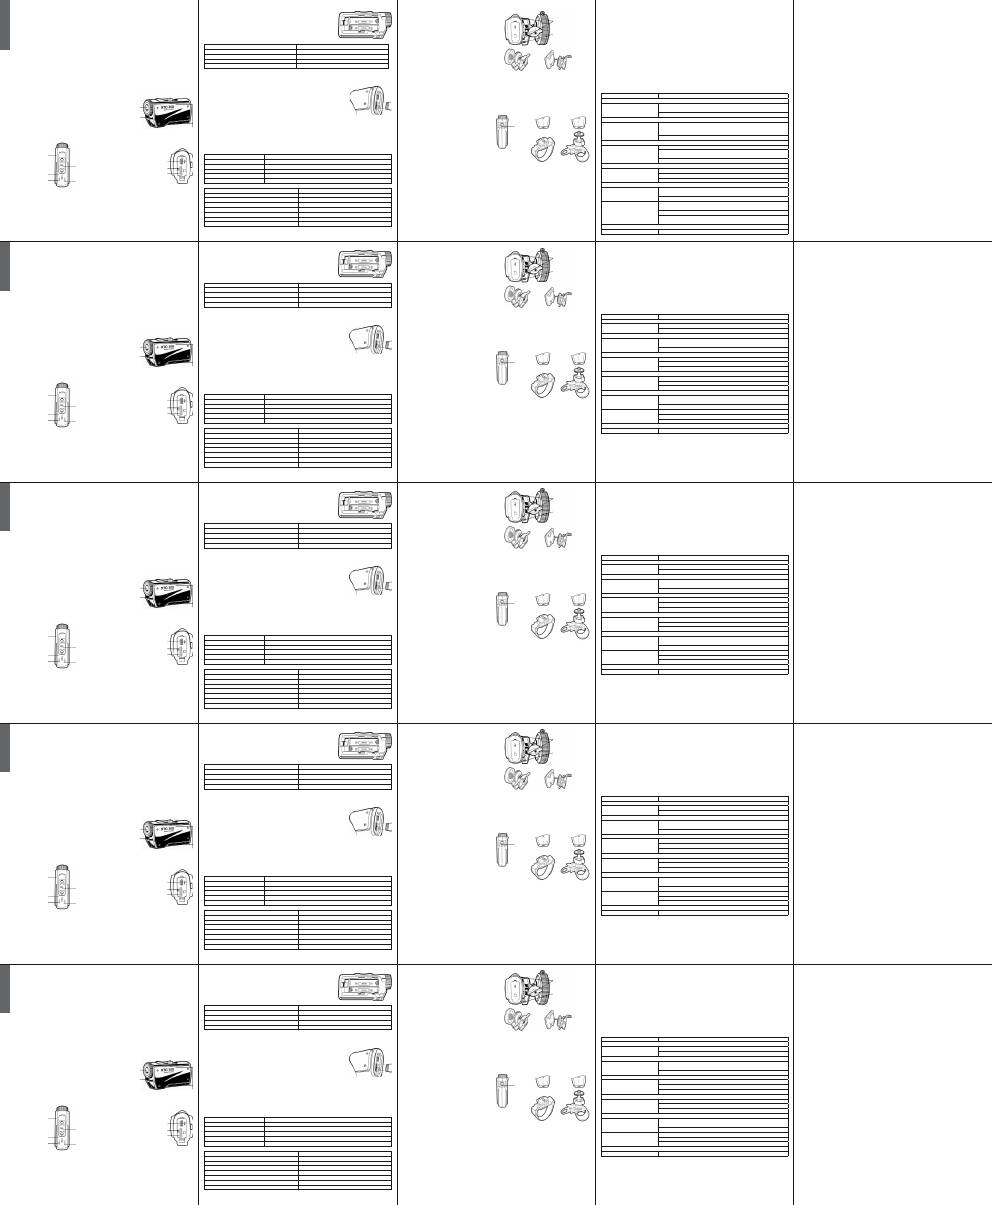
Grandangolo 140°
Microfono
Scanalature per montaggio del supporto a slitta
Selettore Record
In avanti:
on/registrazione
Led di registrazione
lampeggia rosso
mentre registra
Led batteria
Selettore Record
Indietro:
Off/Stop registrazione
Led SD Card
Connettore
Mini USB
Pulsante per
riformattazione SD Card
Vano inserimento
Mini SD Card
Supporto a slitta
con regolazione
dell’inclinazione
Pulsante di rilascio
Supporto adesivo per casco
Supporto per maschera da sci
Foro di fissaggio
Vite di fissaggio
Supporto a cinghia per casco da bici
Supporto al manubrio
I U K XTC-100 Action Camera
Thank you for your purchase of the XTC-100 Action Camera. As someone who seeks adventure, we are proud to
offer you the ultimate tool in capturing and recording your adventures. With easy to use one switch operation, 140
degree algle lens and 2 hour battery life you never miss a minute of the action. Once captured, simply connect to
your computer and upload the videos to share with friends. It is that simple! Enjoy!
What’s in the box
› Midland XTC-100 Action camera
› 2 GB Micro SD card
› 2 AAA Alkalinebatteries
› USB cable
› Goggle mount
› Helmet adhesive mount
› Dual Track mount for goggle mount and helmet adhesive mount.
› Helmet strap mount
› Bicycle handlebar mount
XTC-100 Features and Controls
Features:
› 640x480 resolution (4:3 aspect ratio)
› Records as AVI
› 30 frames per second
› 140 degree angle lens
Quick Start Guide
1. Open battery door and install batteries observing polarity. Replace battery cover.
2. Open and fold down back rubber cover. Insert micro Sd card observing proper direction. Close cover.
3. Move RECORD switch forward,
recording will start in 8 seconds
.
4. To stop recording, slide switch back to the off position.
5. Plug in camera to computer and download video.
Getting to Know the XTC-100
Batteries
1. To insert the batteries, push down the battery door latch on the right side of
the camera. Door will release. Push forward to remove.
2. Install 2 AAA batteries observing polarity.
3. Return battery door and click into place.
Battery Status Indicator
Meaning
Solid Green
Indicates full battery life
Solid Red
Indicates half battery life
Blinking Red*
Indicates low battery life
No Light
Batteries are dead
Note: When the red battery LED begins blinking, be prepared to change the batteries because the camera will stop
recording at this point.
Micro SD Card
1. Open and fold down the back rubber cover.
2. Insert Micro SD card into slot observing proper direction (shown sideways).
3.
Return rubber flap into place.
Recording
1. Move the RECORD switch forward. This turns the camera on.
2. The battery indicator will light from red to green. The SD card indicator will light green.
The record indicator will begin
flashing red after 8 seconds.
This indicates the camera is capturing video.
3. To stop recording, move the RECORD switch back to the off position.
Note: The camera will continue recording for 3 seconds after toggling the switch to the off position.
SD card LED Status
Meaning
Green
1 GB or more avai lable
Orange
512 MB to1 GB available
Red
Below 512 MB available or no MicroSD card installed.
Flashing Red
Cannot read the card
Flashing Green
Indicates card has been reformatted.
Memory Size
Record Time
512 MB
7.5 Minutes
1 GB
15 Minutes
2 GB
30 Minutes
4 GB
60 Minutes
8 GB
120 Minutes
16 GB
240 Minutes
32 GB
480 Minutes
Note: The camera automatically splits the video into 2 GB segments.
Camera Mounting
Mount on Dual Track System
The XTC-100 was innovatively designed with an identi-
cal dual track mount system on either side of the came-
ra. This allows an ease of installation.
To mount the camera on the dual track mount, slide the
camera onto the dual track system with the two notches
on the mount facing towards the back of the camera.
To detach the camera from the dual track mount, hold
the camera with the lens facing away from you. Press
down the mount release switch and pull the mount to-
wards yourself.
The dual track mount allows the camera to be easily
mounted on both helmet mount and goggle mount. This
elimi nates the hassle of having to remount the camera
every time.
When mounting the camera on the dual track mount, you
must do the following:
1. Consider what you would like to shoot and use the
helmet mount or goggle mount accordingly.
2. Ensure, once attached, that the camera is aimed
straight
and not towards the ground or at the sky.
Mount using the Thread Mount
On the bottom of the XTC-100 is a standard thread
mount that allows the camera to be mounted to an hel-
met strap mount or to a bicycle handlebar mount.
To fix the camera, insert the screw on the mount into
the camera thread and rotate the camera clockwise to
tighten down onto the screw.
When mounting the camera on the handlebars of a
bike or with the vented helmet strap mount follow these
steps:
1. Consider what you would like to shoot and mount
accordingly.
2. Ensure, once attached, that the camera is aimed
straight
and not towards the ground or at the sky.
Compatible Systems
The XTC-100 can be used on both Windows operating system and MAC.
The camera records as AVI.
Downloading Videos
There is no need to install any software with the XTC-100. It is a plug and play device.
Ensure
batteries are new or fully charged before downloading video.
Connect the camera to the USB port using the included cable.
The camera will be automatically recognized as external hard drive (USB key)
All your videos will be saved into the DCIM folder.
Reformatting the Micro SD card
The Micro SD card can be reformatted while in the camera. This allows you to delete all the videos at one time. Follow
these steps:
1. Move the RECORD switch to the record position.
2. When the battery indicator turns green, press and hold the Micro SD card reformat button.
3. Keep the Micro SD card reformat button down until the record indicator turns off and the SD card indicator begins
blinking green.
4. Move the RECORD switch to the off position.
Note: The camera cannot reformat the Micro SD card if the low battery light is on. Ensure new batteries are instal-
led in the camera before attempting the reformat process.
Tips and Tricks
Problem
Solution
Batteries
Camera not turning on
Ensure the batteries are installed properly observing polarity.
Make sure batteries are new or fully charged.
Recording
Camera not recording
Make sure the switch is pushed all the way forward. If the record LED does not
come on, turn off the device and reinstall the batteries.
Verify available memory.
Micro SD card
Micro SD card not reading
Ensure the Micro SD card is inserted properly.
Plug camera into the computer to verify it has available storage.
Attempt formatting process.
Video Playback
Slow or choppy video
Verify the camera is plugged into a USB 2.0 device.
Remove other unused USB devices.
Transfer video to computer before viewing.
Video Downloading
Slow data transfer
Verify the camera is plugged into a USB 2.0 device. If registering as 1.1, unplug and
the re-plug the device.
Remove other unused USB devices.
Computer does notrecognize ca-
mera
Ensure record switch is in the record position while connected to computer.
Ensure the Micro SD card is inserted properly.
Micro SD card may becorrupted. Attempt formatting process.
Sound
Excessive Wind Noise
Place piece of tape over microphone hole.
Limited Warranty
Midland Radio Corporation will repair or replace, at its option without charge, any Midland XTC-100 Action camera
which fails due to a defect in material or workmanship within TWO Years following the initial consumer purchase.
This warranty does not apply to accidents of any kind, exposure to pressure, extreme temperatures (outside of -10°C to
45°C), and submersion water damage as this product is water resistant but not waterproof, battery leak or abuse.
Accessories have a 90 day warranty from date of purchase, inclu ding any mounts and cables. This warranty does not
include the cost of labor for removal or re-installation of the product in a vehicle or other mounting.
Hereby, CTE International declares that this XTC-100 is in compliance with the essential requirements and other rele-
vant provisions the Electromagnetic Compatibility Directive 2004/108/CE. A copy of Declaration of Conformity can be
found at:
www.midlandradio.eu
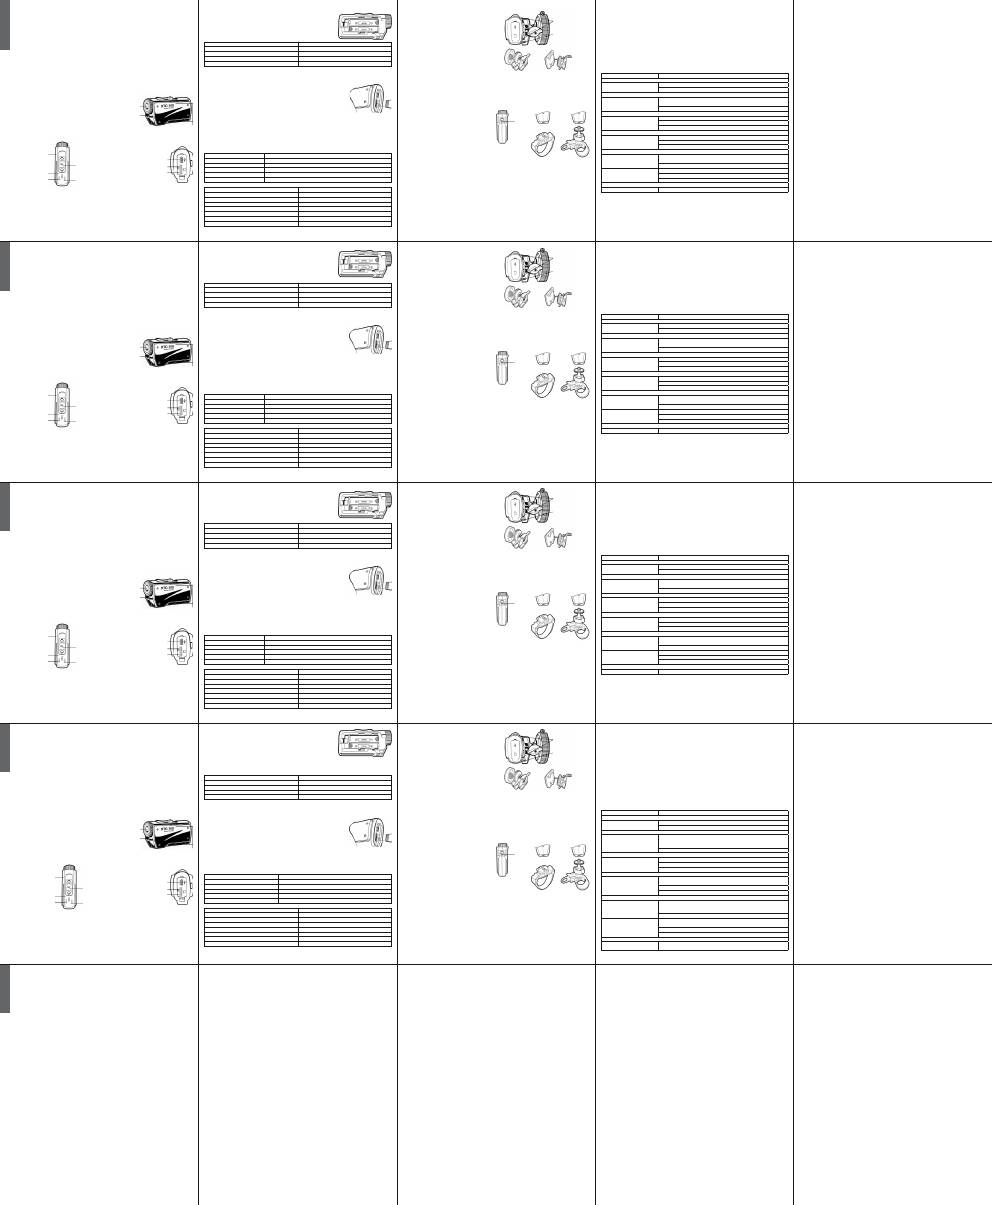
140° degree glass lens
Microphone
Dual track mounting system
Record switch
forward:
on/record
Record led
flashes red when
camera is recording
Battery led
Record switch
backward:
Off/Stop recording
SD Card led
Mini USB
connector
SD Card
reformat button
Mini SD Card slot
dual track system mount
Release button
Helmet adhesive mount
Goggle mount
Camera thread
Mounting screw
Helmet strap mount
Bicycle handle bar mount
D XTC-100 Action Camera
Thank you for your purchase of the XTC-100 Action Camera. As someone who seeks adventure, we are proud to
offer you the ultimate tool in capturing and recording your adventures. With easy to use one switch operation, 140
degree algle lens and 2 hour battery life you never miss a minute of the action. Once captured, simply connect to
your computer and upload the videos to share with friends. It is that simple! Enjoy!
What’s in the box
› Midland XTC-100 Action camera
› 2 GB Micro SD card
› 2 AAA Alkalinebatteries
› USB cable
› Goggle mount
› Helmet adhesive mount
› Dual Track mount for goggle mount and helmet adhesive mount.
› Helmet strap mount
› Bicycle handlebar mount
XTC-100 Features and Controls
Features:
› 640x480 resolution (4:3 aspect ratio)
› Records as AVI
› 30 frames per second
› 140 degree angle lens
Quick Start Guide
1. Open battery door and install batteries observing polarity. Replace battery cover.
2. Open and fold down back rubber cover. Insert micro Sd card observing proper direction. Close cover.
3. Move RECORD switch forward,
recording will start in 8 seconds
.
4. To stop recording, slide switch back to the off position.
5. Plug in camera to computer and download video.
Getting to Know the XTC-100
Batteries
1. To insert the batteries, push down the battery door latch on the right side of
the camera. Door will release. Push forward to remove.
2. Install 2 AAA batteries observing polarity.
3. Return battery door and click into place.
Battery Status Indicator
Meaning
Solid Green
Indicates full battery life
Solid Red
Indicates half battery life
Blinking Red*
Indicates low battery life
No Light
Batteries are dead
Note: When the red battery LED begins blinking, be prepared to change the batteries because the camera will stop
recording at this point.
Micro SD Card
1. Open and fold down the back rubber cover.
2. Insert Micro SD card into slot observing proper direction (shown sideways).
3.
Return rubber flap into place.
Recording
1. Move the RECORD switch forward. This turns the camera on.
2. The battery indicator will light from red to green. The SD card indicator will light green.
The record indicator will begin
flashing red after 8 seconds.
This indicates the camera is capturing video.
3. To stop recording, move the RECORD switch back to the off position.
Note: The camera will continue recording for 3 seconds after toggling the switch to the off position.
SD card LED Status
Meaning
Green
1 GB or more avai lable
Orange
512 MB to1 GB available
Red
Below 512 MB available or no MicroSD card installed.
Flashing Red
Cannot read the card
Flashing Green
Indicates card has been reformatted.
Memory Size
Record Time
512 MB
7.5 Minutes
1 GB
15 Minutes
2 GB
30 Minutes
4 GB
60 Minutes
8 GB
120 Minutes
16 GB
240 Minutes
32 GB
480 Minutes
Note: The camera automatically splits the video into 2 GB segments.
Camera Mounting
Mount on Dual Track System
The XTC-100 was innovatively designed with an identi-
cal dual track mount system on either side of the came-
ra. This allows an ease of installation.
To mount the camera on the dual track mount, slide the
camera onto the dual track system with the two notches
on the mount facing towards the back of the camera.
To detach the camera from the dual track mount, hold
the camera with the lens facing away from you. Press
down the mount release switch and pull the mount to-
wards yourself.
The dual track mount allows the camera to be easily
mounted on both helmet mount and goggle mount. This
elimi nates the hassle of having to remount the camera
every time.
When mounting the camera on the dual track mount, you
must do the following:
1. Consider what you would like to shoot and use the
helmet mount or goggle mount accordingly.
2. Ensure, once attached, that the camera is aimed
straight
and not towards the ground or at the sky.
Mount using the Thread Mount
On the bottom of the XTC-100 is a standard thread
mount that allows the camera to be mounted to an hel-
met strap mount or to a bicycle handlebar mount.
To fix the camera, insert the screw on the mount into
the camera thread and rotate the camera clockwise to
tighten down onto the screw.
When mounting the camera on the handlebars of a
bike or with the vented helmet strap mount follow these
steps:
1. Consider what you would like to shoot and mount
accordingly.
2. Ensure, once attached, that the camera is aimed
straight
and not towards the ground or at the sky.
Compatible Systems
The XTC-100 can be used on both Windows operating system and MAC.
The camera records as AVI.
Downloading Videos
There is no need to install any software with the XTC-100. It is a plug and play device.
Ensure
batteries are new or fully charged before downloading video.
Connect the camera to the USB port using the included cable.
The camera will be automatically recognized as external hard drive (USB key)
All your videos will be saved into the DCIM folder.
Reformatting the Micro SD card
The Micro SD card can be reformatted while in the camera. This allows you to delete all the videos at one time. Follow
these steps:
1. Move the RECORD switch to the record position.
2. When the battery indicator turns green, press and hold the Micro SD card reformat button.
3. Keep the Micro SD card reformat button down until the record indicator turns off and the SD card indicator begins
blinking green.
4. Move the RECORD switch to the off position.
Note: The camera cannot reformat the Micro SD card if the low battery light is on. Ensure new batteries are instal-
led in the camera before attempting the reformat process.
Tips and Tricks
Problem
Solution
Batteries
Camera not turning on
Ensure the batteries are installed properly observing polarity.
Make sure batteries are new or fully charged.
Recording
Camera not recording
Make sure the switch is pushed all the way forward. If the record LED does not
come on, turn off the device and reinstall the batteries.
Verify available memory.
Micro SD card
Micro SD card not reading
Ensure the Micro SD card is inserted properly.
Plug camera into the computer to verify it has available storage.
Attempt formatting process.
Video Playback
Slow or choppy video
Verify the camera is plugged into a USB 2.0 device.
Remove other unused USB devices.
Transfer video to computer before viewing.
Video Downloading
Slow data transfer
Verify the camera is plugged into a USB 2.0 device. If registering as 1.1, unplug and
the re-plug the device.
Remove other unused USB devices.
Computer does notrecognize ca-
mera
Ensure record switch is in the record position while connected to computer.
Ensure the Micro SD card is inserted properly.
Micro SD card may becorrupted. Attempt formatting process.
Sound
Excessive Wind Noise
Place piece of tape over microphone hole.
Limited Warranty
Midland Radio Corporation will repair or replace, at its option without charge, any Midland XTC-100 Action camera
which fails due to a defect in material or workmanship within TWO Years following the initial consumer purchase.
This warranty does not apply to accidents of any kind, exposure to pressure, extreme temperatures (outside of -10°C to
45°C), and submersion water damage as this product is water resistant but not waterproof, battery leak or abuse.
Accessories have a 90 day warranty from date of purchase, inclu ding any mounts and cables. This warranty does not
include the cost of labor for removal or re-installation of the product in a vehicle or other mounting.
Hereby, CTE International declares that this XTC-100 is in compliance with the essential requirements and other rele-
vant provisions the Electromagnetic Compatibility Directive 2004/108/CE. A copy of Declaration of Conformity can be
found at:
www.midlandradio.eu
140° degree glass lens
Microphone
Dual track mounting system
Record switch
forward:
on/record
Record led
flashes red when
camera is recording
Battery led
Record switch
backward:
Off/Stop recording
SD Card led
Mini USB
connector
SD Card
reformat button
Mini SD Card slot
dual track system mount
Release button
Helmet adhesive mount
Goggle mount
Camera thread
Mounting screw
Helmet strap mount
Bicycle handle bar mount
E XTC-100 Action Camera
Thank you for your purchase of the XTC-100 Action Camera. As someone who seeks adventure, we are proud to
offer you the ultimate tool in capturing and recording your adventures. With easy to use one switch operation, 140
degree algle lens and 2 hour battery life you never miss a minute of the action. Once captured, simply connect to
your computer and upload the videos to share with friends. It is that simple! Enjoy!
What’s in the box
› Midland XTC-100 Action camera
› 2 GB Micro SD card
› 2 AAA Alkalinebatteries
› USB cable
› Goggle mount
› Helmet adhesive mount
› Dual Track mount for goggle mount and helmet adhesive mount.
› Helmet strap mount
› Bicycle handlebar mount
XTC-100 Features and Controls
Features:
› 640x480 resolution (4:3 aspect ratio)
› Records as AVI
› 30 frames per second
› 140 degree angle lens
Quick Start Guide
1. Open battery door and install batteries observing polarity. Replace battery cover.
2. Open and fold down back rubber cover. Insert micro Sd card observing proper direction. Close cover.
3. Move RECORD switch forward,
recording will start in 8 seconds
.
4. To stop recording, slide switch back to the off position.
5. Plug in camera to computer and download video.
Getting to Know the XTC-100
Batteries
1. To insert the batteries, push down the battery door latch on the right side of
the camera. Door will release. Push forward to remove.
2. Install 2 AAA batteries observing polarity.
3. Return battery door and click into place.
Battery Status Indicator
Meaning
Solid Green
Indicates full battery life
Solid Red
Indicates half battery life
Blinking Red*
Indicates low battery life
No Light
Batteries are dead
Note: When the red battery LED begins blinking, be prepared to change the batteries because the camera will stop
recording at this point.
Micro SD Card
1. Open and fold down the back rubber cover.
2. Insert Micro SD card into slot observing proper direction (shown sideways).
3.
Return rubber flap into place.
Recording
1. Move the RECORD switch forward. This turns the camera on.
2. The battery indicator will light from red to green. The SD card indicator will light green.
The record indicator will begin
flashing red after 8 seconds.
This indicates the camera is capturing video.
3. To stop recording, move the RECORD switch back to the off position.
Note: The camera will continue recording for 3 seconds after toggling the switch to the off position.
SD card LED Status
Meaning
Green
1 GB or more avai lable
Orange
512 MB to1 GB available
Red
Below 512 MB available or no MicroSD card installed.
Flashing Red
Cannot read the card
Flashing Green
Indicates card has been reformatted.
Memory Size
Record Time
512 MB
7.5 Minutes
1 GB
15 Minutes
2 GB
30 Minutes
4 GB
60 Minutes
8 GB
120 Minutes
16 GB
240 Minutes
32 GB
480 Minutes
Note: The camera automatically splits the video into 2 GB segments.
Camera Mounting
Mount on Dual Track System
The XTC-100 was innovatively designed with an identi-
cal dual track mount system on either side of the came-
ra. This allows an ease of installation.
To mount the camera on the dual track mount, slide the
camera onto the dual track system with the two notches
on the mount facing towards the back of the camera.
To detach the camera from the dual track mount, hold
the camera with the lens facing away from you. Press
down the mount release switch and pull the mount to-
wards yourself.
The dual track mount allows the camera to be easily
mounted on both helmet mount and goggle mount. This
elimi nates the hassle of having to remount the camera
every time.
When mounting the camera on the dual track mount, you
must do the following:
1. Consider what you would like to shoot and use the
helmet mount or goggle mount accordingly.
2. Ensure, once attached, that the camera is aimed
straight
and not towards the ground or at the sky.
Mount using the Thread Mount
On the bottom of the XTC-100 is a standard thread
mount that allows the camera to be mounted to an hel-
met strap mount or to a bicycle handlebar mount.
To fix the camera, insert the screw on the mount into
the camera thread and rotate the camera clockwise to
tighten down onto the screw.
When mounting the camera on the handlebars of a
bike or with the vented helmet strap mount follow these
steps:
1. Consider what you would like to shoot and mount
accordingly.
2. Ensure, once attached, that the camera is aimed
straight
and not towards the ground or at the sky.
Compatible Systems
The XTC-100 can be used on both Windows operating system and MAC.
The camera records as AVI.
Downloading Videos
There is no need to install any software with the XTC-100. It is a plug and play device.
Ensure
batteries are new or fully charged before downloading video.
Connect the camera to the USB port using the included cable.
The camera will be automatically recognized as external hard drive (USB key)
All your videos will be saved into the DCIM folder.
Reformatting the Micro SD card
The Micro SD card can be reformatted while in the camera. This allows you to delete all the videos at one time. Follow
these steps:
1. Move the RECORD switch to the record position.
2. When the battery indicator turns green, press and hold the Micro SD card reformat button.
3. Keep the Micro SD card reformat button down until the record indicator turns off and the SD card indicator begins
blinking green.
4. Move the RECORD switch to the off position.
Note: The camera cannot reformat the Micro SD card if the low battery light is on. Ensure new batteries are instal-
led in the camera before attempting the reformat process.
Tips and Tricks
Problem
Solution
Batteries
Camera not turning on
Ensure the batteries are installed properly observing polarity.
Make sure batteries are new or fully charged.
Recording
Camera not recording
Make sure the switch is pushed all the way forward. If the record LED does not
come on, turn off the device and reinstall the batteries.
Verify available memory.
Micro SD card
Micro SD card not reading
Ensure the Micro SD card is inserted properly.
Plug camera into the computer to verify it has available storage.
Attempt formatting process.
Video Playback
Slow or choppy video
Verify the camera is plugged into a USB 2.0 device.
Remove other unused USB devices.
Transfer video to computer before viewing.
Video Downloading
Slow data transfer
Verify the camera is plugged into a USB 2.0 device. If registering as 1.1, unplug and
the re-plug the device.
Remove other unused USB devices.
Computer does notrecognize ca-
mera
Ensure record switch is in the record position while connected to computer.
Ensure the Micro SD card is inserted properly.
Micro SD card may becorrupted. Attempt formatting process.
Sound
Excessive Wind Noise
Place piece of tape over microphone hole.
Limited Warranty
Midland Radio Corporation will repair or replace, at its option without charge, any Midland XTC-100 Action camera
which fails due to a defect in material or workmanship within TWO Years following the initial consumer purchase.
This warranty does not apply to accidents of any kind, exposure to pressure, extreme temperatures (outside of -10°C to
45°C), and submersion water damage as this product is water resistant but not waterproof, battery leak or abuse.
Accessories have a 90 day warranty from date of purchase, inclu ding any mounts and cables. This warranty does not
include the cost of labor for removal or re-installation of the product in a vehicle or other mounting.
Hereby, CTE International declares that this XTC-100 is in compliance with the essential requirements and other rele-
vant provisions the Electromagnetic Compatibility Directive 2004/108/CE. A copy of Declaration of Conformity can be
found at:
www.midlandradio.eu
140° degree glass lens
Microphone
Dual track mounting system
Record switch
forward:
on/record
Record led
flashes red when
camera is recording
Battery led
Record switch
backward:
Off/Stop recording
SD Card led
Mini USB
connector
SD Card
reformat button
Mini SD Card slot
dual track system mount
Release button
Helmet adhesive mount
Goggle mount
Camera thread
Mounting screw
Helmet strap mount
Bicycle handle bar mount
F XTC-100 Action Camera
Thank you for your purchase of the XTC-100 Action Camera. As someone who seeks adventure, we are proud to
offer you the ultimate tool in capturing and recording your adventures. With easy to use one switch operation, 140
degree algle lens and 2 hour battery life you never miss a minute of the action. Once captured, simply connect to
your computer and upload the videos to share with friends. It is that simple! Enjoy!
What’s in the box
› Midland XTC-100 Action camera
› 2 GB Micro SD card
› 2 AAA Alkalinebatteries
› USB cable
› Goggle mount
› Helmet adhesive mount
› Dual Track mount for goggle mount and helmet adhesive mount.
› Helmet strap mount
› Bicycle handlebar mount
XTC-100 Features and Controls
Features:
› 640x480 resolution (4:3 aspect ratio)
› Records as AVI
› 30 frames per second
› 140 degree angle lens
Quick Start Guide
1. Open battery door and install batteries observing polarity. Replace battery cover.
2. Open and fold down back rubber cover. Insert micro Sd card observing proper direction. Close cover.
3. Move RECORD switch forward,
recording will start in 8 seconds
.
4. To stop recording, slide switch back to the off position.
5. Plug in camera to computer and download video.
Getting to Know the XTC-100
Batteries
1. To insert the batteries, push down the battery door latch on the right side of
the camera. Door will release. Push forward to remove.
2. Install 2 AAA batteries observing polarity.
3. Return battery door and click into place.
Battery Status Indicator
Meaning
Solid Green
Indicates full battery life
Solid Red
Indicates half battery life
Blinking Red*
Indicates low battery life
No Light
Batteries are dead
Note: When the red battery LED begins blinking, be prepared to change the batteries because the camera will stop
recording at this point.
Micro SD Card
1. Open and fold down the back rubber cover.
2. Insert Micro SD card into slot observing proper direction (shown sideways).
3.
Return rubber flap into place.
Recording
1. Move the RECORD switch forward. This turns the camera on.
2. The battery indicator will light from red to green. The SD card indicator will light green.
The record indicator will begin
flashing red after 8 seconds.
This indicates the camera is capturing video.
3. To stop recording, move the RECORD switch back to the off position.
Note: The camera will continue recording for 3 seconds after toggling the switch to the off position.
SD card LED Status
Meaning
Green
1 GB or more avai lable
Orange
512 MB to1 GB available
Red
Below 512 MB available or no MicroSD card installed.
Flashing Red
Cannot read the card
Flashing Green
Indicates card has been reformatted.
Memory Size
Record Time
512 MB
7.5 Minutes
1 GB
15 Minutes
2 GB
30 Minutes
4 GB
60 Minutes
8 GB
120 Minutes
16 GB
240 Minutes
32 GB
480 Minutes
Note: The camera automatically splits the video into 2 GB segments.
Camera Mounting
Mount on Dual Track System
The XTC-100 was innovatively designed with an identi-
cal dual track mount system on either side of the came-
ra. This allows an ease of installation.
To mount the camera on the dual track mount, slide the
camera onto the dual track system with the two notches
on the mount facing towards the back of the camera.
To detach the camera from the dual track mount, hold
the camera with the lens facing away from you. Press
down the mount release switch and pull the mount to-
wards yourself.
The dual track mount allows the camera to be easily
mounted on both helmet mount and goggle mount. This
elimi nates the hassle of having to remount the camera
every time.
When mounting the camera on the dual track mount, you
must do the following:
1. Consider what you would like to shoot and use the
helmet mount or goggle mount accordingly.
2. Ensure, once attached, that the camera is aimed
straight
and not towards the ground or at the sky.
Mount using the Thread Mount
On the bottom of the XTC-100 is a standard thread
mount that allows the camera to be mounted to an hel-
met strap mount or to a bicycle handlebar mount.
To fix the camera, insert the screw on the mount into
the camera thread and rotate the camera clockwise to
tighten down onto the screw.
When mounting the camera on the handlebars of a
bike or with the vented helmet strap mount follow these
steps:
1. Consider what you would like to shoot and mount
accordingly.
2. Ensure, once attached, that the camera is aimed
straight
and not towards the ground or at the sky.
Compatible Systems
The XTC-100 can be used on both Windows operating system and MAC.
The camera records as AVI.
Downloading Videos
There is no need to install any software with the XTC-100. It is a plug and play device.
Ensure
batteries are new or fully charged before downloading video.
Connect the camera to the USB port using the included cable.
The camera will be automatically recognized as external hard drive (USB key)
All your videos will be saved into the DCIM folder.
Reformatting the Micro SD card
The Micro SD card can be reformatted while in the camera. This allows you to delete all the videos at one time. Follow
these steps:
1. Move the RECORD switch to the record position.
2. When the battery indicator turns green, press and hold the Micro SD card reformat button.
3. Keep the Micro SD card reformat button down until the record indicator turns off and the SD card indicator begins
blinking green.
4. Move the RECORD switch to the off position.
Note: The camera cannot reformat the Micro SD card if the low battery light is on. Ensure new batteries are instal-
led in the camera before attempting the reformat process.
Tips and Tricks
Problem
Solution
Batteries
Camera not turning on
Ensure the batteries are installed properly observing polarity.
Make sure batteries are new or fully charged.
Recording
Camera not recording
Make sure the switch is pushed all the way forward. If the record LED does not
come on, turn off the device and reinstall the batteries.
Verify available memory.
Micro SD card
Micro SD card not reading
Ensure the Micro SD card is inserted properly.
Plug camera into the computer to verify it has available storage.
Attempt formatting process.
Video Playback
Slow or choppy video
Verify the camera is plugged into a USB 2.0 device.
Remove other unused USB devices.
Transfer video to computer before viewing.
Video Downloading
Slow data transfer
Verify the camera is plugged into a USB 2.0 device. If registering as 1.1, unplug and
the re-plug the device.
Remove other unused USB devices.
Computer does notrecognize ca-
mera
Ensure record switch is in the record position while connected to computer.
Ensure the Micro SD card is inserted properly.
Micro SD card may becorrupted. Attempt formatting process.
Sound
Excessive Wind Noise
Place piece of tape over microphone hole.
Limited Warranty
Midland Radio Corporation will repair or replace, at its option without charge, any Midland XTC-100 Action camera
which fails due to a defect in material or workmanship within TWO Years following the initial consumer purchase.
This warranty does not apply to accidents of any kind, exposure to pressure, extreme temperatures (outside of -10°C to
45°C), and submersion water damage as this product is water resistant but not waterproof, battery leak or abuse.
Accessories have a 90 day warranty from date of purchase, inclu ding any mounts and cables. This warranty does not
include the cost of labor for removal or re-installation of the product in a vehicle or other mounting.
Hereby, CTE International declares that this XTC-100 is in compliance with the essential requirements and other rele-
vant provisions the Electromagnetic Compatibility Directive 2004/108/CE. A copy of Declaration of Conformity can be
found at:
www.midlandradio.eu
140° degree glass lens
Microphone
Dual track mounting system
Record switch
forward:
on/record
Record led
flashes red when
camera is recording
Battery led
Record switch
backward:
Off/Stop recording
SD Card led
Mini USB
connector
SD Card
reformat button
Mini SD Card slot
dual track system mount
Release button
Helmet adhesive mount
Goggle mount
Camera thread
Mounting screw
Helmet strap mount
Bicycle handle bar mount
P XTC-100 Action Camera
Thank you for your purchase of the XTC-100 Action Camera. As someone who seeks adventure, we are proud to
offer you the ultimate tool in capturing and recording your adventures. With easy to use one switch operation, 140
degree algle lens and 2 hour battery life you never miss a minute of the action. Once captured, simply connect to
your computer and upload the videos to share with friends. It is that simple! Enjoy!
What’s in the box
› Midland XTC-100 Action camera
› 2 GB Micro SD card
› 2 AAA Alkalinebatteries
› USB cable
› Goggle mount
› Helmet adhesive mount
› Dual Track mount for goggle mount and helmet adhesive mount.
› Helmet strap mount
› Bicycle handlebar mount
XTC-100 Features and Controls
Features:
› 640x480 resolution (4:3 aspect ratio)
› Records as AVI
› 30 frames per second
› 140 degree angle lens
Quick Start Guide
1. Open battery door and install batteries observing polarity. Replace battery cover.
2. Open and fold down back rubber cover. Insert micro Sd card observing proper direction. Close cover.
3. Move RECORD switch forward,
recording will start in 8 seconds
.
4. To stop recording, slide switch back to the off position.
5. Plug in camera to computer and download video.
Getting to Know the XTC-100
Batteries
1. To insert the batteries, push down the battery door latch on the right side of
the camera. Door will release. Push forward to remove.
2. Install 2 AAA batteries observing polarity.
3. Return battery door and click into place.
Battery Status Indicator
Meaning
Solid Green
Indicates full battery life
Solid Red
Indicates half battery life
Blinking Red*
Indicates low battery life
No Light
Batteries are dead
Note: When the red battery LED begins blinking, be prepared to change the batteries because the camera will stop
recording at this point.
Micro SD Card
1. Open and fold down the back rubber cover.
2. Insert Micro SD card into slot observing proper direction (shown sideways).
3.
Return rubber flap into place.
Recording
1. Move the RECORD switch forward. This turns the camera on.
2. The battery indicator will light from red to green. The SD card indicator will light green.
The record indicator will begin
flashing red after 8 seconds.
This indicates the camera is capturing video.
3. To stop recording, move the RECORD switch back to the off position.
Note: The camera will continue recording for 3 seconds after toggling the switch to the off position.
SD card LED Status
Meaning
Green
1 GB or more avai lable
Orange
512 MB to1 GB available
Red
Below 512 MB available or no MicroSD card installed.
Flashing Red
Cannot read the card
Flashing Green
Indicates card has been reformatted.
Memory Size
Record Time
512 MB
7.5 Minutes
1 GB
15 Minutes
2 GB
30 Minutes
4 GB
60 Minutes
8 GB
120 Minutes
16 GB
240 Minutes
32 GB
480 Minutes
Note: The camera automatically splits the video into 2 GB segments.
Camera Mounting
Mount on Dual Track System
The XTC-100 was innovatively designed with an identi-
cal dual track mount system on either side of the came-
ra. This allows an ease of installation.
To mount the camera on the dual track mount, slide the
camera onto the dual track system with the two notches
on the mount facing towards the back of the camera.
To detach the camera from the dual track mount, hold
the camera with the lens facing away from you. Press
down the mount release switch and pull the mount to-
wards yourself.
The dual track mount allows the camera to be easily
mounted on both helmet mount and goggle mount. This
elimi nates the hassle of having to remount the camera
every time.
When mounting the camera on the dual track mount, you
must do the following:
1. Consider what you would like to shoot and use the
helmet mount or goggle mount accordingly.
2. Ensure, once attached, that the camera is aimed
straight
and not towards the ground or at the sky.
Mount using the Thread Mount
On the bottom of the XTC-100 is a standard thread
mount that allows the camera to be mounted to an hel-
met strap mount or to a bicycle handlebar mount.
To fix the camera, insert the screw on the mount into
the camera thread and rotate the camera clockwise to
tighten down onto the screw.
When mounting the camera on the handlebars of a
bike or with the vented helmet strap mount follow these
steps:
1. Consider what you would like to shoot and mount
accordingly.
2. Ensure, once attached, that the camera is aimed
straight
and not towards the ground or at the sky.
Compatible Systems
The XTC-100 can be used on both Windows operating system and MAC.
The camera records as AVI.
Downloading Videos
There is no need to install any software with the XTC-100. It is a plug and play device.
Ensure
batteries are new or fully charged before downloading video.
Connect the camera to the USB port using the included cable.
The camera will be automatically recognized as external hard drive (USB key)
All your videos will be saved into the DCIM folder.
Reformatting the Micro SD card
The Micro SD card can be reformatted while in the camera. This allows you to delete all the videos at one time. Follow
these steps:
1. Move the RECORD switch to the record position.
2. When the battery indicator turns green, press and hold the Micro SD card reformat button.
3. Keep the Micro SD card reformat button down until the record indicator turns off and the SD card indicator begins
blinking green.
4. Move the RECORD switch to the off position.
Note: The camera cannot reformat the Micro SD card if the low battery light is on. Ensure new batteries are instal-
led in the camera before attempting the reformat process.
Tips and Tricks
Problem
Solution
Batteries
Camera not turning on
Ensure the batteries are installed properly observing polarity.
Make sure batteries are new or fully charged.
Recording
Camera not recording
Make sure the switch is pushed all the way forward. If the record LED does not
come on, turn off the device and reinstall the batteries.
Verify available memory.
Micro SD card
Micro SD card not reading
Ensure the Micro SD card is inserted properly.
Plug camera into the computer to verify it has available storage.
Attempt formatting process.
Video Playback
Slow or choppy video
Verify the camera is plugged into a USB 2.0 device.
Remove other unused USB devices.
Transfer video to computer before viewing.
Video Downloading
Slow data transfer
Verify the camera is plugged into a USB 2.0 device. If registering as 1.1, unplug and
the re-plug the device.
Remove other unused USB devices.
Computer does notrecognize ca-
mera
Ensure record switch is in the record position while connected to computer.
Ensure the Micro SD card is inserted properly.
Micro SD card may becorrupted. Attempt formatting process.
Sound
Excessive Wind Noise
Place piece of tape over microphone hole.
Limited Warranty
Midland Radio Corporation will repair or replace, at its option without charge, any Midland XTC-100 Action camera
which fails due to a defect in material or workmanship within TWO Years following the initial consumer purchase.
This warranty does not apply to accidents of any kind, exposure to pressure, extreme temperatures (outside of -10°C to
45°C), and submersion water damage as this product is water resistant but not waterproof, battery leak or abuse.
Accessories have a 90 day warranty from date of purchase, inclu ding any mounts and cables. This warranty does not
include the cost of labor for removal or re-installation of the product in a vehicle or other mounting.
Hereby, CTE International declares that this XTC-100 is in compliance with the essential requirements and other rele-
vant provisions the Electromagnetic Compatibility Directive 2004/108/CE. A copy of Declaration of Conformity can be
found at:
www.midlandradio.eu
140° degree glass lens
Microphone
Dual track mounting system
Record switch
forward:
on/record
Record led
flashes red when
camera is recording
Battery led
Record switch
backward:
Off/Stop recording
SD Card led
Mini USB
connector
SD Card
reformat button
Mini SD Card slot
Camera thread
Mounting screw
Helmet strap mount
Bicycle handle bar mount
dual track system mount
Release button
Helmet adhesive mount
Goggle mount
G R XTC-100 Action Camera
Thank you for your purchase of the XTC-100 Action Camera. As someone who seeks adventure, we are proud to
offer you the ultimate tool in capturing and recording your adventures. With easy to use one switch operation, 140
degree algle lens and 2 hour battery life you never miss a minute of the action. Once captured, simply connect to
your computer and upload the videos to share with friends. It is that simple! Enjoy!
What’s in the box
› Midland XTC-100 Action camera
› 2 GB Micro SD card
› 2 AAA Alkalinebatteries
› USB cable
› Goggle mount
› Helmet adhesive mount
› Dual Track mount for goggle mount and helmet adhesive mount.
› Helmet strap mount
› Bicycle handlebar mount
XTC-100 Features and Controls
Features:
› 640x480 resolution (4:3 aspect ratio)
› Records as AVI
› 30 frames per second
› 140 degree angle lens
Quick Start Guide
1. Open battery door and install batteries observing polarity. Replace battery cover.
2. Open and fold down back rubber cover. Insert micro Sd card observing proper direction. Close cover.
3. Move RECORD switch forward,
recording will start in 8 seconds
.
4. To stop recording, slide switch back to the off position.
5. Plug in camera to computer and download video.
Getting to Know the XTC-100
Batteries
1. To insert the batteries, push down the battery door latch on the right side of
the camera. Door will release. Push forward to remove.
2. Install 2 AAA batteries observing polarity.
3. Return battery door and click into place.
Battery Status Indicator
Meaning
Solid Green
Indicates full battery life
Solid Red
Indicates half battery life
Blinking Red*
Indicates low battery life
No Light
Batteries are dead
Note: When the red battery LED begins blinking, be prepared to change the batteries because the camera will stop
recording at this point.
Micro SD Card
1. Open and fold down the back rubber cover.
2. Insert Micro SD card into slot observing proper direction (shown sideways).
3.
Return rubber flap into place.
Recording
1. Move the RECORD switch forward. This turns the camera on.
2. The battery indicator will light from red to green. The SD card indicator will light green.
The record indicator will begin
flashing red after 8 seconds.
This indicates the camera is capturing video.
3. To stop recording, move the RECORD switch back to the off position.
Note: The camera will continue recording for 3 seconds after toggling the switch to the off position.
SD card LED Status
Meaning
Green
1 GB or more avai lable
Orange
512 MB to1 GB available
Red
Below 512 MB available or no MicroSD card installed.
Flashing Red
Cannot read the card
Flashing Green
Indicates card has been reformatted.
Memory Size
Record Time
512 MB
7.5 Minutes
1 GB
15 Minutes
2 GB
30 Minutes
4 GB
60 Minutes
8 GB
120 Minutes
16 GB
240 Minutes
32 GB
480 Minutes
Note: The camera automatically splits the video into 2 GB segments.
Camera Mounting
Mount on Dual Track System
The XTC-100 was innovatively designed with an identi-
cal dual track mount system on either side of the came-
ra. This allows an ease of installation.
To mount the camera on the dual track mount, slide the
camera onto the dual track system with the two notches
on the mount facing towards the back of the camera.
To detach the camera from the dual track mount, hold
the camera with the lens facing away from you. Press
down the mount release switch and pull the mount to-
wards yourself.
The dual track mount allows the camera to be easily
mounted on both helmet mount and goggle mount. This
elimi nates the hassle of having to remount the camera
every time.
When mounting the camera on the dual track mount, you
must do the following:
1. Consider what you would like to shoot and use the
helmet mount or goggle mount accordingly.
2. Ensure, once attached, that the camera is aimed
straight
and not towards the ground or at the sky.
Mount using the Thread Mount
On the bottom of the XTC-100 is a standard thread
mount that allows the camera to be mounted to an hel-
met strap mount or to a bicycle handlebar mount.
To fix the camera, insert the screw on the mount into
the camera thread and rotate the camera clockwise to
tighten down onto the screw.
When mounting the camera on the handlebars of a
bike or with the vented helmet strap mount follow these
steps:
1. Consider what you would like to shoot and mount
accordingly.
2. Ensure, once attached, that the camera is aimed
straight
and not towards the ground or at the sky.
Compatible Systems
The XTC-100 can be used on both Windows operating system and MAC.
The camera records as AVI.
Downloading Videos
There is no need to install any software with the XTC-100. It is a plug and play device.
Ensure
batteries are new or fully charged before downloading video.
Connect the camera to the USB port using the included cable.
The camera will be automatically recognized as external hard drive (USB key)
All your videos will be saved into the DCIM folder.
Reformatting the Micro SD card
The Micro SD card can be reformatted while in the camera. This allows you to delete all the videos at one time. Follow
these steps:
1. Move the RECORD switch to the record position.
2. When the battery indicator turns green, press and hold the Micro SD card reformat button.
3. Keep the Micro SD card reformat button down until the record indicator turns off and the SD card indicator begins
blinking green.
4. Move the RECORD switch to the off position.
Note: The camera cannot reformat the Micro SD card if the low battery light is on. Ensure new batteries are instal-
led in the camera before attempting the reformat process.
Tips and Tricks
Problem
Solution
Batteries
Camera not turning on
Ensure the batteries are installed properly observing polarity.
Make sure batteries are new or fully charged.
Recording
Camera not recording
Make sure the switch is pushed all the way forward. If the record LED does not
come on, turn off the device and reinstall the batteries.
Verify available memory.
Micro SD card
Micro SD card not reading
Ensure the Micro SD card is inserted properly.
Plug camera into the computer to verify it has available storage.
Attempt formatting process.
Video Playback
Slow or choppy video
Verify the camera is plugged into a USB 2.0 device.
Remove other unused USB devices.
Transfer video to computer before viewing.
Video Downloading
Slow data transfer
Verify the camera is plugged into a USB 2.0 device. If registering as 1.1, unplug and
the re-plug the device.
Remove other unused USB devices.
Computer does notrecognize ca-
mera
Ensure record switch is in the record position while connected to computer.
Ensure the Micro SD card is inserted properly.
Micro SD card may becorrupted. Attempt formatting process.
Sound
Excessive Wind Noise
Place piece of tape over microphone hole.
Limited Warranty
Midland Radio Corporation will repair or replace, at its option without charge, any Midland XTC-100 Action camera
which fails due to a defect in material or workmanship within TWO Years following the initial consumer purchase.
This warranty does not apply to accidents of any kind, exposure to pressure, extreme temperatures (outside of -10°C to
45°C), and submersion water damage as this product is water resistant but not waterproof, battery leak or abuse.
Accessories have a 90 day warranty from date of purchase, inclu ding any mounts and cables. This warranty does not
include the cost of labor for removal or re-installation of the product in a vehicle or other mounting.
Hereby, CTE International declares that this XTC-100 is in compliance with the essential requirements and other rele-
vant provisions the Electromagnetic Compatibility Directive 2004/108/CE. A copy of Declaration of Conformity can be
found at:
www.midlandradio.eu
140° degree glass lens
Microphone
Dual track mounting system
Record switch
forward:
on/record
Record led
flashes red when
camera is recording
Battery led
Record switch
backward:
Off/Stop recording
SD Card led
Mini USB
connector
SD Card
reformat button
Mini SD Card slot
dual track system mount
Release button
Helmet adhesive mount
Goggle mount
Camera thread
Mounting screw
Helmet strap mount
Bicycle handle bar mount
N L XTC-100 Action Camera
Thank you for your purchase of the XTC-100 Action Camera. As someone who seeks adventure, we are proud to
offer you the ultimate tool in capturing and recording your adventures. With easy to use one switch operation, 140
degree algle lens and 2 hour battery life you never miss a minute of the action. Once captured, simply connect to
your computer and upload the videos to share with friends. It is that simple! Enjoy!
What’s in the box
› Midland XTC-100 Action camera
› 2 GB Micro SD card
› 2 AAA Alkalinebatteries
› USB cable
› Goggle mount
› Helmet adhesive mount
› Dual Track mount for goggle mount and helmet adhesive mount.
› Helmet strap mount
› Bicycle handlebar mount
XTC-100 Features and Controls
Features:
› 640x480 resolution (4:3 aspect ratio)
› Records as AVI
› 30 frames per second
› 140 degree angle lens
Quick Start Guide
1. Open battery door and install batteries observing polarity. Replace battery cover.
2. Open and fold down back rubber cover. Insert micro Sd card observing proper direction. Close cover.
3. Move RECORD switch forward,
recording will start in 8 seconds
.
4. To stop recording, slide switch back to the off position.
5. Plug in camera to computer and download video.
Getting to Know the XTC-100
Batteries
1. To insert the batteries, push down the battery door latch on the right side of
the camera. Door will release. Push forward to remove.
2. Install 2 AAA batteries observing polarity.
3. Return battery door and click into place.
Battery Status Indicator
Meaning
Solid Green
Indicates full battery life
Solid Red
Indicates half battery life
Blinking Red*
Indicates low battery life
No Light
Batteries are dead
Note: When the red battery LED begins blinking, be prepared to change the batteries because the camera will stop
recording at this point.
Micro SD Card
1. Open and fold down the back rubber cover.
2. Insert Micro SD card into slot observing proper direction (shown sideways).
3.
Return rubber flap into place.
Recording
1. Move the RECORD switch forward. This turns the camera on.
2. The battery indicator will light from red to green. The SD card indicator will light green.
The record indicator will begin
flashing red after 8 seconds.
This indicates the camera is capturing video.
3. To stop recording, move the RECORD switch back to the off position.
Note: The camera will continue recording for 3 seconds after toggling the switch to the off position.
SD card LED Status
Meaning
Green
1 GB or more avai lable
Orange
512 MB to1 GB available
Red
Below 512 MB available or no MicroSD card installed.
Flashing Red
Cannot read the card
Flashing Green
Indicates card has been reformatted.
Memory Size
Record Time
512 MB
7.5 Minutes
1 GB
15 Minutes
2 GB
30 Minutes
4 GB
60 Minutes
8 GB
120 Minutes
16 GB
240 Minutes
32 GB
480 Minutes
Note: The camera automatically splits the video into 2 GB segments.
Camera Mounting
Mount on Dual Track System
The XTC-100 was innovatively designed with an identi-
cal dual track mount system on either side of the came-
ra. This allows an ease of installation.
To mount the camera on the dual track mount, slide the
camera onto the dual track system with the two notches
on the mount facing towards the back of the camera.
To detach the camera from the dual track mount, hold
the camera with the lens facing away from you. Press
down the mount release switch and pull the mount to-
wards yourself.
The dual track mount allows the camera to be easily
mounted on both helmet mount and goggle mount. This
elimi nates the hassle of having to remount the camera
every time.
When mounting the camera on the dual track mount, you
must do the following:
1. Consider what you would like to shoot and use the
helmet mount or goggle mount accordingly.
2. Ensure, once attached, that the camera is aimed
straight
and not towards the ground or at the sky.
Mount using the Thread Mount
On the bottom of the XTC-100 is a standard thread
mount that allows the camera to be mounted to an hel-
met strap mount or to a bicycle handlebar mount.
To fix the camera, insert the screw on the mount into
the camera thread and rotate the camera clockwise to
tighten down onto the screw.
When mounting the camera on the handlebars of a
bike or with the vented helmet strap mount follow these
steps:
1. Consider what you would like to shoot and mount
accordingly.
2. Ensure, once attached, that the camera is aimed
straight
and not towards the ground or at the sky.
Compatible Systems
The XTC-100 can be used on both Windows operating system and MAC.
The camera records as AVI.
Downloading Videos
There is no need to install any software with the XTC-100. It is a plug and play device.
Ensure
batteries are new or fully charged before downloading video.
Connect the camera to the USB port using the included cable.
The camera will be automatically recognized as external hard drive (USB key)
All your videos will be saved into the DCIM folder.
Reformatting the Micro SD card
The Micro SD card can be reformatted while in the camera. This allows you to delete all the videos at one time. Follow
these steps:
1. Move the RECORD switch to the record position.
2. When the battery indicator turns green, press and hold the Micro SD card reformat button.
3. Keep the Micro SD card reformat button down until the record indicator turns off and the SD card indicator begins
blinking green.
4. Move the RECORD switch to the off position.
Note: The camera cannot reformat the Micro SD card if the low battery light is on. Ensure new batteries are instal-
led in the camera before attempting the reformat process.
Tips and Tricks
Problem
Solution
Batteries
Camera not turning on
Ensure the batteries are installed properly observing polarity.
Make sure batteries are new or fully charged.
Recording
Camera not recording
Make sure the switch is pushed all the way forward. If the record LED does not
come on, turn off the device and reinstall the batteries.
Verify available memory.
Micro SD card
Micro SD card not reading
Ensure the Micro SD card is inserted properly.
Plug camera into the computer to verify it has available storage.
Attempt formatting process.
Video Playback
Slow or choppy video
Verify the camera is plugged into a USB 2.0 device.
Remove other unused USB devices.
Transfer video to computer before viewing.
Video Downloading
Slow data transfer
Verify the camera is plugged into a USB 2.0 device. If registering as 1.1, unplug and
the re-plug the device.
Remove other unused USB devices.
Computer does notrecognize ca-
mera
Ensure record switch is in the record position while connected to computer.
Ensure the Micro SD card is inserted properly.
Micro SD card may becorrupted. Attempt formatting process.
Sound
Excessive Wind Noise
Place piece of tape over microphone hole.
Limited Warranty
Midland Radio Corporation will repair or replace, at its option without charge, any Midland XTC-100 Action camera
which fails due to a defect in material or workmanship within TWO Years following the initial consumer purchase.
This warranty does not apply to accidents of any kind, exposure to pressure, extreme temperatures (outside of -10°C to
45°C), and submersion water damage as this product is water resistant but not waterproof, battery leak or abuse.
Accessories have a 90 day warranty from date of purchase, inclu ding any mounts and cables. This warranty does not
include the cost of labor for removal or re-installation of the product in a vehicle or other mounting.
Hereby, CTE International declares that this XTC-100 is in compliance with the essential requirements and other rele-
vant provisions the Electromagnetic Compatibility Directive 2004/108/CE. A copy of Declaration of Conformity can be
found at:
www.midlandradio.eu
140° degree glass lens
Microphone
Dual track mounting system
Record switch
forward:
on/record
Record led
flashes red when
camera is recording
Battery led
Record switch
backward:
Off/Stop recording
SD Card led
Mini USB
connector
SD Card
reformat button
Mini SD Card slot
dual track system mount
Release button
Helmet adhesive mount
Goggle mount
Camera thread
Mounting screw
Helmet strap mount
Bicycle handle bar mount
R U XTC-100 Action Camera
Благодарим Вас за приобретение видеокамеры XTC-100, которая позволит любителям острых ощущений
делать видеозаписи своих приключений. Простота в использовании, широкий угол обзора, 2 часа в режиме
записи гарантируют то, что вы не пропустите ни одной секунды, наполненной адреналином.
Сделав запись, подключите камеру к компьютеру, загрузите видеоролик в Интернет и разделите свои
эмоции с друзьями!
Комплектация:
›
видеокамера XTC-100 Action Camera
›
карта памяти SD (емкость 2 Гб)
›
2 щелочные батарейки типа ААА
›
кабель USB
›
крепеж на очки
›
крепеж на шлем на липучке
›
крепеж на шлем на ремешке
›
крепеж на руль велосипеда/мотоцикла
›
держатель для установки видеокамеры на шлем или очки
Характеристики видеокамеры и элементы управления
Характеристики:
›
разрешение 640х480 (размер кадра 4:3)
›
формат записи: AVI (30 кадров в секунду)
›
угол обзора 140°
Краткое руководство по использованию видеокамеры
1.
Откройте крышку батарейного отсека и установите батарейки, соблюдая полярность.
Закройте крышку батарейного отсека.
2.
Откройте резиновую крышку отсека карты памяти и установите карту памяти.
Закройте крышку отсека карты памяти.
3.
Установите ползунок записи (Rec) в верхней позиции – запись начнется через 8 секунд.
4.
Для остановки записи переместите ползунок (Rec) в нижнюю позицию (off).
5.
Подключите камеру к персональному компьютеру и скопируйте видеоролик.
Установка батареек
1.
Отсек для батареек расположен с правой стороны камеры. Нажмите
на фиксатор батарейного отсека и сдвиньте крышку в сторону объектива –
теперь можно ее снять.
2.
Установите 2 батарейки типа ААА, соблюдая полярность.
3.
Установите крышку батарейного отсека (при правильной установке,
вы услышите щелчок).
Индикация уровня разряда батареек
Индикатор разряда батареи
Соответствующее значение
Постоянно горит зеленым светом
Полный заряд батареи
Постоянно горит красным светом
Батарея наполовину разряжена
Мигает красным светом*
Низкий уровень заряда батареи
Не горит
Батарея разряжена
*Внимание: когда индикатор начинает мигать красным светом, камера прекращает запись ролика.
В этот момент необходимо произвести замену батареек.
Установка Micro SD карты памяти
1.
Откройте отсек карты памяти, расположенный на задней поверхности видеокамеры.
2.
Установите карту памяти.
3.
Закройте крышку отсека.
Запись ролика
1.
Для включения видеокамеры переместите ползунок записи (Rec) ближе к объективу до щелчка.
2.
Индикатор разряда батареи загорится зеленым или красным светом.
Через 8 секунд индикатор записи (Rec)
начнет мигать красным светом – осуществляется запись ролика.
3.
Для остановки записи переместите ползунок (Rec) ближе к USB разъему и разъему для установки Micro SD карты:
камера остановит запись через 3 секунды.
Индикатор состояния Micro SD карты
Свободный объем памяти
Горит зеленым светом
≥ 1Гб
Горит оранжевым светом
512 Мб – 1Гб
Горит красным светом
< 512 Мб или карта не установлена
Мигает красным светом
Карта не читается
Мигает зеленым светом
Карта была отформатирована
Объем памяти
Доступное время записи (в мин.)
512 Мб
7,5
1 Гб
15
2 Гб
30
4 Гб
60
8 Гб
120
16 Гб
240
32 Гб
480
Внимание: видеокамера автоматически разделяет запись на фрагменты размером 2 Гб.
Установка видеокамеры
В комплекте вы найдете следующие варианты крепежей
видеокамеры, характеризующиеся различным назначением
и вариантами соединения с видеокамерой:
1.
2 крепежа на шлем:
на липучке – соединение с камерой осуществляется
посредством держателя (см. следующий раздел),
на ремешке – винтовая система соединения с камерой;
2.
крепеж на очки – соединение с камерой
осуществляется посредством держателя
(см. следующий раздел);
3.
крепеж на руль мотоцикла / велосипеда – винтовая
система соединения с камерой.
Держатель для установки видеокамеры
на шлем или очки
Данный держатель предназначен для фиксации видеокамеры на крепеже шлема или очков, позволяет быстро
и просто сменить положение видеокамеры (шлем-очки) в зависимости от цели / объекта съемки.
Для установки видеокамеры на держателе вставьте направляющие выступы видеокамеры в соответствующие
бороздки держателя и плавно двигайте камеру вдоль бороздок.
Теперь достаточно зафиксировать держатель с камерой на крепеже шлема (на липучке) или очков в необходимой
позиции (направлении), учитывая объект предстоящей съемки, и удостовериться, что объектив видеокамеры
направлен строго вперед, а не на землю или небо. Камера готова к использованию!
Для отсоединения видеокамеры от крепежа, зафиксируйте видеокамеру в руке (объектив направлен от вас),
нажмите на рычажок (см. рисунок сверху) и тяните держатель на себя.
Винтовая система соединения камеры с крепежом
Крепеж на шлем (на ремешке) и рулевой крепеж
имеют винтовую систему соединения видеокамеры
с крепежом.
Для фиксации видеокамеры на данном крепеже вставьте
винт крепежа в резьбовое соединение видеокамеры,
расположенное на нижней поверхности ее корпуса,
и вращайте видеокамеру по часовой стрелке.
Установите видеокамеру в необходимом направлении,
учитывая объект предстоящей съемки, и удостоверьтесь,
что объектив видеокамеры направлен строго вперед, а не
на землю или небо. Камера готова к использованию!
Совместимость видеокамеры с операционными системами персонального компьютера
Видеокамера совместима с операционной системой Windows и MAC.
Видеозаписи сохраняются в формате AVI.
Загрузка видеозаписей на персональный компьютер
Для загрузки видеоролика на персональный компьютер (ПК) установка какой-либо программы не требуется. Перед
началом загрузки удостоверьтесь, что батареи видеокамеры полностью заряжены. Подключите видеокамеру
к персональному компьютеру через разъем USB посредством кабеля, поставляемого в комплекте.
Персональный компьютер автоматически распознает внешнее USB устройство.
Все видеоролики сохраняются в папке DCIM.
Форматирование Micro SD карты памяти
Форматируя Micro SD карту памяти, вы можете просто и быстро удалить все видеозаписи.
Для этого:
1.
Переместите ползунок записи (Rec) в верхнюю позицию (позиция записи).
2.
Когда индикатор батареи загорится зеленым светом, нажмите и удерживайте кнопку форматирования карты
памяти.
3.
Когда процесс форматирования карты завершится, индикатор записи (Rec) погаснет, а индикатор карты
памяти начнет мигать зеленым светом.
4.
Переместите ползунок записи в нижнюю позицию (off).
Внимание: в случае, если горит индикатор низкого заряда батареи, невозможно осуществить
форматирование карты памяти. Таким образом, перед началом форматирования удостоверьтесь, что
батареи видеокамеры полностью заряжены.
Проблемы и неполадки
Проблема
Решение
Батарейки
Камера не включается
Проверьте, правильно ли установлены батарейки (соблюдена ли полярность).
Удостоверьтесь, что батарейки полностью заряжены.
Запись
Камера не осуществляет запись Удостоверьтесь, что ползунок записи расположен в верхней позиции
(до щелчка). Если индикатор записи не загорается, то выключите камеру
и переустановите батарейки.
Проверьте объем доступной памяти.
Карта памяти Micro SD
Карта памяти не читается
Удостоверьтесь, что карта памяти установлена должным образом.
Посредством ПК проверьте доступный объем памяти.
Отформатируйте карту памяти.
Просмотр записи
Медленное или прерывистое
воспроизведение видео файла
Удостоверьтесь, что камера подключена к устройству, поддерживающему
USB 2.0.
Отсоедините другие USB устройства от ПК.
Перед просмотром записи сохраните её на ПК.
Загрузка видео файла на ПК
Медленная передача данных
Удостоверьтесь, что камера подключена к устройству, поддерживающему
USB 2.0. Если камера регистрируется как устройство USB 1.1, то отсоедините
камеру и снова подключите к ПК.
Отсоедините другие USB устройства от ПК.
Персональный компьютер
не распознает камеру, как
внешнее USB устройство
Удостоверьтесь, что ползунок записи видеокамеры расположен в верхней
позиции (позиция записи).
Удостоверьтесь, что карта памяти установлена должным образом.
Отформатируйте карту памяти.
Звук
Чрезмерный шум, задувание
ветра
Прикройте отверстие микрофона.
Правила эксплуатации и ухода.
! Не пользуйтесь содержащими алкоголь жидкостями и чистящими средствами для очистки видеокамеры.
! Не погружайте видеокамеру в воду.
! Протирайте видеокамеру мягким влажным кусочком ткани.
! На время длительного хранения выключите видеокамеру и удалите из нее батарейки.
Внимание! Не вскрывайте корпус видеокамеры самостоятельно!
Несанкционированное вскрытие изделия лишит вас гарантии на устройство!
Гарантия
На данный товар гарантия выдается сроком на один год, считая со дня приобретения товара. Гарантийное
обслуживание осуществляется только при условии строгого соблюдения правил эксплуатации и требований
безопасности, указанных в руководстве пользователя.
Произведено или импортировано:
СТЕ Интернешнл с.р.л. Ул. Р. Севарди 7- 42010
Манкасаль, Реджио Эмилия, Италия
Импортер в России:
ЗАО «Алан-Связь»
Интернет-сайт:
www.midland.ru
105187, г. Москва, Фортунатовская, 31А, стр. 2
угол обзора 140°
микрофон
направляющие крепления камеры на держателе
ползунок записи (Rec)
в верхней позиции –
включение камеры/
запись ролика
индикатор записи (Rec)
– мигает красным светом
во время записи ролика
индикатор батареи
ползунок записи (Rec)
в нижней позиции –
остановка записи/
выключение камеры
индикатор карты памяти
Mini USB разъем
кнопка форматирования
карты памяти
отсек Mini SD
карты памяти
бороздки держателя
рычажок
крепеж на шлем (на липучке)
крепеж на очки
резьбовое
соединение
винт крепежа
крепеж на шлем (на ремешке)
крепеж на руль
