Midland XTC 400: Midland XTC400
Midland XTC400: Midland XTC 400
UK
UK
Midland XTC400 - 14
Midland XTC400 - 15
Resolution
H 1920x1080p (30/25*fps)
Midland XTC400
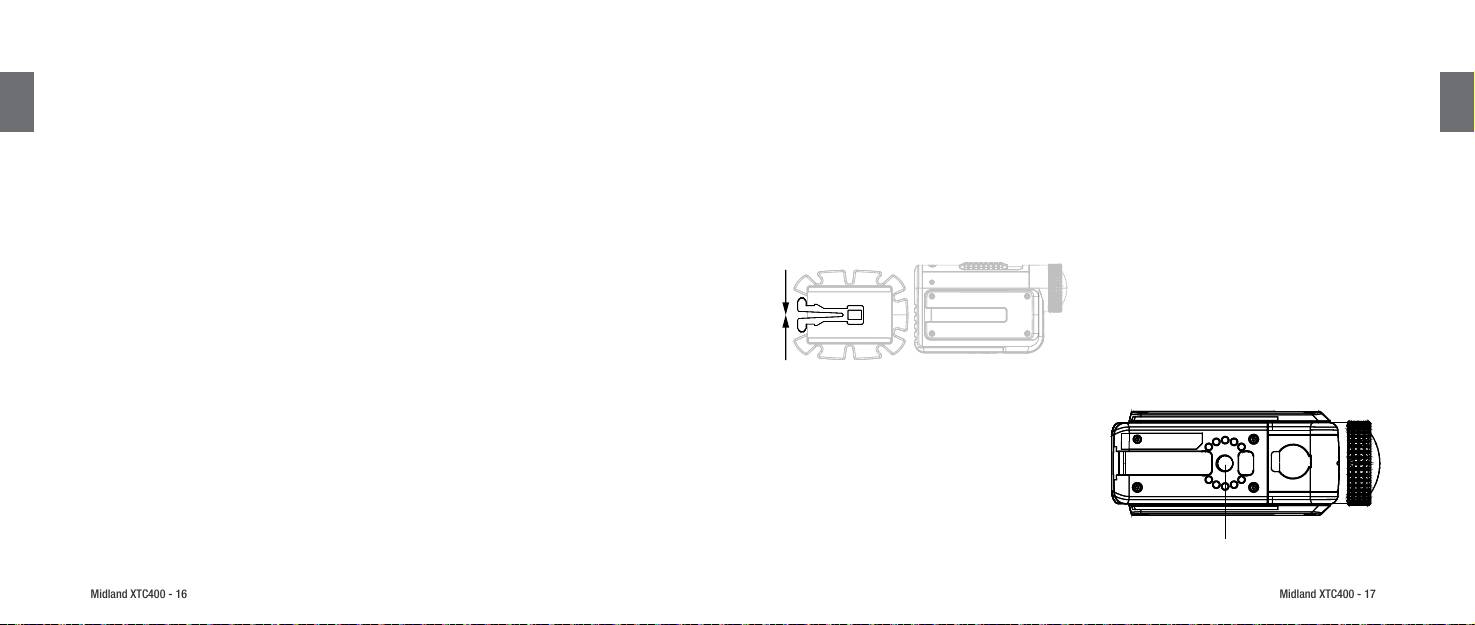
Removing the Battery
L 1280x720p (60/50*fps)
HD ACTION VIDEO CAMERA
* 848x480 (120/100fps)
Photo* 12 Mp/5Mp/3Mp
Thank you for purchasing the XTC400 action video camera. We are proud to oer you an exciting tool to record your life’s
Aspect Ratio 16:9
adventures. With an easy slide-on switch, wi- capability, and long battery life, you’ll never miss a moment. Easily connect to
Format H.264 File Type - MP4
your computer and upload to share with your friends.
Lens 7 elements (6 tempered glass, 1 IRF)
See what other people are doing with their XTC cameras at facebook.com/midlandcom, and post your own video too. Enjoy!
Rotating lens Yes
Angle lens 170° Variable*
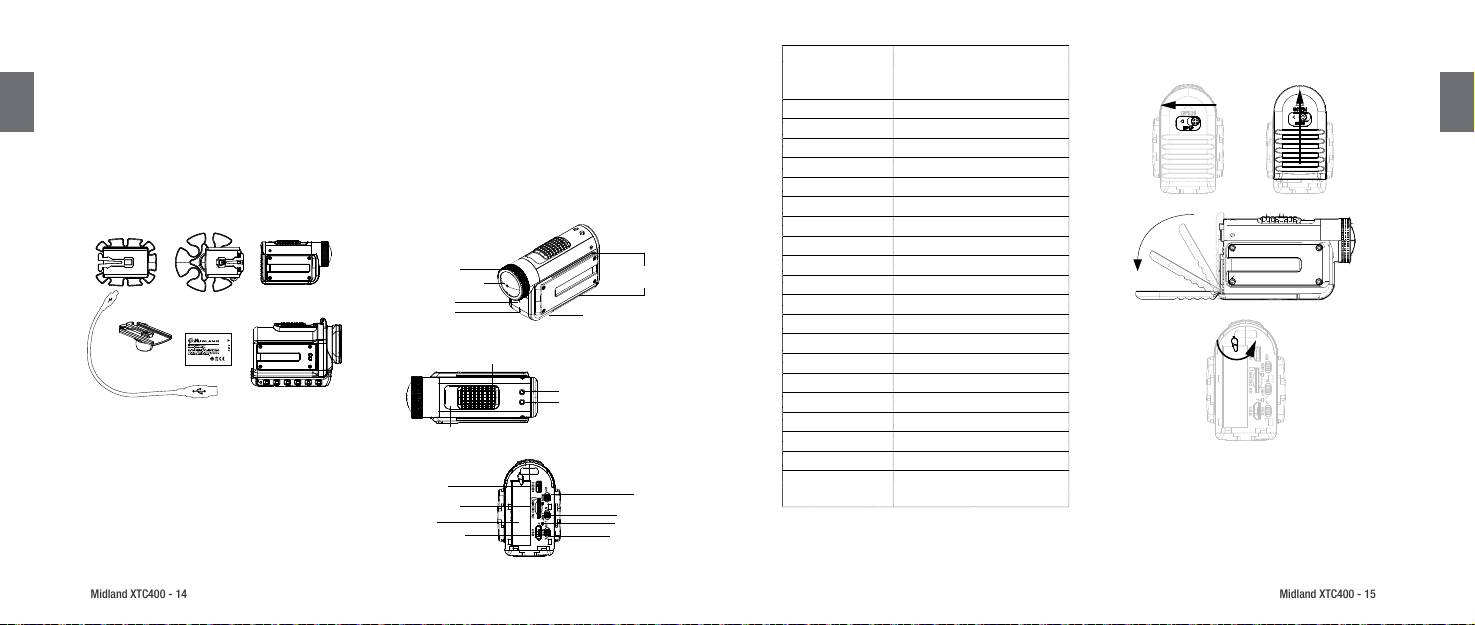
What’s in the Box
Features and Controls
SD Card Up to 32 GB
Battery Li-Ion 1700 mAH
Rotating Lense
Battery last Up to 5 Hours
Track for mounting
170° Lens
accessories
Instant Recording Yes
Microphone
Stealth mode* Optional
Record LED
External Microphone Jack
on the underside
Waterproof 85 m
Record Switch
Photo Yes
Back OFF / Stop
Tripod mount Yes
HDMI jack Yes
Micro SD Card LED
Battery LED
WiFi Yes
External mike jack Yes
XTC400VP Package Includes:
Record Switch
Weight 140 g
› 1. Midland XTC400 Camera
Forward On / Record
Dimension (HxLxD) 52 x 95 x 35 mm
› 2. Submersible Case 85m
1. Press and hold the lock release to the left. Slide the door
HDMI Jack
Compatible System Win XP, SP2, Vista 7&8,
› 3. Micro USB Cable
Wi-Fi Switch
upwards.
Mac OSX 10.4+
› 4. Lithium-Ion Battery Pack
Micro SD Jack
Low Light Switch
2. Pull the door to open.
Battery
› 5. Basic Adhesive Mount
Format Button
*Available only with the APP “Action Connect”
3. After rotating the latch counter-clockwise, the battery
Micro USB Jack
Resolution Switch
› 6. Mini Spider Mount (10° and 45°)
can easily be removed.
UK
UK
Midland XTC400 - 16
Midland XTC400 - 17
Reformatting the Micro SD card
HDMI
Mounting and Aiming Your Camera
3. Once attached, adjust the camera to be sure you are l-
ming in the intended direction
Connect your micro HDMI cable (not included) to both de-
Note: Before the first usage Format the microSD card fol-
Mount on Dual Track System
4. If needed, rotate the lens to maintain an upright viewing
vices –camera and tv/monitor. Once connected, switch the
lowing this procedure
The XTC400 was designed with an innovative 3 point
angle
camera to the ON (forward) position. This will enable live
The micro SD card can be reformatted while in the came-
mount system on both sides and the bottom of the camera.
5. To see where your camera is aimed, enable Wi-Fi and use
streaming, but will not record.
ra. This allows you to completely delete all the les at one
This allows you to mount it on any side with ease.
your smartphone with the app as a viewnder.
When the switch is moved back to the OFF position, video
time. Follow these steps:
To mount the camera on the basic mount, slide the camera
playback will start from the micro SD card. To skip to the
1. Press and hold the format button
onto the track system with the notches on the mount fa-
Mounting and Aiming Your Camera
next le, toggle the switch ON. For the next le, toggle the
2. Move the RECORD switch to the forward/ON position.
cing toward the back of the camera.
switch OFF. Continue in this manner to ip through your
3. The camera will beep 4 times and the icon will alternate
To detach the camera from the mount, squeeze the mount
Mount using the Thread Mount
les. You can always skip forward to the following le, but
blinking red and blue
release tabs and slide the camera forward.
On the bottom of the XTC400 is a standard thread mount
cannot move backward to previous les. If you would like to
When complete, the camera will beep twice, then turn o.
that allows the camera to be mounted to a tripod or other
return to a previous le, you must either unplug the device
xture with a 1/4-20 (1/4” diameter, 20 threads per inch)
from the HDMI cable and plug it in again, or loop through
5/16 deep thread. To attach the camera, insert the screw on
Rotating Lens
all of your les.
the mount into the camera thread and rotate the camera
To maintain upright orientation for your video when the
clockwise to tighten down onto the screw.
camera is mounted at an angle, the XTC400’s lens can ro-
Battery
Note: Over tightening may cause damage to the mount and/
tate 180° in one direction and -90° in the other. There are
The included lithium-ion battery comes partially charged.
or camera
indentations every 90° to enable you to twist the lens into
To charge, connect the included micro USB cable to camera
Aiming the Camera when mounted with the dual track
place at commonly used angles.
and connect the other end of the cable to a power source
mount:
such as a computer, wall charger or vehicle charger. No da-
When mounting the camera on a helmet, you must do the
External Microphone
mage will occur to the camera or battery if used prior to a
following:
To connect your camera to an external microphone, rst open
full charge. See page 20 for battery status indications.
1. Consider what you would like to shoot and mount the
the rubber cover and then insert the 3.5mm microphone jack
camera accordingly- left side, right side or top.
into the plug. If you are using a headset, the left speaker will
2. Find an appropriate surface and ensure the area is clean
be used as the microphone. In addition, you may also connect
of dirt and debris.Remove the cover of the adhesive pad
an mp3 player to directly record music to your video.
and adhere to the helmet.
Tripod Mount

UK
UK
Midland XTC400 - 18
Midland XTC400 - 19
Aiming the Camera when mounted with
1. Connect the camera to the computer using included
2. Slide the record switch forward.
• Timelapse (Burst mode)
micro USB cable.
3. Allow a few seconds for the camera to power on and
• Time Delayed Pictures
the thread mount:
2. Ensure the record switch is in the OFF position
initiate the Wi-Fi
• Wi-Fi Settings
When mounting the camera on a thread mount, follow these steps:
3. Double click “My Computer” and locate “Removable Disk.”
a. The camera will double beep twice and the front indi-
• Time and data setting
1. Consider what you would like to shoot and mount accor-
4. PC:
cator will be blue.
• Any many more
dingly.
b. When the Wi-Fi is ready, the camera will beep once
a. If “Removable Disk” is not showing, close “My Com-
2. Ensure, once attached, that the camera is aimed straight
and the front indicator will be solid green
puter” folder and reopen it. The “Removable Disk” icon
and not toward the ground or at the sky.
Show
should appear.
Attention: Wi-Fi TIME OUT: If the camera is turned on in
3. If needed, rotate the lens to maintain an upright viewing
b. Open the “Removable Disk” icon.
Wi-Fi mode and no devices are connected for 60 sec. the
• Watch directly from your mobile device the video and pic-
angle
camera will automatically start recording.
5. MAC
tures saved on the XTC400.
4. To see where your camera is aimed, enable Wi-Fi and use
a. MAC should automatically recognize the camera
• Manage your les
your smartphone with the app as a viewnder.
Many features and options are avialiable with the
external hard drive.
smartphone app:
b. Click on the icon on the desktop.
Share
Low Light Function
6. Open the “DCIM” folder icon.
Smartphone Application
• Downlaod video on your mobile
The low light function allow the user to take video also in
7. Open the “100MEDIA” icon.
• Share them with your world through Social Networks,
low light conditions.
In order to control the camera you have to download “Ac-
8. Your videos will be in this folder.
e-mail and messages.
To activate the function move the related switch to the L
tion Connect” app.
Note: the camera will generate two clips for each video, one
position. To deactivate the function move the switch to the
Available from the “Apple store” and “Google Play”. With
in the selected resolution and the other in low res. (.tmb)
N position.
this application is possible to:
Compatible Systems
Wi-Fi
The XTC400 can be used on both a PC or MAC. Below are the
Downloading Videos
Shoot
compatible operating systems:
Note: The Wi-Fi doesn’t turn ON if the MicroSD isn’t inserted.
There is no need to install any software with the XTC400.
• Live Preview
Windows XP SP2, Vista, 7, 8
It is a plug and play device. To download video, follow the
The XTC400’s built in Wi-Fi allows you to connect and con-
• Start and stop recording
Macintosh OSX 10.4 and higher
instructions below depending upon whether you have a PC
trol the camera using a smartphone or tablet.
• Customize Video Settings
For video playback, we recommend Windows Media Player,
or a MAC. Downloading Videos on a PC with a WINDOWS
1. Toggle the Wi-Fi switch inside the back cover to the ON
• Zoom (Change angle of view)
Operating System
position.
• Pictures
Quick Time or VLC Media Player.
UK
UK
Midland XTC400 - 20
Midland XTC400 - 21
Minimum System Requirements
Indications
Memory card LED Status
Switch Position
Memory Card LED Meaning
Position Meaning
Processor 3.2GHz or faster
Battery status
Solid Blue 66% - 100% available
Wi-Fi Up (ON) Wi-Fi Enabled
Ram 1GB or greater
Battery LED Meaning
Blinking Blue 33% - 66% Available
Wi.Fi Down Wi-Fi Disabled
Video Card 256MB or greater
Solid Blue Full battery level (fully
Solid Red 0% - 33% Available
Light Settin Up (N) Normal Light Mode
charged)
Video playback requires H.264 codec.
Blinking Red 0% Available
Light Setting Down (L) Low Light Mode
Blinking Blue Medium battery level
To obtain more information go to xtcactioncam.com
(battery charging)
No light No card / Card error
Resolution UP (H) Record at 1080p 30
Upgrade & Firmware
Solid Red Low Battery level
Blinking Red/Blue Formatting - Upgrading
Resolution Downn (L) Record at 720p 60
Firmware
Note: Be sure the camera has the latest rmware
Blinking Red* Battery level too low
No light Battery is depleted
To check the rmware version connect the camera to your
Recording Time
mobile device, open action connect App. go to settings -
Front LED Status
*Note: When the red battery LED begins blinking, be pre-
Memory
720 Record Time 1080 Record Time
about - version.
pared to charge the battery because the camera will stop
Front LED Meaning
size
To upgrade your device visit actioncamxtc.com and follow
recording at this point.
Blinking Green Recording 1080p
512MB 6.5 Minutes 5.5 Minutes
the procedure.
Blinking Blue Recording 720p
1 GB 13 Minutes 11 Minutes
Blinking Red Recording WVGA
2 GB 26 Minutes 22 Minutes
Solid Blue Wi.Fi Enabling
4 GB 52 Minutes 44 Minutes
Solid Green Wi-Fi On
8 GB 104 Minutes 88 Minutes
Solid Red USB Connected
16 GB 208 Minutes 176 Minutes
UK
UK
Midland XTC400 - 22
Midland XTC400 - 23
Tips and Tricks
Tips and Tricks
32 GB 416 Minutes 352 Minutes
Video Playback
Problem Solution
Problem Solution
64 GB 832 Minutes 704 Minutes
Verify the camera is plug-
ged into a USB2.0 or 3.0
Batteries
Video Downloading
Note: the camera automatically splits the video into 29
device
minute segments
Camera not turning ON Be sure battery is fully
Verify the camera is plug-
charged
ged into a USB 2.0 or 3.0
Remove other unused
device. If registering as
Recording
USB devices
Sounds
Slow or choppy video
1.1, unplug and than re-
Slow data transfer
Make sure the switch
plug the device
Sounds Meaning
Verify computer meets
is pushed all the way
minimum requirements
1 Beep Power On (Wi-Fi O)
forward. If the Record
Remove other unused
Camera not recording
LED does not come ON,
USB device
2 x 2 Beeps Power On (Wi-Fi On)
Verify proper codec is
turn OFF the device and
installed
Ensure record switch is
3 Beeps Start Recording
reinstall the battery
in the OFF position while
5 x 3 Beeps Memory Card Full
Micro SD Card
connected to computer.
2 Beeps Power O
Ensure the Micro SD Card
Computer does not reco-
Ensure the Micro SD card
is inserted properly.
1 Beep (Wi-Fi On) App Conrmation
gnize camera
is inserted properly.
4 Beeps Formatting Memory Card
Plug camera into the
MicroSD Card not reading
computer to verify it has
Micro SD card may be
Note: the beeps can be turned off via smartphone app.
available storage.
corrupted. Attempt for-
matting process
Attempt formatting pro-
cess
In the run command type:
File won’t transfer o me-
chkdsk volume:/f
mory card
then press enter
