Dremel Столик для фрезерования: инструкция
Раздел: Инструмент, электроинструмент, силовая техника
Тип:
Инструкция к Dremel Столик для фрезерования

Model 231
Shaper/Router Table
GB
Original instructions 4
CZ
Původním návodem k používání 43
D
Originalbetriebsanleitung 6
PL
Instrukcja obsługi 46
F
Notice originale 10
BG
Оригинално ръководство за експлоатация 50
I
Istruzioni originali 13
H
Eredeti használati utasítás 53
NL
Originele gebruiksaanwijzing 16
RO
Instrucţiuni de folosire originale 56
DK
Original brugsanvisning 19
RUS
Одлинник руководства по эксплуатации 59
S
Bruksanvisning i original 22
EST
Algupärane kasutusjuhend 63
N
Original driftsinstruks 25
LT
Originali instrukcija 66
FIN
Alkuperäiset käyttö-/turvallisuusohjeet 28
SLO
Izvirna navodila 69
E
Manual original
31
LV
Instrukcijām oriģinālvalodā 72
P
Manual original 34
HR
Originalne upute za rad 75
GR
Οδηγίες χρήσης 37
SRB
Оригинално упутство за рад 78
TR
Orijinal kullanım kılavuzu 40
SK
Pôvodný návod na použitie 81
Dremel Europe
The Netherlands
2610004525 310309 All Rights Reserved
www.dremel.com
D
Q
M
N
P
L
R
O
B
A
S
I
K
H
J
B
G
F
B
E
C
D
612
650
615
652
640
654
655
FIG. 1
3
A
B
FIG. 2
A
B
E
C
D
FIG. 3
B
A
C
16mm
E
D
FIG. 4
A
B
FIG. 5
A
B
C
FIG. 8
A
FIG. 7a FIG. 7b
B
C
D
A
FIG. 9
300 mm
400 mm
40 mm
A
B
D
C
FIG. 6
FIG. 10
GENERAL SAFETY INSTRUCTIONS
4
!
WARNING
GB
i. Take protective measures when during work dust can
develop that is harmful to one's health, combustible or
explosive (some dusts are considered carcinogenic); wear a dust
mask and work with dust/ chip extraction when connectable.
READ ALL INSTRUCTIONS.
Failure to follow all instructions
listed below may result in electric shock, fire and/or serious injury. The
POWER TOOL USE AND CARE
term “power tool” in all of the warnings listed below refers to your
a. Do not force the power tool. Use the correct power tool for your
mains-operated (corded) power tool.
application. The correct power tool will do the job better and safer
at the rate for which it was designed.
b. Do not use the power tool if the switch does not switch it on and
SAVE THESE INSTRUCTIONS
off. Any power tool that cannot be controlled with the switch is
dangerous and must be repaired.
WORK AREA
c. Disconnect the plug from the power source before making any
a. Keep work area clean and well lit. Cluttered and dark areas invite
adjustments, changing accessories, or storing power tools. Such
accidents.
preventive safety measures reduce the risk of starting the power
b. Do not operate power tools in explosive atmospheres, such as
tool accidentally.
in the presence of flammable liquids, gases or dust. Power tools
d. Store idle power tools out of the reach of children and do not
create sparks which may ignite the dust or fumes.
allow persons unfamiliar with the power tool or these instructions
c. Keep children and bystanders away while operating a power tool.
to operate the power tool. Power tools are dangerous in the hands
Distractions can cause you to lose control.
of untrained users.
e. Maintain power tools. Check for misalignment or binding of
moving parts, breakage of parts and any other condition that may
ELECTRICAL SAFETY
affect the power tools operation. If damaged, have the power
a. Power tool plugs must match the outlet. Never modify the plug in
tool repaired before use. Many accidents are caused by poorly
any way. Do not use any adapter plugs with earthed (grounded)
maintained power tools.
power tools. Unmodified plugs and matching outlets will reduce
f. Keep cutting tools sharp and clean. Properly maintained cutting
risk of electric shock.
tools with sharp cutting edges are less likely to bind and are easier
b. Avoid body contact with earthed or grounded surfaces such as
to control.
pipes, radiators, ranges and refrigerators. There is an increased
g. Use the power tool, accessories and tool bits etc., in accordance
risk of electric shock if your body is earthed or grounded.
with these instructions and in the manner intended for the particular
c. Do not expose power tools to rain or wet conditions. Water
type of power tool, taking into account the working conditions and
entering a power tool will increase the risk of electric shock.
the work to be performed. Use of the power tool for operations
d. Do not abuse the cord. Never use the cord for carrying, pulling or
different from those intended could result in a hazardous situation.
unplugging the power tool. Keep cord away from heat, oil, sharp
h. Use clamps or other practical way to secure and support the
edges or moving parts. Damaged or entangled cords increase the
workpiece on a stable platform.
risk of electric shock.
i. Use only genuine accessories.
e. When operating a power tool outdoors, use an extension cord
suitable for outdoor use. Use of a cord suitable for outdoor use
SERVICE
reduces the risk of electric shock.
f. If operating a power tool in a damp location is unavoidable, use
a. Have your power tool serviced by a qualified repair person using
an earth leakage circuit breaker. Use of an earth leakage circuit
only identical replacement parts. This will ensure that the safety of
breaker reduces the risk of electric shock.
the power tool is maintained.
PERSONAL SAFETY
SAFETY INSTRUCTIONS FOR ROUTERS
a. Stay alert, watch what you are doing and use common sense
when operating a power tool. Do not use a power tool while you
GENERAL
are tired or under the influence of drugs, alcohol or medication. A
moment of inattention while operating power tools may result in
• Thistoolshouldnotbeusedbypeopleundertheageof16years.
serious personal injury.
• Alwaysdisconnectplugfrompowersourcebeforemakingany
b.
Use safety equipment. Always wear eye protection.
adjustment or changing any accessory.
Safety equipment such as dust mask, non-skid safety
shoes, hard hat, or hearing protection used for
ACCESSORIES
appropriate conditions will reduce personal injuries.
c. Avoid accidental starting. Ensure the switch is in the off position
• Useonlyaccessorieswithanallowablespeedmatchingatleast
before plugging in. Carrying power tools with your finger on the
the highest no-load speed of the tool.
switch or plugging in power tools that have the switch on invites
• Donotusedamagedordeformedrouterbits.
accidents.
• Onlyusesharprouterbits.
d. Remove any adjusting key or wrench before switching the power
• Protectaccessoriesfromimpact,shockandgrease.
tool on. A wrench or a key left attached to a rotating part of the
power tool may result in personal injury.
BEFORE USE
e. Do not overreach. Keep proper footing and balance at all times.
This enables better control of the power tool in unexpected
• Avoiddamagethatcanbecausedbyscrews,nailsandother
situations.
elements in your workpiece; remove them before you start working.
f. Dress properly. Do not wear loose clothing or jewellery. Keep your
• Alwayscheckthatthesupplyvoltageisthesameasthevoltage
hair, clothing and gloves away from moving parts. Loose clothes,
indicated on the nameplate of the tool (tools with a rating of 230V
jewellery or long hair can be caught in moving parts.
or 240V can also be connected to a 220V supply).
g. If devices are provided for the connection of dust extraction and
• Dustfrommaterialsuchaspaintcontaininglead,somewood
collection facilities, ensure these are connected and properly
species, minerals and metal may be harmful (contact with
used. Use of these devices can reduce dust related hazards.
or inhalation of the dust may cause allergic reactions and/or
h. Do not work materials containing asbestos (asbestos is
respiratory diseases to the operator or bystanders); wear a dust
considered carcinogenic).
mask and work with a dust extraction device when connectable.

• Followthedust-relatednationalrequirementsforthematerials
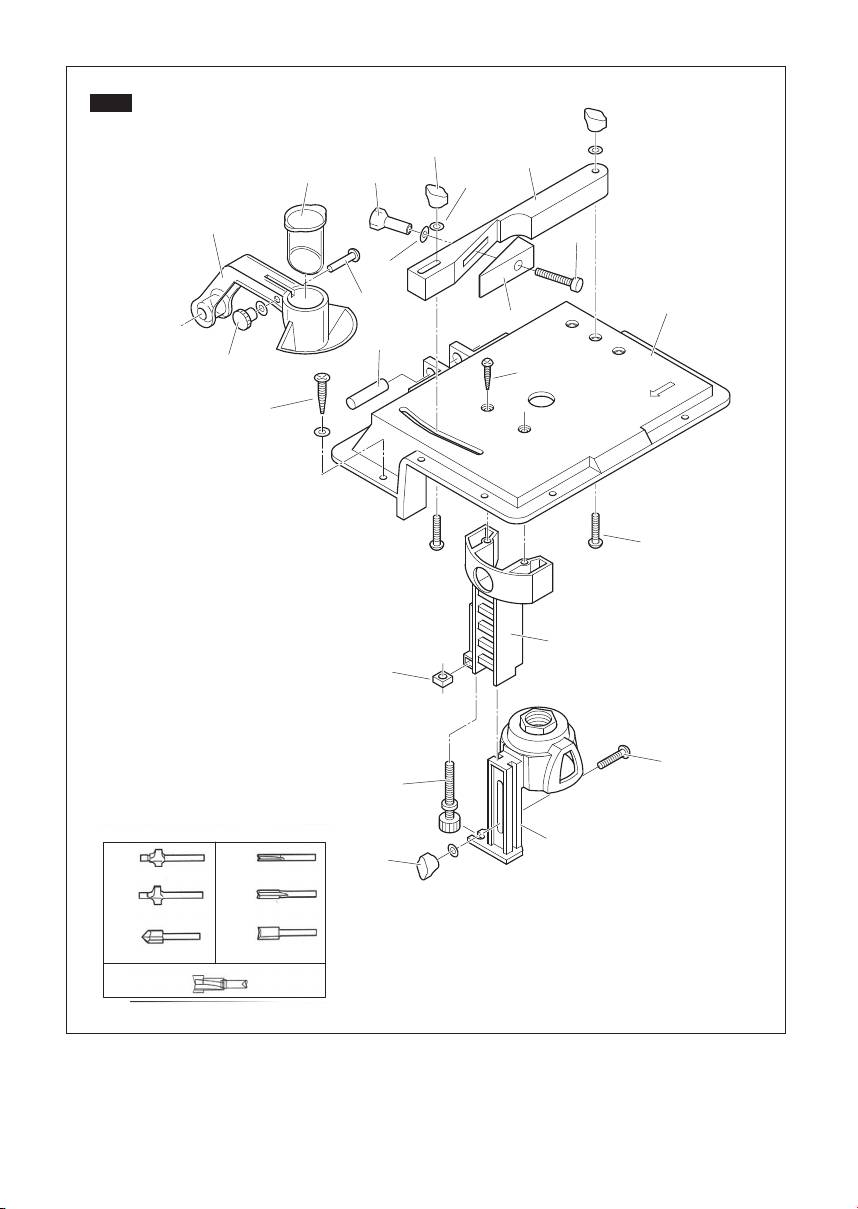
Clamp Screw NutN
you want to work with.
Washer #9O
• Besuretoolisswitchedoffwhenpluggingin.
Washer 4,8 mmP
FenceQ
Wedge Clamp ScrewR
DURING USE
WedgeS
• Alwayskeepthecordawayfrommovingparts.
• Neverusethetoolwhencordorbase-plate(=protectiveguard)is
MOUNT TABLE TO WORKBENCH
damaged; have it replaced by a qualified person.
• Keephandsandngersawayfromrouterbitwhentoolis
TheSHAPER/ROUTERTABLEcomesassembledreadytomountonthe
switched on.
workbench. After determining table location, predrill the bench using a
• Incaseofelectricalormechanicalmalfunction,immediately
3,2 mm diameter drill at the four mounting hole locations. Secure table
switch off the tool and disconnect the plug.
to the bench using the 4 wood screws, and washers. (Included with the
• Incasetherouterbitisblocked,resultinginjerkingforcesonthe
Shaper/RouterTable.)
tool, immediately switch off the tool.
• Incaseofcurrentinterruptionorwhentheplugisaccidentally
SeeFigure2:
pulled out, immediately switch off the tool in order to prevent
4 Wood Screws & WashersA
uncontrolled restarting.
Use 50 mm x 100 mm as alternative mounting optionB
• Donotapplysomuchpressureonthetoolthatitcomestoa
standstill.
INSTALL ROTARY TOOL TO TABLE
SeeFigure3:
GuardA
ENVIRONMENT
FenceB
On/off switch must face forward so left-to-right motion will turn C
DISPOSAL
tool off.
Themachine,accessoriesandpackagingshouldbesortedfor
Depth Adjustment ScrewD
environmental-friendly recycling.
Clamp KnobE
Make sure the power cord of the rotary tool is unplugged and 1.
ONLY FOR EC COUNTRIES
install the required router bit.
Do not dispose of power tools into household waste!
Loosen the clamp knob and adjust the height of the tool holder to 2.
According the European Guideline 2002/96/EC for Waste
the lowest position.
Electrical and Electronic Equipment and its implementation
Move the rotary tool from the underside in the tool holder and 3.
into national right, power tools that are no longer usable
turn the nut on top of the tool holder to fixate the rotary tool. Use
must be collected separately and disposed of in an
the open end spanner to fasten the nut.
environmentally correct manner.
OPERATING INSTRUCTIONS
APPLICATION ADVICE
CHANGING ROUTER BITS
• Usetheappropriaterouterbits.
• Forcutsparallelwiththesideofyourworkpieceusearipfence.
Loosen the clamp knob and adjust the height of the tool holder to 1.
• Protectyourselfagainsttheeffectsofvibrationbymaintaining
the lowest position.
the tool and its accessories, keeping your hands warm, and
Rotate the rotary tool so the shaft lock button can be operated 2.
organizing your work patterns.
through an opening in the tool holder.
Apply the shaft lock button and loosen the router bit.3.
Remove the router bit through the table and install another router 4.
bit.
ASSEMBLY
Apply the shaft lock button and fixate the router bit.5.
ATTACHMENT FOR USE WITH DREMEL ROTARY TOOL MODELS 300,
395, 398, 400, 4000.
CUTTING DEPTH ADJUSTMENT
ATTENTION: Read entire instruction manual carefully before using your
Loosen the clamp knob and turn the depth adjustment knob to set
DremelShaper/RouterTable.Retaininstructionsforfuturereference.
cutting depth. Depth of cut will be the amount the bit extends above
ThisattachmentwillconvertDremelRotaryToolstoaShaper/Router
the shaper/router table.
table for edge forming, routing, grooving, shaping, sanding, edges,
jointing, etc.
SeeFigure4:
Large KnobA
SeeFigure1:
Depth of CutB
BaseA
TableC
Carriage BoltB
Depth Adjustment ScrewD
ToolHolderC
ToolHolderAssemblyE
Large KnobD
Depth Adjustment ScrewE
Adjustment markings on the side of the tool holder facing outward are
Nut - SquareF
marked in inches and millimeters. View the markings prior to starting
Depth BracketG
yourproject.Turnthedepthadjustmentknobtosetdesireddepth.To
Bracket ScrewH
ensure proper settings, rout and measure cut on scrap material.
PinI
Mounting ScrewJ
SeeFigure5:Depth Adjustment Markings
ThumbNutK
Inches in 1/8 inch incrementsA
GuardL
Millimeters in 5 mm incrementsB
SleeveM
5
