Carl Zeiss 10x40 SFL Binoculars: инструкция
Раздел: Оптика
Тип:
Инструкция к Carl Zeiss 10x40 SFL Binoculars

ZEISS SFL
Gebrauchshandbuch
DE
EN FR ES IT NL DK
Patents: www.zeiss.com/cop/patents
FI HU PL SE RU JP CN | 06.2022

2 | 57
BEZEICHNUNG DER BAUTEILE
1. Okularschutzdeckel
2. Augenmuscheln
3. Dioptrienausgleich
4. Trageriemenösen
5. Fokussierrad
6. Schnittstelle für Stativadapter 1/4“
7. Objektivschutzdeckel
Fig. 1
Fig. 2
Fig. 3
(1)
(2)
(3)
(4)
(7)
(5)
(6)
Fig. 4
Fig. 6
Fig. 5
Fig. 10
Fig. 9
Fig. 8
Fig. 7
R 1 R R L L L L 3 4 R 2 6 5 R L R L 7 A A B B 8
3 | 57
GEBRAUCHSHINWEISE
Wir gratulieren Ihnen zu Ihrem neuen ZEISS SFL
®
Fernglas. Genießen Sie das
eindrucksvolle Erlebnis naturgetreuer Bildwiedergabe, das sich durch extreme
Helligkeit und feinste Detailwiedergabe auszeichnet.
Die Produkte der Marke ZEISS sind geprägt durch hervorragende optische
Leistungen, präzise Verarbeitung und lange Lebensdauer. Bitte beachten Sie folgende
Gebrauchshinweise, damit Sie Ihr Produkt optimal nutzen können und es Ihnen über
viele Jahre ein zuverlässiger Begleiter ist.
Bitte beachten Sie die Sicherheitshinweise, diese
finden Sie unter:
www.zeiss.com/cop/safety
LIEFERUMFANG
Produkt
Bestellnummer
Lieferumfang
8 x 40
52 40 23
Fernglas
Okularschutzdeckel
Objektivschutzdeckel
Trageriemen
Tragetasche inkl. Trageriemen
Optikreinigungstuch
Quick Guide
Sicherheitshinweise
10 x 40
52 40 24
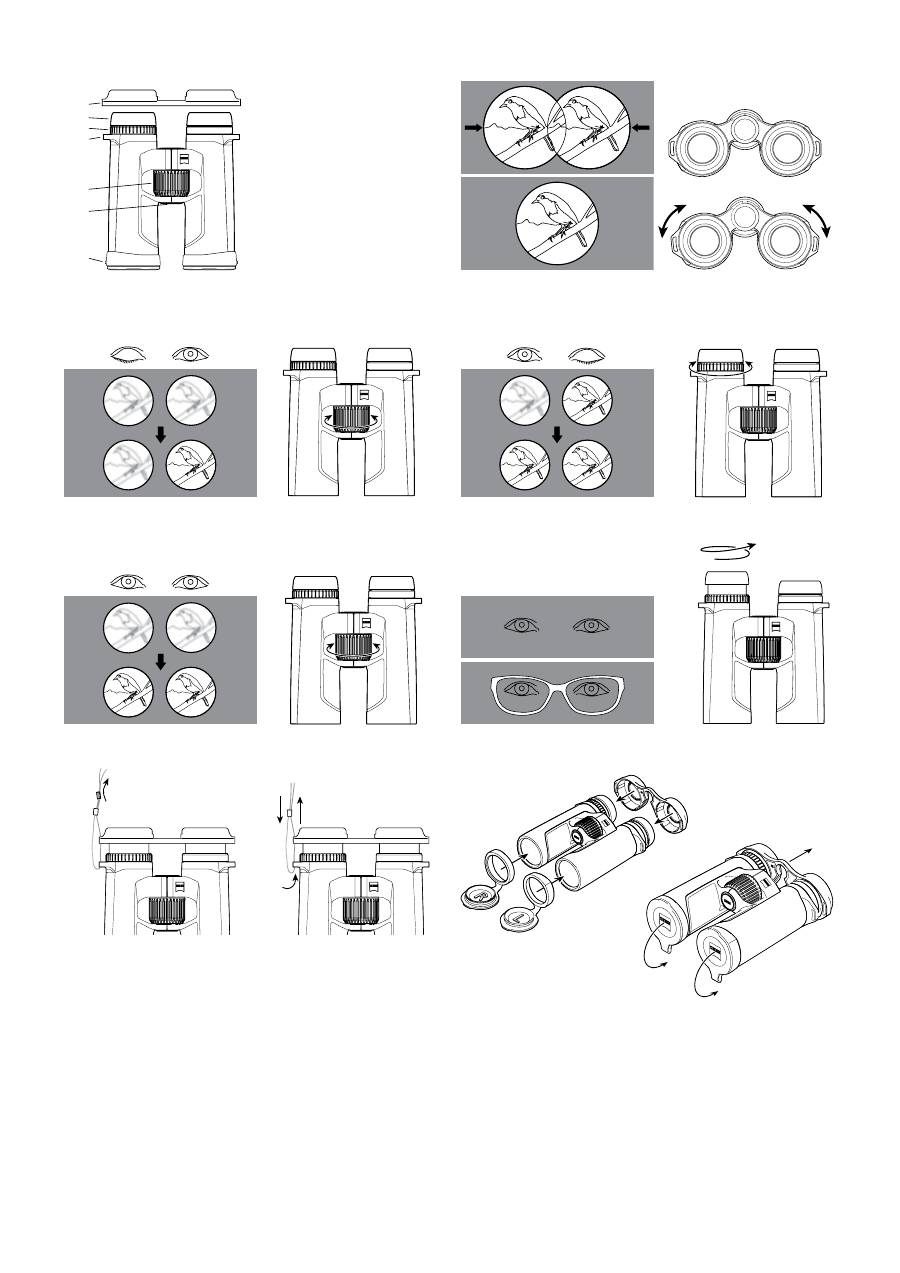
Anpassen an den Augenabstand (Pupillendistanz)
Knicken Sie die beiden Fernglashälften um die Mittelachse gegeneinander, bis der
Abstand der beiden Okulare dem Abstand Ihrer Augen entspricht. So erreichen Sie
das für Ihre Augen optimale Bild. Der optimale Augenabstand ist dann erreicht,
wenn sich beim Beobachten mit beiden Augen durch das Fernglas ein kreisrundes
Bild ergibt
(Fig. 2)
.
Bildschärfe einstellen
Das Fernglas hat ein Fokussierrad und ein Rad für den Dioptrienausgleich. Zum
Einstellen schließen Sie das rechte Auge und stellen Sie mit dem Fokussierrad
das
Bild in der linken Fernglashälfte scharf ein
(Fig. 3)
.
Schließen Sie danach das linke Auge und – falls erforderlich – stellen Sie die
Bildschärfe der rechten Fernglashälfte mit dem Dioptrienausgleich nach
(Fig. 4)
. Die
Einstellung für den Dioptrienausgleich ist mit einer Skala mit den Zeichen „+“ und „–“
versehen und hat einen Indexpunkt als Anhaltspunkt. Merken Sie sich Ihre persönliche
Einstellung, dann können Sie in jedem Fernglas Ihren eigenen Dioptrienausgleich
schnell einstellen.
Zur weiteren Scharfeinstellung auf verschiedene Entfernungen ist nur noch das
Fokussierrad zu betätigen
(Fig. 5)
.
Hinweis: Verwenden Sie immer das gleiche Objekt, um beide Bilder scharf
einzustellen!
Einrichten der Augenmuscheln, Beobachten mit und ohne Brille
Beim Beobachten ohne Brille benutzen Sie das Gerät mit ausgefahrenen
Augenmuscheln. Hierzu werden die Augenmuscheln
(Fig. 6)
gegen den
Uhrzeigersinn nach oben wahlweise bis zur obersten Rastung herausgedreht
(Fig.
6 – Darstellung A)
.
Die Augenmuscheln sind in vier Positionen rastbar, in der unteren und oberen
sowie in zwei Zwischenpositionen. Durch diese Einstellungsmöglichkeit kann der
Abstand des Auges zur Austrittspupille variiert und so für jeden Anwender individuell
eingestellt werden.
Beim Beobachten mit Brille werden die Augenmuscheln (im Uhrzeigersinn) nach
unten gedreht, bis sie in der untersten Stellung sind
(Fig. 6 – Darstellung B)
.
Hinweis: Drehen Sie die Augenmuscheln im ausgefahrenen Zustand weiter gegen
den Uhrzeigersinn, können sich diese lösen. Dies ist beabsichtigt, siehe „Reinigen
und Wechseln der Augenmuscheln“.
Reinigen und Wechseln der Augenmuscheln
Die Augenmuscheln können zum Austausch oder zur Reinigung komplett vom
Fernglas abgeschraubt werden. Drehen Sie die Augenmuscheln, wie in
Fig. 6
dargestellt, bis zur obersten Raststufe heraus und im gleichen Drehsinn über ein
Gewinde weiter, bis die Augenmuscheln ganz abgeschraubt sind.
Nach der Reinigung oder dem Austausch der Augenmuscheln drehen Sie diese
im Uhrzeigersinn komplett am Okular ein (siehe auch Abschnitt „Einrichten der
Augenmuscheln, Beobachten mit und ohne Brille“). Durch einen leichten Ruck im
Uhrzeigersinn rastet das Gewinde der Augenmuscheln in der niedrigsten Einstellung
ein. Im Anschluss können Sie wie gewohnt den von Ihnen gewünschten Abstand
zwischen Auge und Okular über die Raststufen einstellen.
Anbringen des Trageriemens und der Schutzdeckel
Der Trageriemen, der Okularschutzdeckel und die Objektivschutzdeckel befinden sich
in der Verpackung. Der Okularschutzdeckel wird, wie in
Fig. 7
dargestellt, mit dem
Trageriemen durch die Trageriemenösen am Fernglas befestigt.
Die Riemenlänge kann durch Nachführen oder Nachlassen des Riemens auf
die gewünschte Länge eingestellt werden
(Fig. 8)
. Auf der anderen Seite des
Okularschutzdeckels verfahren Sie bei Bedarf bitte in der gleichen Reihenfolge.
Der Okularschutzdeckel kann nach eigenem Ermessen auch nur auf einer Seite
angebracht werden.
Die Objektivschutzdeckel sind mit „L“ für links und „R“ für rechts markiert und
werden jeweils auf den linken und rechten Tubus aufgesteckt
(Fig. 9)
.
Gebrauch von Okular- und Objektivschutzdeckel
Der Okularschutzdeckel wird auf die Augenmuscheln gesteckt
(Fig. 9)
. Sie können
hierbei den von Ihnen gewünschten Austrittspupillenabstand beibehalten. Vor
Gebrauch des Fernglases streifen Sie den Deckel ab
(Fig. 10)
.
Die Objektivschutzdeckel können nach der Anbringung dauerhaft auf dem Fernglas
verbleiben und müssen vor Gebrauch nur aufgeklappt werden
(Fig. 10)
.
Anbringung von Stativadaptern
1
Die Ferngläser der ZEISS SFL-Reihe können zusammen mit
dem ZEISS Stativadapter 1/4” oder der ZEISS Binofix Universal-
Stativhalterung auf jedem handelsüblichen Fotostativ befestigt
werden.
Die Bestellnummern von ZEISS Stativen und Stativadaptern und
weiterem Zubehör entnehmen Sie dem Kapitel „Zubehör für
ZEISS SFL”.
Pflege und Wartung
Das Fernglas ist mit der ZEISS LotuTec
®
Beschichtung versehen. Die wirkungsvolle
Schutzschicht für die Linsenoberflächen reduziert das Verschmutzen der Linse spürbar
durch eine besonders glatte Oberfläche und einen damit verbundenen starken
Abperleffekt. Alle Arten von Verunreinigungen haften weniger an und lassen sich
schnell, leicht und schlierenfrei entfernen. Dabei ist die LotuTec
®
Beschichtung
widerstandsfähig und abriebfest.
Grobe Schmutzteilchen auf den Linsen (z. B. Sand) wischen Sie bitte nicht ab,
sondern blasen Sie von der Linse oder streifen Sie mit einem feinen Haarpinsel von den
Linsen. Fingerabdrücke können nach einiger Zeit die Linsenoberflächen angreifen.
Anhauchen und mit einem sauberen Optikreinigungstuch nachreiben ist die
einfachste Art, Linsenoberflächen zu reinigen. Gegen den – besonders in den
Tropen – möglichen Pilzbelag auf der Optik hilft eine trockene Lagerung und stets
gute Belüftung der äußeren Linsenflächen. Ihr ZEISS SFL Fernglas bedarf keiner
weiteren besonderen Pflege.
Verunreinigung an der Gummierung und am Gehäuse lassen sich zumeist mit
warmem Wasser, einem Baumwolltuch und leichtem Reiben entfernen.
ZUBEHÖR FÜR ZEISS SFL
1
www.zeiss.com/nature/binoculars/accessories
1
Zubehör ist nicht im Lieferumfang enthalten.
KUNDENSERVICE, ERSATZTEILE UND GARANTIE
Wenn Sie Fragen zum Service oder zu Ersatzteilen haben oder die
Garantiebedingungen herunterladen möchten, besuchen Sie bitte
unsere Webseite:
www.zeiss.com/nature/service
Für weitere Fragen, wenden Sie sich bitte an:
ZEISS Customer Service
Carl Zeiss Sports Optics GmbH
Gloelstr. 3–5, 35576 Wetzlar, Deutschland
Telefon
+49 800 934 77 33
E-Mail consumerproducts@zeiss.com
ZEISS Customer Service USA
Carl Zeiss SBE, LLC
Consumer Products
1050 Worldwide Blvd.
Hebron, KY 41048-8632, USA
Telefon
+1-800-441-3005
E-Mail consumerservice.cop.us@zeiss.com
4 | 57
TECHNISCHE DATEN
8 x 40
10 x 40
Vergrößerung
8
10
Wirksamer Objektivdurchmesser
mm
40
40
Austrittspupillen-Durchmesser
mm
5
4
Dämmerungszahl
17,9
20
Sehfeld
m/1000 m
(ft/1000 yds)
140
(420)
115
(345)
Subjektiver Sehwinkel
°
60
62
Naheinstellgrenze
m (ft)
1,5 (4,9)
1,5 (4,9)
Dioptrien-Verstellbereich
dpt
± 4
± 4
Austrittspupillenabstand
mm
18
18
Pupillendistanz
mm
52–74
52–74
Prismensystem
Schmidt-Pechan
Schmidt-Pechan
Vergütung
T*
T*
Stickstofffüllung
√
√
Wasserdichtigkeit
mbar
400
400
Funktionstemperatur
°C
(°F)
-20 / + 55
(-4 / + 131)
-20 / + 55
(-4 / + 131)
Länge
mm (in)
144 (5,7)
144 (5,7)
Breite bei Pupillendistanz von
65 mm
mm (in)
114 (4,5)
114 (4,5)
Gewicht
g (oz)
640 (22,6)
640 (22,6)
Änderungen in Ausführung und Lieferumfang, die der technischen Weiterentwicklung
dienen, sind vorbehalten.

ZEISS SFL Instructions for use
DE
EN
FR ES IT NL DK
Patents: www.zeiss.com/cop/patents
FI HU PL SE RU JP CN | 05.2022
6 | 57
DESCRIPTION OF THE
COMPONENTS
1. Eyepiece cap
2. Eyecups
3. Diopter compensation
4. Carrying strap eyelets
5. Focusing wheel
6. Interface for tripod adapter 1/4“
7. Protective lens cap
Fig. 1
Fig. 2
Fig. 3
(1)
(2)
(3)
(4)
(7)
(5)
(6)
Fig. 4
Fig. 6
Fig. 5
Fig. 10
Fig. 9
Fig. 8
Fig. 7
R 1 R R L L L L 3 4 R 2 6 5 R L R L 7 A A B B 8
7 | 57
INSTRUCTIONS FOR USE
Congratulations on purchasing your new ZEISS SFL
®
binoculars. Enjoy the memorable
experience of realistic image reproduction featuring extreme brightness and the
finest reproduction of detail.
ZEISS products are famous for outstanding optical performance, precision
engineering and a long service life. Please observe the following instructions for use
in order to obtain the best from your product and to ensure that they remain your
constant companion for many years to come.
Please note the safety instructions, they can be
found under:
www.zeiss.com/cop/safety
SCOPE OF SUPPLY
Product
Order number
Scope of supply
8 x 40
52 40 23
Binoculars
Eyepiece cap
Protective lens cap
Carrying strap
Carrying case
Lens cleaning cloth
Quick Guide
Safety instructions
10 x 40
52 40 24
ADJUSTING THE EYE SPACING (PUPILLARY DISTANCE)
Bend the two barrels toward each other around the central axis, until the distance of
the two eyepieces corresponds to the distance between your eyes. This will provide
the optimum image for your eyes. The optimum eye spacing is achieved when one
circular image is seen when viewing through the binoculars with both eyes
(Fig.2)
.
FOCUSING
The binoculars have a focusing wheel and a diopter adjustment wheel. To adjust,
close your right eye and focus the image in the left barrel using the center focusing
wheel
(Fig.3)
.
Then close your left eye and, if necessary, adjust the focus in the right barrel using
the diopter adjustment wheel
(Fig.4)
. The diopter adjustment wheel features a
scale with the signs “+” and “–”, and has an index point as a reference point. Note
your personal setting, then you can quickly set your own diopter setting on any
binoculars.
For additional focusing at different distances, use only the focusing wheel
(Fig.5)
.
Note: Always use the same object to focus both images!
ALIGNING THE EYECUPS, VIEWING WITH AND WITHOUT GLASSES
If you do not wear glasses when viewing, use the binoculars with the eyecups
extended. To do this, turn the eyecups
(Fig.6)
counter-clockwise and upwards to
the top click stop position
(Fig.6 - Illustration A)
.
The eyecups can be locked in four positions – at the bottom and top and in two
intermediate positions. These adjustment options allow the distance of the eye from
the exit pupil to be varied according to the specific requirements of each user.
When viewing with glasses, turn the eyecups down (clockwise) until it locks in the
lowest click stop position
(Fig.6 - Illustration B)
.
Note: If the eyecups are turned further counter-clockwise when in the extended
position, it can loosen. This is by design. For more information, see “Cleaning and
replacing the eyecups”.
CLEANING AND REPLACING THE EYECUPS
To replace the eyecups or for cleaning, they can be completely screwed off of the
binoculars. Turn the eyecups out as shown in
Fig.6
to the top click-stop position
and turn one more thread in the same direction until the eyecups are completely
screwed out.
After cleaning or replacing the eyecups, turn them completely clockwise on the
eyepiece (also refer to the section “Aligning the eyecups, Viewing with and without
glasses”). Using a slight jerk clockwise, the thread of the eyecups click into the
lowest setting. Finally, you can again set your desired distance between the eye and
eyepiece using the click stops.
ATTACHING THE CARRYING STRAP AND PROTECTIVE CAP
The carrying strap, eyepiece cap and protective lens cap are included in the
packaging. As shown in
Fig.7
, the eyepiece cap and carrying strap are attached to
the binoculars by means of the carrying strap eyelet.
The strap length can be set to the desired length by shortening or lengthening the
strap
(Fig.8)
. On the other side of the eyepiece cap follow the same sequence. The
eyepiece cap can also be put on only one side, if preferred.
The lens caps are marked “L” for left and “R” for right and are attached to the left
and right tubes respectively
(Fig.9)
.
USE OF EYEPIECE AND LENS CAP
The eyepiece cap can be attached to the eyecups
(Fig.9)
. You can maintain your
desired exit pupil distance with this. Remove the cover before using the binoculars
(Fig.10)
.
The lens caps can remain permanently on the binoculars after they have been
attached and only need to be opened before use
(Fig.10)
.
ATTACHMENT OF TRIPOD ADAPTERS
1
Binoculars from the ZEISS SFL series can be mounted on any
commercial camera tripod using the ZEISS tripod adapter 1/4”
or the ZEISS Binofix universal tripod adapter.
The order numbers for ZEISS tripods and tripod adapters
and other accessories can be found in the “Accessories for
ZEISS SFL” chapter.
CARE AND MAINTENANCE
The binoculars feature the ZEISS LotuTec
®
coating. The effective protective coating
for the lens surfaces noticeably reduces contamination of the lenses through a
special smooth surface and the strong beading effect connected with it. All types of
contamination adhere less and can be quickly and easily removed, smear-free. The
LotuTec
®
coating is also durable and abrasion resistant.
Please do not wipe coarse particles from the lenses (e. g. sand), rather blow them
away or use a fine brush to remove them. Over time, fingerprints can corrode the
lens surface. Breathing on the lens and polishing with a clean optical cleaning cloth
is the easiest method of cleaning the lens surface. Dry storage and keeping the outer
lens surfaces well ventilated, especially in the tropics, helps to prevent a possible
mold film forming on the optics. Your ZEISS SFL binoculars require no further special
care.
Contamination on the rubber coating and the housing can usually be removed using
warm water, a cotton cloth and light rubbing.
ACCESSORIES FOR ZEISS SFL
1
www.zeiss.com/nature/binoculars/accessories
1
Accessories are not included in the scope of supply.
CUSTOMER SERVICE, REPLACEMENT PARTS AND WARRANTY
For service or replacement part questions or obtaining the warranty
terms, please see our website:
www.zeiss.com/nature/service
For further questions, please feel free to contact:
ZEISS Customer Service
Carl Zeiss Sports Optics GmbH
Gloelstr. 3–5, 35576 Wetzlar, Germany
Phone
+49 800 934 77 33
E-Mail consumerproducts@zeiss.com
ZEISS Customer Service USA
Carl Zeiss SBE, LLC
Consumer Products
1050 Worldwide Blvd.
Hebron, KY 41048-8632, USA
Phone +1-800-441-3005
E-mail consumerservice.cop.us@zeiss.com

8 | 57
TECHNICAL DATA
8 x 40
10 x 40
Magnification
8
10
Objective lens diameter
mm
40
40
Exit pupil diameter
mm
5
4
Twilight factor
17.9
20
Field of view
m/1000 m
(ft/1000 yds)
140
(420)
115
(345)
Subjective angle of view
°
60
62
Close focusing distance
m (ft)
1.5 (4.9)
1.5 (4.9)
Diopter adjustment range
dpt
± 4
± 4
Exit pupil distance
mm
18
18
Pupillary distance
mm
52–74
52–74
Prism system
Schmidt-Pechan
Schmidt-Pechan
Coating
T*
T*
Nitrogen filling
√
√
Watertightness
mbar
400
400
Functional temperature range
°C
(°F)
-20 / +55
(-4 / +131)
-20 / +55
(-4 / +131)
Length
mm (in)
144 (5.7)
144 (5.7)
Width with a pupillary distance
of 65 mm
mm (in)
114 (4.5)
114 (4.5)
Weight
g (oz)
640 (22.6)
640 (22.6)
Subject to changes in design and scope of supply due to technical improvements.
Оглавление
- ZEISS SFLInstructions for use
- ZEISS SFLManuel d’utilisation
- ZEISS SFLManual de instrucciones
- ZEISS SFLManuale d’uso
- ZEISS SFLGebruiksaanwijzing
- ZEISS SFLBrugsvejledning
- ZEISS SFLKäyttöohjekirja
- ZEISS SFLFelhasználói kézikönyv
- ZEISS SFLPodręcznik użytkownika
- ZEISS SFLBruksanvisning
- ZEISS SFLИнструкция по эксплуатации
- ZEISS SFL取扱説明書
- ZEISS SFL使用手册
