Intimus 319: инструкция
Раздел: Офисная Техника
Тип: Шредер
Инструкция к Шредеру Intimus 319
Vor der Inbetriebnahme die Betriebsanleitung durchlesen!
Before operating, please read the Operating Instructions!
Veuillez lire le mode d’emploi avant la mise en service!
Voor de inbedrijfstelling de gebruiksaanwijzing doorlezen!
Leer las instrucciones de uso antes de la puesta en servicio!
Antes de pôr a máquina em funcionamento leia as instruções de operação!
Prima della messa in funzione leggere attentamente le istruzioni!
∆ιαβάστε τις οδηγίες χρήσης προτού χρησιµοποιήσετε το µηχάνηµα!
Läs igenom bruksanvisningen innan maskinen tas i bruk!
Læs betjeningsvejledningen før idriftsættelse!
Les gjennom bruksveiledningen før bruken!
Lue käyttöohjeet tarkoin läpi ennen käyttöönottoa!
Przed uruchomieniem urządzenia należy przeczytać instrukcję obsługi!
Před uvedením do provozu si přečtěte návod k obsluze!
Üzembe helyezés előtt olvassuk el a kezelési utasítást!
Преди да започнете работа с уреда, моля прочетете инструкцията за експлоатация!
Пеpед вводом в эксплyатацию непpеменно пpочтите инстpyкцию по обслyживанию!
Typ/Type/
Τύπος
/Tipo/Tyyppi/Típus
/
Тип:
228-4S + 228-6S + 228-4C + 228-2C
315SC2 315CC3 315CC4 319SC2 319CC3 319CC4
D
GB
F
NL
E
P
I
GR
DK
N
S
FIN
PL
CZ
H
BG
(Seite 2-4)
(page 5-7)
(page 8-10)
(pagina 11-13)
(página 14-16)
(página 17-19)
(pagina 20-22)
(
Σελίδα
23-25)
(side 26-28)
(side 29-31)
(sidan 32-34)
(sivulla 35-37)
(Strona 38-40)
(Strana 41-43)
(Oldal 44-46)
(
стpаници
47-49)
(
стpаницы
50-52)
RUS
Betriebsanleitung
Operating Instructions
Instructions d’opération
Gebruiksaanwijzing
Instrucciones de uso
Instruções de Operação
Istruzioni per l’uso
Οδηγίες χρήσης
Betjeningsvejledning
Bruksveiledning
Bruksanvisningen
Käyttöohjeet
Instrukcja obsługi
Návod k obsluze
Kezelési utasítás
Инструкция за експлоатация
Инстpyкция по обслyживанию

WICHTIGE SICHERHEITSHINWEISE
<< Verletzungsgefahr!
Lose Teile
von Bekleidung, Krawatten,
Schmuck, langes Haar, oder
andere lose Gegenstände von
der Einlaßöffnung fernhalten!
<< Verletzungsgefahr!
Nicht mit den Fingern
in die Einlaßöffnung fassen!
<< Im Gefahrenfalle die Maschine am Haupt-
schalter oder Not-Aus-Schalter ausschal-
ten oder den Netzstecker ziehen!
<< Vor dem Öffnen der Maschine ist der
Netzstecker zu ziehen!
Reparaturen dürfen nur von einem Fach-
mann durchgeführt werden!
<< Die Maschine darf nicht von mehreren
Personen gleichzeitig bedient werden!
Die Auslegung der Sicherheitselemente
beruht auf einer gefahrlosen Bedienung im
“Einmannbetrieb“.
<< Während des Zerkleinerungsvorganges
dürfen keine anderen Arbeiten (z. B.
Reinigung etc.) an der Maschine getätigt
werden!
<< Die Maschine ist kein Spielzeug und für
Einsatz und Benutzung durch Kinder nicht
geeignet!
Die sicherheitstechnische Gesamtkonzeption
(Abmessungen, Zuführöffnungen, Sicher-
heitsabschaltungen etc.) dieser Maschine
beinhaltet keinerlei Garantien einer gefahr-
losen Handhabung durch Kinder.
EINSATZBEREICH:
Der Datenshredder
intimus 315/319SC2/CC3/CC4
ist eine Maschine zum Zerkleinern allgemeinen
Schriftgutes sowie Datenträgern wie CD’s, DVD’s,
Kreditkarten und 3,5”-Disketten.
Die Maschine darf nur zur Zerkleinerung
von Papier und Kreditkarten sowie zur
Zerkleinerung von CD’s, DVD’s und
3,5”-Disketten verwendet werden!
Die Zerkleinerung andersartiger Daten-
träger können Schäden am Gerät (z.B.
Zerstörung des Schneidwerkes etc.) zur
Folge haben.
AUFSTELLUNG:
- Gerät auspacken und aufstellen.
- Mülltonne in das Gestell einschieben.
- Gerät mit Netzstecker (1) (Abb. 2) am Stromnetz
anschließen (Angaben über die erforderliche
Vorsicherung der Netzsteckdose siehe „TECH-
NISCHE DATEN“).
Der Netzanschluß der Maschine muß
frei zugängig sein und sollte sich in der
Nähe der Maschine be
fi
nden!
Die Maschine sollte nur in geschlosse-
nen und temperierten (5-35°C) Räumen
eingesetzt werden!
3
9
10
11
4
6
7
8
2
12
13
5
315SC2
315CC3
315CC4
319SC2
319CC3
319CC4
1
3 = Vorwärtstaster (Abb. 1)
Dieser Taster beinhaltet zwei Funktionen:
a)
Bei kurzem Tippen dieses Tasters läuft
das Schneidwerk für ein paar Sekunden
vorwärts, z.B. um im Schneidwerk ver-
bliebenes Schnittgut herauszuführen.
Gleichzeitig leuchtet die integrierte LED-
Anzeige auf.
b)
Wird dieser Taster ca. zwei Sek. lang
gedrückt gehalten, läuft das Schneidwerk
im Dauerbetrieb vorwärts und die Maschi-
ne kann beschickt werden. Gleichzeitig
leuchtet die integrierte LED-Anzeige
auf.
4 = Rückwärtstaster (Abb. 1)
Bei Betätigung dieses Tasters läuft das
Schneidwerk kurzzeitig rückwärts. Gleich-
zeitig leuchtet die integrierte LED-Anzeige
auf.
5 = Lichtschranke (Vorwärtslauf) (Abb. 3)
Startet den Zerkleinerungsvorgang sobald
Material in einen der beiden Zuführschächte
eingeführt wird. Gleichzeitig leuchtet die
LED-Anzeige des Vorwärtstasters auf.
BEDIENUNG
INBETRIEBNAHME
6 = Kontroll-Anzeige (Abb. 1)
„Materialstau im Gerät“ / „Materialzufüh-
rung parallel“ / „Lichtschranke belegt
beim Herausfahren der Mülltonne oder
beim Einschalten“
Vorgehensweisen siehe jeweilige Beschrei-
bung unter der Rubrik „STÖRUNG“.
a)
„Materialstau im Gerät“
Leuchtet auf, wenn dem Schneidwerk
zuviel Material zugeführt wurde. Das
Schneidwerk blockiert, läuft anschließend
ein Stückweit rückwärts und steht. Der
Motor wird abgeschaltet.
b)
„Materialzuführung parallel“
Leuchtet auf, wenn in beiden Schächten
gleichzeitig Material zugeführt wurde. Das
Schneidwerk stoppt, läuft anschließend
ein Stückweit rückwärts und steht. Der
Motor wird abgeschaltet.
c)
„Lichtschranke belegt
beim Herausfahren Mülltonne“
Leuchtet auf, wenn beim Herausfahren
der Mülltonne sich noch Material in einem
der beiden Zufürschächte be
fi
ndet. Das
Schneidwerk kommt zum Stillstand. Der
Motor wird abgeschaltet.
d)
„Lichtschranke belegt
beim
Einschalten“
Leuchtet auf, wenn beim Einschalten
der Maschine sich Material in einem der
beiden Zufürschächte be
fi
ndet.
BEDIENUNGSELEMENTE:
1 = Netzstecker (Abb. 2)
Mit Anschluss der Maschine durch den
Netzstecker am Stromnetz be
fi
ndet sich
die Maschine zunächst im ausgeschalteten
Zustand.
2 = Funktionstaster (Abb. 1)
„Betriebsbereit“ / „Aus“ / „Stopp“
Dieser Taster beinhaltet drei Funktionen:
a)
„Betriebsbereit“
Bei kurzem Tippen dieses Tasters wird
die Maschine auf „Betriebsbereit“ ge-
schaltet.
Gleichzeitig leuchtet die integrierte LED-
Anzeige auf.
b)
„Aus“
Wird dieser Taster im Zustand „Betriebs-
bereit“ ca. 3 Sek. lang gedrückt gehalten,
wird die Maschine ausgeschaltet.
Hinweis:
Bei Nichtbenutzung der Maschi-
ne über einen Zeitraum von ca. 5 Min.
schaltet die Maschine automatisch aus.
c)
„Stopp“
Bei kurzem Tippen dieses Tasters bei
laufendem Schneidwerk wird dieses
abgeschaltet und steht.
2
Abb. 1
Abb. 2
Abb. 3
D
Originalbetriebsanleitung
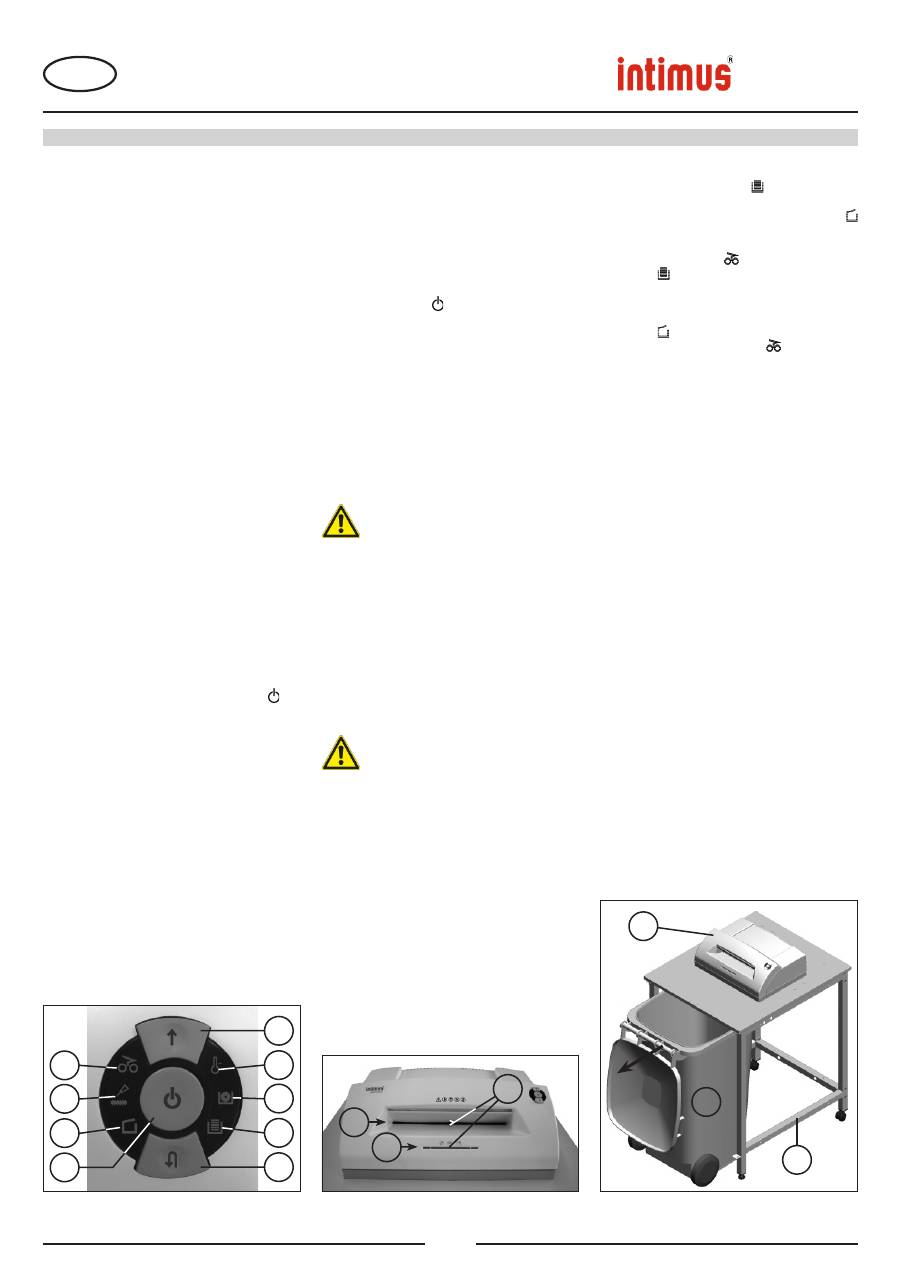
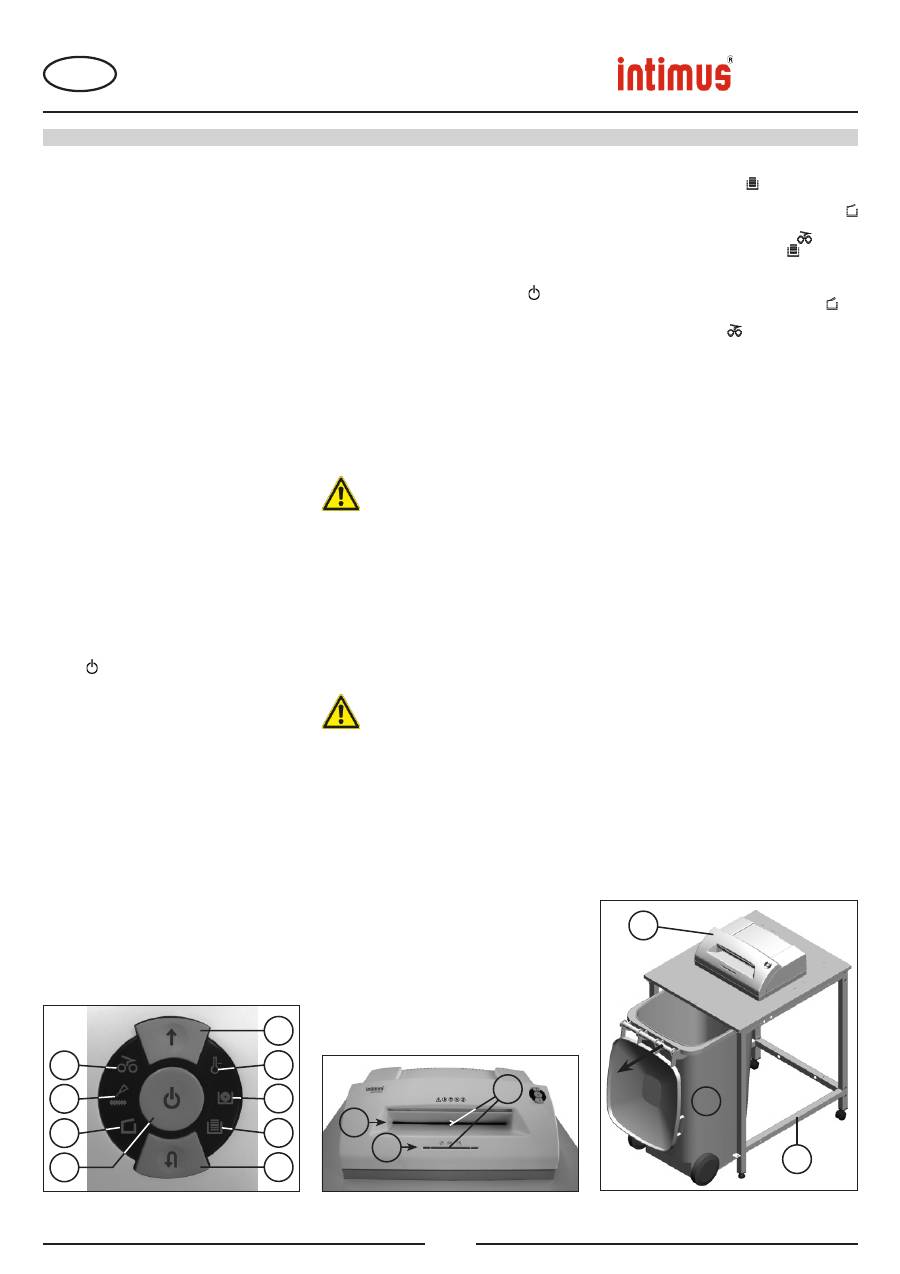
12 = Papierzuführschacht (Abb. 3)
13 = CD/DVD-Zuführschacht (Abb. 3)
14 = Mülltonne (Abb. 4)
15 = Shredder (Abb. 4)
16 = Gestell (Abb. 4)
EINSCHALTEN DER MASCHINE:
Zum Einschalten der Maschine auf „betriebsbereit“
gehen Sie wie folgt vor:
- Funktionstaster (2) kurz betätigen.
- Die LED-Anzeige des Funktionstasters (2)
leuchtet auf für „Betriebsbereit“.
- Die Maschine kann beschickt werden.
MATERIALZUFÜHRUNG:
Papier
durch den Papierzuführschacht (12) (Abb.
3) dem Schneidwerk zuführen.
Datenträger
(CD, DVD oder Kreditkarte) einzeln
durch den separat angeordneten CD/DVD-
Zuführschacht (13) (Abb. 3) dem Schneidwerk
zuführen.
Maschine schaltet automatisch auf Vorwärtslauf,
zieht das Material ein und schaltet nach dem
Zerkleinerungsvorgang automatisch ab.
Während der Zuführung von Papier
niemals gleichzeitig CD/DVD zuführen
und umgekehrt!
Hinweise:
Für die Zerkleinerung von lichtdurch-
lässigen Folien muss die Maschine von Hand auf
Vorwärtslauf geschaltet werden (Vorwärtstaster
(3) ca. 2 Sek. gedrückt halten).
Durch kurze Betätigung des Funktionstasters (2)
(„Stopp“-Funktion) kann der Zerkleinerungsvor-
gang jederzeit gestoppt werden. Zum Fortfah-
ren den Vorwärtstaster (3) ca. 2 Sek. gedrückt
halten.
Bei Nichtbenutzung der Maschine über einen
Zeitraum von ca. 5 Min. schaltet sie aus.
Führen Sie dem Gerät niemals mehr als
die angegebene Höchstmenge Material
(siehe „TECHNISCHE DATEN“) zu!
Sollte trotzdem zuviel Material in das
Schneidwerk gelangt sein, siehe bei
„STÖRUNG“ unter „MATERIALSTAU
IM GERÄT“.
BEDIENUNGSELEMENTE:
7 = Kontroll-Anzeige (Abb. 1)
„Schneidwerk
ölen“
Leuchtet auf, wenn das Schneidwerk der
Cross-Cut-Version geölt werden muß. Der
Ölvorgang muß am Rückwärtstaster (4)
quittiert werden (siehe Beschreibung bei
„WARTUNG SCHNEIDWERK“).
8 = Kontroll-Anzeige (Abb. 1)
„Mülltonne herausgefahren“ /
„Elektrische
Störung“
a)
„Mülltonne herausgefahren“
Leuchtet auf, wenn die Mülltonne heraus-
gefahren ist. Die Maschine wird automa-
tisch abgeschaltet und kann solange die
Mülltonne nicht eingeschoben ist nicht
gestartet werden.
b)
„Elektrische Störung“
Blinkt
, wenn eine elektrische Störung
in der Überwachungssensorik für den
Zustand „Mülltonne nicht eingeschoben“
vorliegt. Die Maschine wird abgeschaltet.
Benachrichtigen Sie bitte Ihren Fachhänd-
ler.
9 = Kontroll-Anzeige (Abb. 1)
„Motorüberlastung“
/
„Elektrische
Störung“
Vorgehensweisen siehe jeweilige Beschrei-
bung unter der Rubrik „STÖRUNG“.
a)
„Motorschutz“
Leuchtet auf, wenn der Motor überlastet
worden ist und abgeschaltet hat. Die
Maschine kann während der Abkühlphase
des Motors nicht gestartet werden.
b)
„Elektrische Störung“
Blinkt
, wenn eine elektrische Störung
innerhalb der Steuerplatine vorliegt.
Gleichzeitig blinkt die LED-Anzeige des
Funktionsschalters (2) auf. Die Maschine
wird abgeschaltet. Benachrichtigen Sie
bitte Ihren Fachhändler.
10 = Kontroll-Anzeige nicht belegt
11 = Kontroll-Anzeige
„Mülltonne voll“ (Abb. 1)
Leuchtet auf, wenn die Mülltonne gefüllt ist
und geleert werden muß. Das Schneidwerk
für die Papierzerkleinerung wird abgeschal-
tet.
Hinweis:
Das Schneidwerk für die CD/DVD-
Zerkleinerung kann weiterhin betrieben
werden.
ENTLEEREN DER MÜLLTONNE (Abb. 4):
Ist die Mülltonne (14) gefüllt, schaltet die Maschi-
ne ab. Die Kontroll-Anzeige (11) leuchtet auf.
Gehen Sie wie folgt vor:
- Mülltonne herausfahren. Die Kontroll-Anzeige
(8) leuchtet auf. Ist noch Material in einem der
Zuführschächte vorhanden, leuchtet zusätzlich
die Kontroll-Anzeige
(6) auf. Die Kontroll-
Anzeige (11) erlischt.
- Die entleerte Mülltonne (14), wie gezeigt, bis
zum Anschlag unter den Shredder (15) in das
Gestell (16) wieder einschieben. Die Kontroll-
Anzeige (8) erlischt.
- Falls die Kontroll-Anzeige
(6) leuchtet
,
betätigen Sie kurz den Vorwärtstaster (3). Im
Zuführschacht verbliebenes Material wird zer-
kleinert und die Anzeige erlischt.
Hinweis:
Die Maschine läuft nur bei vollständig
eingeschobener Mülltonne!
DYNAMISCHE BELASTUNGSANZEIGE:
Um einen Materialstau zu vermeiden und somit
eine kontinuierliche und effektive Vernichtung
der Datenträger zu erreichen, wird während
des Zerkleinerungsvorgangs der momentane
Belastungsgrad des Motors durch ein farbig
abgestimmtes, diffuses Licht im Zuführschacht
wie folgt angezeigt:
Grünes Licht:
Belastung < 50%
Gelbes Licht:
Belastung 50 - 75%
Rotes Licht:
Belastung 75 - 100%
315SC2
315CC3
315CC4
319SC2
319CC3
319CC4
3
9
10
11
4
6
7
8
2
15
16
14
12
13
5
Abb. 3
BEDIENUNG
3
Abb. 1
Abb. 4
D
Originalbetriebsanleitung
MATERIALSTAU IM GERÄT:
(Auto-Reverse-Funktion)
Ergibt sich durch zuviel zugeführtes Material ein Stau, reagiert
die Maschine wie folgt:
- Das Schneidwerk blockiert, läuft anschließend ein Stückweit
rückwärts (Material wird freigegeben) und steht. Der Motor
wird abgeschaltet. Die Kontroll-Anzeige
(6) leuchtet
auf.
Gehen Sie wie folgt vor:
Papierstau im Papierzuführschacht (12)
- Zurückgeführtes Papier entnehmen.
- Schneidwerk läuft jetzt automatisch vorwärts und zerkleinert
den im Schneidwerk verbliebenen Papierrest. Während des
Vorwärtslaufes leuchtet die LED-Anzeige des Vorwärts-
tasters (3). Die Kontroll-Anzeige
(6) erlischt.
- Die Zerkleinerung mit geringerer Papiermenge fortset-
zen.
Materialstau im CD/DVD-Zuführschacht (13)
- Zurückgeführtes Material entnehmen.
Material mit Bedacht entnehmen, da Verlet-
zungsgefahr durch scharfkantige Schnitt-
stellen!
- Das restliche Schnittgut wird jetzt automatisch dem
Schneidwerk erneut zugeführt und zerkleinert. Während
des Vorwärtslaufes leuchtet die LED-Anzeige des
Vorwärtstasters (3). Die Kontroll-Anzeige
(6) erlischt.
- Ist das Schnittgut durchgelaufen, die Zerkleinerung in der
richtigen Dosierung fortsetzen.
- Falls erforderlich, das Schneidwerk manuell abwechselnd
solange auf Vorwärts- und Rückwärtslauf schalten, bis das
Schnittgut vollständig durchgelaufen und zerkleinert ist.
MATERIALZUFÜHRUNG PARALLEL:
Sollte in beiden Zuführschächten Material gleichzeitig zugeführt
werden, reagiert die Maschine wie folgt:
- Das Schneidwerk blockiert, läuft anschließend ein Stückweit
rückwärts (Material wird freigegeben) und steht. Der Motor
wird abgeschaltet. Die Kontroll-Anzeige
(6) leuchtet
auf.
- Entnehmen Sie das Material aus einem der Schächte.
- Betätigen Sie kurz den Vorwärtstaster (3). Das Schnittgut
des anderen Schachtes wird dem Schneidwerk zugeführt
und zerkleinert. Die Kontroll-Anzeige
(6) erlischt.
LICHTSCHRANKE BELEGT
BEIM HERAUSFAHREN DER MÜLLTONNE:
Sollte beim Herausfahren der Mülltonne sich noch Material
in einem der beiden Zufürschächte be
fi
nden, schaltet der
Motor ab und das Schneidwerk kommt zum Stillstand. Die
Kontroll-Anzeige
(6) leuchtet auf.
Schieben Sie die Mülltonne wieder ein und quittieren Sie
den Zustand durch kurze Betätigung des Vorwärtstasters (3).
Das vorhandene Schnittgut wird dem Schneidwerk zugeführt
und zerkleinert.
LICHTSCHRANKE BELEGT BEIM EINSCHALTEN:
Sollte beim Einschalten der Maschine sich Material in einem
der beiden Zufürschächte be
fi
nden, leuchtet die Kontroll-
Anzeige
(6) auf.
Entnehmen Sie das Material und quittieren Sie den Zustand
durch kurze Betätigung des Vorwärtstasters (3).
MOTORSCHUTZ:
Sollte der Motor überfordert werden, so schaltet er ab. Die
Kontroll-Anzeige (9) leuchtet auf.
Nach einer Abkühlzeit von ca. 25-40 Minuten (je nach Modell
und Raumtemperatur) können Sie das Gerät erneut starten.
ELEKTRISCHE STÖRUNG:
Blinkt
die Kontroll-Anzeige (9) in Verbindung mit der
LED-Anzeige des Funktionsschalters (2) oder nur die
Kontroll-Anzeige (8) liegt eine elektrische Störung vor.
Die Maschine kann nicht gestartet werden.
Benachrichtigen Sie bitte in diesem Fall Ihren Fachhändler.
CHECKLISTE BEI STÖRUNGEN:
Sollte das Gerät nicht funktionieren, prüfen Sie folgende
Punkte:
- ist
der
Netzstecker
am Netz angeschlossen?
- ist
die
Mülltonne
eingeschoben?
- ist
die
Mülltonne (14)
voll?
Folgen Sie den Instruktionen bei „ENTLEEREN DER
MÜLLTONNE“.
- ist
ein
Materialstau
im Gerät?
Folgen Sie den Instruktionen bei „MATERIALSTAU IM
GERÄT“.
- ist
der
Motor
überlastet worden?
Siehe unter „MOTORSCHUTZ“.
Wenn keine der Prüfpunkte zutreffen, benachrichtigen
Sie bitte Ihren Fachhändler.
315SC2
315CC3
315CC4
319SC2
319CC3
319CC4
4
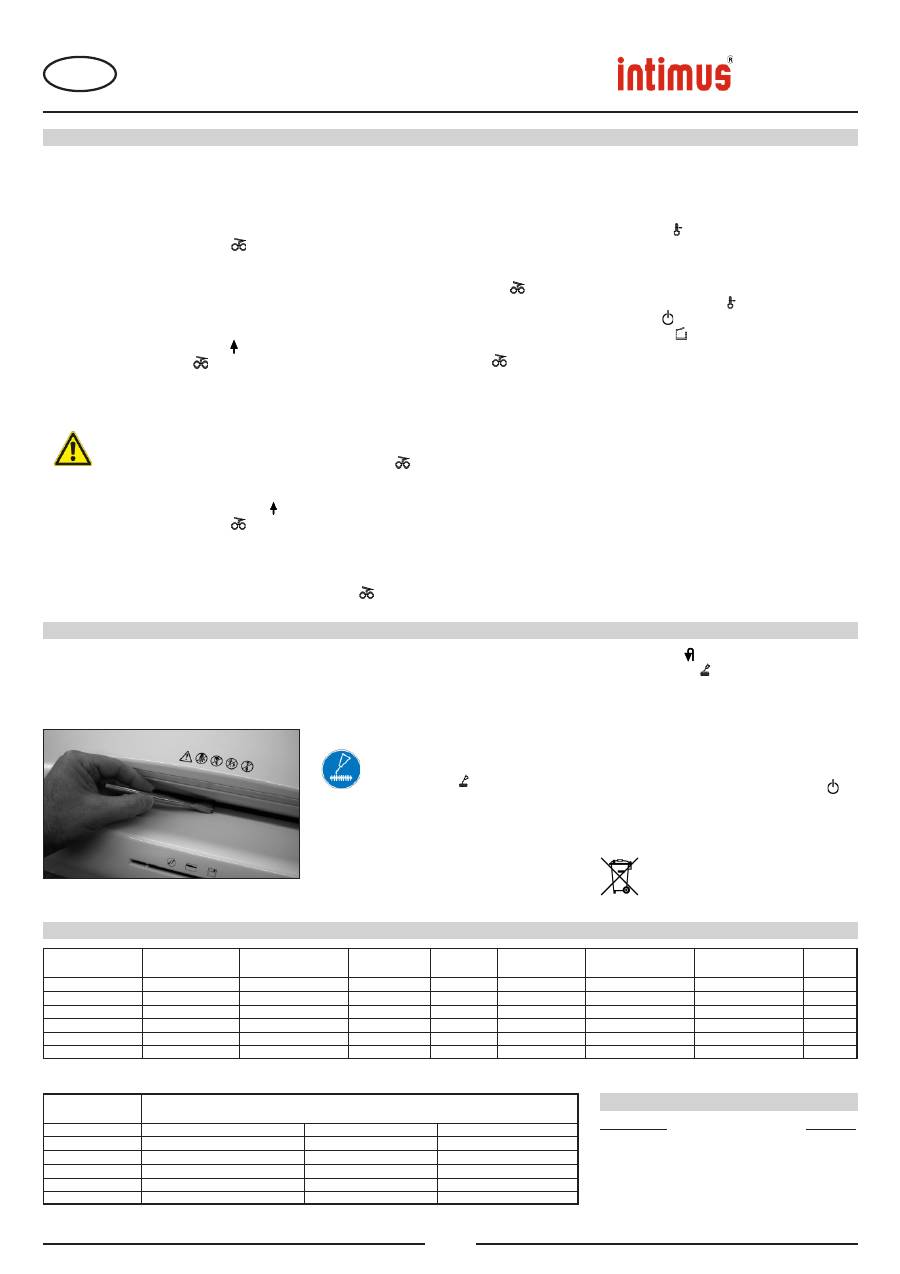
Sie können die Papierstücke entfernen, bzw. die Fotozelle
reinigen, indem Sie dem Schneidwerk ein weiteres Blatt
Papier zuführen, oder die Maschine auf Rückwärtslauf
schalten und mit einem Pinsel kurz über die beiden „Augen“
der Fotozelle wischen.
WARTUNG SCHNEIDWERK (CROSS-CUT):
Cross-Cut-Schneidwerke müssen nach einer
bestimmten Betriebszeit geölt werden. Leuchtet
die Kontroll-Anzeige (7) auf, gehen Sie wie
folgt vor:
Etwas Öl auf einem Blatt Papier verteilen und dieses dann
durch den Papierzuführschacht (12) dem Schneidwerk
zuführen. Das Papier wird eingezogen und das Öl gelangt
somit in das Schneidwerk.
Hinweis: Um die Anzeige zu löschen muß nach einer
durchgeführten Ölung des Schneidwerks dieser Vorgang
wie folgt quittiert werden:
REINIGUNG DER FOTOZELLEN (Abb. 5):
Sollten Papierstücke im Einlaßschlitz zum Liegen kommen (z.
B. nach einem Papierstau) ist es möglich, daß das Gerät durch
die „belegte“ Lichtschranke nicht mehr ausschaltet.
- Rückwärtstaster (4) betätigen und gedrückt halten bis
die Kontroll-Anzeige (7) erlischt.
Das Schneidwerk beginnt nun automatisch einen Reinigungs-
zyklus (Vorwärtslauf/Rückwärtslauf) und schaltet dann ab. Die
Maschine ist wieder einsatzbereit. Im Falle der Nachbestellung
des Spezialöls siehe unter „SONDERZUBEHÖR“.
ENERGIESPAR-AUTOMATIK:
Wird die Maschine für eine Weile nicht benutzt, schaltet sie
automatisch nach ca. 5 Min. aus. Die LED-Anzeige des
Funktionstasters (2) für „Betriebsbereit“ erlischt. Zum Wieder-
einschalten den Funktionstaster kurz betätigen..
ENTSORGUNG DER MASCHINE:
Entsorgen Sie die Maschine am Ende ihrer Lebens-
dauer stets umweltgerecht. Geben Sie keine Teile der
Maschine oder der Verpackung in den Hausmüll.
WARTUNG / ENTSORGUNG
STÖRUNG
* bezogen auf A4-Papier 70g/m
2
bei 230V/50Hz -10%
Modell
Netzanschlußdaten
Anschlußspannung / Frequenz / Stromaufnahme
intimus 315/319SC2
220-230V/50Hz, 7,8 A
115-125V/60Hz, 14,9 A
100V/50/60Hz, 18,0 A
intimus 315/319SC2
220-230V/50Hz, 7,8 A
115-125V/60Hz, 14,9 A
100V/50/60Hz, 18,0 A
intimus 315/319CC3
220-230V/50Hz, 7,8 A
115-125V/60Hz, 14,9 A
100V/50/60Hz, 18,0 A
intimus 315/319CC4
220-230V/50Hz, 7,8 A
115-125V/60Hz, 14,9 A
100V/50/60Hz, 18,0 A
Modell
Schnittbreite Schneidleistung
Arbeitsbreite
Leistung
Geräuschpegel
Aussetzbetrieb Abmessungen Gewicht
Papier / CD,DVD
Papier / CD,DVD
EIN / AUS
B x T x H
intimus 315/319SC2
5,8 mm / 8 mm
35-38 Blatt* / 1 Stück
310 mm
1,8 kW
ca. 57 dB(A)
45 / 60 min
790 x 926 x 1297 mm
81/98 kg
intimus 315/319SC2
3,8 mm / 8 mm
31-33 Blatt* / 1 Stück
310 mm
1,8 kW
ca. 57 dB(A)
45 / 60 min
790 x 926 x 1297 mm
81/98 kg
intimus 315/319CC3
3,8x36 mm / 8 mm
23-25 Blatt* / 1 Stück
310 mm
1,8 kW
ca. 57 dB(A)
45 / 60 min
790 x 926 x 1297 mm
82/99 kg
intimus 315/319CC4
1,9x15 mm / 8 mm
15-17 Blatt* / 1 Stück
310 mm
1,8 kW
ca. 57 dB(A)
45 / 60 min
790 x 926 x 1297 mm
82/99 kg
TECHNISCHE DATEN
SONDERZUBEHÖR
Benennung Best.-Nr.
Ölbehälter, 110 ml
88035
Hinweis:
Bei Nachbestellung von Sonderzube-
hörteilen und bei Ersatzteilbedarf wenden Sie sich
bitte an Ihren Fachhändler.
Abb. 5
D
Originalbetriebsanleitung

AREA OF APPLICATION:
The
intimus 315/319SC2/CC3/CC4
data
shredder is a machine used for shredding general
documents and data carriers such CD’s, DVD’s,
credit cards and 3.5” diskettes.
The machine must only be used to
shred paper, credit cards and CD’s,
DVD’s and 3.5” diskettes.
Shredding other sorts of data carriers
may cause damage to the machine (e.g.
damage to the cutters etc.).
INSTALLATION:
- Unpack the machine and put it together.
- Push waste bin into the frame.
- Connect the machine to the power with the plug
(1) (
fi
g. 2) (For information on the right fuse for
the plug see “TECHNICAL DATA”).
The socket outlet shall be installed
near the equipment and shall be easily
accessible!
Only operate the machine in enclosed
rooms at temperatures between 5°C
and 35°C!
<< The machine may not be operated by more
than one person at any given time!
The machine was designed for safe operation
by “one person only”.
<< During the shredding process no other
work may be performed on the machine
(for example cleaning, etc.)!
<< The machine is not a toy, and is not suitable
for use by children!
The overall technical safety concept of
this machine (dimensions, feed openings,
emergency shutdown devices etc.) does not
provide for any guarantee regarding hazard-
free operation by children.
<< Danger of injury!
Keep all
loose articles of clothing, ties,
jewelery, long hair or other loose
objects away from opening!
<< Danger
of
injury!
Never insert fi ngers into
opening!
<< In case of danger switch the machine off
with the mains switch, or with the emer-
gency switch, or unplug the machine!
<< Always unplug the machine from the
mains power supply before opening the
machine!
Repairs may only be performed by trained
personnel!
IMPORTANT SAFETY NOTES
315SC2
315CC3
315CC4
319SC2
319CC3
319CC4
3
9
10
11
4
6
7
8
2
12
13
5
1
5
OPERATION
INITIATION
fi g. 1
fi g. 2
fi g. 3
6 = Control display (
fi
g. 1)
“Material jam in machine” /
“Simultaneous material feed” / “Light
barrier occupied when moving waste
bin out or switching on”
For the procedures see the relevant
description under the “MALFUNCTION”
section.
a)
“Material jam in machine”
Comes on when too much material has
been fed into the cutters. The cutters
jam, then run in reverse for a short time
and stop. The motor switches off.
b)
“Simultaneous material feed”
Comes on when material has been fed
into both slots at the same time. The
cutters stop, then run in reverse for a
short time and stop. The motor switches
off.
c)
“Light barrier occupied
when waste bin moves out”
Is lit if there is still material in one of
the two feed slots when the waste bin
moves out. The cutters stop. The motor
switches off.
d)
“Light barrier covered
when machine turned on”
Comes on when there is still material
in one of the two feed slots when the
machine is switched on.
CONTROLS:
1 = Mains plug (
fi
g. 2)
When the machine is
fi
rst plugged in it is
not on.
2 = Function buttons (
fi
g. 1)
“Ready”/ “Off” / “Stop“
This button has three functions:
a)
“Ready”
The machine changes to “Ready” if you
press this button brie
fl
y.
At the same time the integral LED
display comes on.
b)
“Off”
The machine switches off if it is in the
“Ready” mode and the button is held
down for about 3 seconds.
Note:
The machine switches off
automatically if it is not used for about 5
minutes.
c)
“Stop”
If you press this button brie
fl
y when the
cutters are running they switch off and
stop.
3 = Forwards button (
fi
g. 1)
This button has two functions:
a)
If this button is pressed brie
fl
y, the
cutting mechanism runs forwards for a
few seconds, e.g. to remove remaining
material from the cutting mechanism.
At the same time the integrated LED
display lights up.
b)
If this button is pressed and held
for approx. two secs., the cutting
mechanism runs forwards continually
and materials to be shredded can be fed
into the machine. At the same time the
integrated LED display lights up.
4 = Reverse button (
fi
g. 1)
If you press this button the cutters run
backwards for a short time. At the same
time the integral LED display comes on.
5 = Light barrier (Forward motion) (
fi
g. 3)
The shredding procedure starts as soon
as material is fed into one of the two feed
slots. At the same time the integral forward
button LED display comes on.
GB
Translation of the Original Operation Manual
Übersetzung der Originalbetriebsanleitung
12 = Paper feed slot (Fig. 3)
13 = CD/DVD feed slot (Fig. 3)
14 = Waste bin (Fig. 4)
15 = Shredder (Fig. 4)
16 = Frame (Fig. 6)
SWITCHING THE MACHINE ON:
Proceed as follows to switch the machine to
“Ready”:
- Press the function button (2) brie
fl
y.
- The function button (2) LED display comes
on for “Ready”.
- The machine can be loaded.
MATERIAL FEED:
Feed
paper
into the cutting mechanism through
the paper feed slot (12) (
fi
g. 3).
Feed
data carriers
(CD, DVD or credit card)
into the cutting mechanism individually into the
separate CD/DVD feed slot (13) (
fi
g. 3).
The machine automatically switches to forwards
running, draws the material in and automatically
switches off after shredding.
When shredding papers, do not shred
CD/DVD at the same time, and vice
versa!
Note:
For shredding transparent
fi
lms, the
machine must be manually switched to forwards
running (press and hold the forwards button (3)
for approx. 2 secs.).
By brie
fl
y pressing the function button (2) (Stop
function), the shredding process can be stopped
at any time. To continue, press and hold the
forwards button (3) for approx. 2 secs.
If the machine is not used for a period of approx.
5 mins., it automatically switches off.
Never feed the shredder with a
quantity of material exceeding the
maximum indicated. Refer to the
TECHNICAL DATA section!
Should the machine become
overloaded, follow the instructions under
“MATERIAL JAM IN MACHINE” under
“MALFUNCTIONS”.
CONTROLS:
7 = Control display (Fig. 1)
“Oil
cutters”
Comes on when the cutters in the cross
cut version must be oiled. The lubrication
procedure must be acknowledged on
the reverse button (4) (see description in
“CUTTER MAINTENANCE”).
8 = Control display (Fig. 1)
“Waste bin moved out” /
“Electrical
fault”
a)
“Waste bin moved out”
Is lit when the waste bin is moved out.
The machine is automatically switched
off and cannot be started as long as the
waste bin is not pushed in.
b)
“Electrical fault”
Flashes
if there is an electrical fault in
the monitoring sensor system for the
status “Waste bin not pushed in”. The
machine switches off. Please contact
your dealer.
9 = Control display (Fig. 1)
“Motor overload” /
“Electrical
fault”
To
fi
nd out what to do see the relevant
description under the “MALFUNCTION”
section.
a)
“Motor protection”
Comes on when the motor has been
overloaded and has switched off. The
machine cannot be started while the
motor is cooling down.
b)
“Electrical fault”
Flashes
when there is an electrical fault
inside the control board. At the same
time the function button (2) LED display
fl
ashes. The machine switches off.
Please contact your dealer.
10 = Control display not occupied
11 = Control display
“Waste bin full” (Fig. 1)
Is lit if the waste bin is full and must be
emptied. The cutting unit for shredding
paper switches off.
Note:
The cutting unit for shredding CDs/
DVDs can continue to be used.
EMPTYING THE WASTE BIN (Fig. 4):
If the waste bin is full (14), the machine switches
off. The control display (11) comes on.
Proceed as follows:
- Move waste bin out. The control display
(8) comes on. If there is still material in one of
the feed slots, the control display
(6) also
comes on. The control display (11) goes
out.
- Push the emptied waste bin (14) into the frame
(16) under the shredder (15) again as far as it
will go, as shown. The control display (8)
goes out.
- If the control display
(6) comes on, press
the forward button (3) brie
fl
y. The remaining
material in the feed slot is shredded and the
display goes out.
Note:
The machine only works when the waste
bin is pushed in!
DYNAMIC LOAD DISPLAY:
To prevent a material jam and thus ensure
a continual, effective destruction of the data
carriers, the current load level of the motor is
displayed during the shredding process by a
coloured, diffuse light in the feed slot as follows:
Green light:
load < 50%
Yellow light:
load 50 - 75%
Red light:
load 75 - 100%
315SC2
315CC3
315CC4
319SC2
319CC3
319CC4
3
9
10
11
4
6
7
8
2
15
16
14
12
13
5
6
OPERATION
fi g. 1
fi g. 4
fi g. 3
GB
Translation of the Original Operation Manual
Übersetzung der Originalbetriebsanleitung
MATERIAL JAM IN THE MACHINE:
(Auto reverse function)
If a jam is caused by too much material being fed in
the following happens:
- The cutters jam, then run in reverse for a short
time (material is released) and stop. The motor
switches off. The control display
(6) comes
on.
Proceed as follows:
Paper jam in paper feed slot (12)
- Remove the paper that has been fed back.
- The cutters now run forwards automatically and
shred the remaining paper in the cutters. During
the forward run the forward button (3) LED
display comes on. The control display
(6)
goes out.
- Continue shredding with less paper.
Material jam in CD/DVD feed slot (13)
- Remove the returned material.
Remove the material carefully
because there is the risk of being
injured by the sharp cut surfaces.
- The remaining material to be cut is now
automatically fed to the cutters again and
shredded. During the forward run the forward
button (3) LED display comes on. The control
display
(6) goes out.
- If the material to be cut has gone through continue
shredding with the right amount of material.
- If necessary, switch the cutters manually
alternately from forward to reverse until the
material has gone through completely and been
shredded.
SIMULTANEOUS MATERIAL FEED:
Should material be fed into the two feed slots at the
same time the following happens:
- The cutters jam, then run in reverse for a short
time (material is released) and stop. The motor
switches off. The control display
(6) comes
on.
- Take the material out of one of the slots.
- Press the forward button (3) brie
fl
y. The material
in the other slot is fed to the cutters and shredded.
The control display
(6) goes out.
LIGHT BARRIER OCCUPIED
WHEN THE WASTE BIN MOVES OUT:
If there is still material in one of the two feed
slots when the waste bin is moved out, the motor
switches off and the cutters stop. The control
display
(6) comes on.
Push the waste bin in again and acknowledge
the status by brie
fl
y pressing the forward button
(3). The existing material is fed to the cutters and
shredded.
LIGHT BARRIER COVERED
WHEN MACHINE TURNED ON:
Should there still be material in one of the two feed
slots when the machine is switched on the control
display
(6) comes on.
Remove the material and acknowledge the status
by pressing the forward button (3) brie
fl
y.
MOTOR PROTECTION:
Should the motor be overloaded it switches off. The
control display (9) comes on.
The machine can be started again after a cooling
down period of about 25 – 40 minutes (depending
on the model and the room temperature).
ELECTRICAL FAULT:
If the control display (9)
fl
ashes
together with
the function button (2) LED display or only the
control display (8)
fl
ashes
there is an electrical
fault. The machine cannot be started.
In this case please contact your dealer.
FAULT CHECK LIST:
Should the machine not work, check the following
points:
- is the
plug
connected to the power supply?
- is the
waste bin
pushed in?
- is the
waste bin (14)
full?
Follow the instructions under “EMPTYING THE
WASTE BIN”.
- Is there a
material jam
in the machine?
Follow the instructions in “MATERIAL JAM IN
THE MACHINE”.
- Is the
motor
overloaded?
See
“MOTOR
PROTECTION”.
If none of these test points apply, please
contact your dealer.
315SC2
315CC3
315CC4
319SC2
319CC3
319CC4
7
MALFUNCTIONS
To remove these paper strips and also to clean the
photocell, pass another sheet of paper through the
feed slot, or switch the machine to reverse and wipe
both “eyes” of the photocell with a brush.
CUTTER MAINTENANCE (CROSS CUT):
Cross cut cutters must be oiled after a
speci
fi
c operating time. If the control display
(7) comes on proceed as follows:
Pour a little oil onto a sheet of paper and then feed this
through the paper feed slot (12) onto the cutters. The
paper is drawn in and in this way the oil is distributed
to the cutters.
Note: This procedure is acknowledged as follows
to turn off the display after the cutters have been
oiled:
- Press the reverse button (4) and keep it held
down until the control display (7) goes out.
CLEANING THE PHOTOCELLS (Fig. 5):
If paper particles should come to rest in the inlet
guide (for example after a paper jam) it is possible
that the machine will not turn off, due to the broken
light barrier.
The cutters now start a cleaning cycle automatically
(forward and reverse run) and then switch off. The
machine is ready for use again. Should you need to re-
order the special oil see “SPECIAL ACCESSORIES”.
AUTOMATIC ENERGY SAVING:
If the machine is not used for a while it automatically
switches off after about 5 minutes. The function button
(2) LED display for “Ready” goes out. Press the
function button brie
fl
y to turn it on again.
DISPOSING OF THE MACHINE:
Dispose of the machine in an environmentally
friendly fashion at the end of its useful service
life. Do not dispose of any of the parts
included in the machine or its packaging with
household waste.
MAINTENANCE / DISPOSING
* based on A4-paper 70g/m² at 230V/50Hz – 10%
Model
Power supply data
supply voltage / frequency / current consumption
intimus 315/319SC2
220-230V/50Hz, 7.8 amps
115-125V/60Hz, 14.9 amps
100V/50/60Hz, 18.0 amps
intimus 315/319SC2
220-230V/50Hz, 7.8 amps
115-125V/60Hz, 14.9 amps
100V/50/60Hz, 18.0 amps
intimus 315/319CC3
220-230V/50Hz, 7.8 amps
115-125V/60Hz, 14.9 amps
100V/50/60Hz, 18.0 amps
intimus 315/319CC4
220-230V/50Hz, 7.8 amps
115-125V/60Hz, 14.9 amps
100V/50/60Hz, 18.0 amps
Model
Cutting width
Cutting capacity
Working width
Power
Noise level
Intermittent operation
Dimensions
Weight
paper / CD,DVD
paper / CD,DVD
ON / OFF
W x D x H
intimus 315/319SC2
5.8 mm / 8 mm
35-38 sheets* / 1 piece
310 mm
1.8 kW
app. 57 dB(A)
45 / 60 min
790 x 926 x 1297 mm
81/98 kg
intimus 315/319SC2
3.8 mm / 8 mm
31-33 sheets* / 1 piece
310 mm
1.8 kW
app. 57 dB(A)
45 / 60 min
790 x 926 x 1297 mm
81/98 kg
intimus 315/319CC3
3.8x36 mm/ 8 mm
23-25 sheets* / 1 piece
310 mm
1.8 kW
app. 57 dB(A)
45 / 60 min
790 x 926 x 1297 mm
82/99 kg
intimus 315/319CC4
1.9x15 mm / 8 mm
15-17 sheets* / 1 piece
310 mm
1.8 kW
app. 57 dB(A)
45 / 60 min
790 x 926 x 1297 mm
82/99 kg
TECHNICAL DATA
SPECIAL ACCESSORIES
Description Order-No.
Lubricant, 110 ml bottle
88035
Note:
For orders of special accessories and spare
parts, please contact your dealer.
fi g. 5
GB
Translation of the Original Operation Manual
Übersetzung der Originalbetriebsanleitung

RECOMMANDATIONS IMPORTANTES DE SÉCURITÉ
<< Risque de blessure!
N’approchez
jamais du bloc de coupe les vête-
ments amples, colliers, cheveux
longs, cravates etc!
<< Risque de blessure!
N’introduisez jamais
les doigts dans l’ouverture!
<< En cas de danger, arrêter la machine
par l’interrupteur principal, ou par
l’interrupteur d’urgence, ou débranchez
la machine!
<< Débrancher le raccordement réseau avant
d’ouvrir l’installation!
Les travaux de réparation doivent être
effectués uniquement par un spécialiste!
<< La machine ne doit pas être utilisée par
plusieurs personnes en même temps!
La conception des éléments de sécurité
repose sur une mise en service sans danger
pour “L’utilisation de la machine par une seule
personne”.
<< Ne pas effectuer d’autres activités sur la
machine (par ex. nettoyage...) durant le
procédé de destruction!
<< La machine n’est pas un jouet et ne convient
pas pour être utilisée par des enfants!
Le concept global de sécurité (dimensions,
orifi ces d‘alimentation, mises hors circuit de
sécurité, etc.) de cette machine ne fournit
aucune garantie pour une manipulation sans
danger par les enfants.
DOMAINE D’APPLICATION :
Le destructeur de données
intimus 315/319SC2/
CC3/CC4
est une machine destinée à broyer des
documents en général ainsi que des supports de
données tels que CD, DVD, cartes de crédit et
disquettes de 3,5».
La machine peut servir uniquement
à broyer du papier et des cartes de
crédit ainsi qu’à broyer des CD, DVD et
disquettes de 3,5».
Le broyage d’autres types de supports de
données est susceptible d’endommager
l’appareil (par ex. destruction du bloc de
coupe, etc.).
INSTALLATION :
- Déballer l’appareil et l’installer.
- Insérer la poubelle dans le bâti.
- Raccorder l’appareil au réseau électrique à l’aide
de la
fi
che secteur (1) (
fi
g. 2) (voir les indications
concernant le fusible auxiliaire requis pour la
prise secteur dans les « CARACTERISTIQUES
TECHNIQUES »).
Le raccordement au secteur de la machine
doit être librement accessible et doit se
trouver à proximité de la machine !
Utiliser la machine uniquement dans des
locaux fermés et tempérés (5 – 35 °C) !
3
9
10
11
4
6
7
8
2
12
13
5
315SC2
315CC3
315CC4
319SC2
319CC3
319CC4
1
8
UTILISATION
MISE EN MARCHE
fi g. 1
fi g. 2
fi g. 3
ELEMENTS DE COMMANDE:
1 = Fiche secteur (
fi
g. 2)
Lorsqu’elle est raccordée au secteur
électrique par le biais de la
fi
che secteur, la
machine est tout d’abord éteinte.
2 = Touche de fonction (
fi
g. 1)
« Prêt à fonctionner » / « Arrêt « /
« Stop »
Cette touche comprend trois fonctions:
a)
« Prêt à fonctionner »
Frapper brièvement sur cette touche
pour commuter la machine sur « prêt à
fonctionner ».
Simultanément, le voyant LED intégré
s’allume.
b)
« Arrêt »
Maintenir enfoncée cette touche dans
l’état « prêt à fonctionner » pendant env.
3 secondes pour éteindre la machine.
Remarque:
La machine s’éteint
automatiquement en cas de non
utilisation pendant un laps de temps
d’environ 5 minutes.
c)
« Stop »
Frapper brièvement sur cette touche
pendant que le bloc de coupe fonctionne
pour éteindre et arrêter celui.ci.
3 = Touche de marche avant (
fi
g. 1)
Cette touche comprend deux fonctions :
a)
Une frappe brève sur cette touche a
pour effet de faire avancer le bloc de
coupe pendant quelques secondes, par
ex. pour faire sortir un document resté
dans le bloc de coupe. Simultanément,
le voyant LED intégré s’allume.
b)
Si cette touche est maintenue enfoncée
pendant env. deux secondes, le bloc de
coupe fonctionne en permanence en
avant et la machine peut être alimentée.
Simultanément, le voyant LED intégré
s’allume.
4 = Touche de marche arrière (
fi
g. 1)
Un actionnement de cette touche fait
reculer brièvement le bloc de coupe.
Simultanément, le voyant LED intégré
s’allume.
5 = Barrière lumineuse (marche avant)
(
fi
g. 3)
Démarre l’opération de broyage dès que
du matériau est introduit dans l’une des
fentes d’alimentation. Simultanément, le
voyant LED intégré de la touche marche
avant s’allume.
6 = Voyant de contrôle (
fi
g. 1)
«
Bourrage de matériau dans
l’appareil » / « Alimentation de matériau
en parallèle » / « Barrière lumineuse
occupée lors de la sortie de la poubelle
ou lors de la mise en marche »
Lire la description des manières de
procéder sous la rubrique « PANNE ».
a)
«
Bourrage de matériau dans
l’appareil »
S’allume lorsque la quantité de matériau
chargée dans le bloc de coupe est trop
importante. Le bloc de coupe se bloque,
se déplace ensuite un peu vers l’arrière
et s’arrête. Le moteur s’éteint.
b)
«
Alimentation de matériau en
parallèle »
S’allume lorsque du matériau est
alimenté simultanément dans les deux
fentes. Le bloc de coupe stoppe, se
déplace ensuite un peu vers l’arrière et
s’arrête. Le moteur s’éteint.
c)
« Barrière lumineuse occupée
lors de la sortie de la poubelle »
S’allume lorsque du matériau se trouve
encore dans l’une des deux fentes
d’alimentation lors de la sortie de la
poubelle. Le bloc de coupe s’arrête. Le
moteur s’éteint.
d)
« Barrière lumineuse occupée
lors de la mise en marche »
S’allume lorsque du matériau se trouve
dans l’une des fentes d’alimentation lors
de la mise en marche de la machine.
F
Traduction de Mode d'emploi d‘origine
Übersetzung der Originalbetriebsanleitung

12 = Fente d’alimentation de papier (
fi
g. 3)
13 = Fente d’alimentation de CD/DVD (
fi
g. 3)
14 = Poubelle pleine (
fi
g. 4)
15 = Destructeur de documents (
fi
g. 4)
16 = Bâti (
fi
g. 6)
MISE EN MARCHE DE LA MACHINE :
Pour mettre la machine sur « prêt à fonctionner »,
procéder comme suit:
- Actionner brièvement la touche de fonction
(2)
- Le voyant LED de la touche de fonction (2)
s’allume et af
fi
che « prêt à fonctionner ».
- La machine peut être alimentée.
ALIMENTATION DE MATERIAU :
Alimenter le bloc de coupe en
papier
par la fente
d’alimentation de papier (12) (
fi
g. 3).
Alimenter le bloc de coupe en
supports de
données
(CD, DVD ou cartes de crédit) de façon
individuelle par la fente d’alimentation agencée
séparément pour CD/DVD (13) (
fi
g. 3).
La machine passe automatiquement en marche
avant, aspire le matériau et s’éteint de nouveau
automatiquement lorsque le broyage est
terminé.
Lors de l’alimentation en papier ne
jamais introduire simultanément des
CD/DVD et inversement.
Remarques:
Pour le broyage de
fi
lms
transparents, il convient de commuter la machine
manuellement sur la marche avant (maintenir
la touche marche avant (3) enfoncée pendant
environ 2 secondes).
Il est possible de stopper à tout moment le
broyage en actionnant brièvement la touche de
fonction (2) (fonction « stop »). Pour poursuivre,
maintenir la touche de marche avant (3) enfoncée
pendant environ 2 secondes.
La machine s’éteint automatiquement en cas
de non utilisation pendant un laps de temps
d’environ 5 minutes.
Ne jamais alimenter l’appareil
avec une quantité de matériau
supérieure au maximum indiqué
(voir «
CARACTERISTIQUES
TECHNIQUES »).
Si malgré tout, une quantité trop
importante de matériau parvient dans
le bloc de coupe, voir la rubrique
« PANNE » sous « BOURRAGE DE
MATERIAU DANS L’APPAREIL ».
ELEMENTS DE COMMANDE :
7 = Voyant de contrôle (
fi
g. 1)
«
Lubri
fi
er bloc de coupe »
S’allume lorsque le bloc de coupe de
la version Cross-Cut doit être lubri
fi
é.
L’opération de lubri
fi
cation doit être validée
sur la touche de marche arrière (voir
description « MAINTENANCE BLOC DE
COUPE »)
8 = Voyant de contrôle (
fi
g. 1)
« Poubelle sortie » /
« Dysfonctionnement électrique »
a)
« Poubelle sortie »
S’allume lorsque la poubelle est sortie.
La machine s’éteint automatiquement
et ne peut être démarrée tant que la
poubelle n’est pas à nouveau insérée.
b)
« Dysfonctionnement électrique »
Clignote
, lorsque le capteur de
surveillance pour l’état « Poubelle pas
insérée » présente un dysfonctionnement
électrique. Veuillez en informer votre
distributeur spécialisé.
9 = Voyant de contrôle (
fi
g. 1)
« Surcharge du moteur » /
« Dysfonctionnement électrique »
Lire la description des manières de
procéder sous la rubrique « PANNE ».
a)
« Protection du moteur »
S’allume lorsque le moteur a subi
une surcharge et qu’il s’est éteint. La
machine ne peut être démarrée pendant
la phase de refroidissement du moteur.
b)
« Dysfonctionnement électrique »
Clignote
en présence d’un
dysfonctionnement électrique sur
le circuit imprimé de commande.
Simultanément, le voyant LED de
la touche de fonction (2) s’allume. La
machine s’éteint. Veuillez en informer
votre distributeur spécialisé.
10 = Voyant de contrôle pas occupé
11 = Voyant de contrôle
« Poubelle pleine » (
fi
g. 1)
S’allume lorsque la poubelle est remplie
et qu’elle doit être vidée. Le bloc de coupe
pour le broyage de papier s’éteint.
Remarque :
Le bloc de coupe pour le
broyage de CD/DVD peut continuer de
fonctionner.
VIDER LA POUBELLE (
fi
g. 4)
La machine s’éteint lorsque la poubelle (14) est
remplie. Le voyant de contrôle (11) s’allume.
Procéder comme suit :
- Sortir la poubelle. Le voyant de contrôle (8)
s’allume. Si du matériau se trouve encore dans
l’une des fentes d’alimentation, le voyant de
contrôle
(6) s’allume également. Le voyant
de contrôle (11) s’éteint.
- Insérer à nouveau la poubelle vidée (14),
jusqu’à la butée comme indiqué, dans le bâti
(16) sous le destructeur de documents (15).
Le voyant de contrôle (8) s’éteint.
- Si le voyant de contrôle
(6) s’allume,
actionner brièvement la touche de marche
avant (3). Le matériau resté dans la fente
d’alimentation est broyé et le voyant s’éteint.
Remarque:
La machine fonctionne uniquement
lorsque la poubelle est complètement insérée !
AFFICHAGE DYNAMIQUE
DE SOLLICITATION :
A
fi
n d’éviter un bourrage de matériau et donc
pour obtenir la destruction continue et ef
fi
cace
des supports de données, le degré momentané
de sollicitation du moteur est af
fi
ché comme suit
en cours de broyage par une lumière colorée et
diffuse dans la fente d’alimentation :
Lumière verte :
Sollicitation < 50%
Lumière jaune :
Sollicitation 50 - 75%
Lumière rouge :
Sollicitation 75 - 100%
315SC2
315CC3
315CC4
319SC2
319CC3
319CC4
3
9
10
11
4
6
7
8
2
15
16
14
12
13
5
9
UTILISATION
fi g. 1
fi g. 4
fi g. 3
F
Traduction de Mode d'emploi d‘origine
Übersetzung der Originalbetriebsanleitung
BOURRAGE DE MATERIAU DANS L’APPAREIL:
[Fonction Auto-Reverse]
Si une quantité trop importante de matériau provoque un
bourrage, la machine réagit comme suit:
- Le bloc de coupe se bloque, se déplace ensuite un peu
vers l’arrière (ce qui libère le matériau) et s’arrête. Le
moteur s’éteint. Le voyant de contrôle
(6) s’allume.
Procéder comme suit:
Bourrage de papier dans la fente d’alimentation pour
papier (12)
- Enlever le papier introduit.
- Le coupe de bloc avance maintenant automatiquement et
broie les résidus de papier restés dans le bloc de coupe.
En cours de marche avant, le voyant LED de la touche
marche avant (3) s’allume. Le voyant de contrôle
(6)
s’éteint.
- Poursuivre le broyage avec une quantité de papier plus
faible.
Bourrage de matériau dans la fente d’alimentation de
CD/DVD (13)
- Enlever le matériau alimenté.
Enlever prudemment le matériau en raison
du risque de blessure par des interfaces à
arêtes vives !
- Le matériau restant est maintenant à nouveau alimenté
automatiquement et est broyé. En cours de marche avant,
le voyant LED de la touche marche (3) avant s’allume.
Le voyant de contrôle
(6) s’éteint.
- Si le matériau est passé, poursuivre le broyage selon la
dose correcte.
- Si nécessaire, commuter manuellement le bloc de coupe
en alternance en marche avant et en marche arrière,
jusqu’à ce que le matériau soit entièrement passé et
broyé.
ALIMENTATION DE MATERIAU EN PARALLELE:
Lorsque du matériau est introduit simultanément dans les
deux fentes d’alimentation, la machine réagit comme suit :
- Le bloc de coupe se bloque, se déplace ensuite un peu
vers l’arrière (ce qui libère le matériau) et s’arrête. Le
moteur s’éteint. Le voyant de contrôle
(6) s’allume.
- Retirer le matériau de l’une des fentes.
- Actionner brièvement la touche de marche avant (3). Le
matériau situé dans l’autre fente passe dans le bloc de
coupe et est broyé. Le voyant de contrôle
(6) s’éteint.
BARRIERE LUMINEUSE OCCUPEE
LORS DE LA SORTIE DE LA POUBELLE :
Si du matériau se trouve encore dans l’une des deux fentes
d’alimentation lors de la sortie de la poubelle, le moteur
s’éteint et le bloc de coupe s’arrête. Le voyant de contrôle
(6) s’allume.
Insérer à nouveau la poubelle et valider l’état en actionnant
brièvement la touche de marche avant (3). Le matériau
présent passe dans le bloc de coupe et est broyé.
BARRIERE LUMINEUSE OCCUPEE
LORS DE LA MISE EN MARCHE:
Si du matériau se trouve dans l’une des fentes d’alimentation
lors de la mise en marche de la machine, le voyant de
contrôle
(6) s’allume.
Retirer le matériau et valider l’état en actionnant brièvement
la touche de marche avant (3).
PROTECTION DU MOTEUR:
Le moteur s’éteint s’il est surchargé. Le voyant de contrôle
(9) s’allume.
Après une période de refroidissement d’environ 25 à 40
minutes (suivant le modèle et la température ambiante), il
est possible de redémarrer l’appareil.
DYSFONCTIONNEMENT ELECTRIQUE:
Il y a dysfonctionnement électrique si le voyant de contrôle
(9)
clignote
parallèlement avec le voyant LED de la
touche de fonction (2) ou si seul le voyant de contrôle (8)
clignote. Il n’est pas possible de démarrer la machine.
Dans ce cas, veuillez informer votre distributeur spécialisé.
LISTE DE CONTROLE EN CAS DE PANNES:
Si l’appareil ne fonctionne pas, véri
fi
er les points ci-après:
- La
fi
che secteur
est-elle raccordée au secteur ?
- La
poubelle
est-elle insérée ?
- La
poubelle
(14) est-elle pleine ?
Suivre les instructions « VIDER LA POUBELLE ».
- Y a-t-il un
bourrage de matériau
dans l’appareil ?
Suivre les instructions « BOURRAGE DE MATERIAU
DANS L’APPAREIL ».
- Le
moteur
a-t-il été surchargé ?
Voir sous « PROTECTION DU MOTEUR ».
Si aucun des points de contrôle n’est pertinent, veuillez
en informer votre distributeur spécialisé.
315SC2
315CC3
315CC4
319SC2
319CC3
319CC4
Le bloc de coupe commence maintenant automatiquement un
cycle de nettoyage (course marche avant/course marche arrière)
et ensuite il s’éteint. La machine est à nouveau prête à fonctionner.
Pour recommander ultérieurement de l’huile spéciale, voir
« ACCESSOIRES SPECIAUX ».
MODE AUTOMATIQUE ECONOMIE D’ENERGIE:
Lorsque la machine n’est pas utilisée pendant un certain temps, elle
s’éteint automatiquement après environ 5 minutes. Le voyant LED
de la touche de fonction (2) indiquant « prêt à fonctionner » s’éteint.
Actionner brièvement la touche de fonction pour remettre la machine
en marche.
ELIMINATION DE LA MACHINE:
Lorsqu’elle est en
fi
n de durée de vie, toujours éliminer la
machine de façon conforme à l’environnement. Ne jamais
jeter aucune pièce de la machine ou de l’emballage avec
les ordures ménagères.
Modèle
Caractéristiques branchement sur le secteur
tension de raccordement / fréquence / courant absorbé
intimus 315/319SC2
220-230V/50Hz, 7,8 A
115-125V/60Hz, 14,9 A
100V/50/60Hz, 18,0 A
intimus 315/319SC2
220-230V/50Hz, 7,8 A
115-125V/60Hz, 14,9 A
100V/50/60Hz, 18,0 A
intimus 315/319CC3
220-230V/50Hz, 7,8 A
115-125V/60Hz, 14,9 A
100V/50/60Hz, 18,0 A
intimus 315/319CC4
220-230V/50Hz, 7,8 A
115-125V/60Hz, 14,9 A
100V/50/60Hz, 18,0 A
10
* se réfère à du papier A4 70g/m2 pour 230 V/50 Hz -10%
Modèle
Largeur de coupe
Capacité de coupe
Largeur de travail
Puissance
Niveau de bruit
Sevice intermittent
Dimensions
Poids
papier / CD,DVD
papier / CD,DVD
MARCHE / ARRET
L x P x H
intimus 315/319SC2
5,8 mm / 8 mm
35-38 feuilles* / 1 pièce
310 mm
1,8 kW
ca. 57 dB(A)
45 / 60 min
790 x 926 x 1297 mm
81/98 kg
intimus 315/319SC2
3,8 mm / 8 mm
31-33 feuilles* / 1 pièce
310 mm
1,8 kW
ca. 57 dB(A)
45 / 60 min
790 x 926 x 1297 mm
81/98 kg
intimus 315/319CC3
3,8x36 mm / 8 mm
23-25 feuilles* / 1 pièce
310 mm
1,8 kW
ca. 57 dB(A)
45 / 60 min
790 x 926 x 1297 mm
82/99 kg
intimus 315/319CC4
1,9x15 mm / 8 mm
15-17 feuilles* / 1 pièce
310 mm
1,8 kW
ca. 57 dB(A)
45 / 60 min
790 x 926 x 1297 mm
82/99 kg
CARACTÉRISTIQUES TECHNIQUES
ACCESSOIRES SEPARES
Désignation Ordre-No.
Flacon d’huile special, 110 ml
88035
Notez:
Pour les accessoires et pièces détachées,
veuillez contacter votre agent.
ENTRETIEN / ELIMINATION
COMMENT REMEDIER AUX PETITES PANNES
Il est possible d’enlever ces morceaux de papier ou de nettoyer les
cellules photoélectriques, soit en introduisant une nouvelle feuille de
papier dans le bloc de coupe, soit en déclenchant la marche arrière
et en passant brièvement un pinceau sur les « yeux » des cellules
photoélectriques.
MAINTENANCE DU BLOC DE COUPE (CROSS-CUT):
Les blocs de coupe Cross-Cut doivent être lubri
fi
és après
avoir fonctionné un certain temps. Si le voyant de contrôle
(7) s’allume, procéder comme suit:
Répandre un peu d’huile sur une feuille de papier et faire passer la
feuille dans le bloc de coupe au travers de la fente d’alimentation
de papier (12). Le papier est aspiré et l’huile parvient ainsi dans le
bloc de coupe.
Remarque: A
fi
n de faire disparaître les voyants de contrôle, il
convient de valider la
fi
n de l’opération de lubri
fi
cation du bloc
de coupe comme suit:
- Actionner la touche de marche arrière (4) et la maintenir
enfoncée jusqu’à ce que le voyant de contrôle (7) s’éteigne.
NETTOYAGE DES
CELLULES PHOTOELECTRIQUES (
fi
g. 5):
Il est possible que des morceaux de papier restent dans la rainure
d’admission (par ex. après un bourrage de papier) et empêchent la
barrière lumineuse « occupée » d’arrêter l’appareil.
fi g. 5
F
Traduction de Mode d'emploi d‘origine
Übersetzung der Originalbetriebsanleitung

BELANGRIJKE VEILIGHEIDSWENKEN
<< Gevaar voor verwondingen!
Losse onderdelen van kleding,
dassen, sie-raden, lang haar of
andere losse voorwerpen uit
de buurt van de toevoergleuf
houden!
<< Gevaar voor verwondingen!
Geen vingers
in de toevoeropening steken!
<< Bij gevaar de machine met de hoofd-scha-
kelaar of noodschakelaar uitschakelen of
de stekker uit het stopcontact trekken!
<< Voordat de machine wordt geopend de
stekker uit het stopcontact trekken!
Reparaties mogen alleen door een vakman
worden uitgevoerd!
<< Het apparaat mag niet door verscheidene
personen tegelijkertijd worden bediend!
Het ontwerp van de veiligheidselementen
berust op een veilige bediening in eenmans-
bedrijf.
<< Tijdens het versnipperen mogen geen
andere werzaamheden (b.v. reinigen) aan
het toestel worden uitgevoerd!
<< Dit toestel is geen speelgoed en mag dus
niet door kinderen worden gebruikt!
De veiligheidstechnische voorzieningen
(afmetingen, toevoeropeningen, veiligheids-
schakelaars enz.) van dit toestel garanderen
op geen enkele manier een gevaarloos gebruik
door kinderen.
TOEPASSINGSGEBIED:
De data shredder
intimus 315/319SC2/CC3/
CC4
is een machine voor het versnipperen van
algemene documenten en van gegevensdragers
als CD’s, DVD’s, creditcards en 3,5”-diskettes.
De machine mag uitsluitend voor het
versnipperen van papier en creditcards
en voor het versnipperen van CD´s,
DVD´s en 3,5”-diskettes worden
gebruikt!
Het versnipperen van andere
gegevensdragers kan schade aan het
apparaat (bijv. vernieling van het snijwerk)
tot gevolg hebben.
PLAATSING:
- Apparaat uitpakken en neerzetten.
- Vuilnisbak in het frame schuiven.
- Apparaat met de stekker (1) (afb. 2) aan de
voedingsspanning aansluiten (informatie omtrent
de noodzakelijke beveiliging van het stopcontact
zie “TECHNISCHE GEGEVENS”).
De elektrische aansluiting van de
machine moet vrij toegankelijk zijn
en mag zich niet in de buurt van de
machine bevinden!
De machine mag alleen in gesloten en
verwarmde (5-35 °C) vertrekken worden
gebruikt!
315SC2
315CC3
315CC4
319SC2
319CC3
319CC4
3
9
10
11
4
6
7
8
2
12
13
5
1
11
BEDIENING
INBEDRIJFSTELLING
BEDIENINGSELEMENTEN:
1 = Netstekker (afb. 2)
Met de aansluiting van de machine met
de netstekker aan het spanningsnet
is de machine in de eerste instantie
uitgeschakeld.
2 = Functietoets (afb. 1)
„Bedrijfsgereed“ / „Uit“ / „Stop“
Deze toets heeft drie functies:
a)
„Bedrijfsgereed“
Door kort op deze toets te drukken
wordt de machine op “Bedrijfsgereed”
geschakeld.
Tegelijk gaat de geïntegreerde LED-
weergave branden.
b)
„Uit“
Wanneer deze toets in de bedrijfsmodus
“Bedrijfsgereed” gedurende ca. 3
sec. ingedrukt, wordt de machine
uitgeschakeld.
Aanwijzing:
Wanneer de machine
gedurende ca. 5 minuten niet wordt
gebruikt, schakelt de machine
automatisch uit.
c)
„Stop“
Wanneer deze toets bij een draaiend
snijwerk kort wordt ingedrukt, wordt het
uitgeschakeld en blijft staan.
3 = Vooruittoets (afb. 1)
Deze toets heeft twee functies:
a)
Wanneer deze toets kort wordt
ingedrukt, draait het snijwerk een
paar seconden verder, bijv. om in het
snijwerk achtergebleven versnipperd
materiaal uit te voeren. Tegelijk gaat
de geïntegreerde LED-weergave
branden.
b)
Wanneer deze toets gedurende ca. twee
seconden wordt ingedrukt, draait het
snijwerk continu verder en de machine
kan niet worden gevuld. Tegelijk gaat
de geïntegreerde LED-weergave
branden.
4 = Achteruittoets (afb. 1)
Wanneer deze toets wordt bediend draait
het snijwerk een poosje achteruit. Tegelijk
gaat de geïntegreerde LED-weergave
branden.
5 = Lichtgordijn (vooruit draaien) (afb. 3)
Start de versnipperprocedure zodra
er materiaal in één van de twee
toevoerschachten wordt gedaan. Tegelijk
gaat de LED-weergave van de
vooruittoets branden.
6 = Controlelampje (afb. 1)
„Materiaalophoping in het apparaat“
/ „Materiaaltoevoer parallel“
/ „Lichtgordijn bedekt bij het
uitschuiven van de vuilnisbak of bij het
inschakelen“
Voor de aanpak zie de betreffende
beschrijving in het hoofdstuk “STORING”.
a)
„Materiaalophoping in het apparaat“
Gaat branden wanneer er te veel
materiaal in het snijwerk is ingevoerd.
Het snijwerk blokkeert, draait vervolgens
een stuk achteruit en blijft dan staan. De
motor wordt uitgeschakeld.
b)
„Materiaaltoevoer parallel“
Gaat branden, wanneer in beide
schachten tegelijk materiaal is ingevoerd.
Het snijwerk stopt, draait vervolgens
een stuk achteruit en blijft dan staan. De
motor wordt uitgeschakeld.
c)
„Lichtgordijn bedekt bij het
uitschuiven van de vuilnisbak”
Gaat branden, wanneer er bij
het uitschuiven van de vuilnisbak
nog materiaal in één van de twee
toevoerschachten zit. Het snijwerk
gaat stilstaan. De motor wordt
uitgeschakeld.
d)
„Lichtgordijn bedekt
bij het inschakelen”
Gaat branden, wanneer er bij
het inschakelen van de machine
nog materiaal in één van de twee
toevoerschachten zit.
afb. 1
afb. 2
afb. 3
NL
Vertaling van de originele gebruiksaanwijzing
Übersetzung der Originalbetriebsanleitung

BEDIENINGSELEMENTEN:
7 = Controlelampje (afb. 1)
„Snijwerk met olie smeren“
Gaat branden, wanneer het snijwerk van
de Cross-Cut-versie met olie gesmeerd
moet worden. Het smeren moet met
de achteruittoets (4) worden bevestigd
(zie beschrijving bij “ONDERHOUD
SNIJWERK”).
8 = Controlelampje (afb. 1)
„Vuilnisbak uitgeschoven“ /
„Elektrische
storing“
a)
„Vuilnisbak uitgeschoven“
Gaat branden, wanneer de vuilnisbak
is uitgeschoven. De machine wordt
automatisch uitgeschakeld en kan
zolang de vuilnisbak niet is ingeschoven
niet worden gestart.
b)
„Elektrische storing“
Knippert
, wanneer er een elektrische
storing aan de deursensors is
opgetreden. De machine wordt
uitgeschakeld. Neem contact op met uw
dealer.
9 = Controlelampje (afb. 1)
„Overbelasting motor“ /
„Elektrische
storing“
Voor de aanpak zie de betreffende
beschrijving in het hoofdstuk “STORING”.
a)
„Motorbeveiliging“
Gaat branden, wanneer de motor
overbelast is geraakt en is uitgeschakeld.
De machine kan gedurende de
afkoelfase van de motor niet worden
opgestart.
b)
„Elektrische storing“
Knippert
, wanneer er een elektrische
storing aan de bedieningsprint is
opgetreden. Tegelijk gaat de LED-
weergave
van functieschakelaar
(2) knipperen. De machine wordt
uitgeschakeld. Neem contact op met uw
dealer.
10 = Controleweergave niet bedekt
11 = Controleweergave
“Vuilnisbak vol” (afb. 1)
Gaat branden, wanneer de vuilnisbak
vol is en geledigd moet worden. Het
snijwerk voor de papierversnippering wordt
uitgeschakeld.
Aanwijzing:
Het snijwerk voor de CD/DVD-
versnippering kan verder worden gebruikt.
12 = Papiertoevoerschacht (afb. 3)
13 = CD/DVD-toevoerschacht (afb. 3)
14 = Vuilnisbak (afb. 4)
15 = Shredder (afb. 4)
16 = Frame (afb. 6)
MACHINE INSCHAKELEN
Om de machine op “Bedrijfsgreed” te schakelen
gaat u als volgt te werk:
- Functietoets (2) kort bedienen.
- De LED-weergave van de functietoets (2)
gaat voor “Bedrijfsgereed” branden.
- De machine kan worden gevuld.
MATERIAALTOEVOER:
Papier
door de papiertoevoerschacht (12) (afb.
3) in het snijwerk doen.
Gegevensdragers
(CD, DVD of creditcard)
apart door de apart aangebrachte CD/DVD-
toevoerschacht (13) (afb. 3) in het snijwerk
doen.
De machine schakelt automatisch op
vooruitdraaien, trekt het materiaal naar binnen
en schakelt na de versnipperingsprocedure
automatisch uit.
Bij de toevoer van papier mogen nooit
tegelijkertijd CD´s / DVD´s worden
toegevoerd of omgekeerd!
Aanwijzingen:
Voor het versnipperen van
lichtdoorlatende folies moet de machine
handmatig op vooruitdraaien worden gezet
(vooruittoets (3) ca. 2 sec. ingedrukt houden).
Door een korte bevestiging met de functietoets
(2) (“Stop”-functie) kan de versnipperprocedure
te allen tijde worden gestopt. Om door te gaan
moet de vooruittoets (3) ca. 2 sec. ingedrukt
worden gehouden.
Wanneer de machine gedurende een periode
van ca. 5 minuten niet wordt gebruikt, schakelt
de machine uit.
Doe nooit meer dan de maximaal
aangegeven hoeveelheid materiaal
in de machine (zie “TECHNISCHE
GEGEVENS”)!
Mocht er ondanks dat te veel materiaal
in het snijwerk terechtkomen, kijk dan bij
“STORING” “MATERIAALOPHOPING
IN HET APPARAAT”.
VUILNISBAK LEDIGEN (afb. 4)
Wanneer de vuilnisbak (14) vol is, schakelt de
machine uit. Het controlelampje (11) gaat
branden. Ga als volgt te werk:
- Vuilnisbak uitschuiven. Het controlelampje
(8) gaat branden. Wanneer er nog materiaal
in één van de toevoerschachten aanwezig
is, gaat bovendien het controlelampje
(6)
branden.Het controlelampje (11) dooft.
- De lege vuilnisbak (14) als aangegeven weer
tot aan de aanslag onder de shredder (15) in
het frame (16) schuiven. Het controlelampje
(8) dooft.
- Indien het controlelampje
(6) brandt,
drukt u even op de vooruittoets (3). In de
toevoerschacht gebleven materiaal wordt
versnipperd en de weergave dooft.
Aanwijzing:
De machine draait alleen bij een
volledig ingeschoven vuilnisbak!
DYNAMISCHE LASTWEERGAVE:
Om een vastlopen van materiaal te voorkomen
en op die manier een continue en effectieve
vernietiging van de gegevensdragers te bereiken,
wordt tijdens de versnipperingsprocedure de
momentele belasting van de motor door een qua
kleur afgestemd diffuus licht in de toevoerschacht
als volgt aangegeven:
Groen licht:
Belasting < 50%
Geel licht:
Belasting 50 - 75%
Rood licht:
Belasting 75 - 100%
315SC2
315CC3
315CC4
319SC2
319CC3
319CC4
3
9
10
11
4
6
7
8
2
15
16
14
12
13
5
12
NL
BEDIENING
afb. 1
afb. 4
afb. 3
Vertaling van de originele gebruiksaanwijzing
Übersetzung der Originalbetriebsanleitung

MATERIAALOPHOPING IN HET APPARAAT:
(Auto-Reverse-functie)
Wanneer er door te veel toevoer materiaal vast loopt,
reageert de machine als volgt:
- Het snijwerk blokkeert, draait vervolgens een stuk
achteruit (materiaal wordt vrijgegeven) en blijft
dan staan. De motor wordt uitgeschakeld. Het
controlelampje
(6) gaat branden.
Ga als volgt te werk:
Papier loopt vast in de papiertoevoerschacht (12)
- Teruggevoerd papier uitnemen.
- Snijwerk draait automatisch vooruit en versnippert
de rest papier die nog in het snijwerk zit. Tijdens het
vooruitdraaien brandt de LED-weergave van de
vooruittoets (3). Het controlelampje
(6) dooft.
- Ga door met het versnipperen van kleinere
papierhoeveelheden.
Vastgelopen materiaal in de CD/DVD-toevoerschacht
(13)
- Teruggevoerd materiaal uitnemen.
Neem het materiaal voorzichtig uit omdat
er gevaar voor snijwonden door scherpe
randen heerst!
- Het resterende materiaal wordt nu automatisch opnieuw
naar het snijwerk getransporteerd en versnipperd.
Tijdens het vooruitdraaien brandt de LED-weergave
van de vooruittoets (3). Het controlelampje
(6)
dooft.
- Ga wanneer het materiaal is verwerkt verder met het
versnipperen in de juiste dosering.
- Indien noodzakelijk moet het snijwerk handmatig
afwisselend zo lang voor- en achteruit worden
geschakeld tot het materiaal volledig is doorgedraaid
en versnipperd.
MATERIAALTOEVOER PARALLEL:
Wanneer er aan beide toevoerschachten tegelijkertijd
materiaal wordt toegevoerd, reageert de machine als
volgt:
- Het snijwerk blokkeert, draait vervolgens een stuk
achteruit (materiaal wordt vrijgegeven) en blijft
dan staan. De motor wordt uitgeschakeld. Het
controlelampje
(6) gaat branden.
- Haal het materiaal uit één van de schachten.
- Druk even op de vooruittoets (3). Het materiaal van
de andere schacht wordt naar het snijwerk geleid en
versnipperd. Het controlelampje
(6) dooft.
LICHTGORDIJN BEDEKT
BIJ HET UITSCHUIVEN VAN DE VUILNISBAK:
Wanneer er zich bij het uitschuiven van de vuilnisbak
nog materiaal in één van de twee toevoerschachten
bevindt, schakelt de motor uit en het snijwerk stopt. Het
controlelampje
(6) gaat branden.
Schuif de vuilnisbak weer in en bevestig de situatie door
kort op de vooruittoets (3) te drukken. Het aanwezige
materiaal wordt naar het snijwerk geleid en versnipperd.
LICHTGORDIJN BELEGD
BIJ HET INSCHAKELEN:
Mocht er bij het inschakelen van de machine materiaal
in één van de twee toevoerschachten zitten, gaat het
controlelampje
(6) branden.
Verwijder het materiaal en bevestig de situatie door kort
op de vooruittoets (3) te drukken.
MOTORBEVEILIGING:
Mocht de motor overbelast worden, schakelt hij uit. Het
controlelampje (9) gaat branden.
Na een afkoelfase van ca. 25-40 minuten (afhankelijk van
het model en de ruimtetemperatuur) kunt u het apparaat
opnieuw opstarten.
ELEKTRISCHE STORING:
Wanneer de controleweergave (9) samen met de
LED-weergave van de functieschakelaar (2) of alleen
de controleweergave (8)
knippert
, is er sprake van
een elektrische storing. De machine kan niet worden
opgestart.
Neem in dit geval contact op met uw dealer.
CHECKLIJST BIJ STORINGEN:
Mocht het apparaat niet functioneren, dient u de volgende
punten te controleren:
- is de
netstekker
aan het spanningsnet aangesloten?
- is de
vuilnisbak
ingeschoven?
- is de
vuilnisbak (14)
vol?
Volg de instructies vermeld bij “VUILNISBAK
LEDIGEN”.
- is er
materiaal vastgelopen
in het apparaat?
Volg de instructies vermeld bij “MATERIAALOPHOPING
IN HET APPARAAT”.
- is de
motor
overbelast?
Zie
“MOTORBEVEILIGING”.
Wanneer geen van de te controleren punten van
toepassing zijn, neem dan contact op met uw dealer.
315SC2
315CC3
315CC4
319SC2
319CC3
319CC4
Fig. 5
Het snijwerk begint nu automatisch met een
reinigingscyclus (vooruit/achteruit) en schakelt vervolgens
uit. De machine is weer gebruiksklaar. Voor bijbestelling
van de speciale olie, zie “SPECIAAL TOEBEHOREN”.
AUTOMATISCHE ENERGIEBESPARING:
Wanneer de machine gedurende een poos niet wordt
gebruikt, schakelt ze automatisch na 5 min. uit. De LED-
weergave van de functietoets (2) voor “Bedrijfsgereed”
dooft. Druk voor het opnieuw inschakelen even op de
functietoets.
MACHINE WEGDOEN:
Doe de machine aan het einde van haar
levensduur altijd op een milieuvriendelijke
manier weg. Doe geen delen van de machine
of van de verpakking bij het huisvuil.
Model
Snijbreedte
Capaciteit Werkbreedte
Vermogen
Geluidsniveau
Pauze
inschakelen Afmetingen Gewicht
papier / CD,DVD
papier / CD,DVD
AAN / UIT
B x D x H
intimus 315/319SC2
5,8 mm / 8 mm
35-38 blad* / 1 stuk
310 mm
1,8 kW
ca. 57 dB(A)
45 / 60 min
790 x 926 x 1297 mm
81/98 kg
intimus 315/319SC2
3,8 mm / 8 mm
31-33 blad* / 1 stuk
310 mm
1,8 kW
ca. 57 dB(A)
45 / 60 min
790 x 926 x 1297 mm
81/98 kg
intimus 315/319CC3
3,8x38 mm / 8 mm
23-25 blad* / 1 stuk
310 mm
1,8 kW
ca. 57 dB(A)
45 / 60 min
790 x 926 x 1297 mm
82/99 kg
intimus 315/319CC4
1,9x15 mm / 8 mm
15-17 blad* / 1 stuk
310 mm
1,8 kW
ca. 57 dB(A)
45 / 60 min
790 x 926 x 1297 mm
82/99 kg
13
NL
* van toepassing op A4-papier 70g/m
2
bij 230V/50Hz -10%
Model
Gegevens aansluiting stroomnet
spanning / frequentie / inkomende stroom
intimus 315/319SC2
220-230V/50Hz, 7,8 A
115-125V/60Hz, 14,9 A
100V/50/60Hz, 18,0 A
intimus 315/319SC2
220-230V/50Hz, 7,8 A
115-125V/60Hz, 14,9 A
100V/50/60Hz, 18,0 A
intimus 315/319CC3
220-230V/50Hz, 7,8 A
115-125V/60Hz, 14,9 A
100V/50/60Hz, 18,0 A
intimus 315/319CC4
220-230V/50Hz, 7,8 A
115-125V/60Hz, 14,9 A
100V/50/60Hz, 18,0 A
TECHNISCHE GEGEVENS
SPECIALE TOEBEHOREN
Benaming Best.
nr.
Flesje olie, 110 ml
88035
Opmerking:
Voor het nabestellen van speciale
toebehoren en voor reserveonderdelen kunt u bij
uw dealer terecht.
ONDERHOUD / AFDANKEN
STORING
REINIGING VAN DE FOTOCELLEN (afb. 5):
Wanneer er stukken papier in de invoerspleet terecht
komen (bijv. na een papierophoping) is het mogelijk dat
het apparaat vanwege een “bedekt” lichtgordijn niet meer
uitschakelt.
U kunt de stukken papier verwijderen of de fotocel
reinigen door nog een vel papier in het snijwerk te doen
of de machine op achteruitdraaien zetten en met een
kwastje even over de “ogen” van de fotocel te vegen.
ONDERHOUD SNIJWERK (CROSS CUT):
Cross-Cut-snijwerken moeten na een bepaalde
tijd van werking met olie worden ingesmeerd.
Wanneer de controleweergave (7) gaat
branden, gaat u als volgt te werk:
Verdeel iets olie op een vel papier en voer het vervolgens
door de papierschacht (12) het snijwerk in. Het papier
wordt ingetrokken en de olie komt op die manier in het
snijwerk terecht.
Aanwijzing: Om de weergave te wissen moet na het
uitvoeren van de oliesmering van het snijwerk deze
procedure als volgt worden bevestigd:
- Achteruittoets (4) indrukken en ingedrukt houden tot
het controlelampje (7) dooft.
Vertaling van de originele gebruiksaanwijzing
Übersetzung der Originalbetriebsanleitung
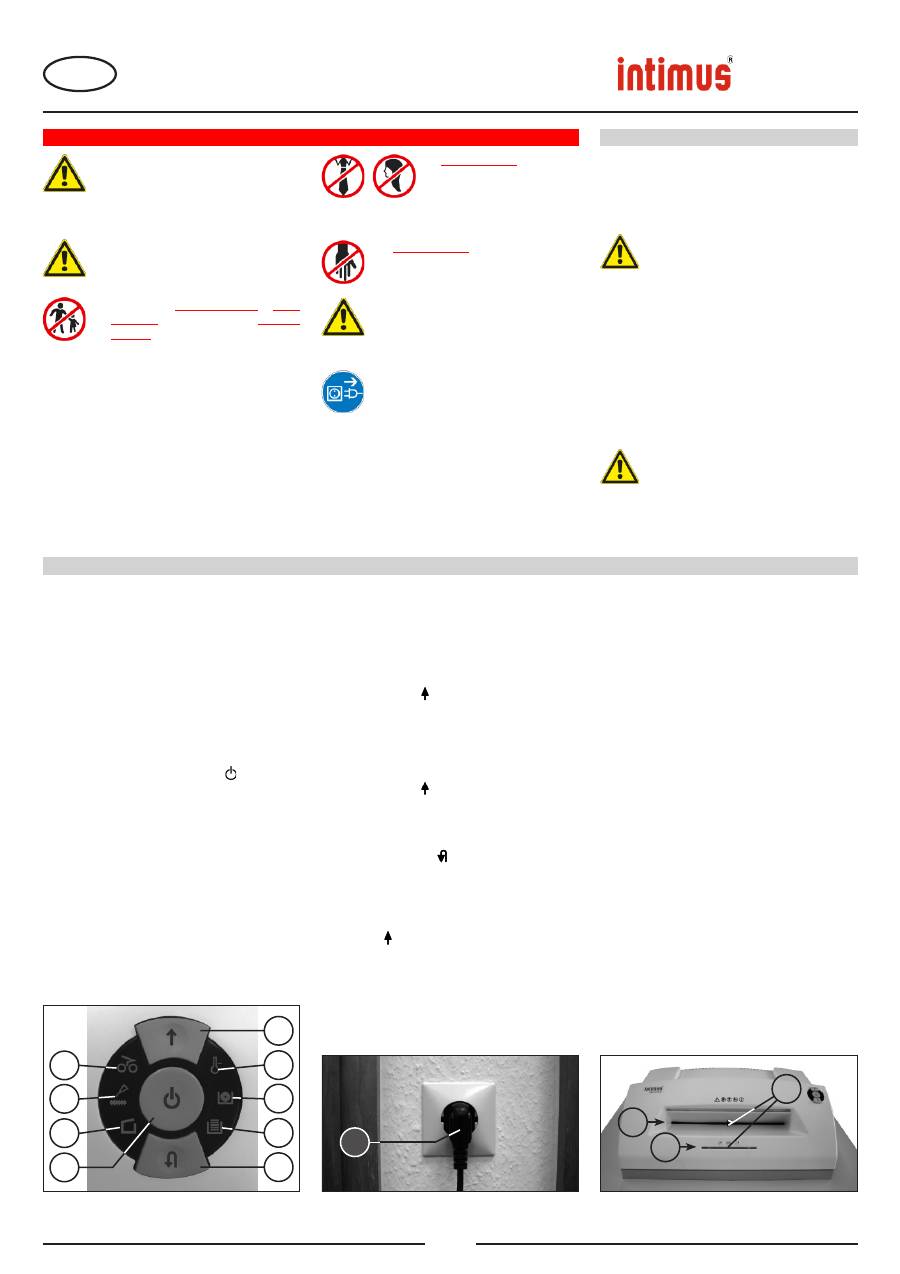
INDICACIONES DE SEGURIDAD IMPORTANTES
<< ¡Peligro de lesión!
No acercar a
la apertura de alimentación pie-
zas sueltas de ropa, corbatas,
bisutería, cabello largo u otros
objetos sueltos!
<< ¡Peligro de lesión!
No introducir los dedos
en la apertura de alimentación!
<< ¡En caso de emergencia desconectar el
aparato usando el interruptor principal o
el interruptor de emergencia, o extraer la
clavija de red!
<< Antes de abrir el aparato hay que extraer
la clavija de red!
¡Las reparaciones solamente debe efectu-
arlas un técnico especialista!
<< ¡El aparato no debe ser operado por varias
personas al mismo tiempo!
La concepción de los elementos de seguri-
dad se basa en un manejo sin peligro en un
„servicio por una sola persona“.
<< ¡Durante el proceso de trituración no
se deben efectuar otros trabajos en la
máquina (p. ej. limpieza etc.)!
<< ¡La máquina no es un juguete y no es
apropiada para el empleo y uso por parte
de niños!
El concepto global en razón de la seguridad
(dimensiones, orificios de alimentación,
desconexiones de seguridad, etc.) de esta
máquina no incluye ningún tipo de garantía
en cuanto a un manejo inofensivo por parte
de niños.
CAMPO DE APLICACIÓN:
La destructora de datos
intimus 315/319SC2/CC3/
CC4
es una máquina que se ha concebido para el
desmenuzamiento de documentos corrientes, así
como de soportes de datos, como discos CD, DVD,
tarjetas de crédito y disquetes de 3,5”.
¡La máquina solamente debe ser utilizada
para el desmenuzamiento de papel y
tarjetas de crédito, así como de discos
CD y DVD y disquetes 3,5”!
El desmenuzamiento de otro tipo de soportes
de datos puede producir daños en el aparato
(p. ej. destrucción del mecanismo de corte,
etc.).
COLOCACIÓN:
- Desembale y coloque el aparato.
- Introduzca el cubo de basura en el marco.
- Enchufe el aparato a la red (1) (Fig. 2) (ver las
indicaciones sobre el fusible previo necesario
del tomacorriente en “CARACTERÍSTICAS
TÉCNICAS”).
¡La toma de conexión a la red de la
máquina tiene que encontrarse en un
lugar fácilmente accesible y en las
inmediaciones de la máquina!
¡La máquina sólo se deberá usar en
recintos cerrados y con temperaturas
comprendidas entre 5 – 35ºC.
Fig. 1
3
9
10
11
4
6
7
8
2
Fig. 2
12
13
Fig. 3
5
315SC2
315CC3
315CC4
319SC2
319CC3
319CC4
1
14
MANEJO
PUESTA EN SERVICIO
ELEMENTOS DE MANDO:
1 = Clavija de enchufe a la red (Fig. 2)
Al enchufar la máquina a través de la clavija
de enchufe a la red eléctrica, la máquina se
encuentra en primer lugar desconectada.
2 = Pulsador funcional (Fig. 1)
“Listo para el uso” / “Apagado” /
“Parada”
Este pulsador comprende tres funciones:
a)
“Listo para el uso”
Accionando brevemente este pulsador
se conecta el equipo en el modo de
funcionamiento “listo para el uso”.
Al mismo tiempo se encenderá el
indicador piloto integrado .
b)
“Apagado”
Si se acciona este pulsador en el
modo de funcionamiento “Listo para el
uso” aprox. por 3 seg., la máquina se
desconectará.
Nota:
Si la máquina no se utiliza durante
un periodo de tiempo de aprox. 5 min.,
se apagará automáticamente.
c)
“Parada”
Al accionar brevemente este pulsador
mientras el mecanismo de corte está
en marcha, se desconectará éste y se
quedará parado.
3 = Pulsador de avance (Fig. 1)
Este pulsador comprende dos funciones:
a)
Accionando brevemente este pulsador,
el mecanismo de corte avanzará unos
pocos segundos, por ejemplo, para
sacar el material que aún se encuentra
en el mecanismo de corte. Al mismo
tiempo se encenderá el indicador piloto
integrado .
b)
Si este pulsador se mantiene oprimido
durante unos dos segundos, el
mecanismo de corte avanzará de modo
continuo, por lo que el máquina se podrá
suministrar con material. Al mismo
tiempo se encenderá el indicador piloto
integrado .
4 = Pulsador de retroceso (Fig. 1)
El mecanismo de corte retrocede
brevemente al accionar este pulsador. Al
mismo tiempo se encenderá el indicador
piloto integrado .
5 = Barrera fotoeléctrica (avance) (Fig. 3)
Inicia el proceso de desmenuzamiento en
el momento de introducir material en una
de las dos ranuras de alimentación. Al
mismo tiempo se encenderá el indicador
piloto del pulsador de avance.
6 = Indicador de control (Fig. 1)
“Material atascado en el aparato” /
“Alimentación de material en paralelo” /
“Barrera fotoeléctrica tapada al sacar el
cubo de basura o al conectar“
Para el modo de proceder consulte la
descripción correspondiente en el apartado
“AVERÍA”.
a)
“Material atascado en el aparato”
Se encenderá al introducir demasiado
material en el mecanismo de corte.
El mecanismo de corte se bloquea,
retrocede a continuación un poco y se
para. El motor se desconecta.
b)
“Alimentación de
material en paralelo”
Se enciende si se alimenta material
al mismo tiempo por ambas ranuras.
El mecanismo de corte se detiene,
retrocede a continuación un poco y se
para. El motor se desconecta.
c)
“Barrera fotoeléctrica tapada
al sacar el cubo de basura“
Se enciende si al sacar el cubo de
basura sigue habiendo material en una
de las dos ranuras de alimentación. El
mecanismo de corte se para. El motor
se desconecta.
d)
“Barrera fotoeléctrica tapada
por
conexión”
Se enciende si al conectar la máquina
sigue habiendo material en una de las
dos ranuras de alimentación.
E
Traducción de Instrucciones de uso originales
Übersetzung der Originalbetriebsanleitung

12 = Ranura de
alimentación de papel (Fig. 3)
13 = Ranura de
alimentación de CD/DVD (Fig. 3)
14 = Cubo de basura (Fig. 4)
15 = Destructora de documentos (Fig. 4)
16 = Marco (Fig. 6)
CÓMO CONECTAR EL APARATO:
Para conectar el aparato en “listo para el uso”
proceda como sigue:
- Accione brevemente el pulsador funcional
(2).
- El indicador piloto del pulsador funcional
(2) se encenderá para la función “Listo para el
uso”.
- A continuación se puede empezar a alimentar
el aparato con papel.
ALIMENTACIÓN DE MATERIAL:
Introduzca
papel
por la ranura de alimentación
de papel (12) (Fig. 3) al mecanismo de corte.
Introduzca los
soportes de datos
(CD, DVD
o tarjeta de crédito), uno a uno, por la ranura
de alimentación de CD/DVD, dispuesta
separadamente, (13) (Fig. 3) al mecanismo de
corte.
El aparato se conecta automáticamente a
la marcha de avance, mete el material y se
desconecta automáticamente después de haber
fi
nalizado la etapa de desmenuzamiento.
¡Mientras se introduzca papel no se
deberá introducir nunca al mismo
tiempo CD/DVD o a la inversa!
Notas:
Para el desmenuzamiento de láminas
transparentes se tiene que conectar la máquina
a mano en el modo de funcionamiento de avance
(mantenga accionado el pulsador de avance (3)
durante unos 2 segundos).
Accionando brevemente el pulsador funcional
(2) (función de “Parada”) se puede detener en
todo momento la etapa de desmenuzamiento.
Para continuar, mantenga accionado el pulsador
de avance (3) durante 2 segundos.
Si la máquina no se utiliza durante un periodo de
tiempo de aprox. 5 min. se desconecta.
¡No introduzca nunca en el aparato
más material del indicado como
máximo (consulte el apartado
“DATOS TÉCNICOS”)!
En el caso de que se haya introducido
de todos modos demasiado material
en el mecanismo de corte, consulte en
“AVERÍAS” en el apartado “MATERIAL
ATASCADO EN EL APARATO”.
ELEMENTOS DE MANDO:
7 = Indicador de control (Fig. 1)
“Engrasar mecanismo de corte”
Se enciende cuando el mecanismo de
corte de la versión Cross-Cut (cruzado)
se tiene que engrasar. El proceso de
engrase se tiene que con
fi
rmar con el
pulsador de retroceso (4) (ver descripción
en “MANTENIMIENTO DEL MECANISMO
DE CORTE”
).
8 = Indicador de control (Fig. 1)
„Cubo de basura retirado“ /
“Avería
eléctrica”
a)
„Cubo de basura retirado“
Se enciende cuando se ha retirado
el cubo de basura. El aparato se
desconecta automáticamente y no se
puede conectar hasta haber introducido
el cubo de basura.
b)
“Avería eléctrica”
parpadea
, si ha surgido una avería
eléctrica en los sensores de control
para el estado „Cubo de basura no
introducido“. El aparato se desconecta.
Avise al comercio especializado más
cercano.
9 = Indicador de control (Fig. 1)
“Sobrecarga de motor” / “Avería
eléctrica”
Para el modo de proceder consulte la
descripción correspondiente en el apartado
“AVERÍA”.
a)
“Guardamotor”
Se enciende cuando el motor se ha
sobrecargado y desconectado. La
máquina no se puede activar durante la
fase de enfriamiento del motor.
b)
“Avería eléctrica”
parpadea
, si ha surgido una avería
eléctrica dentro de la placa de circuitos
impresos del sistema de mando. Al
mismo tiempo se encenderá el indicador
piloto
del pulsador funcional (2).
La máquina se desconecta. Avise al
comercio especializado más cercano.
10 = Indicador de control no ocupado
11 = Indicador de control
“Cubo de basura lleno” (Fig. 1)
Se enciende cuando el cubo de basura
está lleno y se ha de vaciar. El mecanismo
de corte para el desmenuzamiento de
papel se desconecta.
Nota:
El mecanismo de corte para el
desmenuzamiento de CD/DVD puede
seguir funcionando.
VACIADO DEL CUBO DE BASURA (Fig. 4):
En cuanto el cubo de basura (14) se haya
llenado, el aparato se desconectará. El indicador
de control (11) se enciende. Proceda como
sigue:
- Retire el cubo de basura. El indicador de
control
(8) se enciende. Si aún queda
material en una de las ranuras de alimentación,
el indicador de control
(6) se encenderá
también ahora. El indicador de control (11)
se apaga.
- Vuelva a introducir en el marco (16) el cubo
de basura vaciado (14), como se muestra,
hasta el tope debajo de la destructora de
documentos (15). El indicador de control (8)
se apaga.
- Si el indicador de control
(6) está encendido,
con
fi
rme brevemente con el pulsador de
avance (3). El material que se había quedado
en la ranura de alimentación es desmenuzado
y el indicador se apaga.
Nota:
¡El aparato solamente puede funcionar con
el cubo de basura introducido por completo!
INDICADOR DINÁMICO DE CARGA:
A
fi
n de evitar el atasco de material y, por lo
tanto, lograr una destrucción continuada y
efectiva de los soportes de datos, se indica -
durante la etapa de desmenuzamiento - el grado
momentáneo de carga del motor mediante una
luz difusa, determinada por el color, en la ranura
de alimentación, como sigue:
Luz verde:
Carga < 50%
Luz amarilla:
Carga 50 -75%
Luz roja:
Carga 75 -100%
315SC2
315CC3
315CC4
319SC2
319CC3
319CC4
Fig. 1
3
9
10
11
4
6
7
8
2
15
16
Fig. 4
14
12
13
5
15
E
MANEJO
Fig. 3
Traducción de Instrucciones de uso originales
Übersetzung der Originalbetriebsanleitung
MATERIAL ATASCADO EN EL APARATO:
(Función de auto-retroceso)
Si se produce un atasco debido a un exceso de material
introducido, el aparato reacciona como sigue:
- El mecanismo de corte se bloquea, retrocede a continuación
un poco (material se libera) y se para. El motor se desconecta.
El indicador de control
(6) se enciende.
Proceda como sigue:
Papel atascado en la ranura de alimentación de papel (12)
- Retire el papel retrocedido.
- Una vez hecho esto, el mecanismo de corte avanzará
automáticamente y desmenuzará el resto de papel contenido
en el mecanismo de corte. El indicador piloto integrado del
pulsador de avance (3) está encendido durante el avance. El
indicador de control
(6) se apaga.
- Continúe con el desmenuzamiento introduciendo una cantidad
menor de papel.
Material atascado en la ranura de alimentación de CD/DVD
(13)
- Retire el material retrocedido.
¡Retire el material con sumo cuidado, porque se
puede cortar en los puntos a
fi
lados de corte!
- A continuación, el material restante se vuelve a transportar
automáticamente al mecanismo de corte y se desmenuza. El
indicador piloto integrado del pulsador de avance (3) está
encendido durante el avance. El indicador de control
(6)
se apaga.
- En cuanto el material haya pasado por el mecanismo de
corte, podrá seguir con el desmenuzamiento pero dosi
fi
cando
correctamente.
- Si fuera necesario, conecte el mecanismo de corte a
mano, alternando entre avance y retroceso, hasta que el
material haya pasado por el mecanismo de corte y se haya
desmenuzado.
ALIMENTACIÓN DE MATERIAL EN PARALELO:
Si se introduce material por ambas ranuras de alimentación, la
máquina reaccionará como sigue:
- El mecanismo de corte se bloquea, retrocede a continuación
un poco (material se libera) y se para. El motor se desconecta.
El indicador de control
(6) se enciende.
- Retire el material de una de las ranuras.
- Accione brevemente el pulsador de avance (3). El material
restante de la otra ranura se introducirá en el mecanismo de
corte para ser desmenuzado. El indicador de control
(6)
se apaga.
BARRERA FOTOELÉCTRICA TAPADA
AL RETIRAR EL CUBO DE BASURA:
Si al retirar el cubo de basura se encontrara aún material en
una de las ranuras de alimentación, el motor se desconectará
y el mecanismo de corte se parará. El indicador de control
(6) se enciende.
Vuelva a introducir el cubo de basura y con
fi
rme la situación
accionando brevemente el pulsador de avance (3). El material
restante se introducirá en el mecanismo de corte para ser
desmenuzado.
BARRERA FOTOELÉCTRICA TAPADA POR CONEXIÓN:
Si al conectar la máquina hubiera material en una de las ranuras
de alimentación, el indicador de control se enciende
(6).
Retire el material y con
fi
rme la situación accionando brevemente
el pulsador de avance (3).
GUARDAMOTOR:
Si el motor se sobrecarga, se desconectará. El indicador de
control (9) se enciende.
Deje enfriar el aparato unos 25-40 minutos (en función del
modelo y temperatura ambiental) y vuelva a activar entonces
el aparato.
AVERÍA ELÉCTRICA:
Si el indicador de control (9)
parpadea
en combinación con el
indicador piloto del interruptor funcional (2) o sólo el indicador
de control (8), signi
fi
ca que ha surgido una avería eléctrica.
Con lo que el aparato no se puede activar.
Avise en este caso al comercio especializado más cercano.
LISTA DE VERIFICACIÓN EN LAS AVERÍAS:
Si el aparato no funciona, compruebe los siguientes puntos:
- ¿Se ha conectado la
clavija de enchufe
a la red de corriente
eléctrica?
- ¿Se ha introducido el
cubo de basura
?
- ¿Está lleno el
cubo de basura (14)?
Siga las instrucciones en el apartado „CÓMO VACIAR EL
CUBO DE BASURA“.
- ¿Hay
material atascado
en el aparato?
Siga las instrucciones en el apartado “MATERIAL ATASCADO
EN EL APARATO”.
- ¿Se ha sobrecargado el
motor
?
Consulte el apartado “GUARDAMOTOR”.
Si su aparato presenta otro problema distinto a los alistados
anteriormente, notifíquelo al comercio especializado más
cercano.
315SC2
315CC3
315CC4
319SC2
319CC3
319CC4
Fig. 5
- Accione el pulsador de retroceso (4) y no lo suelte hasta que el
indicador de control (7) se apague.
Una vez hecho esto, el mecanismo de corte comenzará
automáticamente un ciclo de limpieza (avance/retroceso) y, a
continuación, se desconecta. La máquina vuelve a estar lista para
el uso. Si desea pedir el aceite especial, consulte el apartado
“ACCESORIOS ESPECIALES”.
FUNCIÓN AUTOMÁTICA DE AHORRO ENERGÉTICO:
Si el aparato no se utiliza durante algún tiempo, se desconectará
automáticamente tras unos 5 min. El indicador piloto del pulsador
funcional (2) para “Listo para el uso” se apaga. Accione brevemente
el pulsador funcional para reconectar.
ELIMINACIÓN DEL APARATO USADO:
Elimine el aparato usado al
fi
nal de su vida útil respetando
siempre las normas medioambientales. No tire las partes
de la máquina ni el embalaje con la basura doméstica.
16
E
* referido a papel formato A4 70g/m
2
a 230V/50Hz -10%
Modelo
Datos de conexión a la red
tensión de conexión / frecuencia / consumo de corriente
intimus 315/319SC2
220-230V/50Hz, 7,8 A
115-125V/60Hz, 14,9 A
100V/50/60Hz, 18,0 A
intimus 315/319SC2
220-230V/50Hz, 7,8 A
115-125V/60Hz, 14,9 A
100V/50/60Hz, 18,0 A
intimus 315/319CC3
220-230V/50Hz, 7,8 A
115-125V/60Hz, 14,9 A
100V/50/60Hz, 18,0 A
intimus 315/319CC4
220-230V/50Hz, 7,8 A
115-125V/60Hz, 14,9 A
100V/50/60Hz, 18,0 A
Modelo
Ancho de corte
Rendimiento de corte Ancho de trabajo
Potencia
Nivel de ruídos
Servicio intermitente
Dimensiones
Peso
papel / CD,DVD
papel / CD,DVD
CONECTADO / DESCONECTADO
A x F x A
intimus 315/319SC2
5,8 mm / 8 mm
35-38 hojas* / 1 unidad
310 mm
1,8 kW
aprox. 57 dB(A)
45 / 60 min
790 x 926 x 1297 mm
81/98 kg
intimus 315/319SC2
3,8 mm / 8 mm
31-33 hojas* / 1 unidad
310 mm
1,8 kW
aprox. 57 dB(A)
45 / 60 min
790 x 926 x 1297 mm
81/98 kg
intimus 315/319CC3
3,8x36 mm / 8 mm
23-25 hojas* / 1 unidad
310 mm
1,8 kW
aprox. 57 dB(A)
45 / 60 min
790 x 926 x 1297 mm
82/99 kg
intimus 315/319CC4
1,9x15 mm / 8 mm
15-17 hojas* / 1 unidad
310 mm
1,8 kW
aprox. 57 dB(A)
45 / 60 min
790 x 926 x 1297 mm
82/99 kg
DATOS TÉCNICOS
ACCESSORIO ESPECIAL
Denominación
N° de pedido
Botellita de aceite, 110 ml
88035
Inicación:
En el caso de pedidos ulteriores de
accesorios especiales y de piezas de repuesto, ro-
gamos se dirija a nuestro representante ofi cial.
MANTENIMIENTO / ELIMINACIÓN
AVERIA
LIMPIEZA DE LAS FOTOCÉLULAS (Fig. 5):
En el caso de que se hayan quedado papeles adheridos en la ranura
de entrada (p. ej. tras un atasco de papel) es posible que el aparato
no se desconecte a causa de la fotocélula “tapada”.
Puede retirar los trozos de papel o bien limpiar la fotocélula,
alimentando el mecanismo de corte con una hoja de papel adicional,
o activar la marcha de retroceso del aparato pasando, a continuación,
brevemente un pincel sobre ambas “ópticas” de la fotocélula.
MANTENIMIENTO DEL MECANISMO DE CORTE
(CORTE CRUZADO/CROSS-CUT):
Después de haber transcurrido un determinado tiempo de
servicio, se deberá aplicar aceite en los mecanismos de
corte cruzado. Si el indicador de control está encendido
(7), proceda como sigue:
Distribuya un poco de aceite sobre una hoja de papel y, a
continuación, introdúzcala por la ranura de alimentación de papel
(12) al mecanismo de corte. El papel se mete y el aceite penetrará
así en el mecanismo de corte.
Nota: Para borrar el indicador, habrá que con
fi
rmar este
proceso, después de haber engrasado el mecanismo de corte,
como sigue:
Traducción de Instrucciones de uso originales
Übersetzung der Originalbetriebsanleitung
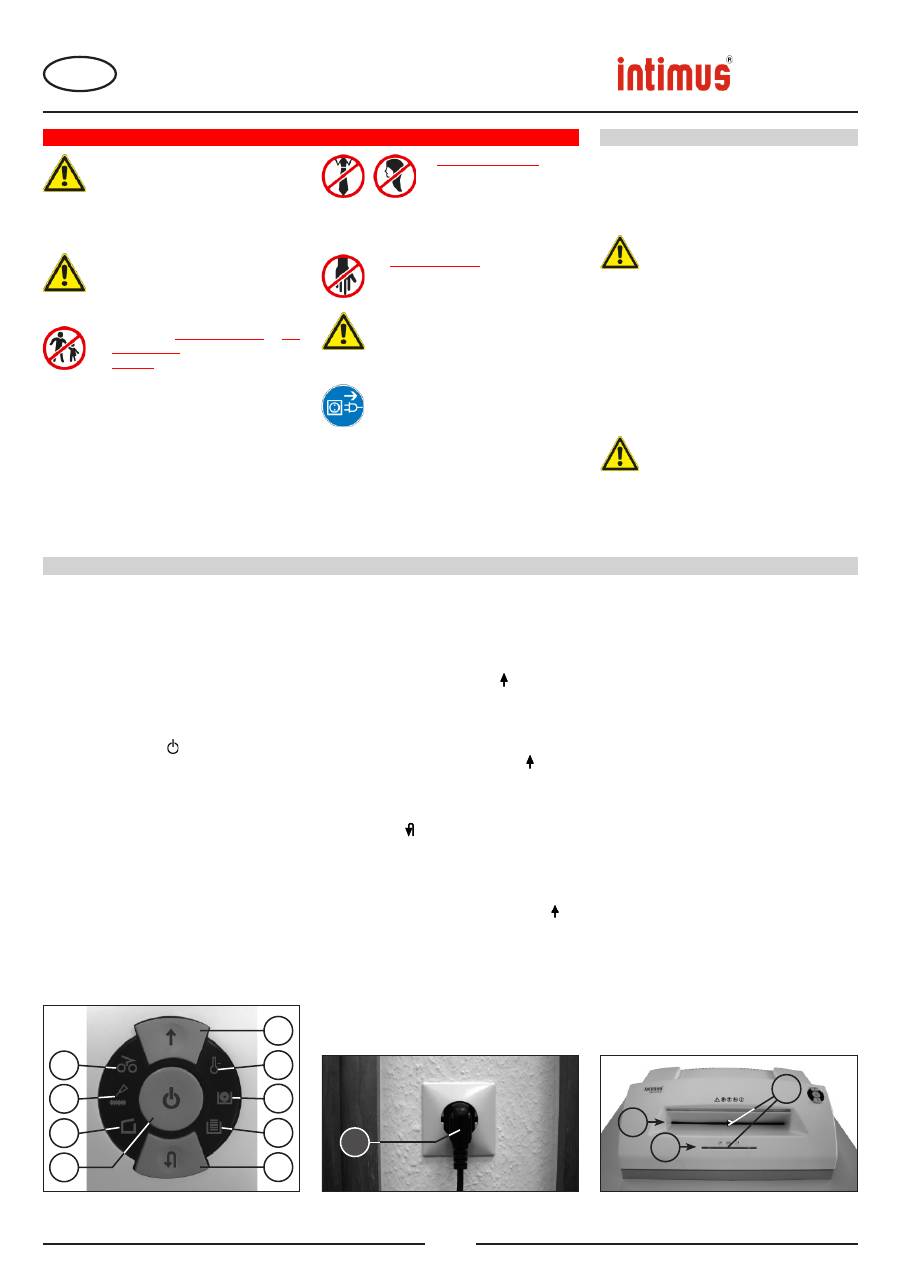
INSTRUÇÕES DE SEGURANÇA IMPORTANTES
<< Risco de ferimento!
Manter
peças de vestuários penden-
tes, gravatas, jóias, cabelos
compridos ou outros abjectos
pendentes afastados da aber-
tura para alimentação!
<< Risco de ferimento!
Não colocar as mãos
na abertura para alimentação!
<< Em caso de perigo, desligar a máquina
no interruptor principal, ou no interruptor
de emergência, ou desligar a fi cha da
tomada!
<< Antes de abrir a máquina deve desligar a
fi cha da tomada!
Todas as reparações devem ser executadas
por especialistas!
<< O aparelho não deve ser manejado por
várias pessoas ao mesmo tempo!
Os elementos de segurança servem para
um manejo sem perigo no „servigo por um
só operador“.
<< Durante a operação de corte de papel não
devem ser realizados outros trabalhos na
máquina (por exemplo limpezas, etc.)!
<< A máquina não é brinquedo e não
é apropriada para a utilização por
crianças!
Os aspectos de técnica de segurança
(dimensões, aberturas de alimentação,
dispositivos de desligamento de segurança,
etc.) desta máquina não implicam qualquer
garantia de manuseio seguro por crianças.
ÁREA DE APLICAÇÃO:
A des
fi
bradora de dados
intimus 315/319SC2/
CC3/CC4
é uma máquina que se destina à
destruição de documentos em geral, bem como
de suportes de dados, como CDs, DVDs, cartões
de crédito e disquetes de 3,5”.
A máquina só pode ser usada para
a destruição de papel e cartões de
crédito, bem como de CDs, DVDs e
disquetes de 3,5”!
A destruição de outros tipos de suportes
de dados pode dani
fi
car o aparelho (por
ex., o mecanismo de corte).
INSTALAÇÃO:
- Desembale a máquina e instale-a.
- Meter o contentor na armação.
- Ligue a
fi
cha da máquina (1) (Fig. 2) à rede
eléctrica (para indicações sobre o fusível de
entrada necessário da tomada de rede, veja
“DADOS TÉCNICOS”).
A ligação à rede eléctrica da máquina
tem de estar acessível, desimpedida
e perto da máquina!
A máquina só deve ser usada em
espaços fechados e com uma
temperatura amena (5 - 35 °C)!
315SC2
315CC3
315CC4
319SC2
319CC3
319CC4
Fig. 1
3
9
10
11
4
6
7
8
2
Fig. 2
Fig. 3
12
13
5
1
17
P
UTILIZAÇÃO
ENTRADA EM FUNCIONAMENTO
ELEMENTOS DE COMANDO:
1 = Ficha de ligação à rede (Fig. 2)
Quando se liga a máquina com a respectiva
fi
cha à rede eléctrica, ela
fi
ca em estado de
desligado.
2 = Botão das funções (Fig. 1)
“Operacional”/”Desligar”/”Parar”
Este botão inclui três funções:
a)
“Operacional”
Com um breve toque neste botão, a
máquina
fi
ca em estado “Operacional”.
Ao mesmo tempo, acende-se o indicador
LED integrado .
b)
“Desligar”
Mantendo este botão premido no
estado “Operacional” durante aprox. 3
segundos, a máquina desliga-se.
Nota:
Se a máquina não for usada
durante aprox. 5 minutos, desliga-se
automaticamente.
c)
“Parar”
Com um breve toque neste botão,
estando o mecanismo de corte a
funcionar, este desliga-se e pára.
3 = Botão de avanço (Fig. 1)
Este botão inclui duas funções:
a)
Com um breve toque neste botão, o
mecanismo de corte avança durante
alguns segundos, por ex. para fazer
sair o material cortado que tenha aí
fi
cado. Ao mesmo tempo, acende-se o
indicador LED integrado .
b)
Se este botão for mantido premido
durante aprox. dois segundos, o
mecanismo de corte gira continuamente
para a frente e a máquina pode ser
alimentada. Ao mesmo tempo, acende-
se o indicador LED integrado .
4 = Botão de retrocesso (Fig. 1)
Premindo este botão, o mecanismo de
corte gira, por instantes, para trás. Ao
mesmo tempo, acende-se o indicador LED
integrado .
5 = Dispositivo fotoeléctrico
(avanço) (Fig. 3)
Inicia o processo de trituração assim que
é introduzido material numa das duas
ranhuras de alimentação. Ao mesmo
tempo, acende-se o indicador LED do
botão de avanço.
6 = Indicador de controlo (Fig. 1)
“Congestionamento de material no
aparelho” / ”Alimentação de material em
paralelo” / „Barreira luminosa ocupada
ao retirar o contentor ou quando da
partida“
Para a descrição do procedimento, ver na
rubrica “FALHA”.
a)
“Congestionamento de
material no aparelho”
Acende-se quando é fornecido
demasiado material ao mecanismo de
corte. O mecanismo de corte bloqueia,
gira um pouco para trás e pára. O motor
desliga-se.
b)
“Alimentação de
material em paralelo”
Acende-se quando é introduzido
material ao mesmo tempo nas duas
ranhuras de alimentação. O mecanismo
de corte pára, gira um pouco para trás e
fi
ca parado. O motor desliga-se.
c)
“Barreira luminosa ocupada ao retirar
o contentor ou quando da partida”
Acende quando, ao retirar o contentor,
ainda há material em uma das duas
ranhuras de alimentação.
O mecanismo
de corte pára. O motor desliga-se.
d)
“Dispositivo fotoeléctrico
ocupado ao ligar”
Acende-se quando, ao ligar a máquina,
há material numa das duas ranhuras de
alimentação.
Tradução das instruções de serviço originais
Übersetzung der Originalbetriebsanleitung
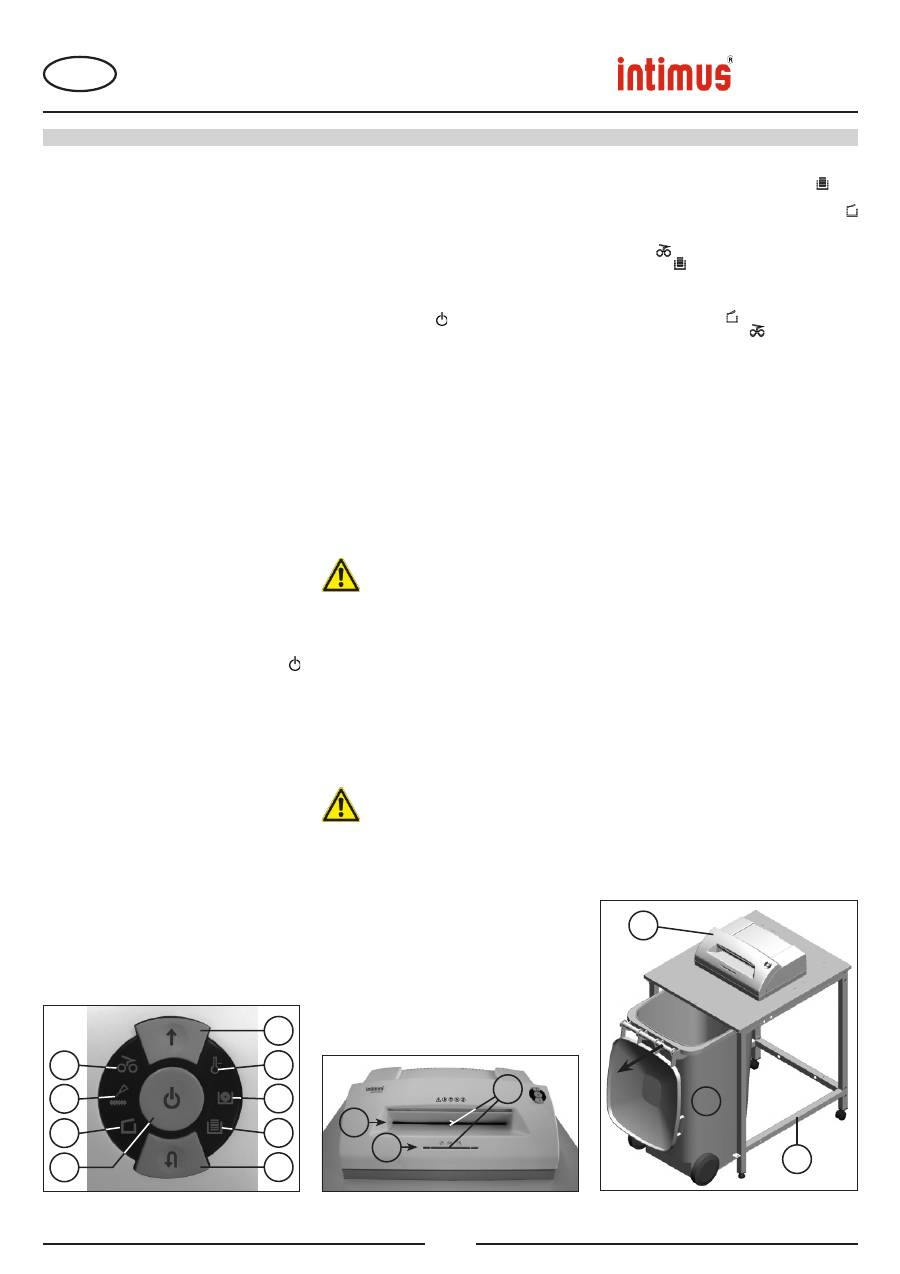
12 = Ranhura de
alimentação de papel (Fig. 3)
13 = Ranhura de
alimentação de CDs/DVDs (Fig. 3)
14 = Contentor (Fig. 4)
15 = Des
fi
bradora (Fig. 4)
16 = Armação (Fig. 6)
LIGAR A MÁQUINA:
Para ligar a máquina no modo “Operacional”,
proceda da seguinte forma:
- Prima por instantes o botão das funções (2).
- O indicador LED do botão das funções
(2) acende-se para indicar o modo
“Operacional”.
- A máquina pode ser alimentada.
ALIMENTAÇÃO DE MATERIAL:
Alimentar o mecanismo de corte com
papel
através da ranhura de alimentação de papel
(12) (Fig. 3).
Alimentar o mecanismo de corte com
suportes de dados
(CDs, DVDs ou cartões
de crédito) individualmente através da ranhura
de alimentação de CDs/DVDs disposto em
separado (13) (Fig. 3).
A máquina activa automaticamente a rotação
para a frente e puxa o material, desligando-
se automaticamente depois do processo de
destruição.
Durante a alimentação de papel,
nunca introduza, ao mesmo tempo,
CDs/DVDs e vice-versa!
Nota:
Para a destruição de películas
transparentes, a máquina tem de ser mudada
manualmente para a rotação para a frente
(mantenha premido o botão de avanço (3)
durante, aprox., 2 segundos).
Com um breve toque no botão das funções (2)
(função “Parar”), o processo de destruição pode
ser parado em qualquer altura. Para continuar,
mantenha premido o botão de avanço (3)
durante, aprox., 2 segundos.
Se a máquina não for usada durante aprox. 5
minutos, desliga-se automaticamente.
Nunca alimente o aparelho com uma
quantidade de material superior
à máxima indicada (veja “DADOS
TÉCNICOS”)!
Se, mesmo assim, alguma vez
entrar demasiado material no
mecanismo de corte, veja “FALHA”,
em “CONGESTIONAMENTO DE
MATERIAL NO APARELHO”.
ELEMENTOS DE COMANDO:
7 = Indicador de controlo (Fig. 1)
“Olear o mecanismo de corte”
Acende-se quando o mecanismo de corte
da versão de corte cruzado (“cross-cut“)
precisa de ser oleado. A lubri
fi
cação tem de
ser con
fi
rmada com o botão de retrocesso
(4) (veja a descrição em “MANUTENÇÃO
DO MECANISMO DE CORTE”).
8 = Indicador de controlo (Fig. 1)
“Contentor retirado” /
”Falha
eléctrica”
a)
“Contentor retirado”
Acende quando o contentor foi retirado.
A máquina é desligada de modo
automático e não pode ser ligada
enquanto o contentor não for novamente
inserido.
b)
“Falha eléctrica”
Pisca
quando a análise sensorial
regista uma falha eléctrica referente
à situação “Contentor não inserido“. A
máquina desliga-se. Informe o vendedor
autorizado.
9 = Indicador de controlo (Fig. 1)
“Sobrecarga do motor”/
“Falha
eléctrica”
Para a descrição do procedimento, ver na
rubrica “FALHA”.
a)
“Protecção do motor”
Acende-se quando o motor é
sobrecarregado e se desliga por esse
motivo. Durante a fase de arrefecimento
do motor, a máquina não pode ser
colocada em funcionamento.
b)
“Falha eléctrica”
Pisca
se houver alguma falha eléctrica
na placa de circuitos impressos. Ao
mesmo tempo, o indicador LED
do interruptor de funcionamento (2)
pisca. A máquina desliga-se. Informe o
vendedor autorizado.
10 = Indicador de controlo não ocupado
11 = Indicador de controlo
“Contentor cheio” (Fig. 1)
Acende quando o contentor está cheio
e deve ser esvaziado. O mecanismo de
corte para destruição de papel desliga-se.
Nota:
O mecanismo de corte para a
destruição de CDs/DVDs pode continuar a
funcionar.
ESVAZIAR O CONTENTOR (Fig. 4):
Quando o contentor (14) está cheio, a máquina
desliga-se. O indicador de controlo (11)
acende-se. Proceda da seguinte forma:
- Retirar o contentor. O indicador de controlo
(8) acende-se. Se ainda houver material numa
das ranhuras de alimentação, o indicador de
controlo (6) também se acende. O indicador
de controlo (11) apaga-se.
- Voltar a inserir, conforme indicado, o contentor
(14) esvaziado até o ponto de esbarro, abaixo
da des
fi
bradora (15) na armação (16). O
indicador de controlo (8) apaga-se.
- Se o indicador de controlo
(6) estiver aceso
,
prima o botão de avanço (3) por instantes. O
material restante na ranhura de alimentação é
destruído e o indicador apaga-se.
Nota:
A máquina só trabalha com o contentor
completamente inserido!
INDICAÇÃO DINÂMICA DA CARGA:
Para evitar um congestionamento de material
e conseguir, assim, uma inutilização contínua
e e
fi
caz dos suportes de dados, durante o
processo de destruição, é indicado o grau de
carga do motor nesse momento através de uma
luz difusa com a cor apropriada na ranhura de
alimentação:
Luz verde:
Carga < 50 %
Luz amarela:
Carga 50 % - 75 %
Luz vermelha:
Carga 75 % - 100%
315SC2
315CC3
315CC4
319SC2
319CC3
319CC4
Fig. 1
3
9
10
11
4
6
7
8
2
Fig. 4
Fig. 3
15
16
14
12
13
5
18
P
UTILIZAÇÃO
Tradução das instruções de serviço originais
Übersetzung der Originalbetriebsanleitung
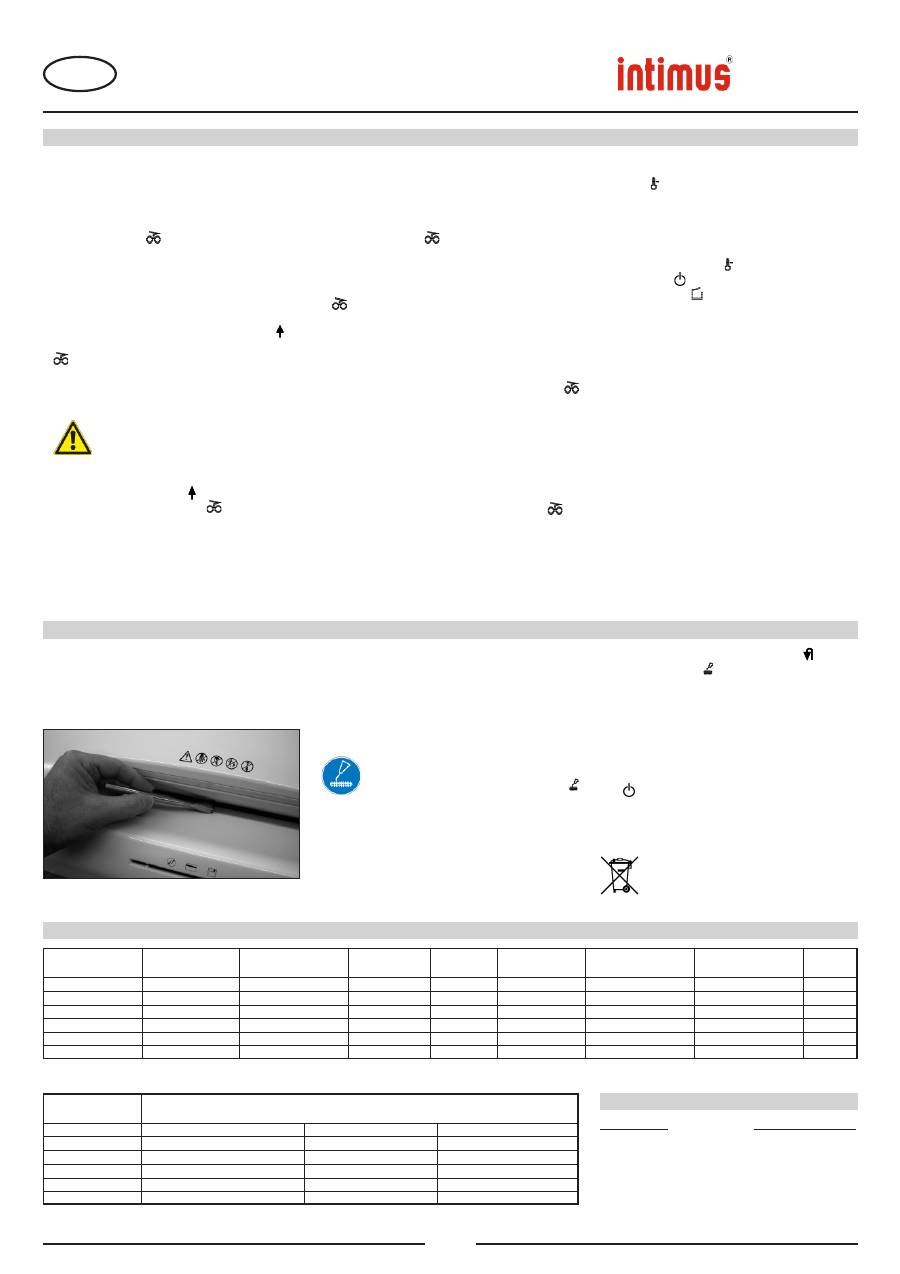
CONGESTIONAMENTO DE MATERIAL NO APARELHO:
(Função Auto-Reverse)
Em caso de congestionamento devido a fornecimento de
demasiado material, a máquina reage da seguinte forma:
- O mecanismo de corte bloqueia, retrocede um pouco (o
material é desbloqueado) e pára. O motor desliga-se. O
indicador de controlo
(6) acende-se.
Proceda da seguinte forma:
Congestionamento de papel na respectiva ranhura de
alimentação (12)
- Retire o papel reconduzido.
- O mecanismo de corte gira agora automaticamente para a
frente e destrói o papel que resta no mecanismo de corte.
Durante a rotação para a frente, o indicador LED do
botão de avanço (3) acende-se. O indicador de controlo
(6) apaga-se.
- Continue a destruição com menos quantidade de papel.
Congestionamento de material na ranhura de
alimentação de CDs/DVDs (13)
- Retire o material reconduzido.
Retire o material com cuidado, pois as
arestas de corte a
fi
adas podem causar
ferimentos!
- O material restante é reconduzido automaticamente para
o mecanismo de corte e destruído. Durante a rotação
para a frente, o indicador LED do botão de avanço (3)
acende-se. O indicador de controlo
(6) apaga-se.
- Depois de o material ter passado, continue com a
destruição na quantidade certa.
- Se necessário, vá alternando manualmente entre rotação
para a frente e para trás do mecanismo de corte até todo
o material estar completamente inserido e destruído.
ALIMENTAÇÃO DE MATERIAL EM PARALELO:
Se for introduzido material, ao mesmo tempo, nas duas
ranhuras de alimentação, a máquina reage da seguinte
forma:
- O mecanismo de corte bloqueia, retrocede um pouco (o
material é desbloqueado) e pára. O motor desliga-se. O
indicador de controlo
(6) acende-se.
- Retire o material de uma das ranhuras de alimentação.
- Prima o botão de avanço (3) por instantes. O material de
corte da outra ranhura de alimentação é conduzido ao
mecanismo de corte e destruído. O indicador de controlo
(6) apaga-se.
BARREIRA LUMINOSA OCUPADA
AO RETIRAR O CONTENTOR:
Caso ainda haja material em uma das duas ranhuras de
alimentação, quando retirar o cotentor, o motor desliga-se
e o mecanismo de corte pára. O indicador de controlo
(6) acende-se.
Volte a inserir o contentor e con
fi
rme a situação actual
premindo brevemente o botão de avanço (3). O material
de corte existente é conduzido ao mecanismo de corte e
destruído.
DISPOSITIVO FOTOELÉCTRICO OCUPADO AO LIGAR:
Se, ao ligar a máquina, houver material numa das duas
ranhuras de alimentação, o indicador de controlo
(6)
acende-se.
Retire o material e con
fi
rme o estado premindo o botão de
avanço (3) por instantes.
PROTECÇÃO DO MOTOR:
Se estiver sobrecarregado, o motor desliga-se. O indicador
de controlo (9) acende-se.
Após um período de arrefecimento de aprox. 25 a 40 minutos
(conforme o modelo e a temperatura ambiente), pode voltar
a ligar o aparelho.
FALHA ELÉCTRICA:
Se o indicador de controlo (9)
piscar
juntamente com
o indicador LED do botão das funções (2) ou apenas o
indicador de controlo (8), é porque há uma falha eléctrica.
Não é possível colocar a máquina em funcionamento.
Neste caso, informe o seu revendedor autorizado.
LISTA DE CONTROLO EM CASO DE FALHA:
Se o aparelho não funcionar, veri
fi
que os seguintes pontos:
- A
fi
cha
está ligada à rede?
- O
contentor
está inserido?
- O
contentor (14)
está cheio?
Siga as instruç
õ
es ”ESVAZIAR O CONTENTOR“.
- Há
congestionamento de material
no aparelho?
Siga as instruções em “CONGESTIONAMENTO DE
MATERIAL NO APARELHO”.
- O
motor
fi
cou sobrecarregado?
Veja em “PROTECÇÃO DO MOTOR”.
Se nenhum destes pontos de veri
fi
cação se aplicar,
informe o seu revendedor autorizado.
315SC2
315CC3
315CC4
319SC2
319CC3
319CC4
Fig. 5
- Mantenha premido o botão de retrocesso (4) até o
indicador de controlo (7) se apagar.
O mecanismo de corte inicia automaticamente um ciclo de
limpeza (rotação para a frente e para trás) e desliga-se. A
máquina volta ao estado operacional. Para encomendar o
óleo especial, consulte “ACESSÓRIOS ESPECIAIS”.
ECONOMIZAÇÃO AUTOMÁTICA DE ENERGIA:
Se a máquina não for usada durante algum tempo, desliga-
se automaticamente depois de aprox. 5 min. O indicador
LED do botão das funções (2) do modo “Operacional”
apaga-se. Para a voltar a ligar, prima por instantes o botão
das funções.
ELIMINAR A MÁQUINA:
No
fi
m da sua vida útil, elimine a máquina da forma
menos prejudicial para o ambiente. Não deite
nenhuma peça da máquina nem da embalagem
no lixo doméstico.
19
P
* Referente a papel A4 70g/m
2
com 230V/50Hz -10%
Modelo
Dados de conexão à rede
Tensão de conexão / Frequência / Consumo de corrente
intimus 315/319SC2
220-230V/50Hz, 7,8 A
115-125V/60Hz, 14,9 A
100V/50/60Hz, 18,0 A
intimus 315/319SC2
220-230V/50Hz, 7,8 A
115-125V/60Hz, 14,9 A
100V/50/60Hz, 18,0 A
intimus 315/319CC3
220-230V/50Hz, 7,8 A
115-125V/60Hz, 14,9 A
100V/50/60Hz, 18,0 A
intimus 315/319CC4
220-230V/50Hz, 7,8 A
115-125V/60Hz, 14,9 A
100V/50/60Hz, 18,0 A
Modelo
Largura do corte
Produtividade do corte Lagura de trabalho
Potência
Nivel de ruido
Serviço intermitente
Dimensões
Peso
papel / CD,DVD
papel / CD,DVD
LIGAR / DESLIGAR
L x P x A
intimus 315/319SC2
5,8 mm / 8 mm
35-38 folhas* / 1 unidade
310 mm
1,8 kW
57 dB(A) (aprox)
45 / 60 min
790 x 926 x 1297 mm
81/98 kg
intimus 315/319SC2
3,8 mm / 8 mm
31-33 folhas* / 1 unidade
310 mm
1,8 kW
57 dB(A) (aprox)
45 / 60 min
790 x 926 x 1297 mm
81/98 kg
intimus 315/319CC3
3,8x36 mm / 8 mm 23-25 folhas* / 1 unidade
310 mm
1,8 kW
57 dB(A) (aprox)
45 / 60 min
790 x 926 x 1297 mm
82/99 kg
intimus 315/319CC4
1,9x15 mm / 8 mm 15-17 folhas* / 1 unidade
310 mm
1,8 kW
57 dB(A) (aprox)
45 / 60 min
790 x 926 x 1297 mm
82/99 kg
DADOS TECNICOS
ACESSORIOS ESPECIAIS
Designação
N° de encomenda
Frasco de óleo, 110 ml
88035
Indicação:
No caso de encomendar mais tarde
peças dos acessórios especiais e no caso de
necessitar peças de reposição, dirija-se ao seu
revendedor especializado.
MANUTENÇAO / DISPOSIÇÃO
AVARIAS
LIMPEZA DAS CÉLULAS FOTOELÉCTRICAS (Fig. 5):
Se
fi
carem pedaços de papel na ranhura de alimentação (por
ex. depois de um congestionamento de papel) é possível
que o aparelho já não se desligue porque o dispositivo
fotoeléctrico detecta o estado “ocupado”.
Pode retirar os pedaços de papel ou limpar a célula
fotoeléctrica introduzindo mais uma folha de papel no
mecanismo de corte ou activando a rotação inversa da
máquina e, com um pincel, limpar por instantes o dois
“olhos” da célula fotoeléctrica.
MANUTENÇÃO DO MECANISMO
DE CORTE CRUZADO (“CROSS-CUT”):
Os mecanismos de corte cruzado (“cross-cut“)
têm de ser lubri
fi
cados depois de um determinado
tempo de operação. Se o indicador de controlo
(7) se acender, proceda da seguinte forma:
Distribua um pouco de óleo numa folha de papel e introduza-
a no mecanismo de corte pela ranhura de alimentação de
papel (12). O papel é puxado e o óleo entra no mecanismo
de corte.
Nota: Para apagar a indicação, depois de lubri
fi
car o
mecanismo de corte, con
fi
rme o procedimento desta
forma:
Tradução das instruções de serviço originais
Übersetzung der Originalbetriebsanleitung

IMPORTANTI ISTRUZIONI DI SICUREZZA
<< Pericolo di lesioni!
Evitare
l‘avvicinamento alla bocca
d‘immission di parti di indu-
menti, cravatte, monili, capelli
lunghi o altri oggetti sciolti!
<< Pericolo di lesioni!
Non avvicinarsi con le
dita alla bocca d‘immissione!
<< IIn casi di pericolo disinnestare la mac-
china mediante l‘interruttore principale,
oppure tramite il pulsante d‘emergenza o
staccando la spina!
<< Innanzi l‘apertura della macchina staccare
la spina!
Eventuali riparazioni andranno eseguite
esclusivamente da personale specializzato!
<< L‘apparecchio non deve essere usato
contemporaneamente da più persone!
La disposizione degli elementi di sicurezza si
basa su un uso esente da pericoli in „Funzio-
namento con un solo operatore“.
<< Durante il procedimento di trinciatura è
proibito altri lavori alla macchina /ad es.
interventi di pulizia ecc.)!
<< Questa macchina non è un giocattolo e
non è pertanto adatta all’uso da parte di
bambini!
La concezione di sicurezza della macchina
(dimensioni, aperture di alimentazione,
interdizioni di sicurezza ecc.) non prevede una
manipolazione sicura da parte dei bambini.
CAMPO D’IMPIEGO:
Il distruggi documenti
intimus 315/319SC2/CC3/CC4
serve a frantumare carta nonché supporti di dati come
CD, DVD, carte di credito e dischetti da 3,5 pollici.
Il distruggi documenti deve essere utilizzato
esclusivamente per frantumare carta e carte
di credito nonché CD, DVD e dischetti da 3,5
pollici!
La frantumazione di supporti di dati diversi può
causare il danneggiamento dell’apparecchio (ad
es. la distruzione dell’utensile di taglio ecc.).
MESSA IN OPERA:
- Disimballare e mettere in opera l’apparecchio.
- Inserire il cestino nella struttura.
- Allacciare l’apparecchio alla rete elettrica inserendo il
connettore (1) (Fig. 2) in una presa di corrente (per
i dati sul prefusibile necessario della presa di rete
consultare il capitolo “DATI TECNICI”).
La presa di rete dell’apparecchio
deve essere liberamente accessibile e
trovarsi preferibilmente nelle vicinanze
dell’apparecchio!
L’apparecchio dovrebbe essere utilizzato
solamente in ambienti chiusi e temperati
(5-35°C)!
Fig. 1
3
9
10
11
4
6
7
8
2
Fig. 2
12
13
Fig. 3
5
315SC2
315CC3
315CC4
319SC2
319CC3
319CC4
1
20
I
USO
MESSA IN FUNZIONE
ELEMENTI DI COMANDO:
1 = Connettore (Fig. 2)
Dopo aver inserito il connettore nella presa di
rete, l’apparecchio è inizialmente spento.
2 = Tasti funzione (Fig. 1)
“Pronto per l’uso” / “Off” / “Stop”
Questo tasto ha tre funzioni:
a)
“Pronto per l’uso”
Premendo brevemente il tasto, l’apparecchio
passa allo stato “pronto per l’uso”.
Contemporaneamente si accende l’indicatore
a LED integrato .
b)
“Off”
Se si preme questo tasto per ca. 3 secondi
mentre è attivo lo stato “pronto per l’uso”,
l’apparecchio si disinserisce.
Nota:
l’apparecchio si disinserisce
automaticamente se non viene utilizzato per
ca. 5 minuti.
c)
“Stop”
Premendo brevemente il tasto con l’utensile
di taglio in funzione, quest’ultimo viene
disinserito e si arresta.
3 = Tasto di corsa in avanti (Fig. 1)
Questo tasto ha due funzioni:
a)
Premendo brevemente il tasto, l’utensile di
taglio esegue una breve corsa in avanti, ad
es. per condurre fuori del materiale rimasto
nell’utensile. Contemporaneamente si
accende l’indicatore a LED integrato .
b)
Se si mantiene premuto il tasto per ca. 2
secondi, l’utensile di taglio si sposta in avanti
in modalità continua e l’apparecchio può
essere caricato. Contemporaneamente si
accende l’indicatore a LED integrato .
4 = Tasto di corsa indietro (Fig. 1)
Premendo il tasto, l’utensile di taglio esegue
una breve corsa indietro. Contemporaneamente
si accende l’indicatore a LED integrato .
5 = Fotocellula (corsa in avanti) (Fig. 3)
Avvia la frantumazione non appena si trova del
materiale in uno dei due vani di alimentazione.
Contemporaneamente si accende l’indicatore a
LED del tasto di corsa in avanti.
6 = Indicatore di controllo (Fig. 1)
“Inceppamento di materiale nell’apparecchio”
/ “Alimentazione parallela di materiale” /
„Fotocellula attiva durante l’estrazione o
l‘accensione del cestino“
Per le istruzioni consultare la rispettiva
descrizione nel capitolo “GUASTO”.
a)
“Inceppamento di
materiale
nell’apparecchio”
Si accende in caso di eccessiva alimentazione
di materiale nell’utensile di taglio. L’utensile
di taglio si blocca, esegue quindi una breve
corsa indietro e si arresta. Il motore viene
disinserito.
b)
“Alimentazione parallela di materiale”
Si accende in caso di alimentazione
contemporanea di materiale in entrambi i
vani. L’utensile di taglio si blocca, esegue
quindi una breve corsa indietro e si arresta.
Il motore viene disinserito.
c)
“Fotocellula attiva
durante l’estrazione del cestino”
Si illumina se, in fase di estrazione del
cestino, è rimasto del materiale all’interno
di uno dei due vani di alimentazione.
L’utensile di taglio si arresta. Il motore viene
disinserito.
d)
“Fotocellula occupata all’inserimento”
Si accende quando all’inserimento
dell’apparecchio si trova del materiale in uno
dei due vani di alimentazione.
Traduzione del manuale originale di istruzioni per l’uso
Übersetzung der Originalbetriebsanleitung
