Kaiser EG63...: instruction
Class: Kitchen Appliances
Type: Oven
Manual for Kaiser EG63...
USER MANUAL
EN
DE
RU
GEBRAUCHSANWEISUNG
ИНСТРУКЦИЯ ПО ОБСЛУЖИВАНИЮ И ЭКСПЛУАТАЦИИ
EG ...
BUILT IN GAS OVEN
EINBAUGASBACKOFEN
ВСТРАИВАЕМЫЙ
ГАЗОВЫЙ
ДУХОВОЙ ШКАФ

2
EN
DEAR CUSTOMERS,
thank you for purchasing this Kaiser product.
We are convinced that you have made a right choice.
This product which satisfies the high quality demands
and corresponds to world comprehensive standards
realizes your cookeries, and his modern appearance
which has been developed by the best European
designers will decorate your kitchen splendidly.
We ask you to read the operating instructions before
usage thoroughly. The consideration of
recommendations protects you from possible
inconveniences which can appear as a result of the
wrong use of the oven, and allows you to reduce the
consumption of gas and electrical energy. If the use
corresponds to the present operating instructions, the
oven will bring you a lot of pleasure for a long time.
Our ovens correspond to the main demands of the
security, hygiene and environment protection, according
to the directives of the EU which is confirmed with
certificates DIN ISO 9001, ISO 1400, according to the
norms counting within the frames of the EU, they also
correspond to the Gosstandart of Russia, standards of
the CIS, which is confirmed with the corresponding
certificates.
With the thoughts of a constant improvement of the
quality of our ovens the changes in design and
equipment which lead only to positive changes of the
technical qualities are reserved by the manufacturer.
We wish you an effective use of our oven.
Yours faithfully
OLAN-Haushaltsgeräte
Berlin Germany
We Inform you that our devices which are the object of the present
operating instructions are precertain exclusively for the domestic
use.

3
DE
RU
LIEBE KUNDIN, LIEBER KUNDE,
wir danken Ihnen für den Erwerb unserer Technik.
Wir sind überzeug, dass Sie eine richtige Wahl getroffen
haben. Dieses Produkt, das die hohen Forderungen zur
Qualität befriedigt und weltumfassenden Standards
entspricht, verwirklicht Ihre Kochkünste, und sein
modernes Aussehen, das von besten europäischen
Designer entwickelt worden ist, wird Ihre Küche
prächtig schmücken.
Wir bitten Sie die Bedienungsanleitung vor der Nutzung
aufmerksam zu lesen. Die Beachtung von Empfehlungen
schützt Sie von eventuellen Unannehmlichkeiten, die als
Folge der falschen Nutzung des Backofens auftreten
können, und ermöglicht Ihnen den Verbrauch von Gas
und Elektroenergie zu reduzieren. Der Backofen bringt
Ihnen viel Vergnügen auf lange Zeit, wenn der
Gebrauch der vorliegenden Bedienungsanleitung
entsprechen wird.
Unsere Backöfen entsprechen den Hauptforderungen
der Sicherheit, der Hygiene und des Umweltschutzes,
laut den Direktiven der EU, was mit Zertifikaten DIN
ISO 9001, ISO 1400, entsprechend den im Rahmen der
EU geltenden Normen, bestätigt ist, und genauso auch
den Anforderungen von Gosstandart in Russland und
Standards anderer GUS Länder, was durch die
Identifikationszertifikate bestätigt ist.
Mit den Gedanken der ständigen Verbesserung der
Qualität unserer Backöfen sind Änderungen bei Design
und Einrichtung, die nur zu positiven Veränderungen
der technischen Eigenschaften führen, vom Hersteller
vorbehalten.
Wir wünschen Ihnen die effektive Nutzung unseres
Backofens.
Hochachtungsvoll
OLAN-Haushaltsgeräte
Berlin Germany
Wir Informieren Sie, dass unsere Geräte, die der Gegenstand der
vorliegenden Bedienungsanleitung sind, sind ausschließlich für den
häuslichen Gebrauch vorbestimmt.
УВАЖАЕМЫЙ ПОКУПАТЕЛЬ,
благодарим Вас за приобретение нашей техники.
Мы уверены, что Вы сделали правильный выбор.
Данный продукт, удовлетворяющий самым высоким
требованиям и отвечающий мировым стандартам,
позволит Вам легко воплотить все Ваши
кулинарные способности, а его современный вид,
разработанный
лучшими
европейскими
дизайнерами, великолепно украсит Вашу кухню.
Просим Вас внимательно прочитать инструкцию
по обслуживанию и эксплуатации до пуска
устройства. Соблюдение содержащихся в ней
рекомендаций защитит Вас от возможных
неприятностей при неправильной эксплуатации
духового шкафа, а также позволит Вам уменьшить
расход газа и электроэнергии. Если эксплуатация
духового
шкафа
будет
соответствовать
настоящей инструкции, наш духовой шкаф будет
радовать Вас долгое время.
Наши духовые шкафы полностью соответствуют
основным требованиям безопасности, гигиены и
защиты окружающей среды, согласно директивам
Европейского
Союза,
что
подтверждено
сертификатами DIN ISO 9001, ISO 1400, в
соответствии
с
настоящими
нормами,
действующими на территории Европейского
сообщества, a также полностью отвечают всем
требованиям Госстандарта России и стандартов
других стран СНГ, что подтверждается
сертификатами соответствия.
С мыслью о дальнейшем повышении технических и
эксплуатационных характеристик наших духовых
шкафов мы оставляем за собой право на внесение
изменений в дизайн и устройство, влияющих только
положительно на потребительские качества и
свойства продукта.
Желаем Вам эффективного пользования духовым
шкафом нашей фирмы.
Уважающий Вас
OLAN-Haushaltsgeräte
Berlin Germany
Информируем, что наши приборы, являющиеся предметом
настоящей Инструкции, предназначены исключительно для
домашнего пользования.

4
EN
CONTENTS
INSTALLATION INSTRUCTIONS
6
Electrical connection
6
Gas connection
8
Conversion to a different gas type
10
Installation of the oven
14
SAFETY CONDITIONS
18
BRIEF DESCRIPTION
22
Control panel
22
EQUIPMENT AND USAGE
24
Preparation
24
Oven temperature control
26
Electric grill
28
Digital clock timer with sensor
Touch control
of
the ovens
CHEF
30
Spit
42
PRACTICAL ADVISES
44
CARE AND ATTENDANCE
50
RESPECT FOR THE ENVIRONMENT
56

5
DE
RU
INHALTSVERZEICHNIS
FÜR DEN INSTALLATEUR
7
Stromanschluss
7
Gasanschluss
9
Umstellen auf einen anderen Gastyp
11
Einbau des Backofens
15
SICHERHEITSBEDINGUNGEN
19
KURZBESCHREIBUNG
23
Bedienblende
23
AUSSTATUNG UND BENUTZUNG
25
Vorbereitung
25
Temperatureinstellung
27
Elektrogrill
29
Elektronische Zeitschaltuhr mit Sensor
Touch
control
von Backöfen
CHEF
31
Bratspieß
43
PRAKTISCHE EMPFEHLUNGEN
45
PFLEGE UND WARTUNG
51
UMWELTVERTRÄGLICHKEIT
57
ОГЛАВЛЕНИЕ
ИНСТРУКЦИЯ ПО МОНТАЖУ
7
Подключение к электросети
7
Подключение к газу
9
Переключение на другой тип газа
11
Установка духового шкафа
15
УСЛОВИЯ БЕЗОПАСНОСТИ
19
КРАТКОЕ ОПИСАНИЕ
23
Панель управления
23
ОБОРУДОВАНИЕ И ИСПОЛЬЗОВАНИЕ
25
Подготовка
25
Установка температуры
27
Электрический гриль
29
Сенсорное электронное программирующее
устройство
Touch control
духовок
CHEF
31
Вертел
43
ПРАКТИЧЕСКИЕ СОВЕТЫ
45
ОБСЛУЖИВАНИЕ И УХОД
51
ОХРАНА ОКРУЖАЮЩЕЙ СРЕДЫ
57
6
EN
INSTALLATION INSTRUCTIONS
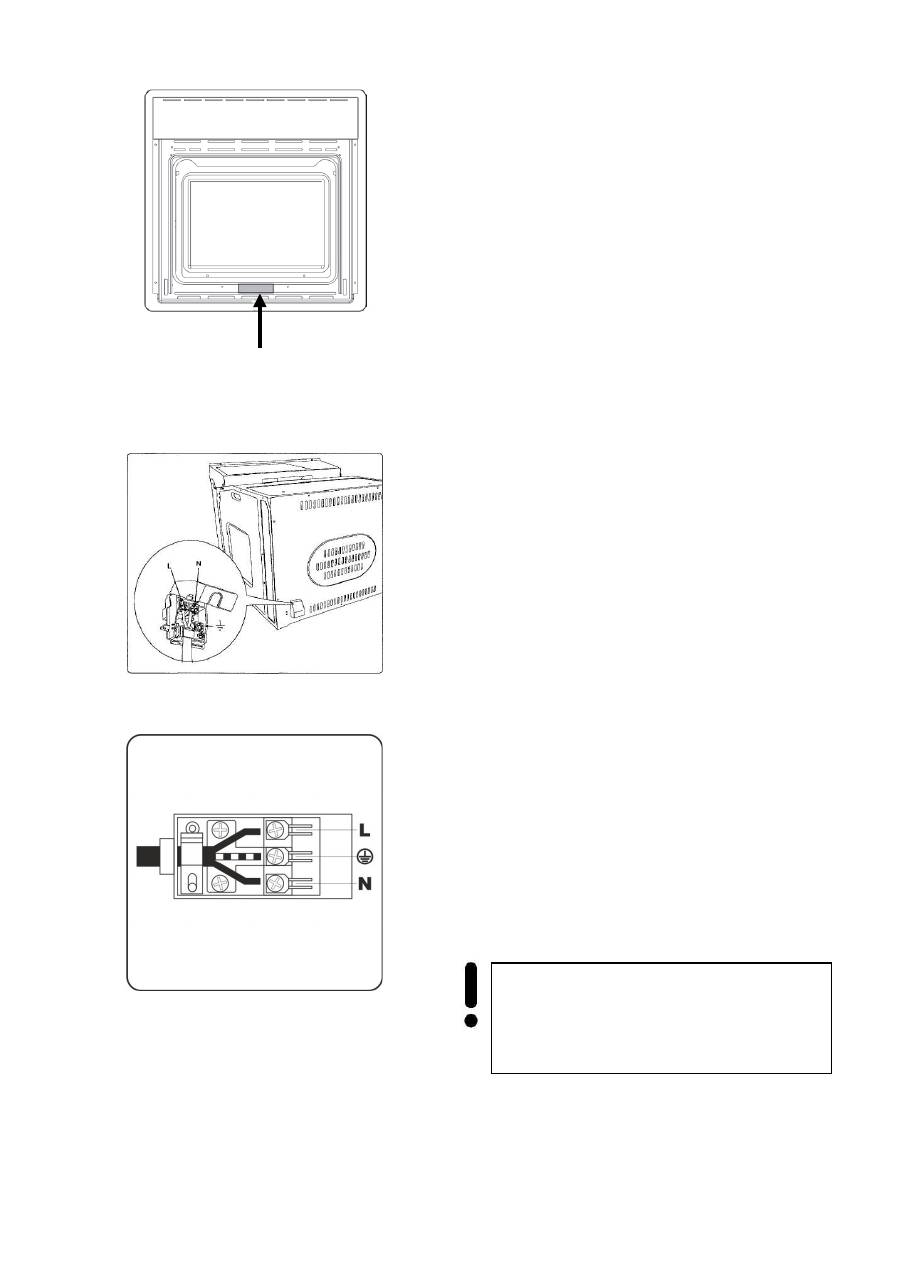
ELECTRICAL CONNECTION
Before connecting the oven to the mains power
supply, make sure that:
•
the supply voltage corresponds to the
specifications on the data plate
1
on the
front of the oven,
•
the mains supply has an efficient ground
connection complying with all applicable
laws and regulations.
Correct grounding is a legal requirement. If the
appliance is not pre-fitted with a power cable
and/or plug, use only suitable cables and plugs
capable of handling the power specified on the
appliance's data plate
1
and capable of resisting
heat. The power cable should never reach a
temperature 50°C above ambient temperature at
any point along its length.
If the appliance is to be connected directly to
mains terminals, fit a switch with minimum
aperture of 3 mm between the contacts. Make sure
that the switch is of sufficient capacity for the
power specified on the appliance's data plate, and
compliant with applicable regulations. The switch
must not break the yellow-green earth wire. The
socket or switch must be easily reachable with the
oven fully installed.
Cable types and diameters
230V H05VV-F 3 x 1.0 mm²
1
Attention!
The manufacturer declines all
responsibility for damage or injury if the
above instructions and normal safety
precautions are not respected
7
DE
RU
FÜR DEN INSTALLATEUR
STROMANSCHLUSS
Vor der Durchführung des Stromanschlusses muss
sichergestellt werden, dass:
•
die Eigenschaften des Stromnetzes mit den
Werten auf dem angebrachten Typenschild
1
, das bei geöffneter Backofentür sichtbar
ist, übereinstimmen,
•
das Stromnetz gemäß den geltenden
Bestimmungen und Rechtsvorschriften
geerdet ist.
Die Erdung ist eine notwendige Voraussetzung der
Nutzung des Gerätes. Falls der Backofen mit
keinem Kabel und/oder Netzstecker ausgestattet
ist, muss geeignetes Material verwendet werden,
das den Werten auf dem Typenschild des Gerätes
1
entspricht. Das Kabel darf an keiner Stelle
keinesfalls eine Temperatur von über 50°C
erreichen.
Wenn ein direkter Netzanschluss gewünscht wird,
muss ein allpoliger Schalter mit Kontaktöffnung von
min. 3mm vorgesehen werden, der erlaubt das
Gerät vom Netz zu trennen, der den technischen
Daten der geltenden Vorschriften entsprechen
muss (das gelb-grüne Erdungskabel darf nicht vom
genannten Schalter unterbrochen werden). Der
Stecker bzw. der allpolige Schalter müssen bei
dem installierten Gerät problemlos zugänglich sein.
Kabeltyp und Durchmesser
230V H05VV-F 3 x 1.0 mm²
ИНСТРУКЦИЯ ПО МОНТАЖУ
ПОДКЛЮЧЕНИЕ К ЭЛЕКТРОСЕТИ
Перед подключением духовки к эл. сети,
необходимо убедиться, что:
•
параметры сети соответствуют данным в
табличке
1
на фронтальной стенке
духовки, которая видна при открытии
дверцы,
•
эл. сеть заземлена в соответствии с
действующими предписаниями.
Заземление является необходимым условием
правильной эксплуатации. Если духовка не
оборудована
кабелем
и/или
штекером,
применяйте
только
материалы,
соответствующие
данным,
указанным
в
заводской табличке
1
. Кабель ни в коем случае
не должен нагреваться выше температуры
50°С.
В случае подсоединения непосредственно к эл.
сети, необходимо использовать специальный
автоматический выключатель с зазором между
контактами не менее 3 мм, позволяющий
отсоединять прибор от сети, соответственно
техническим
данным
действующих
предписаний
(желто-зеленый
кабель
заземления не должен прерываться данным
выключателем). Штекер или автоматический
выключатель, на правильно установленном
приборе, должен быть всегда легко досягаем.
Тип кабеля и сечение
230V H05VV-F 3 x 1.0 mm²
Внимание!
Изготовитель не несет
никакой ответственности, если при
установке прибора не соблюдаются все
вышеприведенные предписания.
Achtung!
Der Hersteller ist nicht haftbar,
wenn bei der Installation des Gerätes alle
oben angeführten Anweisungen nicht
befolgt werden.
8
EN
GAS CONNECTION
The oven is designed to operate with both natural
gas (methane) and liquid gas (LPG), and can be
easily converted from one type to another following
the instructions given in the relative section of this
booklet (Conversion to a different type of gas).
If the appliance is to operate with gas bottles
(LPG), a pressure regulator conforming to the
requirements.
Rigid pipe connection
Connection to the mains gas supply may be made
via a rigid pipe firmly attached to the fitting
1
, or
via a flexible stainless steel continuous-wall hose,
conforming to a maximum length of 2 meters.
The fitting
1
and seal
2
are supplied with the
appliance, and comply with standards.
Important:
Use two wrenches to turn the fitting
1
to the
required position. When the fitting is in the desired
position, firmly tighten nut
3
Cautions:
CHECK UP LEAK
PROOFNESS of the connection to the gas
supply pipe or gas cylinder using soap
suds only.
Don’t use open flame – danger to life!
Внимание!
Connection to the gas supply
and conversion to a different type of gas
must be carried out by qualified technicians
and in conformance with the requirements.
2
1
2
3
3
9
DE
RU
GASANSCHLUSS
Der Backofen kann mit Erdgas (Methan) oder
Flüssiggas betrieben und ganz einfach von einem
Gastyp auf den anderen umgestellt werden (siehe
Abschnitt „Umstellen auf einen anderen Gastyp“).
Wird das Gerät mit Flüssiggas aus einer
Gasflasche versorgt, muss der Druckregler gemäß
den geltenden Vorschriften benutzt werden.
Anschluss an die Gasleitung
Der Gasanschluss kann mit Hilfe eines steifen
Metallschlauches, der fest mit dem Anschluss
1
verbunden sein muss, oder des rostfreien
Stahlschlauchs oder des Schlauches mit der
Stahlspitze, hergestellt werden. Die maximale
Länge darf 2 m nicht überschreiten.
Der Anschluss
1
und die Dichtung
2
werden
zusammen mit dem Gerät als Zubehör geliefert
und entsprechen den Normen.
Wichtig:
Zum Installieren des Anschlusses
1
benutzen Sie
bitte zwei Schlüssel. Wenn der Anschluss in die
gewünschte Richtung zeigt, die Mutter
3
fest
anziehen.
ПОДКЛЮЧЕНИЕ К ГАЗУ
Духовка может работать на природном (метан)
или сжиженном газе и очень просто
переключаться с одного типа газа на другой
(см. раздел „Переключение на другой тип газа“).
Если прибор потребляет сжиженный газ из
газового баллона, регулятор давления должен
использоваться
в
соответствии
с
действующими предписаниями.
Подключение к источнику газа
Подсоединение к газу осуществляется с
помощью металлической трубы, которая плотно
подключается к соединению
1
, или с помощью
нержавеющего стального шланга или шланга со
стальным наконечником, свободная длина
которого не должна превышать 2-x метров.
Соединение
1
и уплотнение
2
поставляются в
комплекте с прибором как принадлежности и
соответствуют нормам.
Важно:
Для установки соединения
1
использовать два
ключа. Выставить соединение в нужном
направлении и плотно затянуть гайку
3
.
Внимание!
После подключения прибора к
газопроводу
или
газовому
балону
ПРОКОНТРОЛИРОВАТЬ
ГЕРМЕТИЧНОСТЬ соединений с помощью
мыльной пены.
Ни в коем случае не применять открытое
пламя.
Achtung!
Nach dem Anschließen des
Gerätes an das Gasnetz (bzw. die
Gasflasche) mit Seifenwasser
KONTROLLIEREN, ob der Anschluss
DICHT ist bzw. Gas austritt. Auf keinen
Fall einen Feuerzeug, einen Zündholz oder
offene Flamme anderer Art benutzen.
Внимание!
Подключение прибора к
газовому баллону или газопроводу и
переключение на другой тип газа должно
осуществляться квалифицированными
специалистами
в
соответствии
с
действующими предписаниями
Achtung!
Der Anschluss an das Gasnetz
und Umstellung auf einen anderen Gastyp
muss von einem Fachmann gemäß den
geltenden Vorschriften ausgeführt werden.
10
EN
CONVERSION TO A DIFFERENT TYPE OF
GAS
Before converting the appliance for operation with
a different gas type, check which type of gas it is
currently set to operate with (adhesive label
1
on
appliance).
For the correct nozzle diameter, refer to the table
“Nozzle Table”.
Conversion to a different gas type must be carried
out by qualified technicians and in conformance
with the requirements.
Conversion procedure:
•
Disconnect the electrical power supply to
the appliance,
•
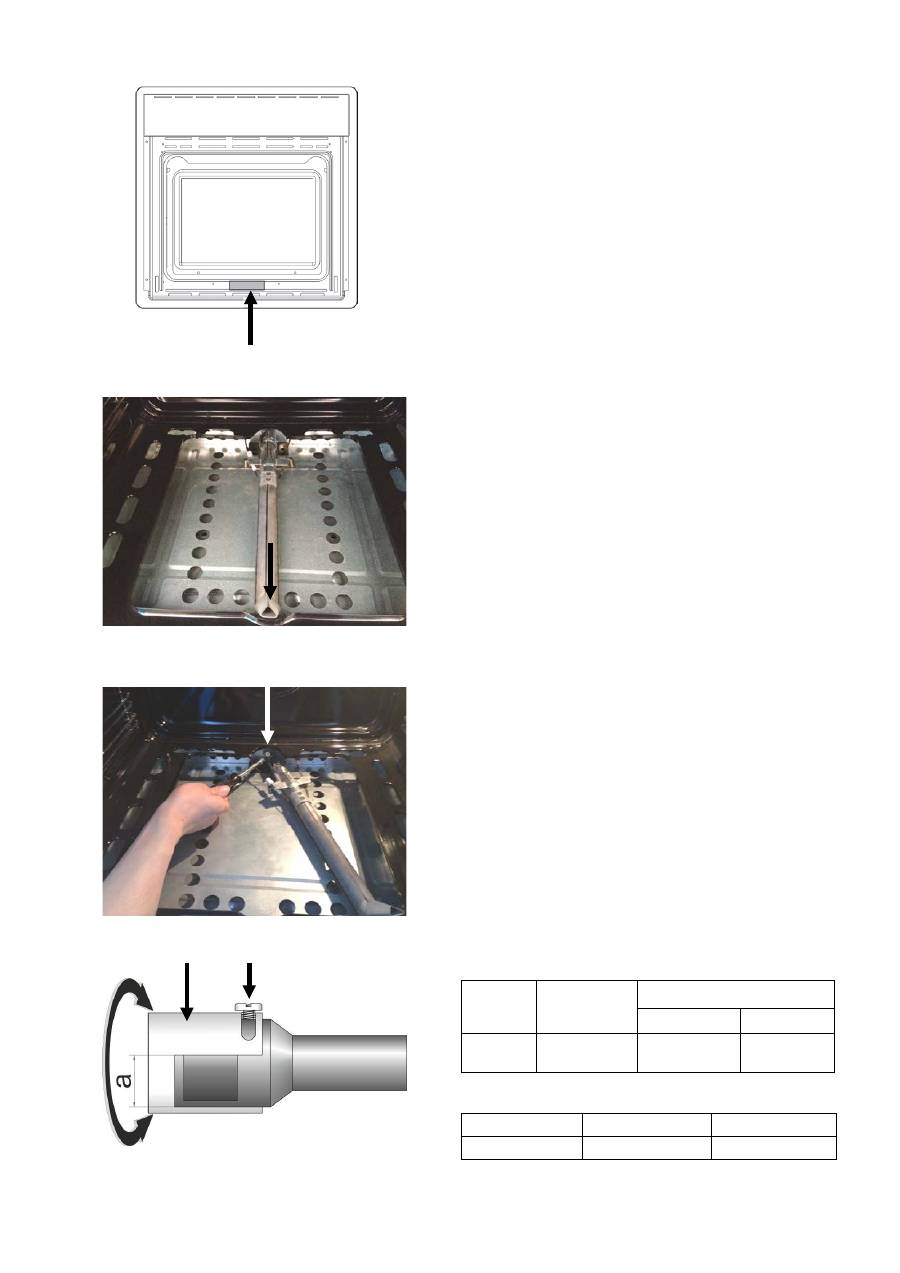
Change the main oven nozzle:
1. Remove the burner cover plate (see
«Removal of the burner cover plate»),
2. Remove the screws securing the oven
burner
2
and with draw the burner from the
support together with the heat sensor and
the ignition spark plug,
3. Remove the nozzle using a 7 mm box
wrench
3
,
4. Screw the new nozzle in fully (diameter in
hundredths of millimetre stamped on the
nozzle), taking care not to cross the thread,
5. Loosen the screw
4
and adjust according
to table the opening size
a
for air supply by
rotation of the sleeve
5
,
6. Tighten the screw
4
,
7. Replace the burner reversing the
operations in step 2 above,
8. Replace the cover plate.
NOZZLE TABLE
TABLE OPENING SIZE
Burner
Rated load
kW
Nozzle bore in mm
G20/20
G30/29
Oven
burner
2,50
1,18
0,77
Type of gas
Natural gas
Liquid gas
Size
a
, mm
6,4
15,0
1
2
3
4
5
11
DE
RU
UMSTELLEN AUF EINEN ANDEREN
GASTYP
Vor dem Umstellen auf einen anderen Gastyp den
Gastyp feststellen, auf den das Gerät eingestellt ist
(siehe Typenschild des Gerätes
1
).
Für den Düsendurchmesser siehe »Tabelle der
Düsen«.
Umstellung von einem Gastyp auf einen anderen
muss von einem Fachmann gemäß den geltenden
Vorschriften ausgeführt werden.
Vorgangsweise bei Umstellung auf einen anderen
Gastyp:
•
Das Gerät vom Stromnetz trennen,
•
Die Hauptdüsen des Backofens wie folgt
auswechseln:
1. Die Brennerabdeckung herausziehen (siehe
»Herausziehen des Bodens«),
2. Die Schrauben
2
, mit deren
der
Backofenbrenner befestigt ist,
ausschrauben und den Backofenbrenner
zusammen mit dem Heizelement und der
elektrischen Zündkerze herausnehmen,
3. Die Düse mit einem 7er-Steckschlüssel
3
herausschrauben,
4. Die neue Düse aufschrauben (Durchmesser
ist in Hundertstelmillimeter auf der Düse
eingestanzt) und dabei darauf achten, dass
das Gewinde exakt sitzt,
5. Die Schraube
4
lösen und die
Öffnungsgröße
a
für die Luftzufuhr
entsprechend der Tabelle durch Drehen der
Buchse
5
justieren,
6. Die Schraube
4
festziehen,
7. Den Brenner wieder montieren (wie oben in
Punkt 2, jedoch in umgekehrter
Reihenfolge)
8. Die Abdeckung wieder korrekt einsetzen.
TABELLE DER DÜSEN
TABELLE ÖFFNUNGSGRÖßE
Gastyp
Erdgas
Flüssiggas
Größe
a
, mm
6,4
15,0
Brenner Nennlast kW
Durchmesser der Düse
G20/20
G30/29
Backofen-
brenner
2,50
1,18
0,77
ПЕРЕКЛЮЧЕНИЕ НА ДРУГОЙ ТИП ГАЗА
Перед переключением на другой тип газа,
определить на какой тип газа настроен прибор
(
см. на заводской табличке
1
).
Данные диаметров форсунок указаны в
«
Таблице форсунок».
Переключение с одного типа газа на другой
должно осуществляться квалифицированным
специалистом в соответствии с действующими
предписаниями.
Порядок действий при переключении на другой
тип газа:
•
Прибор отключить от эл. сети,
•
Главные форсунки духовки заменить
следующим образом:
1.
Выдвинуть защитную крышку (см. раздел
«
Извлечение днища»)
2.
Вывернуть
винты
2
,
которыми
закреплена горелка духового шкафа,
и
вынуть её вместе с нагревающим
элементом и свечoй электроподжига,
3.
Вывернуть форсунку ключем на 7 мм
3
,
4.
Закрутить новую форсунку (диаметр
проштампован на форсунке в сотых
долях миллиметра), при этом обратить
внимание на состояние резьбы,
5.
Ослабить винт
4
и отрегулировать в
соответствии с таблицей размер окна
a
для подачи воздуха поворотом втулки
5
,
6.
Закрутить винт
4
,
7.
Монтировать горелку (как описано выше
в пункте 2, только в обратной
последовательности),
8.
Днище правильно поместить обратно.
ТАБЛИЦА ФОРСУНОК
ТАБЛИЦА РАЗМЕР ОКНА
Горелка Номинальная
мощность кВт
Диаметр форсунки в мм
G20/20
G30/29
Горелка
духовки
2,50
1,18
0,77
Тип газа
Природный
Пропан-бутан
Размер
a
, мм
6,4
15,0
12
EN
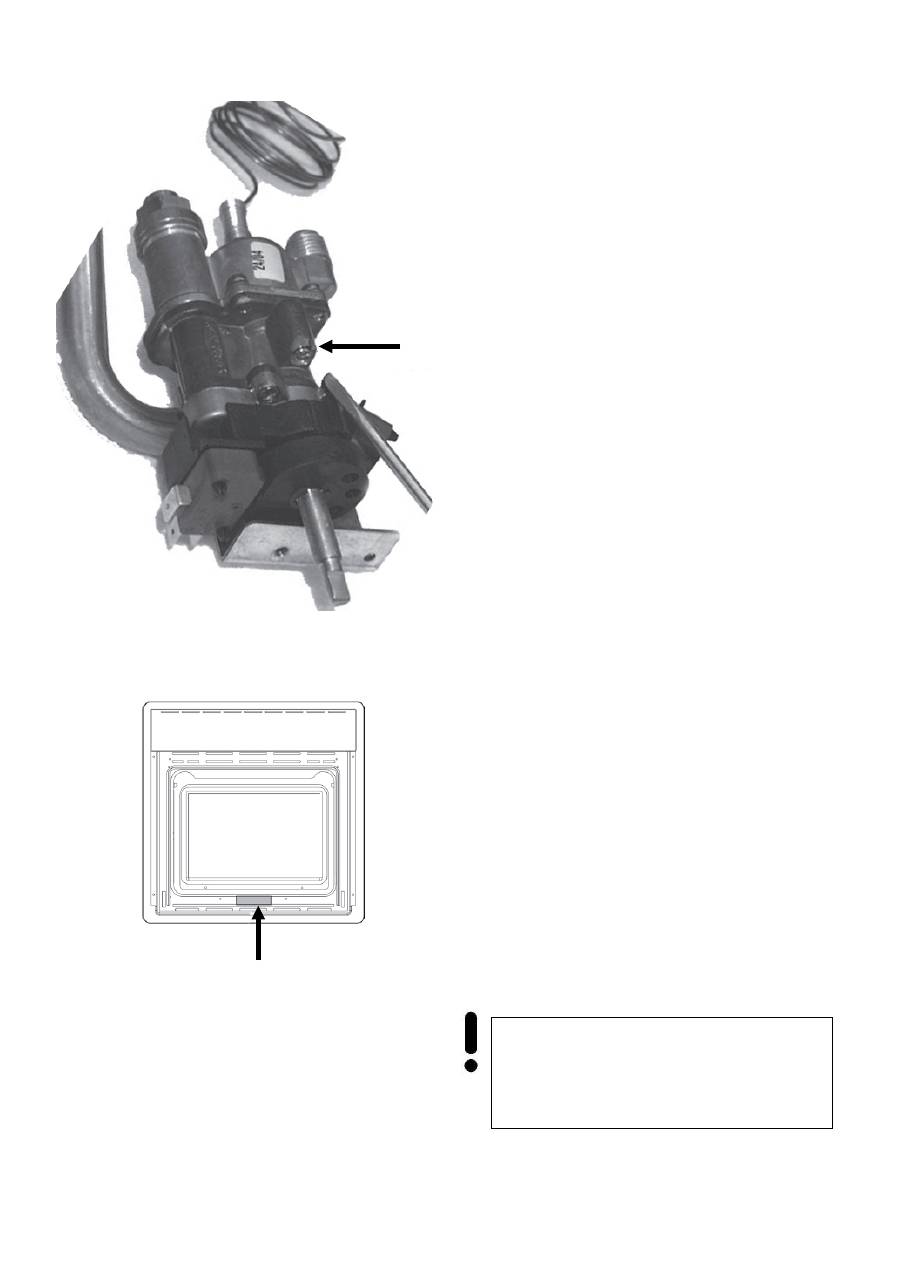
Adjustment of the minimum setting
following conversion to a different gas type
Conversion from natural gas to LPG
Ovens with stainless steel front:
Turn the temperature control knob to the
minimum position,
Then remove the knob. Insert a screwdriver
through the aperture to engage the bypass
screw
1
,
Turn the screw fully to the right.
Ovens with glass fronts:
Turn the temperature control knob to the
minimum position,
Remove the front by unscrewing the two
ring nuts,
Insert a screwdriver through the hole in the
front wall of the oven and turn the screw
1
fully clockwise.
Conversion from LPG to natural gas
Turn the oven temperature control knob to
the „Minimum“ position and allow the
appliance to warm up for about 10 minutes,
Then turn the bypass screw anticlockwise
to a obtain a low but stable flame,
Replace the front.
Attention!
After converting the appliance
to a different type of gas, remember to
change the data plate
2
to one with the
new data (gas type and pressure)
1
2
13
DE
RU
Einstellen der minimalen Gaszufuhr bei der
Umstellung auf einen anderen Gastyp
Umstellen vom Erdgas auf Flüssiggas
Geräte
mit Edelstahl-Bedienblende:
•
Den Drehregler des Thermostats auf
Minimum stellen und dann abnehmen,
•
Den Schraubendreher durch die Öffnung in
die Schraube
1
einführen,
•
Nach rechts drehen und so die
Regulierschraube ganz schließen.
Geräte mit Glas-Bedienblende:
•
Den Drehregler des Thermostats auf
Minimum stellen und dann abnehmen,
•
Die Bedienblende abnehmen; dafür die
beiden fixierenden Nutmuttern lösen,
•
Mit dem Schraubendreher die Schraube
des Gas-Thermostates
1
festziehen.
Umstellen vom Flüssiggas auf Erdgas
•
Den Thermostat des Backofens in die
Stellung „Minimum“ drehen und das Gerät
etwa 10 Minuten lang erwärmen,
•
Dann die Regulierschraube lockern, bis
eine kleine, aber stabile Flamme zu sehen
ist,
•
Die Bedienblende wieder montieren.
Установка минимальной подачи газа при
переключении на другой тип газа
Переключение с природного газа на
сжиженный
Приборы с панелью управления из
нержавеющей стали:
•
Установить ручку терморегулятора на
минимум и после этого ее снять,
•
Вставить отвертку через отверстие в
винт
1
,
•
Крутить вправо и таким образом
завернуть до конца регулировочный
винт.
Приборы с панелью управления из стекла:
•
Установить ручку терморегулятора на
минимум и после этого ее снять,
•
Панель управления снять; для этого
выкрутить фиксирующие гайки,
•
Отверткой плотно затянуть винт
терморегулятора
1
.
Переключение с сжиженного газа на
природный
•
Повернуть терморегулятор духовки в
положение „минимальное“ и прогреть
прибор в течении 10 минут,
•
Затем ослабить регулировочный винт,
чтобы
установить
маленькое,
но
стабильное пламя,
•
Монтировать панель управления.
Внимание!
После переключения на
другой
тип
газа
должны
быть
обязательно исправлены данные на
заводской табличке
2
(новые значения
для типа газа и давления).
Achtung!
Nach der Umstellung auf einen
anderen Gastyp müssen die Daten auf
dem Typenschild
2
korrigiert werden (neue
Werte für Gastyp und Gasdruck).
14
EN
INSTALLATION OF THE OVEN
The regulations covering the installation,
maintenance and operation of gas appliances for
domestic use are applicable regulations.
Positioning
The products of combustion from cooking
appliances must always be discharged into
suitable extractor hoods, which must be connected
to a chimney, flue or vented directly to outside the
building.
In situations where it is not possible to install an
extractor hood, an electric extractor fan installed in
a window or external wall may be used, provided
that all requirements of the ventilation regulations
are satisfied; the fan should switch on whenever
the appliance is in operation.
Ventilation of the room
It is essential that the room in which gas
appliances are installed is adequately ventilated to
ensure that all the appliances receive the required
quantity of fresh air for combustion.
To ensure an adequate air flow, it may be
necessary to create apertures in accordance with
the following requirements:
•
With cross-sectional area of 6 cm² per kW
with a minimum cross-sectional area of
100 cm² (these apertures may also be
created by increasing the gap between the
bottom of doors and the floor),
•
Situated at the bottom of an external wall,
preferably opposite the wall on which
combustion products are extracted,
•
The positions of the apertures should
selected so as to avoid the possibility of
their being obstructed and, if made in
external walls, they must be protected with
grilles, metal meshes, etc. installed on the
outside face of the wall.
If an electric extractor fan for the removal of foul air
is installed in the room, the apertures provided for
air changes must allow a ventilation rate of at least
35 m³/h per kW of power installed.

15
DE
RU
EINBAU DES BACKOFENS
Für die Installation, Wartung und Benutzung von
Gasgeräten des privaten Gebrauchs handeln Sie
entsprechend den geltenden Normen und
Vorschriften.
Standort
Die
Verbrennungsprodukte
von
Kochgeräten
müssen in eine zu diesem Zweck vorgesehene
Abzugshaube abgeleitet werden, die an einen
Kamin oder einen Rauchkanal angeschlossen sein
soll, oder den Rauch direkt nach Außen abführt.
Besteht keine Möglichkeit, eine Dunstabzugshaube
zu installieren, kann auch,
sofern die
belüftungsrelevanten Normen eingehalten werden,
ein am Fenster oder einer Außenwand installierter
Elektroventilator benutzt werden, der gleichzeitig
mit dem Gerät betrieben werden muss.
Raumbelüftung
Der Raum, in dem mit Gas funktionierende Geräte
installiert sind, muss mindestens mit so viel
Frischluft versorgt werden, wie zur Verbrennung
des von allen Geräten verbrauchten Gases
erforderlich ist.
Es müssen also für die Raumbelüftung Luftzufuhr-
Öffnungen angebracht werden, die die folgenden
Voraussetzungen erfüllen:
•
Freier Gesamtquerschnitt soll 6 cm² pro kW
und mindestens 100 cm² betragen (diese
Öffnungen können gegebenenfalls auch
durch Erweiterung des Schlitzes zwischen
Tür und Fußboden erhalten werden),
•
Die Öffnungen müssen sich im unteren
Abschnitt einer Außenwand befinden, die
vorzugsweise gegenüber der Wand, an der
die Verbrennungsprodukte abgeführt
werden, liegt,
•
Sie müssen so platziert werden, dass sie
nicht verlegt werden können, und wenn sie
sich in einer Außenwand befinden, müssen
sie durch klar abgegrenzte Gitter,
Metallnetze o. ä. Vorrichtungen an der
Außenseite der Wand geschützt sein.
Sollte im Raum ein Elektroventilator zur Abführung
der abgearbeiteten Luft installiert sein, müssen die
Öffnungen für den Luftaustausch einen
Luftdurchsatz von mindestens 35 m³/h pro kW im
Raum installierter Leistung ermöglichen.
УСТАНОВКА
ДУХОВОГО ШКАФА
Для установки, ухода и пользования газовым
прибором
следуйте
требованиям
соответствующих норм.
Место установки
Продукты сгорания от кухонного борудования
должны
отводиться
для
этой
цели
предусмотренной вытяжкой, которая должна
быть
подключена
к
дымоходу
или
вентиляционному каналу, или отводить дым
непосредственно наружу.
При невозможности установки вытяжки, может
быть использован электрический вентилятор,
вмонтированный в окно или наружную стену с
соблюдением требований норм к вентиляции
помещений, который должен быть включен во
время пользования газовым прибором.
Вентиляция помещения
Помещение, в котором установлены газовые
приборы, должно обеспечиваться таким
минимальным количеством свежего воздуха,
которое необходимо для сгорания всего газа на
всех газовых приборах.
Для вентиляции помещения должны быть
предусмотрены вентиляционные отверстия,
отвечающие следующим требованиям:
•
Свободное полное поперечное сечение
должно составлять 6 см² на каждый кВт
устанавливаемой мощности, но минимум
100
см²
(эти
отверстия
при
необходимости могут быть обеспечены
за счёт увеличения зазора между
дверью и полом),
•
Отверстия должны находиться в нижней
части
внешней
стены,
которая
расположена
преимущественно
напротив стены, от которой отводятся
продукты сгорания,
•
Отверстия должны быть расположены
так, чтобы они не могли быть перекрыты,
и, если они находятся в наружной стене,
они должны быть забраны защитными
решетками, металлическими сетями или
другими приспособлениями.
Если в помещении установлен электрический
вентилятор для отвода продуктов сгорания, то
отверстия для обмена воздуха должны
обеспечить пропускную способность воздуха
минимум
35
м³/час
на
каждый
кВт
устанавливаемой мощности.
16
EN
Flush fitting
The oven can be installed under a work top or in a
cooking column.
Figure shows the installation dimensions.
The installation space measurements are given in
mm
.
Make sure that surrounding materials are heat
resistant. Align the oven centrally with respect to
the side walls of the units surrounding it and fix it in
place with the screws and bushings provided.
See the accompanying instructions for combining
the oven with multi-functional gas or gas-electric
cookers.
Attention!
You must set the time on the
clock before you can use the oven.
(See chapter
Digital clock timer
with
sensor
).
If the time is not set, the oven will not work!
17
DE
RU
Einbau des Backofens
Der Backofen kann unter einer Arbeitsplatte oder in
einen Schrank eingebaut werden.
Die Einbaumaßen müssen den auf der Abbildung
dargestellten Massen entsprechen.
Die Einbaumaßen sind in
mm
angegeben.
Das Möbelmaterial muss hitzebeständig sein. Der
Backofen muss zu den Möbelwänden zentriert, und
mit den mitgelieferten Schrauben und Buchsen
befestigt werden.
Für die Kombination des Backofens mit den Gas-
oder Gas/Elektrokombikochfeldern siehe
beiliegende Anleitungen.
Установка духового шкафа
Духовой шкаф предназначен для встройки либо
под рабочую поверхность стола, либо в шкаф.
Размеры,
которыми
необходимо
руководствоваться при встройке, указаны на
рисунке.
Размеры для встраивания даны в
мм
.
Мебель
должна
быть
изготовлена
из
нагревостойкого материала. Духовка должна
быть выставлена по центру по отношению к
стенкам мебели и надежно закреплена при
помощи поставляемых в комплекте крепежных
материалов.
Для комбинации духовки с газовой или газо-
электрической
поверхностью
используйте
документацию,
прилагающуюся
к
нагревательным поверхностям.
Achtung!
Vor dem ersten Gebrauch des
Backofens muss die aktuelle Tageszeit
eingestellt werden. (siehe Kapitel
Elektronische Zeitschaltuhr mit Sensor
).
Ohne eingestellte Uhr funktioniert der
Backofen nicht!
Внимание!
Перед
первым
использованием
духового
шкафа
необходимо выставить текущее время на
часах
(см.
раздел
Сенсорное
электронное
программирующее
устройство
).
В прoтивном случае устройство не будет
работать!

18
EN
SAFETY CONDITIONS
•
Please, keep watch over children as long as
the gas oven is in operation. Children are
unaware of operating rules. Hot gas hot
oven cavity, oven door can cause a skin-
burn.
•
If faults occur, further operation is not
allowed until the appliance has been
repaired by an authorized serviceman.
•
Don’t turn on the valve of the gas inlet or
gas cylinder before you make sure that the
gas burners are switched off.
•
Unauthorized persons are not allowed to
carry on amendments or repair the oven.
•
Don’t blow out the flame of the burner!
•
Users are not allowed to adjust the ovens to
different gas type on their own, move the
oven to another place or make changes in
the gas supply system. These operations
can be carried on only by an authorized
serviceman.
•
Don’t let children and persons who are not
informed about the operation instructions to
operate the oven.

19
DE
RU
SICHERHEITSBEDINGUNGEN
•
Während des Gasbackofenbetriebs auf
Kinder aufpassen, weil sie über keine
Kenntnisse hinsichtlich der
Backofenbedienung verfügen.
Insbesondere heiße Backofenraum, Rost,
Türscheibe können bei Kindern
Verbrennungen verursachen.
•
Falls der Backofen beschädigt wird, darf er
erst wieder benutzt werden, nachdem die
Beschädigung von einem qualifizierten
Fachmann beseitigt ist.
•
Den Gasabsperrhahn an der
Gasanschlussstelle bzw. an der Gasflasche
niemals öffnen ohne sichergestellt zu
haben, dass alle Gassperrventile des
Backofens zugedreht sind.
•
Es ist streng verboten, den Backofen von
nicht speziell ausgebildeten Personen zu
modifizieren bzw. reparieren zu lassen.
•
Gasbrennerflamme nie durch Blasen
löschen.
•
Eigenwillige Anpassung vom Backofen an
einen anderen Gastyp, Umstellen des
Backofens auf einen anderen Platz sowie
Einführung von Änderungen in die
Gasversorgungsleitung sind verboten.
Diese Tätigkeiten dürfen ausschließlich von
einem autorisierten Installateur
durchgeführt werden.
•
Kleine Kindern und Personen, welche mit
der Gebrauchsanweisung des Backofens
nicht vertraut sind, den Gasbackofen nicht
bedienen lassen.
УСЛОВИЯ БЕЗОПАСНОСТИ
•
Пожалуйста, во время пользования
духовкой следите за детьми, так как дети
не знают принципов обслуживания
духовки. Горячие духовой шкаф, гриль,
стекло дверцы могут быть причиной
ожога у ребенка.
•
В
случае
повреждения
духовки,
дальнейшая эксплуатация разрешена
только после полного устранения
повреждений
квалифицированным
специалистом.
•
Не открывайте кран на вводе газа или
клапан на газобаллоне не убедившись
предварительно в том, что все вентили
духовки закрыты.
•
Запрещается совершать модификацию и
ремонт
духовки
лицами,
без
профессиональной подготовки.
•
Запрещается задувать пламя горелки.
•
Запрещается самостоятельно совершать
настройку духовки на другой тип газа,
переносить духовку на другое место, а
также совершать изменения в системе
питания. Эти операции могут быть
совершены только квалифицированным
специалистом.
•
Не допускайте к духовке малых детей, а
также лиц, не ознакомленных с
руководством по эксплуатации духовки.

20
EN
In case of gas leak, it is not allowed:
to strike a match, smoke, switch on and off an
electric receiver (a door bell, a light switch) as well
as use other electrical or mechanical appliances
which can cause electric or chugging spark.
In this case, immediately shut off gas supply (turn
off the valve of the gas cylinder or the switch which
cuts off the connection to the gas supply), air the
room and contact an authorized person.
•
Don’t attach any cables to the gas
appliance.
•
If the gas leaking out of a nontight junction
gets inflamed, immediately cut off the gas
supply by turning off the valve of the gas
cylinder or the switch which disconnects gas
supply).
•
In case of damage: air the room, disconnect
the appliance from the power supply and
repair the fault.
•
If the gas leaking out of the non tight
junction of the gas cylinder gets inflamed,
wrap the cylinder with a wet blanket to
extinguish the flame and turn off the valve
(stopcock) of the gas cylinder. Further use
of the damaged gas cylinder is not allowed.
•
If you don’t use the gas ovens for a few
days, disconnect it from the gas supply by
turning off the stop valve. In case of a gas
cylinder, turn off the stopcock every time
after the use.
The gas supply should provide the oven with
the type of gas it has been adjusted to in plant.
Information about the gas type which the oven
has been adjusted to is registered on the data
plate.
