Kaiser KCT6412: instruction
Class: Built-in hobs
Type:
Manual for Kaiser KCT6412
USER MANUAL
EN
DE
RU
GEBRAUCHSANWEISUNG
ИНСТРУКЦИЯ ПО ОБСЛУЖИВАНИЮ И ЭКСПЛУАТАЦИИ
KCT 6403 F *, KCT 6412 F *
BUILT IN COOKING HOB VITROCERAMIC
EINBAUKOCHFELD GLASKERAMIK
ВСТРАИВАЕМАЯ НАГРЕВАТЕЛЬНАЯ ПОВЕРХНОСТЬ
СТЕКЛОКЕРАМИКА

DEAR CUSTOMERS,
thank you for purchasing this Kaiser product.
We are convinced that you have made a right choice. This
product which satisfies the high quality demands and
corresponds to world comprehensive standards realizes your
cookeries, and his modern appearance which has been
developed by the best European designers will decorate your
kitchen splendidly.
We ask you to read the operating instructions before usage
thoroughly. The consideration of recommendations protects
you from possible inconveniences which can appear as a
result of the wrong use of the cooking hobs, and allows you to
reduce the consumption of electrical energy. If the use
corresponds to the present operating instructions, the
cooking hob will bring you a lot of pleasure for a long time.
Our cooking hobs correspond to the demands of the security,
hygiene and environment protection, according to the
directives of the EU which is confirmed with certificates DIN
ISO 9001, ISO 1400, according to the norms counting within
the frames of the EU, they also correspond to the Gosstandart
of Russia, standards of the CIS, which is confirmed with the
corresponding certificates.
With the thoughts of a constant improvement of the quality of
our cooking hobs the changes in design and equipment which
lead only to positive changes of the technical qualities are
reserved by the manufacturer.
Yours faithfully
We wish you an effective use of the cooking hob of our firm.
OLAN-Haushaltsgeräte
Berlin Germany
We Inform you that our devices which are the object of the
present operating instructions are precertain exclusively
for the domestic use.
EN
2

УВАЖАЕМЫЙ ПОКУПАТЕЛЬ
,
благодарим Вас за приобретение нашей техники.
Мы уверены, что Вы сделали правильный выбор.
Данный продукт, удовлетворяющий самым высоким
требованиям и отвечающий мировым стандартам,
позволит Вам легко воплотить все Ваши кулинарные
способности, а его современный вид, разработанный
лучшими европейскими дизайнерами, великолепно
украсит Вашу кухню.
Просим Вас внимательно прочитать инструкцию по
обслуживанию и эксплуатации до пуска устройства.
Соблюдение содержащихся в ней рекомендаций
защитит Вас от возможных неприятностей при
неправильной эксплуатации варочной поверхности, а
т а к ж е п о з в о л и т В а м у м е н ь ш и т ь р а с х о д
эл ектроэнергии. Если эксплуатация варочной
поверхности будет соответствовать настоящей
инструкции, наша варочная поверхность будет
радовать Вас долгое время.
Н а ш и
в а р о ч н ы е
п о в е р х н о с т и
п о л н о с т ь ю
соответствует требованиям безопасности, гигиены и
защиты окружающей среды, согласно директивам
Е в р о п е й с к о г о С о ю з а , ч т о п о д т в е р ж д е н о
сертификатами
1400, в
соответствии с настоящими нормами, действующими
на территории Европейского сообщества,
также
полностью отвечают всем требованиям Госстандарта
России и стандартов других стран СНГ, что
подтверждается сертификатами соответствия.
С мыслью о дальнейшем повышении технических и
эксплуатационных характеристик наших варочных
поверхностей мы оставляем за собой право на внесение
изменений в дизайн и устройство, влияющих только
положительно на потребительские качества и
свойства продукта.
Уважающий Вас
DIN ISO 9001, ISO
a
Желаем Вам эффективного пользования варочной
поверхностью нашей фирмы.
OLAN-Haushaltsgeräte
Berlin Germany
Информируем, что наши приборы, являющиеся
предметом настоящей Инструкции, предназначены
исключительно для домашнего пользования.
LIEBE KUNDIN, LIEBER KUNDE,
wir danken Ihnen für den Erwerb unserer Technik.
Wir sind überzeug, dass Sie eine richtige Wahl getroffen
haben. Dieses Produkt, das die hohen Forderungen zur
Qualität befriedigt und weltumfassenden Standards
entspricht, verwirklicht Ihre Kochkünste, und sein modernes
Aussehen, das von besten europäischen Designer entwickelt
worden ist, wird Ihre Küche prächtig schmücken.
Wir bitten Sie die Bedienungsanleitung vor der Nutzung
aufmerksam zu lesen. Die Beachtung von Empfehlungen
schützt Sie von eventuellen Unannehmlichkeiten, die als
Folge
der falschen Nutzung des Kochfeldes
auftreten
können, und ermöglicht Ihnen den Verbrauch von
Elektroenergie zu reduzieren. Das Kochfeld bringt Ihnen viel
Vergnügen auf lange Zeit, wenn der Gebrauch der
vorliegenden Bedienungsanleitung entsprechen wird.
Unsere Kochfelder entsprechen den Forderungen der
Sicherheit, der Hygiene und des Umweltschutzes, laut den
Direktiven der EU, was mit Zertifikaten DIN ISO 9001, ISO
1400, entsprechend den im Rahmen der EU geltenden
Normen, bestätigt ist, und genauso auch den Anforderungen
von Gosstandart in Russland und Standards anderer GUS
Länder, was durch die Identifikationszertifikate bestätigt ist.
Mit den Gedanken der ständigen Verbesserung der Qualität
unserer Kochfelder sind Änderungen bei Design und
Einrichtung, die nur zu positiven Veränderungen der
technischen Eigenschaften führen, vom Hersteller
vorbehalten.
Hochachtungsvoll
Wir wünschen Ihnen die effektive Nutzung des Kochfeldes
unserer Firma.
OLAN-Haushaltsgeräte
Berlin Germany
Wir nformieren Sie, dass unsere Geräte, die der Gegenstand
der vorliegenden Bedienungsanleitung sind, sind
ausschließlich für den häuslichen Gebrauch vorbestimmt.
i
3
DE
RU

4
EN
INSTALLATION INSTRUCTIONS
6
CARE AND ATTENDANCE
30
34
Installation of the hobs
6
Electrical connection
8
Location drawing
10
Control panels
12
Heating elements
14
Cooking zones control
16
BRIEF DESCRIPTION
10
EQUIPMENT
14
USAGE
16
RESPECT FOR THE ENVIRONMENT

5
DE
RU
ИНСТРУКЦИЯ ПО МОНТАЖУ
7
КРАТКОЕ ОПИСАНИЕ
11
ОБОРУДОВАНИЕ
ИСПОЛЬЗОВАНИЕ
ОБСЛУЖИВАНИЕ И УХОД
ОХРАНА ОКРУЖАЮЩЕЙ СРЕДЫ
Установка варочной поверхности
Подключение к электросети
Внешний вид
11
Панели управления
Нагревательные элементы
Управление нагревательными полями
7
9
13
15
17
15
17
31
35
FÜR DEN INSTALLATEUR
7
KURZBESCHREIBUNG
11
AUSSTATUNG
15
BENUTZUNG
17
PFLEGE UND WARTUNG
31
UMWELTVERTRÄGLICHKEIT
35
Einbau des Kochfeldes
7
Stromanschluss
9
Gesamtansicht
11
Bedienblenden
13
Heizelemente
15
Kochfeldersteuerung
17
6
EN
INSTALLATION INSTRUCTIONS
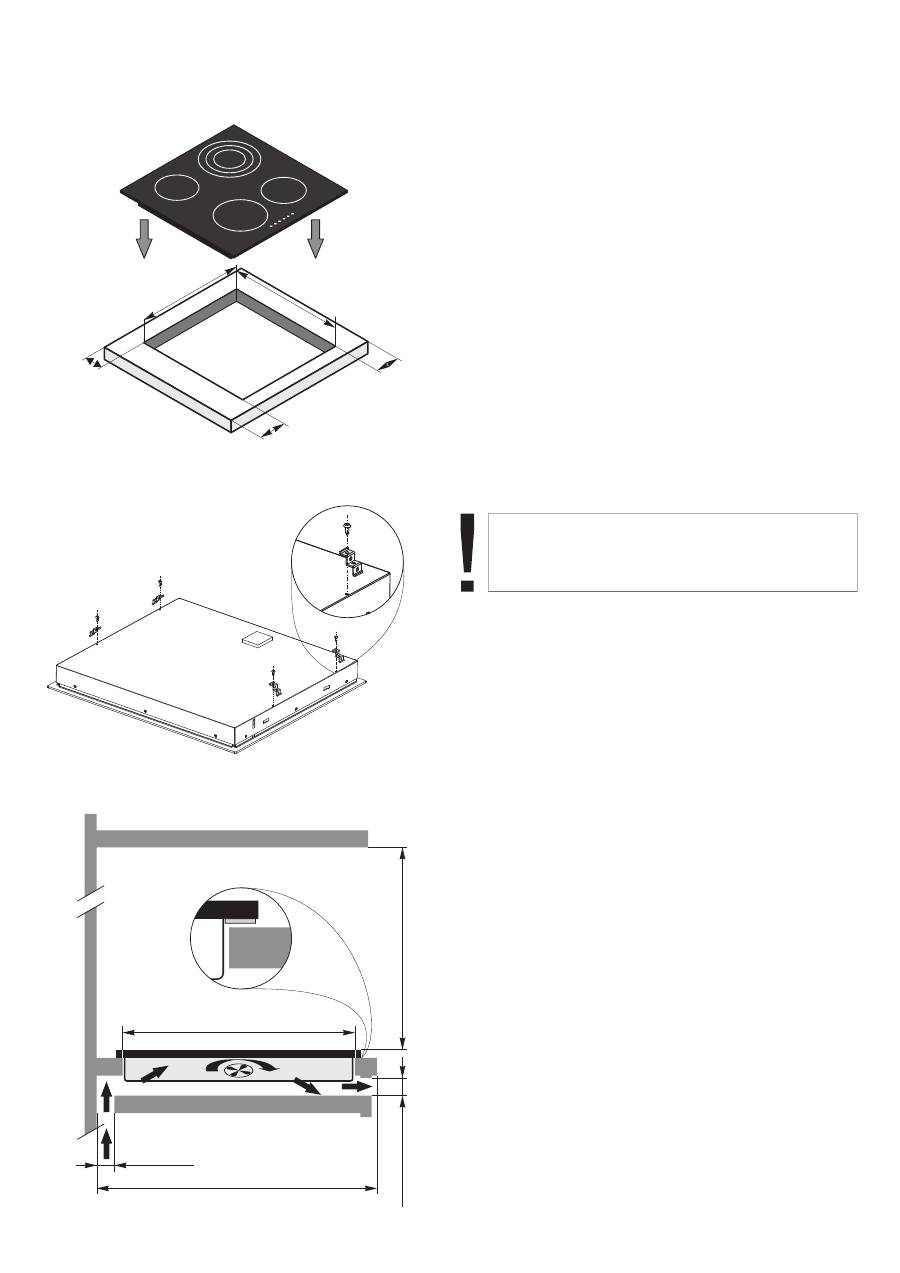
INSTALLATION OF THE COOKING HOB
These Instructions are for the qualified technician, as a
guide to the installation, adjustment and maintenance,
according to the laws and standards in force.
Any of these operations must always be carried out
when the appliance has been disconnected from the
electric system.
The appliance can be fitted into a working area as
illustrated on the figure. Apply the seal supplied over the
whole perimeter of the working area.
20 mm
min
15
mm
min
650
mm
600 mm
490 mm
560
mm
495
mm
50
mm
min
50
mm
min
50
mm
min
Attention!
Installation and ellectrical connection of
the cooking hob must be made by a qualified
expert only.
FÜR DEN INSTALLATEUR
EINBAU DES KOCHFELDES
Die angegebenen Anweisungen sind an den
zugelassenen Installateur als Richtlinie für die
Installation, Regelung und Instandhaltung, gemäß den
geltenden Gesetzen und Normen, gerichtet.
Alle Arbeiten sollen nur bei abgeschaltet vom
elektrischen Netz Apparat durchgeführt werden.
Der Apparat ist für den Einbau in eine Arbeitsplatte
vorgesehen. Siehe Abbildung. Auf den ganzen
Perimeter der Platte die mitgelieferte Dichtmasse
verteilen.
7
DE
RU
ИНСТРУКЦИЯ ПО МОНТАЖУ
УСТАНОВКА ВАРОЧНОЙ ПОВЕРХНОСТИ
Сборка, регулировка и уход должны проводиться
специально обученным персоналом в соответствии
с действующими нормами и правилами.
Все работы должны проводиться только при
отключенном от электрической сети устройстве.
Прибор предусмотрен для встройки в рабочую
поверхность, как это изображно на иллюстрации.
В д о л ь
в н е ш н е г о
к о н т у р а
в с т р а и в а е м о й
поверхности прокладывается прилагаемый в
комплекте уплотнительный материал.
Внимание!
Монтаж и подключение варочной
поверхности должны проводиться только
квалифицированным специалистом.
Achtung!
Die Montage und Stromnetzanschluss
des Kochfeldes soll nur von einem qualifiziertem
Fachmann durchgeführt werden.
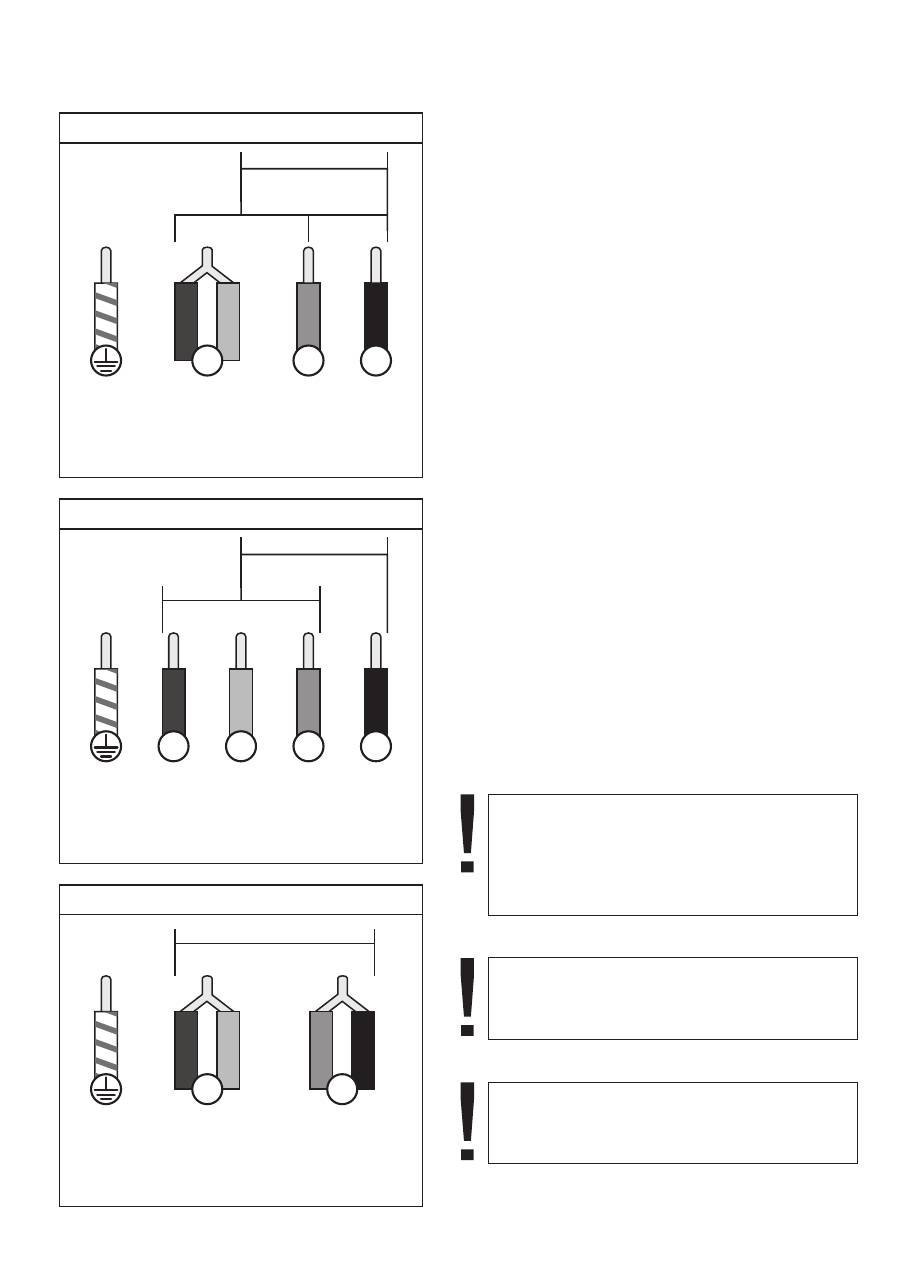
ELECTRICAL CONNECTION
Before connecting the cooking hob to the mains power
supply, make sure that:
Correct grounding is a legal requirement. If the
appliance is not pre-fitted with a power cable and/or
plug, use only suitable cables and plugs capable of
handling the power specified on the appliance's data
plate and capable of resisting heat. The power cable
should never reach a temperature 50 °C (122 ºF) above
ambient temperature at any point along its length.
If the appliance is to be connected directly to mains
terminals, fit a switch with minimum aperture of 3 mm
between the contacts. Make sure that the switch is of
sufficient capacity for the power specified on the
appliance's data plate, and compliant with applicable
regulations. The switch must not break the yellow-
green earth wire. The socket or switch must be easily
reachable with the cooking hob fully installed.
•
•
the plant characteristics are such as to follow
what is indicated on the matrix plate placed at the
bottom of the working area,
the mains supply has an efficient ground
connection complying with all applicable laws
and regulations.
Attention!
This
is exclusively for
domestic use! Use the oven only for preparing
meals.
cooking hob
EN
8
Attention!
Do not use the appliance
if the power
cable is damaged, if the cooking hob does not
function correctly or if it has been damaged or
dropped. Contact the
.
c
u
stomer service
Attention!
The manufacturer declines all
responsibility for damage or injury if the above
instructions and normal safety precautions are not
respected.
black
schwarz
черный
brown
braun
к
оричневый
grey
grau
серый
g
re
y
g
ra
u
с
е
р
ы
й
blue
blau
синий
grey-yellow
grau-gelb
ж
елт
о-з
ел
еный
220 – 240 V
220 – 240 V~
N
L
black
schwarz
черный
brown
braun
к
оричневы
й
grey
grau
серый
g
re
y
g
ra
u
с
е
р
ы
й
blue
blau
синий
grey-yellow
grau-gelb
ж
елт
о-з
ел
еный
220 – 240 V
220 – 240 V
220 – 240 V • 2 + 2N~
N2
N1
L2
L1
400 V • 2N~
black
schwarz
черный
brown
braun
к
оричневы
й
grey
grau
серый
g
re
y
g
ra
u
с
е
р
ы
й
blue
blau
синий
grey-yellow
grau-gelb
ж
елт
о-з
ел
еный
220 – 240 V
400 V
220 – 240 V
N
L2
L1
ПОДКЛЮЧЕНИЕ К ЭЛЕКТРОСЕТИ
Перед подключением варочной поверхности к эл.
сети, необходимо убедиться, что
параметры сети соответствуют данным в
табличке на нижней части самого прибора
эл. сеть заземлена в соответствии с
действующими нормами и предписаниями.
Заземление является необходимым условием
правильной эксплуатации. Если варочная
поверхность не оборудована кабелем и/или
штекером, применяйте только материалы,
соответствующие данным указанным в табличке на
нижней части самой поверхности, которые могут
функционировать в рабочем режиме температур.
Кабель ни в коем случае не должен нагреваться
выше температуры
С.
В случае подсоединения непосредственно к эл.
сети, необходимо использовать специальный
автоматический выключатель с зазором между
контактами не менее 3 мм, позволяющий
отсоединять прибор от сети, соответственно
техническим данным действующих предписаний
(желто зеленый кабель заземления не должен
прерываться данным выключателем). Штекер или
автоматический выключатель на правильно
установленном приборе должен быть всегда легко
досягаем.
:
,
50 °
-
•
•
STROMANSCHLUSS
Vor der Durchführung des Stromanschlusses muss
sichergestellt werden, dass:
die Eigenschaften des Stromnetzes mit den
We r t e n
a u f
d e m
u n t e r
d e r
K o c h f e l d
angebrachten Leistungsschild übereinstimmen,
das
Stromnetz
gemäß
den
geltenden
Bestimmungen und Rechtsvorschriften geerdet
ist.
Die Erdung ist eine notwendige Voraussetzung der
Nutzung des Gerätes. Falls das Kochfeld nicht mit
Kabel und\ oder Netzstecker ausgestattet ist, muss
geeignetes Material verwendet werden, das der auf
dem Typenschild auf dem unter das Gerät angegebene
Stromaufnahme und der Betriebstemperatur
entspricht. Das Kabel darf an keiner Stelle keinesfalls
eine Temperatur von über 50 °C erreichen.
Wenn ein direkter Netzanschluss gewünscht wird,
muss ein allpoliger Schalter mit Kontaktöffnung von
min. 3 mm vorgesehen werden, der erlaubt das Gerät
vom Netz zu trennen, der den technischen Daten der
geltenden Vorschriften entsprechen muss (das gelb-
grüne Erdungskabel darf nicht vom genannten Schalter
unterbrochen werden). Der Stecker bzw. der allpolige
Schalter müssen bei installiertem Gerät problemlos
zugänglich sein.
•
•
Achtung!
Dieses Kochfeld ist nur für die häusliche
Nutzung vorbestimmt! Verwenden Sie das Gerät
nur, um die Nahrung vorzubereiten.
Внимание!
Эта
предназначена только для домашнего
использования! Используйте устройство
только для приготовления пищи.
варочная поверхность
DE
RU
9
Achtung!
Der Hersteller ist nicht haftbar, wenn
b e i
d e r
I n s t a l l a t i o n
d e s
G e r ä t e s
a l l e
obenangeführten Anweisungen nicht befolgt
werden.
Внимание!
Изготовитель не несет никакой
ответственности, если при установке прибора
не соблюдаются все вышеприведенные
предписания.
Внимание
Не пользуйтесь устройством,
!
если сетевой кабель поврежден, если
варочная поверхность работает неправильно
или она имеет повреждения, или была
уронена. Свяжитесь с сервисной службой.
Achtung! Benutzen Sie das Gerät nicht
, falls
das Netzkabel beschädigt ist, falls das Gerät nicht
richtig funktioniert bzw. wenn es Schäden erlitten
hat oder heruntergefallen ist. Setzen Sie sich
gegebenenfalls mit dem Kundendienst in
Verbindung.
EN
10
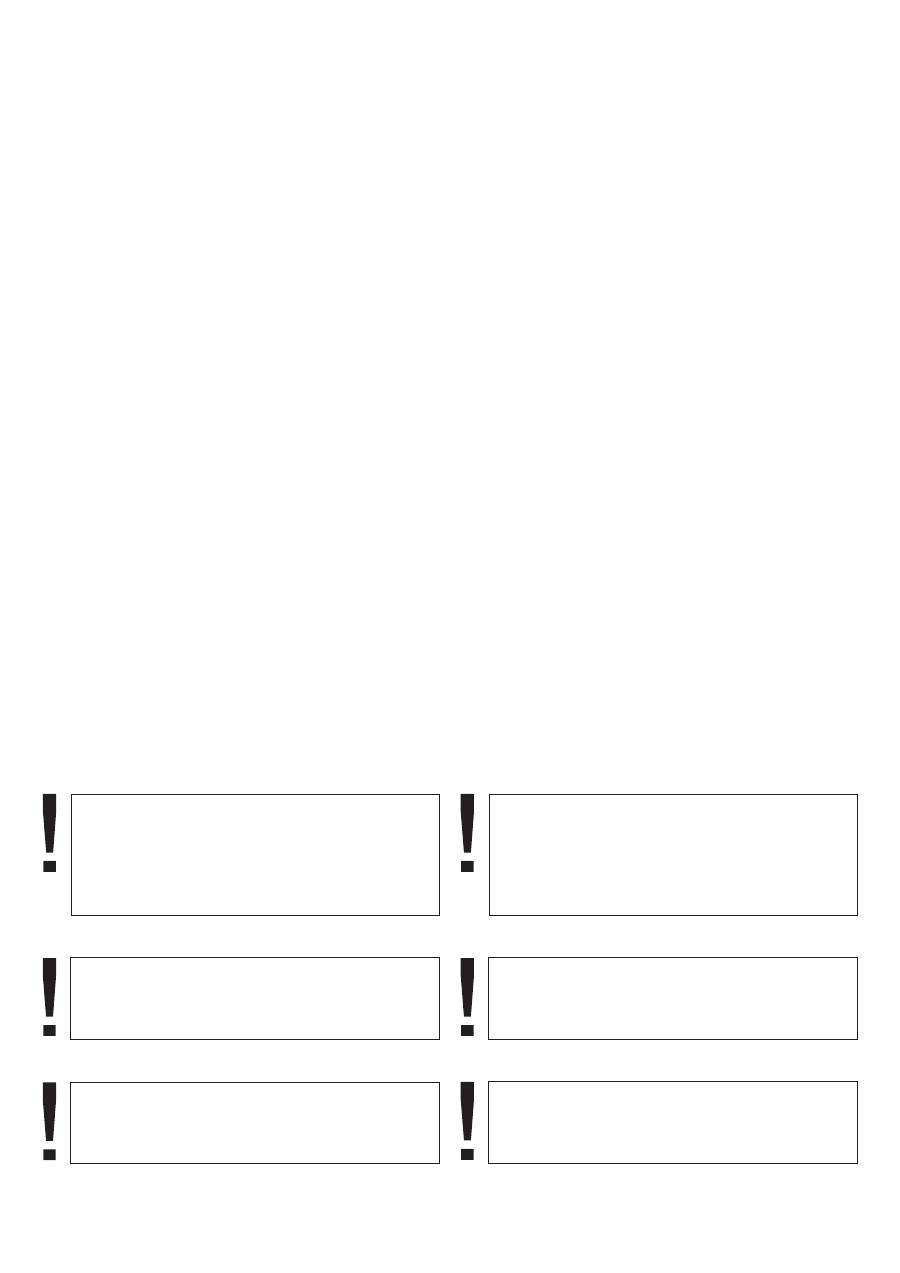
BRIEF DESCRIPTION
LOCATION DRAWING
Arrangement of functional assemblies
1. Cooking zone
2. Control panel
1
1
1
1
2
2
1
1
1
1
2
2

DE
RU
11
КРАТКОЕ ОПИСАНИЕ
ВНЕШНИЙ ВИД
Примерное размещение функциональных узлов
Нагревательное поле
Панель управления
1.
2.
KURZBESCHREIBUNG
GESAMTANSICHT
Anordnung von Funktionsbaugruppen
1. Kochzone
2. Bedienblende
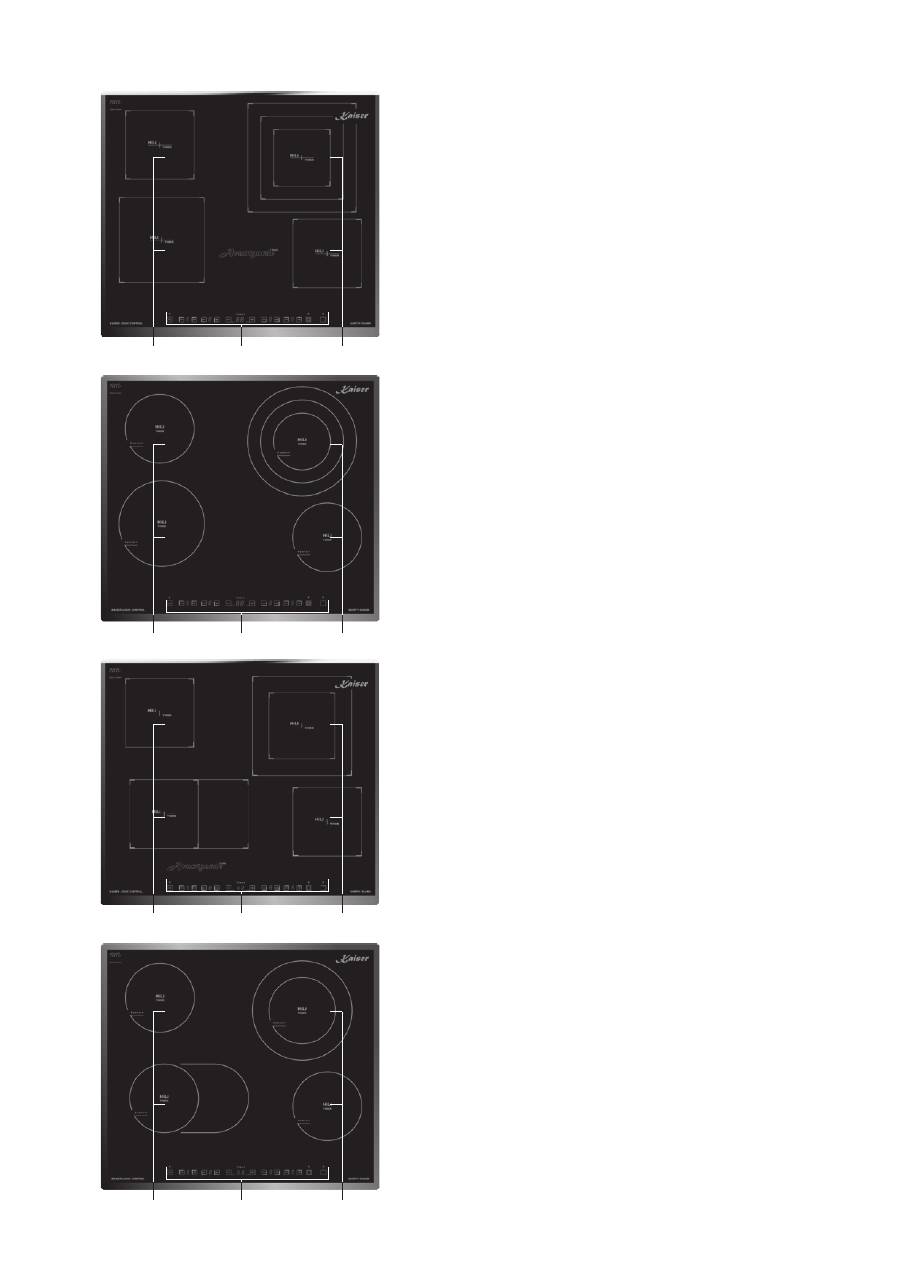
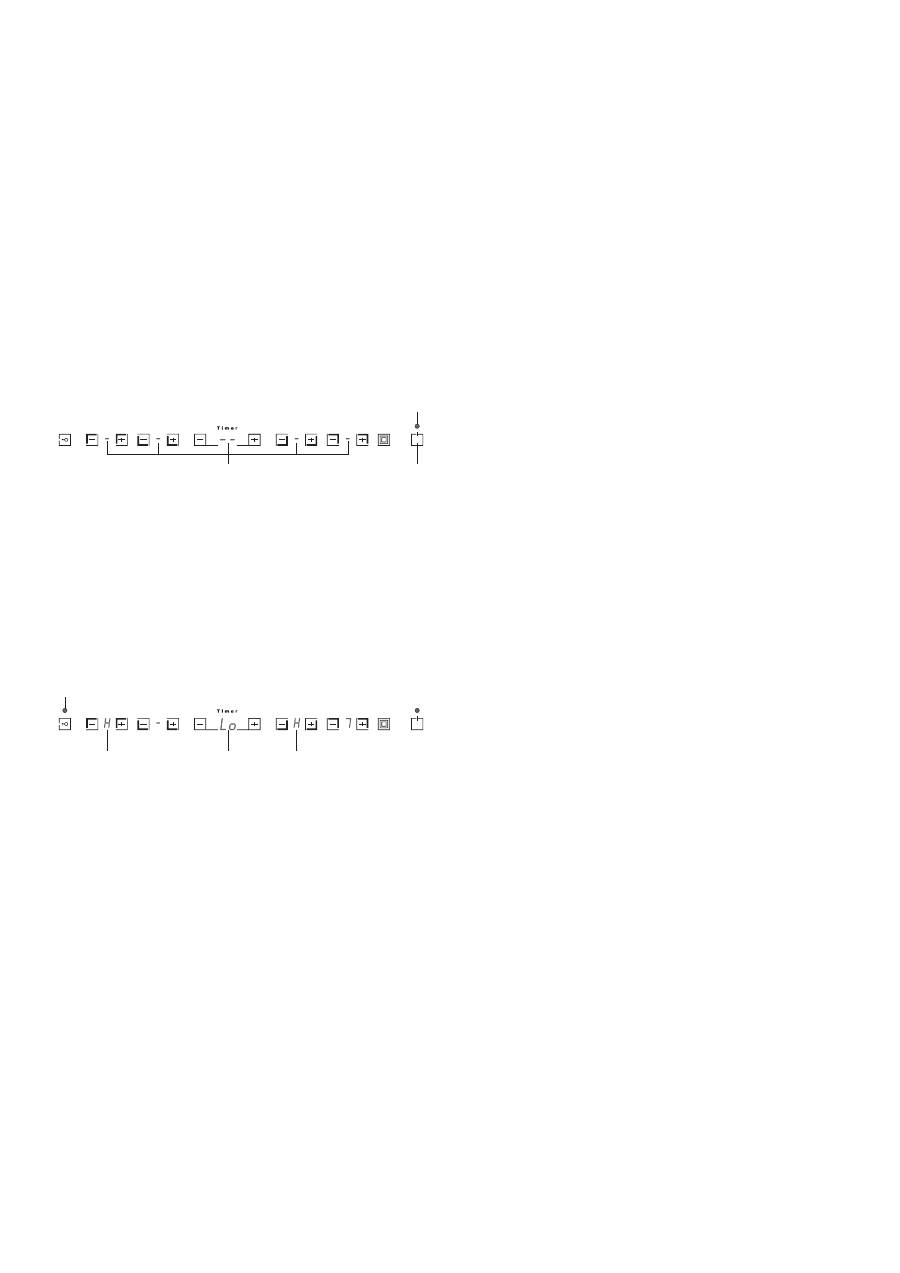
CONTROL PANELS
1. Child lock
2. Cooking zone
3. Power display
4. Cooking zone
5. Timer
6. Timer display
7. Timer
8. Single/ double/ triple circuit (
) or
single/ double circuit (
)
9. Power
–
+
–
+
ON/ OFF
KCT 6403...
KCT 6412...
EN
1
1
2
2
3
3
4
4
5
5
6
6
7
7
8
8
9
9
2
2
3
3
4
4
2
2
3
3
4
4
2
2
3
3
4
4
KCT 6403 F*
KCT 6412 F*
12

DE
RU
ПАНЕЛИ УПРАВЛЕНИЯ
Защита от детей
. Нагревательное поле
. Дисплей нагревательного поля
. Нагревательное поле
Дисплей таймера
О д и н а р н о е /
д в о й н о е /
т р о й н о е
нагревательное поле
или
одинарное/ двойное нагревательное поле
Кнопка
1.
2
3
4
5. Таймер
6.
7. Таймер
8.
(
)
(
)
9.
–
+
–
+
KCT 6403...
KCT 64
...
12
ВКЛ/ ВЫКЛ
BEDIENBLENDEN
1. Kindersiecher
u
ng
2. Kochzone
3.
. Kochzone
–
+
–
+
EIN/ AUS
Display für Leistungsanzeige
für
anzeige
4
5. Timer
6. Display
Timer
7. Timer
8. Einzel-/ doppel-/ dreifachkochzone (
)
oder Einzel-/ doppelkochzone (
)
9.
Taste
KCT 6403...
KCT 6412...
13
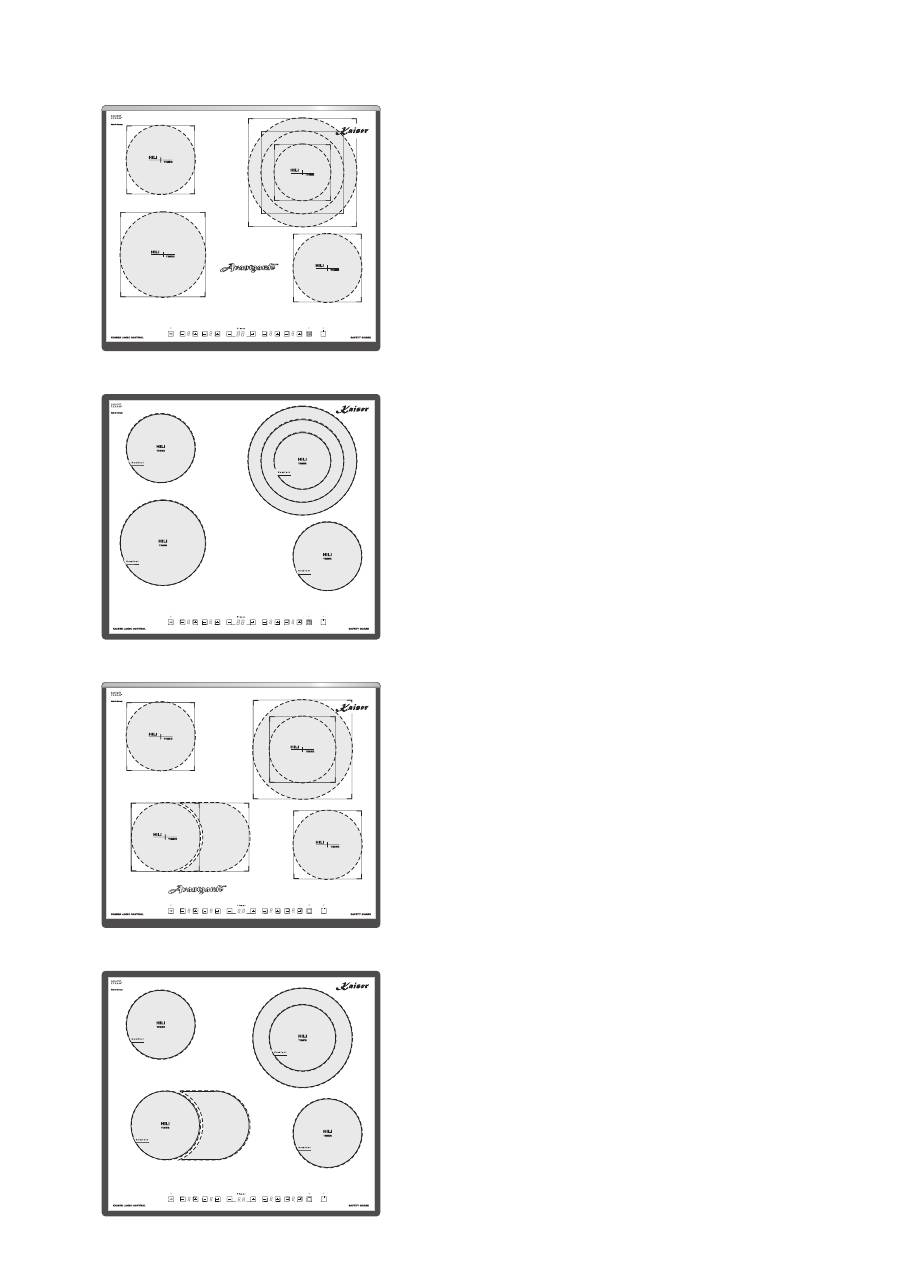
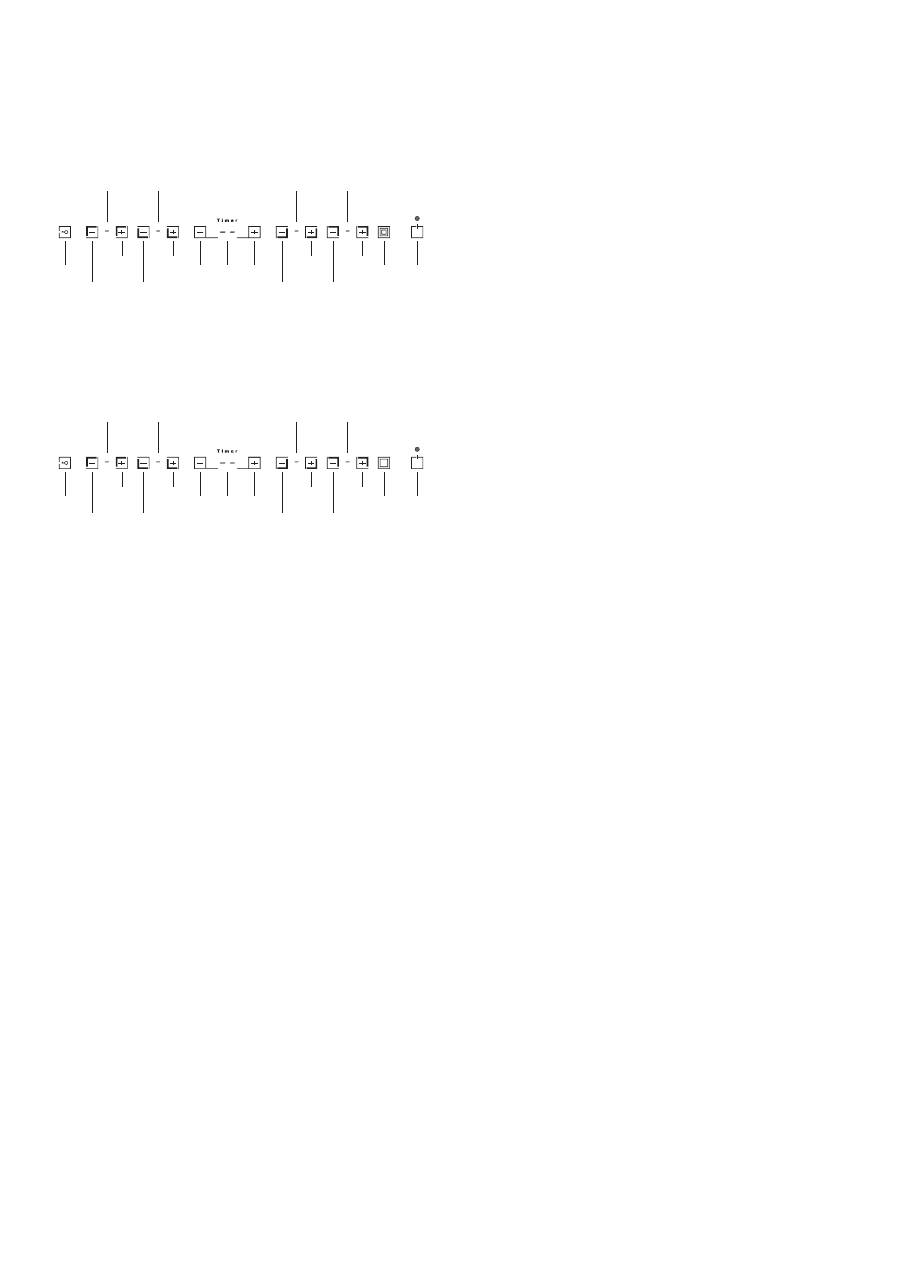
EQUIPMENT
HEATING ELEMENTS
KCT 6403 F*
KCT 6412 F*
4
4
1.
Triple circuit c
:
.
1.
.
c
:
Cooking zone:
Ø 145 mm, 1200 W
2.
ooking zone
Ø 120 mm,
0 W
Ø 175 mm, 1600 W
Ø 230 mm, 2300 W
. Cooking zone:
Ø 145 mm, 1200 W
Cooking zone:
Ø 180 mm, 1800 W
Cooking zone:
Ø 145 mm, 1200 W
2. Dual circuit cooking zone:
Ø 140 mm, 1000 W
Ø 210 mm, 2 00 W
3. Cooking zone:
Ø 145 mm, 1200 W
Dual circuit ooking zone
Ø 145 mm, 1100 W
145 × 250 mm, 2 00 W
80
3
2
0
EN
14
1
1
4
3
2
1
4
3
2
1
4
2
2
4
1
3
3

ОБОРУДОВАНИЕ
НАГРЕВАТЕЛЬНЫЕ ЭЛЕМЕНТЫ
KCT 6403 F*
KCT 6412 F*
П
П
П
П
П
1.
:
.
1.
:
.
:
Ø 145
, 1200
2.
Ø 120
,
0
Ø 175
, 1600
Ø 230
, 2300
.
:
Ø 145
, 1200
4
:
Ø 180
, 1800
:
Ø 145
, 1200
2.
Ø 1 0
, 0 0
Ø
,
00
.
:
Ø 145
, 1200
4
:
Ø 1
, 1100
145 × 250
, 2 00
мм
мм
мм
мм
мм
мм
мм
4 мм 1 0
210 мм 22
мм
45 мм
мм
0
Вт
оле нагрева
Вт
Тройное поле нагрева
Вт
Вт
Вт
3
оле нагрева
Вт
оле нагрева
Вт
оле нагрева
Вт
ойное поле нагрева
Вт
Вт
3
оле нагрева
Вт
ойное поле нагрева
Вт
80
Дв
Дв
15
DE
RU
AUSSTATUNG
HEIZELEMENTE
KCT 6403 F*
KCT 6412 F*
4
4
1. Kochzone
Dreikreiskochzone:
Kochzone
. Kochzone
1. Kochzone
eikreiskochzone:
Kochzone
.
eikreiskochzone:
:
Ø 145 mm, 1200 W
2.
Ø 120 mm,
0 W
Ø 175 mm, 1600 W
Ø 230 mm, 2300 W
.
:
Ø 145 mm, 1200 W
:
Ø 180 mm, 1800 W
:
Ø 145 mm, 1200 W
2. Zw
Ø 140 mm, 1000 W
Ø 210 mm, 2 00 W
.
:
Ø 145 mm, 1200 W
Zw
Ø 1
mm, 1100 W
145 × 250 mm, 2 00 W
80
3
2
3
45
0
EN
USAGE
COOKING ZONES CONTROL
Turning the
ON/ OFF
stand-by mode
.
Key lock
0
Touch Control
ON/ OFF
1
2
3 –
H 4
Lo 5
6
ON/ OFF
1
ON/ OFF
1
After mains voltage is applied the control initializes for
approx. 1 second before it is ready for operation.
After a reset all displays and LEDs glow for approx. 1
minute. When this time is over all displays and LEDs
extinguish and the control is in the
.
Touch the
key
to turn on the hob’s
control
It comes a sound signal. The light indicator
lights up.
The displays of the heating fields and of the timer show
the symbols
If a cooking zone has residual heat, the display shows a
symbol
, .
If the child lock feature was active when switching on,
the display shows a symbol
,
– locked and LED
lights (also refer to
).
When the Touch Control is ON it can be turned-OFF at
any time by operating the
key . This is also
valid if the control has been locked (activated child lock
feature).
The
key
has always priority in the turn-OFF
function.
When the control is ON it automatically turns-OFF after
1 minute if no cooking zone or select key has been
operated within this period of time.
If a cooking zone has been selected with heating level
, in 10 seconds it will be deactivated.
•
( ).
16
1
3
4
4
5
6
2

DE
RU
BENUTZUNG
KOCHFELDERSTEUERUNG
EIN/ AUS-Schalten der
Steuerung
Stand-by
locked
Tastensperre
0
Touch Control
EIN/ AUS
1
2
3 –
H 4
Lo
5
6
EIN/ AUS
1
EIN/ AUS
1
Nach Anlegen der Netzspannung initialisiert sich die
Steuerung für ca. 1 Sekunde bevor sie betriebsbereit
ist.
Nach einem Reset leuchten alle Anzeigen und LEDs für
1 Minute. Nach Ablauf dieser Zeit werden alle Anzeigen
und LEDs wieder ausgeschaltet, und die Steuerung
befindet sich im
Zustand.
Berühren Sie die
-Taste
, un die
Kochfeldsteuerung anzuschalten.
Es ertönt ein akustischen Signal. Der Lichtindikator
leuchtet auf. Alle Kochzonendisplays und Timer-
Display zeigen Symbole
Sollte eine Kochzone den Status »Heiss« besitzen,
wird ein statisches Symbol
,
angezeigt.
Sollte zum Zeitpunkt des Einschaltens die
Kindersicherung noch aktiv sein, wird auf Display das
Symbol
(wie
) angezeigt und die LED
leuchtet (siehe auch
).
Durch Betätigung der
-Tasten,
EIN-
Zustand der Steuerung läßt sich die Touch Control
jederzeit wieder ausschalten. Dies gilt auch dann,
wenn die Kindersicherung aktiviert wurde.
Die
-Taste,
hat in der Ausschalt-Funktion
immer Vorrang.
Die Steuerung schaltet sich aus dem Ein-Zustand nach
1 Minute. selbsttätig aus, wenn in dieser Zeit keine
Kochzone aktiviert oder eine Selekttatste betätigt
wurde.
Wenn eine Kochzone mit Kochstufe
ausgewählt
wurde, in 10 Sekunden schaltet sie aus.
•
( ).
17
ИСПОЛЬЗОВАНИЕ
УПРАВЛЕНИЕ НАГРЕВАТЕЛЬНЫМИ ПОЛЯМИ
Включение/ Выключение программатора
Блокировка кнопок
Touch
Control
П о с л е
п о д к л ю ч е н и я
к
с е т и
с е н с о р н ы й
программатор инициализируется примерно 1
секунду, прежде чем он готов к эксплуатации.
После включения все контрольные
ветодиоды
горят 1 минуту По истечении этого времени
все дисплеи и контрольные светодиоды гаснут и
программатор переходит в режим ожидания
•
Коснитесь кнопки
, чтобы
включить программатор.
Раздается звуковой сигнал. Загорается световой
индикатор
. На дисплеях нагревательных полей и
таймера горят символы
( ).
Если какое-либо поле горячее, высветится символ
.
Если была активирована блокировка от детей, то
во время включения на дисплее высветится символ
заблокировано) и загорится
светодиод , (см.
Касанием до кнопки
при
включенном программаторе, нагревательную
поверхность можно в любой момент выключить.
Это действительно даже при включенной
блокировке от детей.
Кнопка
имеет приоритет при
выключении.
Программатор автоматически выключается через 1
минуту, если за это время не было активировано
никакое поле или какая-либо кнопка выбора.
В случае если поле выбрано, но находится в
положении , через 10 сек. происходит деактивация
поля
c
(LEDs)
.
.
,
,
(
).
,
,
.
Stand-
by
locked
0
ВКЛ/ ВЫКЛ 1
2
3 –
H 4
Lo
5
–
6
ВКЛ/ ВЫКЛ
1
ВКЛ/ ВЫКЛ 1
EN
18
2
2
1
1 4
4
4
4
6
7
5
5
3
3
5
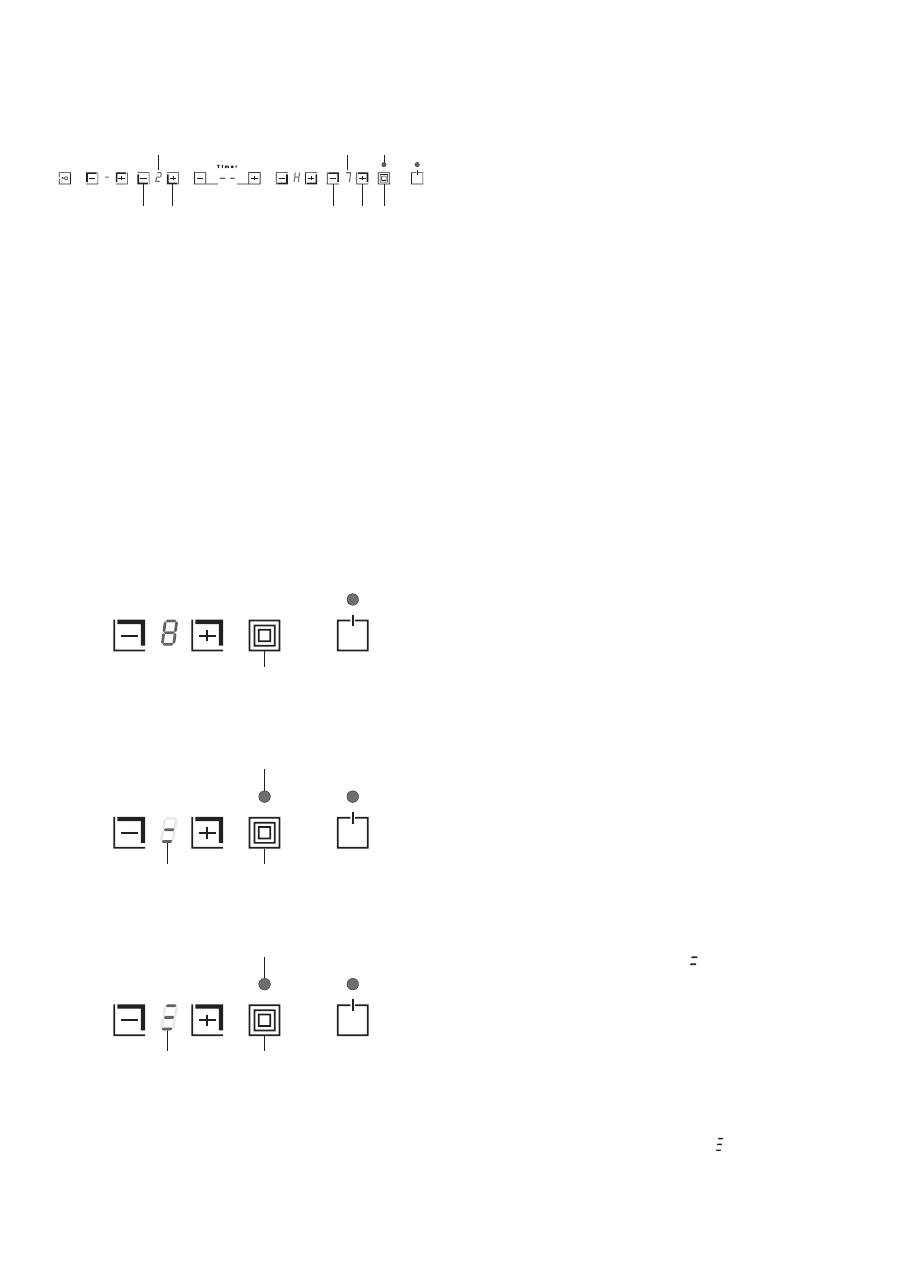
Turning a cooking zone ON and OFF
System
5
5
9
5
0
Triple cooking zone
If the control is ON the respective cooking zone can be
selected by operating a cooking zone select keys
and
( and ) of the respective cooking zone.
For a more comfortable control of the heating fields
under the action with the buttons
and
( and ) the
increase and decrease the heating level occurs at the
level . If you hold the button
( ) heating level varies
from
to . If you hold the button
( ) heating level
varies from to .
When you change a heating level of the field on the
display flashes a corresponding digit.
You can turn on as an internal heating element alone,
as together with the external elements at the same
time.
Select the heating level for internal heating element
of the triple zone buttons
and
( and ).
Touching the
and
( and ) keys emits the audible
signals. A digit of the required heating level flashes on
the display
. After 5 seconds the display stops
flashing, the internal element begins to heat up, the
display shows the preseted heating level.
Touch the key
to turn on the middle heating
element of the triple zone.
The indicator
lights up. It comes a sound signal. The
middle heating element is heated to the level chosen for
the internal element, the display
shows alternately
the heating level and the symbol of heating of the
internal and middle elements
.
Touch the key
to turn on an external heating
element of the triple zone.
It comes a sound signal. External heating element is
heated to level chosen for the internal elements, the
display
shows alternately the heating level and the
symbol of heating of all elements
.
1
+
Comfort
1
+
–
1 +
3
1
+
1
+
,
•
•
( )
•
( )
2
–
2
2 –
2
–
2
–
3
4
3
6
3
7
5
4

DE
RU
19
Включение/ Выключение нагревательного поля
5
5
9
5
0
Т
Система
ройное поле нагрева
Когда управление поверхностью включено, любое
нагревательное поле может быть включено
посредством нажатия кнопок выбора
и
и
соответствующего поля.
Для более комфортного управления полями при
воздействии на кнопки
и
и
увеличение и
уменьшение степени нагрева происходит с уровня
. При удержании кнопки
степень нагрева
меняется в пределах от
до
. При удержании
кнопки
степень нагрева меняется в пределах от
до .
При изменении степени нагрева поля на дисплее
мигает соответствующая цифра.
Вы можете включать как один внутренний, так и
внешние нагревательные элементы одновременно.
•
Выберите степень нагрева внутреннего
нагревательного элемента тройного поля
кнопками
и
и
.
При касании до кнопок
и
и
раздаются
звуковые сигналы. Цифра выбранной степени
нагрева мигает на дисплее
. Спустя 5 секунд
мигание дисплея прекращается, внутренний
эл е м е н т
н ач и н а ет
н а г р е ват ь с я ,
д и с п л е й
показывает установленную степень нагрева.
•
Коснитесь кнопки
, чтобы включить средний
нагревательный элемент тройного поля.
Загорается световой индикатор
. Раздается
звуковой сигнал. Средний нагревательный элемент
разогревается до степени нагрева, выбранной для
внутреннего элемента. На дисплее
сменяются
показание степени нагрева и символ нагрева
внутреннего и среднего элементов
( ).
•
Коснитесь кнопки , чтобы включить внешний
нагревательный элемент тройного поля.
Р а з д а е т с я
з в у к о в о й
с и г н а л .
В н е ш н и й
нагревательный элемент разогревается до степени
нагрева, выбранной для внутренних элементов. На
дисплее
сменяются показание степени нагрева и
символ нагрева всех элементов
( ).
1
+
1
+
1 +
1
+
1
+
6
7
(
)
(
)
,
( )
( )
(
)
(
)
2
–
Comfort
2
–
2 –
3
2
–
2
–
3
4
5
3
4
3
Einschalten/ Ausschalten einer Kochzone
Dreikreis- Kochzone
System
5
5
9
5
0
Komfort
1
2
+
–
1 +
2 –
3
1
2 +
–
1
2 +
–
6
7
Für noch komfortabelere Bedienung der Kochzonen
m i t t e l s
d e r
Ta s t e n
u n d
(
u n d
)
Leistungsreduzierung bzw. Leistungssteigerung
geschieht ab der Stufe . Bei langem Drücken der Taste
( ) ändert sich die Leistung von
bis . Bei langem
Drücken der Taste
( ) ändert sich die Leistung von
bis .
Bei der Leistungsänderung der Kochzone blinkt auf
dem Display
die entsprechende Ziffer.
Sie können sowohl nur das innere Heizelement, als
auch die äußeren Heizelemente gleichzeitig
einschalten.
Wählen Sie die Leistungsstufe vom inneren
Element der Dreikreis-Kochzone mittels der
Tasten
und
( und )
Beim Betätigen der Tasten
und
( und ) erklingen
Signaltöne. Auf dem Display
blinkt die Ziffer der
gewählten Leistungsstufe. Nach 5 Sekunden hört das
Blinken des Displays auf, das innere Element beginnt
sich zu erwärmen, das Display zeigt die Ziffer der
gewählten Leistungsstufe.
Berühren Sie die Taste
um das mittlere
Element der Dreikreis-Kochzone einzuschalten
Der Lichtindikator
leuchtet auf. Es erklingt ein
Signalton. Das mittlere Heizelement erwärmt sich bis
zur für das innere Heizelement gewählten
Leistungsstufe, das Display
zeigt abwechselnd die
Ziffer der gewählten Leistungsstufe und das Symbol der
Erhitzung der inneren und mittleren Elementen
Berühren Sie die Taste
um das äußere
H e i z e l e m e n t
d e r
D r e i k r e i s - K o c h z o n e
einzuschalten
Es erklingt ein Signalton. Das äußere Heizelement
erwärmt sich bis zur für die inneren Heizelementen
gewählten Leistungsstufe, das Display
zeigt
abwechselnd die Ziffer der gewählten Leistungsstufe und
das Symbol der Erhitzung aller Elementen
•
.
•
,
.
( ).
•
,
.
( ).
3
4
5
3
4
3
Wenn die Bedienung der Kochplatte eingeschaltet
ist, kann die beliebige Kochzone durch das
Drücken auf die Wahltaste
und
(
und ) der
entsprechenden Kochzone eingeschaltet werden.
1
2 +
–

EN
20
4
1
2
4
6
5
3
Dual cooking zone
You can turn on as an smaller heating element alone, as
together with the bigger element at the same time.
Select the heating level for smaller heating element
of the dual zone buttons
and
( and ).
Touching the
and
(
and ) keys emits the sound
signals. A digit of the required heating level flashes on
the display
. After 5 seconds the display stops
flashing, the smaller element begins to heat up, the
display shows the preseted heating level.
Touch the key
to turn on the bigger heating
element of the dual zone.
The indicator
lights up. It comes a sound signal. The
bigger heating element is heated to the level chosen for
the smaller element, the display
shows alternately the
heating level and the symbol of heating of the both
elements
.
After reaching the required heating level the heating
elements turn off to save power. To maintain the
temperature corresponding to the selected heating
level, heating elements are turn on automatically.
•
•
( )
1
2 +
–
1
2 +
–
3
4
5
3
6
