Gorenje E55329AW: instruction
Class: Household, kitchen appliances, electronics and equipment
Type: Stove
Manual for Gorenje E55329AW
Table of contents
- Electronic timer EN Setting the clock Manual (non-programmed) operation Semi-automatic operation by setting the cooking time Semi-automatic operation by setting the end of cooking time
- Automatic operation by setting the cooking time and end of cooking time Example Minute minder Acoustic alarm volume Cancelling the timer programming Instant reset of timer programming Using the timer in combination with the oven

Navodila za uporabo - Elektronska programska ura
Instructions for use - Electronic timer
Руководство
по
эксплуатации
-
Электронный
программатор
Інструкція
з
експлуатації
-
електронний
таймер
Upute za uporabu - Elektronski programski sat
Brugsanvisning - elektronisk timer
Instruktioner för användning - Elektroniskt tidur
Bruksanvisning - elektronisk tidsur
Käyttöohjeet - Sähköinen ajastin
Naudojimo instrukcijos - elektroninis laikmatis
Lietošanas instrukcijas - elektroniskais taimeris
Kasutusjuhend - Elektrooniline taimer
Instrukcja obs
ł
ugi - Elektroniczny zegar programuj
ą
cy
SI
MT IE GB
RU
BA HR
UA
DK
SV
NO
FI
LT
LV
ET
PL

326554
1
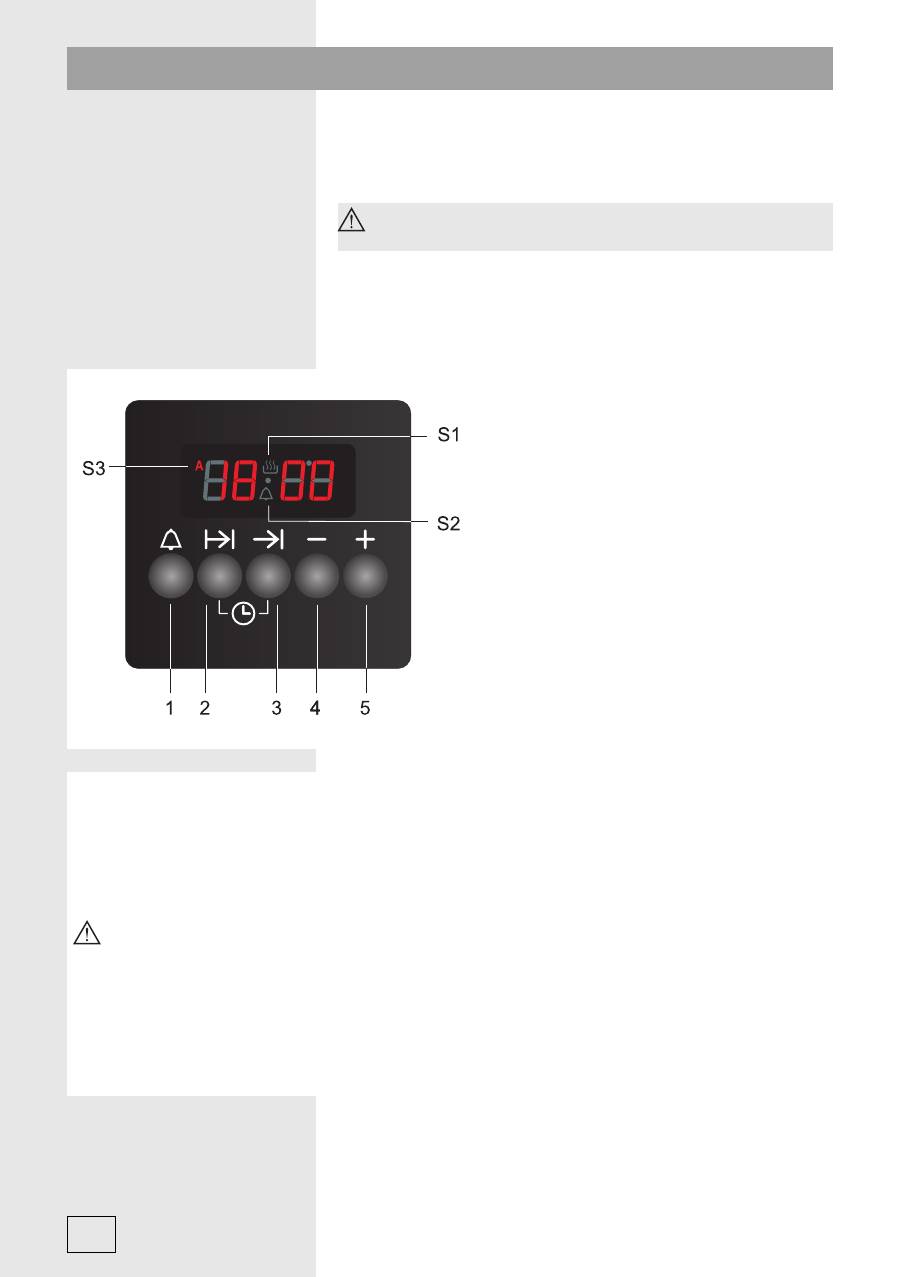
minutnik
2
trajanje delovanja
3
konec delovanja
4
(-) minus
5
(+) plus
Naravnava ure na dnevni
č
as
Ko aparat priklju
č
ite na elektri
č
no omrežje, se na števil
č
nici prikaže utripajo
č
i
0 00
, prav tako utripa
simbol
S3
. Isto
č
asno pritisnite tipki
2 in 3
in s tipkama
4 ali 5
uro naravnajte na to
č
en dnevni
č
as.
Zasveti tudi simbol
S1
, ki ponazarja, da je ura nastavljena na neprogramirano (ro
č
no) delovanje.
Opomba:
č
e držite tipko
4 ali 5
pritisnjeno dalj
č
asa, se števil
č
nica hitreje spreminja.
Nastavitev neprogramiranega (ro
č
nega) delovanja
Isto
č
asno pritisnite tipki
2 in 3. Preklican je vsak do takrat nastavljeni program
(simbol S3 se
zbriše,
č
e je bil aktiven). Aktiven postane simbol S1 (
č
e že ni bil), kar pomeni, da je nastavljeno
neprogramirano (ro
č
no) delovanje.
Polavtomatsko delovanje s trajanjem delovanja
Pritisnite tipko
2.
Na števil
č
nici se prikaže
0 00.
S tipkama
4 ali 5
nastavite željeni
č
as. Pojavi se
simbol
S3
.
Č
as lahko nastavljate v intervalu po 1 minuto. Maksimalni možni nastavljeni
č
as je 10 ur.
Ko ste nastavili željeni
č
as, se le-ta za
č
ne odštevati po 5 sekundah. Na števil
č
nici pa se prikazuje
dnevni
č
as. S pritiskom na tipko
2
lahko preverite preostali
č
as in ga po želji korigirate s tipkama
4 ali 5
. Po poteku nastavljenega
č
asa se oglasi zvo
č
ni signal, ki se po 7 minutah izklju
č
i sam,
č
e ni
prekinjen s pritiskom na tipke
1, 2 ali 3
. Simbol
S1
ugasne, simbol
S3
pa utripa. V tem trenutku se
pe
č
ica izklopi. Po isto
č
asnem pritisku na tipki
2 in 3
simbol
S3
ugasne. Prižge se simbol
S1
in ura je
nastavljena na neprogramirano (ro
č
no) delovanje.
Č
e želite zaklju
č
iti pe
č
enje, morate izklopiti tudi pe
č
ico!
Polavtomatsko delovanje s koncem delovanja
Pritisnite tipko
3
. Na števil
č
nici se prikaže dnevni
č
as. S tipkama
4 ali 5
nastavite željeni
č
as konca
delovanja (le-ta mora biti daljši od trenutnega dnevnega
č
asa). Pojavi se simbol
S3
. 5 sekund po
nastavitvi željenega
č
asa se na števil
č
nici prikaže dnevni
č
as. Ko doseže dnevni
č
as nastavljeni
kon
č
ni
č
as pe
č
enja, se oglasi zvo
č
ni signal, ki se po 7 minutah izklju
č
i sam,
č
e ni prekinjen s
pritiskom na tipke
1, 2 ali 3
. Simbol
S1
ugasne, simbol
S3
pa utripa. V tem trenutku se pe
č
ica
izklopi. Po isto
č
asnem pritisku na tipki
2 in 3
simbol
S3
ugasne. Prižge se simbol
S1
in ura je
2
Elektronska programska ura SI

326554
nastavljena na neprogramirano (ro
č
no) delovanje.
Č
e želite zaklju
č
iti pe
č
enje, morate izklopiti tudi pe
č
ico!
Avtomatsko delovanje z nastavitvijo trajanja in konca delovanja
Pritisnite tipko 2 in s tipkama 4 in 5 nastavite trajanje delovanja. Zatem pritisnite tipko 3 in na
števil
č
nici se prikaže najbližji možen kon
č
ni
č
as delovanja. S tipkama 4 in 5 nastavite konec
delovanja. Simbol S1 ugasne,
č
e je kon
č
ni
č
as daljši od dnevnega
č
asa + trajanja delovanja.
Pe
č
ica za
č
ne avtomatsko delovati glede na nastavljene
č
ase.
Primer
Dnevni
č
as = 12:00, trajanje delovanja je nastavljeno na 1:30, konec pa na 14:00. To pomeni, da
bo pe
č
ica za
č
ela delovati ob 12:30.
Minutnik
S pritiskom na tipko
1
lahko aktivirate minutnik, ki ima samo opozorilno funkcijo in ne izklopi pe
č
ice.
S tipkama
4 in 5
nastavite željeni
č
as. Prižge se simbol
S2
. Ko ste nastavili željeni
č
as, se le-ta
za
č
ne odštevati po 5 sekundah. Na števil
č
nici se prikazuje dnevni
č
as. S pritiskom na tipko
1
lahko
preverite preostali
č
as in ga po želji korigirate s tipkama
4 ali 5
. Maksimalni možni nastavljeni
č
as
je 23 ur in 59 minut. Ko se izte
č
e nastavljeni
č
as, se oglasi zvo
č
ni signal, ki se po 7 minutah izklju
č
i
sam,
č
e ni prekinjen s pritiskom na tipke
1, 2 ali 3
. Simbol
S2
ugasne.
Jakost zvo
č
nega signala
Zbirate lahko 3 razli
č
ne jakosti zvo
č
nega signala tako, da pritiskate tipko
4
. Ko tipko
4
pritisnete in
držite pritisnjeno, se pojavi prva nastavitev zvo
č
nega signala.
Č
e jo spustite in ponovno pritisnete,
se pojavi naslednja jakost. Ohrani se tista jakost zvo
č
nega signala, ki jo dolo
č
ite nazadnje. Jakost
lahko ponovno nastavite, kadarkoli želite.
Preklic
č
asovnega programa
Vse
č
asovne nastavitve, razen minutnika, lahko prekli
č
ete
kadarkoli
z isto
č
asnim pritiskom tipk
2
in 3
. Nastavljeni programi se avtomatsko prekinejo in ura se postavi v stanje neprogramiranega
(ro
č
nega) delovanja.
Hitro brisanje
č
asovnih programov
S pritiskom na tipko 1,2 ali 3 prekli
č
ete ustrezen
č
asovni program. Izbrišete ga s so
č
asnim
pritiskom na tipki 4 in 5.
Uporaba ure v kombinaciji s pe
č
ico
Pri uporabi ure v kombinaciji s pe
č
ico morate najprej vklopiti pe
č
ico in nastaviti željeni
sistem pe
č
enja ter temperaturo. Šele nato nastavljajte funkcije na uri. Ko zaklju
č
ite s
pe
č
enjem, izklopite pe
č
ico.
3

326554
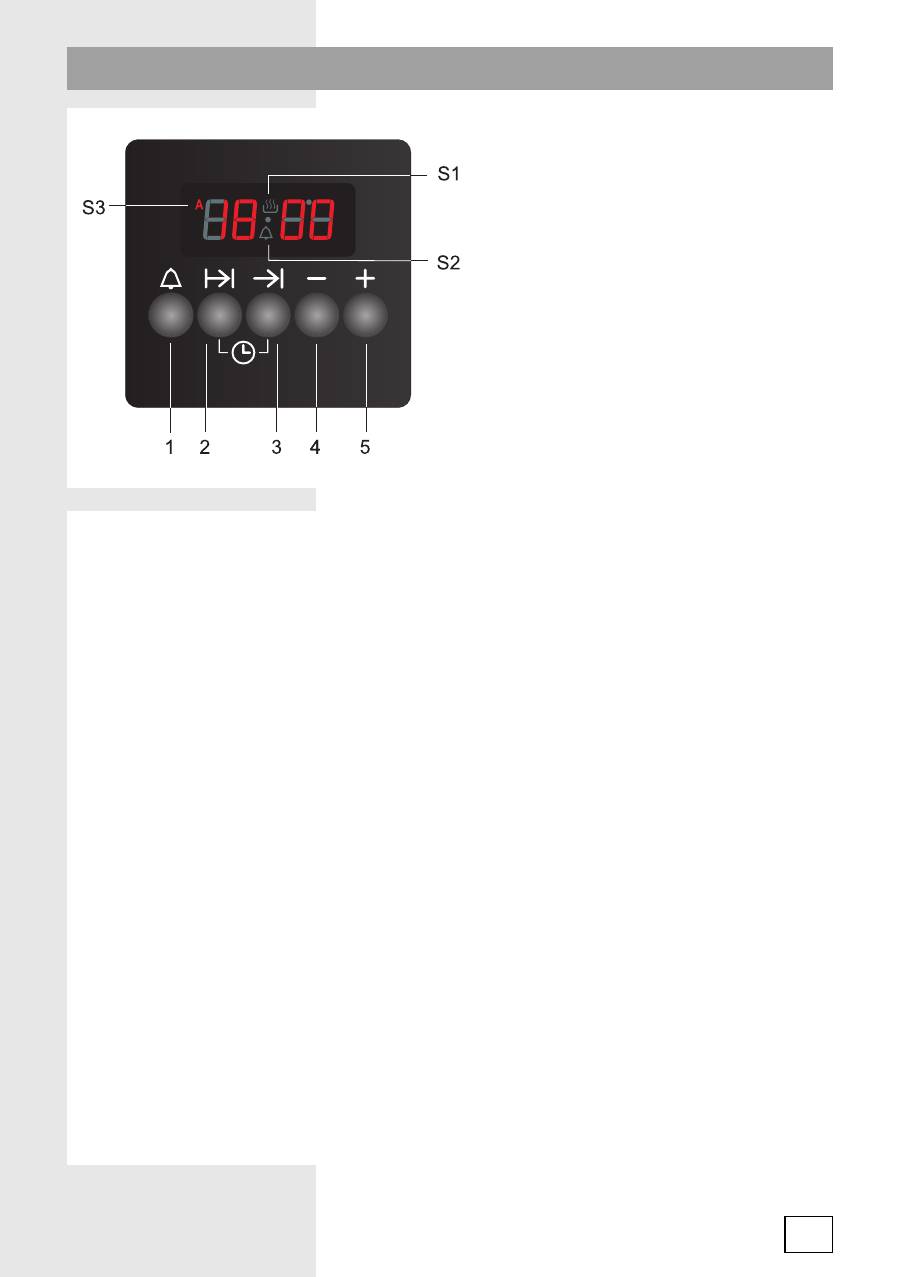
1
Minute minder
2
Cooking time
3
End of cooking time
4
(-) minus
5
(+) plus
Setting the clock
When the appliance is connected to the power mains,
“0 00”
will
fl
ash on the display; furthermore,
the symbol
S3
will
fl
ash as well. Press the
2
and
3
keys simultaneously and use the keys 4 and
5 to set the clock. Symbol
S1
will also light up to indicate that the timer is set to non-programmed
(manual) operation.
Note:
if you keep the
4
and
5
key pressed for a while, the digits will change faster.
Manual (non-programmed) operation
Press the
2
and
3
keys simultaneously.
All previously set programs will be reset
(symbol S3 will
disappear, if it was activated). Symbol S1 will appear (if it had not been activated earlier), which
means that manual (non-programmed) operation has been selected.
Semi-automatic operation by setting the cooking time
Press the 2 key.
0 00
will appear on the display. Use the
4
and
5
keys to set the desired time.
Symbol
S3
will appear. The time can be set in 1-minute steps. Cooking time can be set to a
maximum of 10 hours. When the time is set, countdown will begin in
fi
ve-second steps. The display
will indicate the time of day. Press the 2 key to check the remaining cooking time and adjust it as
required using the 4 and 5 keys. When the set time expires, an acoustic signal will go off. The alarm
will be deactivated automatically after 7 minutes, if it is not acknowledged earlier by pressing the
1
,
2
, or
3
key. The symbol
S1
will disappear and the symbol
S3
will
fl
ash. At that time, the oven will be
switched off. Press the
2
and
3
keys simultaneously and the symbol
S3
will disappear. The symbol
S1
will appear and the timer will be reset to manual (non-programmed operation).
In order to complete the cooking process, switch off the oven!
Semi-automatic operation by setting the end of cooking time
Press the
3
key. Current time of day (clock) will appear on the display. Use the
4
and
5
keys to set
the desired end of cooking time (i.e. the time when you wish the cooking to end); this time has to
be later than the current time. Symbol
S3
will appear. 5 seconds after the desired time is set, clock
will be displayed again. When the clock reaches the set end of cooking time, an acoustic signal
4
Electronic timer EN

326554
will go off. The alarm will be deactivated automatically after 7 minutes, if it is not acknowledged
earlier by pressing the
1
,
2
, or
3
key. The symbol
S1
will disappear and the symbol
S3
will
fl
ash. At
that time, the oven will be switched off. Press the
2
and
3
keys simultaneously and the symbol
S3
will disappear. The symbol
S1
will appear and the timer will be reset to manual (non-programmed
operation).
In order to complete the cooking process, switch off the oven!
Automatic operation by setting the cooking time and end of cooking time
Press the 2 key and use the 4 and 5 keys to set the cooking time. Then, press the 3 key and the
earliest possible end of cooking time will be displayed. Use the 4 and 5 keys to adjust the time
when you want the cooking process to end. Symbol S1 will disappear if the end time is at a later
time than current time + cooking duration. The oven starts to operate automatically according to the
times set.
Example
Current time = 12:00. Cooking time set to 1:30, end of cooking time set to 14:00. This means, that
the oven will start operating at 12:30.
Minute minder
Press the
1
key to activate the minute minder which only has a countdown alarm function and does
not switch off the oven. Use the
4
and
5
keys to set the desired time. Symbol
S2
will appear. When
the desired time is set, the countdown begins in
fi
ve-second steps. The time of day is indicated on
the display. Press the
1
key to check the remaining time and adjust it as required using the
4
and
5
keys. Maximum time that you can set is 23 hours and 59 minutes. When the set time expires, an
acoustic alarm will be activated. After 7 minutes, the alarm will be deactivated automatically, if it is
not acknowledged earlier by pressing the
1
,
2
, or
3
key. The symbol
S2
will disappear.
Acoustic alarm volume
You may choose from 3 different acoustic alarm volumes by pressing the
4
key. When the
4
key
is pressed and held, the initial alarm setting will be restored. If the key is released and pressed
again, the following volume level will be set. The most recently set level will remain effective. Alarm
volume may be adjusted at any time.
Cancelling the timer programming
All settings, except for the minute minder, may be cancelled
at any time
by simultaneously
pressing the
2
and 3 keys. Any set programs will be automatically stopped and the clock will be rest
to manual (non-programmed) operation.
Instant reset of timer programming
Press the 1, 2, or 3 key to select the timer program. Then, press the 4 and 5 keys simultaneously to
delete it.
Using the timer in combination with the oven
When using the timer in combination with the oven,
fi
rst switch on the oven and set the
desired cooking system and temperature. Only then, set the timer functions. When cooking
is complete, switch off the oven.
5
326554
1
Будильник
2
Продолжительность
приготовления
3
Окончание
приготовления
4
Кнопка
«–»
5
Кнопка
«+»
Установка
текущего
времени
После
подключения
прибора
к
электросети
и
в
случае
отключения
электроэнергии
на
дисплее
мигает
0 00
и
индикатор
S3.
Одновременно
нажмите
кнопки
2
и
3
и
далее
кнопками
4
и
5
установите
точное
время
суток
.
Через
несколько
секунд
загорится
индикатор
S1
,
показывая
,
что
прибор
находится
в
ручном
режиме
работы
.
Если
кнопку
«+»
или
«–»
удерживать
,
то
значение
будет
меняться
быстрее
(
увеличиваться
или
уменьшаться
соответственно
).
Ручной
режим
Одновременно
нажмите
кнопки
2
и
3
.
Отменятся
все
установленные
функции
(
индикатор
S3
погаснет
,
если
он
горел
).
Загорится
индикатор
S1
,
это
означает
,
что
прибор
находится
в
ручном
режиме
работы
.
После
первого
подключения
прибора
к
электросети
и
в
случае
отключения
электроэнергии
необходимо
установить
текущее
время
.
Без
установки
текущего
времени
пользование
духовкой
невозможно
.
Нагревательные
элементы
могут
работать
при
открытой
дверце
духовки
,
если
прибор
не
оборудован
встроенным
выключателем
духовки
.
Опасность
ожога
!
6
Электронный программатор RU

326554
Программирование
времени
работы
духовки
Для
программирования
времени
работы
духовки
сначала
включите
духовку
,
выбрав
режим
нагрева
и
температуру
.
Затем
можно
установить
необходимую
функцию
.
После
завершения
приготовления
выключите
духовку
,
установив
переключатели
в
положение
0.
Продолжительность
приготовления
Данная
функция
позволяет
запрограммировать
время
,
как
долго
духовка
будет
работать
(
продолжительность
приготовления
).
Максимальное
время
функции
составляет
10
часов
.
•
Нажмите
кнопку
2
.
На
дисплее
появится
0 00
.
Кнопками
4
и
5
установите
продолжительность
приготовления
.
Загорится
индикатор
S3
.
Время
устанавливается
с
шагом
в
1
минуту
.
Максимальное
время
функции
составляет
10
часов
.
•
Через
5
секунд
после
установки
начнется
отсчет
времени
.
На
дисплее
отображается
время
суток
.
Нажатием
на
кнопку
2
можно
проверить
оставшееся
время
и
при
необходимости
его
изменить
кнопками
4
и
5
.
•
По
истечении
установленного
времени
раздастся
звуковой
сигнал
,
который
можно
выключить
нажатием
на
кнопки
1, 2
или
3
,
или
через
7
минут
сигнал
выключится
автоматически
.
Индикатор
S1
погаснет
,
индикатор
S3
мигает
.
Духовка
автоматически
выключится
.
После
одновременного
нажатия
на
кнопки
2
и
3
индикатор
S3
погаснет
.
Загорится
индикатор
S1
,
духовка
готовка
к
работе
в
ручном
режиме
.
Чтобы
завершить
приготовление
,
выключите
духовку
,
установив
переключатели
в
положение
0.
Окончание
приготовления
Данная
функция
позволяет
запрограммировать
время
отключения
духовки
(
окончание
приготовления
).
Окончание
приготовления
можно
запрограммировать
не
больше
чем
на
10
часов
с
момента
установки
функции
.
•
Нажмите
кнопку
3
.
На
дисплее
появится
время
суток
.
Кнопками
4
и
5
установите
время
окончания
приготовления
(
время
должно
быть
больше
,
чем
текущее
время
суток
).
Загорится
индикатор
S3
.
•
Через
5
секунд
после
установки
на
дисплее
отобразится
время
суток
.
Нажатием
на
кнопку
3
можно
проверить
оставшееся
время
и
при
необходимости
его
изменить
кнопками
4
и
5
.
•
По
истечении
установленного
времени
раздастся
звуковой
сигнал
,
который
можно
выключить
нажатием
на
кнопки
1
,
2
или
3
,
или
через
7
минут
сигнал
выключится
автоматически
.
Индикатор
S1
погаснет
,
индикатор
S3
мигает
.
Духовка
автоматически
выключится
.
После
одновременного
нажатия
на
кнопки
2
и
3
индикатор
S3
погаснет
.
Загорится
индикатор
S1
,
духовка
готовка
к
работе
в
ручном
режиме
.
Чтобы
завершить
приготовление
,
выключите
духовку
,
установив
переключатели
в
положение
0.
Отсрочка
старта
Данная
функция
позволяет
запрограммировать
время
,
как
долго
духовка
будет
работать
(
продолжительность
приготовления
),
и
время
отключения
духовки
(
окончание
приготовления
).
Окончание
приготовления
можно
запрограммировать
не
больше
чем
на
10
часов
с
момента
установки
функции
.
7

326554
•
Нажмите
кнопку
2
и
кнопками
4
и
5
установите
продолжительность
приготовления
.
•
Нажмите
кнопку
3
,
на
дисплее
отобразится
сумма
текущего
времени
суток
и
продолжительности
приготовления
.
Кнопками
4
и
5
установите
время
окончания
приготовления
.
•
Индикатор
S1
погаснет
,
если
время
окончания
приготовления
больше
суммы
текущего
времени
суток
и
продолжительности
приготовления
.
Духовка
в
определенное
время
автоматически
включится
и
выключится
в
установленное
время
.
Пример
Текущее
время
12:00,
установлена
продолжительность
приготовления
1:30,
а
окончание
на
14:00.
Значит
,
духовка
начнет
работу
в
12:30.
Чтобы
завершить
приготовление
,
выключите
духовку
,
установив
переключатели
в
положение
0.
Будильник
Программатор
оснащен
функцией
будильника
,
который
оповещает
,
что
установленное
время
истекло
,
и
не
отключает
духовку
.
Будильник
можно
использовать
независимо
от
работы
духовки
.
Максимальное
время
функции
составляет
23
часа
59
минут
!
•
Нажмите
кнопку
1
и
кнопками
4
и
5
установите
время
будильника
.
Загорится
индикатор
S2
.
Максимальное
время
функции
составляет
23
часа
59
минут
!
•
Через
5
секунд
после
установки
начнется
отсчет
времени
.
На
дисплее
отображается
время
суток
.
С
помощью
кнопки
1
можно
проверить
оставшееся
время
и
при
необходимости
его
изменить
кнопками
4
и
5
.
•
По
истечении
установленного
времени
раздастся
звуковой
сигнал
,
который
можно
выключить
нажатием
на
кнопки
1, 2
или
3
,
или
через
7
минут
сигнал
выключится
автоматически
.
Индикатор
S2
погаснет
.
Настройка
громкости
звукового
сигнала
Вы
можете
выбрать
один
из
трех
уровней
громкости
звукового
сигнала
.
•
Нажмите
и
удерживайте
кнопку
4
.
Вы
услышите
первый
уровень
громкости
.
Отпустите
и
снова
нажмите
кнопку
4
.
Появится
следующий
уровень
громкости
.
Программатор
автоматически
сохраняет
последний
установленный
уровень
громкости
.
•
Вы
можете
отрегулировать
громкость
сигнала
в
любое
время
.
Отмена
текущей
функции
•
Для
отмены
любой
текущей
функции
,
кроме
будильника
,
одновременно
нажмите
кнопки
2
и
3
.
Выполнение
программы
и
приготовление
автоматически
прекратится
.
Программатор
перейдет
в
ручной
режим
.
Быстрая
отмена
функций
•
Вызовите
функцию
с
помощью
кнопки
1, 2
или
3
и
для
ее
отмены
одновременно
нажмите
кнопки
4
и
5
.
8
326554
1
Зворотний
відлік
2
Тривалість
готування
3
Час
завершення
готування
4
Мінус
(-)
5
Плюс
(+)
Настроювання
годинника
Після
підключення
приладу
до
електромережі
на
дисплеї
блиматиме
індикація
“0 00”
,
а
також
символ
S3
.
Одночасно
натисніть
клавіші
2
і
3
й
настройте
годинник
за
допомогою
клавіш
4
і
5
.
На
дисплеї
також
засвітиться
символ
S1
,
який
сигналізує
,
що
таймер
працює
в
режимі
незапрограмованої
(
ручної
)
експлуатації
.
Примітка
:
якщо
утримувати
клавіші
4
і
5
натиснутими
впродовж
певного
часу
,
цифри
почнуть
змінюватися
швидше
.
Режим
ручної
(
незапрограмованої
)
експлуатації
Одночасно
натисніть
клавіші
2
і
3
.
Буде
скинуто
всі
раніше
настроєні
програми
(
якщо
на
дисплеї
відображався
символ
S3
,
він
зникне
).
На
дисплеї
з
’
явиться
символ
S1
(
якщо
він
не
відображався
раніше
),
який
свідчить
,
що
вибрано
режим
ручної
(
незапрограмованої
)
експлуатації
.
Режим
напівавтоматичної
експлуатації
з
настроюванням
тривалості
готування
Натисніть
клавішу
2
.
На
дисплеї
з
’
явиться
індикація
0 00
.
За
допомогою
клавіш
4
і
5
настройте
потрібну
тривалість
.
На
дисплеї
з
’
явиться
символ
S3
.
Тривалість
настроюється
із
кроком
в
1
хвилину
.
Максимальна
можлива
тривалість
готування
становить
10
годин
.
Після
настроювання
тривалості
почнеться
зворотний
відлік
із
кроком
у
п
’
ять
секунд
.
На
дисплеї
відображатиметься
поточний
час
.
Натисніть
клавішу
2,
щоб
переглянути
,
яка
тривалість
готування
залишилася
,
та
настроїти
її
в
разі
потреби
за
допомогою
клавіш
4
і
5
.
Після
завершення
тривалості
готування
спрацює
звуковий
сигнал
.
Сигнал
автоматично
вимкнеться
через
7
хвилин
,
якщо
його
не
підтвердити
раніше
,
натиснувши
клавішу
1, 2
або
3
.
Символ
S1
зникне
з
дисплея
;
почне
блимати
символ
S3
.
У
цей
час
піч
буде
вимкнуто
.
Одночасно
натисніть
клавіші
2
і
3
,
щоб
прибрати
символ
S3
з
дисплея
.
На
дисплеї
з
’
явиться
символ
S1,
і
таймер
повернеться
в
режим
ручної
(
незапрограмованої
)
експлуатації
.
Щоб
завершити
процес
готування
,
вимкніть
піч
!
9
Електронний таймер UA

326554
Режим
напівавтоматичної
експлуатації
з
настроюванням
часу
завершення
готування
Натисніть
клавішу
3
.
На
дисплеї
відобразиться
поточний
час
(
годинник
).
За
допомогою
клавіш
4
і
5
настройте
потрібний
час
завершення
готування
(
тобто
момент
часу
,
в
який
потрібно
завершити
готування
).
Цей
час
має
бути
пізнішим
за
поточний
час
.
На
дисплеї
з
’
явиться
символ
S3
.
Через
5
секунд
після
настроювання
потрібного
часу
знову
відобразиться
годинник
.
Коли
на
годиннику
настане
настроєний
час
завершення
готування
,
спрацює
звуковий
сигнал
.
Сигнал
автоматично
вимкнеться
через
7
хвилин
,
якщо
його
не
підтвердити
раніше
,
натиснувши
клавішу
1, 2
або
3.
Символ
S1
зникне
з
дисплея
;
почне
блимати
символ
S3.
У
цей
час
піч
вимкнеться
.
Одночасно
натисніть
клавіші
2
і
3,
щоб
прибрати
символ
S3
з
дисплея
.
На
дисплеї
з
’
явиться
символ
S1,
і
таймер
повернеться
в
режим
ручної
(
незапрограмованої
)
експлуатації
.
Щоб
завершити
процес
готування
,
вимкніть
піч
!
Режим
автоматичної
експлуатації
з
настроюванням
тривалості
та
часу
завершення
готування
Натисніть
клавішу
2
,
а
потім
настройте
тривалість
готування
за
допомогою
клавіш
4
і
5
.
Потім
натисніть
клавішу
3
,
щоб
відобразити
найбільш
ранній
можливий
час
завершення
готування
.
За
допомогою
клавіш
4
і
5
настройте
момент
часу
,
в
який
потрібно
завершити
процес
готування
.
Якщо
час
завершення
буде
пізнішим
за
поточний
час
,
до
якого
додано
тривалість
готування
,
з
дисплея
зникне
символ
S1
.
Піч
почне
працювати
в
режимі
автоматичної
експлуатації
відповідно
до
настроєних
значень
тривалості
та
часу
.
Зворотний
відлік
Поточний
час
= 12:00.
Настроєна
тривалість
готування
= 1:30,
настроєний
час
завершення
готування
= 14:00.
Це
означає
,
що
піч
почне
працювати
о
12:30.
Зворотний
відлік
Натисніть
клавішу
1
,
щоб
увімкнути
зворотний
відлік
,
який
виконує
лише
сигнальну
функцію
та
не
забезпечує
вимкнення
печі
.
За
допомогою
клавіш
4
і
5
настройте
потрібну
тривалість
.
З
’
явиться
символ
S2
.
Після
настроювання
потрібної
тривалості
почнеться
зворотний
відлік
із
кроком
у
п
’
ять
секунд
.
На
дисплеї
відображається
поточний
час
.
Натисніть
клавішу
1,
щоб
переглянути
,
яка
тривалість
готування
залишилася
,
та
настроїти
її
в
разі
потреби
за
допомогою
клавіш
4
і
5
.
Максимальна
можлива
тривалість
становить
23
години
59
хвилин
.
Після
завершення
настроєної
тривалості
спрацює
звуковий
сигнал
.
Сигнал
автоматично
вимкнеться
через
7
хвилин
,
якщо
його
не
підтвердити
раніше
,
натиснувши
клавішу
1, 2
або
3
.
Із
дисплея
зникне
символ
S2
.
Гучність
звукового
сигналу
За
допомогою
клавіші
4
можна
вибрати
один
із
3
рівнів
гучності
звукового
сигналу
.
Натискання
та
утримання
клавіші
4
призведе
до
відновлення
початкової
настройки
сигналу
.
Якщо
відпустити
клавішу
та
натиснути
її
знову
,
буде
вибрано
наступний
рівень
гучності
.
Вибраним
залишається
востаннє
настроєний
рівень
.
Настроїти
гучність
сигналу
можна
в
будь
-
який
час
.
10

326554
Скасування
програмування
таймера
Усі
настройки
,
окрім
зворотного
відліку
,
можна
скасувати
в
будь
-
який
час
,
одночасно
натиснувши
клавіші
2
і
3
.
Це
призведе
до
автоматичного
зупинення
всіх
настроєних
програм
і
повернення
годинника
в
режим
ручної
(
незапрограмованої
)
експлуатації
.
Миттєве
скидання
програмування
таймера
Натисніть
клавішу
1, 2
або
3
,
щоб
вибрати
програму
таймера
.
Потім
одночасно
натисніть
клавіші
4
і
5
,
щоб
видалити
її
.
Використання
таймера
в
поєднанні
з
піччю
Використовуючи
таймер
у
поєднанні
з
піччю
,
спочатку
ввімкніть
піч
і
настройте
потрібні
режим
і
температуру
готування
.
Лише
після
цього
настройте
функції
таймера
.
Після
завершення
готування
вимкніть
піч
.
11

326554
1
Upozoravaju
ć
i signal (alarm)
2
Trajanje djelovanja pe
ć
nice
3
Završetak djelovanja pe
ć
nice
4
(-) minus
5
(+) plus
Podešavanje to
č
nog vremena
Kad ure
đ
aj priklju
č
ite na elektri
č
nu mrežu, na broj
č
aniku se prikaže bljeskaju
ć
i natpis 0 00, a
istovremeno bljeska i simbol
S3
. Pritisnite tipke
2
i
3
istovremeno, te tipkama
4
ili
5
podesite
to
č
no vrijeme. Zasvijetli simbol
S1
, što signalizira da je sat podešen na neprogramirano (ru
č
no)
djelovanje. Napomena: ako tipku
4
ili
5
držite pritisnutu duže vrijeme, broj
č
anik se brže mijenja.
Podešavanje neprogramiranog (ru
č
nog) djelovanja
Istovremeno pritisnite tipke
2
i
3.
Time je opozvan svaki, do tog trenutka podešen program
(simbol
S3
se izbriše, ako je bio aktivan). Aktivan postane simbo
l S1
(ako ve
ć
nije bio), što zna
č
i da
je podešeno neprogramirano (ru
č
no) djelovanje pe
ć
nice.
Poluautomatsko djelovanje s odre
đ
enim trajanjem djelovanja
Pritisnite tipku
2
. Na broj
č
aniku se pojavi
0 00
. Tipkama
4
ili
5
odaberite željeno razdoblje. Pojavi se
simbol
S3
. Vrijeme možete podešavati u intervalima po 1 minutu. Maksimalno mogu
ć
e podešeno
razdoblje je 10 sati.
Nakon što ste podesili izabrano razdoblje, nakon 5 sekundi vrijeme se zapo
č
ne odbrojavati. Na
broj
č
aniku je prikazano to
č
no vrijeme. Pritiskom na tipku
(2)
možete provjeriti preostalo vrijeme, i po
želji ga popravljati tipkama
4
ili
5
.
Nakon isteka podešenog vremena, za
č
uje se zvu
č
ni signal koji se nakon 7 minuta isklju
č
i sam, ako
nije prekinut pritiskom na tipke
1, 2,
ili
3
. Simbol
S1
se tada ugasi, a simbol
S3
bljeska. U tom se
trenutku pe
ć
nica isklju
č
i. Istovremenim pritiskom na tipke
2
i
3
simbol
S3
se ugasi, upali se simbol
S1
i sat je podešen na neprogramirano (ru
č
no) djelovanje.
Ako želite završiti s pe
č
enjem, morate isklju
č
iti i pe
ć
nicu!
Poluautomatsko djelovanje s izabranim vremenom završetka djelovanja
Pritisnite tipku
3
, na broj
č
aniku se pojavi to
č
no vrijeme. Tipkama
4
ili
5
izaberite vrijeme završetka
djelovanja (ovo mora biti duže od trenutnog vremena). Pojavi se simbol
S3
, a 5 sekundi nakon
podešavanja izabranog vremena završetka na broj
č
aniku se prikaže to
č
no vrijeme.
Kad to
č
no vrijeme na satu sustigne podešeno vrijeme završetka pe
č
enja, za
č
uje se zvu
č
ni signal
12
Elektronski programski sat HR BA

326554
koji se nakon 7 minuta isklju
č
i sam, ako nije prekinut pritiskom na tipke
1, 2,
ili
3
.
Simbol S1 se tada ugasi, a simbol
S3
bljeska. U tom se trenutku pe
ć
nica isklju
č
i. Istovremenim
pritiskom na tipke
2
i
3
simbol
S3
se ugasi, upali se simbol
S1
i sat je podešen na neprogramirano
(ru
č
no) djelovanje.
Ako želite završiti s pe
č
enjem, morate isklju
č
iti i pe
ć
nicu!
Automatsko djelovanje s podešenim trajanjem i završetkom
Pritisnite tipku
2
i tipkama
4
i
5
izaberite trajanje djelovanja. Zatim pritisnite tipku
3
i na broj
č
aniku
se prikaže najbliže mogu
ć
e vrijeme završetka djelovanja. Tipkama
4
i
5
izaberite završetak
djelovanja. Simbol
S1
se ugasi ako je vrijeme završetka duže od trenutnog vremena + trajanja
djelovanja. Pe
ć
nica zapo
č
ne automatski djelovati sukladno podešenim vremenima.
Primjer:
To
č
no vrijeme = 12:00, trajanje djelovanja podešeno je na 1:30, a završetak na 14:00. Ovo zna
č
i,
da
ć
e pe
ć
nica zapo
č
eti raditi u 12:30.
Tipka za odbrojavanje (timer)
Pritiskom na tipku
1
aktivirate odbrojavanje vremena, koje ima samo upozoravaju
ć
u funkciju, i ne
isklju
č
uje pe
ć
nicu.
Tipkama
4
i
5
podešavate željeno vrijeme. Upali se simbol
S2
. Kad ste izabrali vrijeme, nakon 5
sekundi ono se zapo
č
ne odbrojavati. Na broj
č
aniku je prikazano teku
ć
e to
č
no vrijeme. Pritiskom
na tipku 1 možete provjeriti preostatak vremena i po želji ga korigirati tipkama
4
i
5
. Maksimalno
mogu
ć
e podešeno vrijeme je 23 sata i 59 minuta.
Kad je podešeno vrijeme isteklo, za
č
uje se zvu
č
ni signal, koji se nakon 7 minuta isklju
č
i sam, ako
ga ne prekinemo pritiskom na tipke
1, 2
, ili
3
. Simbol
S2
se ugasi.
Ja
č
ina zvu
č
nog signala
Na raspolaganju imate 3 razli
č
ite ja
č
ine zvu
č
nog signala. Birate ih tako da pritiš
ć
ete tipku
4
. Ako
tu tipku držite pritisnutu, pojavi se prva ja
č
ina zvu
č
nog signala. Ako je sad ispustite i ponovno
pritisnete pojavi se slijede
ć
a ja
č
ina. Podešena ostane ona glasno
ć
a zvu
č
nog signala, koja je
zadnja odre
đ
ena. Ja
č
inu možete mijenjati i ponovno podešavati kad god želite.
Poništavanje bilo kojeg vremenskog programa
Sva vremenska podešavanja, osim tipke odbrojavanja, možete poništiti
bilo kada
, tako da
istovremeno pritisnete tipke
2
i
3
. Podešeni programi automatski se prekidaju, a sat se postavi u
stanje neprogramiranog (ru
č
nog) djelovanja.
Brzo brisanje vremenskih programa
Pritiskom na tipku 1,2 ili 3 poništavate odgovaraju
ć
i vremenski program. Brišete ga istovremenim
pritiskom na tipke 4 i 5.
Uporaba sata u kombinaciji s pe
ć
nicom
Prilikom korištenja sata u kombinaciji s pe
ć
nicom, morate najprije uklju
č
iti pe
ć
nicu i
izabrati sustav pe
č
enja te temperaturu. Tek zatim podešavajte funkcije sata. Kad završite s
pe
č
enjem, isklju
č
ite pe
ć
nicu.
13

326554
1
Minutur
2
Tilberedningstid
3
Sluttid for tilberedning
4
(-) minus
5
(+) plus
Indstille uret
Når apparatet sluttes til strømforsyningen, blinker
“0 00”
og symbolet
S3
på displayet. Hold
knapperne
2
og
3
inde samtidigt, og indstil klokkeslættet med knapperne
4
og
5
. Symbolet
S1
tændes også for at vise, at timeren er indstillet til ikke-programmeret (manuel) drift.
Bemærk:
Hvis du holder knappen
4
eller
5
inde lidt tid, skifter tallene hurtigere.
Manuel (ikke-programmeret) drift
Tryk samtidigt på knapperne
2
og
3
.
Alle tidligere indstillede programmer nulstilles
(symbolet
S3 slukkes, hvis det var tændt). Symbolet S1 tændes (hvis det ikke var tændt allerede) for at vise, at
manuel (ikke-programmeret) drift er valgt.
Halvautomatisk drift ud fra sluttidspunkt for tilberedningen
Tryk på knappen
3
. Klokkeslættet vises på displayet. Brug knapperne
4
og
5
til at indstille det
ønskede sluttidspunkt for tilberedningen (dvs. hvornår maden skal være færdig). Tidspunktet skal
være senere end klokkeslættet. Symbolet
S3
vises. 5 sekunder efter, at det ønskede tidspunkt er
indstillet, vises klokkeslættet igen. Når sluttidspunktet for tilberedningen nås, lyder alarmen. Alarmen
slås automatisk fra efter 7 minutter og kan inden da afbrydes ved at trykke på en hvilken som helst
af knapperne
1, 2
eller
3
. Symbolet
S1
slukkes, og symbolet
S3
blinker. På dette tidspunkt slukkes
ovnen. Tryk samtidigt på knapperne
2
og
3
, så symbolet
S3
slukkes. Symbolet
S1
tændes, og
timeren nulstilles til manuel (ikke-programmeret) drift.
Sluk ovnen for at afslutte tilberedningen!
Halvautomatisk drift ud fra sluttidspunkt for tilberedningen
Tryk på knappen
3
. Klokkeslættet vises på displayet. Brug knapperne
4
og
5
til at indstille det
ønskede sluttidspunkt for tilberedningen (dvs. hvornår maden skal være færdig). Tidspunktet skal
være senere end klokkeslættet. Symbolet
S3
vises. 5 sekunder efter, at det ønskede tidspunkt er
indstillet, vises klokkeslættet igen. Når sluttidspunktet for tilberedningen nås, lyder alarmen. Alarmen
slås automatisk fra efter 7 minutter og kan inden da afbrydes ved at trykke på en hvilken som helst
af knapperne
1, 2
eller
3
. Symbolet
S1
slukkes, og symbolet S3 blinker. På dette tidspunkt slukkes
14
Elektronisk timerfunktion DK

326554
ovnen. Tryk samtidigt på knapperne
2
og
3
, så symbolet
S3
slukkes. Symbolet
S1
tændes, og
timeren nulstilles til manuel (ikke-programmeret) drift.
Sluk ovnen for at afslutte tilberedningen!
Automatisk drift ud fra tilberedningstid og sluttidspunkt
Tryk på knappen 2, og indstil tilberedningstiden med knapperne 4 og 5. Tryk på knappen 3. Det
tidligst mulige sluttidspunkt vises på displayet. Indstil det ønskede sluttidspunkt for tilberedningen
med knapperne 4 og 5. Symbolet S1 slukkes, hvis sluttidspunktet er senere end en time +
tilberedningstiden i forhold til det aktuelle klokkeslæt. Ovnen tændes automatisk i henhold til de
indstillede tider.
Eksempel
Klokken er 12:00. Tilberedningstiden er indstillet til 1:30, og sluttidspunktet er indstillet til klokken
14:00. Dermed tændes ovnen klokken 12:30.
Minutur
Tryk på knappen
1
for at vælge minuturet, som afgiver en lydalarm efter det indstillede tidsrum
uden at slukke for ovnen. Indstil det ønskede tidsrum med knapperne
4
og
5
. Symbolet
S2
vises.
Når tiden er indstillet, starter nedtællingen i trin a 5 sekunder. Klokkeslættet vises på displayet. Tryk
på knappen
1
for at få vist den resterende tid, til alarmen lyder. Du kan ændre den resterende tid
med knapperne
4
og
5
. Den højeste tid, der kan indstilles, er 23 timer og 59 minutter. Når tiden er
gået, lyder alarmen. Alarmen slås automatisk fra efter 7 minutter og kan inden da afbrydes ved at
trykke på en hvilken som helst af knapperne
1, 2
, eller
3
. Symbolet
S2
slukkes.
Alarmens lydstyrke
Du kan vælge mellem 3 lydstyrker ved at trykke på knappen
4
. Hvis du holder knappen
4
inde,
gendannes fabriksindstillingen. Hvis du trykker på knappen, ændres lydstyrken til det næste trin.
Lydstyrken vil altid være det senest valgte trin. Du kan til enhver tid indstille alarmens lydstyrke.
Annullere timerprogrammet
Alle indstillinger med undtagelsen af minuturet kan
til enhver tid
annulleres ved at trykke på
knapperne
2
og
3
samtidigt. Eventuelle programmer annulleres automatisk,og ovnen går tilbage til
manuel (ikke-programmeret) drift.
Hurtig nulstilling af timerprogram
Tryk på knapperne 1, 2 eller 3 for at vælge timerprogrammet. Tryk samtidigt på knapperne 4 og 5
for at slette det.
Bruge timeren sammen med ovnen
Hvis du vil bruge timeren sammen med ovnen, skal du først tænde ovnen og indstille den
ønskede tilberedningsmetode og -temperatur. Indstil herefter timerfunktionerne. Sluk for
ovnen efter endt tilberedning.
15

326554
1
Äggklocka
2
Tillagningstid
3
Slut för tillagningstid
4
(-) minus
5
(+) plus
Ställa in klockan
När apparaten ansluts till elnätet blinkar
“0 00”
på displayen; dessutom blinkar symbolen
S3
. Tryck
på knapparna
2
och
3
samtidigt och använd knapparna
4
och
5
för att ställa in klockan. Symbolen
S1
tänds också för att indikera att tiduret är inställt på icke-programmerad (manuell) drift.
Obs!
Om du håller in knapparna 4 och 5 en stund ändras siffrorna snabbare.
Manuell (icke-programmerad) drift
Tryck på knapparna
2
och
3
samtidigt. Alla tidigare inställda program återställs (symbolen S3
försvinner, om den var aktiverad). Symbolen S1 visas (om den inte hade aktiverats tidigare), vilket
innebär att manuell (icke-programmerad) drift har valts.
Halvautomatisk drift genom inställning av tillagningstiden
Tryck på knappen
2. 0 00
visas på displayen. Använd knapparna
4
och
5
för att ställa in önskad tid.
Symbolen
S3
visas. Tiden kan ställas in i steg om 1 minut. Tillagningstiden kan ställas in på max.
10 timmar. När tiden är inställd börjar nedräkningen i steg om 5 sekunder. Klockslaget visas på
displayen. Tryck på knappen
2
för att kontrollera den återstående tillagningstiden och justera den
efter behov med knapparna
4
och
5
. När den inställda tiden har för
fl
utit hörs en ljudsignal. Larmet
avaktiveras automatiskt efter 7 minuter om det inte kvitteras tidigare med tryckning på knappen
1
,
2
eller
3
. Symbolen
S1
försvinner och symbolen
S3
blinkar. Vid den tiden stängs ugnen av. Tryck på
knapparna
2
och
3
samtidigt och symbolen
S3
försvinner. Symbolen
S1
visas och tiduret återställs
till manuell (icke-programmerad) drift.
Slutför tillagningsprocessen genom att stänga av ugnen!
Halvautomatisk drift genom inställning av tillagningstidens slut
Tryck på knappen
3
. Aktuellt klockslag (klocka) visas på displayen. Använd knapparna 4 och 5
för att ställa in önskat slut på tillagningstiden (dvs. tiden då du vill att tillagningen ska vara klar);
denna tid måste vara senare än den aktuella tiden. Symbolen
S3
visas. 5 sekunder efter att den
önskade tiden har ställts in visas klockan igen. När klockan når tillagningstidens inställda slut hörs
en ljudsignal. Larmet avaktiveras automatiskt efter 7 minuter om det inte kvitteras tidigare med
16
Elektroniskt tidur SV

326554
tryckning på knappen
1, 2
eller
3
. Symbolen
S1
försvinner och symbolen
S3
blinkar. Vid denna tid
stängs ugnen av. Tryck på knapparna
2
och
3
samtidigt och symbolen
S3
försvinner. Symbolen
S1
visas och tiduret återställs till manuell (icke-programmerad) drift.
Slutför tillagningsprocessen genom att stänga av ugnen!
Automatisk drift genom inställning av tillagningstiden och dess slut
Tryck på knappen 2 och använd knapparna 4 och 5 för att ställa in tillagningstiden. Tryck sedan på
knappen 3 och det tidigast möjliga slutet på tillagningstiden visas. Använd knapparna 4 och 5 för att
justera tiden när du vill att tillagningsprocessen ska vara klar. Symbolen S1 försvinner om sluttiden
är en senare tid än den aktuella tiden + tillagningens längd. Ugnen startar automatiskt i enlighet
med de inställda tiderna.
Exempel
Aktuell tid = 12:00. Tillagningstid inställd på 1:30, tillagningstidens slut på 14:00. Det innebär att
ugnen startar 12:30.
Äggklocka
Tryck på knappen
1
för att aktivera äggklockan som endast har en nedräkningslarmfunktion och
inte stänger av ugnen. Använd knapparna
4
och
5
för att ställa in önskad tid. Symbolen
S2
visas.
När den önskade tiden är inställd börjar nedräkningen i steg om 5 sekunder. Aktuellt klockslag
indikeras på displayen. Tryck på knappen 1 för att kontrollera den återstående tiden och justera
den efter behov med knapparna
4
och
5
. Max. tid som kan ställas in är 23 timmar och 59 minuter.
När den inställda tiden har för
fl
utit aktiveras ett ljudlarm. Efter 7 minuter avaktiveras larmet
automatiskt om det inte kvitteras tidigare med tryckning på knappen
1, 2
eller
3
. Symbolen
S2
försvinner.
Ljudlarmvolym
Du kan välja mellan 3 olika ljudlarmvolymnivåer genom att trycka på knappen
4
. Om du trycker på
och håller inne knappen
4
återställs den ursprungliga larminställningen. Om du släpper knappen
och trycker på den igen ställs följande volymnivå in. Den senast inställda nivån förblir verksam.
Larmvolymen kan justeras när som helst.
Avbryta programmeringen av tidur
Du kan
när som helst
avbryta alla inställningar, förutom äggklockan, genom att trycka på
knapparna
2
och
3
samtidigt. Inställda program stoppas automatiskt och klockan återställs till
manuell (icke-programmerad) drift.
Omedelbar återställning av tidursprogrammering
Tryck på knappen 1, 2, eller 3 för att välja tidursprogrammet. Tryck sedan på knapparna 4 och 5
samtidigt för att radera det.
Använda tiduret i kombination med ugnen
Vid användning av tiduret i kombination med ugnen, slå först på ugnen och ställ in önskat
tillagningssystem och temperatur. Ställ därefter in tidursfunktionerna. När tillagningen är
klar, stäng av ugnen.
17

326554
1
Kjøkkenklokke
2
Tilberedningstid
4
Sluttid for tilberedning
4
(-) minus
5
(+) pluss
Stille klokken
Når apparatet kobles til strømnettet, blinker
“0 00”
og symbolet
S3
på displayet. Trykk samtidig på
knappene
2
og
3
, og still inn klokken med knappene
4
og
5
. Symbolet
S1
begynner å lyse for å vise
at tidsuret er i uprogrammert modus.
Merk! Hvis du holder knappene
4
og
5
inne en stund, endres sifrene hurtigere.
Uprogrammert modus
Trykk samtidig på knappene
2
og
3
.
Alle tidligere innstilte programmer tilbakestilles
(symbolet
S3 forsvinner hvis det var aktivert). Symbolet S1 begynner å lyse (hvis det ikke lyser allerede). Dette
betyr at uprogrammert modus er valgt.
Innstilling av tilberedningstid
Trykk på knappen
2. 0 00
vises på displayet. Bruk knappene
4
og
5
for å stille inn ønsket tid.
Symbolet
S3
vises. Tiden kan stilles inn i trinn på ett minutt. Tilberedningstiden kan settes til
maksimalt 10 timer. Når tiden er innstilt, begynner nedtellingen i trinn på fem sekunder. Displayet
viser klokkeslettet. Trykk på knappen
2
for å sjekke gjenstående tilberedningstid, og juster den etter
behov med knappene
4
og
5
. Når den innstilte tiden er ute, høres et lydsignal. Alarmen deaktiveres
automatisk etter sju minutter. Du kan også kvittere den tidligere ved å trykke på knappen
1, 2
, eller
3
. Symbolet
S1
forsvinner og symbolet
S3
blinker. Ovnen slås av. Trykk samtidig på knappen
2
og
3
. Symbolet
S3
forsvinner. Symbolet
S1
vises, og tidsuret tilbakestilles til uprogrammert modus.
Når tilberedningen er ferdig, må du slå av strømmen til ovnen!
Innstilling av sluttid for tilberedning
Trykk på knappen
3
. Klokkeslettet vises på displayet. Bruk knappene
4
og
5
til å stille inn ønsket
sluttid for tilberedningen (dvs. tidspunktet da du vil at maten skal være ferdig). Dette tidspunktet
må være seinere enn gjeldende klokkeslett. Symbolet
S3
vises. Fem sekunder etter at ønsket
sluttid er valgt, vises klokken på nytt. Når klokken når den innstilte sluttiden, høres et lydsignal.
Alarmen deaktiveres automatisk etter sju minutter. Du kan også kvittere den tidligere ved å trykke
på knappen
1, 2,
eller
3.
Symbolet
S1
forsvinner og symbolet
S3
blinker. Ovnen slås av. Trykk
18
Elektronisk tidsur NO

326554
samtidig på knappen
2
og
3
. Symbolet
S3
forsvinner. Symbolet
S1
vises, og tidsuret tilbakestilles til
uprogrammert modus.
Når tilberedningen er ferdig, må du slå av strømmen til ovnen!
Innstilling av både tilberedningstid og sluttid for tilberedning
Trykk på knappen 2, og bruk knappene 4 og 5 til å stille inn tilberedningstiden. Trykk deretter på
knappen 3. Den tidligst mulige sluttiden for tilberedningen vises. Bruk knappene 4 og 5 for å stille
inn tidspunktet da du vil at maten skal være ferdig. Symbolet S1 forsvinner dersom den valgte
sluttiden er senere enn gjeldende klokkeslett + tilberedningstid. Ovnen slås på automatisk.
Eksempel
Klokken er 12:00. Tilberedningstiden settes til 1:30, sluttiden settes til 14:00. Dette betyr at ovnen
slås på automatisk kl. 12:30.
Kjøkkenklokke
Trykk på knappen
1
for å aktivere kjøkkenklokken. Den har bare en nedtellingsfunksjon med alarm
og slår ikke av ovnen. Bruk knappene
4
og
5
for å stille inn ønsket tid. Symbolet
S2
vises. Når
ønsket tid er innstilt, begynner nedtellingen i trinn på fem sekunder. Gjeldende klokkeslett vises
på displayet. Trykk på knappen 1 for å sjekke gjenstående tid, og juster den etter behov med
knappene
4
og
5
. Maksimumstiden som kan stilles inn, er 23 timer og 59 minutter. Når den innstilte
tiden er ute, høres et lydsignal. Alarmen deaktiveres automatisk etter sju minutter. Du kan også
kvittere den tidligere ved å trykke på knappen
1, 2
, eller
3
. Symbolet
S2
forsvinner.
Alarmvolum
Du kan velge mellom tre forskjellige lydstyrker for alarmen ved å trykke på knappen
4
. Når
knappen
4
holdes inntrykt, gjenopprettes den opprinnelige alarminnstillingen. Hvis knappen slippes
og trykkes inn igjen, velges den neste lydstyrken. Den sist innstilte lydstyrken vil bli brukt. Du kan
når som helst endre lydstyrken.
Avbryte tidsinnstillingen
Alle innstillinger, unntatt kjøkkenklokken, kan
når som helst
avbrytes ved å trykke samtidig
på knappene
2
og
3
. Alle innstilte programmer stanses automatisk, og klokken tilbakestilles til
uprogrammert modus.
Hurtigsletting av tidsurprogrammering
Trykk på knappen 1, 2 eller 3 for å velge program. Trykk deretter samtidig på knappene 4 og 5 for å
slette programmeringen.
Bruke tidsuret sammen med ovnen
Når du skal bruke tidsuret sammen med ovnen, må du først slå på strømmen til ovnen og
velge tilberedningsmåte og -temperatur. Deretter velger du funksjoner for tidsuret. Når
tilberedningen er ferdig, slår du av strømmen til ovnen.
19

326554
1
Minuuttimuistutin
2
Kypsennysaika
3
Kypsennyksen päättymisaika
4
(-) miinus
5
(+) plus
Kellon asettaminen
Kun laite kytketään sähköverkkoon, näytössä vilkkuu
“0 00”
; lisäksi myös symboli
S3
vilkkuu. Paina
painikkeita
2
ja
3
samanaikaisesti ja aseta kello käyttäen painikkeita
4
ja
5
. Symboli
S1
palaa myös
osoittaen, että ajastin on asetettu ei-ohjelmoituun (manuaaliseen) toimintaan.
Huomaa:
Jos pidät painikkeita
4
ja
5
painettuina hetken aikaa, numerot vaihtuvat nopeammin.
Manuaalinen (ei-ohjelmoitu) toiminta
Paina painikkeita
2
ja
3
samanaikaisesti.
Kaikki aiemmin asetetut ohjelmat nollautuvat
(symboli
S3 häviää, jos se on aktiivinen). Symboli S1 tulee näkyviin (jos sitä ole aktivoitu aiemmin), mikä
tarkoittaa että manuaalinen (ei-ohjelmoitu) toiminta on valittu.
Puoliautomaattinen toiminta, jossa asetetaan kypsennysaika
Paina painiketta
2. 0 00
ilmestyy näyttöön. Aseta haluamasi aika painikkeiden
4
ja
5
avulla.
Symboli
S3
tulee näkyviin. Aika voidaan asettaa minuutin askelin. Kypsennysajaksi voidaan
asettaa korkeintaan 10 tuntia. Kun aika on asetettu, ajan laskeminen alkaa viiden sekunnin askelin.
Kellonaika näkyy näytössä. Painikkeella
2
voit tarkistaa jäljellä olevan kysennysajan ja painikkeilla
4
ja
5
voit säätää sitä tarvittaessa. Kun asetettu aika umpeutuu, kuuluu äänimerkki. Hälytys sammuu
automaattisesti 7 minuutin kuluttua, jos sitä ei kuitata aiemmin painamalla painiketta
1, 2
, tai
3.
Symboli
S1
häviää ja symboli
S3
vilkkuu. Silloin uuni kytkeytyy pois päältä. Paina painikkeita
2
ja
3
samanaikaisesti ja symboli
S3
häviää. Symboli
S1
häviää ja ajastin nollautuu manuaaliseen (ei-
ohjelmoituun) toimintaan.
Päätä kypsennysprosessi sammuttamalla uuni!
Puoliautomaattinen toiminta, jossa asetetaan kypsennyksen päättymisaika
Paina painiketta
3
. Nykyinen aika (kello) tulee näkyviin näyttöön. Valitse haluamasi kypsennyksen
päättymisaika (aika jolloin haluat kypsennyksen päättyvän) painikkeilla
4
ja
5
; tämän ajan tulee olla
myöhemmin kuin nykyinen aika. Symboli
S3
tulee näkyviin. Kello tulee taas näkyviin 5 sekunnin
kuluttua halutun ajan asettamisesta. Kun kello saavuttaa asetetun kypsennyksen päättymisajan,
kuuluu äänimerkki. Hälytys sammuu automaattisesti 7 minuutin kuluttua, jos sitä ei kuitata aiemmin
20
Sähköinen ajastin FI
- 1
- 2


