Xoro HSD 2050: Connection
Connection: Xoro HSD 2050
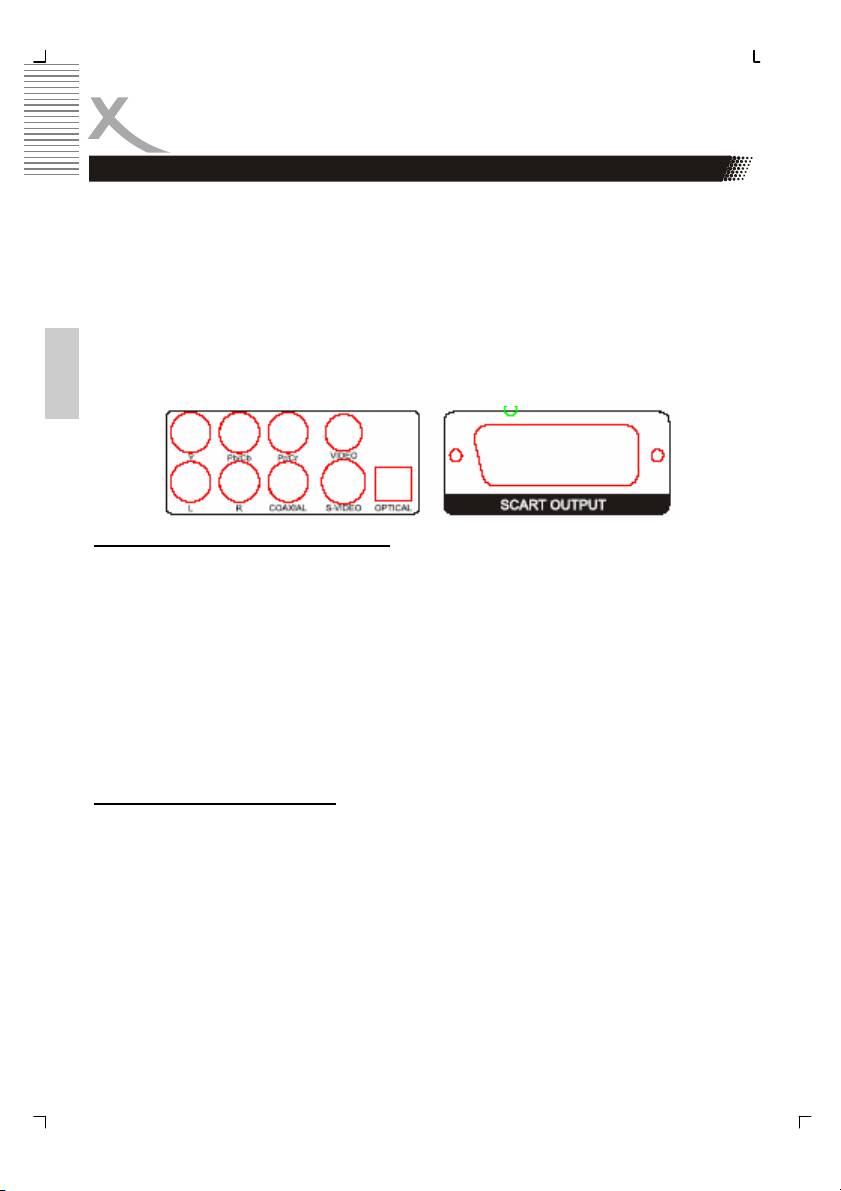
Connection
Video Output
The HSD 2220 provides different ways to output video and audio signals. Please refer the
below picture which shows the different Audio and Video outputs:
• CVBS
• S-Video
• SCART
• Component
• Stereo RCA
• Coaxial
• Optical
English
Connecting with a VIDEO (CVBS) cable
The video (CVBS) cable transmits the signals for brightness (Y-signal) and colour (C-signal)
in a combined way. You should only use this connection if no other connection type can be
used. Plug a cable into the VIDEO (CVBS) socket on the rear side of your DVD player. The
other side of the cable must be connected to the VIDEO input socket of the TV-set (usually
labeled “VIDEO IN” or “AV IN”. Please also refer to your TV set’s user manual). As VIDEO
(CVBS) does not transmit sound, you also must add an audio connection.
Insert one end of the supplied audio (Cinch [RCA]) cable into the white/red Cinch [RCA]
socket L/R AUDIO OUT at the back of the DVD player and the other end into the audio input
socket (usually white/red) on the TV set (usually labelled “AUDIO IN” or “AV IN”. Please also
refer to your TV set’s user manual)
Switch on the TV set and select the s-video input or the respective channel number. For
channel number and input selection please also refer to your TV operating instructions.
Connecting with a SCART cable
The SCART or Euro AV cable serves as the universal connector for picture, sound and con-
trol signals. Plug a cable into the SCART socket at the back of the DVD player and the
SCART IN socket on the rear side of the TV set. Please also refer to your TV set’s user
manual. Switch on the TV set and select the SCART input or the respective channel num-
ber. For channel number and input selection please also refer to your TV operating instruc-
tions.
Note:
The SCART interface of this DVD recorder is RGB enabled. In RGB mode, the picture qual-
ity is much better than in standard SCART mode. You can activate RGB mode on the video
settings page of your DVD recorder. You only can use this mode if it is supported by your TV
set. Otherwise, the use of RGB will result in wrong colour display. Please also refer to your
TV set’s user manual.
12

Connection
Video Output
Connecting with a S-Video cable
S-Video (S-VHS) cable transmits the signals for brightness (Y-signal) and colour (C-signal)
separately. This connection type offers a better picture quality as CVBS or SCART connec-
tion. Plug a cable into the s-video socket on the rear side of your DVD player. The other side
of the cable must be connected to the s-video input socket of the TV-set (usually labelled “S-
VIDEO IN” or “SVHS IN”. Please also refer to your TV set’s user manual). As s-video does
not transmit sound, you also must add an audio connection.
Insert one end of the supplied audio (Cinch [RCA]) cable into the white/red Cinch [RCA]
English
socket L/R AUDIO OUT at the back of the DVD player and the other end into the audio input
socket (usually white/red) on the TV set (usually labelled “AUDIO IN” or “AV IN”. Please also
refer to your TV set’s user manual). Switch on the TV set and select the s-video input or the
respective channel number. For channel number and input selection please also refer to
your TV operating instructions.
Connecting with a YUV (Y Pb Pr) cable
YUV (Y Pb Pr) is a transmission technology separating colour and brightness information in
the signal. Similar to RGB, the signals are transmitted on a 3 wire cinch [RCA] cable. This
way of transmission is also called “component”. This connection offers best picture quality
available with analogue signal transmission. Plug a cable into the Y Pb Pr socket on the rear
side of your DVD player. You can recognize the sockets by their colours red, green and blue
easily. The other side of the cable must be connected to the Y Pb Pr input socket of the TV-
set (usually labelled „Y Pb Pr“ or „HDTV IN“.
Please change the video output in the Setup settings to “YUV
”. In case, that your TV set
supports progressive Scan, you can choose by the settings “Scan Mode
” the option
“Progressive
”. Otherwise, you can change the setting during playback from “Interlaced” to
“Progressive
” by pressing the P-Scan button on the remote control.
As YUV does not transmit sound, you also must add an audio connection. Insert one end of
the supplied audio (Cinch [RCA]) cable into the white/red Cinch [RCA] socket L/R AUDIO
OUT at the back of the DVD player and the other end into the audio input socket (usually
white/red) on the TV set (usually labelled “AUDIO IN” or “AV IN”. Please also refer to your
TV set’s user manual). Switch on the TV set and select the YUV input or the respective
channel number. For channel number and input selection please also refer to your TV oper-
ating instructions.
Note:
Make sure you observe the colours of the three sockets when you establish the connection.
When the colours are connected in a wrong way, no picture or a picture with wrong colours
will be displayed.
13

Connection
Audio Output
Digital Output
This player contains a Dolby Digital or MPEG2 decoder. This enables the playback of DVD
recorded in Dolby Digital, MPEG1/2 audio or linear PCM without an external decoder sup-
ports. When the player is connected to an AV amplifier with 5.1 channel input connectors,
theatre quality audio could be enjoyed at your home at the time of playing disc recorded in
Dolby digital, MPEG1/2 audio or linear PCM.
The "S/PDIF" specifications allow several different types of cables and connectors which
must match the device being used. Key words for the electrical type are "coaxial" and "RCA
jack." The other type is called "optical" with the word "TOSLINK" often used.
1. Insert the audio plug into the orange socket on the rear side of the device (left from
English
the S-Video jack), marked with the label “COAXIAL”. Or, insert an optical cable on
the rear side of the DVD player into black quadrangular connector (right from the S-
Video jack), marked with the label “OPTICAL”.
2. Plug the Audio jack into the corresponding socket on your playback device or your
amplifier.
3. Choose on the amplifier the correspondent input (optical or coaxial).
Notes:
1. The cable is not part of the accessories.
2. Choose right audio setting for this player according to your audio system require-
ment after connection is made.
3. If the type of the speaker connected does not satisfy the channels recorded in a
MPEG-2 or Linear PCM disc, the disc will not be played in all channels but only in 2
channels (i.e. even if the front speakers and the centre speakers are connected, a
disc recorded in 5.1 channels will be played only in 2 channels.
When DVD discs recorded in DOLBY digital, MPEG audio or other formats are played, cor-
responding bit stream is output from the player COAXIAL digital audio output connector.
When the player is connected to an external decoder or a power amplifier, you can enjoy
theatre-quality at your home.
Caution for the coaxial digital audio output connector:
Do not connect an amplifier with a Coaxial digital input connector which does not contain the
Dolby digital or MPEG audio decoder otherwise it may be harmful to your ears and damage
your speakers.
Stereo Analogue Output
Insert one end of the audio (Cinch [RCA]) cable into the white/red Cinch [RCA] socket L/R
AUDIO OUT at the back of the DVD player and the other end into the audio input socket
(usually white/red) on the amplifier set (usually labelled “AUX IN” or “Stereo IN”. Please also
refer to your Amplifier user manual). Switch on the Amplifier and select the AUX or Stereo
input.
14
Оглавление
- MPEG-4 DVD-Player with USB
- Inhaltsangabe
- SICHERHEITSHINWEISE
- Recycling Informationen
- Zubehör
- Schnellstartanleitung
- Bedienelemente
- Verbinden
- Fernbedienung
- Abspielen
- Einstellungen
- Fehlerbehebung
- Spezifikation
- Glossar
- Table of Content
- Safety Information
- Recycling Information
- Accessoires
- Quick Start Guide
- Control Elements
- Connection
- Remote Control
- PLAYBACK
- SETUP
- TROUBLESHOOTING
- Specification
- GLOSSARY
- TABLE DES MATIERES
- Recyclage Information
- INTRODUCTION
- GUIDE DE DÉMARRAGE RAPIDE
- INTERFACES ET COMMANDES
- CONNEXIONS
- TÉLÉCOMMANDE
- LECTURE
- CONFIGURATION
- CONFIGURATION
- DÉPANNAGE
- CARACTÉRISTIQUES
- GLOSSAIRE
- INFORMACIÓN DE SEGURIDAD
- Reciclaje
- Accesorios
- Guía de Comienzo Rápida
- ELEMENTOS DE CONTROL
- CONECTANDO
- TELECOMANDO
- SETUP
- Problemas
- XORO by MAS Elektronik AG
