Mitsubishi Motors Diamond Plus 230 SB: инструкция
Раздел: Аксессуары для телевизоров
Тип:
Инструкция к Mitsubishi Motors Diamond Plus 230 SB
www.nec-mitsubishi.com
01_cover.p65
08/05/2002, 15:34
1
E
NERGY
S
TAR
®
is a U.S. registered trademark. All other brands and product names are trademarks or registered trademarks of
their respective owners.
As an
E
NERGY
S
TAR
Partner, NEC-Mitsubishi Electric Visual Systems Corporation has determined that this product meets the
E
NERGY
S
TAR
guidelines for energy efficiency.
The
E
NERGY
S
TAR
emblem does not represent EPA endorsement of any product or service.
All other trademarks mentioned in this manual are the property of their respective owners.
Canadian Department of Communications Compliance Statement
DOC: This Class B digital apparatus meets all requirements of the Canadian Interference-Causing Equipment Regulations.
C-UL: Bears the C-UL Mark and is in compliance with Canadian Safety Regulations according to CSA C22.2 #950.
FCC Information
1. Use the attached specified cables with the Diamond Plus 230
SB
colour monitor so as not to interfere with radio and television
reception.
(1) Please use the supplied power cable or equivalent to ensure FCC compliance.
(2) Shielded video type signal cable.
Use of other cables and adapters may cause interference with radio and television reception.
2. This equipment has been tested and found to comply with the limits for a Class B digital device, pursuant to part 15 of the FCC Rules.
These limits are designed to provide reasonable protection against harmful interference in a residential installation. This equipment
generates, uses, and can radiate radio frequency energy, and, if not installed and used in accordance with the instructions, may
cause harmful interference to radio communications. However, there is no guarantee that interference will not occur in a particular
installation. If this equipment does cause harmful interference to radio or television reception, which can be determined by turning
the equipment off and on, the user is encouraged to try to correct the interference by one or more of the following measures:
• Reorient or relocate the receiving antenna.
• Increase the separation between the equipment and receiver.
• Connect the equipment into an outlet on a circuit different from that to which the receiver is connected.
• Consult your dealer or an experienced radio/TV technician for help.
If necessary, the user should contact the dealer or an experienced radio/television technician for additional suggestions. The user
may find the following booklet, prepared by the Federal Communications Commission, helpful: “How to Identify and Resolve Radio-
TV Interference Problems.” This booklet is available from the U.S. Government Printing Office, Washington, D.C., 20402, Stock No.
004-000-00345-4.
No user serviceable parts inside. Do not attempt to modify this equipment. If modified, your authority to operate this equipment might
be voided by FCC.
01_cover.p65
08/05/2002, 15:34
2
01_cover.p65
08/05/2002, 15:34
3

Index
Warning ....................................... English-1 Caution ........................................ English-1 Contents ...................................... English-1 Quick Start .................................. English-1 Controls ....................................... English-2 Declaration .................................. English-3 Varování ....................................... âesky-1 Upozornûní ................................... âesky-1 Obsah .......................................... âesky-1 Rychl˘ start .................................. âesky-1 Ovládací prvky ............................. âesky-2 Prohlá‰ení v˘robce ...................... âesky-3 ΠΡΟΕΙ∆ΟΠΟΙΗΣΗ ................. Ελληνικά-1 ΠΡΟΣΟΧΗ ............................. Ελληνικά-1 Περιεχµενα ......................... Ελληνικά-1 Γρήγορη Εκκίνηση ............... Ελληνικά-1 Πλήκτρα ελέγχου ................. Ελληνικά-2 ∆ήλωση του Κατασκευαστή ...................... Ελληνικά-3 Warnung ................................... Deutsch-1 Vorsicht ..................................... Deutsch-1 Inhalt der Verpackung ............... Deutsch-1 Kurzanleitung ............................ Deutsch-1 Bedienelemente ........................ Deutsch-2 Erklärung des Herstellers ......... Deutsch-3 Advertencia ............................... Español-1 Peligro ....................................... Español-1 Contenido .................................. Español-1 Inicio rápido ............................... Español-1 Controles ................................... Español-2 Declaraciones del fabricante ..... Español-3 Avertissement ........................... Français-1 Attention .................................... Français-1 Contenu .................................... Français-1 Mise en marche rapide ............. Français-1 Commandes .............................. Français-2 Déclaration du constructeur ...... Français-3 Avvertenza .................................. Italiano-1 Attenzione ................................... Italiano-1 Contenuto ................................... Italiano-1 Guida rapida ............................... Italiano-1 Comandi ...................................... Italiano-2 Dichiarazione del Costruttore ...... Italiano-3 Waarschuwing ...................... Nederlands-1 Let op! .................................. Nederlands-1 Inhoud .................................. Nederlands-1 Snel aan de slag .................. Nederlands-1 Besturingselementen ........... Nederlands-2 Kennisgeving van de fabrikant ........................... Nederlands-3 ПРЕДУПРЕЖДЕНИЕ .............. Русский-1 ВНИМАНИЕ ............................. Русский-1 Содержимое ............................ Русский-1 Краткое руководство по началу работы ......................... Русский-1 Органы управления ................. Русский-2 Заявление изготовителя ........ Русский-3 Ostrze˝enIe ................................... Polski-1 Uwaga ........................................... Polski-1 ZawartoÊç opakowania ................. Polski-1 Pod∏àczenie monitora ................... Polski-1 Przyciski ........................................ Polski-2 OÊwiadczenie Wytwórcy ............... Polski-3 D∑KKAT ....................................... Türkçe-1 UYARI ......................................... Türkçe-1 ∑çindekiler .................................... Türkçe-1 H∂zl∂ Baµlama .............................. Türkçe-1 Kontroller ..................................... Türkçe-2 Üreticinin Bildirimi ....................... Türkçe-3
01_cover.p65
08/05/2002, 15:34
4
English
English-1
TO PREVENT FIRE OR SHOCK HAZARDS, DO NOT EXPOSE THIS
UNIT TO RAIN OR MOISTURE. ALSO, DO NOT USE THIS UNIT’S
POLARIZED PLUG WITH AN EXTENSION CORD RECEPTACLE OR
OTHER OUTLETS UNLESS THE PRONGS CAN BE FULLY INSERTED.
REFRAIN FROM OPENING THE CABINET AS THERE ARE HIGH
VOLTAGE COMPONENTS INSIDE. REFER SERVICING TO QUALIFIED
SERVICE PERSONNEL.
WARNING CAUTION
CAUTION: TO REDUCE THE RISK OF ELECTRIC SHOCK, DO NOT
REMOVE COVER (OR BACK). NO USER SERVICEABLE PARTS INSIDE.
REFER SERVICING TO QUALIFIED SERVICE PERSONNEL.
This symbol warns user that uninsulated voltage within the unit may
have sufficient magnitude to cause electric shock. Therefore, it is
dangerous to make any kind of contact with any part inside this unit.
This symbol alerts the user that important literature concerning the
operation and maintenance of this unit has been included. Therefore,
it should be read carefully in order to avoid any problems.
RISK OF ELECTRIC SHOCK • DO NOT OPEN
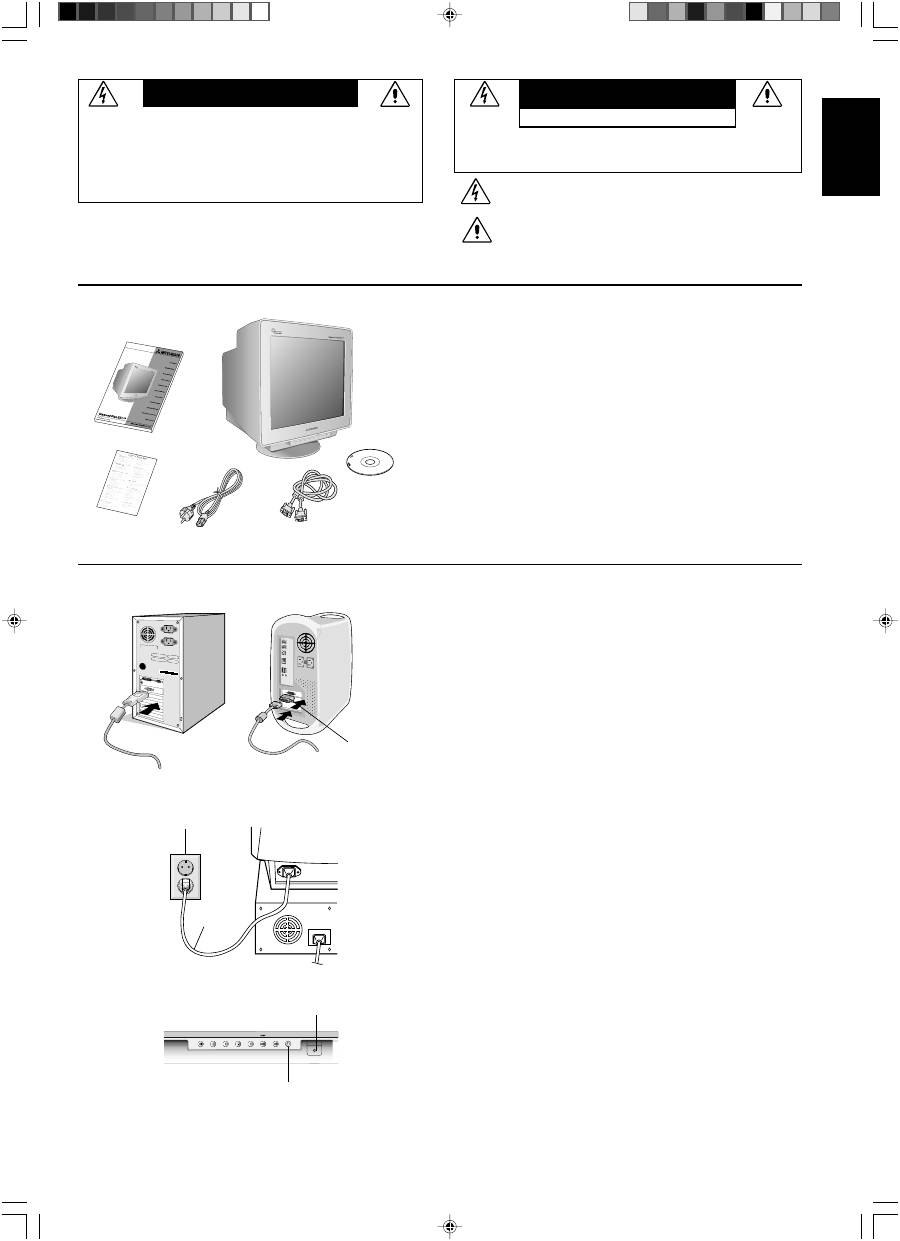
Contents Quick Start
Figure A.1
Figure B.1
Figure C.1
Power Cord
Power Outlet
Figure D.1
Power Button
Power Indicator
Mac Adapter
(not included)
To attach the Diamond Plus 230
SB
monitor to your system, follow
these instructions:
1.
Turn off the power to your computer.
2.
If necessary, install the display card into your system. For more
information, refer to the display card manual.
3.
For the PC:
Connect one end of the signal cable to the
connector of the display card in your system (
Figure A.1
).
Tighten all screws.
For the Mac:
Connect the Macintosh cable adapter
(not included) to the computer (
Figure B.1
).
Attach one end of the signal cable to the Macintosh cable
adapter (
Figure B.1
).
NOTE:
Some Macintosh systems do not require a Macintosh
cable adapter.
4.
Connect the other end of signal cable connector on the back of
the monitor.
NOTE:
Incorrect cable connections may result in irregular
operation, damage display quality/components of CRT monitor.
5.
The Windows
®
95/98/2000/Me/XP INF file for your monitor can
be found on the CD-ROM, delivered with the monitor.
6.
Connect one end of the power cord to the AC inlet on the back of
the monitor and the other end to the power outlet (
Figure C.1
).
7.
Turn on the monitor (
Figure D.1
).
8.
Turn on the Computer.
NOTE:
If you have any problems, please refer to the
Troubleshooting
section of this User’s Manual.
Your new Diamond Plus 230
SB
monitor box* should contain the
following:
•
Diamond Plus 230
SB
Monitor with tilt/swivel base
•
Power cord
•
Video Signal Cable (VGA - VGA)
•
User’s Manual
•
Sales Office List
•
CD-ROM:
Includes complete User’s Manual in PDF format and Windows
related files (INF file and colour profile). To see the complete
User’s Manual, Acrobat Reader 4.0 must be installed at your PC.
*
Remember to save your original box and packing material to
transport or ship the monitor.
Power Cord
CD-ROM
Video Signal Cable
(VGA –VGA)
User’s Manual
Sales
Office List
01_English
08/05/2002, 15:34
1
Оглавление
- English
- Controls
- English
- Recommended use
- âesky
- Ovládací prvky
- âesky
- Provozní pokyny
- Deutsch
- Bedienelemente
- Deutsch
- Einsatzempfehlungen
- Ελληνικά
- Πλήκτρα ελέγχου
- Ελληνικά
- Συνιστώµενη Χρήση
- Español
- Controles
- Español
- Uso recomendado
- Français
- Commandes
- Français
- Conseils d’utilisation
- Italiano
- Comandi
- Italiano
- Raccomandazioni per l’uso
- Nederlands
- Besturingselementen
- Nederlands
- Aanbevolen gebruik
- Polski
- Przyciski
- Polski
- Zalecenia eksploatacyjne
- Русский
- Органы управления
- Русский
- Рекомендации по эксплуатации
- Türkçe
- Kontroller
- Türkçe
- Tavsiye edilen kullan∂m
