Benelli M4 Tactical Shotgun – страница 5
Инструкция к Benelli M4 Tactical Shotgun
80
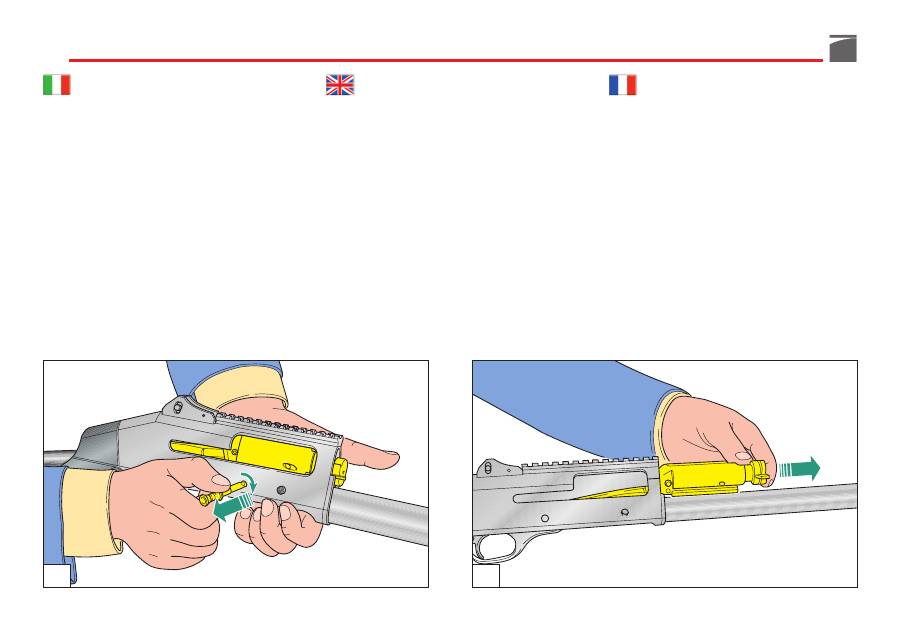
8) Ruotare e contemporaneamente sfilare
la manetta di armamento
(fig. 35).
9) Estrarre
il gruppo otturatore
dalla car-
cassa, sfilandolo dal davanti (fig. 36).
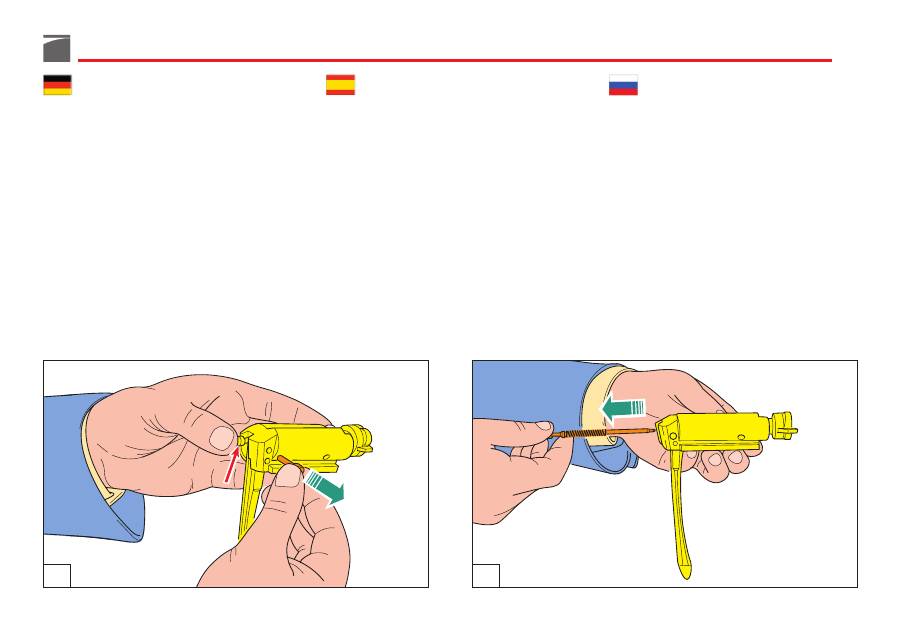
10) Sfilare
il perno di arresto
percussore,
avendo cura di
trattenere
percussore e
relativa
molla di richiamo
(fig. 37).
11) Estrarre
il percussore
completo di mol-
la (fig. 38).
8) Twist and pull off
the cocking lever
(fig.
35).
9) Remove
the bolt assembly
from the
receiver, pulling it forward (fig. 36).
10) Remove
the firing pin
, ensuring that the
firing pin and the relative
return spring
remain inside
the bolt (fig. 37).
11) Remove
the firing pin
and the
firing
pin spring
(fig. 38).
8) Tourner et retirer simultanément
le le-
vier d’armement
(fig. 35).
9) Extraire
le groupe obturateur
de la car-
casse en le faisant coulisser vers l’avant
(fig. 36).
10) Retirer
le goujon d’arrêt
du percuteur,
en ayant soin de
retenir
le percuteur et
son
ressort de rappel
(fig. 37).
11) Retirer
le percuteur
et son ressort (fig.
38).
35
36
81
8) Den
Spannhebel
drehen und gleich-
zeitig herausziehen (Abb. 35).
9) Den
kompletten Verschlusssatz
nach
vorn aus dem Gehäuse herausziehen
(Abb. 36).
10) Den
Schlagbolzenfixierstift
vorsichtig
herausziehen und dabei darauf achten,
dass der Schlagbolzen nicht durch die
Federkraft der Schlagbolzenfeder
heraus-
geschleudert wird (Abb. 37).
11) Den
Schlagbolzen
und die
Schlagbol-
zenfeder
entnehmen (Abb. 38).
8) Gire y contemporáneamente saque
la
maneta de armado
(fig. 35).
9) Extraiga
el grupo obturador
de la car-
casa, sacándolo desde la parte delante-
ra (fig. 36).
10) Quite el
eje de parada
del percutor del
grupo obturador,
reteniendo
el percutor
y su
resorte antagonista
(fig. 37).
11) Extraiga
el percutor
y su resorte (fig.
38).
8) Повернуть и одновременно снять
рычаг
затвора
(рис. 35).
9) Извлечь
узел затвора
из ствольной
коробки, сняв его с передней стороны
(рис. 36).
10) Снять
фиксатор ударника
с узла
затвора, помня о необходимости
удерживать
ударник и его
пружину
возврата
(рис. 37).
11) Извлечь
ударник
с пружиной (рис. 38).
37
38
82
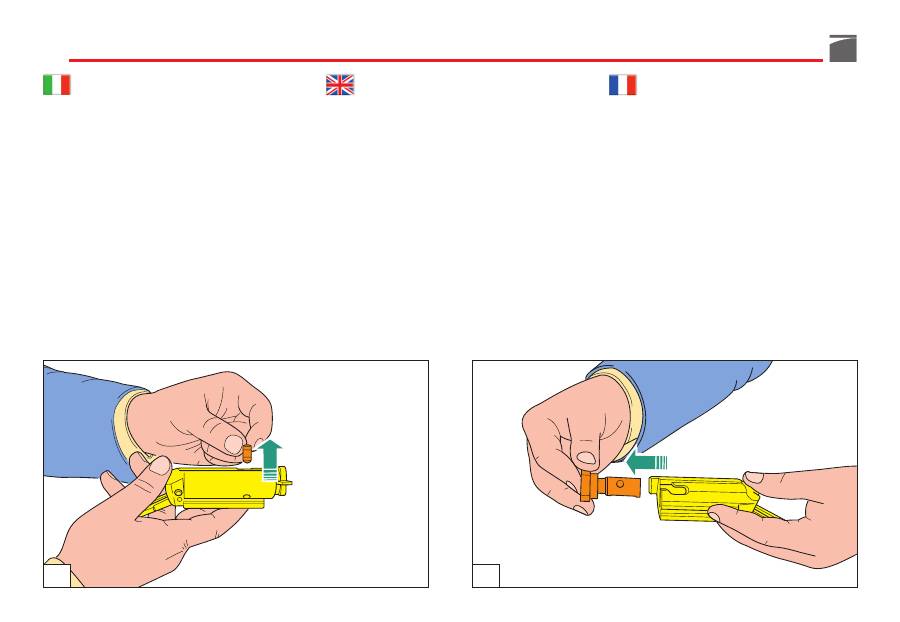
12) Togliere
il perno rotazione
testa di chiu-
sura (fig. 39).
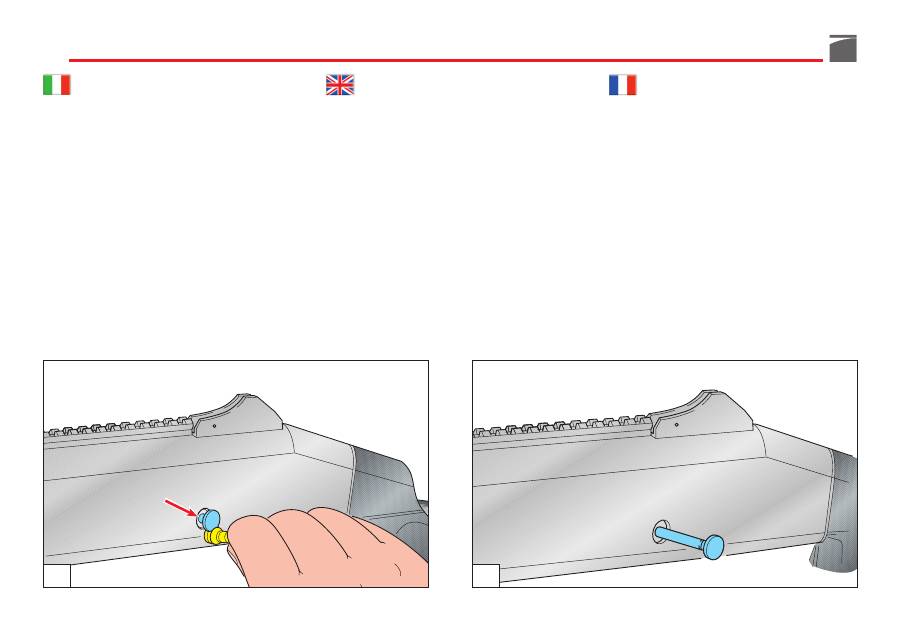
13) Sfilare
la testa di chiusura
(fig. 40).
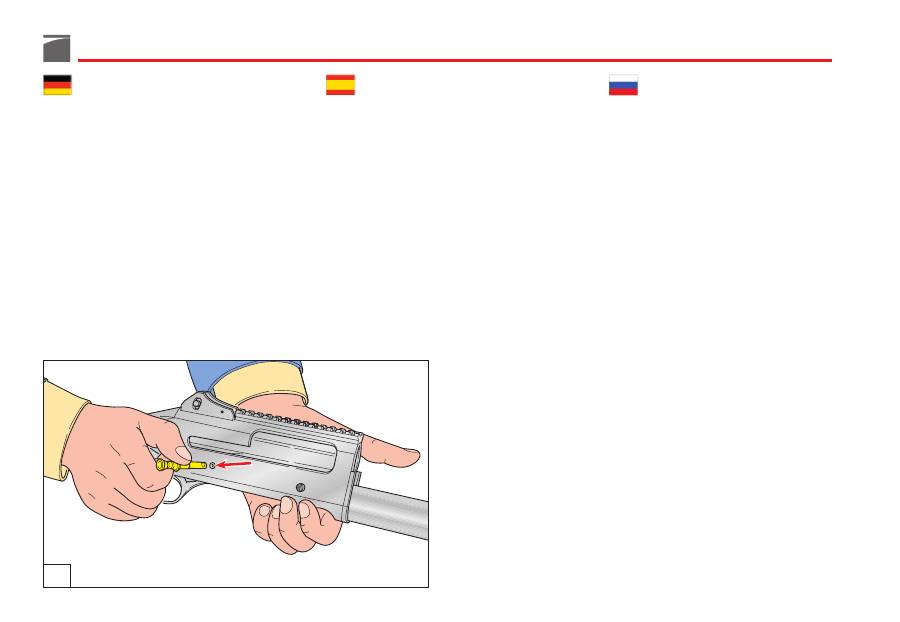
14) Spingere fuori
la spina di arresto
della
guardia, utilizzando la punta della ma-
netta di armamento (fig. 41).
12) Remove
the locking head pin
from its
seat (fig. 39).
13) Remove
the locking head
(fig. 40).
14) Pull out
the trigger guard pin
using the
cocking lever tip (fig. 41).
12) Retirer
le goujon de rotation
de la tête
de fermeture (fig. 39).
13) Retirer
la tête de fermeture
(fig. 40).
14) Pousser vers l’extérieur
la goupille d’ar-
rêt
de la garde en utilisant la pointe du
levier d’armement (fig. 41).
39
40
83
12) Den
Fixierbolzen des Drehverschluss-
knopfes
herausziehen (Abb. 39).
13) Den
Drehverschlusskopf
nach vorne
herausziehen (Abb. 40).
14) Den
Achsensperrstift
des Abzugsbügels
mit der Spitze des Spannhebels von rechts
nach links in das Gehäuse eindrücken
(Abb. 41).
12) Quite
el eje de rotación
de la cabeza
de cierre (fig. 39).
13) Quite
la cabeza de cierre
(fig. 40).
14) Empuje hacia fuera
la espiga de blo-
queo
del guardamonte, utilizando la
punta de la maneta de armado (fig. 41).
12)
Снять
штырь вращения
запорного
механизма (рис. 39).
13)
Снять
запорный механизм
(рис. 40).
14)
Вытолкнуть наружу
стопорный
штырь
защиты, используя конец
рычага затвора (рис. 41).
41
84
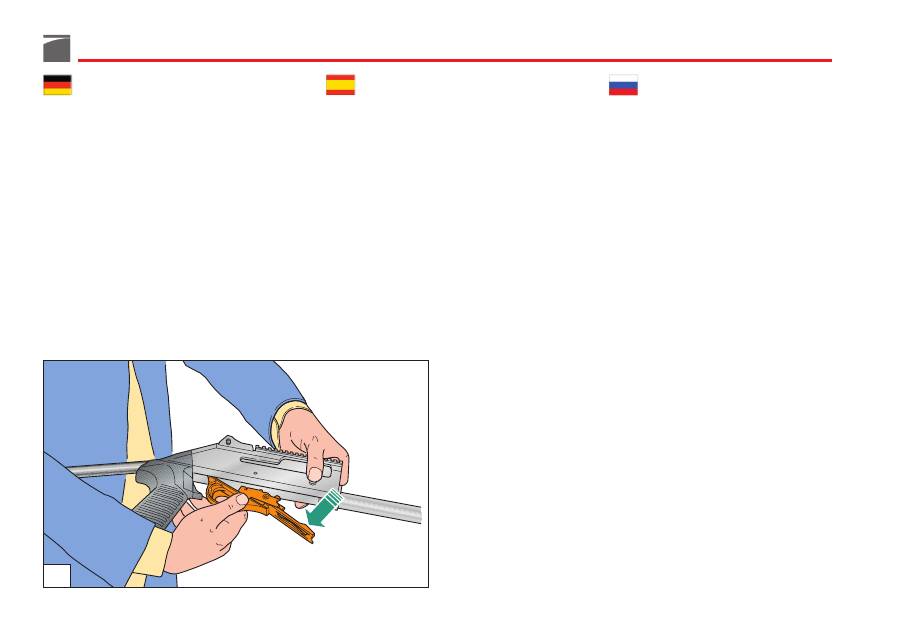
15) Completare
l’estrazione della spina
operando sul lato sinistro e utilizzando
la testa della manetta di armamento
(figg. 42-43).
16) Premere
il bottone
comando elevatore
e sfilare in avanti
il gruppo guardia
(fig.
44).
15) Complete
the pulling out of the trigger
guard pin
using the cocking lever end
(fig. 42-43).
16) Press
the carrier button
and extract
the
trigger guard assembly
towards the front
(fig. 44).
15) Finir de
retirer la goupille
en agissant
sur le côté gauche et en utilisant la tête
du levier d’armement (fig. 42-43).
16) Presser
le bouton
de commande éléva-
teur et faire coulisser
la sous-garde
vers
l’avant (fig. 44).
42
43
85
15) Den
Achsensperrstift
auf der linken Seite
unter Zuhilfenahme des Spannhebelen-
des
herausziehen
(Abb. 42-43).
16) Den
Verschlussfanghebelknopf
drücken
und die komplette
Abzugsgruppe
nach
vorn entnehmen (Abb. 44).
15) Complete
la extracción de la espiga
actuando en el lado izquierdo y utili-
zando la cabeza de la maneta de arma-
do (figs. 42-43).
16) Pulse
el botón
de mando del elevador
y deslice hacia adelante
el grupo guar-
damonte
(fig. 44).
15)
Завершить
извлечение штыря,
действуя с левой стороны и используя
головку рычага затвора (рис. 42-43).
16)
Нажать на
кнопку
управления
держателем и снять, двигаясь вперед,
узел предохранительной
скобы (рис.
44).
44
86
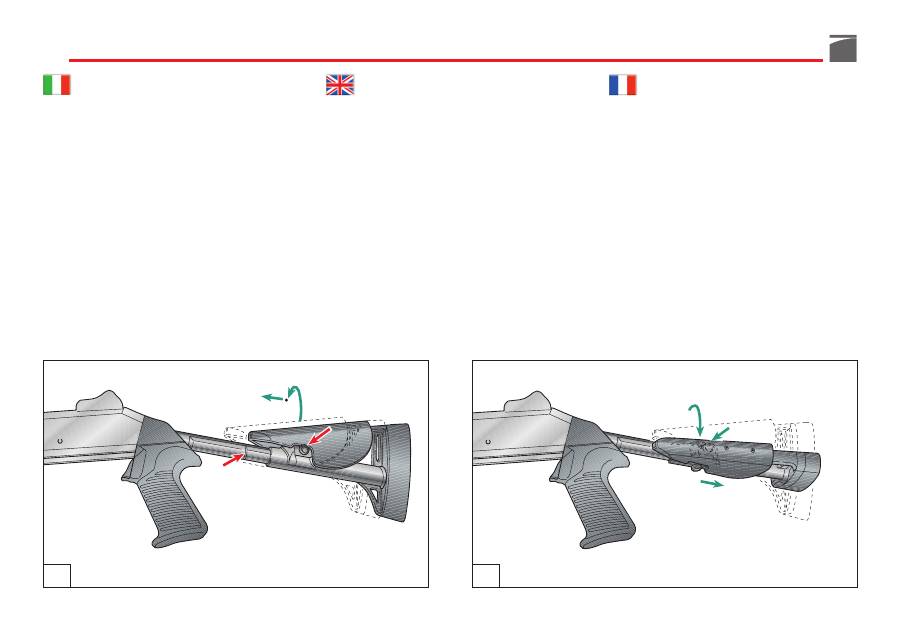
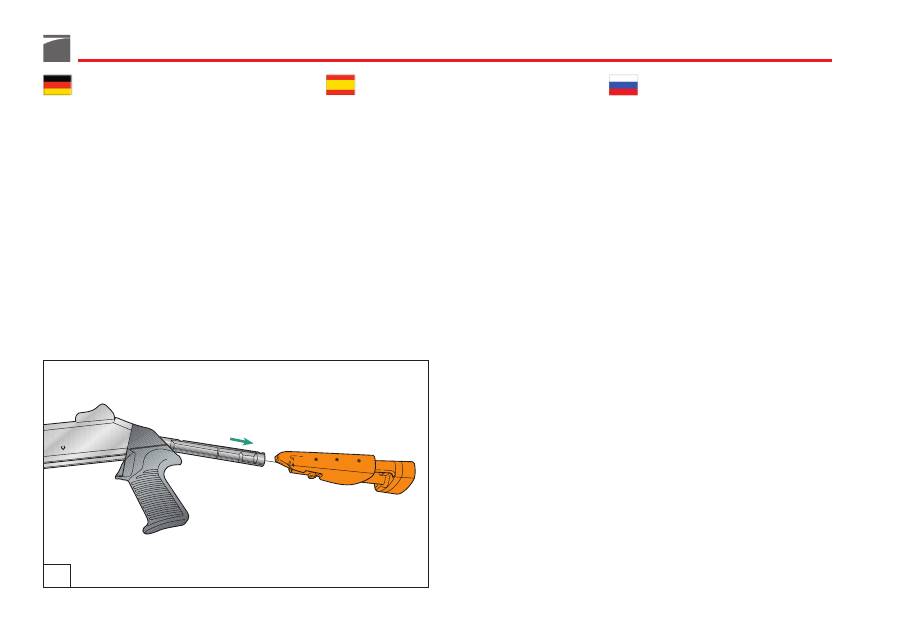
17)
Partendo dalla posizione di calcio
allungato
:
a) Premere
il pulsante di blocco
.
b) Ruotare il calcio
in senso orario
(visto da dietro).
c) Avanzarlo fino
al segno
ricavato sul
tubo guida molla (fig. 45).
d) Ruotare il calcio
in senso antiorario
.
e) Sfilarlo completamente all’indietro
(figg. 46-47).
17)
Starting with the telescoping stock
extended
:
a) Depress
locking button
.
b) Rotate the stock
clockwise
(rear
view).
c) Push it forward till
the line
marked
on the recoil tube (fig. 45).
d) Rotate the stock
counter-clockwise
.
e) Pull it to the rear off the recoil tube
(figs. 46-47).
17)
En partant de la position de crosse al-
longée
:
a) Enfoncer le
poussoir de blocage
.
b) Tourner la crosse
dans le sens des
aiguilles d’une montre
(vue de l’ar-
rière).
c) La faire avancer jusqu’à
la marque
pratiquée sur le tube de guidage
ressort (fig. 45).
d) Tourner la crosse
dans le sens inver-
se des aiguilles d’une montre
.
e) La faire coulisser entièrement vers
l’arrière (fig. 46-47).
45
46
c
b
a
d
e
a
87
17)
Bei verlängertem Schaft:
a) Den
Sperrknopf drücken
.
b) Den Schaft
im Uhrzeigersinn
(von
hinten gesehen) drehen.
c) Ihn bis zur
Kerbe
auf dem Federfüh-
rungsrohr nach vorn schieben (Abb.
45).
d) Den Schaft
gegen den Uhrzeiger-
sinn drehen
.
e) Ihn ganz nach hinten abziehen (Abb.
46-47).
17)
Partiendo de la posición de culata alar-
gada:
a) Apriete
el botón de bloqueo.
b) Gire la culata
en el sentido de las
agujas del reloj
(vista de la parte tra-
sera).
c) Aváncela hasta
la marca
presente en
el tubo guía resorte (fig. 45).
d) Gire la culata
en sentido opuesto al
de las agujas del reloj.
e) Sáquela completamente hacia atrás
(figs. 46-47).
17)
Если вы имеете удлиненное
положение приклада:
a) Нажать на
кнопку блокировки.
b) Повернуть приклад
в направлении
по часовой стрелке
(вид сзади).
c) Продвигаться до
метки
, сделанной
на трубке направляющей пружины
(рис. 45).
d) Повернуть приклад
в направлении
против часовой стрелки.
e) Полностью снять его сзади (рис. 46-
47).
47
e
88
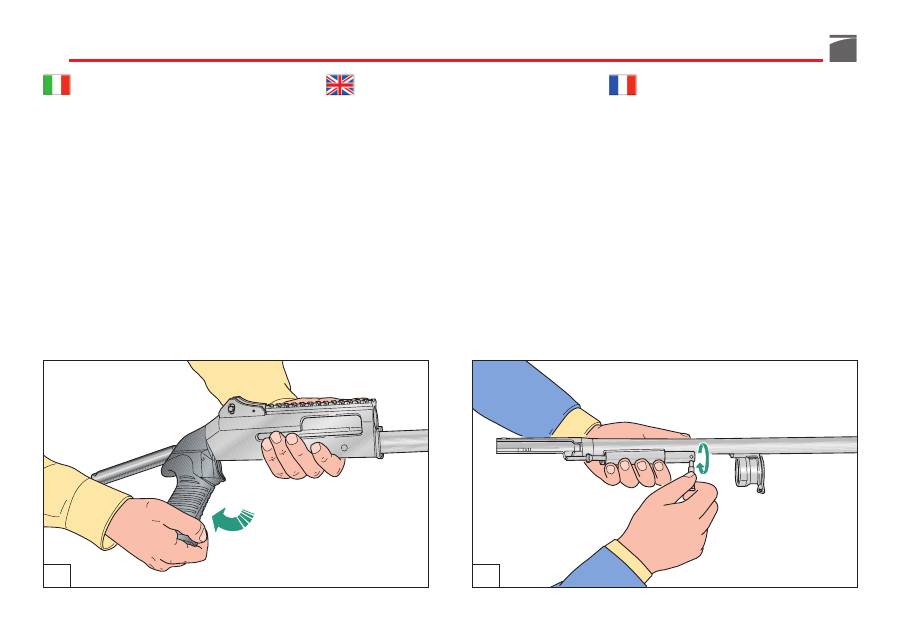
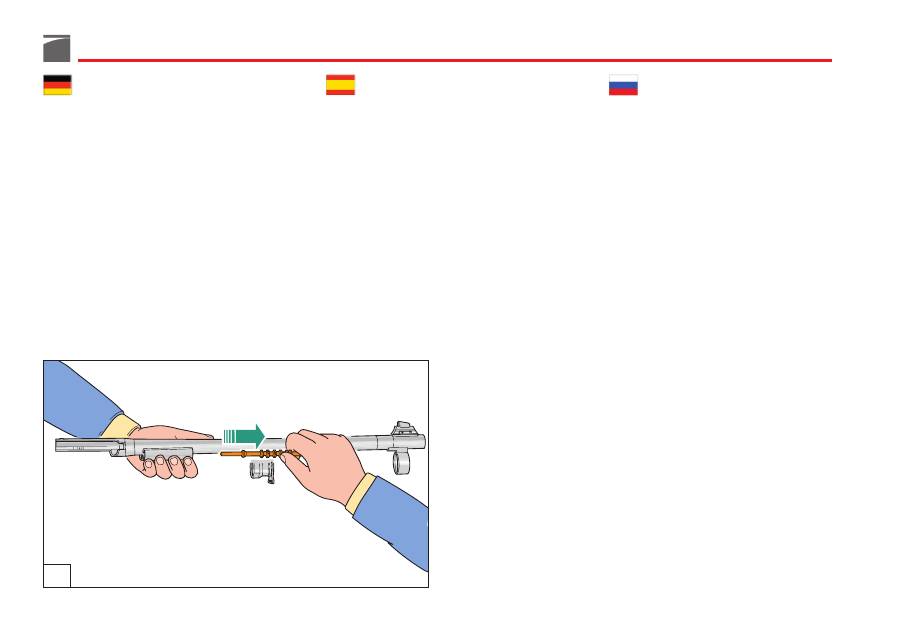
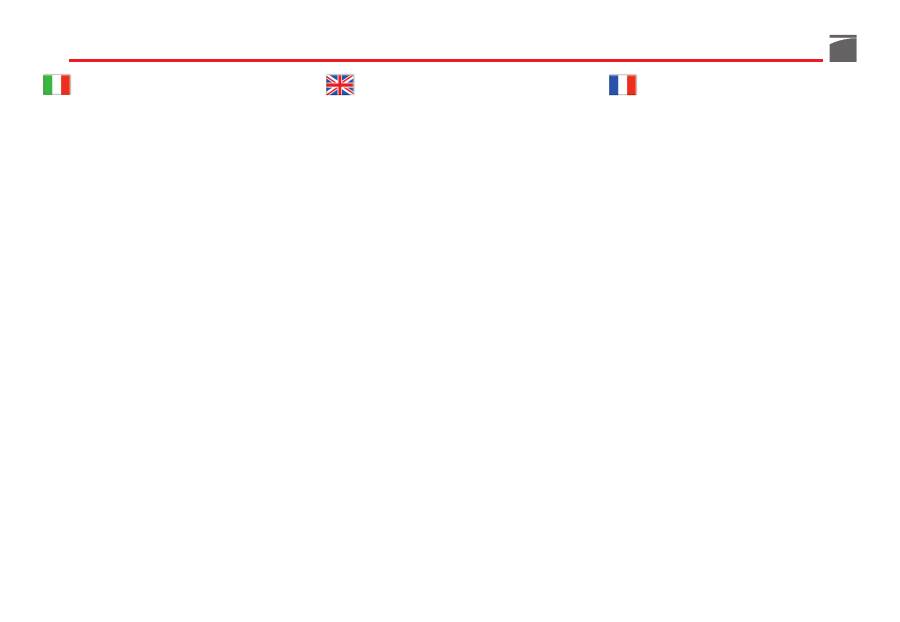
18) Impugnare il fucile all’altezza della car-
cassa con una mano e afferrare con l’al-
tra
l’impugnatura a pistola
, ruotandola
poi
in senso antiorario
(vista da dietro)
per svitarla dalla carcassa (fig. 48).
19) Svitare
le valvole presa gas
, utilizzando
la manetta di armamento (fig. 49).
20) Sfilare
i pistoni
in avanti (fig. 50).
Il fucile è completamente smontato: le parti
interessate a verifica e pulizia sono tutte sepa-
rate.
18) Empoigner le fusil à hauteur de la car-
casse d’une main, et de l’autre empoi-
gner la
poignée pistolet
avant de la
tourner
dans le sens inverse des aiguil-
les d’une montre
(vue de l’arrière) pour
la retirer de la carcasse (fig. 48).
19) Dévisser la
prise de gaz
au moyen du
levier d’armement (fig. 49).
20) Retirer les
pistons
vers l’avant (fig. 50).
Le fusil est entièrement démonté; les parties
devant être contrôlées et nettoyées sont tou-
tes séparées.
48
49
18) Take the receiver with a hand and with
the other unscrew the
pistol grip
in a
counter-clockwise
direction until free
(fig. 48).
19) Using the cocking lever, remove
the
gas cylinder plugs
(fig. 49).
20) Remove
the gas pistons
from the front
end (fig. 50).
The gun is now completely stripped: the parts
to be inspected and cleaned are all separat-
ed.
89
18) Das Gewehr mit einer Hand am Gehäuse
festhalten und mit der anderen den
Pistolengriff gegen den Uhrzeigersinn
(von hinten gesehen) drehen, um ihn
vom Gehäuse abzuschrauben (Abb. 48).
19) Die
Gasventile
mit Hilfe des Spann-
hebels abschrauben (Abb. 49).
20) Die
Ventilkolben
nach vorn abziehen
(Abb. 50).
Das Gewehr ist nun vollkommen zerlegt. Die
zu prüfenden und zu säubernden Teile liegen
einzeln vor.
18) Agarre el fusil a la altura de la carcasa
con una mano y con la otra agarre
la
empuñadura de pistola,
girándola lue-
go
en sentido opuesto al de las agujas
del reloj
(vista de la parte trasera) para
sacarla de la carcasa (fig. 48).
19) Destornille
las válvulas toma de gas,
uti-
lizando la maneta de armado (fig. 49).
20) Saque
los pistones
hacia adelante (fig. 50).
El fusil está completamente desmontado; las
partes que pueden interesar para una verifica-
ción cuidadosa y para la limpieza están sepa-
radas.
18)
Взять винтовку на высоте ствольной
коробки одной рукой и другой рукой
взять
пистолетную рукоятку,
повернув
ее затем в
направлении против
часовой стрелки
(вид сзади) для
отвинчивания со ствольной коробки
(рис. 48).
19)
Отвинтить
клапаны забора газа,
используя рукоятку затвора (рис. 49).
20)
Снять
поршни
по направлению к
передней части (рис. 50).
Винтовка полностью демонтирована; части,
которые следует проверить и очистить,
полностью разобраны и разделены.
50
90
Criteri di stoccaggio, pulizia e
manutenzione dell’arma
I componenti metallici presenti nei prodotti
Benelli (acciaio e leghe di alluminio) sono
trattati secondo i migliori standard commer-
ciali presenti sul mercato.
Per mantenere l’arma in buone condizioni è
necessario seguire le seguenti regole di cor-
retta manutenzione.
Imballaggio
L’arma viene fornita da Benelli pulita ed oliata
con olio protettivo che ne garantisce la con-
servazione nel tempo.
Modalità di stoccaggio del prodotto imballato
L’ambiente di stoccaggio del contenitore deve
essere un luogo chiuso, asciutto e ventilato.
Durante lo stoccaggio dell’arma nell’imballag-
gio originario, garantire che l’imballo rimanga
inalterato, in quanto necessario per garantire
la resistenza alla corrosione dell’arma. Verifi-
care periodicamente e comunque ogni 6
mesi che sulle parti metalliche sia presente
uno strato omogeneo di olio di tipo CLP
(Cleaning, Lubricant e Protective). Laddove
l’arma risulti carente di protezione lubrifican-
te, ripristinare secondo i “Criteri di pulizia e
lubrificazione”.
NOTA:
l’interno del cilindro ed i pistoni pre-
sa gas non richiedono lubrificazione.
Criteria for gun storage,
cleaning and maintenance
All metals used in the Benelli product line
(aluminium alloys and steel) are treated
according to the most advanced standards
available on the market today.
In order to maintain your gun in excellent
working conditions, you will need to follow
these simple maintenance procedures.
Packing
Benelli supplies the gun cleaned and lubricat-
ed with a protective oil to guarantee mainte-
nance over time.
How to store the packaged product
The container must be stored in a dry, closed
and ventilated environment. During storage
of the gun in its original packing, ensure that
the packing remains unchanged as this is
necessary to guarantee the gun’s resistance to
corrosion. On a regular basis, or at least once
every 6 months, make sure all metal parts
show a homogenous layer of CLP (Cleaning,
Lubricant, Protective) type oil. Should parts of
the gun be lacking this lubricant protection,
replace according to the “Criteria for cleaning
and lubrication”.
IMPORTANT:
the inside of the cylinder and
gas collector pistons do not require lubricating.
Critères de stockage, nettoyage
et entretien du fusil
Les composants métalliques présents sur les
produits Benelli (acier et alliages d’alumi-
nium) sont traités selon les meilleurs standards
commerciaux présents sur le marché.
Pour maintenir le fusil en bonne condition, il
est nécessaire de suivre les règles de correct
entretien.
Emballage
Le fusil est fourni par Benelli propre et lubrifié
avec une l’huile de protection qui garantit sa
conservation dans le temps.
Modalités de stockage du produit emballé
Le lieu de stockage de l’emballage doit être
un lieu fermé, sec et ventilé. Durant le stocka-
ge du fusil dans son emballage d’origine, il est
important de s’assurer que l’emballage de-
meure inaltéré, car cette condition est néces-
saire pour garantir la résistance à la corrosion
du fusil. Vérifier périodiquement et dans tous
les cas tous les 6 mois que les parties en métal
présentent une couche homogène d’huile du
type CLP (Cleaning, Lubricant et Protective).
Rétablir les parties du fusil qui présentent une
lubrification insuffisante en suivant les “Critè-
res de nettoyage et de lubrification”.
NOTE:
l’intérieur du cylindre et les pistons de
prise de gaz ne requièrent aucune lubrification.
91
Kriterien zur Lagerung, Reinigung
und Instandhaltung der Waffe
Die Metallkomponenten der Produkte von
Benelli (Stahl und Aluminiumlegierungen)
werden nach den besten auf dem Markt vor-
handenen Handelsstandards behandelt.
Um die Waffe in einem guten Zustand zu
erhalten, müssen die folgenden Regeln zur
korrekten Instandhaltung beachtet werden.
Verpackung
Die Waffe wird von Benelli gereinigt und mit
Schutzöl geschmiert geliefert, wodurch eine
lange Erhaltung garantiert wird.
Lagerungsbedingungen des verpackten Produkts
Das verpackte Produkt muss an einem gesch-
lossenen, trockenen und ventilierten Ort gela-
gert werden. Während der Lagerung der Waffe
in der Originalverpackung muss garantiert sein,
dass die Verpackung unverändert bleibt, da sie
notwendig ist, um die Korrosionsresistenz der
Waffe zu garantieren. Regelmäßig und minde-
stens alle 6 Monate kontrollieren, dass auf den
Metallteilen eine homogene Schicht des Öltyps
CLP (Cleaning, Lubricant und Protective) vor-
handen ist. An den Stellen, an denen die Waffe
keinen ausreichenden Schmierschutz aufweist,
nach den Anweisungen von “Kriterien zur Rei-
nigung und Schmierung” vorgehen.
HINWEIS:
Der Innenteil des Zylinders und der
Gas-Aufnahmekolben erfordert keine Schmierung.
Criterios de conservación, limpieza
y mantenimiento del arma
Los componentes metálicos presentes en los
productos Benelli (acero y aleaciones de alu-
minio) están tratados según los mejores están-
dares comerciales presentes en el mercado.
Para mantener el arma en buenas condiciones
es necesario respetar las siguientes reglas de
manutención correcta.
Embalaje
Benelli entrega el arma limpia y oleada con
aceite de protección que le garantiza la con-
servación de la misma en el tiempo.
Modo de conservación del producto embalado
El medio ambiente para guardar el contenedor
debe ser un lugar cerrado, seco y ventilado.
Durante la conservación del arma en el emba-
laje original, garantizar que el embalaje per-
manezca inalterado, puesto que es necesario
para garantizar la resistencia del arma a la corro-
sión. Controlar periódicamente y en cualquier
caso cada 6 meses la presencia en las partes
metálicas de un estrato homogéneo de aceite
de tipo CLP (Cleaning, Lubricant y Protective).
En caso de que el arma resulte carente de pro-
tección lubricante, restaurar según los “Crite-
rios de limpieza y lubricación”.
NOTA:
el interior del cilindro y los pistones de
toma gas no requieren lubricación.
Критерии хранения оружия,
чистки и ухода за ним
Металлические компоненты, содержащиеся в
продукции Benelli, (сталь и алюминиевые
сплавы) обработаны в соответствии с лучшими
коммерческими стандартами, существующими
на рынке. Для поддержки оружия в хорошем
состоянии, необходимо следовать правилам
надлежащего ухода за ним.
Упаковка
Оружие поставляется компанией Benelli в
чистом виде, с защитной смазкой,
обеспечивающей ему длительное хранение.
Методы хранения упакованной продукции
Контейнер следует хранить в закрытом, сухом
и проветриваемом помещении. Во время
хранения оружия в оригинальной упаковке,
нужно следить, чтобы упаковка не
подвергалась изменениям, что необходимо для
обеспечения устойчивости оружия к коррозии.
Необходимо периодически, и, по крайней мере,
раз в шесть месяцев, проверять, чтобы
металлические части были покрыты
равномерным слоем масла типа CLP (Чистка,
Смазка и Защита). Если на оружии
недостаточно защитной смазки, восполните ее
в соответствии с "Критериями по уходу и
смазке".
ПРИМЕЧАНИЕ:
внутренняя часть цилиндра и
поршни забора газа не требуют смазки.
92
Modalità di stoccaggio del prodotto
Una volta rimossa l’arma dall’imballaggio
originario, occorre stoccare l’arma in am-
bienti chiusi, asciutti e ventilati. In caso di
successivo stoccaggio all’interno dell’imballo
originario, verificare che l’arma sia completa-
mente asciutta e lubrificata e che l’interno
dell’imballo risulti completamente asciutto.
Occorre verificare periodicamente e comun-
que ogni mese che sulle parti metalliche sia
presente uno strato omogeneo di olio di tipo
CLP (Cleaning, Lubricant e Protective). Lad-
dove l’arma risulti carente di protezione lu-
brificante, ripristinare secondo i “Criteri di
pulizia e lubrificazione”.
NOTA:
l’interno del cilindro ed i pistoni pre-
sa gas non richiedono lubrificazione.
Criteri di pulizia e lubrificazione dell’arma
Dopo aver rimosso l’arma dall’imballaggio e
prima del suo utilizzo deve essere eseguita
una pulizia di base. L’arma deve essere lubri-
ficata con olio di tipo CLP (Cleaning, Lubri-
cant e Protective) che va applicato con dosi
uniformi sopra le superfici metalliche.
Occorre inoltre effettuare dopo l’uso del-
l’arma:
1) pulizia e lubrificazione della canna;
2) pulizia e lubrificazione del gruppo guar-
dia (cane, grilletto, ecc.);
How to store the product
Once the gun has been removed from its ori-
ginal packing, it must be stored in a dry, clos-
ed and ventilated environment.
If subsequently stored in its original packing,
check that the gun is completely dry and
lubricated, and that the inside of its packing
is completely dry.
On a regular basis, or at least once a month,
check that the metal parts show a homoge-
nous layer of CLP (Cleaning, Lubricant, Pro-
tective) type oil. Should parts of the gun be
lacking this lubricant protection, replace
according to the “Criteria for cleaning and
lubrication”.
IMPORTANT:
the inside of the cylinder and
gas collector pistons do not require lubricating.
Criteria for gun cleaning and lubrication
After removing the gun from its packing, it
must be cleaned prior to use. The gun must
be lubricated using a CLP (Cleaning, Lubri-
cant, Protective) type oil to be applied using
uniform doses onto the metal surfaces.
The following must also be carried out after
using the gun:
1) clean and lubricate the barrel;
2) clean and lubricate the trigger guard
assembly (hammer, trigger, etc.);
Modalités de stockage du produit
Après avoir retiré l’arme de son emballage
d’origine, il faut la stocker dans un lieu fer-
mé, sec et ventilé.
En cas de stockage successif à l’intérieur de
l’emballage d’origine, vérifier que l’arme soit
entièrement sèche et lubrifiée et que l’inté-
rieur de l’emballage soit parfaitement sec.
Il faut vérifier périodiquement et dans tous les
cas tous les mois que les parties en métal pré-
sentent une couche homogène d’huile du
type CLP (Cleaning, Lubricant et Protective).
Rétablir les parties du fusil qui présentent une
lubrification insuffisante en suivant les “Critè-
res de nettoyage et de lubrification”.
NOTE:
l’intérieur du cylindre et les pistons de
prise de gaz ne requièrent aucune lubrification.
Critères de nettoyage et de lubrification de l’arme
Après avoir retiré l’arme de son emballage, il
faut effectuer un nettoyage de base avant d’u-
tiliser le fusil. L’arme doit être lubrifiée avec
de l’huile du type CLP (Cleaning, Lubricant et
Protective) qu’il faut appliquer en doses uni-
formes sur les surfaces métalliques.
Il faut en outre effectuer, après l’usage de
l’arme:
1) le nettoyage et la lubrification du canon;
2) le nettoyage et la lubrification du groupe
sous-garde (chien, détente, etc.);
93
Bedingungen zur Lagerung des Produkts
Nachdem die Waffe aus der Originalver-
packung entnommen wurde, muss die Waffe an
einem geschlossenen, trockenen und ventilier-
ten Ort aufbewahrt werden. Wenn die Waffe
wieder in der Originalverpackung aufbewahrt
werden sollte, muss kontrolliert werden, dass
die Waffe komplett trocken und geschmiert ist
und dass die Verpackung innen komplett
trocken ist. Es muss regelmäßig mindestens
jeden Monat kontrolliert werden, dass auf den
Metallteilen eine homogene Schicht des Öltyps
CLP (Cleaning, Lubricant und Protective) vor-
handen ist. An den Stellen, an denen die Waffe
keinen ausreichenden Schmierschutz aufweist,
nach den Anweisungen von “Kriterien zur Rei-
nigung und Schmierung“ vorgehen.
HINWEIS:
Der Innenteil des Zylinders und der
Gas-Aufnahmekolben erfordert keine Schmierung.
Kriterien zur Reinigung und Schmierung der Waffe
Nach dem Auspacken der Waffe muss vor der
Benutzung eine Grundreinigung durchgeführt
werden. Die Waffe muss mit dem Öltyp CLP
(Cleaning, Lubricant und Protective) geschmiert
werden. Das Öl muss gleichmäßig auf den
Metalloberflächen aufgetragen werden.
Nach Benutzung der Waffe müssen die fol-
genden Vorgänge durchgeführt werden:
1) die Reinigung und Schmierung des Laufs;
2) die Reinigung und Schmierung der Ab-
zugsgruppe (Hahn, Abzug, etc.);
Modo de conservación del producto
Tras haber extraído el arma de su embalaje
original, es necesario guardar el arma en me-
dioambientes cerrados, secos y ventilados.
En caso de sucesiva conservación dentro del
embalaje original controlar que el arma esté
completamente seca y lubricada y que el inte-
rior del embalaje resulte completamente seco.
Es necesario controlar periódicamente y en
cualquier caso cada mes que en las partes
metálicas haya un estrato homogéneo de
aceite de tipo CLP (Cleaning, Lubricant y Pro-
tective). En las partes donde el arma resulte
carente de protección lubricante, restaurar los
“Criterios de limpieza y lubricación”.
NOTA:
el interior del cilindro u los pistones de
toma del gas no requieren lubricación.
Criterios de limpieza y lubricación del arma
Tras haber extraído el arma del embalaje debe
realizarse una limpieza de base antes del uso
del arma. El arma debe lubricarse con aceite
de tipo CLP (Cleaning, Lubricant y Protective)
que debe aplicarse con dosis uniformes sobre
las superficies metálicas.
Además, es necesario realizar después del uso
del arma:
1) la limpieza y lubricación del cañón;
2) la limpieza y lubricación del grupo guar-
damonte (martillo, gatillo, etc.);
Методы хранения продукции
После удаления оригинальной упаковки,
оружие следует хранить в закрытых, сухих и
проветриваемых помещениях. В случае
последующего хранения в оригинальной
упаковке, оружие необходимо смазать и
убедиться, что оно полностью сухое, и
упаковка внутри абсолютно сухая.
Необходимо периодически, и, по крайней
мере, раз в месяц, проверять, чтобы
металлические части были покрыты
равномерным слоем масла типа CLP (Чистка,
Смазка и Защита). Если на оружии
недостаточно защитной смазки, восполните
ее в соответствии с "Критериями по уходу и
смазке".
ПРИМЕЧАНИЕ:
внутренняя часть цилиндра и
поршни забора газа не требуют смазки.
Критерии по уходу и смазке оружия
После освобождения оружия от упаковки,
перед его применением, необходимо
произвести базовую чистку. Оружие следует
смазать маслом типа CLP (Чистка, Смазка и
Защита), которое наносится равномерными
дозами на металлическую поверхность.
Кроме того, после применения оружия,
необходимо:
1) очистить и смазать ствол;
2) очистить и смазать узел предохранительной
скобы (курок, спусковой крючок, и т.д.);
94
3) pulizia e lubrificazione del gruppo ottura-
tore;
4) smontaggio delle valvole presa gas per la
pulizia dei relativi pistoni. La frequenza
della pulizia può dipendere dal tipo di
munizioni utilizzato.
NOTA:
l’interno del cilindro ed i pistoni pre-
sa gas non richiedono lubrificazione.
Intervalli di pulizia e mantenimento
in esercizio
Durante l’utilizzo dell’arma, al termine di
ogni prova di sparo e comunque ogni 250
colpi, è necessario rimuovere eventuali resi-
dui di sporco o polvere incombusta. Ogni
residuo deve essere rimosso dall’arma me-
diante pulizia periodica, applicando sulle par-
ti metalliche uno strato omogeneo di olio di
tipo CLP (Cleaning, Lubricant e Protective) e
operando come specificato in “Prodotti ed
attrezzi per la pulizia”.
NOTA:
l’interno del cilindro ed i pistoni pre-
sa gas non richiedono lubrificazione.
Prodotti ed attrezzi per la pulizia
Per rimuovere sporco e macchie è normalmen-
te sufficiente utilizzare un panno morbido.
Devono essere impiegati solo detergenti dedi-
cati alla pulizia delle armi da applicare con
un panno morbido o scamosciato. Non utiliz-
zare detergenti a base acquosa o con additivi
3) clean and lubricate the bolt assembly;
4) dismantle the gas collection valves to
clean the various pistons (frequency of
cleaning will depend on the type of am-
munition used).
IMPORTANT:
the inside of the cylinder and
gas collector pistons do not require lubricating.
Frequency of cleaning and function
maintenance
During gun use, at the end of each fire test,
and in any case once every 250 shots, you
will need to remove any residues of dirt
and/or dust.
All residues must be removed from the gun by
means of regular cleaning, applying a homo-
genous layer of CLP (Cleaning, Lubricant, Pro-
tective) type oil onto the metal parts, using
what specified in the section “Cleaning pro-
ducts and devices”.
IMPORTANT:
the inside of the cylinder and
gas collector pistons do not require lubricating.
Cleaning products and devices
A soft cloth will normally suffice to remove
dirt and marks. Only use specific gun clea-
ning detergents, to be applied using a soft or
chamois cloth. Do not use water-based deter-
gents or those containing abrasive, alkaline or
acidic additives. Use a normal sponge with no
3) le nettoyage et la lubrification du groupe
obturateur;
4) le démontage des soupapes de prise de
gaz pour le nettoyage des pistons relatifs;
la fréquence du nettoyage peut dépendre
du type de munitions utilisées.
NOTE:
l’intérieur du cylindre et les pistons de
prise de gaz ne requièrent aucune lubrification.
Intervalles de nettoyage et de maintien
en service
Durant l’utilisation du fusil, à la fin de cha-
que test de tir et dans tous les cas tous les
250 coups, il est nécessaire d’éliminer les rési-
dus de saleté et de poudre imbrûlée; tout rési-
du doit être éliminé de l’arme à travers un net-
toyage périodique en appliquant sur les par-
ties en métal une couche homogène d’huile
du type CLP (Cleaning, Lubricant et Protective)
et en utilisant les outils indiqués dans le chapi-
tre “Produits et instruments pour le nettoyage”.
NOTE:
l’intérieur du cylindre et les pistons de
prise de gaz ne requièrent aucune lubrification.
Produits et instruments pour le nettoyage
Pour éliminer la saleté et les taches, il suffit
normalement d’utiliser un chiffon souple. Il
faut utiliser uniquement des produits déter-
gents destinés au nettoyage des armes et les
appliquer à l’aide d’un chiffon souple ou en
daim. Ne jamais utiliser de produits à base
95
3) die Reinigung und Schmierung des Ver-
schlusssatzes;
4) das Zerlegen der Gasventile zur Reini-
gung der Kolben; die Reinigungsfrequenz
hängt von dem Typ der benutzten Muni-
tion ab.
HINWEIS:
Der Innenteil des Zylinders und der
Gas-Aufnahmekolben erfordert keine Schmierung.
Reinigungsintervalle und
Instandhaltung
Während des Waffengebrauchs, nach jedem
Testschuss und nach 250 Schüssen müssen
eventuelle Schmutzrückstände oder unver-
branntes Schießpulver entfernt werden; jegli-
cher Rückstand muss von der Waffe durch
regelmäßige Reinigung entfernt werden; dazu
auf den Metallteilen eine homogene Schicht
des Öltyps CLP (Cleaning, Lubricant und Pro-
tective) auftragen; dazu die Anweisungen von
“Produkte und Geräte zur Reinigung“ befolgen.
HINWEIS:
Der Innenteil des Zylinders und der
Gas-Aufnahmekolben erfordert keine Schmierung.
Produkte und Geräte zur Reinigung
Zum Entfernen von Schmutz und Flecken
genügt normalerweise ein weiches Tuch. Es
dürfen nur spezielle Reinigungsmittel zur Reini-
gung von Waffen benutzt werden, die mit
einem weichen Velourtuch aufgetragen werden
dürfen. Keine Reinigungsmittel mit Wasserbasis
3) la limpieza y lubricación del grupo obtu-
rador;
4) el desmontaje de las válvulas de toma gas
para la limpieza de los respectivos pisto-
nes; la frecuencia de limpieza puede de-
pender del tipo de munición utilizado.
NOTA:
el interior del cilindro y los pistones
de toma gas no requieren lubricación.
Intervalos de limpieza y mantenimiento en
ejercicio
Durante el uso del arma, al final de cada
prueba de disparo y en cualquier caso cada
250 disparos es necesario extraer posibles
residuos de suciedad o polvo no combusto;
todo residuo debe eliminarse del arma me-
diante limpieza periódico aplicando en las
partes metálicas un estrato homogéneo de
aceite de tipo CLP (Cleaning, Lubricant y Pro-
tective) utilizando los productos indicados en
“Productos y utensilios para la limpieza”.
NOTA:
el interior del cilindro y los pistones de
toma de gas no requieren lubricación alguna.
Productos y utensilios para la limpieza
Para eliminar la suciedad y manchas normal-
mente es suficiente utilizar un paño húmedo y
suave. Deben emplearse solo detergentes
dedicados a la limpieza de las armas a aplicar
con un paño suave y afelpado. No utilice
detergentes de base acuosa o con aditivos
3) очистить и смазать узел затвора;
4) разобрать клапаны забора газа для
чистки соответствующих поршней;
периодичность чистки зависит от типа
применяемых боеприпасов.
ПРИМЕЧАНИЕ:
внутренняя часть цилиндра и
поршни забора газа не требуют смазки.
Периодичность чистки и обслуживание
в эксплуатации
Во время использования оружия, по
окончании испытаний по стрельбе, и в любом
случае после каждых 250 выстрелов,
необходимо удалять остатки грязи или
несгоревшего пороха; все остатки нужно
удалять путем периодической чистки оружия,
смазывая при этом металлические части
равномерным слоем масла типа CLP (Чистка,
Смазка и Защита), следуя указаниям в пункте
"Средства и инструменты для чистки".
ПРИМЕЧАНИЕ:
внутренняя часть цилиндра и
поршни забора газа не требуют смазки.
Средства и инструменты для чистки
Чтобы удалить грязь и пятна, как правило,
достаточно
воспользоваться
мягкой
салфеткой. Следует использовать только те
чистящие средства, которые предназначены
для чистки оружия, и наносить их мягкой или
замшевой салфеткой. Нельзя использовать
96
abrasivi, alcalini o acidi. Usare una normale
spugna senza inserti in ferro. Non usare pol-
veri abrasive o lana d’acciaio. Non usare
spazzole metalliche.
La pulizia deve essere ripetuta fino alla com-
pleta scomparsa di tracce e striature di sporco.
Al termine di ogni ciclo di pulizia applicare
sulle parti metalliche uno strato omogeneo di
olio di tipo CLP (Cleaning, Lubricant e Pro-
tective).
NOTA:
l’interno del cilindro ed i pistoni pre-
sa gas non richiedono lubrificazione.
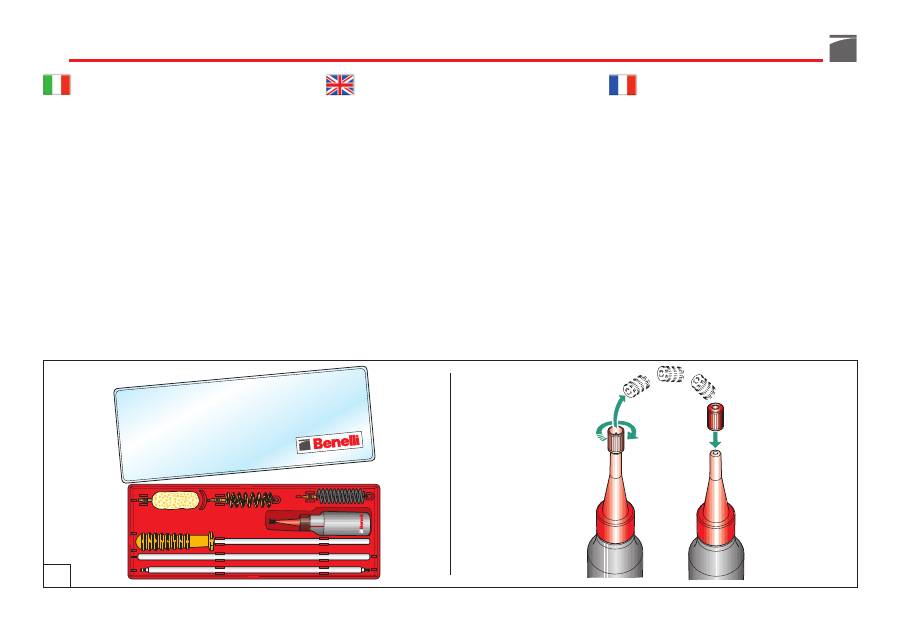
Si consiglia di utilizzare il set di pulizia e l’o-
lio Benelli Armi
(fig. 51) (in dotazione con il
fucile).
iron inserts. Do not use abrasive powders or
steel wool. Do not use metal brushes.
Cleaning must be repeated until all traces and
lines of dirt have been completely removed.
At the end of each cleaning cycle, apply a
homogenous layer of CLP (Cleaning, Lubri-
cant, Protective) type oil to all metal parts.
IMPORTANT:
the inside of the cylinder and
gas collector pistons do not require lubricating.
We recommend using the Benelli gun oil and
cleaning set
(fig. 51) (supplied with the gun).
d’eau ou contenant des additifs, abrasifs, alca-
lins ou acides. Utiliser une éponge classique
sans fer. Ne pas utiliser de poudres abrasives
ou de laine d’acier, ni des brosses métalliques
ou des pailles de fer.
Le nettoyage doit être répété jusqu’à ce que
les traces et les rayures de saleté disparaissent
entièrement. A la fin de chaque cycle de net-
toyage, appliquer sur les parties en métal une
couche homogène d’huile du type CLP (Clean-
ing, Lubricant et Protective).
NOTE:
l’intérieur du cylindre et les pistons de
prise de gaz ne requièrent aucune lubrification.
Il est conseillé d’utiliser le kit de nettoyage et
l’huile Benelli Armi
(fig. 51) (fournis en dota-
tion avec le fusil).
51
97
oder mit abrasiven Zusätzen, Alkalien oder
Säuren benutzen; einen normalen Schwamm
ohne Metalleinsatz, kein Abrasionspulver oder
Stahlwolle, keine Metallbürsten verwenden.
Die Reinigung muss so lange wiederholt wer-
den, bis die Schmutzspuren und Schmutz-
streifen komplett verschwunden sind. Am Ende
jedes Reinigungszyklus muss auf den Metall-
teilen eine homogene Schicht des Öltyps CLP
(Cleaning, Lubricant und Protective) aufgetra-
gen werden.
HINWEIS:
Der Innenteil des Zylinders und der
Gas-Aufnahmekolben erfordert keine Schmierung.
Es wird empfohlen, das Reinigungsset und das
Öl Benelli Armi
(Abb. 51) (im Lieferumfang
mit dem Gewehr vorhanden) zu benutzen.
abrasivos, alcalinos o ácidos; use una esponja
normal sin aplicaciones de estropajo. No use
polvos abrasivos ni lana de acero. No use
cepillos metálicos.
La limpieza debe repetirse hasta que toda
huella y estría de suciedad hayan desapareci-
do completamente. Al final de cada ciclo de
limpieza aplicar en las partes metálicas una
capa homogénea de aceite de tipo CLP
(Cleaning, Lubricant y Protective).
NOTA:
el interior del cilindro y de los pistones
de toma de gas no requieren lubricación alguna.
Se recomienda utilizar el juego de limpieza y
el aceite Benelli Armi
(fig. 51) (en dotación
con el fusil).
чистящие средства на водной основе или
абразивные чистящие добавки, щелочи или
кислоты; пользоваться обычной губкой без
железных вставок. Нельзя использовать
абразивные порошки или стальное волокно.
Нельзя использовать металлические щетки.
Чистку необходимо повторять до тех пор,
пока полностью не исчезнут следы
загрязнения и полосы. После каждого цикла
очистки на металлические части необходимо
нанести равномерный слой масла типа CLP
(Чистка, Смазка и Защита).
ПРИМЕЧАНИЕ:
внутренняя часть цилиндра и
поршни забора газа не требуют смазки.
Рекомендуется использовать комплект
для чистки и масло Benelli Armi
(рис. 51) (в
комплекте с ружьем).
98
Montaggio dell’arma
Per un corretto montaggio dell'arma, proce-
dere come segue:
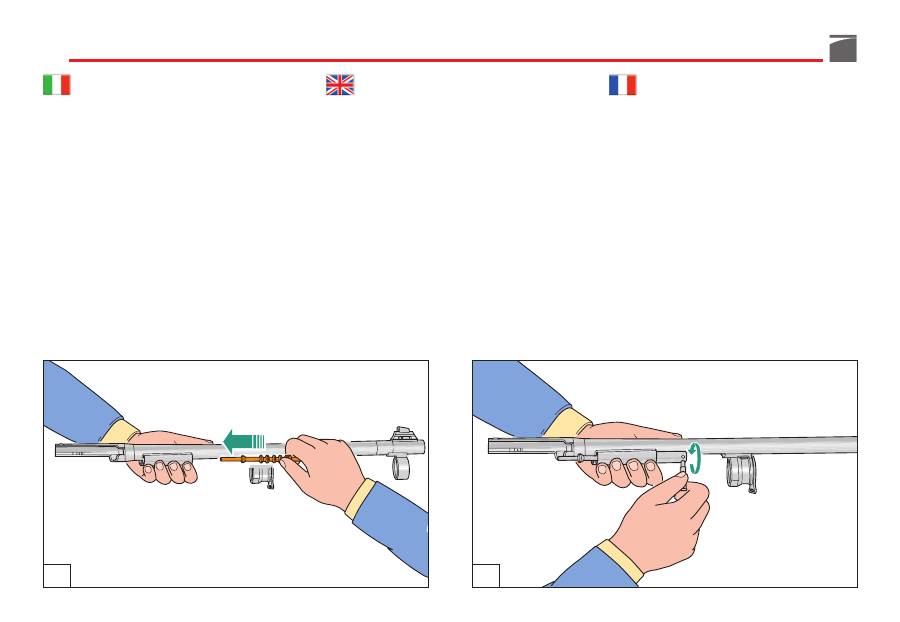
1) Montare i pistoni (fig. 52) e avvitare le
valvole nei cilindri di presa gas (fig. 53),
utilizzando la manetta di armamento per
il serraggio.
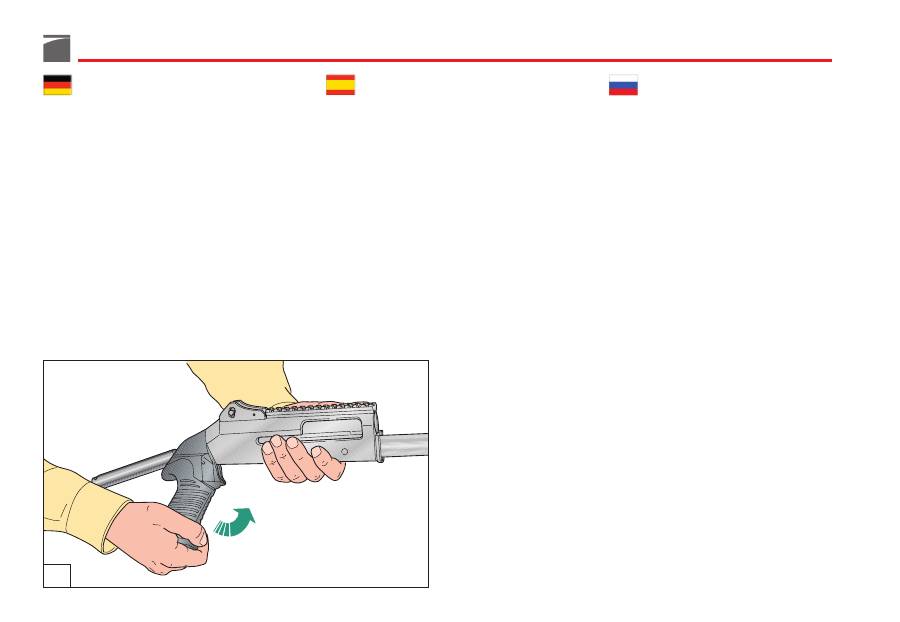
2) Montare
l’impugnatura del calcio
sulla
carcassa avvitandola in senso orario (vista
da dietro) (fig. 54) fino a portarla a con-
tatto con la carcassa. Da questo punto
ruotare l’impugnatura di massimo un giro
fino ad allineare il suo profilo con quello
della carcassa.
Shotgun assembly
For correct assembly of the gun proceed as
follows:
1) Install gas pistons (fig. 52). Using the cock-
ing lever, screw gas plugs into cylinders
(fig. 53).
2) Rotate
the pistol grip
onto the receiver
(clockwise direction from rear sight) (fig.
54) until it is against the back end of the
receiver; then
align
it with the receiver
(max are additional turn).
Montage de l’arme
Pour un montage correct de l’arme, procéder
comme suit:
1) Monter les pistons (fig. 52) et visser les
soupapes dans les cylindres de prise de
gaz (fig. 53) en utilisant le levier d’arme-
ment pour le serrage.
2) Monter
la poignée de la crosse
sur la car-
casse en la vissant dans le sens des aiguil-
les d’une montre (vue de l’arrière) (fig.
54) jusqu’à ce qu’elle entre en contact
avec la carcasse. Tourner alors la poignée
d’un tour au maximum jusqu’à aligner
son profil avec celui de la carcasse.
53
52
99
Zusammenbauen der Waffe
Die Waffe wird auf folgende Weise korrekt
zusammengebaut:
1) Die Kolben (Abb. 52) einbauen und die
Ventile in die Gaszylinder (Abb. 53) ein-
schrauben; den Spannhebel zum Fest-
ziehen benutzen.
2) Den
Griff des Gewehrschafts
auf das
Gehäuse aufsetzen und im Uhrzeigersinn
aufschrauben (von hinten gesehen) (Abb.
54), bis er das Gehäuse berührt; den
Pistolengriff auf das Gehäuse ausrichten
(max. eine zusätzliche Drehung).
Montaje del arma
Para el correcto montaje del arma proceda
en el siguiente orden:
1) Monte los pistones (fig. 52) y atornille las
válvulas en los cilindros de toma de gas
(fig. 53), utilizando la maneta de armado
para el apriete.
2) Monte
la empuñadura de la culata
en la
carcasa atornillándola en el sentido de las
agujas del reloj (vista de la parte trasera)
(fig. 54) hasta llevarla en contacto con la
carcasa. Desde este punto gire la em-
puñadura de máximo un giro hasta ali-
near su perfil con el de la carcasa.
Сборка оружия
Для правильной сборки оружия, действовать
в указанной последовательности:
1) Монтировать поршни (рис. 52) и
завинтить клапаны в цилиндрах взятия
газа (рис. 53), используя рукоятку затвора
для закручивания.
2) Монтировать
рукоятку приклада
на
ствольную коробку, завинтив ее в
направлении по часовой стрелке (вид
сзади) (рис. 54) пока она не дойдет до
контакта со ствольной коробкой. В этой
точке повернуть рукоятку на максимум
один оборот, пока ее профиль не будет
выровнен по отношению к профилю
ствольной коробки.
54

