Benelli M4 Tactical Shotgun – страница 4
Инструкция к Benelli M4 Tactical Shotgun

60
ATTENZIONE:
il caricamento del serbatoio
deve essere effettuato
con il cane armato
per
consentire alla leva fermo cartuccia di bloc-
care le cartucce che si introducono nel serba-
toio stesso.
A questo punto il fucile non può ancora spa-
rare se prima non si introduce
una cartuccia
in canna
, operando secondo una delle due
alternative indicate.
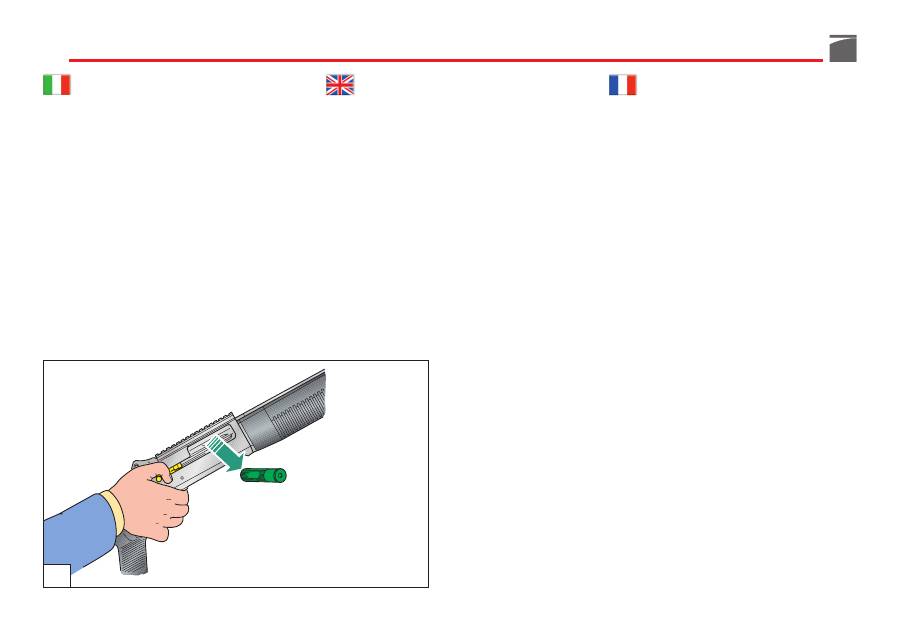
A) soluzione diretta:
1)
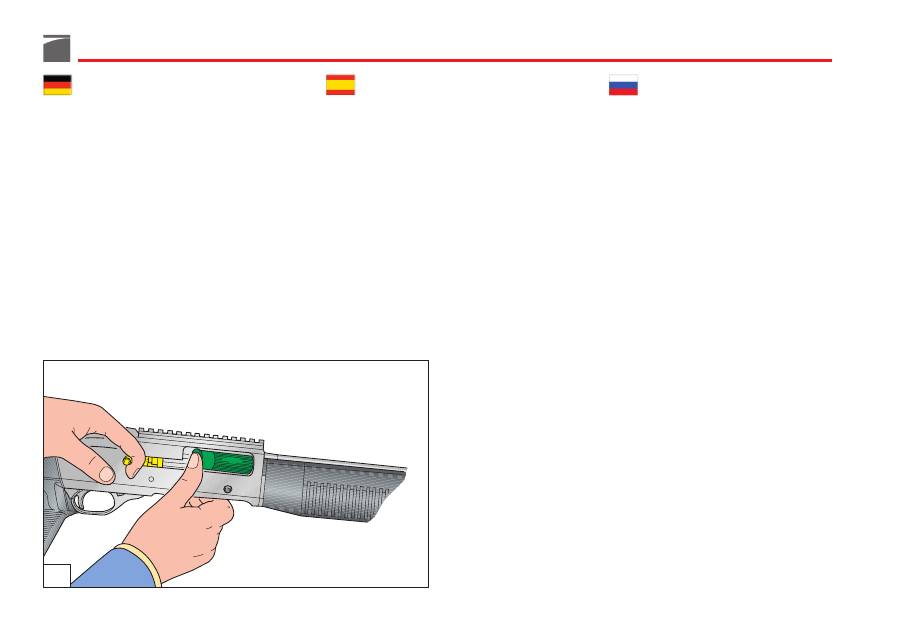
Aprire l'otturatore
(fig. 19) e trattenerlo
in tale posizione mentre
si introduce
una
cartuccia in canna attraverso la finestra di
espulsione bossolo (fig. 20).
NOTE:
the gun must be loaded with the
ham-
mer cocked
so that the carrier latch can
retain the cartridges as they are inserted in
the magazine.
Now the gun cannot be fired unless a
car-
tridge is placed in the barrel
, as to one of the
following procedures.
A) direct procedure:
1)
Open the bolt
(fig. 19) and at the same
time
insert
a cartridge into the barrel
through the case ejection port (fig. 20).
ATTENTION:
le chargement du magasin doit
être effectué
chien armé
afin de permettre au
levier d’arrêt de cartouche de bloquer les car-
touches que l'on introduit dans le magasin.
Le fusil n’est prêt à tirer qu’après introduction
d’une cartouche dans le canon
selon l’une
des deux solutions indiquées.
A) solution directe:
1)
Ouvrir l’obturateur
(fig. 19) et le mainte-
nir ouvert
en introduisant
simultanément
une cartouche dans le canon à travers la
fenêtre d’éjection de la douille (fig. 20).
19
61
ACHTUNG:
Das Magazin muss mit
gespann-
tem Hahn
geladen werden, damit die Maga-
zinsperrklinke die Patronen vorschriftsmäßig
aufnimmt, die ins Magazin geschoben wer-
den.
Die Flinte ist noch nicht schussbereit, denn
vorher muss
eine Patrone in das Patronen-
lager
des Laufes geladen werden. Dafür gibt
es die zwei folgenden Vorgehensweisen.
A) Direkte Zuführung:
1) Den
Verschluss öffnen
(Abb. 19) und bei
dieser Verschlussstellung gleichzeitig ma-
nuell eine Patrone durch die Hülsenaus-
wurföffnung
stecken
(Abb. 20).
ATENCIÓN:
la carga del almacén se debe
realizar con el
martillo armado
para permitir
a la palanca de bloqueo del cartucho blo-
quear los cartuchos que se introduzcan en el
almacén.
Ahora, el fusil todavía no puede disparar si
antes no se introduce un
cartucho en el
cañón
actuando según una de las dos alter-
nativas indicadas:
A) solución directa:
1)
Abra el obturador
(fig. 19) y manténgalo
en esa posición mientras
introduce
un
cartucho en el cañón a través de la venta-
na de expulsión del casquillo (fig. 20).
ВНИМАНИЕ:
заряжание магазина должно
выполняться
со взведенным курком
,
чтобы позволить рычагу держателя патрона
блокировать патроны, введенные в магазин.
Теперь винтовка еще не может стрелять,
если не ввести предварительно
один
патрон в ствол,
действуя в соответствии
с двумя указанными вариантами.
A) прямое решение:
1)
Открыть затвор
(рис. 19) и удерживать
его в этом положении, одновременно
вводя один патрон в ствол через окно
выбрасывания гильзы (рис. 20).
20
62
2)
Rilasciare l'otturatore
che, scorrendo in
avanti, incamera la cartuccia e si arresta
in posizione di chiusura.
B) soluzione indiretta:
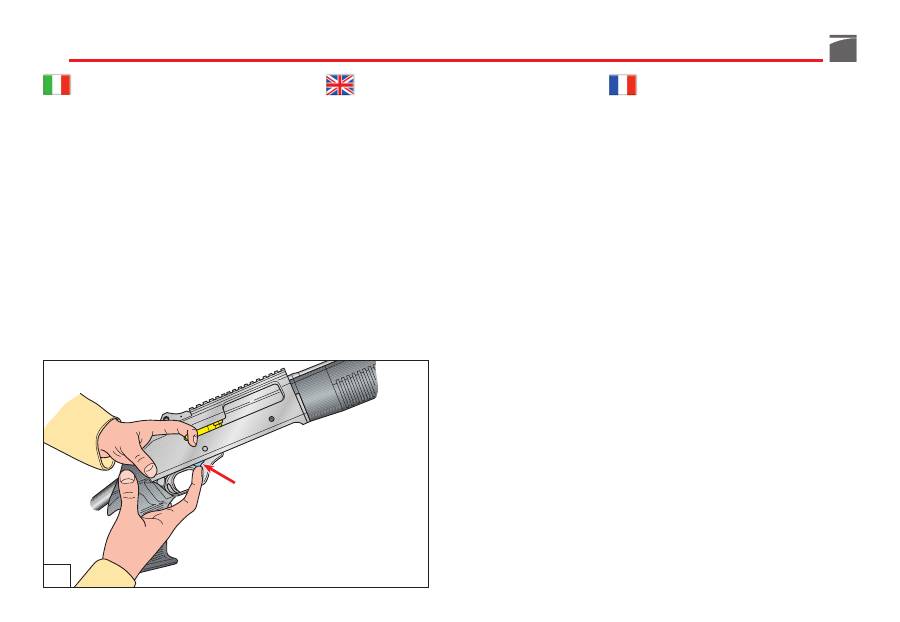
1)
Aprire l'otturatore
e trattenerlo in tale
posizione mentre si preme
la leva discesa
cartuccia
, consentendo alla prima cartuc-
cia di scendere sul cucchiaio elevatore
(fig. 21).
2)
Rilasciare l'otturatore
che, scorrendo in
avanti incamera la cartuccia e si arresta
in posizione di chiusura.
2)
Relâcher l’obturateur
; ce dernier, coulis-
sant vers l’avant, enferme la cartouche et
s’arrête en position de fermeture.
B) solution indirecte:
1)
Ouvrir l’obturateur
et le maintenir en po-
sition en pressant simultanément le
levier
de descente cartouche
, permettant ainsi
à la première cartouche de descendre sur
le support élévateur (fig. 21).
2)
Relâcher l’obturateur
; ce dernier, coulis-
sant vers l’avant, enferme la cartouche et
s’arrête en position de fermeture.
21
2)
Release the cocking lever:
the bolt will
push the cartridge on the carrier into the
chamber and stop in the closed position.
B) indirect procedure:
1)
Open the bolt
and hold it in this position
through the cocking lever. Press in the
same time
the cartridge drop lever
, so
that the first cartridge in the magazine
drops into the carrier (fig. 21).
2)
Release the cocking lever:
the bolt will
push the cartridge on the carrier into the
chamber and stop in the closed position.
63
2) Den
Verschluss freigeben
; durch die
Vorwärtsbewegung nimmt er die Patrone
vom Ladelöffel mit und befördert sie in
das Patronenlager, wobei sich der Ver-
schlussknopf hinter der Patrone verriegelt.
B) Indirekte Zuführung:
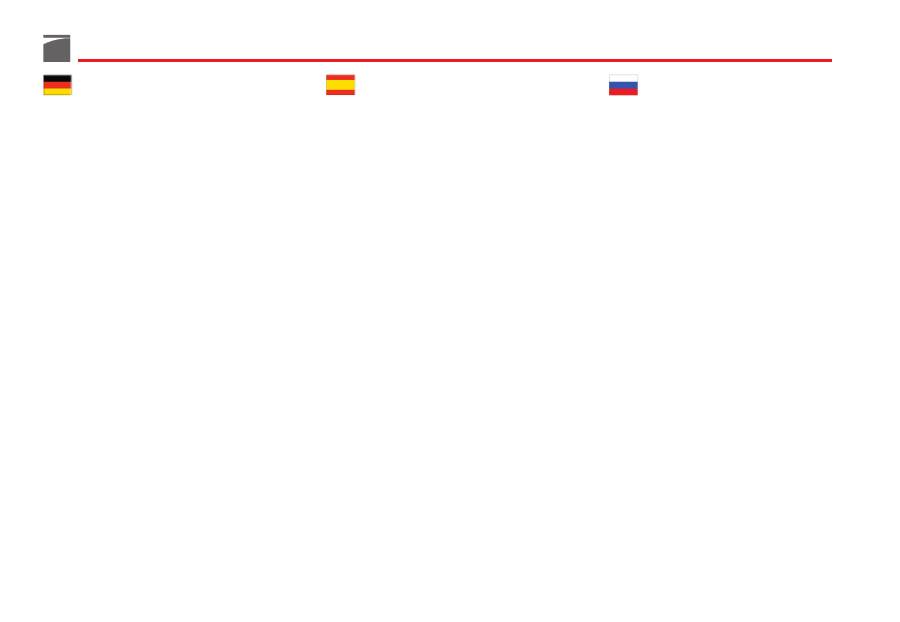
1) Den
Verschluss öffnen
und bei dieser
Verschlussstellung gleichzeitig den
Patro-
nenfreigabehebel
drücken. Dies bewirkt,
dass die erste Patrone aus dem Magazin-
rohr auf den Ladelöffel geschoben wird
(Abb. 21).
2) Den
Verschluss freigeben
; durch die
Vorwärtsbewegung nimmt er die Patrone
vom Ladelöffel mit und befördert sie in
das Patronenlager, wobei sich der Ver-
schlussknopf hinter der Patrone verriegelt.
2)
Suelte el obturador
que, deslizándose
hacia adelante, toma el cartucho y se
para en la posición de cierre.
B) solución indirecta:
1)
Abra el obturador
y manténgalo en esa
posición mientras pulsa
la palanca de
descenso del cartucho
, permitiendo al
primer cartucho descender al elevador
(fig. 21).
2)
Suelte el obturador
que, deslizándose
hacia adelante, toma el cartucho y se
para en la posición de cierre.
2)
Отпустить затвор,
который, продвигаясь
вперед, введет патрон и остановится в
положении закрытия.
B) непрямое решение:
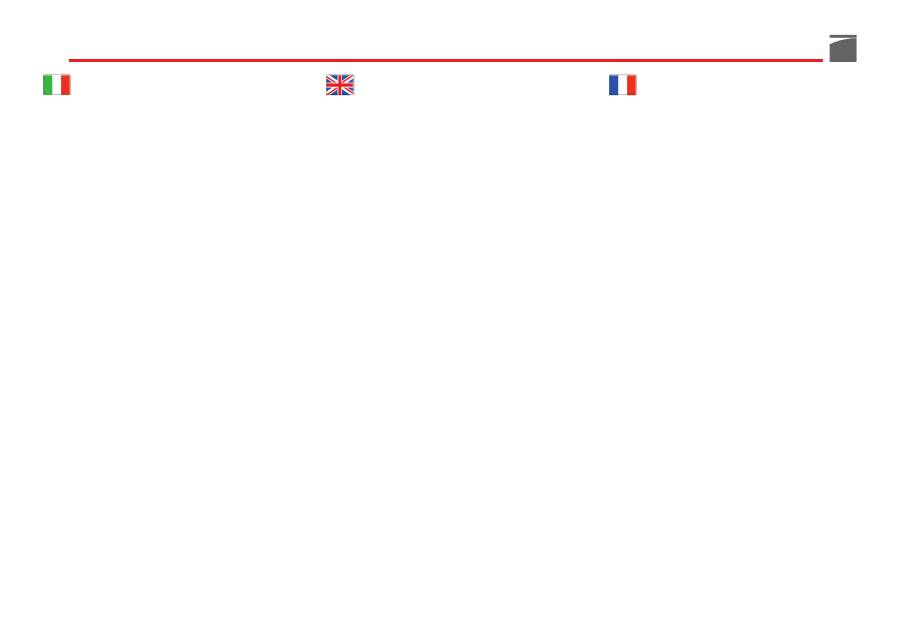
1) Открыть затвор и удерживать его в
данном положении, одновременно нажав
на
рычаг выбрасывателя патрона,
позволяя первому патрону спуститься в
ложку держателя (рис. 21).
2)
Отпустить затвор,
который, продвигаясь
вперед, введет патрон и остановится в
положении закрытия.
64
AVVERTENZA:
avvalendosi della soluzione
di caricamento
"B"
si riduce di un colpo la
quantità di cartucce nel serbatoio. E' possibi-
le l'inserimento - come prima descritto - di
una ulteriore cartuccia per riempirlo comple-
tamente.
ATTENZIONE:
durante queste operazioni -
anche se l'arma è in sicura (vedi “Sicura del
fucile”) - è opportuno
orientare la canna in
direzione di sicura prudenza
.
A questo punto
il fucile è carico:
portando la
sicura in posizione di sparo (
anello rosso visi-
bile
), l'arma è pronta per sparare.
WARNING:
with the procedure
“B”
the
number of cartridges in the magazine will be
reduced by one round. A new cartridge can
be inserted - see above - to fill the magazine
completely.
NOTE:
during this operation, always
point the
gun in a safe direction
, even though the safety
catch is engaged (see “Gun safety catch”).
Now the
gun is loaded
: when the safety catch
is moved to firing position (
red ring visible
),
the gun is ready for use.
AVERTISSEMENT
:
la solution de chargement
“
B
” réduit d’un coup la quantité de cartou-
ches à l’intérieur du magasin. Il est possible
d’introduire une dernière cartouche - comme
expliqué plus haut - pour remplir entièrement
le magasin.
ATTENTION
:
durant ces opérations - même si
le cran de sûreté est en place (voir “Sûreté du
fusil”) - il est nécessaire
d’orienter le canon
dans une direction ne comportant aucun
danger
.
Le
fusil est maintenant chargé
; placer la
sûreté en position de tir (
bague rouge visible
);
l’arme est prête à tirer.
65
HINWEIS:
Bei der Ladevariante
"B"
ist die
Zahl der im Magazin enthaltenen Patronen
um einen Schuss geringer. Wie beschrieben,
kann eine weitere Patrone hinzugefügt wer-
den, damit das Magazin vollständig geladen
ist.
ACHTUNG:
Bei diesen Vorgängen muss
der
Lauf immer in eine sichere Richtung gehal-
ten werden
, auch wenn die Waffe gesichert
ist (siehe “Sicherung des Gewehrs”).
Nun ist die
Waffe geladen
; nach dem Entsi-
chern (
der rote Ring ist sichtbar
) ist die Waffe
schussbereit.
ADVERTENCIA:
utilizando la solución de
carga
“B”
disminuye de un tiro la cantidad
de cartuchos en el almacén. Es posible la
introducción - como se ha descrito - de otro
cartucho para llenarlo completamente.
ATENCIÓN:
durante estas operaciones - aun-
que el arma tenga puesto el seguro (ver
“Seguro del fusil”) - es oportuno
orientar el
cañón hacia una dirección segura.
Ahora
el fusil está cargado
: llevando el segu-
ro a la posición de disparo (
anillo rojo a la
vista
), el arma está lista para disparar.
ПРЕДУПРЕЖДЕНИЕ:
используя способ
заряда
"B"
количество патронов в магазине
уменьшается на один. Возможно вставить –
как было описано ранее - дополнительный
патрон для его заполнения.
ВНИМАНИЕ:
во время этих операций – даже
если оружие установлено на предохранитель
(смотри “Предохранитель винтовки”) - следует
направлять
ствол
в
безопасном
направлении.
Теперь
винтовка заряжена:
установив
предохранитель в положение выстрела
(
видимое красное кольцо
), оружие готово к
выстрелу.
66
Sostituzione cartuccia
(Operazione da effettuarsi con fucile in sicu-
ra - vedi “Sicura del fucile” - e canna orien-
tata in direzione di sicura prudenza)
Per sostituire una cartuccia già incamerata si
possono seguire due procedure:
A) tramite
introduzione manuale
della nuo-
va cartuccia;
B) tramite
azionamento della leva discesa
cartuccia.
A) introduzione manuale della cartuccia
(sostituzione con cartuccia non presente nel
serbatoio)
1) Appoggiare il calcio sull'anca ed
aprire
manualmente
l'otturatore: la cartuccia
incamerata viene estratta ed espulsa dal-
l'arma (fig. 22).
2) Mantenendo aperto l'otturatore,
introdur-
re
in canna la cartuccia scelta, attraverso
la finestra di espulsione (fig. 20), rila-
sciando poi l'otturatore.
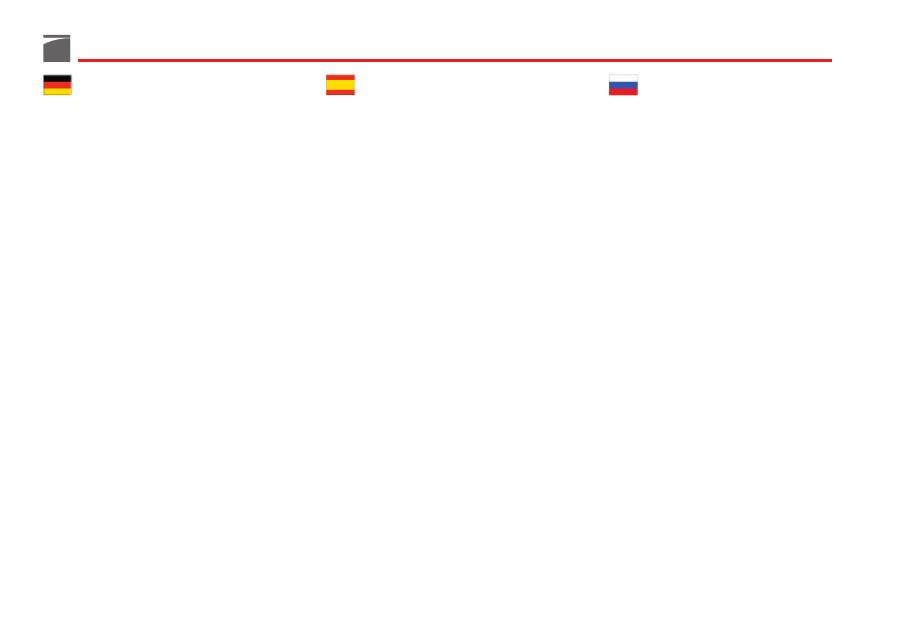
Cartridge replacement
(This operation must be carried out with the
gun safety catch engaged - see “Gun safety
catch”, and barrel pointed in a safe direction)
To replace a cartridge in the chamber, two
procedures can be followed:
A) by
manual replacement
of a new car-
tridge;
B) by
using the cartridge drop lever.
A) manual replacement
(when the cartridge
is not in the magazine)
1) Rest the stock on your hip and pull the
cocking lever
to open
the bolt: the car-
tridge in the chamber is extracted and
ejected from the gun (fig. 22).
2)
Insert
a new cartridge in the barrel
through the ejection port (fig. 20) and
release the cocking lever to close the bolt
again.
Remplacement cartouche
(Cette opération doit être effectuée avec le
cran de sûreté enclenché - voir “Sûreté du
fusil” - et avec le canon orienté dans une
direction ne présentant aucun danger)
Pour remplacer une cartouche déjà en place,
deux opérations sont possibles:
A)
introduction manuelle
de la nouvelle
cartouche;
B)
manoeuvre du levier de descente cartou-
che
.
A) introduction manuelle de la cartouche
(remplacement par une cartouche non pré-
sente dans le magasin)
1) Poser la crosse sur la hanche et
ouvrir
manuellement
l’obturateur: la cartouche
contenue est extraite et éjectée de l’arme
(fig. 22).
2) En maintenant l’obturateur ouvert,
intro-
duire
la cartouche choisie dans le canon
à travers la fenêtre d’éjection (fig. 20),
puis relâcher l’obturateur.
67
Auswechseln der Patrone
(Dieser Vorgang ist bei gesichertem Gewehr
auszuführen - siehe "Sicherung des Gewehrs"
- wobei der Lauf in eine sichere Richtung ge-
halten werden muss)
Zum Auswechseln einer bereits der Kammer
zugeführten Patrone ist wie folgt vorzugehen:
A)
Manuelles Einstecken
der neuen Patrone;
B)
Betätigung des Patronenfreigabehebels.
A) Manuelles Einstecken der Patrone (
Aus-
wechseln mit einer nicht im Magazin enthal-
tenen Patrone)
1) Den Schaft auf der Hüfte abstützen und
den Verschluss
per Hand öffnen
; die in
der Kammer enthaltene Patrone wird aus
der Waffe ausgezogen und ausgeworfen
(Abb. 22).
2) Bei geöffnetem Verschluss die gewählte
Patrone durch die Auswurföffnung (Abb.
20) in den Lauf
einsetzen
und dann den
Verschluss freigeben.
Sustitución del cartucho
(Esta operación se debe realizar con el segu-
ro puesto - ver “Seguro del fusil” - y cañón
orientado hacia una dirección segura)
Para sustituir un cartucho que ya se encuen-
tra en la cámara se pueden seguir dos proce-
dimientos:
A) por medio de la
introducción manual
del
nuevo cartucho;
B) por medio del
accionamiento de la pa-
lanca de descenso del cartucho
.
A) introducción manual del cartucho
(susti-
tución con cartucho no presente en el al-
macén)
1) Apoye la culata en la cadera y
abra ma-
nualmente
el obturador. De esta manera
el cartucho de la cámara es extraído y
expulsado del arma (fig. 22).
2) Manteniendo abierto el obturador,
intro-
duzca
en el cañón el cartucho elegido, a
través de la ventana de expulsión (fig.
20), soltando luego el obturador.
Замена патрона
(Операция выполняется с винтовкой,
установленной на предохранитель -
смотри “Предохранитель винтовки” - и со
стволом, направленным в безопасном
направлении)
Для замены уже введенного патрона можно
выполнить две операции:
A)
Ручное введение
нового патрона;
B)
Приведение в действие рычага
выбрасывателя патрона.
A) ручное введение патрона
(замена на
патрон, не поступающий из магазина)
1) Поместить приклад на бедро и открыть
вручную затвор: патрон в камере
извлекается и выбрасывается из ружья
(рис. 22).
2) Держа открытым затвор,
вставить в
ствол выбранный патрон, через окно
выбрасывателя (рис. 20), отпустив
затем затвор.
68
B) azionamento della leva discesa cartuccia
(sostituzione con cartuccia presente nel ser-
batoio)
1) Appoggiare il calcio sull'anca ed
aprire
manualmente
l'otturatore: la cartuccia
incamerata viene estratta ed espulsa dal-
l'arma (fig. 22).
2) Mantenendo aperto l'otturatore, premere
la leva discesa cartuccia
(fig. 21). Rila-
sciando poi l'otturatore si ottiene il pas-
saggio rapido della cartuccia dal serba-
toio alla camera di scoppio.
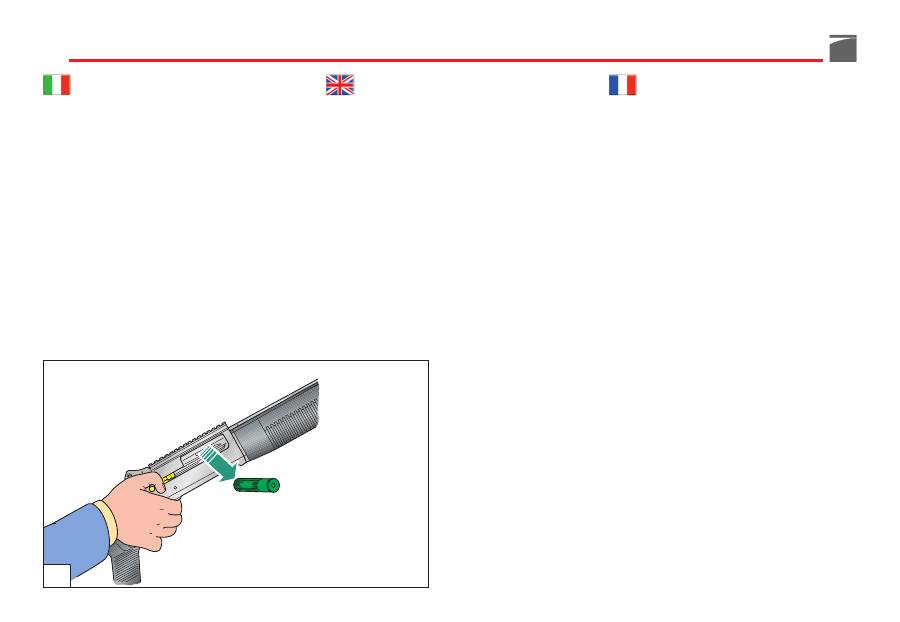
B) using the cartridge drop lever
(when the
cartridge is in the magazine)
1) Rest the stock on your hip and
open
the
bolt by hand: the cartridge in the cham-
ber is extracted and ejected from the gun
(fig. 22).
2) Press
the cartridge drop lever
(fig. 21).
Release the cocking lever to reclose the
bolt. In this way, the cartridge will pass
quickly from the magazine to the cham-
ber.
B) manoeuvre du levier de descente cartou-
che
(remplacement par une cartouche pré-
sente dans le magasin)
1) Poser la crosse sur la hanche et
ouvrir
manuellement
l’obturateur: la cartouche
contenue est extraite et éjectée de l’arme
(fig. 22).
2) En maintenant l’obturateur ouvert, enfon-
cer
le levier de descente cartouche
(fig.
21) avant de relâcher l’obturateur pour
provoquer le passage rapide de la cartou-
che du magasin à la chambre de défla-
gration.
22
69
B) Betätigung des Patronenfreigabehebels
(Auswechseln mit einer im Magazin enthaltenen
Patrone)
1) Den Schaft auf der Hüfte abstützen und
den Verschluss
per Hand öffnen
; die in
der Kammer enthaltene Patrone wird aus
der Waffe ausgezogen und ausgeworfen
(Abb. 22).
2) Den
Patronenfreigabehebel
bei geöff-
netem Verschluss drücken (Abb. 21). Bei
Freigabe des Verschlusses wird die Patro-
ne schnell vom Magazin in das Patronen-
lager gestoßen.
B) accionamiento de la palanca de descenso
del cartucho
(sustitución con cartucho pre-
sente en el almacén)
1) Apoye la culata en la cadera y
abra ma-
nualmente
el obturador. De esta manera
el cartucho de la cámara es extraído y
expulsado del arma (fig. 22).
2) Manteniendo abierto el obturador, apriete
la palanca de descenso del cartucho
(fig.
21). Soltando luego el obturador se obtie-
ne el paso rápido del cartucho desde el
almacén a la cámara de explosión.
B) приведение в действие рычага
выбрасывателя патрона
(замена на
патрон, поступающий из магазина)
1) Поместить приклад на бедро и открыть
вручную
затвор:
патрон в камере
извлекается и выбрасывается из ружья
(рис. 22).
2) Держа открытым затвор, нажать на
рычаг выбрасывателя патрона
(рис.
21). Отпустив затем затвор, происходит
быстрый переход патрона из магазина в
камеру воспламенения.
70
Scarico dell’arma
(Operazione da effettuarsi con fucile in sicu-
ra - vedi “Sicura del fucile” - e canna orien-
tata in direzione di sicura prudenza)
Per scaricare il fucile, agire come segue:
1)
Aprire l'otturatore:
la cartuccia incame-
rata viene estratta ed espulsa dall'arma
(fig. 23).
2)
Chiudere l'otturatore
, accompagnando
la manetta con la mano (fig. 24).
Déchargement de l’arme
(Cette opération doit être effectuée avec le
cran de sûreté enclenché - voir “Sûreté du
fusil” - et avec le canon orienté dans une
direction ne présentant aucun danger)
Pour décharger le fusil, procéder comme suit:
1)
Ouvrir l’obturateur
: la cartouche à l’inté-
rieur est extraite et éjectée de l’arme (fig.
23).
2)
Fermer l’obturateur
en accompagnant de
la main le levier (fig. 24).
23
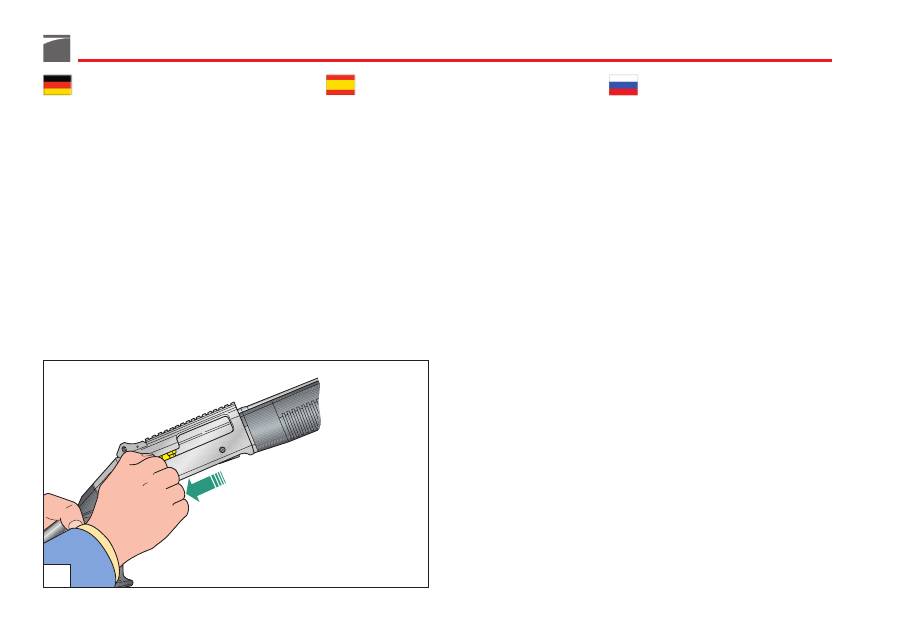
Unloading
(This operation must be carried out with the
gun safety catch engaged - see “Gun safety
catch” and barrel pointed in a safe direction)
To unload the shotgun, proceed as follows:
1)
Open the bolt
: the cartridge in the cham-
ber will be extracted and ejected (fig. 23).
2)
Close the bolt
: gently releasing the cock-
ing lever (fig. 24).
71
Entladen der Waffe
(Dieser Vorgang ist bei gesichertem Gewehr
auszuführen - siehe "Sicherung des Gewehrs"
- wobei der Lauf in eine sichere Richtung ge-
halten werden muss)
Zum Entladen der Waffe muss wie folgt vor-
gegangen werden:
1)
Den Verschluss öffnen
: Die in der Kam-
mer vorhandene Patrone wird aus der
Waffe herausgezogen und ausgeworfen
(Abb. 23).
2)
Den Verschluss schließen
und dabei den
Hebel mit der Hand führen (Abb. 24).
Descarga del arma
(Esta operación se debe realizar con el segu-
ro puesto - ver “Seguro del fusil” - y cañón
orientado hacia una dirección segura)
Para descargar el fusil siga las indicaciones
siguientes:
1)
Abra el obturador:
el cartucho de la
cámara es extraído y expulsado del arma
(fig. 23).
2)
Cierre el obturador,
acompañando la
maneta con la mano (fig. 24).
Разряжания оружия
установленной на предохранитель -
смотри “Предохранитель винтовки” - и со
стволом, направленным в безопасном
направлении)
Для разряжания винтовки, действовать, как
указано:
1)
Открыть затвор:
патрон в камере
извлекается и выбрасывается из оружия
(рис. 23).
2)
Закрыть затвор,
сопровождая рычаг
рукой (рис. 24).
24
72
3) Capovolgere l'arma e - spingendo l'eleva-
tore all'interno -
far pressione
con l'indi-
ce della mano destra nella parte anteriore
della
leva di fermo
cartuccia (fig. 25): la
prima cartuccia nel serbatoio uscirà. Si
deve premere la leva di fermo per ogni
cartuccia che si vuol togliere dal serba-
toio.
AVVERTENZA:
l'arma può essere scaricata
anche ripetendo più volte l'operazione
descritta al punto B del capitolo:
”Sostituzio-
ne cartuccia”.
3) Renverser l’arme et – en poussant l’éléva-
teur à l’intérieur –
faire pression
avec
l’index de la main droite dans la partie
antérieure du
levier d’arrêt
cartouche
(fig. 25): la première cartouche du maga-
sin sortira. Enfoncer le levier d’arrêt pour
chaque cartouche que l’on désire ôter du
magasin.
AVERTISSEMENT
:
l’arme peut également être
déchargée en répétant plusieurs fois l’opéra-
tion décrite au point B du chapitre “
Rempla-
cement cartouche
”.
25
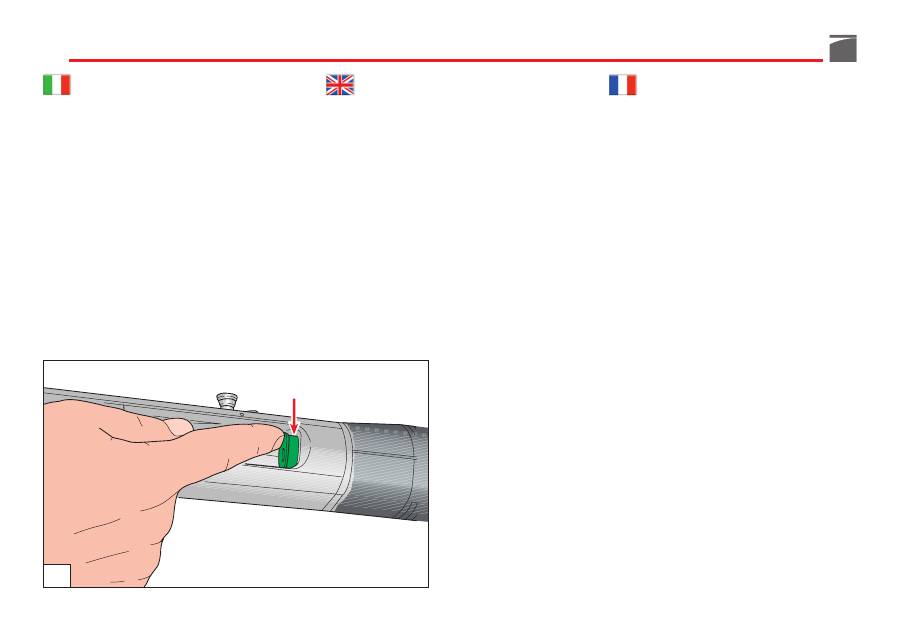
3) Reverse the gun and - thrusting the carrier
towards inside -
press the carrier latch
frontal part with your index finger (fig.
25); the first cartridge will come out. The
carrier latch must be pressed for each
released cartridge.
WARNING:
gun can be unloaded by repeat-
ing the operation, as described under point B
of the chapter:
”Cartridge replacement”
.
73
3) Die Waffe umdrehen und bei gleichzeiti-
gem
Drücken
des Ladelöffels nach innen
mit dem Zeigefinger der rechten Hand
auf den vorderen Bereich der Magazin-
sperrklinke (Abb. 25) drücken; dabei tritt
die erste, im Magazin enthaltene Patrone
aus. Für jede aus dem Magazin zu entlee-
rende Patrone muss die Magazinsperr-
klinke gedrückt werden.
HINWEIS:
Die Waffe kann auch durch mehr-
maliges Wiederholen des unter Punkt B des
Abschnitts
"Auswechseln der Patrone"
be-
schriebenen Vorgangs entladen werden.
3) Voltee el arma y, empujando el elevador
hacia adentro,
presione
con el dedo índi-
ce la parte anterior de
la palanca de
parada
del cartucho (fig. 25): el primer
cartucho del almacén saldrá. Se debe
presionar la palanca de parada para cada
cartucho que se quiere sacar del al-
macén.
ADVERTENCIA:
el arma también se puede
descargar repitiendo varias veces la operación
descrita en el punto B del capítulo:
“Sustitu-
ción del cartucho”.
3) Перевернуть оружие и – толкая
держатель
внутрь
-
надавить
указательным пальцем правой руки на
переднюю часть
рычага стопора
патрона (рис. 25): первый патрон в
магазине выйдет наружу. Необходимо
нажать на рычаг стопора для извлечения
каждого патрона из магазина.
ПРЕДУПРЕЖДЕНИЕ:
оружие может быть
разряжено, повторив несколько раз
описанную операцию в пункте B в главе:
“Замена патрона”
.
74
Smontaggio dell’arma
Prima di effettuare qualunque tipo di inter-
vento sul fucile, accertarsi sempre che came-
ra di scoppio e serbatoio siano completa-
mente vuoti!
(Leggere attentamente le istru-
zioni di caricamento e scaricamento del-
'arma).
Il fucile è completamente smontabile nei suoi
gruppi principali senza richiedere l’uso di at-
trezzi.
Procedura di smontaggio
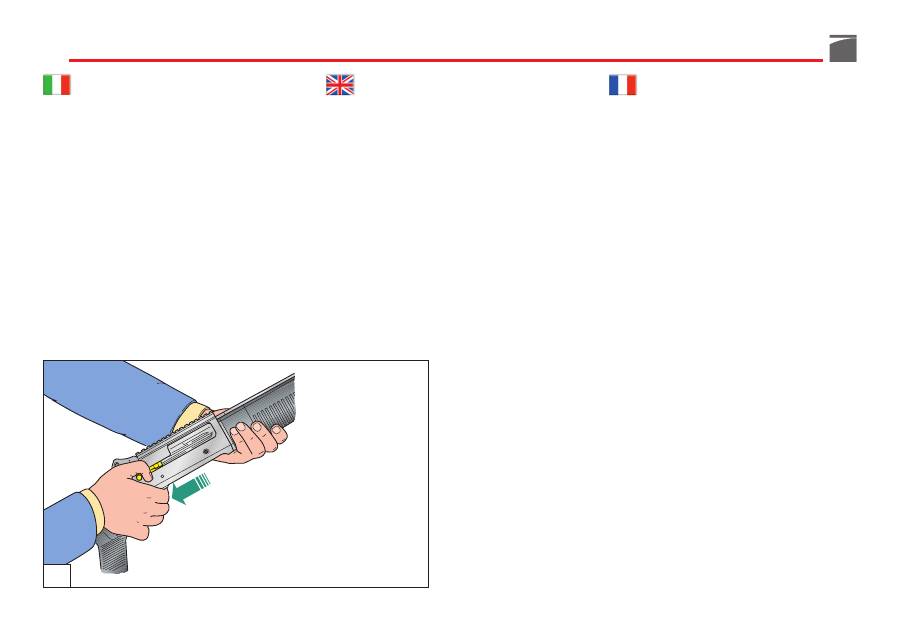
1) Arretrare
la manetta di armamento
(fig.
26).
Gun stripping
Before attempting any work on your M4
make sure that the chamber and the maga-
zine of your shotgun are unloaded.
(See the
instructions on loading and unloading).
M4 is a modular-style shotgun: no armorer
tools are required for its stripping.
Stripping procedure
1) Pull
the cocking lever
back (fig. 26).
Démontage de l’arme
Avant toute intervention sur le fusil, contrôler
toujours que la chambre de déflagration et le
magasin soient entièrement vides
(lire avec
attention les instructions de chargement et de
déchargement de l’arme).
Les principaux groupes du fusil sont totale-
ment démontables sans besoin d’outil.
Opérations de démontage
1) Tirer le
levier d’armement
vers l’arrière
(fig. 26).
26
75
Zerlegen der Waffe
Vor jeglichem Handgriff an Ihrem Gewehr
sollten Sie sicherstellen, dass die Patronen-
lager und das Magazin ihres Gewehrs völlig
leer sind!
(Bitte lesen Sie aufmerksam die
Anweisungen für das Laden und das Entladen
der Waffe).
Das Gewehr kann komplett ohne jegliches
Werkzeug in seine Hauptbaugruppen zerlegt
werden.
Zerlegen
1) Den
Spannhebel
zurückziehen (Abb. 26).
Desmontaje del arma
Antes de realizar cualquier tipo de opera-
ción en su fusil, asegúrese siempre que la
cámara de explosión y el almacén estén
completamente vacíos.
(Lea atentamente las
instrucciones para la carga y la descarga del
arma).
El fusil es completamente desmontable en sus
grupos principales sin necesidad de utilizar
herramientas.
Procedimiento de desmontaje
1) Haga retroceder
la maneta de armado
(fig. 26).
Демонтаж оружия
Перед тем, как выполнять любые операции
с Вашей винтовкой, убедиться, что камера
воспламенения и магазин совершенно
пустые!
(внимательно прочитать инструкции по
заряжанию и разряжанию оружия).
Винтовка полностью разбирается на
основные узлы, не используя для этого
специальные инструменты.
Порядок демонтажа
1) Отвести назад
рычаг затвора
(рис. 26).
76
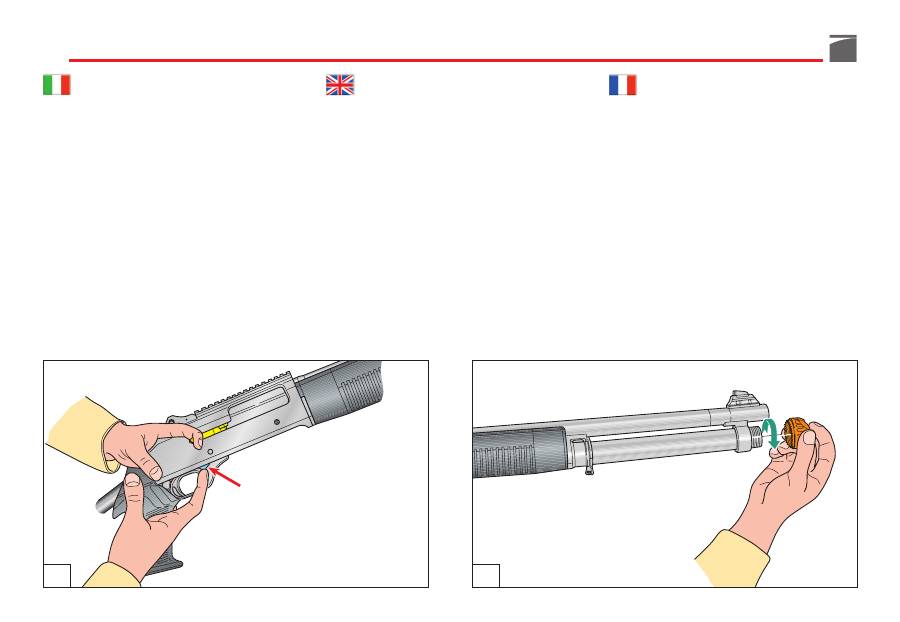
2) Azionare
la leva discesa
cartuccia (fig.
27).
3) Svitare
il cappellotto
fissaggio astine (fig.
28).
4) Sfilare
il gruppo canna
in avanti, lungo il
tubo serbatoio (fig. 29).
5) Sfilare verso il basso
le semi-astine
(fig.
30).
2) Move the
cartridge drop lever
(fig. 27).
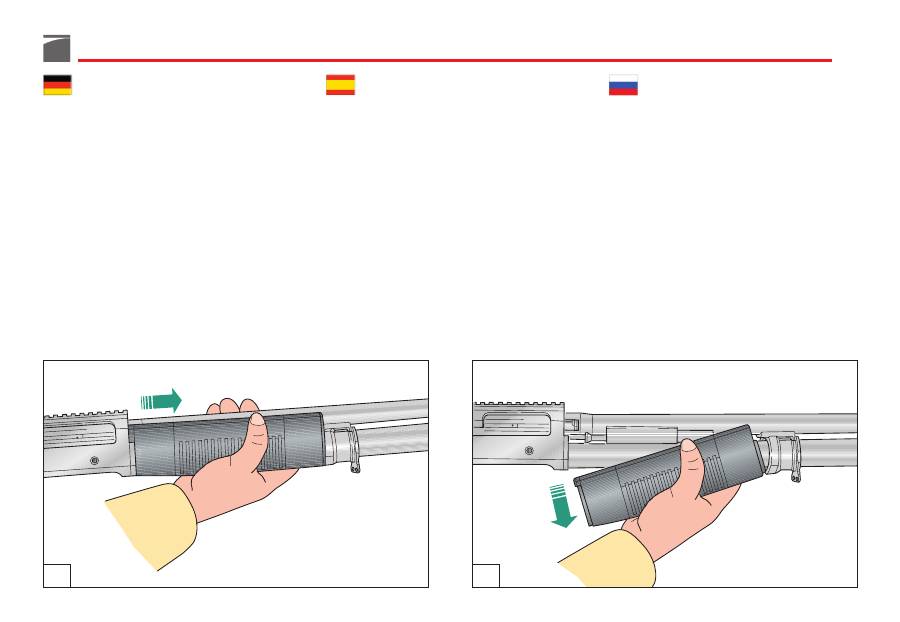
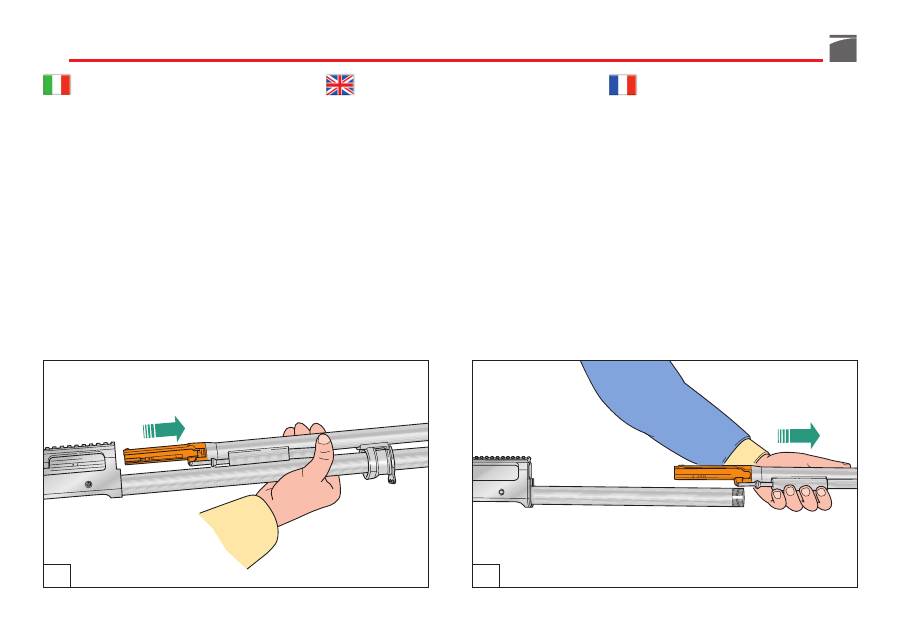
3) Unscrew
the fore-end cap
(fig. 28).
4) Remove
the barrel
along the magazine
tube (fig. 29).
5) Slide down
the twin forearms
(fig. 30).
2) Actionner le
levier de descente cartou-
che
(fig. 27).
3) Dévisser le
capuchon
de fixation devant
(fig. 28).
4) Faire coulisser
le groupe canon
vers l’a-
vant le long du tube magasin (fig. 29).
5) Faire coulisser
le fût
vers le bas (fig. 30).
27
28
77
2) Den
Patronenfreigabehebel
betätigen
(Abb. 27).
3) Die
Vorderschaftbefestigungskappe
vom
Magazinrohr abschrauben (Abb. 28).
4) Den
Lauf
nach vorn ziehen, um den
Laufführungsring vom Magazinrohr zu
trennen (Abb. 29).
5) Die beiden
Vorderschafthälften
nach
unten herausziehen (Abb. 30).
2) Accione
la palanca de descenso
del car-
tucho (fig. 27).
3) Destornille
el capuchón
de fijación de la
varilla
(fig. 28).
4) Quite
el grupo cañón
haciéndolo desli-
zar hacia adelante a lo largo del tubo
almacén (fig. 29).
5) Quite hacia el suelo
las semi-varillas
(fig.
30).
2) Привести в действие
рычаг спуска
патрона (рис. 27).
3) Отвинтить
заглушку
крепления цевья
(рис. 28).
4) Снять
узел ствола
вперед, вдоль трубки
магазина (рис. 29).
5) Снять по направлению к низу
полцевья
(рис. 30).
29
30
78
6) Prendere il gruppo
canna-culatta
e farlo
scorrere in avanti, sfilandolo poi comple-
tamente dal tubo serbatoio (figg. 31-32).
7) Trattenere
la manetta di armamento
e
premere contemporaneamente
il bottone
comando elevatore
(fig. 33), lasciando
poi avanzare lentamente l'otturatore, fino
al suo arresto (fig. 34).
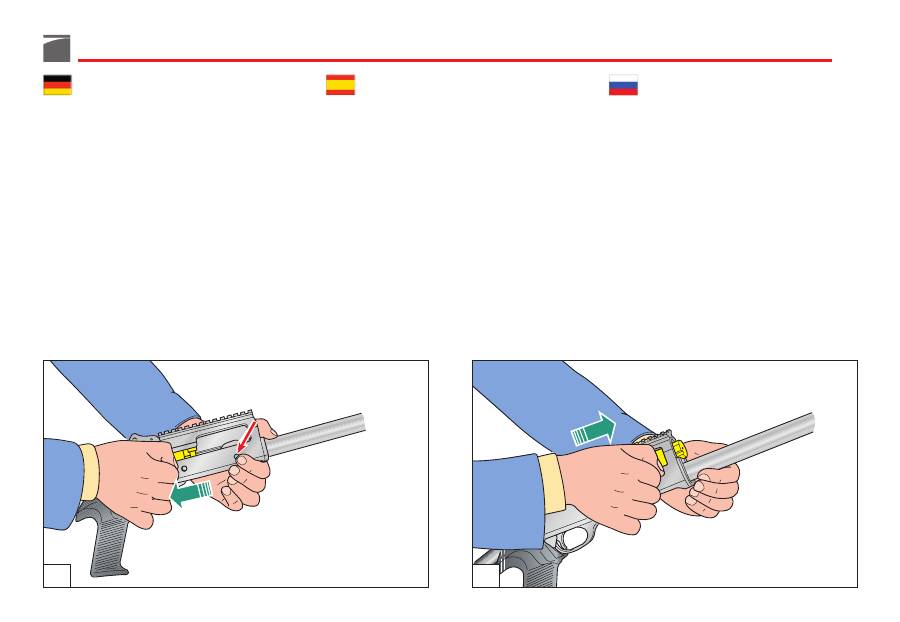
6)
Grip the barrel
and move it forward to
remove the whole barrel-breech unit
from the receiver (figs. 31-32).
7) Hold
the cocking lever firmly
and press
the carrier button
(fig. 33), allowing the
bolt to move a little way forward until it
stops (fig. 34).
6) Saisir le groupe
canon-culasse
et le faire
coulisser vers l’avant pour le retirer com-
plètement du tube magasin (fig. 31-32).
7) Retenir
le levier d’armement
et enfoncer
simultanément
le bouton de commande
élévateur
(fig. 33) avant de laisser avan-
cer lentement l’obturateur jusqu’à l’arrêt
de ce dernier (fig. 34).
31
32
79
6) Den
Lauf
umgreifen und vollständig nach
vorne aus dem Gehäuse herausziehen
(Abb. 31-32).
7) Den
Spannhebel
festhalten und gleich-
zeitig den
Verschlussfanghebelknopf
drücken (Abb. 33); dann langsam den
Verschluss bis zum Anschlag nach vorn
gleiten lassen (Abb. 34).
6) Coja el grupo
cañón-cerrojo
y hágalo
deslizar hacia delante, sacándolo luego
completamente del tubo almacén (figs.
31-32).
7) Detenga
la maneta de armado
y simultá-
neamente pulse
el botón de mando ele-
vador
(fig. 33), dejando avanzar lenta-
mente el obturador hasta su parada (fig.
34).
6) Взять узел
ствол-казенник
и продвинуть
его вперед, сняв затем полностью с
трубки магазина (рис. 31-32).
7) Удерживать
ручку
затвора
и
одновременно
нажать на кнопку
управления держателем
(рис. 33), дав
затем медленно продвинуться вперед
затвору до стопора (рис. 34).
33
34

