Avery Dennison Pathfinder 6057 Quick Reference: инструкция
Раздел: Техника
Тип:
Инструкция к Avery Dennison Pathfinder 6057 Quick Reference

QUICK REFERENCE
This Quick Reference contains supply loading information and
general care and maintenance procedures for the Pathfinder®
6057 printer. For more detailed information, refer to the
Operator’s Handbook available on our Web site
(www.monarch.com
).
Review the printer safety information in the Regulatory
Compliance document provided with your printer.
Information in this document supercedes information in previous
versions. Check our Web site for the latest documentation and
release information.
Charging the Battery
1. Charge the main battery using a Monarch® battery charger.
Refer to the 6057 Accessories List for battery charger
models.
Refer to the documentation with your charger for additional
instruction.
Important: You must charge the main battery when you
receive the printer.
Refer to the Operator’s Handbook for important battery
safety information.
2. Insert the main battery into the printer.
The internal backup battery charges from the main battery. The
internal backup battery is not user-replaceable.
Avery Dennison® and Pathfinder® are registered
trademarks of Avery Dennison Corporation.
TC6057EUQR Rev. AC 7/12 ©2011 Avery Dennison Corp. All Rights Reserved.

Replacing the Main Battery
Always remove the main battery from the printer when storing the
printer for a month or longer.
1. Hold the printer upright with one hand and press the battery
release button on the handle with your other hand.
2. The battery compartment door opens slightly. Use your finger
to open the door.
3. Remove the battery.
4. Insert a new battery (label side up) into the compartment
(connector
end last).
5. Close the compartment door until it clicks into place.
2-EN
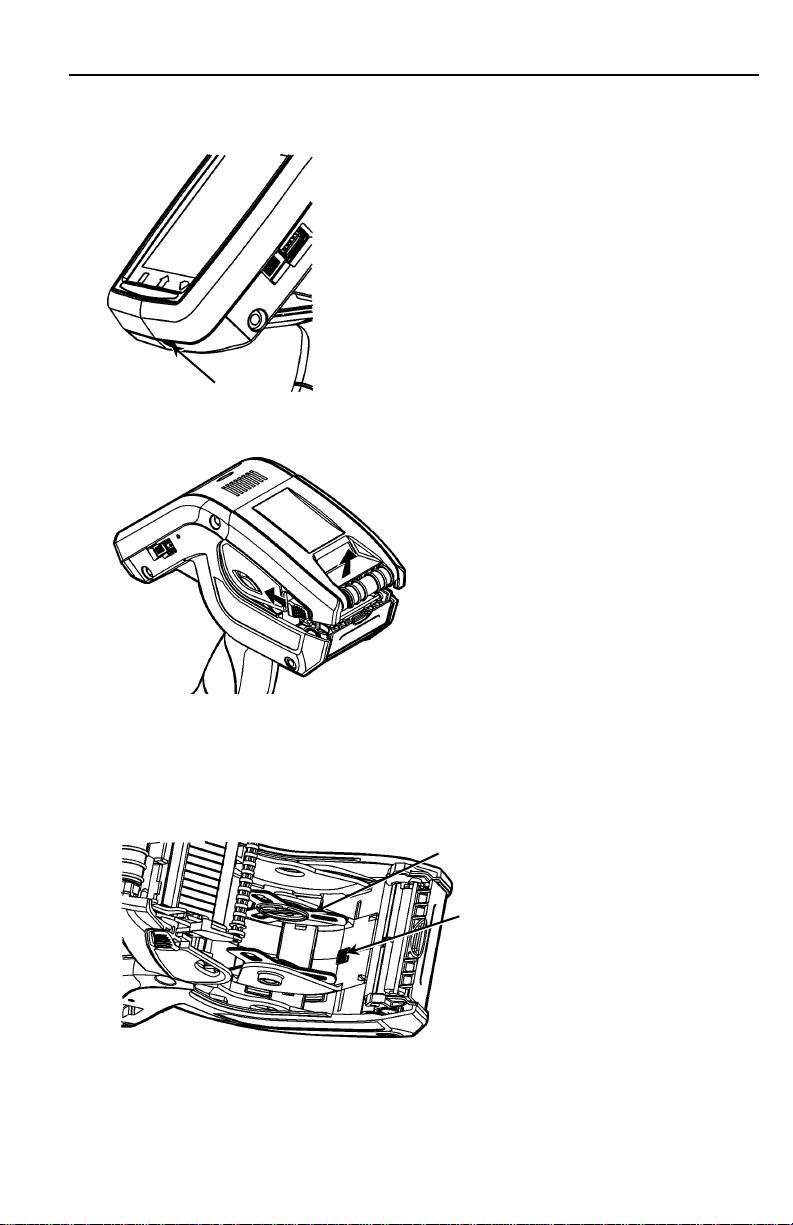
Loading Supplies
1. Turn on the printer. You may need to wait a few seconds for
the desktop to load.
Power
Button
2. Press
the latch buttons and open the supply cover.
3.
Spread
the supply holder tabs apart with one hand so it
adjusts to the size of your supply roll.
4. Adjust the supply lock tab to lock the supply holder in place.
The supply lock tab has three positions to adjust for 1.2”, 1.5”,
and 2.0” supply.
Supply Holder
Supply Lock Tab
EN-3

5. Place a roll of supply in the supply holder so it unrolls from
the bottom.
6.
Lo
ad the supplies for the printing mode you want: Peel or Non-
Peel.
Loading for Non-Peel Mode
1. Feed the supply over the platen roller, peel bar, and label
deflector.
Platen Roller
(black rubber)
Peel Bar
(metal)
Label
Deflector
2. Close
the supply cover.
3. Touch the Home key on the display, then
select Load Supply, Calibrate Stock.
4-EN
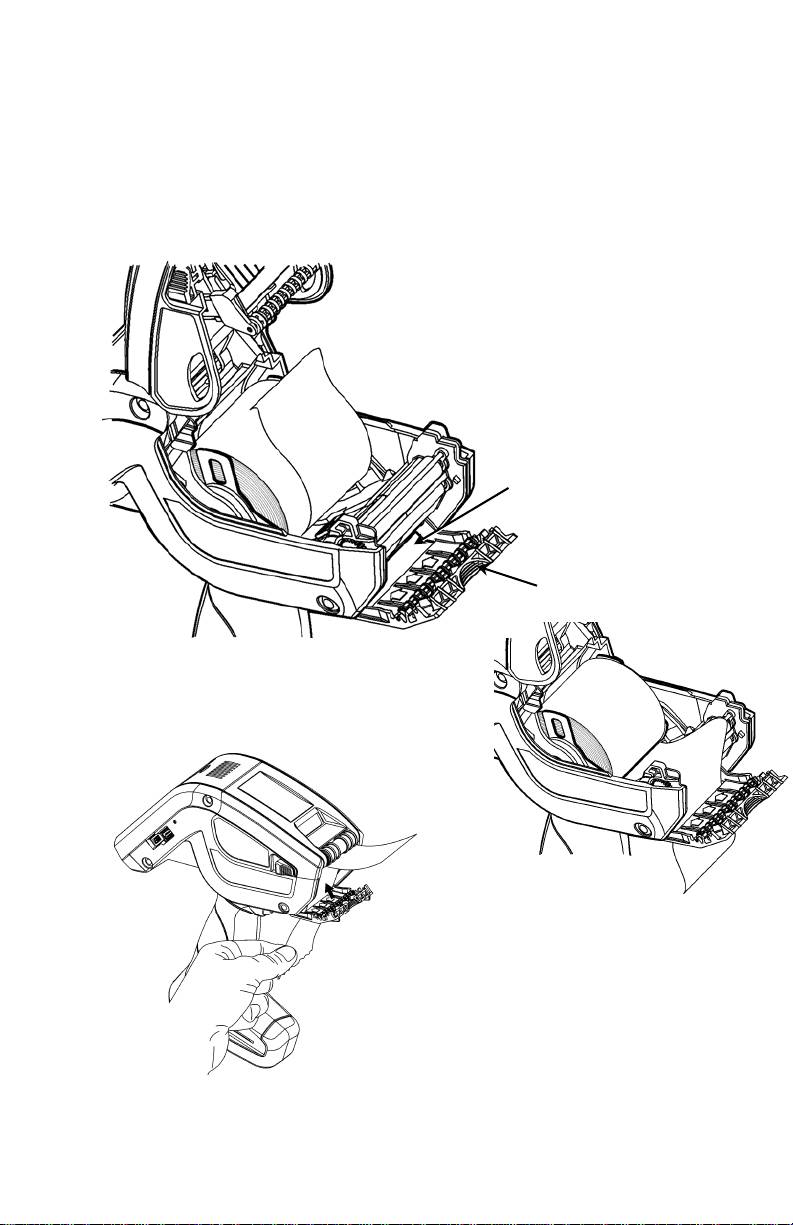
Loading for Peel Mode
1. Peel and discard the first four inches of labels from the
backing paper.
2. Hold the printer upright and gently press down on the label
deflector.
3. Feed the supply over the platen roller, over the peel bar, and
through the opening at the base of the label deflector.
Backing Paper
Opening
Label
Deflector
4. Close
the cover completely.
5. Hold the backing paper and push
the label deflector up until it snaps
into place.
6. Touch the Home key on the display, then select Load Supply,
Calibrate Stock.
EN-5
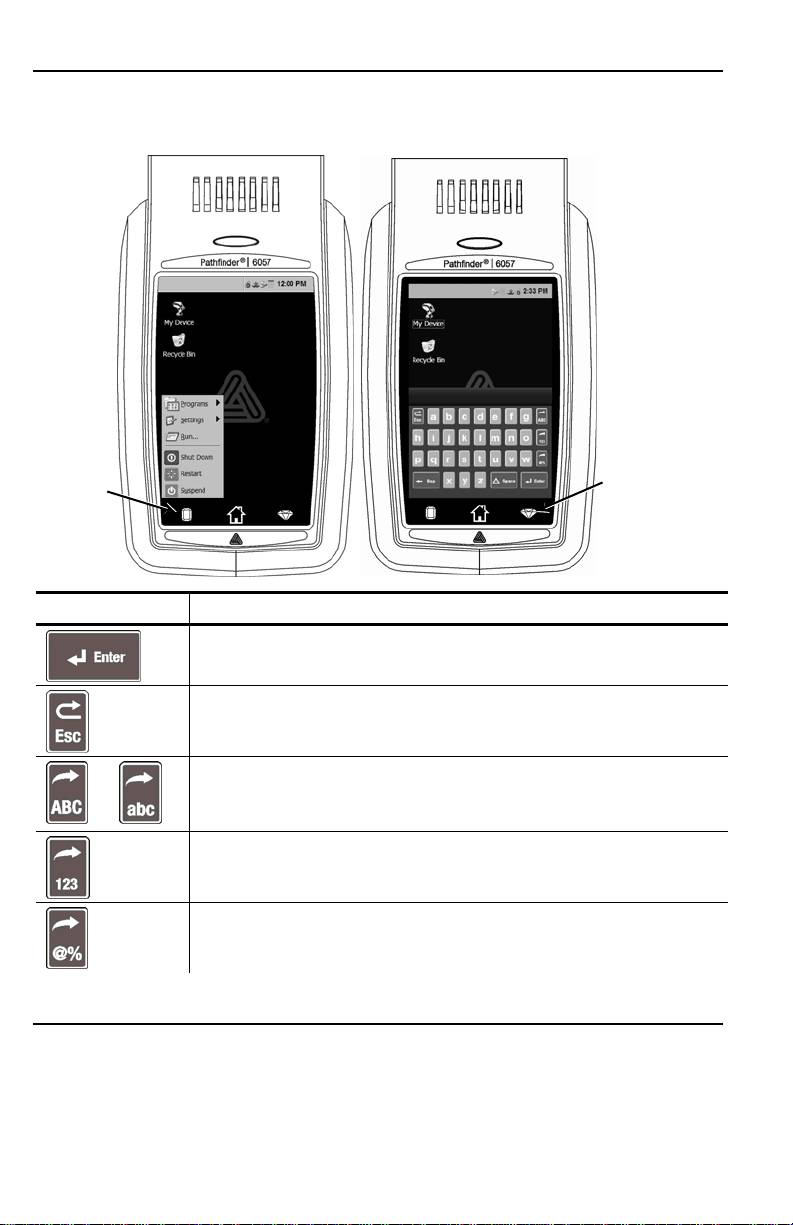
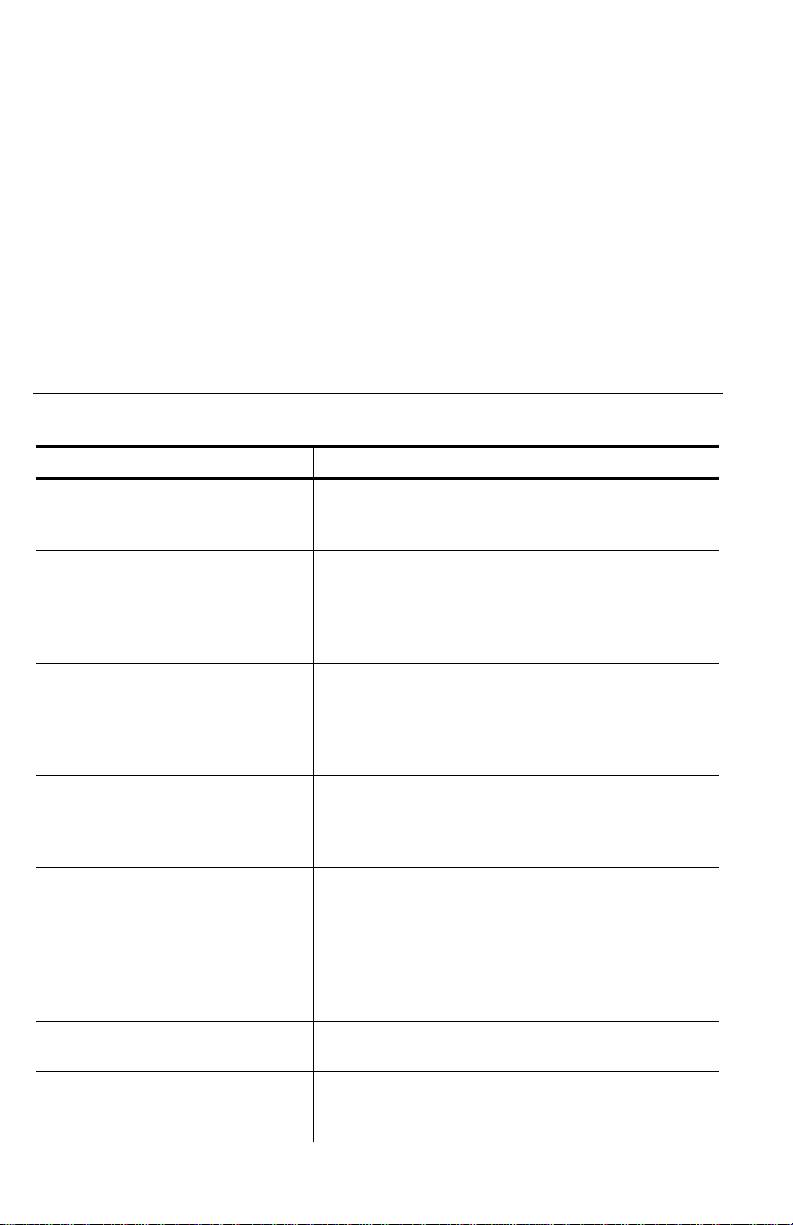
Using the Input Panel
To open the printer’s Start Menu, touch the Emerald key.
To open the printer’s input panel, touch the Diamond key.
Emerald
key
Diamond
key
Key(s) Description
Accepts data or menu selection.
Closes any open windows.
Displays upper case or lower-case alphabetic input
panel.
or
Displays numeric input panel.
Displays special character & symbol input panel.
Changing the Display Settings
To change the backlight, sound (beep) and other standard
Windows options, touch the Emerald key to open the Start Menu,
select Settings, Control Panel.
6-EN
Cleaning the Printer
When cleaning the printer, do not use sharp objects, do not use
household cleaners, use isopropyl alcohol on the interior areas
only (except where specified), never on the exterior. The printer
should be turned off and supplies removed when cleaning.
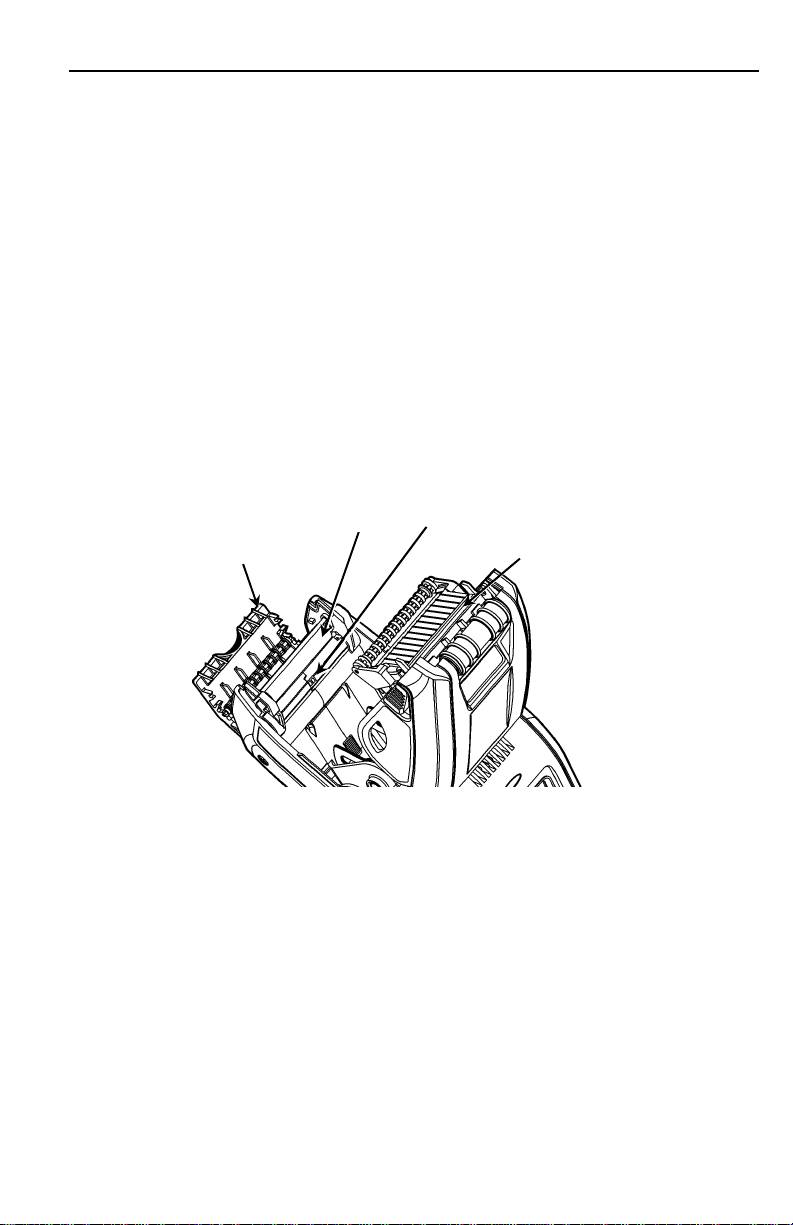
Cleaning the Printhead, Black Mark Sensor, and
Platen Roller
1. Check the supply holder for adhesive buildup; clean it if
necessary.
2. Ground yourself by touching a metal object, other than the
printer, to prevent electrostatic discharge, which may damage
the printer.
3. Clean the printhead area using a Monarch Cleaning Pen
(#114226) or a soft cloth moistened with isopropyl alcohol.
Allow the printer to dry before reloading supplies.
Platen
Black Mark
Roller
Sensor
Label
Deflector
Printhead
4. Clean
the black mark sensor with a dry cotton swab.
5. Clean the platen roller with a dry, soft-bristle brush (such as a
toothbrush) when you see significant adhesive build-up or when
a label is wrapped around the platen roller.
6. Reload supplies, close the label deflector and supply cover.
Cleaning the Scanner Window and Display
1. Turn off the printer.
2. Moisten a soft cloth with distilled water.
3. Wipe the scanner window and the display screen until they are
clean.
EN-7
Clearing Supply Jams
1. Turn off the printer.
2. Open the supply cover and remove the supplies.
3. Hold the printer upright and gently press down on the label
deflector.
4. Carefully remove any jammed supply and close the deflector.
Do not pull the jammed supply out through the front of the
label deflector. Do not use sharp objects to remove jammed
supplies.
5. Reload the supplies and close the label deflector.
Troubleshooting
This section lists some common problems and their solutions.
Problem Solution
Printer does not print.
Switch to a fully-charged battery.
Load the supply correctly.
Clean the printhead.
Printer does not feed.
Switch to a fully-charged battery.
Load the supply correctly.
Check the platen roller for jammed
labels.
Close the supply cover completely.
Print has voids or is too
Load the supply correctly / Check for
light.
damage.
Close the supply cover completely.
Switch to a fully-charged battery.
Clean the printhead.
Printer partially prints and
Re-load the supply or load new supplies.
fails to respond to the
Clear any supply jams.
keypad or trigger.
Clean the printhead.
Switch to a fully-charged battery.
Scanner does not scan a
Alter the scan angle and distance.
bar code.
Clean the scanner window or move to a
more dimly lit area.
Scan a bar code you have previously
scanned correctly.
Check bar code for voids.
Run a scan test.
Display does not turn on.
Switch to a fully charged battery/Make
sure power is on.
Printer and display locks
Press and hold the power button until
up.
the printer shuts down, then turn it back
on.
8-EN
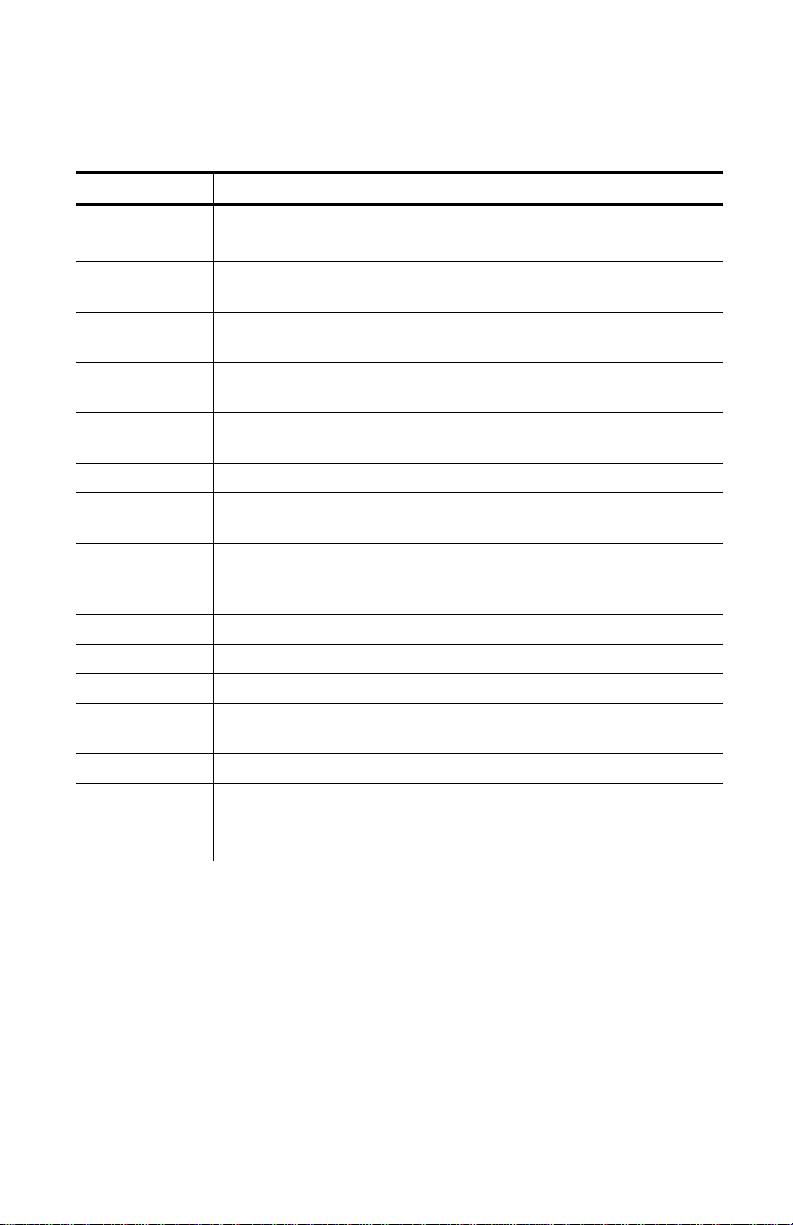
Error Codes
Following are some common error codes you may receive. See
your System Administrator if you receive any codes not listed
here.
Code(s) Description
004 – 005
Supply size is incorrect. Reload the correct
supplies.
267 – 271
Communication error. See your System
410 – 413
Administrator.
703 – 704
Load supplies or make sure they are loaded
correctly.
750
Printhead is overheated. Turn off the printer to let
it cool.
751 – 753
Check the supplies to see if they are loaded
correctly.
756 The printer is out of supplies. Load supplies.
757
The calibrated supply length differs by plus or
minus .25 inches from the format. Load supplies.
758
Check supply. Remove any printed labels. Check
for a label jam. Clear the supply path or reload
supplies.
762 Low battery. Recharge the battery.
763 Waiting to dispense label. Press the trigger.
768 Printhead error. See your System Administrator.
790 – 791
Turn off the printer. Wait two seconds and turn it
back on.
904 – 911 System error. See your System Administrator.
SYSTEM
System error. See your System Administrator.
ERROR
VECTOR ##
EN-9
Оглавление
- QUICK REFERENCE
- KORT OVERSIGT
- BEKNOPTE HANDLEIDING
- PIKAOPAS
- KURZANLEITUNG
- ΕΓΧΕΙΡΊΔΙΟ ΓΡΉΓΟΡΗΣ ΑΝΑΦΟΡΆΣ
- GUIDA RAPIDA
- REFERÊNCIA RÁPIDA
- КРАТКОЕ СПРАВОЧНОЕ РУКОВОДСТВО
- REFERENCIA RÁPIDA
- SNABBGUIDE
