Sony VPL-VW1100ES – страница 2
Инструкция к Проектору Sony VPL-VW1100ES
21
JP
1
本機と、本機に接続した機器の電
源を入れる。
2
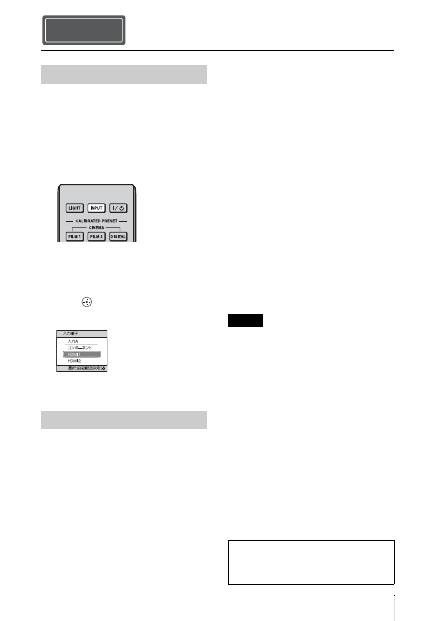
INPUT ボタンを押して、スク
リーンに入力選択パレットを表示
させる。
3
スクリーンに映したい機器を選
ぶ。
INPUT ボタンを繰り返し押すか、
M
/
m
/ (確定)ボタンで映したい
機器を選びます。
1
?
/
1
(オン/スタンバイ)ボタン
を押す。
「パワーオフしますか?」という
メッセージが表示されます。
2
メッセージが消える前に
?
/
1
(オ
ン/スタンバイ)ボタンをもう一
度押す。
レンズプロテクターが閉じます。指
や物を挟まないように注意してくだ
さい。
ON/STANDBY ランプが緑色に点
滅し、本機内部の温度を下げるため
に、ファンが回り続けます。はじめ
は早い間隔で点滅します。この間は
再び
?
/
1
(オン/スタンバイ)ボタ
ンを押してもランプは点灯しませ
ん。
ファンが止まり、ON/STANDBY
ランプが緑色の点滅から赤色の点灯
に変わります。
以上で電源が切れました。電源コード
を抜くことができます。
ランプの点滅中は、電源コードを抜かな
いでください。
上記の手順のかわりに
?
/
1
(オン/ス
タンバイ)ボタンを約 1 秒押したまま
にしても電源が切れます。
見る Step 4
映像を投写する
電源を切る
例:本機の HDMI1 端子につないだビデオ
の画像を見る
ご注意
◆さらに詳しく知りたいときは、取扱説
明書(CD-ROM)の「見る」をご覧く
ださい。
JP
22
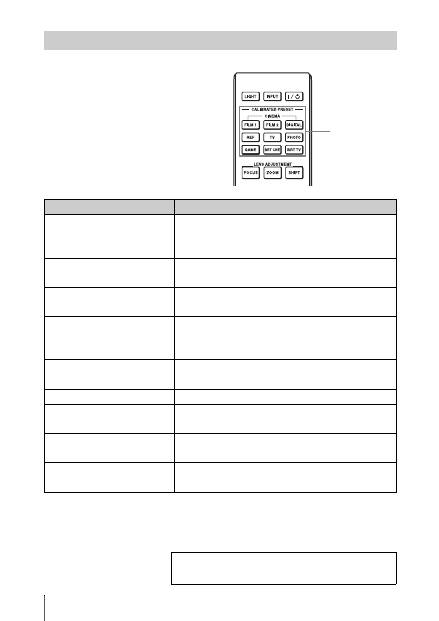
CALIBRATED PRESET ボタンを
押す。
画質を選ぶ
CALIBRATED
PRESET
(キャリブレイテ
ドプリセット)
ボタン
設定モード
説明
CINEMA FILM1
(シネマ フィルム 1)
最高画質といわれるマスターポジフィルム(ダイナ
ミックレンジの広い、透明感のある画質)を再現する
画質設定
CINEMA FILM2
(シネマ フィルム 2)
FILM1 をベースに色調を変え、実際の映画館の映像
美を再現する画質設定
CINEMA DIGITAL
(シネマ デジタル)
DCI 仕様に近似させながら、デジタルシネマ画質を再
現する画質設定
REF(リファレンス)
コンテンツの持つ画質そのものを忠実に再現したい場
合や、調整のない素直な画質を楽しむのに適した画質
設定
TV(TV)
テレビ番組やスポーツ、コンサート等のビデオ映像に
適した画質設定
PHOTO(フォト)
デジタルカメラなどの静止画に適した画質設定
GAME(ゲーム)
ゲーム用にメリハリある色再現や応答性に優れた画質
設定
BRT CINE(ブライトシネマ) リビングルームなどの明るい環境で、映画を見るのに
適した画質設定
BRT TV(ブライト TV)
リビングルームなどの明るい環境で、テレビ番組やス
ポーツ、コンサート等のビデオ映像に適した画質設定
◆さらに詳しく知りたいときは、取扱説明書(CD-ROM)
の「見る」をご覧ください。
23
JP
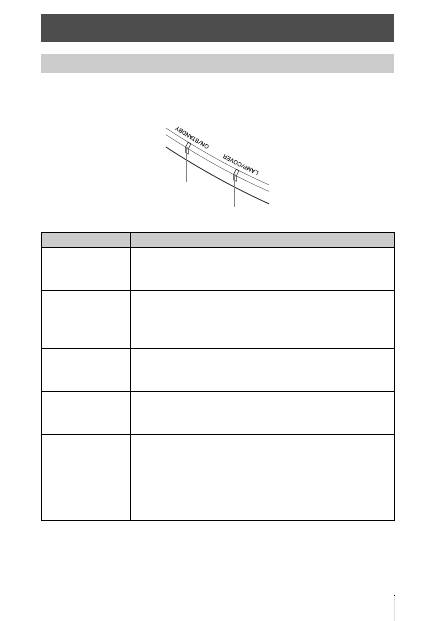
本機では、本体前面の ON/STANDBY ランプと LAMP/COVER ランプの点灯また
は点滅で不具合をお知らせします。
困ったときは
警告ランプの見かた
症状
原因と対処
LAMP/COVER 赤
色点滅(2 回点滅パ
ターンの繰り返し)
c
光源用ランプカバーをしっかりはめて、ネジをしめてくださ
い。
LAMP/COVER 赤
色点滅(3 回点滅パ
ターンの繰り返し)
c
ランプが高温になっています。電源を切り、ランプが冷えて
からもう一度電源を入れてください。
c
症状が再発する場合は、ランプの消耗が考えられます。新し
いランプに交換してください。
ON/STANDBY 赤
色点滅(4 回点滅パ
ターンの繰り返し)
c
ファンが故障しています。ソニーの相談窓口にご相談くださ
い。
ON/STANDBY 赤
色点滅(2 回点滅パ
ターンの繰り返し)
c
本体内部が高温になっています。排気口、吸気口がふさがれ
ていないか、標高が高い場所で使用していないか確認してく
ださい。
ON/STANDBY 赤
色点滅(6 回点滅パ
ターンの繰り返し)
c
[
/
1
(オン/スタンバイ)ボタンを押して電源を入れてくだ
さい。電源が入らない場合は、電源コードを抜いて ON/
STANDBY ランプの消灯を確認してください。約 10 秒たっ
てから、電源コードを差してもう一度電源を入れてくださ
い。それでもこの状態が続いたら、電気系統が故障していま
す。ソニーの相談窓口にご相談ください。
LAMP/COVER ランプ
ON/STANDBY ランプ
JP
24
上記以外の警告ランプ点滅ならびに上記対応を行っても解決しない場合は、ソニーの相
談窓口にご相談ください。
ON/STANDBY 赤
色点滅(5回点滅パ
ターンの繰り返し)
c
レンズプロテクターが完全に開いていません。もう一度電源
を入れ直してください。それでも直らない場合はソニーの相
談窓口にご相談ください。
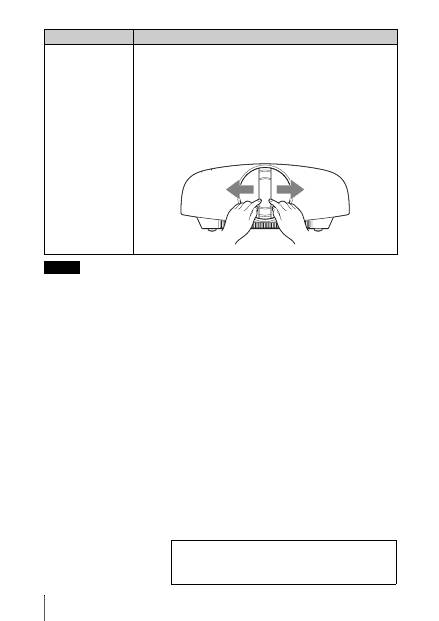
ちょっと一言
緊急で使用する場合は、レンズプロテクターを手で開いてくださ
い。(下図参照)
[
/
1
(オン/スタンバイ)ボタンを押すと電源
が入り、使用することができます。
ご注意
症状
原因と対処
◆ご使用中にトラブルが発生したり、メッセージが表示
された場合は、取扱説明書(CD-ROM)の「故障か
な?と思ったら」をご覧ください。
25
JP
光源用ランプには寿命があります。画
面が暗くなったり色がおかしくなった
場合、または画面に「ランプを交換し
てください。」というメッセージが出た
ときは、光源用ランプが消耗していま
す。新しい光源用ランプ(別売り)と
交換してください。
用意するもの:
・ プロジェクターランプ LMP-H330
(別売り)
・ 標準プラスドライバー
・ 布(傷防止)
・
[
/
1
(オン/スタンバイ)ボタンで電
源を切った直後は光源用ランプが高
温になっており、さわるとやけどの
原因となることがあります。光源用
ランプを充分に冷やすため、光源用
ランプ交換は、本機の電源を切って
から 1 時間以上たってから行ってく
ださい。
・ 交換ランプのガラス面は触らないで
ください。もし汚れが付着した場合
は乾いた柔かい布でふき取ってくだ
さい。
・ 天井つりした状態での光源用ランプ
交換は十分注意してください。
・ 天井つりした状態で光源用ランプを
交換するときは、ランプカバーの斜
め下に立ち、ランプドア(内蓋)を
はずすときはなるべく傾けないでく
ださい。万一光源用ランプが破裂し
ている場合に、光源用ランプの破片
が飛び出し、けがの原因となること
があります。
・ 光源用ランプを取り出すときは、光
源用ランプを水平に持ち上げ、傾け
ないでください。光源用ランプを傾
けて持つと、万一光源用ランプが破
損した場合に、光源用ランプの破片
が飛び出し、けがの原因となること
があります。
1
本機の電源を切り、電源コードを
コンセントから抜く。
2
床置きの場合は本機や机などに傷
がつかないように布などを敷き、
本機を布の上に置く。
本機は不安定な場所には置かないでくだ
さい。
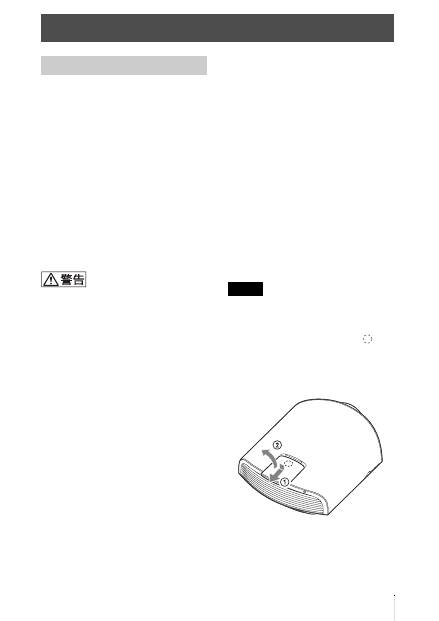
3
光源用ランプカバーの図の
部分
を押しながらカバーをずらし
(
1
)、光源用ランプカバーを開け
る(
2
)。
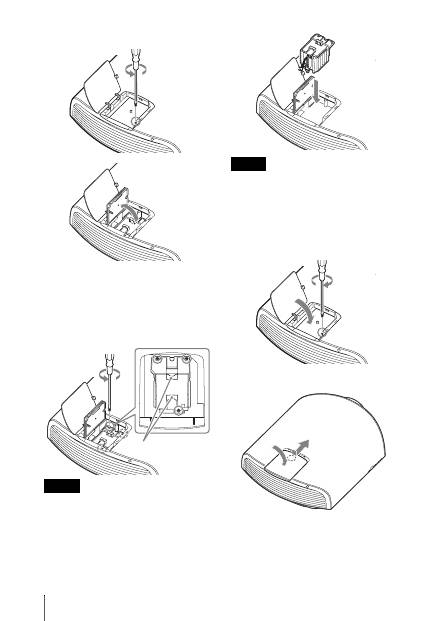
4
ランプドア(内蓋)を固定してい
るネジ(1か所)をプラスドライ
バーでゆるめ、ランプドアを開け
る。
メンテナンス
ランプを交換する
ご注意
JP
26
5
光源用ランプを固定しているネジ
(3か所)をプラスドライバーで
ゆるめ、取っ手を持って光源用ラ
ンプを上に引き出す。
光源用ランプは取っ手を持って、取りは
ずし、取り付けを行ってください。
6
新しい光源用ランプの取っ手を
持って奥まで確実に押し込み、ネ
ジ(3 か所)を締める。
光学ブロックには手をふれないでくださ
い。
7
ランプドア(内蓋)を閉め、ネジ
を締める。
8
光源用ランプカバーを閉める。
9
吸気口に付着したほこりをやわら
かい布でふきとる。
ご注意
取っ手
ご注意
27
JP
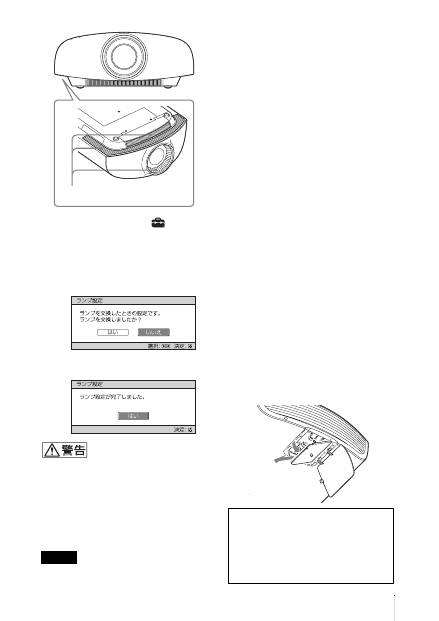
10
本機の電源を入れ、「
初期設
定」メニューのランプ設定項目を
選択する。
以下のようなメニュー画面が表示さ
れます。
11
「はい」を選択する。
光源用ランプをはずしたあとのランプ
の収納部に金属類や燃えやすい物など
の異物を入れないでください。火災や
感電の原因となります。また、やけど
の危険がありますので手を入れないで
ください。
・ 新しい光源用ランプは、必ず交換用ラ
ンプ LMP-H330 をお使いください。そ
れ以外のものをお使いになると、故障
の原因になります。
・ 光源用ランプを交換する前に必ず本機
の電源を切り、電源プラグをコンセン
トから抜いて、ON/STANDBY ランプ
の消灯を確認してください。
・ 光源用ランプが確実に装着されていな
いと、電源が入りません。
・ 光源用ランプカバーが確実に閉まって
いないと、電源が入りません。
・ 画面に表示されるメッセージを消す場
合は、リモコンまたはコントロールパ
ネルのいずれかのボタンを押してくだ
さい。
天井つり状態での不点灯ランプ交換時
のご注意
光源用ランプの破損時に発生した光源
用ランプの破片が飛び、けがの原因と
なることがあります。
天井つりした状態のときは、ランプド
ア(内蓋)を 30 度ほど開いた状態で少
しランプドア(内蓋)を持ち上げてか
らゆっくりと横にスライドしてはずし
ます。ランプドア(内蓋)をなるべく
傾けないようにしてください。
ご注意
吸気口
お願い
本機の光源用ランプの中には水銀が含
まれています。使用済みの光源用ラン
プは、地域の蛍光管の廃棄のルールに
従って廃棄してください。
30°
US
2
This Quick Reference Manual explains the installation and basic operations for projecting
pictures. It also describes important notes and cautions to which you have to pay attention when
handling and using this unit.
Refer to “Warning Indicators” and “Replacing the Lamp,” as necessary.
For details on the operations, refer to the Operating Instructions contained in the supplied CD-
ROM.
About the Quick Reference Manual
Preparing
....................................................Page 9
Installing the Unit
..................................Page 11
Connecting the Unit
.............................Page 12
Selecting the Menu Language
........Page 16
Projecting
..................................................Page 17
Error Handling
Warning Indicators
.........................................Page 19
Maintenance
Replacing the Lamp
.......................................Page 21
Step 1 Step 2 Step 3 Step 4 Step 5
3
US
Before operating the unit, please read this
manual thoroughly and retain it for future
reference.
WARNING
To reduce the risk of fire or electric
shock, do not expose this apparatus
to rain or moisture.
To avoid electrical shock, do not open
the cabinet. Refer servicing to
qualified personnel only.
WARNING
THIS APPARATUS MUST BE
EARTHED.
WARNING
When installing the unit, incorporate a
readily accessible disconnect device in the
fixed wiring, or connect the power plug to an
easily accessible socket-outlet near the unit.
If a fault should occur during operation of
the unit, operate the disconnect device to
switch the power supply off, or disconnect
the power plug.
CAUTION
About the LAN connector
For safety, do not connect the connector for
peripheral device wiring that might have
excessive voltage to this port.
For the customers in the U.S.A.
This equipment has been tested and found to
comply with the limits for a Class B digital
device, pursuant to part 15 of the FCC Rules.
These limits are designed to provide
reasonable protection against harmful
interference in a residential installation. This
equipment generates, uses and can radiate
radio frequency energy and, if not installed
and used in accordance with the instructions,
may cause harmful interference to radio
communications. However, there is no
guarantee that interference will not occur in
a particular installation. If this equipment
does cause harmful interference to radio or
television reception, which can be
determined by turning the equipment off and
on, the user is encouraged to try to correct
the interference by one or more of the
following measures:
- Reorient or relocate the receiving antenna.
- Increase the separation between the
equipment and receiver.
- Connect the equipment into an outlet on a
circuit different from that to which the
receiver is connected.
- Consult the dealer or an experienced
radio/TV technician for help.
You are cautioned that any changes or
modifications not expressly approved in this
manual could void your authority to operate
this equipment.
All interface cables used to connect
peripherals must be shielded in order to
comply with the limits for a digital device
pursuant to Subpart B of part 15 of FCC
Rules.
If you have any questions about this product,
you may call;
Sony Customer Information Service Center
1-800-222-7669 or http://www.sony.com/
For the customers in Canada
CAN ICES-3 (B)/NMB-3(B)
For the customers in Europe
This product has been manufactured by or
on behalf of Sony Corporation, 1-7-1 Konan
Minato-ku Tokyo, 108-0075 Japan. Inquiries
related to product compliance based on
Declaration of Conformity
Trade Name:
SONY
Model:
VPL-VW1100ES
Responsible party: Sony Electronics Inc.
Address:
16530 Via Esprillo,
San Diego, CA 92127
U.S.A.
Telephone Number:858-942-2230
This device complies with part 15 of the
FCC Rules. Operation is subject to the
following two conditions: (1) This device
may not cause harmful interference, and
(2) this device must accept any interference
received, including interference that may
cause undesired operation.
US
US
4
European Union legislation shall be
addressed to the authorized representative,
Sony Deutschland GmbH, Hedelfinger
Strasse 61, 70327 Stuttgart, Germany. For
any service or guarantee matters, please
refer to the addresses provided in the
separate service or guarantee documents.
For kundene i Norge
Dette utstyret kan kobles til et IT-
strømfordelingssystem.
For the customers in Taiwan only
For the Customers in Brazil only
DESCARTE DE PILHAS E BATERIAS
Pilhas e Baterias não recarregáveis
Atenção:
Verifique as instruções de uso do aparelho
certificando-se de que as polaridades (+) e
(-) estão no sentido indicado. As pilhas
poderão vazar ou explodir se as polaridades
forem invertidas, expostas ao fogo,
desmontadas ou recarregadas.
Evite misturar com pilhas de outro tipo ou
com pilhas usadas, transportá-las ou
armazená-las soltas, pois aumenta o risco de
vazamento.
Retire as pilhas caso o aparelho não esteja
sendo utilizado, para evitar possíveis danos
na eventualidade de ocorrer vazamento.
As pilhas devem ser armazenadas em local
seco e ventilado.
No caso de vazamento da pilha, evite o
contato com a mesma.
Lave qualquer parte do corpo afetado com
água abundante.
Ocorrendo irritação, procure auxílio médico.
Não remova o invólucro da pilha.
Mantenha fora do alcance das crianças. Em
caso de ingestão procure auxílio médico
imediatamente.
DESCARTE DE PILHAS E BATERIAS
Este produto contém bateria de alimentação
integrada (não removível pelo usuário) que
só deve ser substituída por profissionais
qualificados. Ao fim da vida útil do
equipamento, disponha-o em um ponto de
coleta na Rede Autorizada Sony ou nas lojas
Sony, de forma a garantir o tratamento
adequado da bateria.
Note on use of the USB charging
AC power adaptor AC-UD10
For the customer in the U.S.A.
The following FCC statement applies only to
the version of this model manufactured for
safe in the USA.
Other versions may not comply with FCC
technical regulations.
This device complies with part 15 of the
FCC Rules. Operation is subject to the
following two conditions: (1) This device
may not cause harmful interference, and (2)
this device must accept any interference
received, including interference that may
cause undesired operation.
5
US
Precautions
On safety
• Check that the operating voltage of your
unit is identical with the voltage of your
local power supply.
• Should any liquid or solid object fall into
the cabinet, unplug the unit and have it
checked by qualified personnel before
operating it further.
• Unplug the unit from the wall outlet if it is
not to be used for several days.
• To disconnect the cord, pull it out by the
plug. Never pull the cord itself.
• The wall outlet should be near the unit and
easily accessible.
• The unit is not disconnected to the AC
power source (mains) as long as it is
connected to the wall outlet, even if the
unit itself has been turned off.
• Do not look into the lens while the lamp is
on.
• Do not place your hand or objects near the
ventilation holes. The air coming out is
hot.
On preventing internal heat build-
up
After you turn off the power with the
?
/
1
(ON/STANDBY) button, do not disconnect
the unit from the wall outlet while the
cooling fan is still running.
Caution
This unit is equipped with ventilation holes
(intake) and ventilation holes (exhaust). Do
not block or place anything near these holes,
or internal heat build-up may occur, causing
picture degradation or damage to the unit.
On repacking
Save the original shipping carton and
packing material; they will come in handy if
you ever have to ship your unit. For
maximum protection, repack your unit as it
was originally packed at the factory.
For the customers in the U.S.A.
SONY LIMITED WARRANTY
- Please
visit http://www.sony.com/psa/warranty
for important information and complete
terms and conditions of Sony’s limited
warranty applicable to this product.
For the customers in Canada
SONY LIMITED WARRANTY
- Please
visit http://www.sonybiz.ca/solutions/
Support.do for important information and
complete terms and conditions of Sony’s
limited warranty applicable to this product.
For the customers in Europe
Sony Professional Solutions Europe -
Standard Warranty and Exceptions on
Standard Warranty.
Please visit http://www.pro.sony.eu/
warranty for important information and
complete terms and conditions.
For the customers in Korea
SONY LIMITED WARRANTY
- Please
visit http://bpeng.sony.co.kr/handler/
BPAS-Start for important information and
complete terms and conditions of Sony’s
limited warranty applicable to this product.

US
6
Safety precautions when using 3D
Glasses
Warning
• Do not put the 3D Glasses in a fire.
• Do not disassemble the 3D Glasses.
• Do not use, charge, store, or leave the 3D
Glasses near a fire, or in places with a high
temperature, e.g., in direct sunlight, or in
sun-heated cars.
• Use only the supplied USB cable.
• Do not charge the 3D Glasses with
anything other than the supplied USB
charging AC power adaptor.
• Do not allow water or foreign material to
enter the 3D Glasses.
Safety precautions
• Use only the type of 3D glasses included
with this unit. You should only use the 3D
glasses for watching 3D video images. Do
not use the 3D Glasses with other
equipment, such as TV.
• If you observe flickering or flashing, turn
off the lighting in the room.
• Not for use by children without proper
adult supervision.
• Be careful not to pinch your fingers in
hinges of the 3D glasses when bending the
temple frames.
• Do not drop or modify these 3D glasses.
• If these glasses are broken, keep broken
pieces away from your mouth or eyes.
On LCD Projector
The LCD projector is manufactured using
high-precision technology. You may,
however, see tiny black points and/or bright
points (red, blue, or green) that continuously
appear on the LCD projector. This is a
normal result of the manufacturing process
and does not indicate a malfunction.
Also, when you use multiple LCD projectors
to project onto a screen, even if they are of
the same model, the color reproduction
among projectors may vary, since color
balance may be set differently from one
projector to the next.
On condensation
If the room temperature where the projector
is installed changes rapidly, or if the
projector is moved suddenly from a cold to a
warm place, condensation in the projector
may occur. As the condensation may cause
malfunction, be careful in adjusting
temperature settings of the air conditioner. If
condensation occurs, leave the projector
turned on for about two hours before use.
SONY WILL NOT BE LIABLE FOR
DAMAGES OF ANY KIND
RESULTING FROM A FAILURE TO
IMPLEMENT PROPER SECURITY
MEASURES ON TRANSMISSION
DEVICES, UNAVOIDABLE DATA
LEAKS RESULTING FROM
TRANSMISSION SPECIFICATIONS,
OR SECURITY PROBLEMS OF ANY
KIND.
7
US
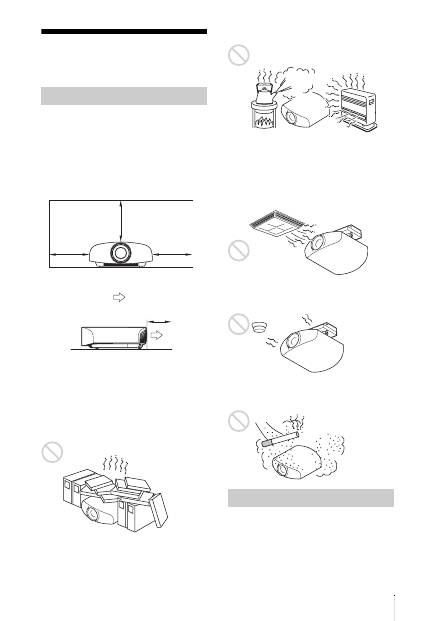
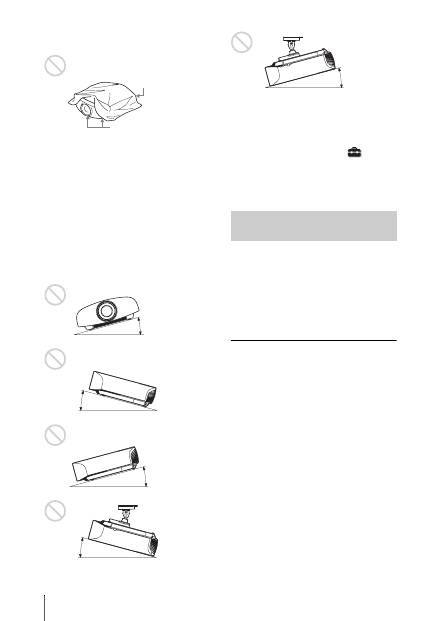
Notes on Installation and Usage
Do not place the unit in the following
situations, which may cause malfunction or
damage to the unit.
Near walls
To maintain the performance and reliability
of the unit, leave space between walls and
the unit as illustrated.
Leave a space of at least 5 cm (2 inches)
between the wall and the exhaust port side of
the unit. Note that the wall behind the unit
may become hot.
Poorly ventilated location
Leave space of more than 30 cm (11
7
/
8
inches) around the unit.
Hot and humid
Locations subject to direct cool or
warm air from an air-conditioner
Installing the unit in such a location may
cause a malfunction of the unit due to
moisture condensation or rise in
temperature.
Near a heat or smoke sensor
Malfunction of the sensor may occur.
Very dusty and extremely smoky
locations
Do not do any of the following while using
the unit.
Unsuitable installation
30 cm
(11
7
/
8
inches)
30 cm
(11
7
/
8
inches)
30 cm
(11
7
/
8
inches)
5 cm (2 inches)
: Exhaust
Unsuitable Conditions
US
8
Blocking the ventilation holes (intake
or exhaust)
Tilting front/rear and left/right
Avoid using the unit tilted at an angle of
more than 15 degrees.
Do not install the unit anywhere other than
on a level surface or on the ceiling. Installing
the unit in such a location may result in
uneven color uniformity or reduce the
reliability of the effects of the lamp.
If the unit is tilted up or down, the image on
the screen may be trapezoidal.
Position the unit so that the lens is parallel to
the screen.
When installing the unit at high
altitudes
When using the unit at an altitude of
1,500 m (approx. 4,900 ft) or higher, set
“Cooling Setting” on the Setup
menu to
“High”. Failing to set this mode when using
the unit at high altitudes could have adverse
effects, such as reducing the reliability of
certain components.
• Never mount the projector on the ceiling
or move it by yourself. Be sure to consult
with qualified Sony personnel (charged).
• When installing the unit on a ceiling, be
sure to use a safety wire, etc., to prevent
the unit from falling. Entrust the
installation to an experienced contractor or
installer.
For dealers
• When the projector is mounted on the
ceiling, a Sony bracket or recommended
equivalent must be used for installation.
• Be sure to secure the cabinet cover firmly
when installing to the ceiling firmly.
Ventilation holes
(intake)
Ventilation holes
(exhaust)
15° or more
15° or
more
15° or more
15° or
more
Safety precautions for
installing the unit on a ceiling
15° or more

9
US
Check the carton to make sure it contains the
following items:
• Remote control RM-PJ22 (1)
• Size AA (R6) manganese batteries (2)
• AC power cord for the projector (1)
• Plug holder (1)
• AC inlet cover (1)
• 3D glasses (2)
• Pouch for the 3D glasses (2)
• USB charging AC power adaptor (AC-
UD10) (1)
Specifications
Input voltage: AC 100 to 240 V, 0.2 A,
50/60 Hz
Rated output voltage: DC 5 V, 1.5 A
Please use the above power requirements.
• AC power cord for USB charging AC
power adaptor (1)
For the customers in the U.S.A. and
Canada
WARNING:
Using this unit at a voltage other than
120 V may require the use of a different
line cord or attachment plug, or both. To
reduce the risk of fire or electric shock,
refer servicing to qualified service
personnel.
• USB charging cable (G2551-0077-00/-01
or APY5244-010020/SONY) (1.2 m) (1)
• Quick Reference Manual (this manual) (1)
• Operating Instructions (CD-ROM) (1)
CAUTION
Danger of explosion if battery is incorrectly
replaced.
Replace only with the same or equivalent
type recommended by the manufacturer.
When you dispose of the battery, you must
obey the law in the relative area or country.
Installing batteries
Two size AA (R6) batteries are supplied for
Remote Control.
To avoid risk of explosion, use size AA (R6)
manganese or alkaline batteries.
Caution about handling the remote
control
• Handle the remote control with care. Do
not drop or step on it, or spill liquid of any
kind onto it.
• Do not place the remote control in a
location near a heat source, a place subject
to direct sunlight, or a damp room.
Preparing Step 1
Checking the Supplied
Accessories
Note
Inserting the Batteries into
the Remote Control
Push and slide to
open.
Insert the batteries
E
side first.
US
10
The manual can be read on a computer with
Adobe Reader installed.
You can download Adobe Reader free from
the Adobe website.
1
Open the index.html file in the CD-
ROM.
2
Select and click on the manual that
you want to read.
If you have lost or damaged the CD-ROM, you
can purchase a new one from your Sony dealer
or Sony service counter.
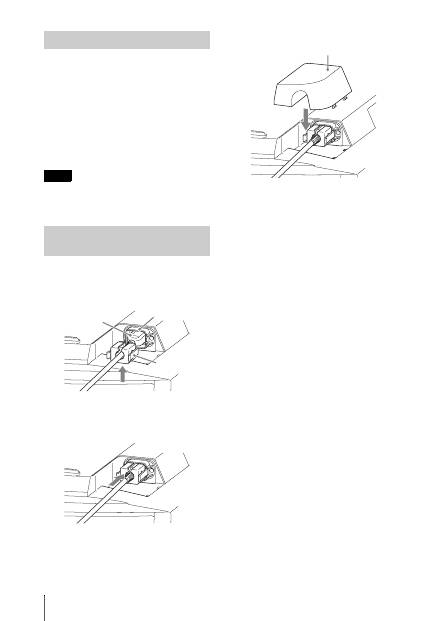
1
Plug the AC power cord into the AC
IN socket, then attach the plug holder
to the AC power cord.
2
Slide the plug holder over the AC
power cord to fix to the unit.
3
Attach the AC inlet cover to the unit.
Using the CD-ROM manual
Note
Connecting the AC Power
Cord
Plug holder
(supplied)
AC power cord
(supplied)
AC IN socket
AC inlet cover (supplied)
11
US
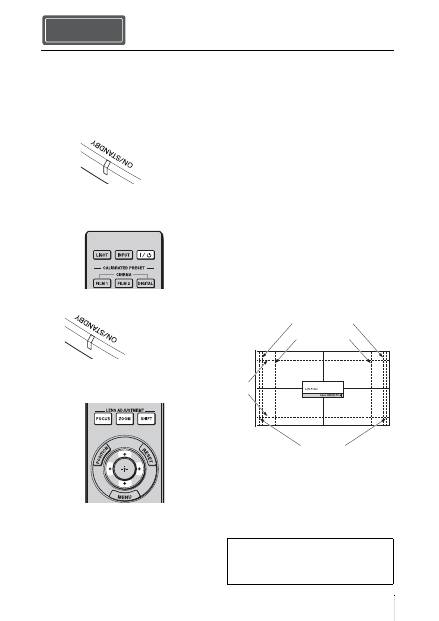
1
Position the unit parallel to the screen.
2
After connecting the AC power cord to
the unit, plug the AC power cord into
a wall outlet.
3
Press the
?
/
1
(ON/STANDBY) button
to turn on the unit.
4
Project an image on the screen, then
adjust the focus, size, and position.
a
Adjust the focus.
Press the LENS ADJUSTMENT
(FOCUS) button to display the Lens
Focus adjustment window (test pattern).
Then adjust the focus of the picture by
pressing the
M
/
m
/
<
/
,
buttons.
b
Adjust the picture size.
Press the LENS ADJUSTMENT
(ZOOM) button to display the Lens
Zoom adjustment window (test pattern).
Then adjust the size of the picture by
pressing the
M
/
m
/
<
/
,
buttons.
c
Adjust the picture position.
Press the LENS ADJUSTMENT
(SHIFT) button to display the Lens Shift
adjustment window (test pattern). Then
adjust to the proper position of the
picture by pressing the
M
/
m
/
<
/
,
buttons.
Lens adjustment window (test
pattern)
Installing the Unit Step 2
Lights in red.
Front of the unit
Flashes in green for
tens of seconds and
then lights in green.
Front of the unit
1.78:1 (16:9)
2.35:1
1.85:1
1.33:1 (4:3)
The dashed lines show the screen sizes of each
aspect ratio.
For more information, refer to
“Connections and Preparations” in the
Operating Instructions contained in the
supplied CD-ROM.
US
12
When making connections, be sure to do the following:
• Turn off all equipment before making any connections.
• Use the proper cables for each connection.
• Insert the cable plugs properly; poor connection at the plugs may cause a malfunction or poor
picture quality. When pulling out a cable, be sure to pull it out from the plug, not the cable
itself.
• Refer to the operating instructions of the connected equipment.
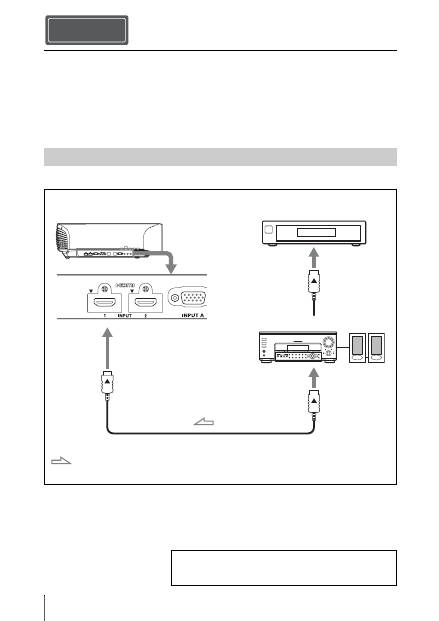
To connect to equipment with HDMI output connectors
Connecting the Unit Step 3
Connecting to a VCR
HDMI cable (not supplied)
: Video signal flow
Right side of the unit
Equipment with HDMI output
connectors
to HDMI output
AV amplifier
Speakers
When using an optional HDMI cable, be sure to use a Sony
HDMI cable or other cable that has the HDMI logo.
For more information, refer to “Connections and
Preparations” in the Operating Instructions contained in
the supplied CD-ROM.
13
US
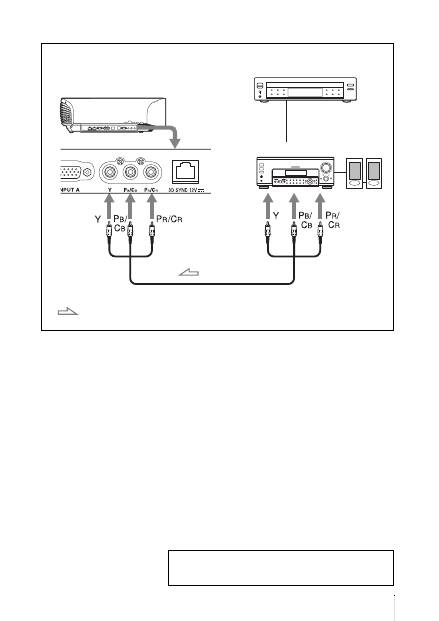
To connect to equipment with component video output connectors
Component video cable (not supplied)
: Video signal flow
Equipment with component
video output connectors
Right side of the unit
AV amplifier
Speakers
For more information, refer to “Connections and
Preparations” in the Operating Instructions contained in
the supplied CD-ROM.
US
14
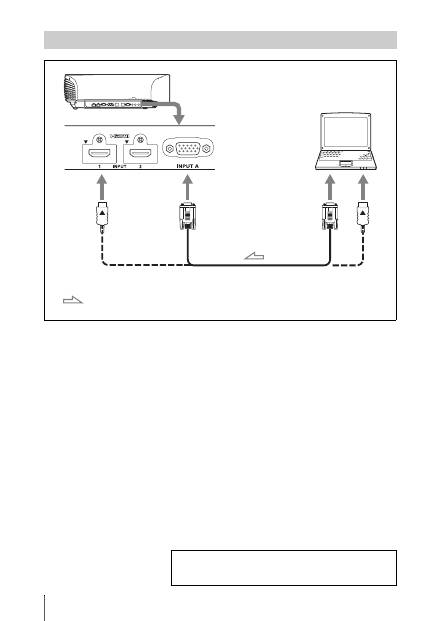
Connecting to a Computer
HD-Dsub15 pin cable (not supplied) or HDMI cable (not supplied)
: Video signal flow
Right side of the unit
to monitor output
Computer
When using an optional HDMI cable, be sure to use a Sony HDMI
cable or other cable that has the HDMI logo.
For more information, refer to “Connections and
Preparations” in the Operating Instructions contained in
the supplied CD-ROM.
