Microlife BP A90: instruction
Class: Beauty, health, sport, tourism, hobbies
Type:
Manual for Microlife BP A90
Europe / Middle-East / Africa
Asia
North / Central / South America
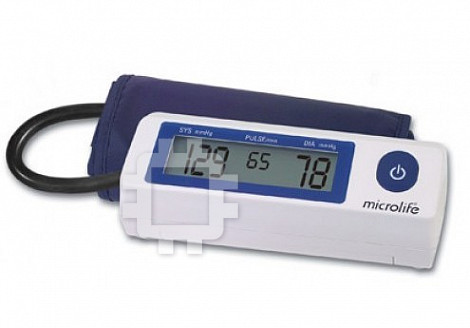
Microlife BP A90
Microlife AG
Microlife Corporation.
Microlife USA, Inc.
Espenstrasse 139
9F, 431, RuiGang Road, NeiHu
424 Skinner Blvd., Suite C
EN Ä 1
9443 Widnau / Switzerland
Taipei, 114, Taiwan, R.O.C.
Dunedin, FL 34698 / USA
FR Ä 10
Tel. +41 / 71 727 70 30
Tel. 886 2 8797-1288
Tel. +1 727 451 0484
ES Ä 18
Fax +41 / 71 727 70 39
Fax.886 2 8797-1283
Fax +1 727 451 0492
PT Ä 26
Email admin@microlife.ch
Email service@microlife.com.tw
Email msa@microlifeusa.com
www.microlife.com
www.microlife.com
www.microlife.com
NL Ä 36
DE Ä 44
RU Ä 52
PL Ä 62
HU Ä 72
BG Ä 82
RO Ä 92
CZ Ä 100
SK Ä 108
TR Ä 117
GR Ä 126
IB BP A90 V17 3910
AR Ä 136
FA Ä 144
Guarantee Card BP A90
Name of Purchaser / Nom de l'acheteur / Nombre del comprador / Nome do comprador
/ Name des Käufers / Naam koper / Ф.И.О. покупателя /
Imię i nazwisko nabywcy /
Vásárló neve
/ Име на купувача /
Numele cumpărătorului
/
Jméno kupujícího
/
Meno zákazníka
/ Alıcının Adı / Ονοματεπώνυμο αγοραστή / /
ØĮęĸŤşº Ţijº
Serial Number / Numéro de série / Número de serie / Número de série / Serien-Nr. /
Serienummer / Серийный номер /
Numer seryjny
/
Sorozatszám
/
Сериен номер /
Număr de serie
/
Výrobní číslo
/
Výrobné číslo
/ Seri Numarası / Αριθμός σειράς /
/
Date of Purchase / Date d'achat / Fecha de compra / Data da compra / Kaufdatum/
Datum van aankoop / Дата покупки /
Data zakupu
/
Vásárlás dátuma
/ Дата на
закупуване /
Data cumpărării
/
Datum nákupu
/
Dátum kúpy
/ Satın Alma Tarihi /
Ημερομηνία αγοράς / /
Specialist Dealer / Revendeur / Vendedor especializado / Revendedor autorizado /
Fachhändler / Specialist Dealer / Специализированный дилер /
Przedstawiciel
/
Forgalmazó
/ Специалист дистрибутор /
Distribuitor de specialitate
/
Specializovaný dealer
/
Špecializovaný predajca
/ Uzman Satıcı / Εξειδικευμένος
αντιπρόσωπος / /
:
ﺪﺮﺧ ﺎﻧ
ŞĴŠĴęşº ŢŗÄ
ﺎﺮﺳ ﺎﻤﺷ
´ºĮĸşº ĦųÄďĘ
ﺪﺮﺧ ﺦﺎﺗ
ĺęĨŤşº Įğďęşº
:
Microlife BP A90
ﺺﺼﺨﺘﻣ ﺪﻨﺷﺮﻓ

Microlife BP A90
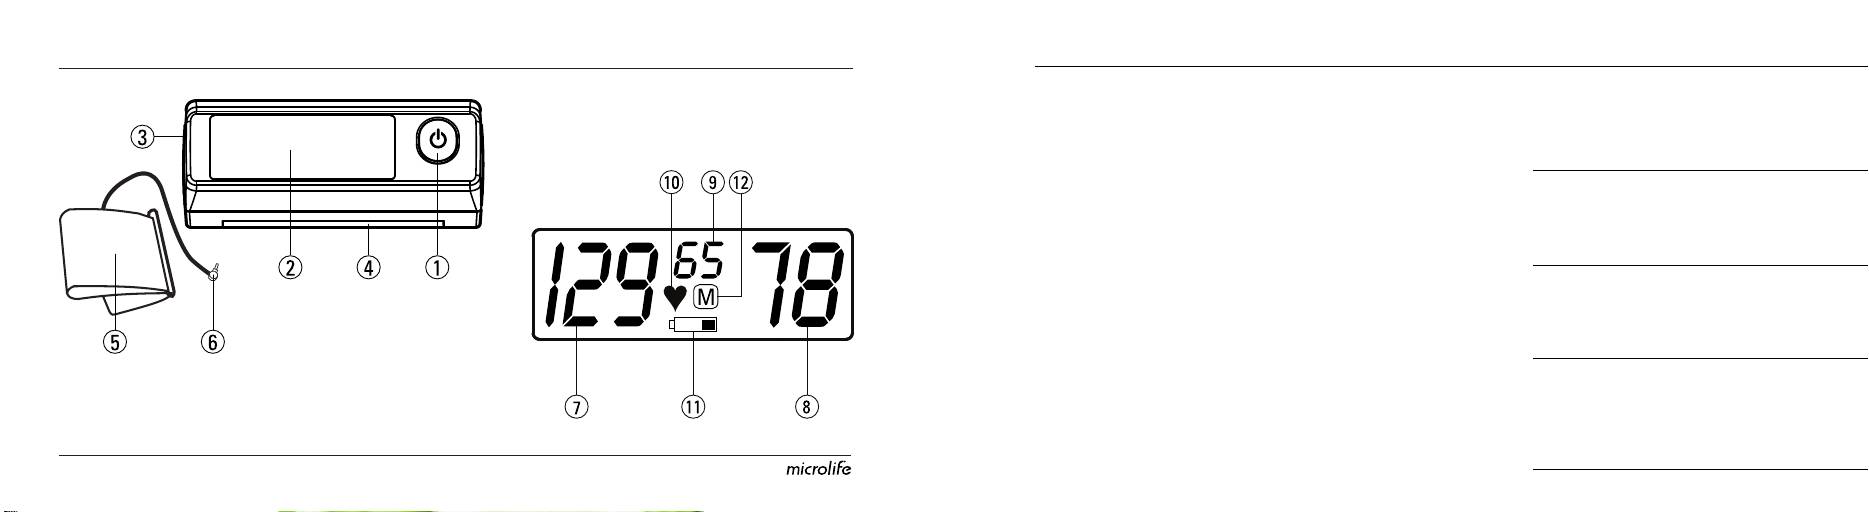
EN
1
ON/OFF Button
Dear Customer,
2
Display
Your new Microlife blood pressure monitor is a reliable medical
3
Cuff Socket
instrument for taking measurements on the upper arm. It is simple to
4
Battery Compartment
use, accurate and comes highly recommended for blood pressure
5
Cuff
monitoring in your home. This instrument was developed in collabo-
6
Cuff Connector
ration with physicians and clinical tests prove its measurement accu-
racy to be very high.*
Display
Please read through these instructions carefully so that you under-
7
Systolic Value
stand all functions and safety information. We want you to be happy
8
Diastolic Value
with your Microlife product. If you have any questions, problems or
9
Pulse
want to order spare parts, please contact Microlife-Customer
AT
Pulse Rate
Service. Your dealer or pharmacy will be able to give you the address
AK
Battery Display
of the Microlife dealer in your country. Alternatively, visit the Internet
AL
Stored Value
at www.microlife.com where you will find a wealth of invaluable
information on our products.
Stay healthy – Microlife AG!
Read the instructions carefully before using this device.
* This instrument uses the same measuring technology as the award
winning «BP 3BTO-A» model tested according to the British Hyper-
Type BF applied part
tension Society (BHS) protocol.
1BP A90
EN

Table of Contents
1. Important Facts about Blood Pressure and Self-
1. Important Facts about Blood Pressure and Self-Measurement
Measurement
• How do I evaluate my blood pressure?
2. Using the Instrument for the First Time
•
Blood pressure
is the pressure of the blood flowing in the arteries
generated by the pumping of the heart. Two values, the
systolic
• Inserting the batteries
(upper) value and the
diastolic
(lower) value, are always measured.
• Selecting the correct cuff
•
The instrument also indicates the pulse rate (the number of times
3. Taking a Blood Pressure Measurement using this Instrument
the heart beats in a minute).
4. Data Memory
•
Permanently high blood pressure values can damage your
5. Battery Indicator and Battery change
health and must be treated by your doctor!
• Low battery
•
Always discuss your values with your doctor and tell him/her if you
• Flat battery – replacement
have noticed anything unusual or feel unsure. Never rely on
• Which batteries and which procedure?
single blood pressure readings.
• Using rechargeable batteries
•
Enter your readings in the enclosed blood pressure diary. This
6. Error Messages
will give your doctor a quick overview.
7. Safety, Care, Accuracy Test and Disposal
•
There are many causes of excessively
high blood pressure
• Safety and protection
values
. Your doctor will explain them in more detail and offer treat-
• Instrument care
ment where appropriate. Besides medication, relaxation techniques,
• Accuracy test
weight loss and exercise can also lower your blood pressure.
• Disposal
•
Under no circumstances should you alter the dosages of
8. Guarantee
any drugs prescribed by your doctor!
9. Technical Specifications /
Guarantee Card (see Back Cover)
2
•
Depending on physical exertion and condition, blood pressure is
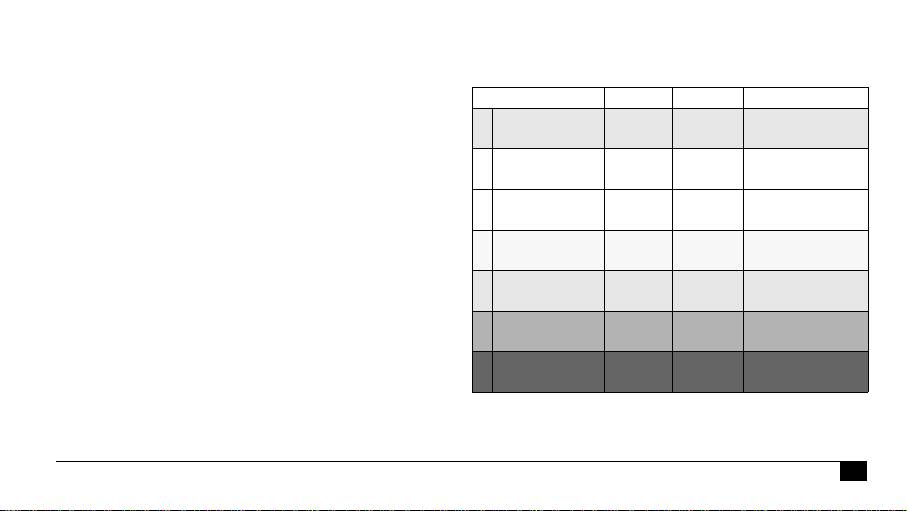
How do I evaluate my blood pressure?
subject to wide fluctuations as the day progresses. You should
Table for classifying blood pressure values in adults in accordance
therefore take your measurements in the same quiet condi-
with the World Health Organisation (WHO) in 2003. Data in mmHg.
tions and when you feel relaxed! Take at least two measure-
Range Systolic Diastolic Recommendation
ments per day, one in the morning and one in the evening.
•
It is quite normal for two measurements taken in quick succession
blood pressure
z 100 z 60 Consult your doctor
to produce significantly different results.
too low
•
Deviations between measurements taken by your doctor or in the
1. blood pressure
100 - 120 60 - 80 Self-check
pharmacy and those taken at home are quite normal, as these situ-
optimum
ations are completely different.
2. blood pressure
120 - 130 80 - 85 Self-check
•
Several measurements provide a much clearer picture than just
normal
one single measurement.
3. blood pressure
130 - 140 85 - 90 Consult your doctor
•
Leave a small break of at least 15 seconds between two
slightly high
measurements.
4. blood pressure
140 - 160 90 - 100 Seek medical advice
•
If you are pregnant, you should monitor your blood pressure very
too high
closely as it can change drastically during this time!
5. blood pressure far
160 - 180 100 - 110 Seek medical advice
•
If you suffer from an irregular heartbeat, measurements taken
too high
with this instrument should only be evaluated after consultation
with your doctor.
6. blood pressure
180 y 110 y Urgently seek
dangerously high
medical advice!
•
The pulse display is not suitable for checking the
frequency of heart pacemakers!
The higher value is the one that determines the evaluation. Example:
a readout value between 150/85 or 120/98 mmHg indicates «blood
pressure too high».
3BP A90
EN
2. Using the Instrument for the First Time
3. Taking a Blood Pressure Measurement using this
Inserting the batteries
Instrument
After you have unpacked your device, first insert the batteries. The
Checklist for taking a reliable measurement
battery compartment 4 is at the back of the device. Insert the
1. Avoid activity, eating or smoking immediately before the
batteries (4 x size AA 1,5 V), thereby observing the indicated polarity.
measurement.
Selecting the correct cuff
2.
Sit down for at least 5 minutes before the measurement and relax.
Microlife offers 3 different cuff sizes: S, M and L. Select the cuff size to
match the circumference of your upper arms (measured by close fitting
3. Always measure on the same arm (normally left).
in the centre of the upper arm). M is the correct size for most people.
4. Remove close-fitting garments from the upper arm. To avoid
constriction, shirt sleeves should not be rolled up - they do not
Cuff size for circumference of upper arm
interfere with the cuff if they are laid flat.
S 17 - 22 cm (6.75 - 8.75 inches)
5. Always ensure that the cuff is positioned correctly, as shown in
M 22 - 32 cm (8.75 - 12.5 inches)
the pictures illustrated on the short instruction card.
L 32 - 42 cm (12.5 - 16.5 inches)
• Fit the cuff closely, but not too tight.
)
Only use Microlife cuffs.
• Make sure that the cuff is 2 cm (0.75 inch) above your elbow
with the tube on the inside of your arm.
X
Contact Microlife Service if the enclosed cuff 5 does not fit.
• Support your arm so it is relaxed.
X
Connect the cuff to the instrument by inserting the cuff connector
• Ensure that the cuff is at the same height as your heart.
6 into the cuff socket 3 as far as it will go.
6. Press the ON/OFF button 1 to start the measurement.
7. The cuff will now pump up automatically. Relax, do not move
and do not tense your arm muscles until the measurement
result is displayed. Breathe normally and do not talk.
4

8.
When the correct pressure is reached, the pumping stops and the
5. Battery Indicator and Battery change
pressure falls gradually. If the required pressure was not reached,
Low battery
the instrument will automatically pump some more air into the cuff.
When the batteries are approximately ¾ empty the battery symbol
9. During the measurement, the heart symbol AT flashes in the
AK will flash as soon as the instrument is switched on (partly filled
display and a beep sounds every time a heartbeat is detected.
battery displayed). Although the instrument will continue to measure
10.
The result, comprising the systolic
7
and the diastolic
8
blood
reliably, you should obtain replacement batteries.
pressure and the pulse
9
is displayed and longer beep is heard.
Flat battery – replacement
Note also the explanations on further displays in this booklet.
When the batteries are flat, the battery symbol AK will flash as soon
11. When the measurement has finished, remove the cuff.
as the instrument is switched on (flat battery displayed). You cannot
12. Switch off the instrument. (The monitor does switch off auto-
take any further measurements and must replace the batteries.
matically after approx. 1 min.).
1. Open the battery compartment 4 at the back of the instrument.
)
You can stop the measurement at any time by pressing the
2. Replace the batteries – ensure correct polarity as shown by the
ON/OFF button (e.g. if you feel uneasy or an unpleasant pres-
symbols in the compartment.
sure sensation).
Which batteries and which procedure?
4. Data Memory
)
Use 4 new, long-life 1.5V, size AA batteries.
This instrument always stores the last result at the end of the
)
Do not use batteries beyond their date of expiry.
measurement. To recall the reading, press and hold the ON/OFF
)
Remove batteries if the instrument is not going to be used for
button 1 while the instrument is switched off. All display elements
a prolonged period.
are shown now. Release the button when the stored result with the
letter «M» is displayed.
5BP A90
EN
Using rechargeable batteries
Error Description Potential cause and remedy
You can also operate this instrument using rechargeable batteries.
«
ERR 2
» Error signal During the measurement, error signals were
)
Only use «NiMH» type reusable batteries.
detected by the cuff, caused for instance by
)
Batteries must be removed and recharged when the flat
movement or muscle tension. Repeat the
battery symbol appears. They should not remain inside the
measurement, keeping your arm still.
instrument as they may become damaged (total discharged as
«
ERR 3
» No pressure
An adequate pressure cannot be generated
a result of low use of the instrument, even when switched off).
in the cuff
in the cuff. A leak may have occurred. Check
)
Always remove the rechargeable batteries if you do not intend
that the cuff is correctly connected and is
to use the instrument for a week or more.
not too loose. Replace the batteries if neces-
)
Batteries cannot be charged in the blood pressure monitor.
sary. Repeat the measurement.
Recharge batteries in an external charger and observe the
«
ERR 5
» Abnormal
The measuring signals are inaccurate and no
information regarding charging, care and durability.
result
result can therefore be displayed. Read
through the checklist for performing reliable
6. Error Messages
measurements and then repeat the
If an error occurs during the measurement, the measurement is inter-
measurement.*
rupted and an error message, e.g. «ERR 3», is displayed.
«
HI
» Pulse or cuff
The pressure in the cuff is too high (over
Error Description Potential cause and remedy
pressure too
300 mmHg) OR the pulse is too high (over
«
ERR 1
» Signal too
The pulse signals on the cuff are too weak.
high
200 beats per minute). Relax for 5 minutes
weak
Re-position the cuff and repeat the
and repeat the measurement.*
measurement.*
«
LO
» Pulse too low The pulse is too low (less than 40 beats per
minute). Repeat the measurement.*
6


