JVC WR-MG300: instruction
Class: Photo and Video Accessories
Type:
Manual for JVC WR-MG300
1
*LYT2366-001A*
WR-MG270_EN.book Page 1 Wednesday, March 24, 2010 1:36 PM
LYT2366-001A
WR-MG270
300
ENGLISH
DEUTSCH
Marine Case
INSTRUCTIONS
FRANÇAIS
Unterwassergehäuse
NEDERLANDS
BEDIENUNGSANLEITUNG
Boîtier sous-marin
CASTE.ESP.
MANUEL D’UTILISATION
ITALIANO
Onderwaterhuis
GEBRUIKSAANWIJZING
РУССКИЙ
Carcasa submarina
POLSKI
MANUAL DE INSTRUCCIONES
Custodia subacquea
ISTRUZIONI
Бокс для подводной съемки
ИНСТРУКЦИЯ ПО ЭКСПЛУАТАЦИИ
Obudowa podwodna
INSTRUKCJA OBSŁUGI
ᑨֽฏ
ࠌشᎅࣔ
お買い上げありがとうございます。
マリンケースは高い水圧の中で安全に撮影
この取扱説明書をよくお読みのうえ、正し
ができるように設計した精密商品です。
くお使いください。
ご使用前の取り扱いとご使用後の管理は、
本書に基づいて十分に配慮してください。
安全に
注意
ご使用いただくために
この表示を無視した取り扱いをすると、
人が傷害を負う可能性が想定される注意
内容、および物的損害の発生が想定され
準備
(6 ページ )
る内容を示しています。
・O リングに汚れ・ヒビ割れキズなどが
ないことを確認しましょう。
・O リングにはグリスを必ず塗りましょ
使用上のご注意
う。
1. 下記の薬品類を使用しないでください。
装着
(7、 8 ページ )
直接的、または間接的 ( 薬剤が気化した
・O リングのねじれ
取り付け忘れがないこ
状態 ) に使用した場合、高圧下でのひび
とを確認しましょう。
割れの原因になります。
・ 密閉するとき、異物をはさみ込んでい
・ アルコール・ガソリン・シンナーなど
ないことを確認しましょう。
( 洗浄には真水、またはぬるま湯を使
用します )
撮影
(8、 9 ページ )
・ 防錆剤など ( 金属部分はステンレス製
・ 撮影場所ではマリンケースの開閉を避
およびアルミニウム製です。真水で洗
けましょう。
浄できます )
・ マリンケースを持っているときは、静
・ 一般市販の乾燥剤 ( 付属の乾燥剤をご
かに水に入りましょう。
使用ください )
・ 市販のシリコングリス ( 付属のシリコ
取りはずし・メンテナンス
ングリスをご使用ください )
( 9、 10、 11 ページ )
・ 接着剤 ( 補修が必要な場合は、販売店
にご相談ください )
・ 使用後はマリンケースを必ず真水で洗
いましょう。
2. 付属のくもり止め液は、フロントガラ
・O リングをメンテナンスしましょう。
ス以外には使用しないでください。
3. マリンケースを岩場や水面などにぶつ
取り扱い上の不注意により漏水事故を起
けたり、衝撃を与えたりしないでくだ
こした場合、内部機材 ( ビデオカメラ、
さい。落下などの衝撃を与えると破損
SD カードなど ) の損傷、および撮影に要
する場合があります。
した諸費用などについて責任を負いかね
ます。十分にご注意ください。
4. マリンケースを直射日光下、車内、船
上、海辺などに長時間放置しないでく
ださい。内部の温度が非常に高くなり、
内部のカメラが正常に動作しなくなる
場合があります。
■保険について
5. 車、船、列車、飛行機で移動する際、
さまざまな危険 ( 火災、盗難、破損など )
マリンケースにビデオカメラをセット
から大切なビデオカメラを総合的にお守
したままにしないでください。カメラ
りする《総合保険》の加入をおすすめし
をセットして持ち歩くのは、目的地か
ます。
らダイビングポイントまでのような、
ごく短時間の場合だけにしてください。
2
使用上のご注意
(つづき)
付属品の確認
6. マリンケースの分解や改造、および指
定以外の部品の使用をしないでくださ
付属品を確認してください。
い。漏水事故の原因になります。
・ くもり止め液
7. 本仕様と外観は、改良のため予告なく
・ 乾燥剤 (2g) × 5
変更することがあります。あらかじめ
・ シリコングリス (5g) × 1
ご了承ください。
・ ストラップ
・ シリコンクロス
O リング
・O リング
( オーリング ) × 1
・台座
ビデオカメラに取り付けます
・グリップ
市販のライトまたはウェイトなどを
取り付けられます。浮力調整が必要
な時は、市販のウエイトをグリップ・
アーム部に装着して下さい。
・ピック
・ネジ止めキー
・六角レンチ ( × 2)
大 ( グリップ止め )
小 ( バックルオープナー )
別売メンテナンスキット
( 部品番号:MG300_MTKIT)
次の消耗品のセットをお買い求めいただけます。
ビクターサービス窓口にお問い合わせください。
・ O リング× 2
・ 乾燥剤 (2g) × 5
・ シリコングリス (5g) × 1
・ レンズティッシュペーパー (50 枚 ) × 1
3

4
4
Buckle
5
メンテナンスキットの使いかた
ストラップ
マリンケースが、水中で
手から離れないように取
り付けます。
ストラップ取り付け穴に
ストラップを通します。
くもり止め液
フロントガラス
マリンケースを使う前に、フ
ロントガラスの内側に塗り
ます。
市 販 の レ ン ズ テ ィ ッ シ ュ
ペーパーやきれいな布など
に 2 〜 3 滴たらし、フロント
ガラスの内側に塗ります。
マリンケース
乾燥剤
マリンケース内のくもりを防ぎます。
ビデオカメラを取り付ける台座の裏側
に装着します。
※一度、使った乾燥剤は吸湿性能が衰え
る場合があります。毎回、交換すること
をおすすめします。
5
4
Buckle
5
シリコンクロス
マリンケースを水洗いし、
乾 燥 さ せ た あ と、外 側 の
ケース全体やフロントガラ
スを拭きます。
バックル
六角レンチ小
(バックルオープナー)
バックルが開けにく
いときに使います。
バックルにひっかけ
て手前に引きます。
カメラのベルト
台座
ネジ止めキー
台座のネジを締め
るときに使います。
6
786
24
4
1
5
3
6
1 準備
❶
本体にキズ・ヒビ割れがないか点検する
■フロントガラスのくもり止め
付属のくもり止め液を
市販のレンズ テ ィ ッ
シュペーパーやきれい
な布などに 2 〜 3 滴た
らし、マリンケースの
フロントガラスの内側
を拭きます。
2
1
2
1
7
各部の名前とはたらき
マリンケースの使いかた
ストラップ
フロント
ガラス
❷
O リングを点検する
付属のピックを使い、O リングを本体か
らはずします。
底面部
■ O リング、O リング接触面、O リングが
はめ込まれていた溝に異物やキズ・ヒビ
1. 本体グリップ
などがないことを確認してください。
付属のストラップを上図のように取り付
※別紙「O リングについて」をご覧くださ
けます。
い。
2. ズームレバー
ご注意
撮影中にズーム(望遠 / 広角)します。
●異物は必ず取り除いてください。
● キズやヒビがある場合は絶対に使わない
3. リング
でください。
市販のフィルター ( 径 67mm) などを取
り付けられます。
取り扱いかたを誤ると漏水事故
の原因になります。
4. バックル (3 か所 )
マリンケースを密閉します。
❸
O リングにグリスを塗り、取り付け直す
❹
空のままマリンケースを閉じる
5. グリップ取り付け穴
付属のグリップや市販のウェイトなどを
ご注意:
装着できます。
ビデオカメ
6. 静止画レバー
ラはまだ入
れないでく
押す度に静止画を撮影します。
ださい。
7. 録画ボタン
1 回押すと、動画の撮影を開始します。
もう 1 回押すと、撮影を停止します。
❺
マリンケースを水に浸ける
8. 電源ボタン
■水を張った浴槽や水槽などに浸け、漏水
ビデオカメラの電源を「入 / 切」します。
しないことを確認してください。
7
786
24
4
1
5
3
6
2
1
2
1
7
2 装着
❺
マリンケースを開ける
❶
ビデオカメラを設定する
バックルを開けにくいときは、六角レン
● ライトを搭載している機種のみライトを
チ小(バックルオープナー)を使います。
「切」に合わせます。
● レンズカバーを開きます。
● 撮影モードを設定します。(動画/静止画)
※撮影モードを「動画」に設定した際も、動画
撮影中に静止画レバーを押すことにより静止
画の撮影が可能です。
● オート撮影モードに合わせておくことをお
すすめします。
六角レンチ小
(バックルオープナー)
● バッテリーと SD/SDHC カードまたはマイ
クロSD /SDHC カード(必要に応じて)を
❻
電源ボタンキャップを取り付ける
事前に装着します。
(ビデオカメラが GZ-HD620 の場合)
● 電源ボタンを 2 秒以上押して電源を「切」
・電源ボタンキャップのくぼみとケースの電
にします。
源ボタンの突起を合わせて取り付ける
❷
台座の裏側に乾燥剤を装着する
引っ掛ける
乾燥剤
下に通す
❻
ビデオカメラをマリンケースに挿入する
● 台座取り付け溝と台座の位置を合わ
せて挿入します。
❸
ビデオカメラの底面部に台座を取
り付ける
ネジをしめる
台座取り付け溝
台座
液晶画面を開く
マリンケース内
❼
液晶画面の角度を調整する
● ビデオカメラ底面部の三脚用ネジ穴と
● 液晶画面の角度は、上向きに最大
台座のネジの位置を合わせ、ネジを締
30 度まで傾けることがで
めます。
きます。
ご注意
●液晶画面を開くと自動的に電源が入り
ます。電源ボタンを 2 秒以上押して電
源を「切」にしてください。
❹
グリップベルトを折りたたむ
●
マリンケースを密閉するとき、グリッ
プベルトを挟み込まないようにします。

8
9
2
1
8
❽
マリンケースを密閉する
3 撮影
● O リングのねじれ、取り付け忘れがないか
確認します。
● 異物(ストラップ、ベルト、ゴミなど)が
水中撮影の前に……
挟み込んでいないか確認します。
真水を張った浴槽や水槽に、ビデオカメラ
を装着したマリンケースを浸けてみましょ
う。水に浸ける時間は、次のように段階的
に増やしてください。
・1 回目……5 〜 10 秒間
O リングのねじれ・取り付け忘れ、
・2 回目……30 秒間〜 1 分間
または異物の挟み込みがあると、
・3 回目……3 分間〜 5 分間 ( 水中でレバー・
漏水事故の原因になります。
ボタンを操作します )
❾
ビデオカメラの各操作ボタンの動
問題がなければ、いよいよ水中撮影です。
作を確認する
● ビデオカメラをマリンケースに挿入したあ
・ダイビングで水に入るときや水
と、各操作ボタンが正常に動作するか確認
から上がるときは、破損、紛失
します。
などの事故防止の為、マリンケー
● 動作しないときは、ビデオカメラを本体か
ら取り出し、装着し直します。
スを他の人に預けてください。
・万一漏水した場合、バッテリー
をはずしてください。ビデオカ
❿
グリップを取り付ける
メラが破裂する原因になります。
● マリンケース底面部に、グリップやラ
イトまたはウエイトを取り付けます。
❶
ビデオカメラの電源を入れる
ON/OFF
● 電源ボタンを 2 秒以上押して電源を入
れます。( ビデオカメラの電源ランプ
及びモニターが点灯します )
● マリンケースの揺れや衝撃により、落
下検出機能が働いて電源が切れること
があります。電源が切れたときは、電
源を入れ直してください。
●「管理ファイルを更新しています」と
表示された時は「更新が完了しました」
と表示されたことをご確認のうえ、撮
影を再開してください。
2
1
8
六角レンチ大
(グリップ止め)
9
9
マリンケースのメンテナンス
撮影のあとには、必ずメンテナンスをしま
しょう。メンテナンスをしないとマリン
ケース内に塩分結晶や汚れがたまり、漏水
の原因になります。
マリンケースを密封したまま、水洗いする
●ダイビング後、30 分以内に行なってくだ
さい。
●容器の中にマリンケース全体が浸かる程
度の真水を入れ、本体を上下左右に揺す
ります。
●レバーやボタンを動かし、スキ間にはい
り込んでいる汚れを落とします。→
❸
へ
●海で使った場合は→ 塩抜き処理 へ
塩抜き処理
海で使った場合には塩分を落とすため、真
水に1時間以上浸け、塩抜き処理をします。
❶
マリンケース容積の 5 倍以上の真
水の入った容器を準備する
※マリンケース全体がつかる容器が必要
です。
※容器をご用意できない場合は、マリン
ケース容積の 5 倍以上相当の真水を入
れ替えてください。
● 本体を上下左右に揺すると、より効果
的です。
● レバーやボタンを水中で動かし、スキ
間に入り込んでいる塩分を洗い流しま
す。
● グリップも塩抜きしてください。
❷
1 時間以上真水につける
❸
マリンケースを取り出し、ケース表
面の水滴を乾いた布で拭き取る
2
1
8
❷
録画ボタン / 静止画レバーを押す
ズーム
(望遠)
ズーム
静止画レバー
(広角)
静止画を撮影します
録画ボタン
動画の撮影を開始 / 停止します
撮影が終了したら……
❸
電源ボタンを 2 秒以上押し、ビデ
オカメラの電源を切る
● ビデオカメラの電源ランプ及びモニ
ターが消灯します。
4 ビデオカメラの取りはずし
[ すぐに取りはずす必要がある場合 ]
❶
真水の入った容器の中でマリンケース
を上下左右に 10 回以上揺すって、すす
ぐ
❷
マリンケースを取り出し、ケース表面
の水滴を乾いた布で拭き取る
❸
Oリング・バックル部などの細部に残っ
た水滴が内部に入らないように注意し、
マリンケースのフロントガラス面を上に
向け、バックルを開けてビデオカメラを
取り出す
❹
ビデオカメラを取り出したあと、水滴
が内部に入らないように注意し、再びマ
リンケースを閉じ、全てのバックルを締
める
※マリンケースを使ったあとは、必ずメ
ンテナンスを行なってください。
[ すぐに取りはずす必要がない場合 ]
マリンケースのメンテナンスを行なってく
ださい。
10
10
11
❹
ビデオカメラを取り出す
● O リング・バックル 部
など細部に残った水滴が
内部に入らないように注
意し、マリンケースのフ
ロントガラス面を上に向
け、バックルを開けてビ
デオカメラを取り出しま
す。
ご注意
●フロントガラス面を下に向けてバック
ルを開けるとビデオカメラが飛び出す
恐れがあります。
やむを得ず、ダイビングポイント
でマリンケースを開けるときは、
濡れた髪の毛や体から水滴が落
ちないように十分、注意してくだ
さい。
❺
O リングをはずし、塩分・砂など
の異物を拭き取る
● O リングがはめ込まれていた溝、O リ
ングが接触していたマリンケース本体
も同様に拭き取り乾燥させます。
※ O リングの取り扱い・保管については
別紙「O リングについて」をご覧くだ
さい
10
❻
ケースの内側、外側を乾いた布で
十分に拭く
※ケースの内側は、けば立ちの少ない布
を使用してください。
❼
フロントガラスの内側を拭く
●フロントガラスの内側に市販のクリー
ナー液を数滴たらし、レンズティッ
シュペーパーやきれいな布などで拭き
取ります。
フロントガラスが汚れていると、
くもりの原因になります。
❽
日陰で完全に乾燥させる
・直射日光にさらさないでくださ
い。
・マリンケースの変色や O リン
グの劣化を早める原因になりま
す。
メモ)気温、湿度、水温、塩分濃度などの
ご利用状況により、条件が異なる場
合があります。
10
ゴ ミ・ 砂・塩
の結晶など
髪の毛・糸
くずなど
11
11
O リングの保管
保証とアフターサービス
1 か月以上マリンケースを使わないときは、
●
保証書 ( 別途添付しています )
Oリングを取りはずして保管してください。
保証書は、必ず「お買い上げ日・販売店名」
※別紙「Oリングについて」をご覧ください。
などの記入をお確かめのうえ、販売店か
ら受け取っていただき、内容をよくお読
O リングは消耗品で
みの後、大切に保管してください。保証
す。1 年ごとに新し
期間は、お買い上げ日から 1 年間です。
いものと交換してく
ださい。
●
性能部品の最低保有期間
当社は性能部品を製造打ち切り後、最
低5 年間保有しています。性能部品とは、
その製品の機能を維持するために必要
な部品です。
保管後、再度使用するときは、O
リングの状態を確認してくださ
●
故障に起因する付随的損害
い。変形 ( つぶれ、ゆがみ )、ヒ
マリンケースの故障に起因する付随的損
ビ割れ、キズなどがあるときは、
害 ( 撮影に要した諸費用、撮影によって
絶対に使用しないでください。
得るであろう利益の損失、精神的な損害
など ) についての補償には応じかねます。
製品についてのご相談・修理の
主な仕様
ご依頼 修理に関するご相談
許容耐圧 : 水深 40 メートル
まず、お買い上げの販売店にご相談ください
操作 : 電源の入 / 切
ビクターサービスエンジニアリング株式会社
●別紙の「ビクターサービス窓口案内」をご覧ください
動画の撮影 / 停止
静止画の撮影
お買い物情報や全般的なご相談
ズーム ( 望遠 )/ ズーム ( 広角 )
お客様ご相談センター
フィルター径
:67mm
0120-2828-17
寸法 :216mm × 128mm × 180mm
●携帯電話・PHS・FAX などからのご利用は
(幅×高さ×奥行き)
電話:(045)450-8950
質量 :約 900 g ( グリップ含まず )
FAX :(045)450-2275
〒 221-8528
●
ご利用になれるビデオカメラ
横浜市神奈川区守屋町 3-12
GZ-HM450, GZ-HM670,GZ-HM690
・ご相談窓口におけるお客様の個人情報は、お
問い合わせへの対応、修理およびその確認に
使用し、適切に管理を行い、お客様の同意な
く個人情報を第三者に提供または開示するこ
とはありません。
ビクターホームページ http://www.victor.co.jp/
日本ビクター株式会社
〒 221-8528 横浜市神奈川区守屋町 3-12
WR-MG270_EN.book Page 13 Wednesday, March 24, 2010 1:36 PM
3. Check that there are no scratches or cracks
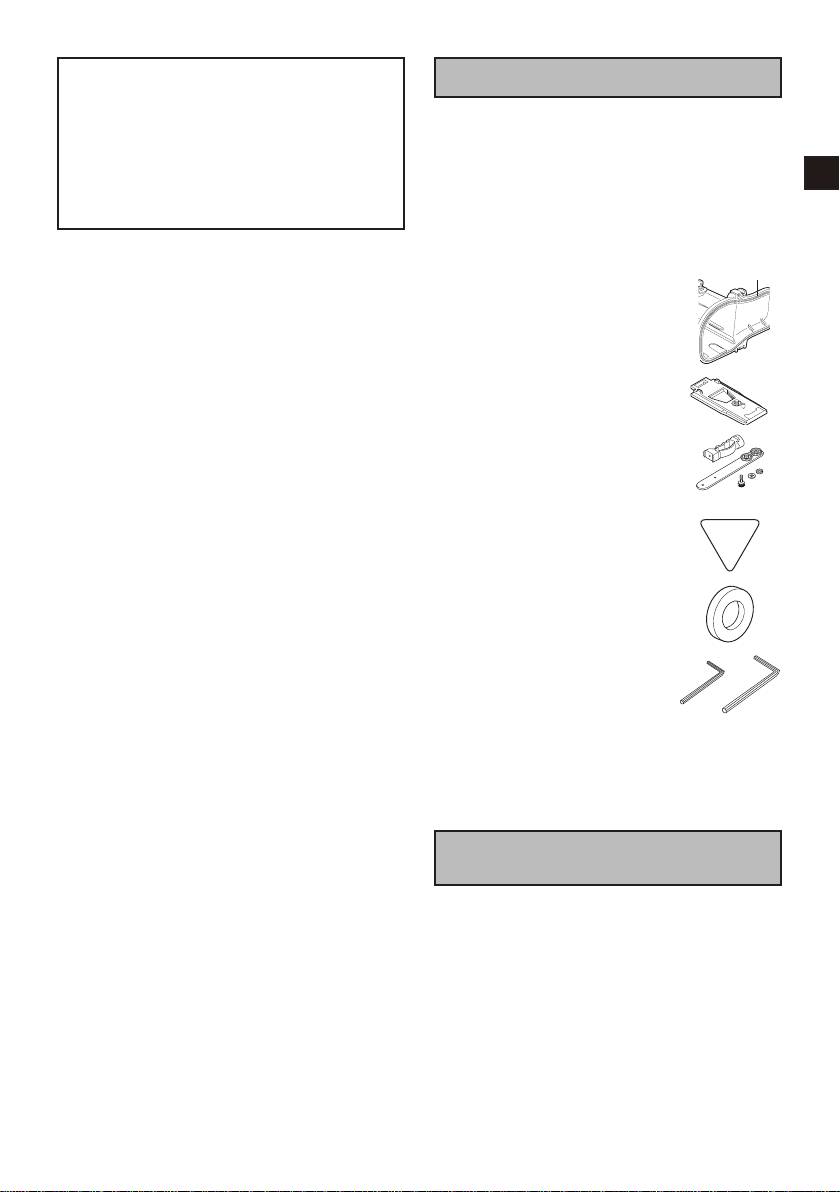
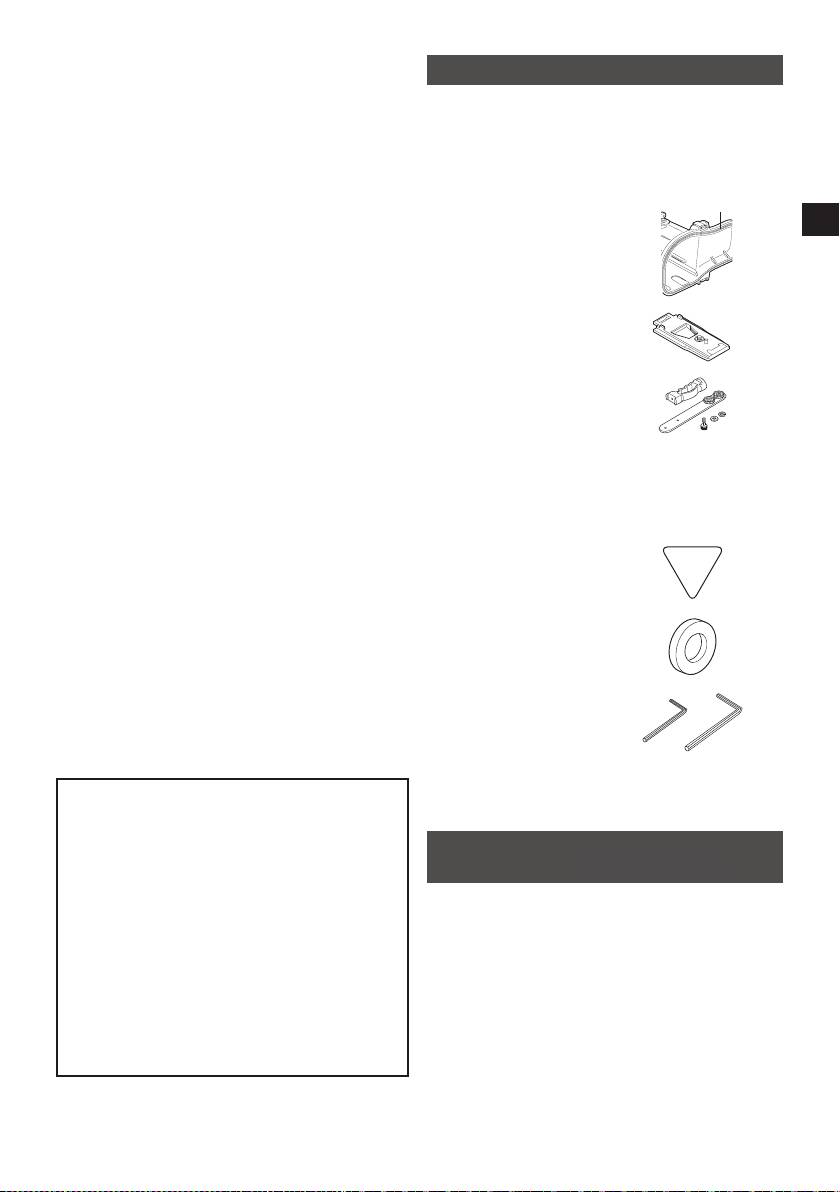
Accessories
on the marine case every time you use it.
The marine case must withstand water
• Anti-fog liquid
pressure with use. Repeated exposure to
• Silicone grease (5 g) x 1
pressure eventually leads to material fatigue,
• Silicone cloth
which may result in damage of the marine
• Drying agent (2 g) x 5
case. Every time you use the marine case,
check in advance that there are no scratches
• Strap
or cracks. If you frequently use the marine
• 2 O-rings
O-ring
case, be sure to ask for maintenance at the
One spare O-ring.
store of purchase. (There is a charge for
maintenance.)
To protect your camera and ensure optimum use,
keep the examples listed above in mind when
• Base
using the marine case.
To attach to the camera.
JVC accepts no responsibility for water leakage or
damage to anything inside the marine case
• Grip
(camera, SD card, etc.) due to careless usage of
Commercially available
this product. Be sure to follow correct procedures
lights and weights can also
when using the marine case.
be attached.
¹ When there is a need for
buoyancy adjustment,
attach commercially
available weights to the
grip.
• Pick
• Screw tightening key
• 2 hexagonal wrenches
Large: for screwing the grip
Small: buckle opener
• Power button cap
Maintenance Kit - Sold Separately
(Part Number: MG270_MTKIT)
You can purchase the following set of expendable
parts.
Please contact your local JVC service
representative.
• O-rings x 2
• Silicone grease (5 g) x 1
• Drying agent (2 g) x 5
• Lens tissue paper (50 sheets) x 1
• Power button cap x 2
13
WR-MG270_EN.book Page 12 Wednesday, March 24, 2010 1:36 PM
In order to use this product safely
Safety Precaution
Preparation (A Pg. 16)
Before use, this unit must be pre-
• Check that there is no dirt, cracks, or damage to
tested to check if there is any water
the O-ring.
leakage.
• Always apply grease to the O-ring.
Please read before use
Attaching the Marine Case to the Camera
This marine case is a precision instrument
(A Pg. 17, 18)
designed to permit safe video recording under
• Attach the power button cap depending on the
high water pressure. Please pay careful attention
camera used.
when handling the unit before and after use, as
• Make sure that the O-ring is not twisted, and that
explained in this user’s manual.
you do not forget to attach it.
Each part of the marine case has been subject to
strict controls during the manufacturing process,
• When tightening the seal, make sure there are
and the individual functions have faced stringent
no foreign objects caught in the seal.
tests during the assembly process. Each marine
case has also had to pass waterproof inspections
using high-pressure water testers. However,
damage can sometimes occur during transport
Recording the Video/Still Image Files
and distribution, or during storage after purchase,
(A Pg. 18, 19)
so before diving always carry out the following
• Avoid opening and closing the marine case in
pre-use test to verify safety.
the shooting location.
• When holding the marine case, lower it gently
Pre-use test
into the water.
Be sure to perform the following pre-use test
before diving.
1. Before mounting the camera inside the
marine case, dive with only the empty
Detaching the Marine Case/Maintenance
marine case and test for water leaks.
(A Pg. 19, 20, 21)
Allow 5 or 6 minutes to ensure there are no
• Always wash the marine case in fresh water
leaks.
after use.
Be sure to perform this test to ensure the
• Perform maintenance on the O-ring.
safety of your camera.
2. The following are some common causes of
water leaks:
If water leaks into the case due to careless use of
the marine case, JVC cannot accept responsibility
A. The marine case is used without attaching
for any damage that may occur to the internal
the O-ring.
equipment and materials (video camera, SD card,
B. The O-ring is not mounted in the correct
etc.), or any expenses incurred in taking the
position.
photographs/video. Therefore, please be careful
C. The O-ring is damaged or deformed.
when using the marine case.
D. There is sand, dirt, hair or other foreign
matter on the O-ring.
E. There is sand, dirt, hair or other foreign
matter on the contact surface of the O-ring
or on the inside of the lid.
F. The provided strap or drying agent bag is
pinched inside the marine case when the lid
is closed.
12
WR-MG270_EN.book Page 13 Wednesday, March 24, 2010 1:36 PM
3. Check that there are no scratches or cracks
Accessories
on the marine case every time you use it.
The marine case must withstand water
• Anti-fog liquid
pressure with use. Repeated exposure to
• Silicone grease (5 g) x 1
pressure eventually leads to material fatigue,
• Silicone cloth
which may result in damage of the marine
• Drying agent (2 g) x 5
case. Every time you use the marine case,
check in advance that there are no scratches
• Strap
or cracks. If you frequently use the marine
• 2 O-rings
O-ring
case, be sure to ask for maintenance at the
One spare O-ring.
store of purchase. (There is a charge for
maintenance.)
To protect your camera and ensure optimum use,
keep the examples listed above in mind when
• Base
using the marine case.
To attach to the camera.
JVC accepts no responsibility for water leakage or
damage to anything inside the marine case
• Grip
(camera, SD card, etc.) due to careless usage of
Commercially available
this product. Be sure to follow correct procedures
lights and weights can also
when using the marine case.
be attached.
¹ When there is a need for
buoyancy adjustment,
attach commercially
available weights to the
grip.
• Pick
• Screw tightening key
• 2 hexagonal wrenches
Large: for screwing the grip
Small: buckle opener
• Power button cap
Maintenance Kit - Sold Separately
(Part Number: MG270_MTKIT)
MG300_MTKIT)
You can purchase the following set of expendable
parts.
Please contact your local JVC service
representative.
• O-rings x 2
• Silicone grease (5 g) x 1
• Drying agent (2 g) x 5
• Lens tissue paper (50 sheets) x 1
• Power button cap x 2
13
WR-MG270_EN.book Page 12 Wednesday, March 24, 2010 1:36 PM
In order to use this product safely
Safety Precaution
Preparation (A Pg. 16)
Before use, this unit must be pre-
• Check that there is no dirt, cracks, or damage to
tested to check if there is any water
the O-ring.
leakage.
• Always apply grease to the O-ring.
Please read before use
Attaching the Marine Case to the Camera
This marine case is a precision instrument
(A Pg. 17, 18)
designed to permit safe video recording under
• Attach the power button cap depending on the
high water pressure. Please pay careful attention
camera used.
when handling the unit before and after use, as
• Make sure that the O-ring is not twisted, and that
explained in this user’s manual.
you do not forget to attach it.
Each part of the marine case has been subject to
strict controls during the manufacturing process,
• When tightening the seal, make sure there are
and the individual functions have faced stringent
no foreign objects caught in the seal.
tests during the assembly process. Each marine
case has also had to pass waterproof inspections
using high-pressure water testers. However,
damage can sometimes occur during transport
Recording the Video/Still Image Files
and distribution, or during storage after purchase,
(A Pg. 18, 19)
so before diving always carry out the following
• Avoid opening and closing the marine case in
pre-use test to verify safety.
the shooting location.
• When holding the marine case, lower it gently
Pre-use test
into the water.
Be sure to perform the following pre-use test
before diving.
1. Before mounting the camera inside the
marine case, dive with only the empty
Detaching the Marine Case/Maintenance
marine case and test for water leaks.
(A Pg. 19, 20, 21)
Allow 5 or 6 minutes to ensure there are no
• Always wash the marine case in fresh water
leaks.
after use.
Be sure to perform this test to ensure the
• Perform maintenance on the O-ring.
safety of your camera.
2. The following are some common causes of
water leaks:
If water leaks into the case due to careless use of
the marine case, JVC cannot accept responsibility
A. The marine case is used without attaching
for any damage that may occur to the internal
the O-ring.
equipment and materials (video camera, SD card,
B. The O-ring is not mounted in the correct
etc.), or any expenses incurred in taking the
position.
photographs/video. Therefore, please be careful
C. The O-ring is damaged or deformed.
when using the marine case.
D. There is sand, dirt, hair or other foreign
matter on the O-ring.
E. There is sand, dirt, hair or other foreign
matter on the contact surface of the O-ring
or on the inside of the lid.
F. The provided strap or drying agent bag is
pinched inside the marine case when the lid
is closed.
12
Notes
Limitations in use with GZ-HM30/50/430/435.
1) These models neither have Power button
nor Digital still camera function.
2) To prevent the Camcorder from switching
off automatically, it is recommended to set
"Auto power off" mode to "off" from the
Camcorder setting menu.
3) With above procedure, the Camcorder
would always be on in the marine case.
Please prepare battery to meet your
operation time while the Camcorder is in
the marine case. (Larger capacity battery
is recommended)
WR-MG270_EN.book Page 15 Wednesday, March 24, 2010 1:36 PM
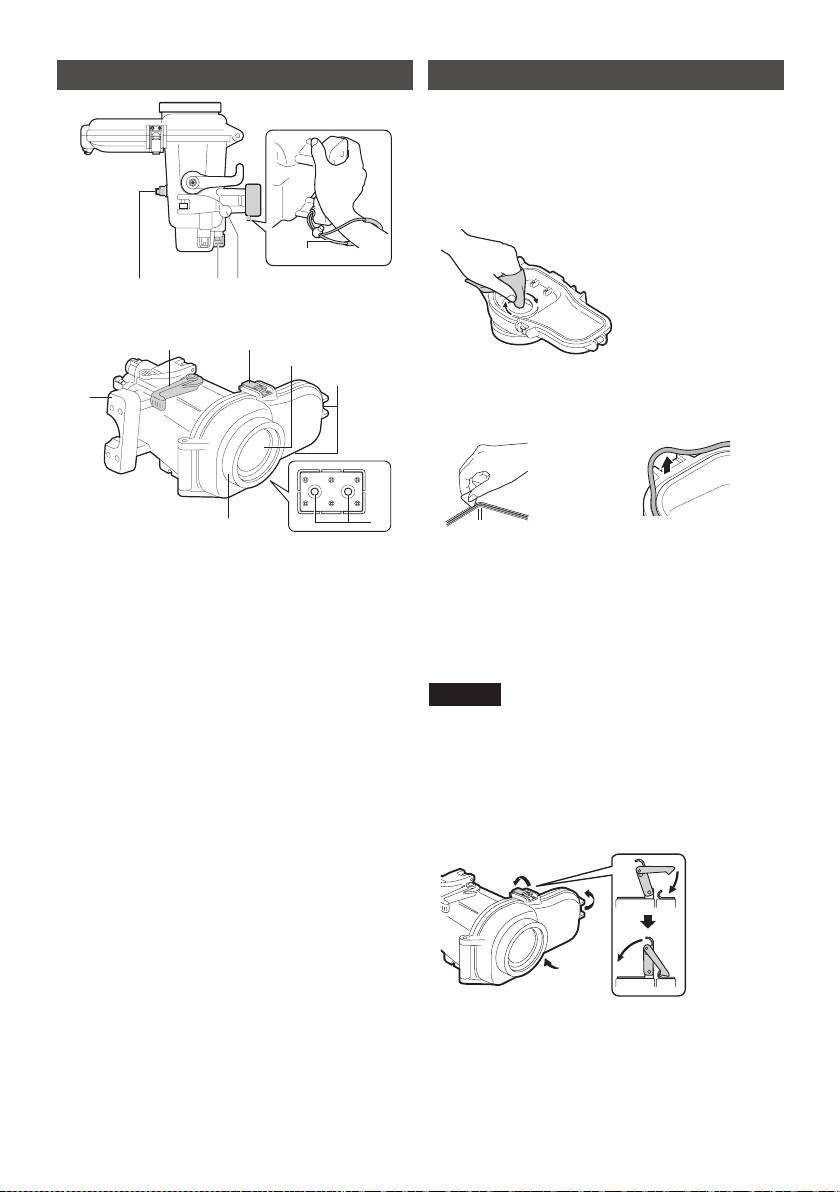
Silicone cloth
Wash the marine case with
fresh water, and wipe the outer
side of the whole case with the
silicone cloth after drying.
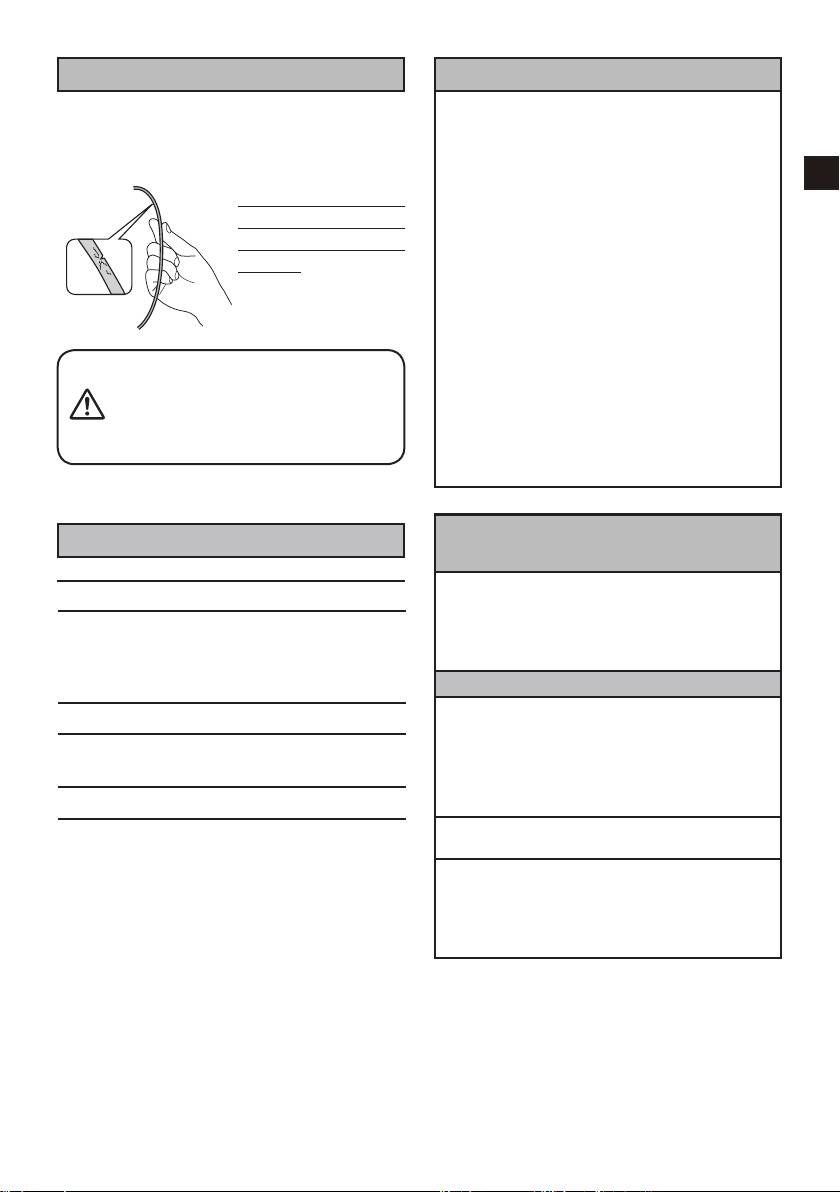
Buckle
Hexagonal wrench (small)
Buckle
(Buckle opener)
For use when you have
difficulty opening the
buckle.
Hook the wrench to the
buckle and pull towards
you.
Base
Grip belt of camera
Screw tightening key
Use the key to tighten
the screw of the base.
15
WR-MG270_EN.book Page 14 Wednesday, March 24, 2010 1:36 PM
Procedures for Using the Supplied Maintenance Kit
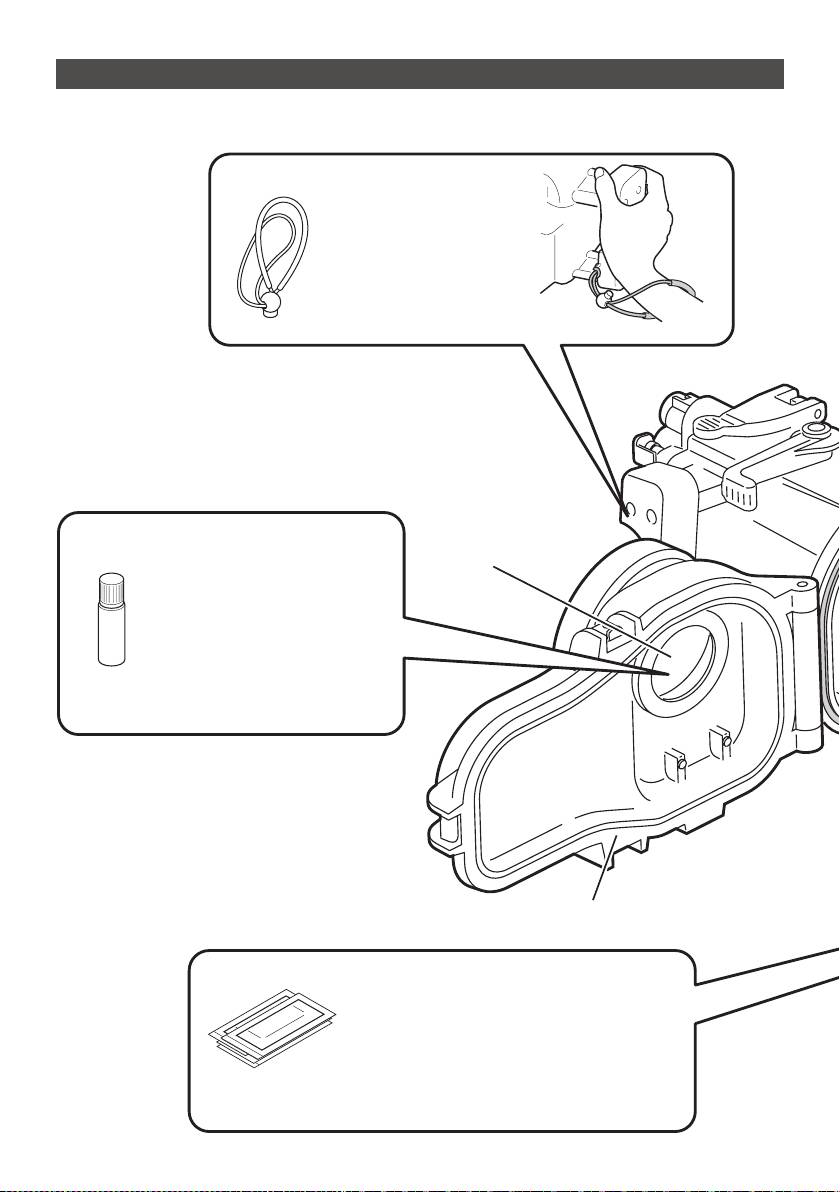
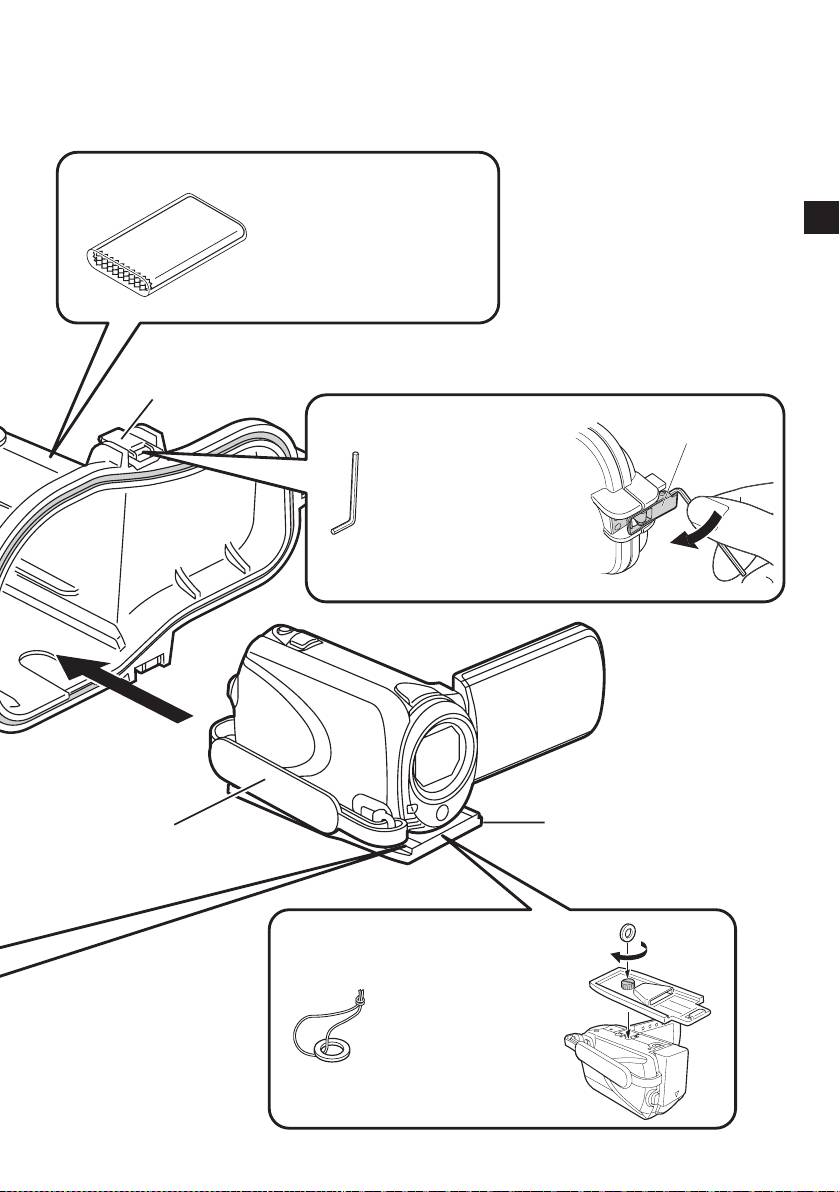
Strap
Pass the strap through the
strap attachment hole
before using the marine
case to maintain a firm grip
in water.
Anti-fog liquid
Front glass
Apply the anti-fog liquid on the
inner side of front glass before
using the marine case.
Add two to three drops of the
liquid on a lens tissue paper
(commercially available) or a
clean cloth, and apply on the inner
side of the front glass.
Marine case
Drying agent
Prevents fogging inside the marine case.
Insert it at the back of the base attached to the
camera.
¹ The moisture absorption ability of drying
agent that has previously been used may
deteriorate depending on the conditions of
use. As such, we recommend that the drying
agent be replaced each time.
14
WR-MG270_EN.book Page 15 Wednesday, March 24, 2010 1:36 PM
Silicone cloth
Wash the marine case with
fresh water, and wipe the outer
side of the whole case with the
silicone cloth after drying.
Buckle
Hexagonal wrench (small)
Buckle
(Buckle opener)
For use when you have
difficulty opening the
buckle.
Hook the wrench to the
buckle and pull towards
you.
Base
Grip belt of camera
Screw tightening key
Use the key to tighten
the screw of the base.
15
WR-MG270_EN.book Page 14 Wednesday, March 24, 2010 1:36 PM
Procedures for Using the Supplied Maintenance Kit
Strap
Pass the strap through the
strap attachment hole
before using the marine
case to maintain a firm grip
in water.
Anti-fog liquid
Front glass
Apply the anti-fog liquid on the
inner side of front glass before
using the marine case.
Add two to three drops of the
liquid on a lens tissue paper
(commercially available) or a
clean cloth, and apply on the inner
side of the front glass.
Marine case
Drying agent
Prevents fogging inside the marine case.
Insert it at the back of the base attached to the
camera.
¹ The moisture absorption ability of drying
agent that has previously been used may
deteriorate depending on the conditions of
use. As such, we recommend that the drying
agent be replaced each time.
14
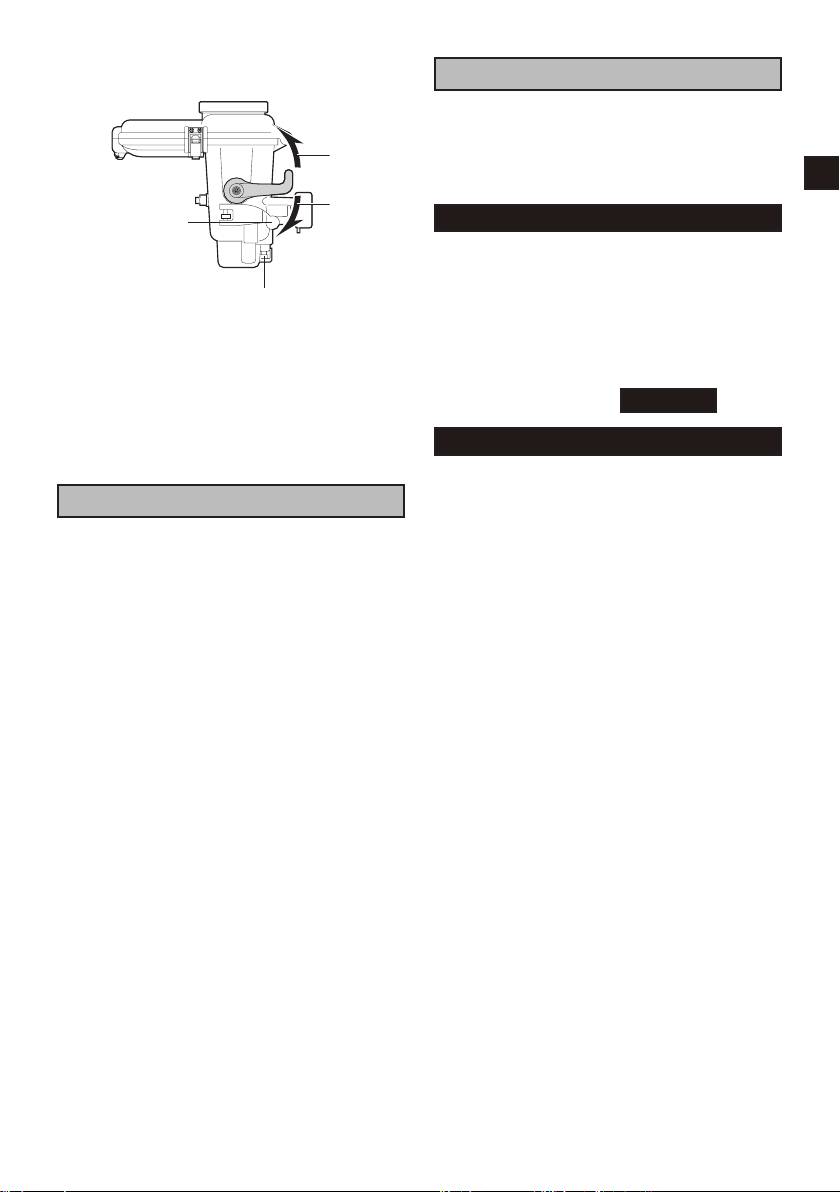
WR-MG270_EN.book Page 17 Wednesday, March 24, 2010 1:36 PM
D
Fold the grip belt.
Attaching the Marine Case to the
z Make sure the grip belt is not caught
Camera
between the marine case when sealing.
A
Setup the camera.
E
Open the marine case.
z For models equipped with light, turn off the
z If it is difficult to open buckles, use the
light.
small hexagonal wrench (buckle opener).
z Open the lens cover.
z Set to the shooting mode (video/still
image).
¹ Even when the shooting mode is set to
“video”, still images can be captured by
pressing the still image lever during video
recording.
z It is recommended to set to the auto
Small hexagonal wrench
shooting mode.
(Buckle opener)
z Insert the battery and the microSD/
F
Attach the power button cap.
microSDHC card or SD/SDHC card
(Not required for GZ-HM545 to GZ-HM570.)
beforehand if needed.
z Fit the hollow of the power button cap to
z To turn off the camera, press and hold the
the protrusion of the power button on the
power button for more than 2 seconds.
case.
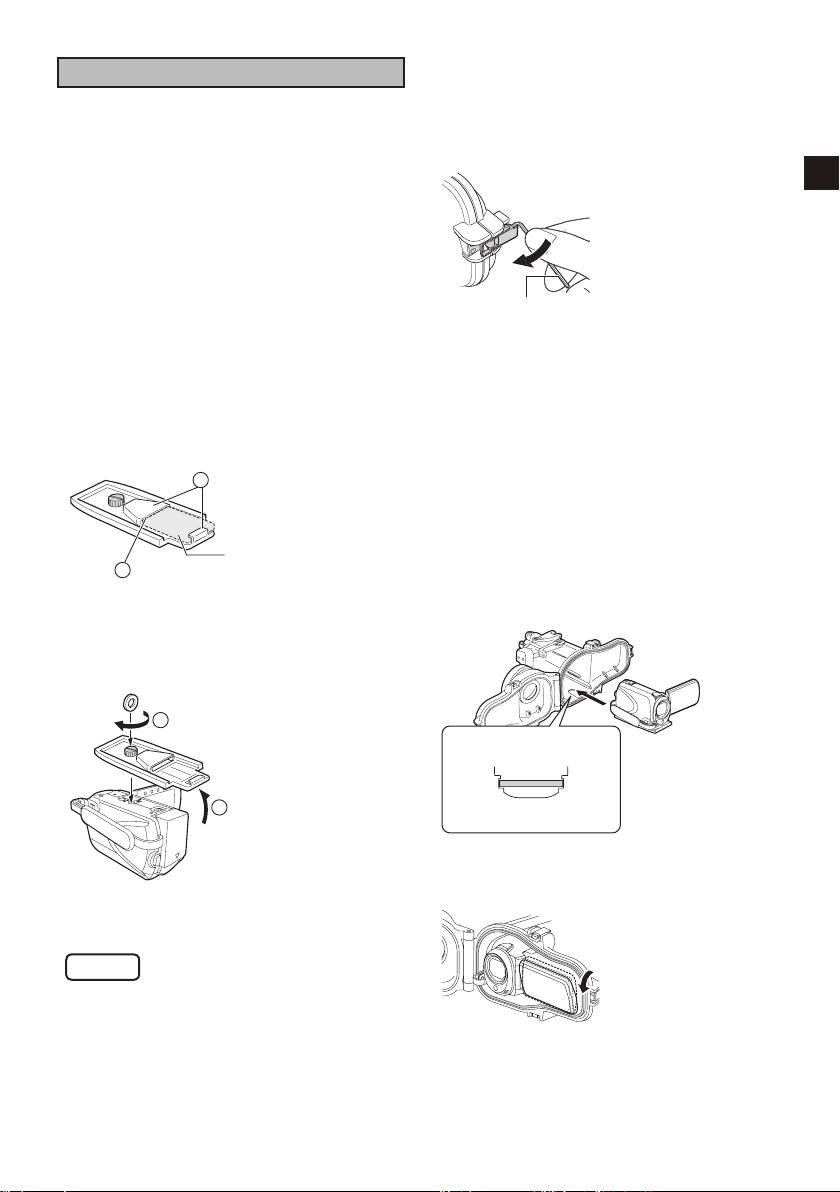
B
Insert the drying agent at the back of the
Power button cap
base.
2
Catch
Drying agent
1
Pass underneath
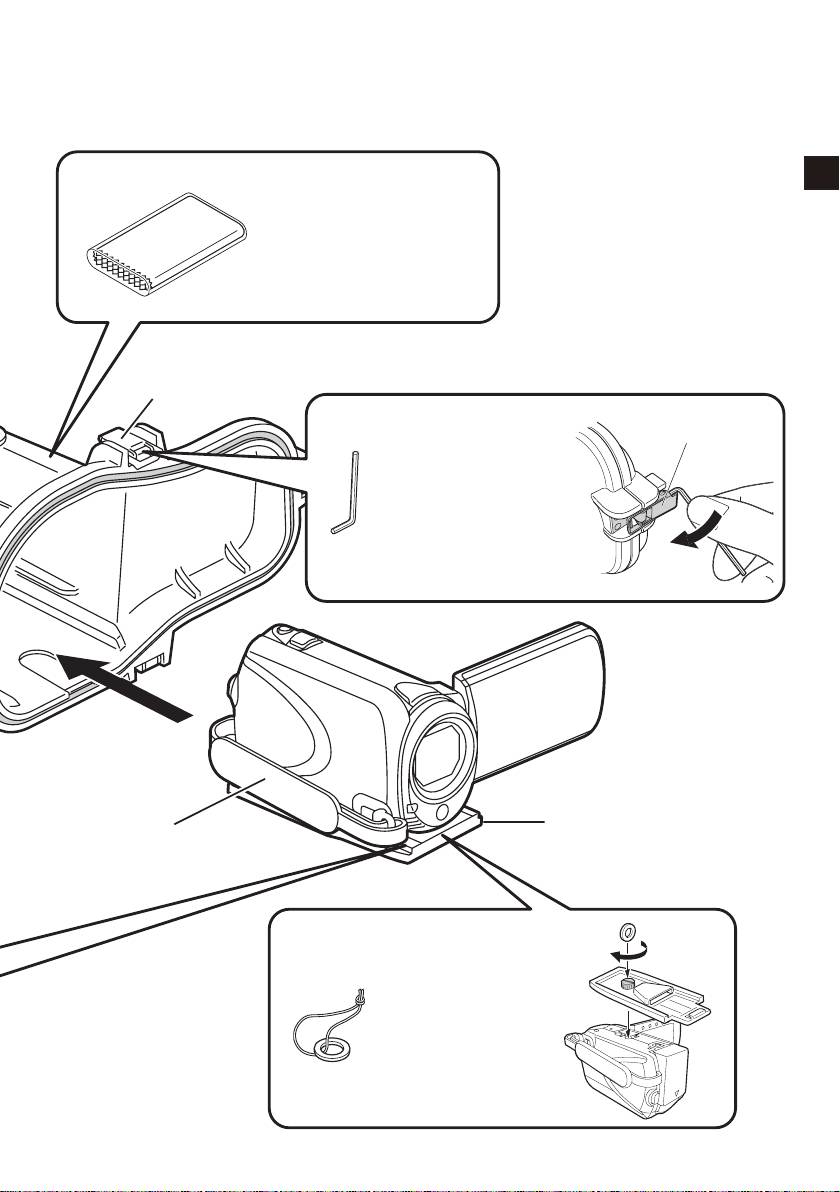
G
Insert the camera into the marine case.
z Align the base attachment groove with the
C
Attach the base to the bottom of the
base to insert.
camera.
z Align the tripod screw hole at the bottom of
your camera with the screw of the base,
and tighten the screw.
2
Tighten the screw
Base attachment groove
Base
1
Open up the LCD monitor
Marine case internal base
H
Adjust the angle of the LCD monitor.
z The LCD monitor can be tilt upwards to a
maximum angle of 30 degrees.
Caution
z The camera turns on automatically when the
LCD monitor is opened. To turn off the camera,
press and hold the power button for more than
2 seconds.
17
WR-MG270_EN.book Page 16 Wednesday, March 24, 2010 1:36 PM
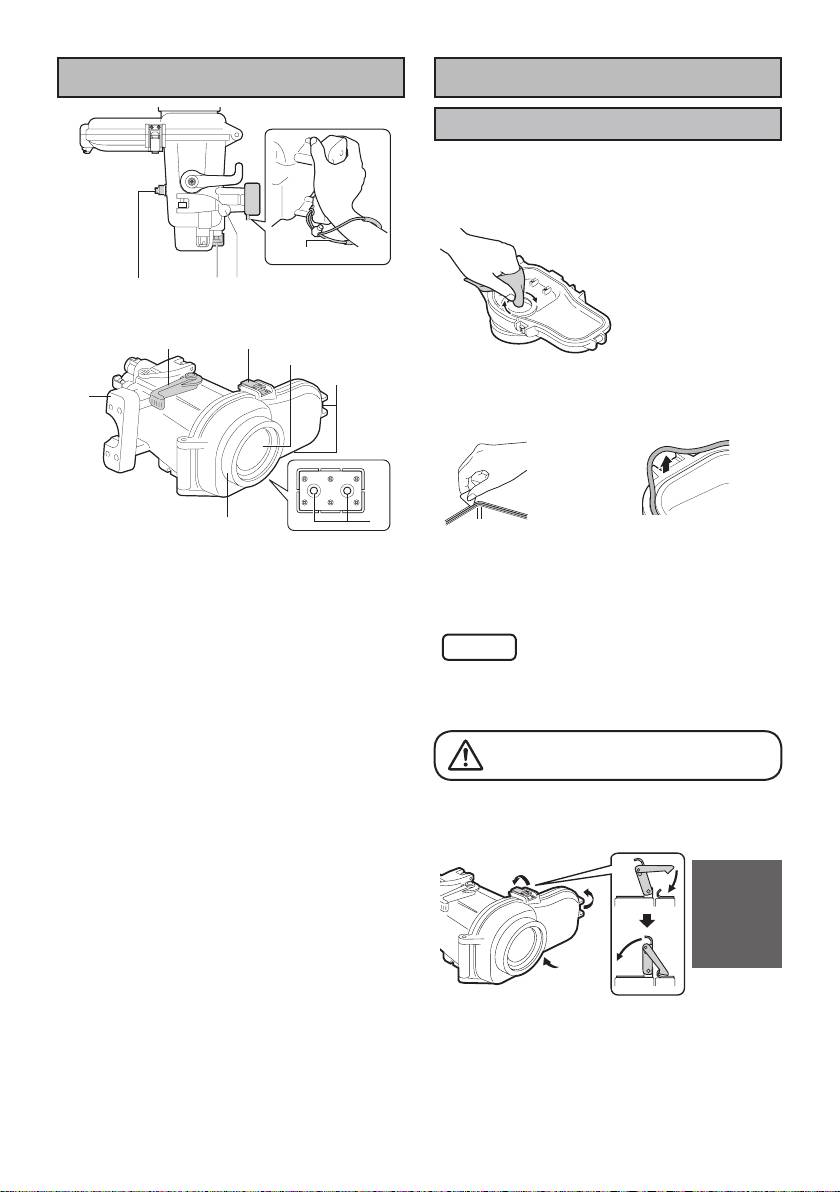
Parts and Functions
Preparation
A
Inspect the main casing for scratches and
cracks.
Apply 2 or 3 drops of the anti-fog liquid
provided onto a lens tissue paper
(commercially available) or a clean cloth, and
wipe the inner side of the marine case front
glass.
Strap
786
24
Front glass
4
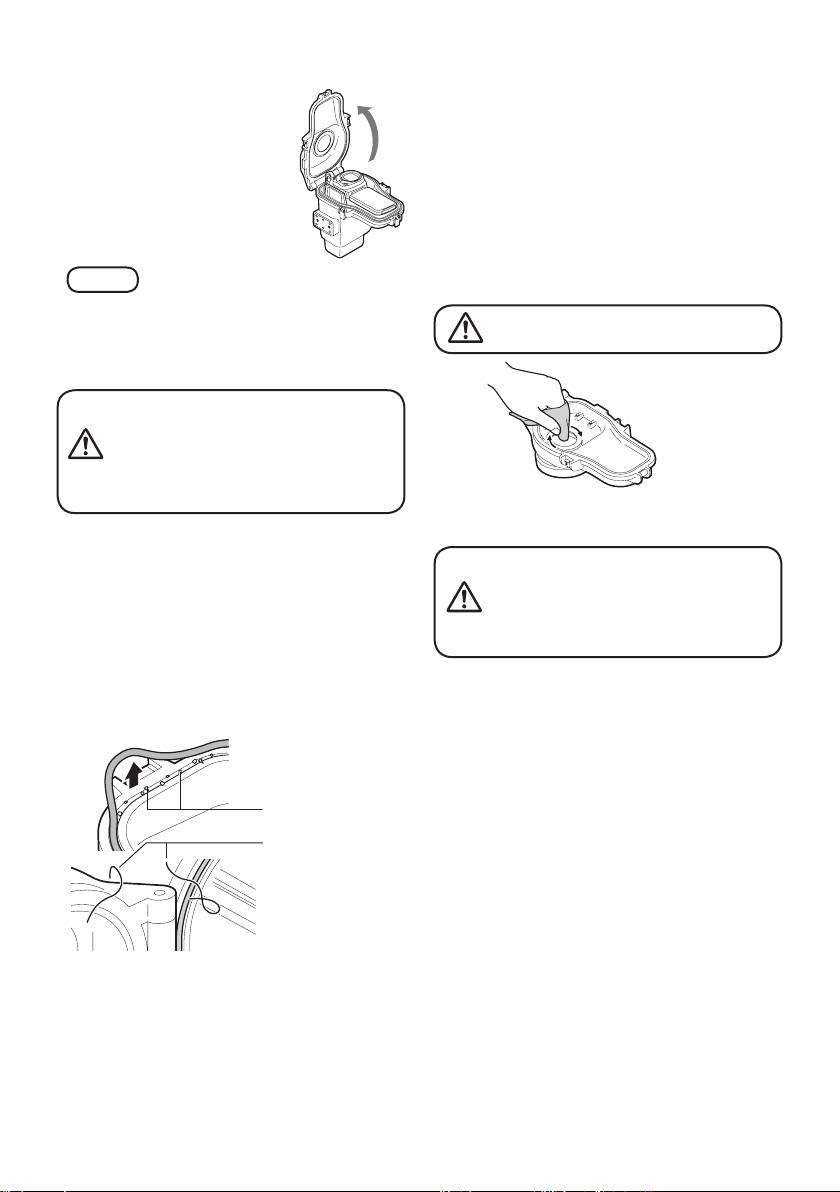
B
Check the O-ring.
1
Using the pick provided, remove the O-ring
from the main case.
B
5
3
Bottom view
Check the O-ring, O-ring contact surface, and
1. Main casing grip
groove in which the O-ring fits for foreign
Attach the strap provided as shown in the
matter, nicks, cracks, etc.
diagram above.
Be sure to remove any foreign matter (dirt,
2. Zoom lever
sand, salt crystals, hair, lint, etc.).
Zoom (tele/wide) while shooting.
¹ For details, refer to the “O-ring
3. Ring
Maintenance Manual”.
Commercially available filters (67 mm
diameter) can be attached.
Caution
4. Buckle (3 locations)
z Never use the O-ring in case of nicks and
Seal the marine case.
cracks.
5. Grip attachment holes
z If the O-ring is handled inappropriately, it can
cause water leakage .
You can attach the grip provided, or
commercially available weights.
C
Apply grease to the O-ring and re-attach.
6. Still image lever
(
1)
*
D
Close the empty marine case (no camera
Press to take still images.
inside).
7. Video recording start/stop button
Press once to start recording a video.
Press again to stop.
8. Power button
(
1)
*
Turns camera’s power on/off.
(
1): For selected models.
*
E
Submerge the marine case in water and
check that there are no water leaks.
(A Pg. 18)
16
