LevelOne ADSL2 FBR-1461: инструкция
Раздел: Профоборудование
Тип: Аппарат
Инструкция к Аппарату LevelOne ADSL2 FBR-1461

FBR-1461
ADSL2+ Modem Router
1W 4LAN QoS
Quick Installation Guide
English
Português
Deutsch
繁體中文
Français
한국어
Español
日本語
Nederlands
Danish
ไทย
Italiano
V1.0

FBR-1461 Quick Installation Guide
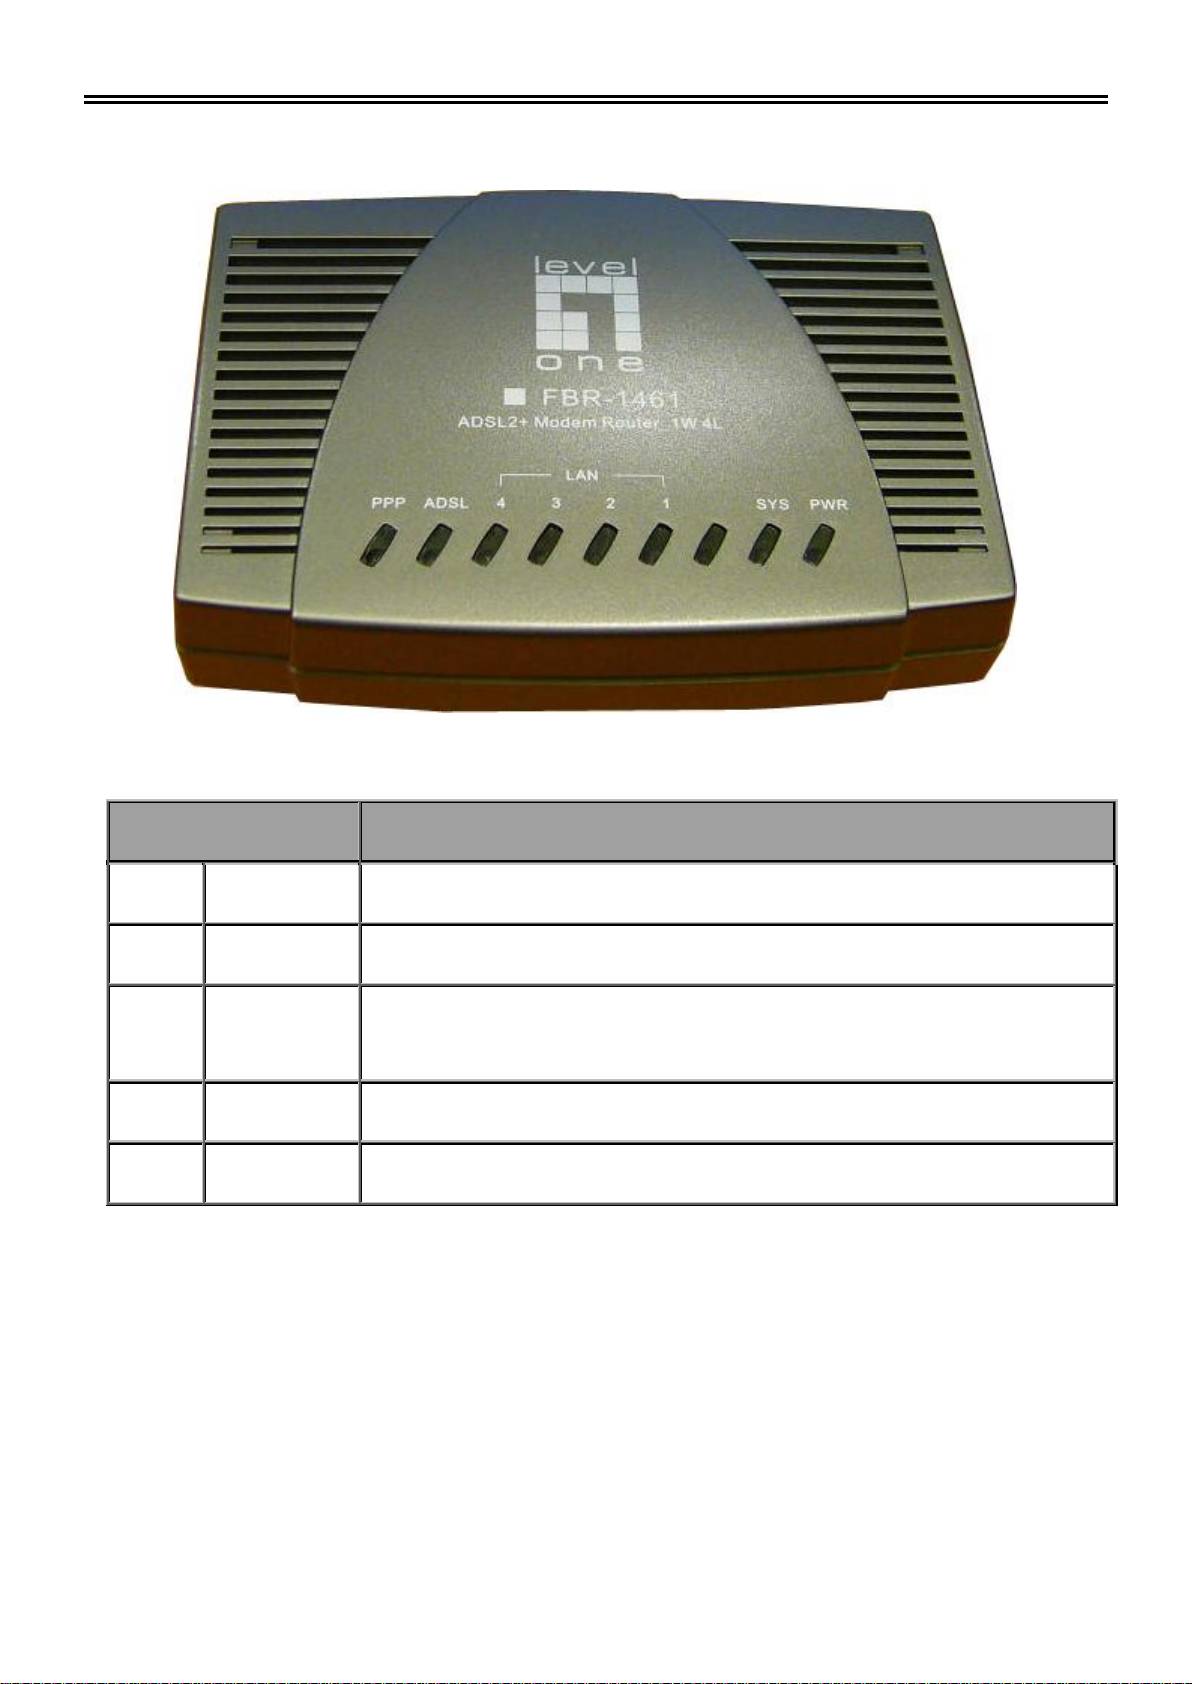
1
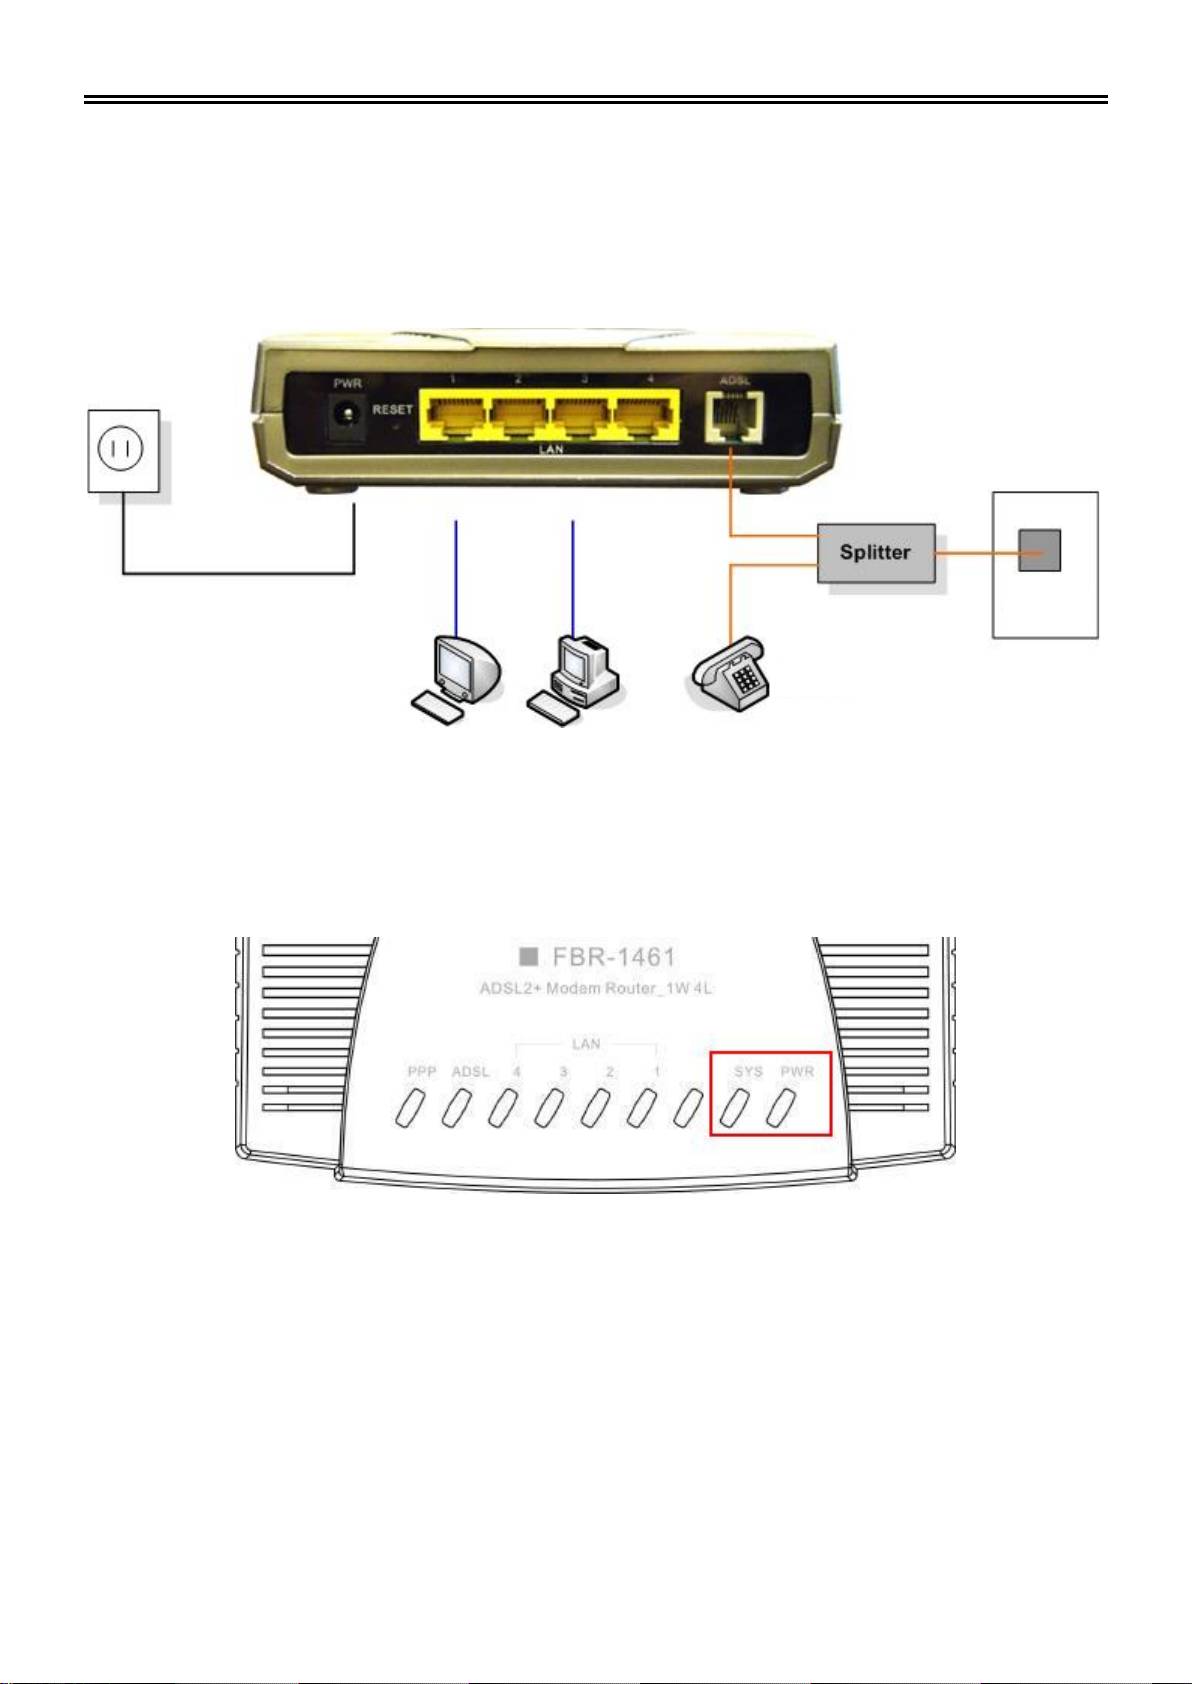
Front Panel
LED
Meaning
1
PPP :
Lit steady when there is a PPPoA / PPPoE connection.
2
ADSL:
3
LAN Port :
Lit when connected to an Ethernet device.
Green for 100Mbps; Orange for 10Mbps.
Blinking when data is Transmitted / Received.
4
SYS :
Lit when the system is ready.
5
PWR :
Lit when power is ON.
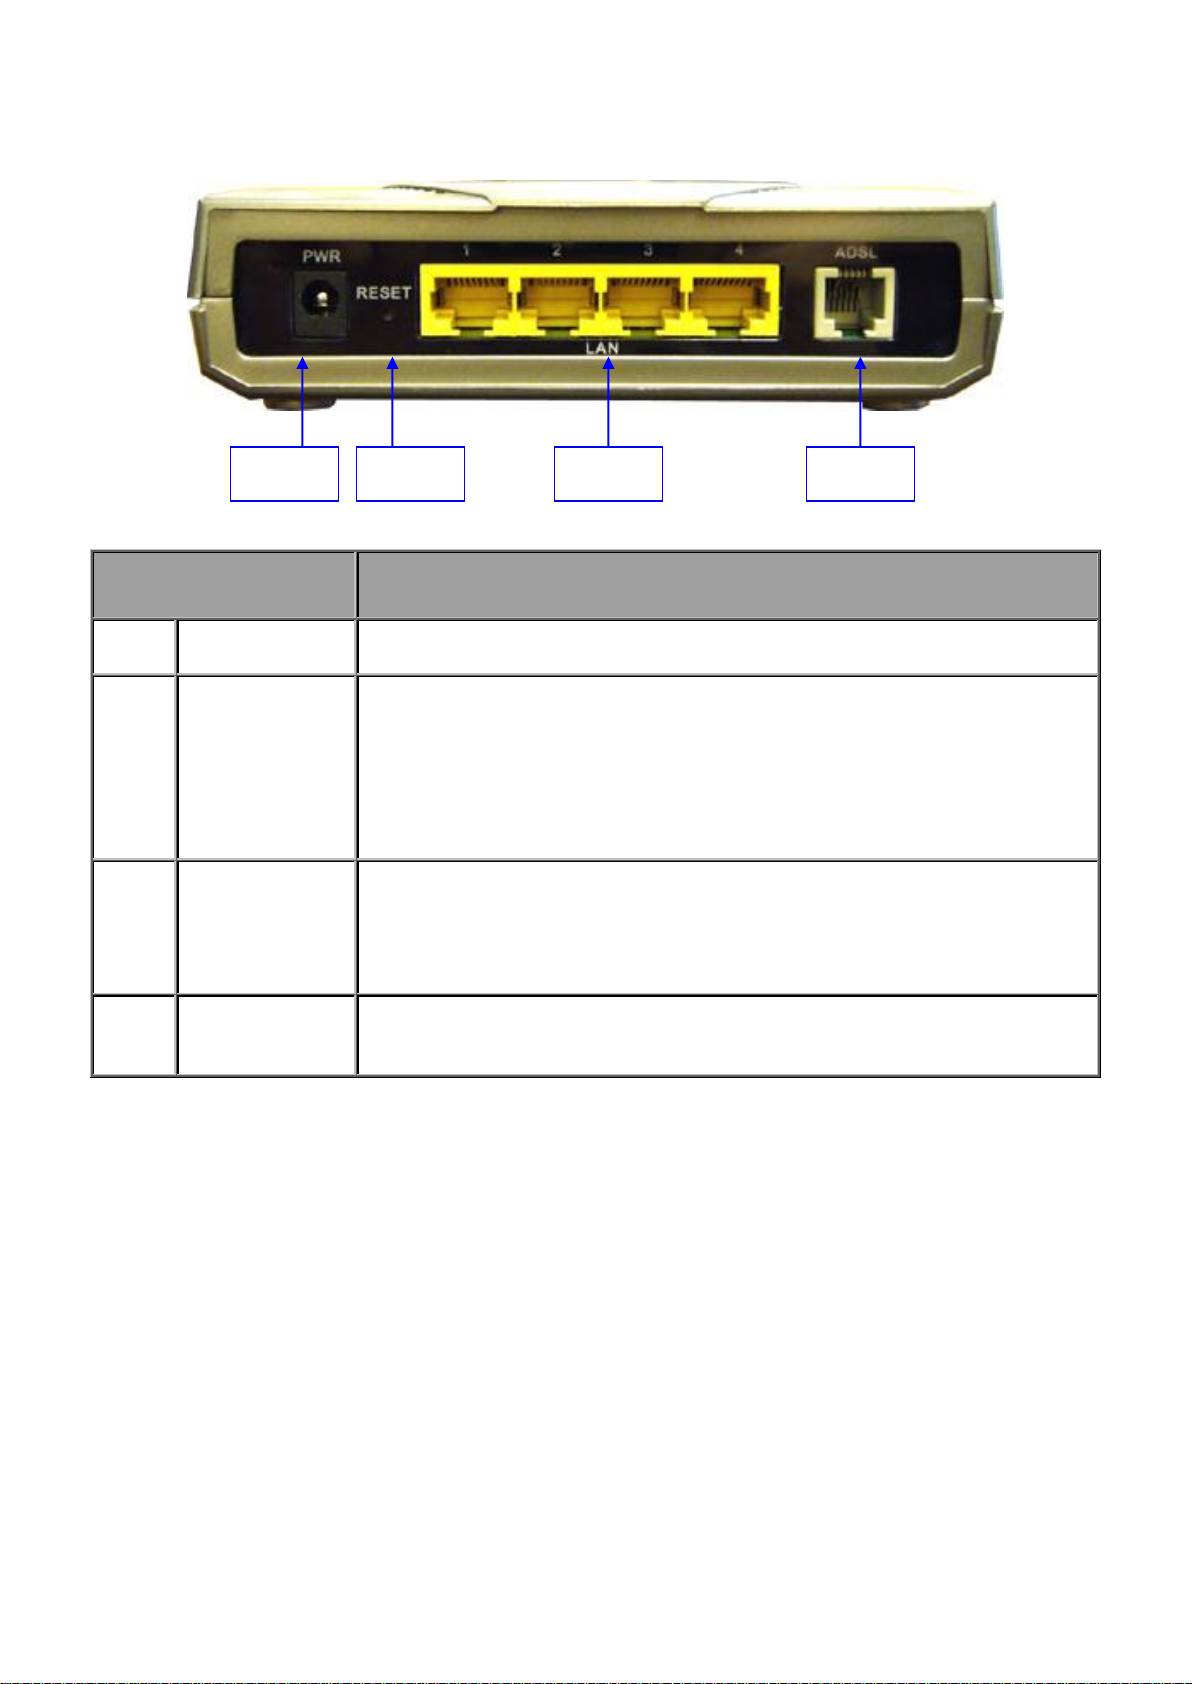
2
Rear Ports
Port
Meaning
1
POWER
Connect the supplied power adapter to this jack.
2
RESET
After the device is powered on, press it to reset the device or restore
to factory default settings.
0-3 seconds: reset the device
6 seconds above: restore to factory default settings (this is used
when you can not login to the router, e.g. forgot the password)
3
LAN
Connect a UTP Ethernet cable (Cat-5 or Cat-5e) to the LAN ports
when connecting to a PC or an office/home network of 10Mbps or
100Mbps.
4
ADSL
Connect the supplied RJ-
connecting to the ADSL/telephone network.
LAN
Power
ADSL
Reset

FBR-1461 Quick Installation Guide
3
Package Contents
FBR-1461 ADSL2+ Modem Router
AC-DC Power Adapter (12VDC, 1A)
RJ-11 ADSL/telephone Cable
Cat.5 Ethernet Cable
CD-ROM with Manual / Driver
Quick Installation Guide
Note
For more detailed instructions on configuring and using the ADSL2+ Modem
Router, please refer to the User Manual
Warning
Do not use the FBR-1461 in high humidity or high temperatures.
Do not use the same power source for the FBR-1461 as other equipment.
Do not open or repair the case yourself. If the FBR-1461 is too hot, turn
off the power immediately and have it repaired at a qualified service
center.
Avoid using this product and all accessories outdoors.
Attention
Place the FBR-1461 on a stable surface.
Only use the power adapter that comes with the package. Using a
different voltage rating power adaptor may damage the router.

4
Connecting Your ADSL2+ Modem/Router
Through Ethernet Port
1. Connect the Router to a LAN (Local Area Network) and the ADSL/telephone (LINE) network
and Power on the device.
2. Make sure the PWR and SYS LEDs are lit steadily and that the relevant LAN LED is lit.
FBR-1461 Quick Installation Guide
5
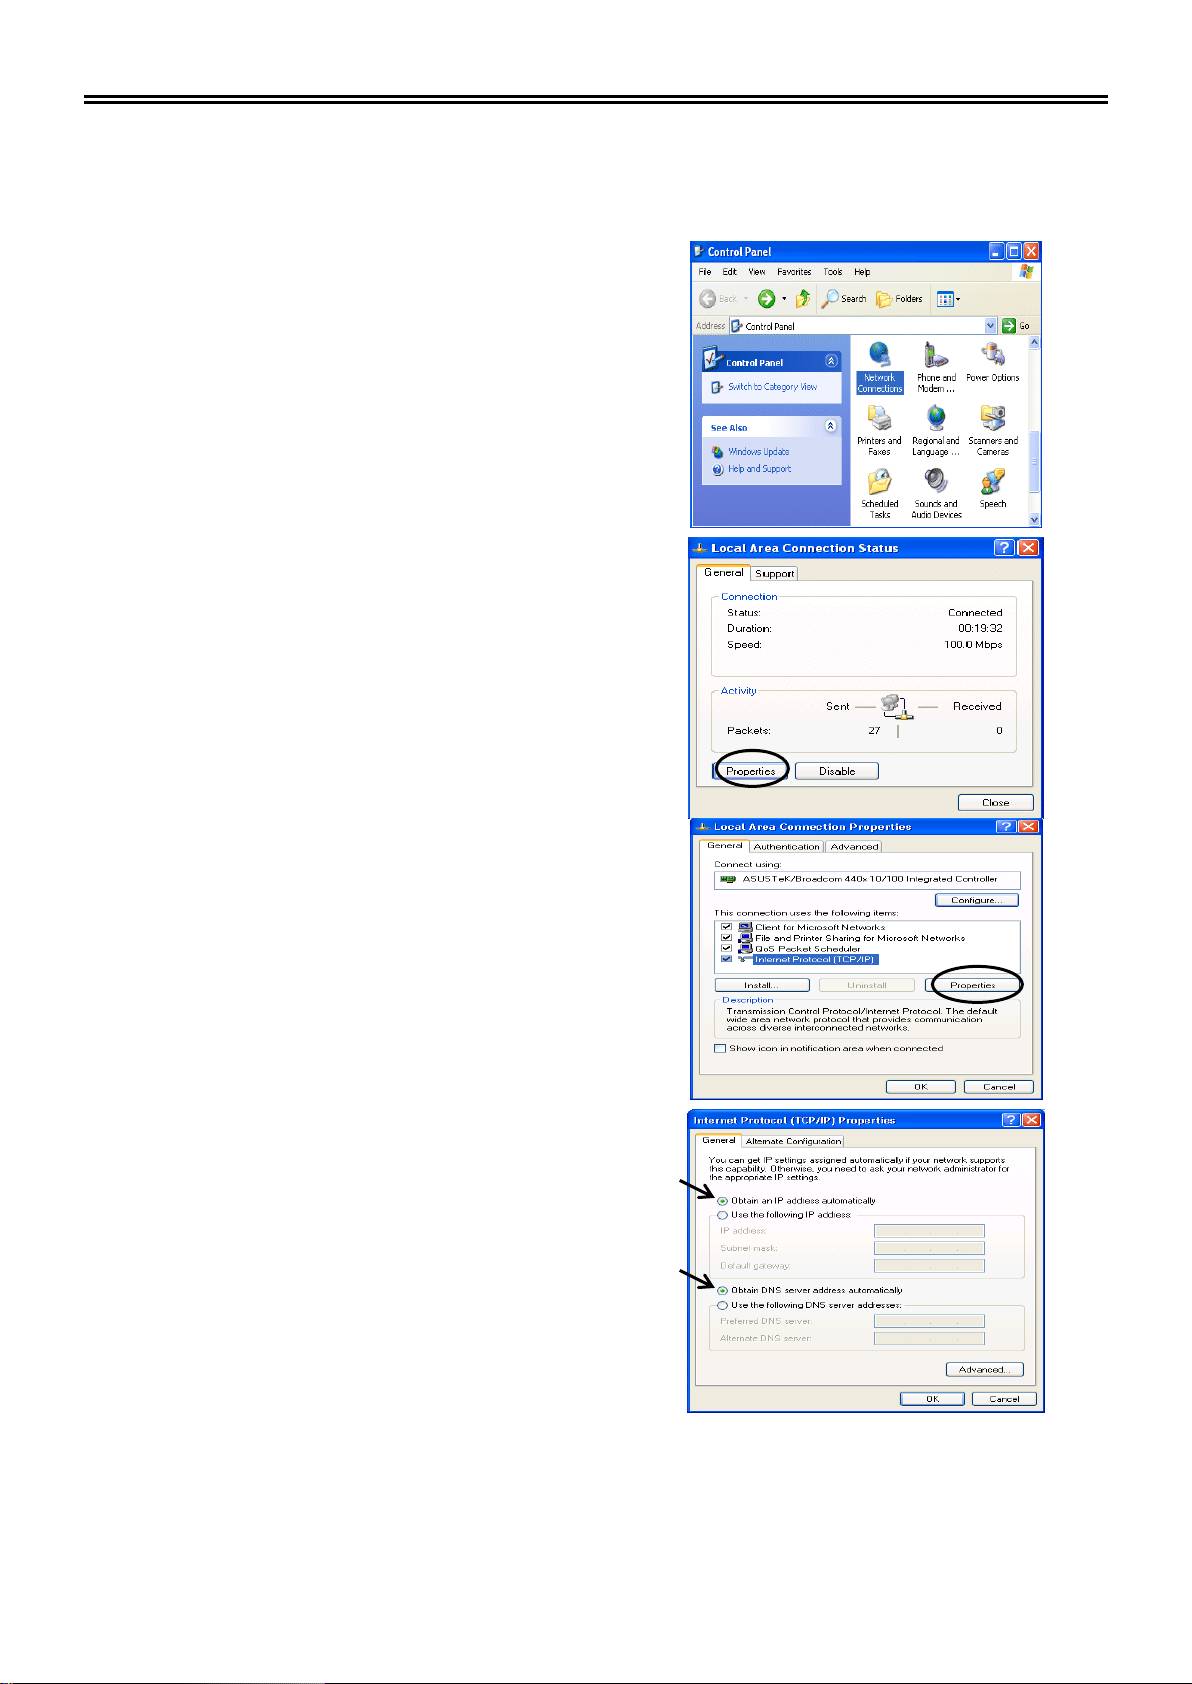
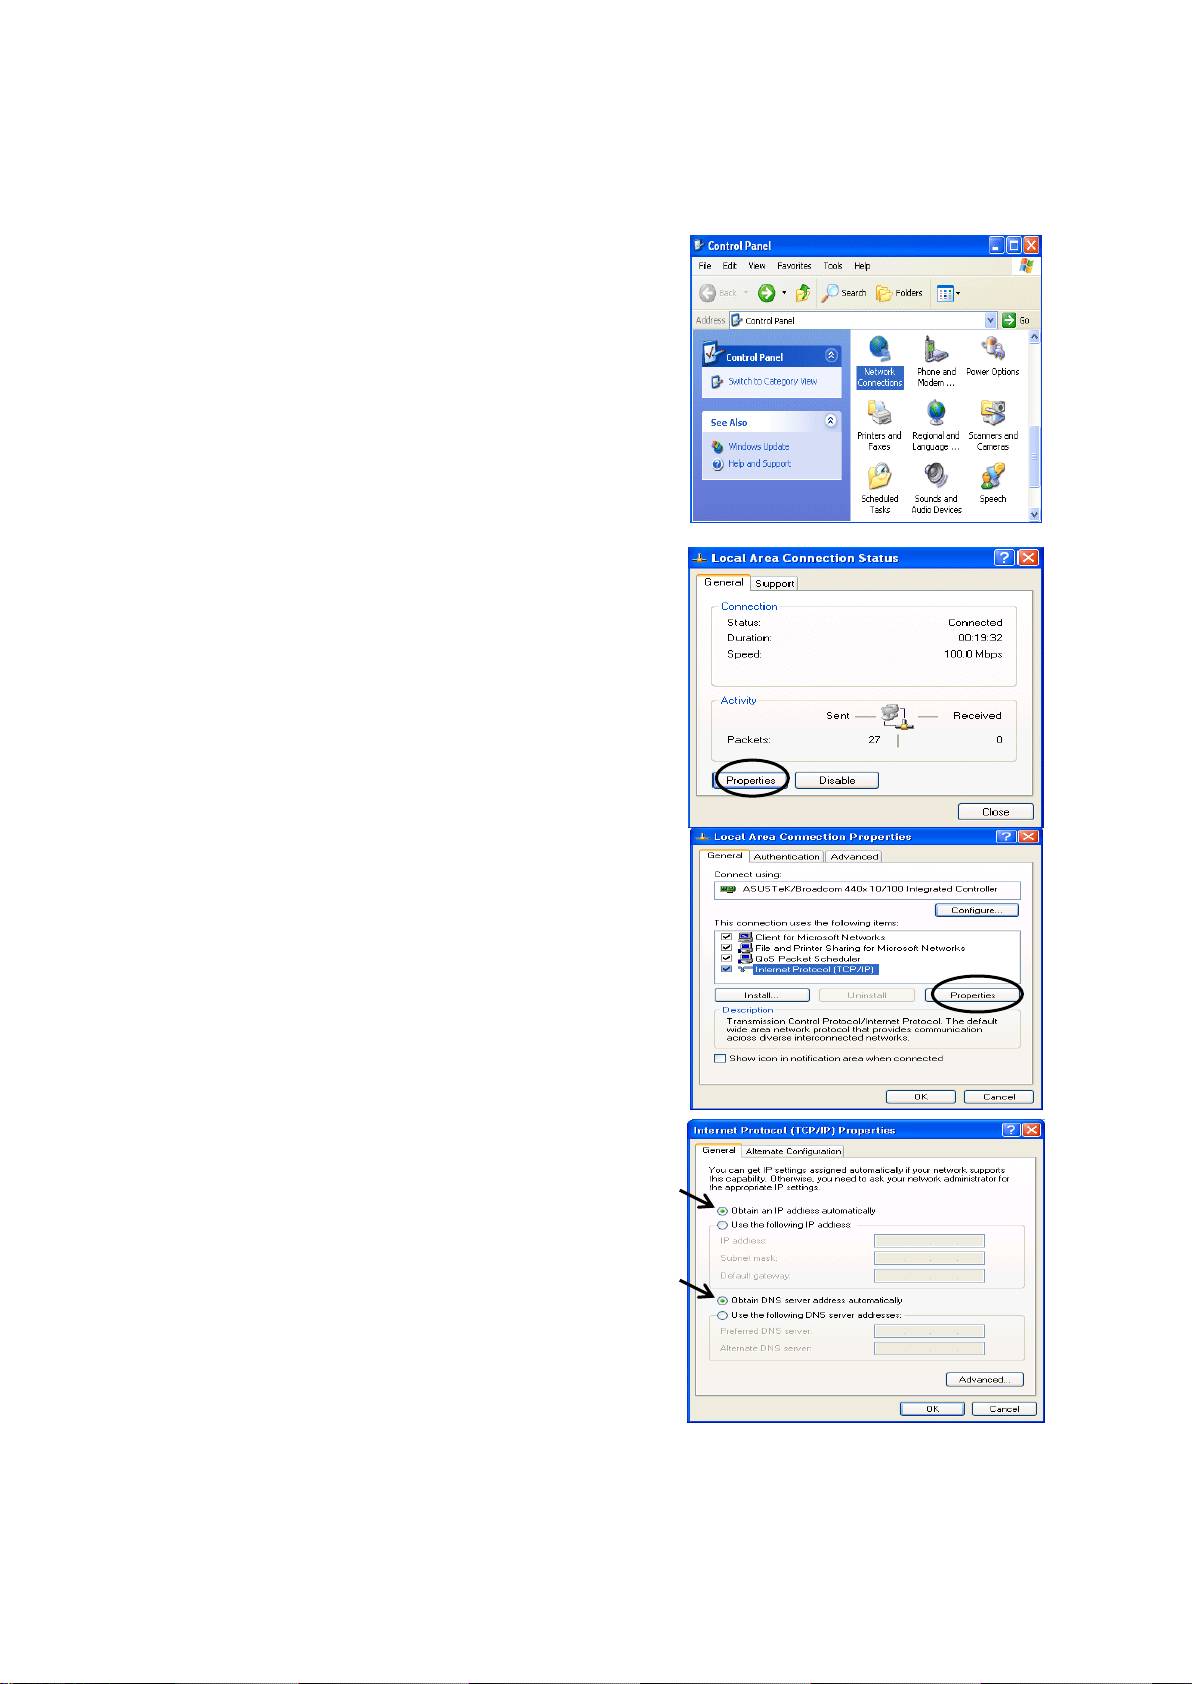
Configuring the Network Properties
Configuring PC in Windows XP
1. Go to Start / Control Panel (in Classic
View). In the Control Panel, double-click on
Network Connections
2. Double-click Local Area Connection.
3. In the Local Area Connection Status
window, click Properties.
4. Select Internet Protocol (TCP/IP) and click
Properties.
5. Select the Obtain an IP address
automatically and the Obtain DNS server
address automatically radio buttons.
6. Click OK to finish the configuration.
6
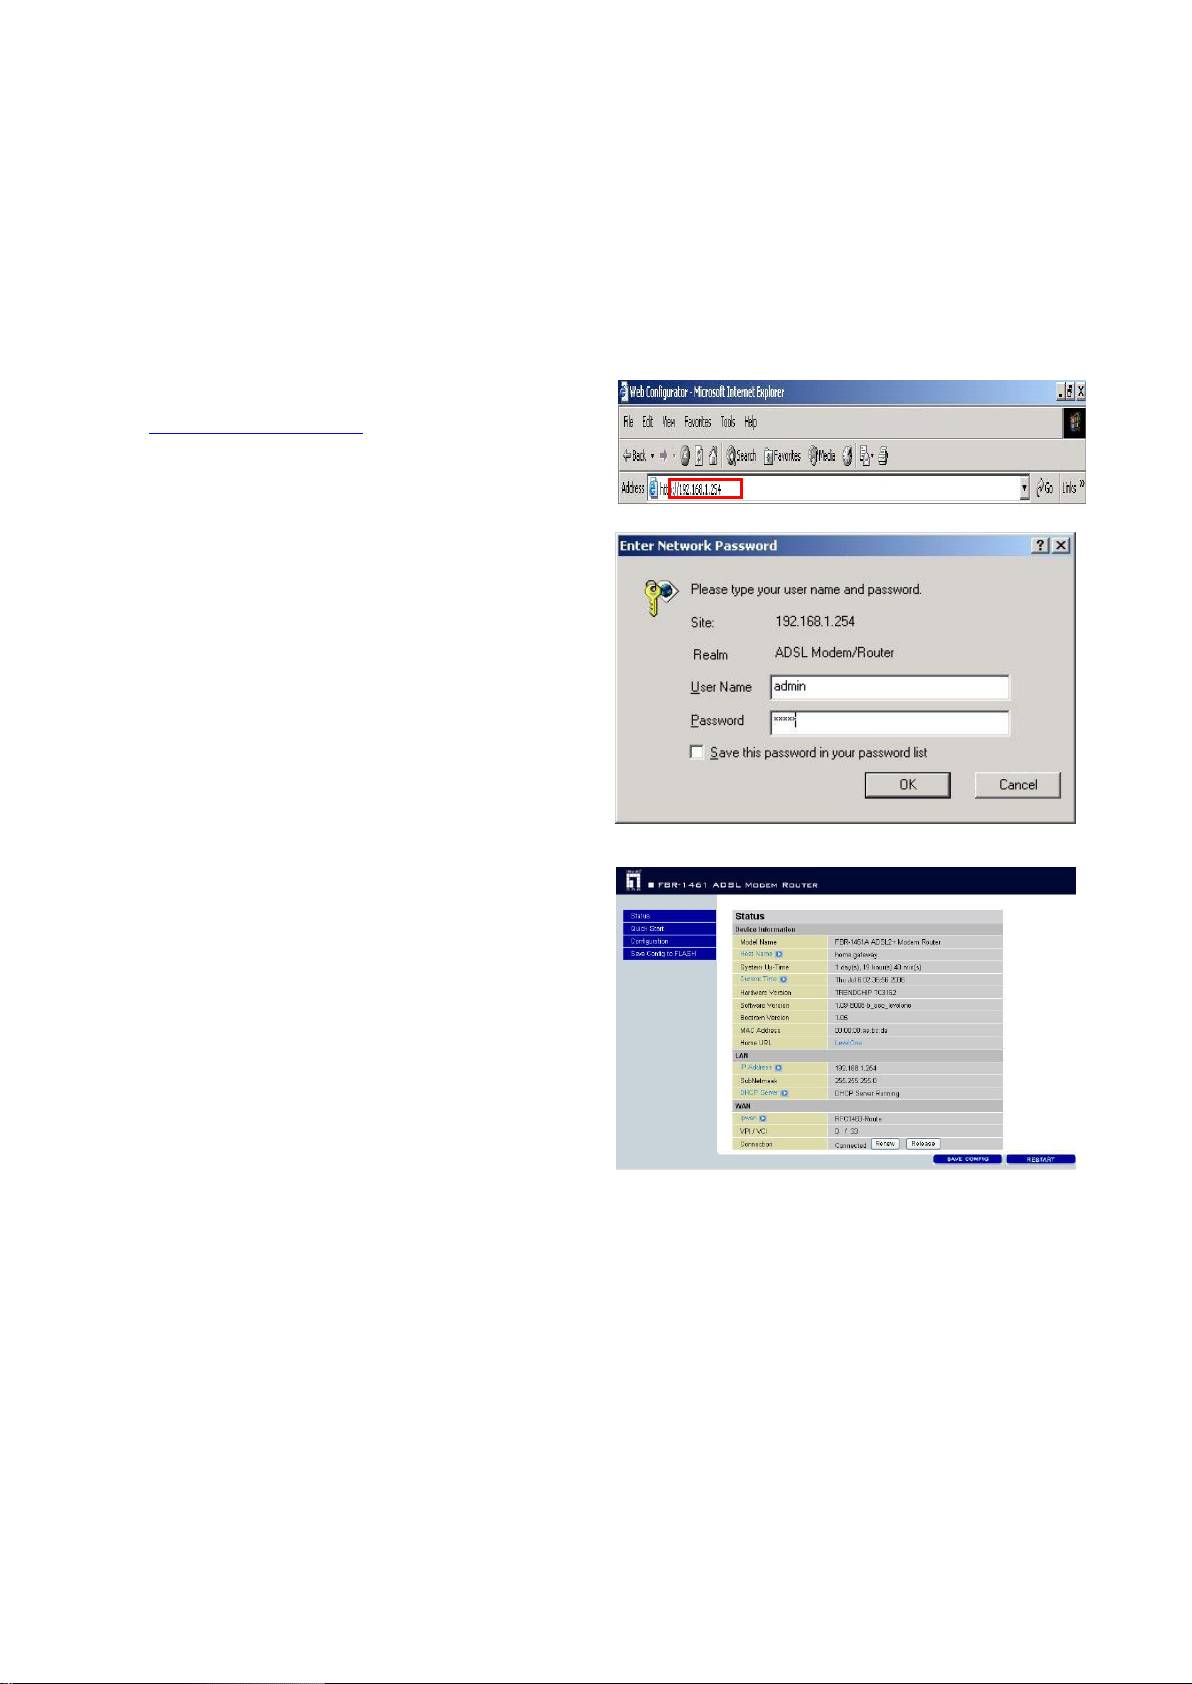
Configuring Your ADSL2+ Modem/Router
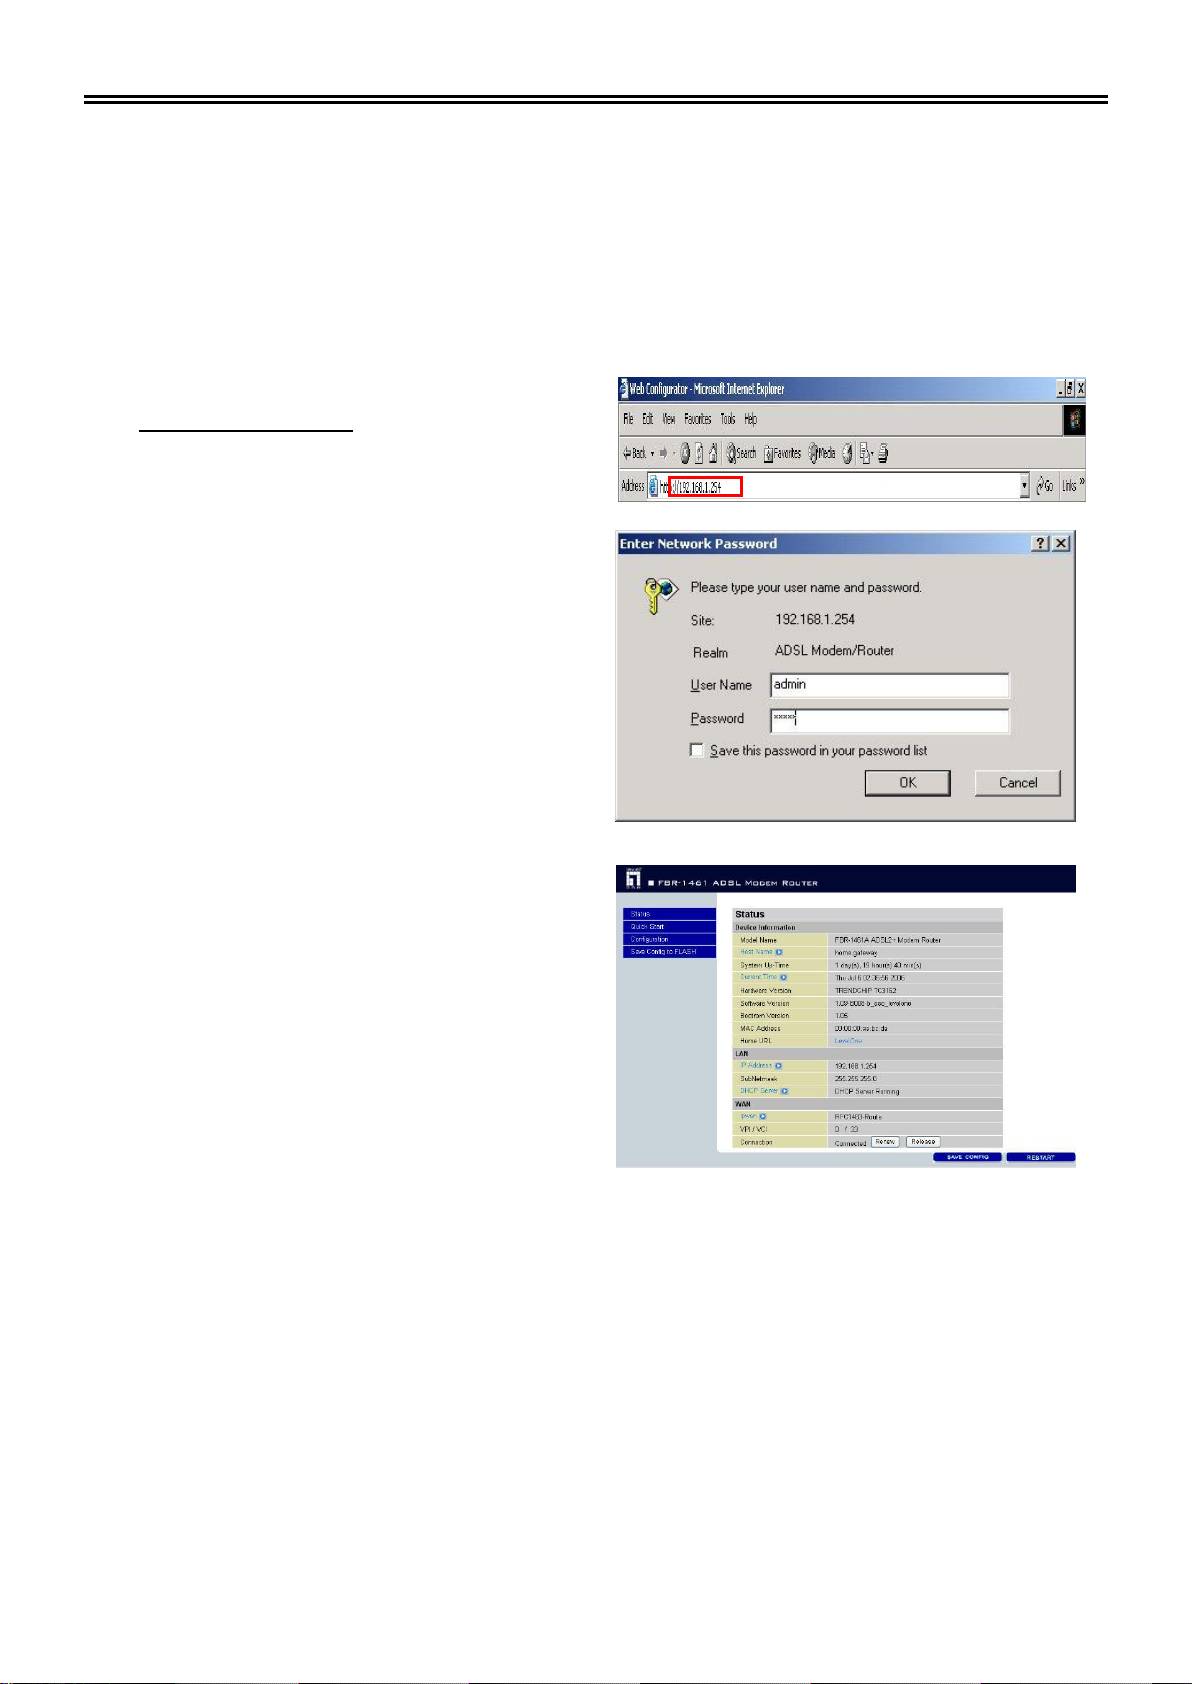
Note
To configure this device, you must have IE 5.0 / Netscape 4.5 or above
installed
1. Open the web browser and type
http://192.168.1.254
address box. This number is the default IP
address for this router. Press Enter.
2. A username and password window will
appear. The default username and
password are admin and admin. Press
OK to proceed.
3. You will get a status report on web page.
FBR-1461 Quick Installation Guide
7
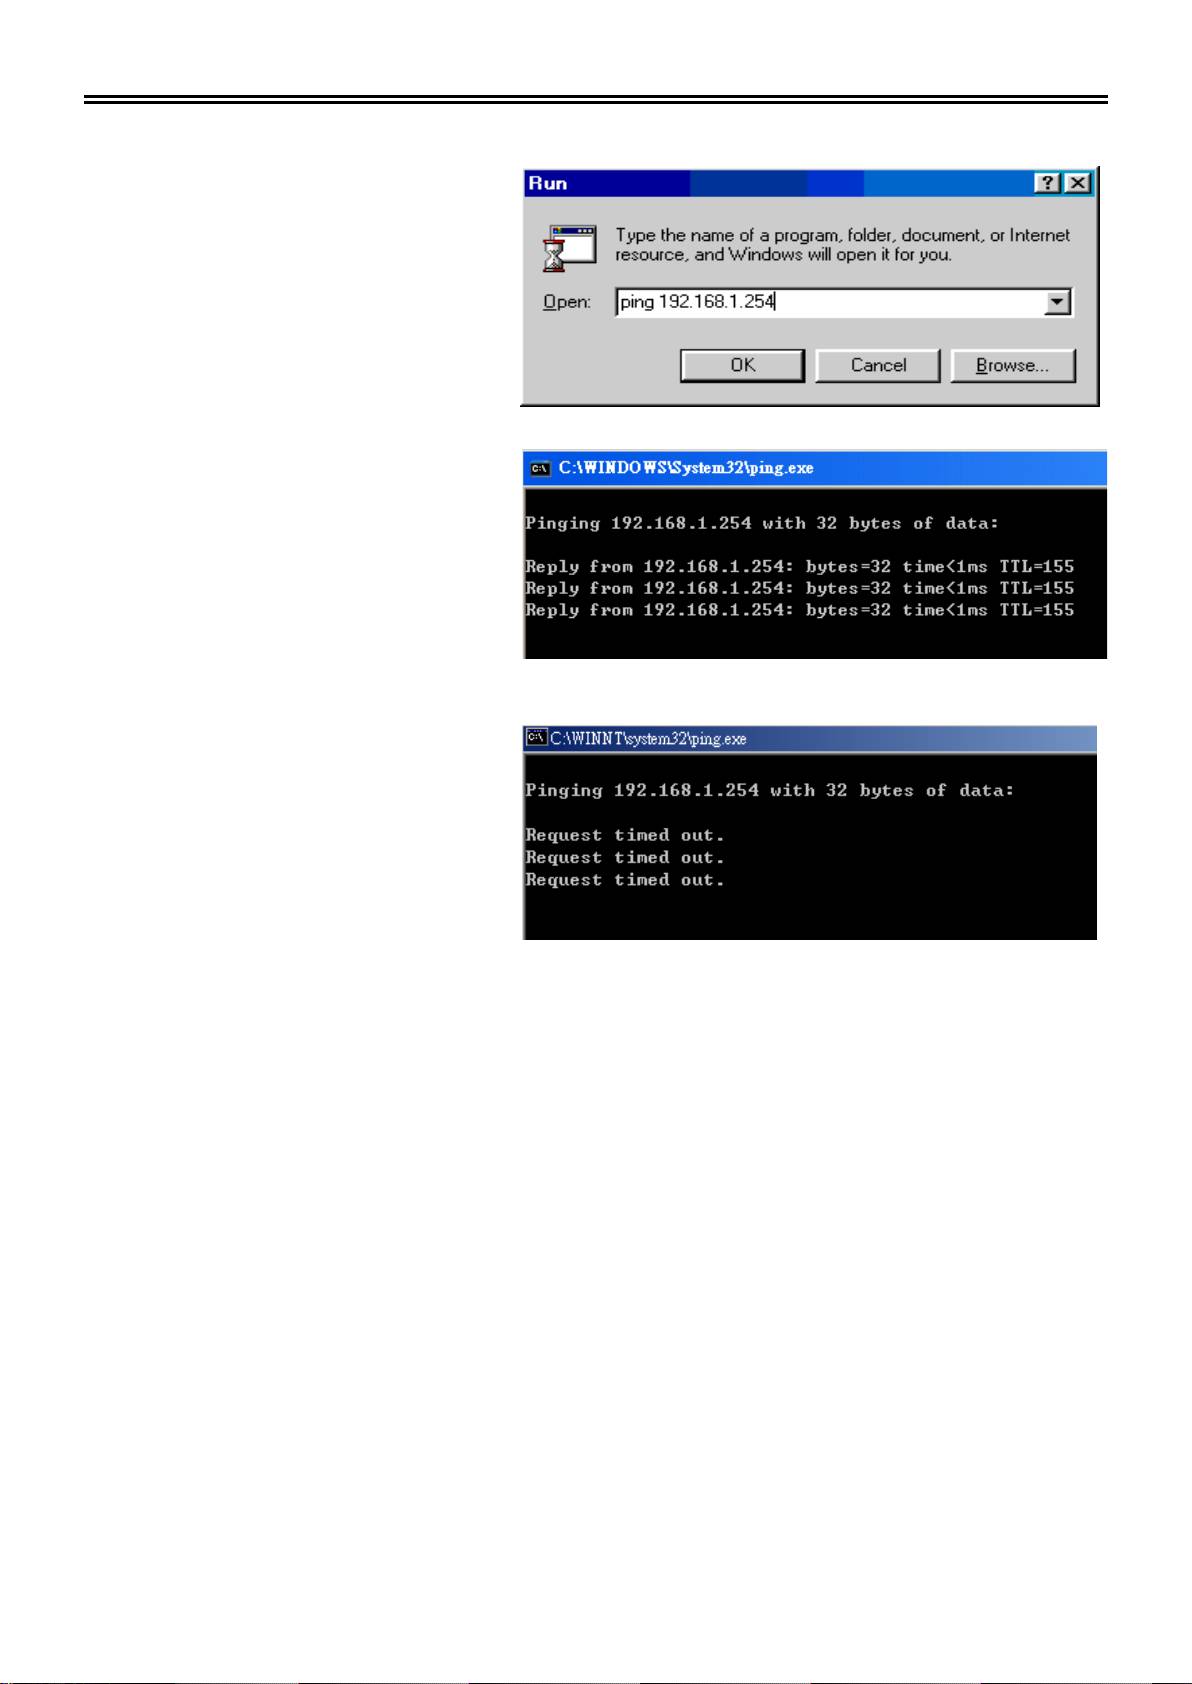
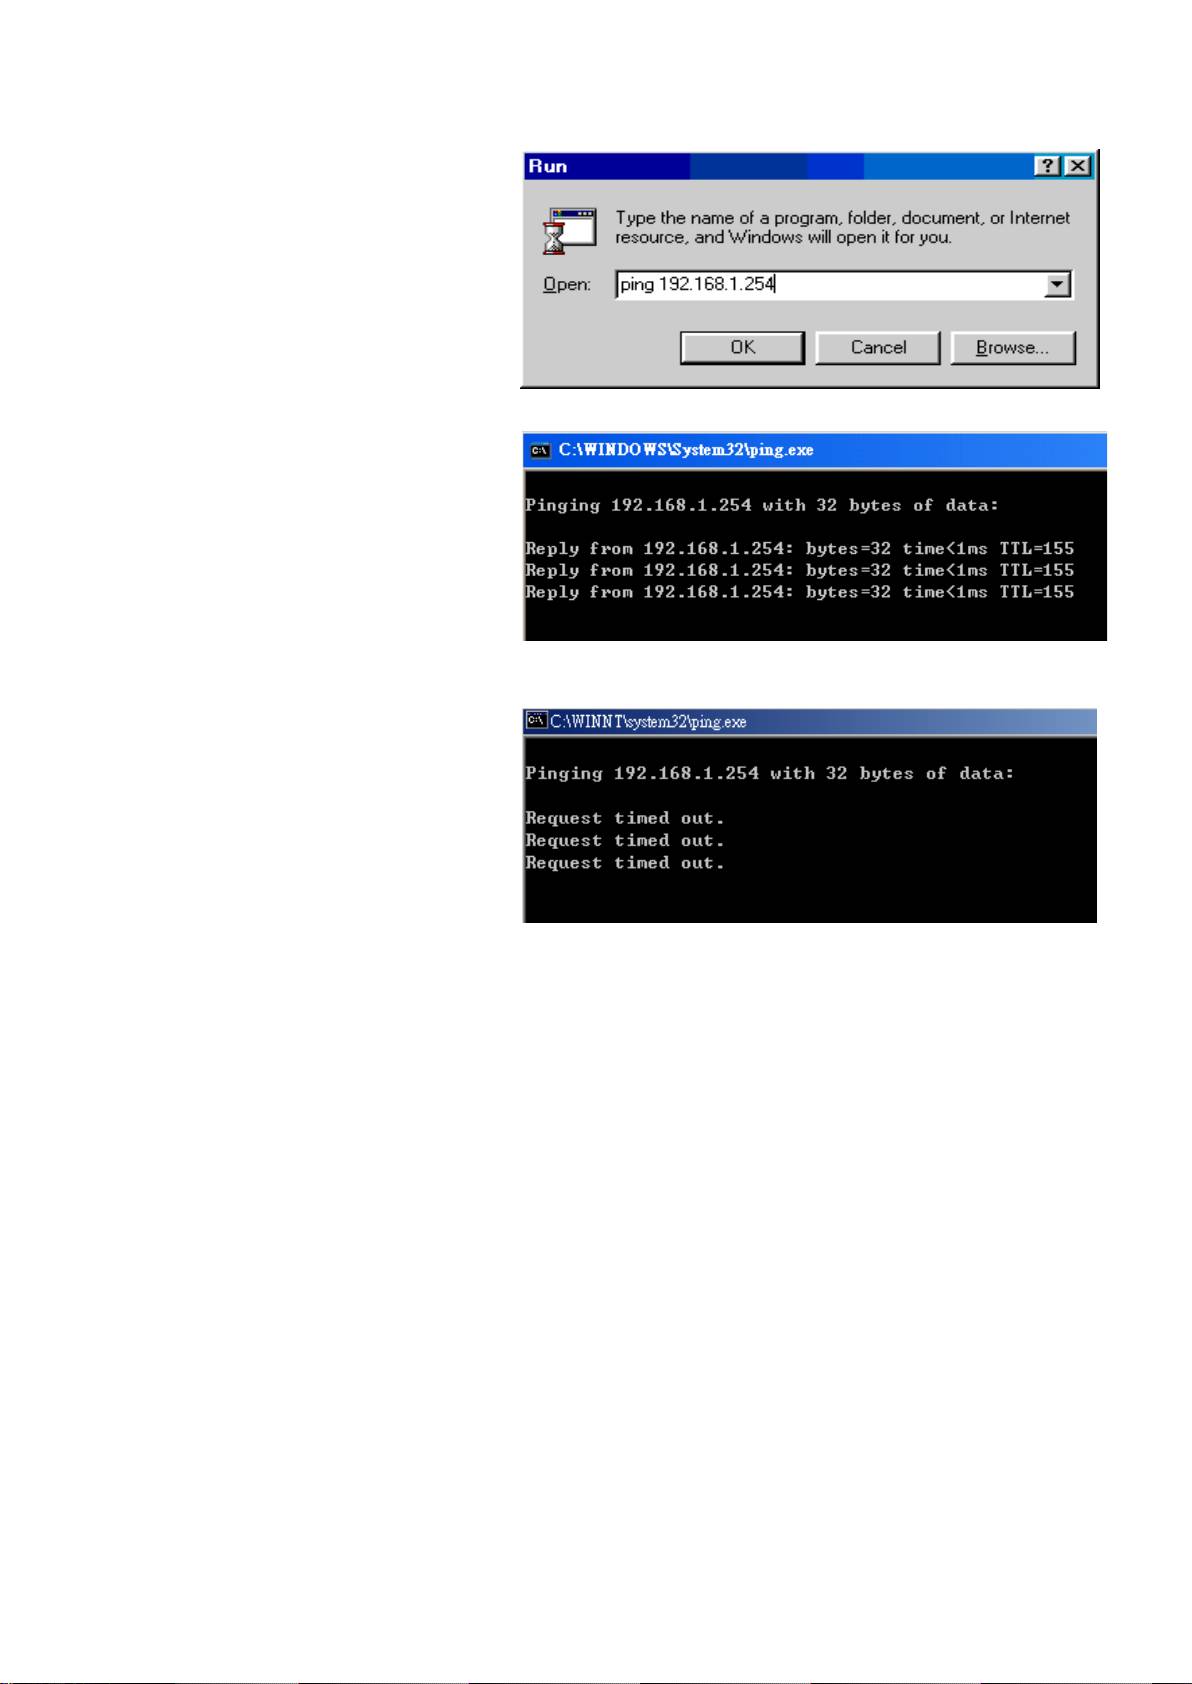
Verifying Your Local Network Connection with the Device
To see if this ADSL Router is
visible on the local network, go
to Start / Run. In the Run dialog
box, type
then press OK.
A command prompt window will
pop out. If your ping is
successful which means your
local network is able to reach to
the device, then the command
prompt window will close up
automatically.
Connection fails, when you see
in the
command prompt window. You
may need to check your set up.

8
DE
Lieferumfang
FBR-1461 ADSL2+ Modem/Router
Kurz-Installationsanleitung
CD-ROM mit Anleitung und Treiber
Netzteil (12 VDC, 1 A)
RJ-11-Kabel (ADSL/Telefon)
Ethernet-Kabel, Cat. 5
Hinweis
Detailliertere Hinweise zur Konfiguration und zum Einsatz des
ADSL2+-Modems/Routers finden Sie in der Bedienungsanleitung.
Warnung
Verwenden Sie das Gerät nicht an feuchten oder heißen Orten.
Schließen Sie das Gerät an eine eigene Stromquelle an.
Ö ffnen Sie nicht das Gehäuse, versuchen Sie nicht, das Gerät selbst zu
reparieren. Falls sich das Gerät überhitzen sollte, schalten Sie sofort den
Strom ab und lassen das Gerät in einem qualifizierten Servicecenter
reparieren.
Setzen Sie das Produkt und sämtliche Zubehörteile nicht im Freien ein.
Achtung
Stellen Sie das Produkt auf einem stabilen Untergrund auf.
Verwenden Sie ausschließlich das mitgelieferte Netzteil. Bei Verwendung
eines Netzteils mit abweichenden Ausgangswerten kann der Router
beschädigt werden.
FBR-1461 Quick Installation Guide
9
So schließen Sie Ihr ADSL2+-Modem/Router an
Ü ber den Ethernet-Port
1. Schließen Sie den Router an ein LAN (lokales Netzwerk) und das ADSL-/Telefonnetzwerk
(Leitung) an und schalten Sie das Gerät ein.
2. Achten Sie darauf, dass die LEDs PWR und SYS dauerhaft leuchten und die LAN-LED
ebenfalls leuchtet.
Telefondose
Telefon
Switch/Hub
Netzteil
10
Netzwerkeinstellungen konfigurieren
PC unter Windows XP konfigurieren
1. Rufen Sie (in der klassischen Ansicht)
Start / Control Panel (Start / Einstellungen
/ Systemsteuerung) auf. In der
Systemsteuerung doppelklicken Sie auf
Network Connections
(Netzwerkverbindungen).
2. Doppelklicken Sie auf Local Area
Connection (LAN oder
Hochgeschwindigkeitsinternet).
3. Im Fenster Local Area Connection Status
(Status von LAN-Verbindung) klicken Sie
auf Properties (Eigenschaften).
4. Wählen Sie Internet Protocol
(Internetprotokoll) (TCP/IP) aus und klicken
Sie auf Properties (Eigenschaften).
5. Wählen Sie Obtain an IP address
automaticall (IP-Adresse automatisch
beziehen) und Obtain DNS server address
automatically (DNS-Serveradresse
automatisch beziehen).
6. Klicken Sie zum Abschluss der Konfiguration
auf OK.
FBR-1461 Quick Installation Guide
11
So konfigurieren Sie Ihr ADSL2+-Modem/Router
Hinweis
Zur Konfiguration des Gerätes muss Internet Explorer 5.0/Netscape 4.5 oder
eine jeweils aktuellere Version installiert sein.
1. Ö ffnen Sie den Webbrowser und geben Sie
http://192.168.1.254 in das Adresse-Feld
des Browsers ein. Diese Adresse ist die
Standard-IP-Adresse des Routers.
Drücken Sie Enter.
2. Ein Fenster zur Eingabe von
Benutzername und Kennwort wird
eingeblendet. Standard-Benutzername
und Standard-Kennwort lauten
Klicken Sie zum
Fortfahren auf OK.
3. Ein Statusbericht wird in Form einer
Webseite angezeigt.
12
Lokale Netzwerkverbindung mit dem Gerät ü berprü fen
Um zu überprüfen, ob Ihr
ADSL-Router im Netzwerk
angesprochen werden kann,
klicken Sie auf Start / Run
(Start/Ausführen). Im
Ausführen-Dialogfenster geben
Sie ping 192.168.1.254 ein und
klicken dann auf OK.
Ein Befehlsfenster
-Fenste
Sofern der Ping erfolgreich war,
kann das Gerät im lokalen
Netzwerk erreicht werden. Das
Befehlsfenster schließt sich nach
kurzer Zeit von selbst.
Bei einem Verbindungsfehler
wird Request timed out
(Zeitüberschreitung der
Anforderung) angezeigt. In
diesem Falle sollten Sie Ihre
Einstellungen noch einmal
überprüfen.
