Aiptek PocketCinema V150W: Projecting from External Video Input Source
Projecting from External Video Input Source : Aiptek PocketCinema V150W
User’s Manual
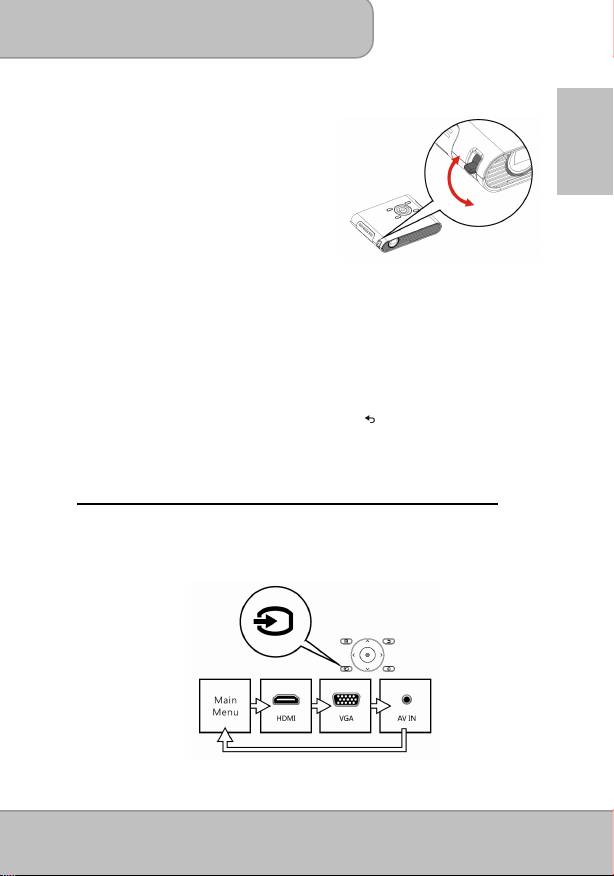
Adjusting the Focus according to distance
Place the projector on a flat surface and
toward a wall or a projection screen. The
EN
projectional distance and projectional size
are:
Distance: 50 cm ~ 425 cm (20 ” ~ 167 ”)
Image size: 36 cm ~ 305 cm (14 ” ~ 120 ”)
Adjust the focus by turning the Focus Lever
upward or downward to get a sharp and clear picture.
Note: Use a tripod (not included) to increase the height of the projectional image
when necessary. The tripod socket is located under the projector.
Select the Language
Use the navigation keys to select ‘Setting’ and press ◎ (OK) to enter the
submenu. Select ‘Language’ and press ◎ (OK) to enter the language list. Select your
preferred language and confirm with ◎ (OK). Press (Exit) to return to Main Menu.
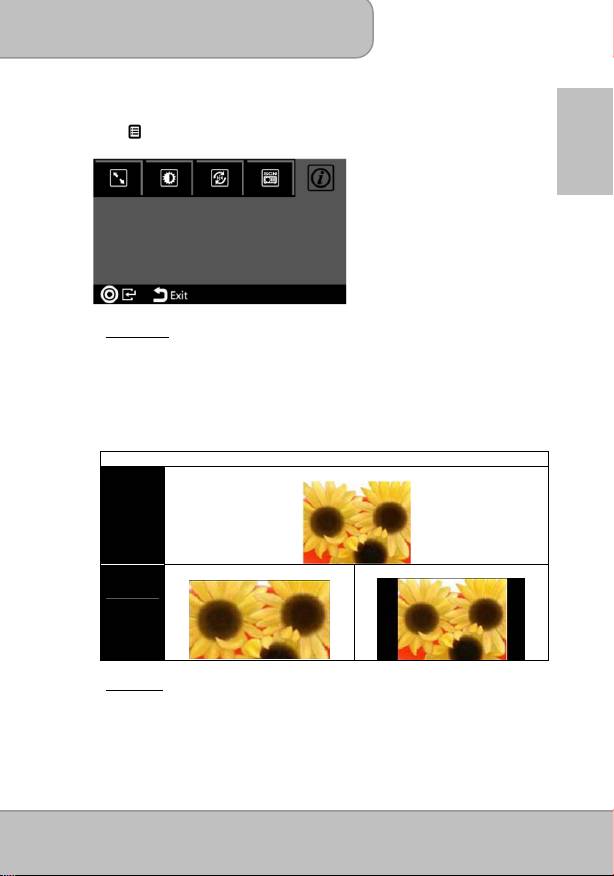
Projecting from External Video Input Source
The projector has built-in multiple interface on the rear side. You can connect your
external video Input source to the projector by using the appropriate cable and press the
Source key on the control panel of the projector to select the input source.
Page 9

User’s Manual
HDMI
Use the HDMI cable to connect the HDMI port
EN
on the rear panel of the projector to the
external HDMI signal source. After connected,
the screen switches to HDMI source
automatically.
VGA
Use a VGA cable to connect the VGA port on
the rear panel of the projector to the external
VGA signal source. After connected, press
the Source button on the remote control or
control panel to select VGA source.
Note: VGA cable is not included in standard
package.
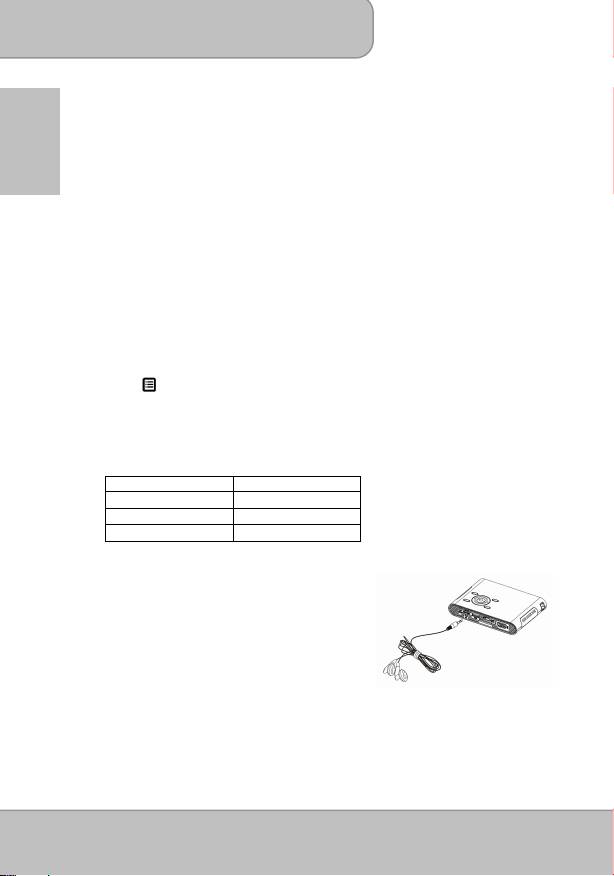
AV IN
Follow the figure below to connect the external AV output device to the AV jack.
Connection is color-coded. After connection, press the Source button on the remote
control or control panel to select the AV-IN source.
Page 10
User’s Manual
Changing Playback Setting for External Video Source
Press /Menu on control panel or remote control to enter the playback setting.
EN
1. Aspect ratio
When the video file is in 4:3 aspect ratio, this function allows you to adjust how the
image should appear on the 16: 9 screen.
Press
◎
/
OK to display the options.
1) Pan & Scan: the image is scaled up to fit to 16:9 screen.
2) Letterbox: the image is displayed by original aspect ratio.
Illustration for the Aspect ratio setting:
4:3 Aspect Ratio
Source
Screen
Pan & Scan (16:9)
Letterbox (16:9)
Projection
Screen
2. Brightness
It allows you to change the brightness according to the environment and the power
consumption.
1) Enhanced: Select this mode when external power supply is available to
maximize the performance.
2) Normal: The default mode for optimizing the projection performance and
battery capacity.
Page 11
User’s Manual
3) Eco: This mode is recommended when the projector is operated under battery
mode to save power.
Note: The projector is automatically switched to Enhanced mode when It’s
EN
powered by the power adapter.
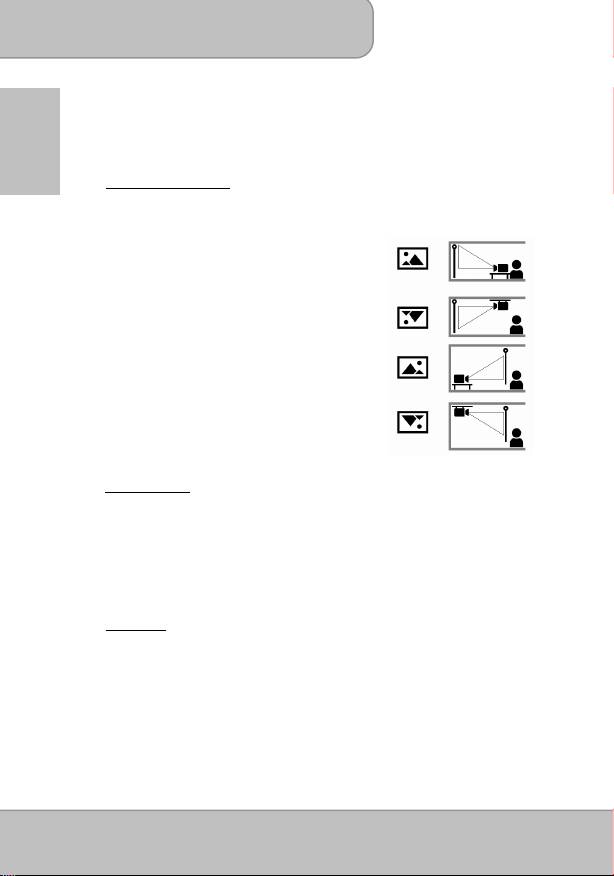
3. Projection (Lens) mode
It allows you to select the projection mode, depending upon how the projector is
mounted.
Front: This is the most common way to
position the projector for quick setup
and portability.
Front Ceiling: The projector turns the image upside
down for ceiling-mounted projection.
Rear: The projector reverses the image so
that it can project from behind a
translucent screen.
Rear Ceiling: The projector reverses and turns the
image upside down. It can project
from behind a translucent screen in
the ceiling-mounted position.
4. Scene selection
It allows you to select the ideal mode for watching movie, photo slideshow, or
reading the text with balanced brightness, color, and contrast.
Cinema: ideal for watching movie
Normal: ideal for photo slideshow
Text: ideal for image with text
5. Information
Shows firmware version: Txxxx / Axxxx
Page 12
User’s Manual
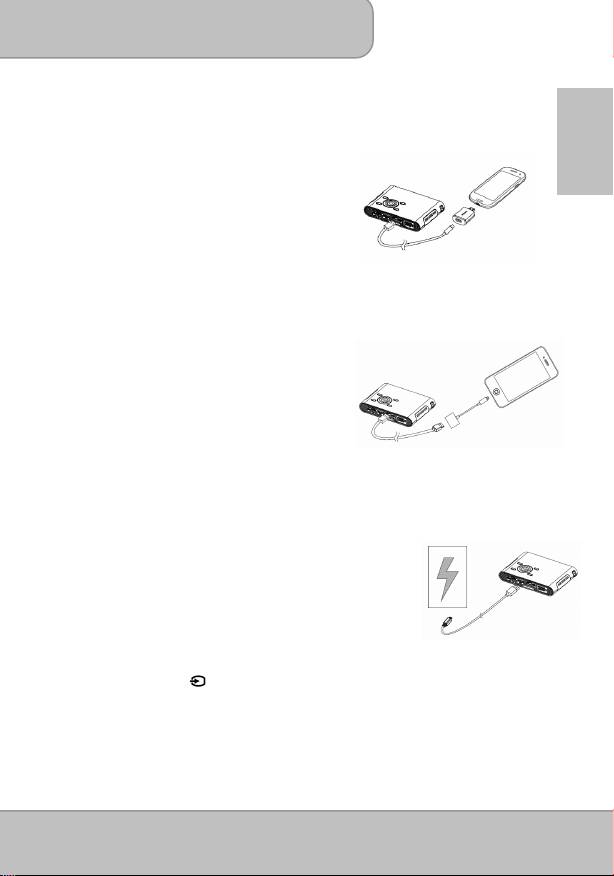
Projecting from Smartphones or Tablets
1. Connect smartphones supported
MHL (Mobile High-Definition Link)
for
projection.
EN
Connect
Samsung Galaxy S2, Note; new
HTC one, one X+, one X, one S; or Sony
Xperia Z
with the projector via MHL (A to
USB D type HDMI) cable.
Connect
Samsung Galaxy S4, Note II
with
the projector via MHL (A to USB D type
HDMI) cable and Samsung 5 to 11 pin MHL
converter (as illustration shows) for projection.
Note: It’s normal that the projector is automatically charging the smartphones or
tablets when connected with the MHL cable for projection.
2. Connect
iPhone 5
for Mirror projection
(with Lightning connector)
Connect iPhone 5, iPad 4th, iPad mini and
iPod touch 5th with the projector via Apple
Lightning Digital AV adapter and A-to-A
type HDMI cable.
th
iPhone 4S, 4, New iPad, iPad 2, and iPod touch (4
) can connect with projector
with Apple 30-pin digital AV adapter and A-to-A type HDMI cable
Charging the External Mobile Device
The internal battery of the projector cannot only be used for
projection, but also charge your mobile device.
1. Connect your mobile device to the projector via the USB
cable with the end of Type A connector plugged into the
USB port on the rear side of projector.
2. When the projector is powered on, the device will be
charged automatically.
3. When the projector is powered off, please press the
Source button ( ) to start or stop charging.
Note: The projector provides 5V/500mA output power for charging the mobile
devices.
Page 13

User’s Manual
Projecting from Memory
Projecting from Internal Memory
EN
The projector has 2 GB internal memory and 1.2 GB is free for file storage. Please
download media files from your PC or Notebook to the internal memory for projection:
1. Turn on the PC and the projector.
2. Connect the micro-USB port of the
projector to the PC or Notebook via USB
cable. Once the connection is established,
the screen and ventilation fan will
automatically turns off to save the power.
Now the projector is in mass storage
mode.
3. You can copy the pictures, videos, music,
Windows Office (PowerPoint, Word, and Excel), and PDF files from your PC to the
internal memory or delete the files on the internal memory.
Note: 1. The remote controller is not applicable when the projector is connected
to PC or notebook.
2. Please refer the supported file format in ‘Functions and Operations’
(P.15)
Projecting from External Memory
1.
External SD/SDHC/SDXC card slot
The memory card slot is built in to reading SD, SDHC,
and SDXC card up to 128 GB. Gently insert the card
by following the direction shown below until it reaches
the bottom of the slot. To remove the memory card,
gently push the top edge of the card and pull it out.
2. USB Device
The projector can project the content from USB device
such as USB memory stick or Hard Disk Drive (with its
own power supply).
Note: External memory source will be the default memory displayed on the playlist.
When both SD/SDHC card and USB memory stick are in use, USB memory
stick will be the default memory displayed on the playlist.
Selecting the memory source
Use the navigation keys
to select
‘Setting’
and press
◎
(OK) to enter the
submenu. Select ‘Memory’ and press
◎
(OK) to enter the memory options. Select
your preferred memory source and confirm with
◎
(OK). Press (Exit) to return to
Main Menu.
Page 14
User’s Manual
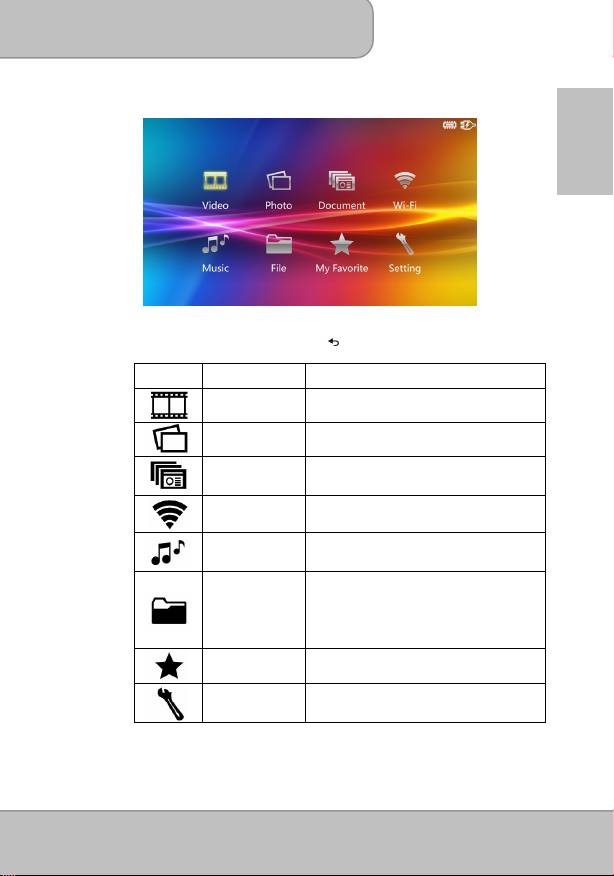
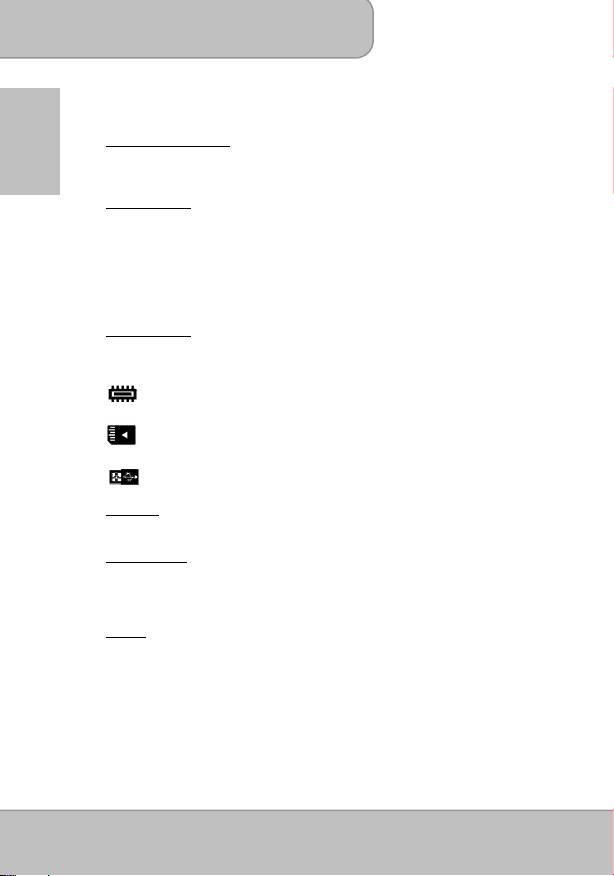
Main Menu
EN
Press the navigation key to highlight the desired item and press
◎/OK to enter the submenu; press /Exit to return to Main Menu.
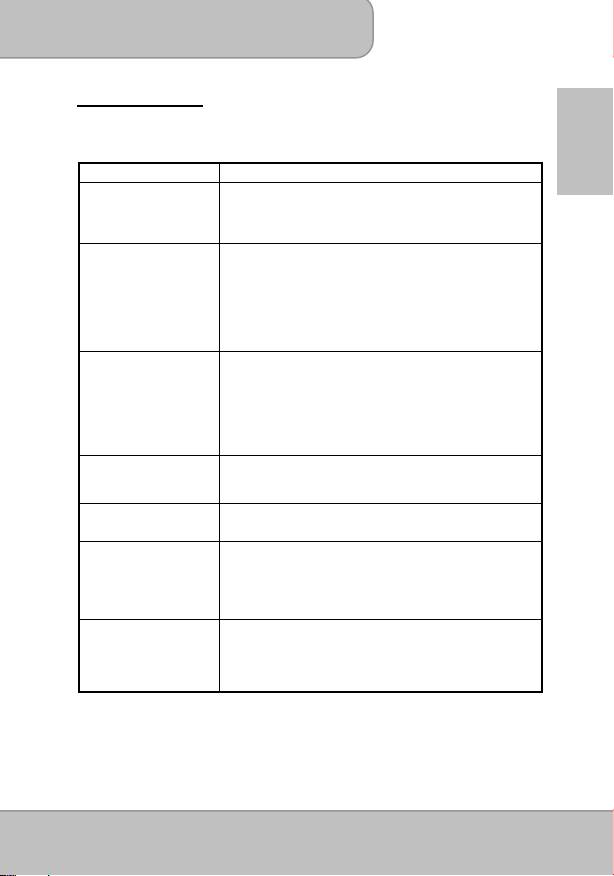
Icon Function Description
This function allows users to select video file
Video
for projection.
This function allows users to select JPEG,
Photo
JPG or BMP image file for projection.
This function allows users to select Office
Document
PowerPoint, Word, Excel, and PDF files for
projection
Wi-Fi
Enable wireless function for the projector
This function allows users to select MP3,
Music
WAV, and OGG files to playback on the
projector.
This function allows users to navigate all
folders and files regardless their file format in
the selected memory source. Photo and
File
Video can be previewed while navigating the
list. You can copy selected file to another
memory source or delete it.
My Favorite
View all files that are marked as favorites.
This function allows users to setup
Setting
preference settings including Brightness,
Scene selection, Language, and Memory.
Page 15
User’s Manual
Projecting Videos
Select and project video files.
1. Select and press OK to enter ‘
Video
’ on the main menu.
EN
2. In the file list, use
to select the folder and press
◎
/
OK to open the selected
folder. Use
to navigate the playlist. Press
◎
/
OK to start playing and
projecting the selected video.
3. During playback, press
to play the previous / next video.
4. Press
longer to fast rewind /fast forward.
5. Press
◎
/OK to pause and press it again to resume.
6. To adjust the video volume, press
to adjust the value.
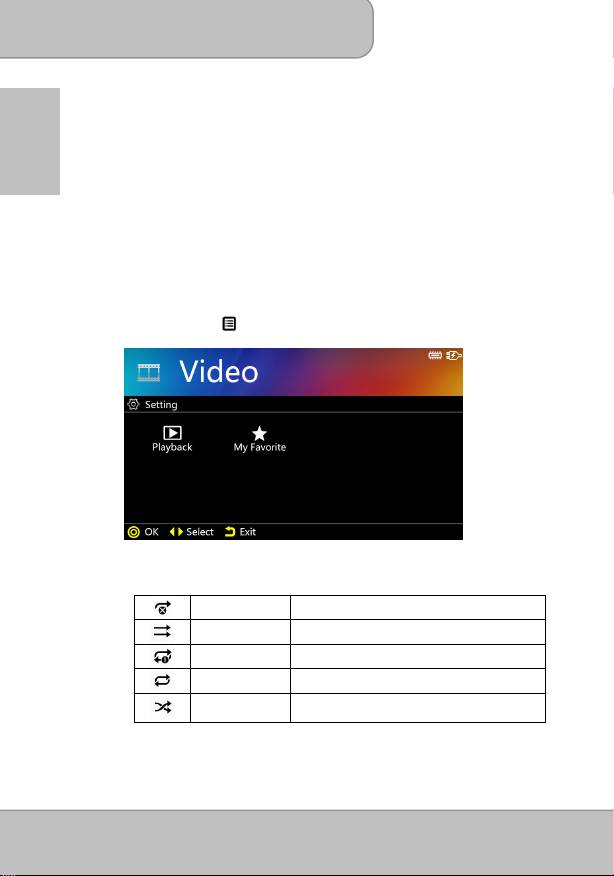
Changing Video Playback Setting:
Under the file list, press /Menu to enter the video setting.
1) Playback: Select the playback mode (as Table A) for video clips.
<Table A>
Repeat Off Play current video or track once
Normal Play current folder
Repeat One Play current video or track repeatedly
Repeat All Play current folder repeatedly
Play current folder repeatedly in random
Random
order
Page 16

User’s Manual
2) My Favorite: The file will be marked ★ icon and be grouped into “My Favorite”
folder for easy access (like a bookmark). (Please refer to page 21, “My
Favorite” section introduction.)
EN
You may also select a file in the file list and press ◎/OK for 2
seconds to mark the file. If want to unmark the selected file, just press
the ◎ “OK” for 2 seconds again to remove the mark.
Note: The projector supports the following video formats:
File Extension Video Decoder Audio Decoder
*.avi MJPEG
AAC (AAC-LC and HE-AAC)
Xvid
PCM
H.264/AVC
ADPCM
MPEG4
*.mov
MPEG4
AAC
*.mp4
H.264
PCM
ADPCM
*.mpg MPEG1 LPCM
Projecting Photos
Select and project still images.
1. Select ‘
Photo
’ and press
◎
/
OK
to enter Photo mode on the main menu.
2. Use
to select the folder and press
◎
/
OK
to open the selected folder. Use
to navigate the thumbnail of photos.
3. Press
◎
/OK
to project the selected photo in full screen.
4. Press the Left/Right (
) key to move to previous/next picture.
5. Zoom or Pan the picture:
Press the Up
key to enter Zoom mode. Use Up/Down (
) keys to Zoom in
/ Zoom out.
In Zoom mode, press
◎
/OK to switch to pan function.
Page 17
User’s Manual
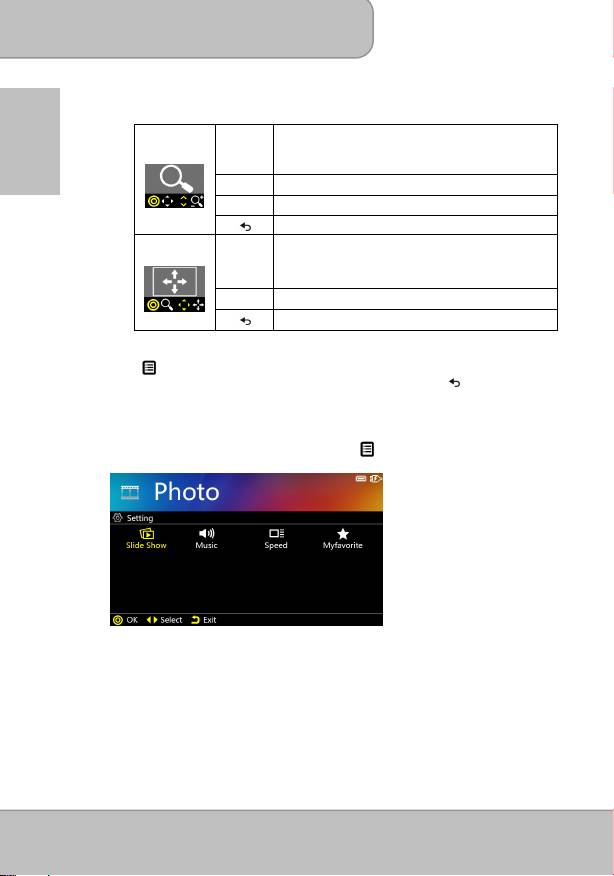
Please see the detail operation as following <Table B>.
<Table B>
Zoom in / Zoom out
EN
(Photo: The Magnification levels are 1x ~ 4x.
Zoom
Document: The Magnification levels are 1x ~ 8x.)
Previous / Next picture (page)
◎
/OK
Enter to Pan mode
Return to full screen
Pan
and
Pan up, down, left, right
◎
/OK
Return to Zoom mode
Return to full screen
6. Rotate the picture :
Press /Menu to enter Rotation function. Use Left/Right (
) key to select the
direction to rotate and press
◎
/OK to confirm. To return, press (Exit) to photo
folders or thumbnails.
Changing Photo Playback Setting:
Under the file list, select a thumbnail and press /Menu to enter Photo Setting.
1) Slideshow: To turn On or turn Off the slideshow.
2) Music: To have or without background music during the slideshow. To play the
music, please save the preferred music under the same folder.
3) Speed: To set up the slideshow interval speed as 5 sec, 10 sec, 30 sec, 1
min,or 10 min.
4) During slideshow, press ◎/OK to stop or resume the slideshow. Use to
navigate previous / next picture.
Page 18
User’s Manual
5) My Favorite: The file will be marked ★ icon and be grouped into “My Favorite”
folder for easy access (like a bookmark). (Please refer to page 21, “My
Favorite” section introduction.)
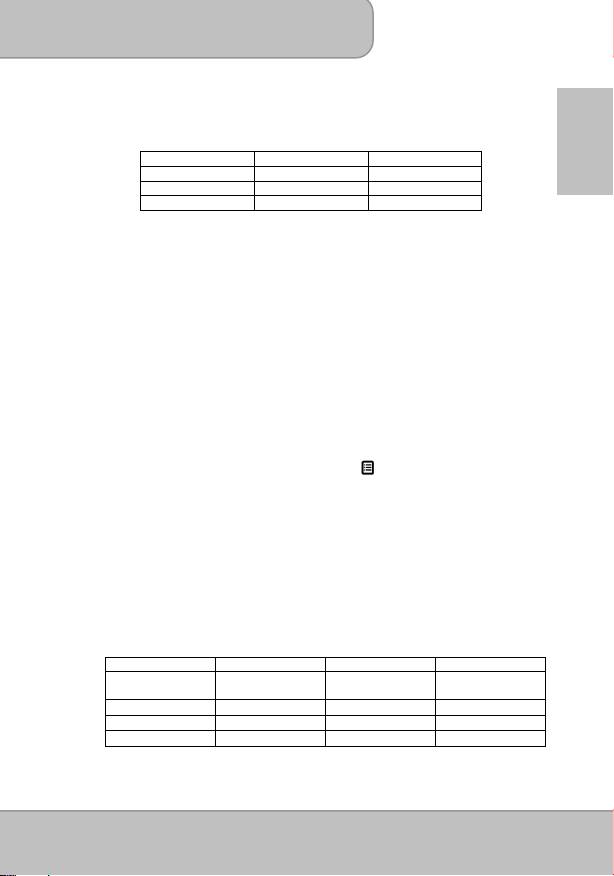
Note: The projector supports the following photo formats:
EN
File Format Max. resolution File Extension
JPEG 8000 x 6000 *.jpeg
JPG 8000 x 6000 *.jpg
BMP 8000 x 6000 *.bmp
Projecting Document
Select and project Windows Office and PDF files.
1. On the Main menu, select ‘
Document
’ and press the
◎
/
OK
button to enter the
Document mode.
2. Navigate the folders and files and press
◎
/
OK to open the selected document.
3. Press the Left/Right (
) button to move to previous/next page.
4. Zoom or Pan the document:
-
Press the Up
key to enter Zoom mode. Use Up/Down (
) keys to Zoom in/
Zoom out.
-
In Zoom mode, press
◎
/OK to switch to pan function.
Changing Document Playback Setting:
Under the file list, select a document and press /Menu to enter Document
Setting.
1) Slideshow: To turn On or turn Off the slideshow.
2) Speed: To set up the slideshow interval speed as 5 sec, 10 sec, 30 sec, 1
min,or 10 min.
3) During slideshow, press ◎/OK to stop or resume the slideshow. Use to
navigate previous / next picture.
4) My Favorite: The file will be marked ★ icon and be grouped into “My Favorite”
folder. (Please refer to page 21, “My Favorite” section introduction.)
Note: 1. The projector supports the following document formats and Limitations:
File Format File Extension Support Version Size Limitation
POWERPOINT *.ppt, *.pptx, PowerPoint 97 ~
Up to 19MB
2010
PDF *.pdf PDF 1.0 ~ 1.4 Up to 75MB
WORD *.doc , *.docx, WORD 97 ~ 2010 Up to 100MB
EXCEL *.xls, *.xlsx Excel 97 ~ 2010 Up to 15MB
Page 19
User’s Manual
2. When opening, magnifying or panning a file, it may take a few seconds to
open the page due to large file size or multiple photos on one page.
3. The projector has limited font support. Opening a document with
EN
unsupported fonts, the document viewer automatically substitutes
unsupported fonts with default fonts. It may cause the layout different.
4. If the document layout is more complicated with photo and multiple
columns, it may be displayed in separate pages.
Playing Music
Select and playback audio files.
1. Before you are able to listen to music, you must first store music files on the
internal memory or external memory devices.
2. Press
to select one song and press
◎
/
OK to start the music playback.
3. To adjust the music volume, press
to adjust the volume.
4. Press
◎
/OK to pause the music. Press it again to resume normal playback.
5. The screen will be automatically turned off after 20 seconds to save power. To turn
on the screen, touch the keypad to activate the projection function.
6. Press (Menu) to enter the music setting.
1) Playback: Select the playback setting as Table A (Page 16).
2) My Favorite: The file will be marked ★ icon and be grouped into “My Favorite”
folder. (Please refer to page 21, “My Favorite” section introduction.)
Note: The projector supports the following music formats:
File Format File Extension
MP3 *.mp3
WAV *.wav
OGG *.ogg
Using Headphones
The projector equips speaker for providing the
best audio performance. Additionally, you can
connect the earphone or external speaker to the
AV jack of the unit. When earphone is connected,
the speaker will be automatically turned off.
File Manager
The File manager is a fast and convenient way to navigate, project, and manage files
in different formats.
1. On the Main Menu, select
‘File’
and press
◎
/OK
to enter File list.
Page 20

User’s Manual
2. Navigate the file list, select a file, and press
◎
/
OK
to start projecting.
3. To manage the files, highlight a file on the list and
press (Menu) key to enter
‘
Copy & Delete
’
EN
function.
Copying file Select and press
◎
/OK
“Copy” to copy the selected file to another
memory device.
Deleting file Select and press
◎
/OK
“Delete” to delete the selected file.
Press to cancel and return to file list.
My Favorite
Select and playback the files that you have marked as favorite.
1. On the Main menu, select ‘
My Favorite
’ and press the
◎
/
OK
button to enter the
My Favorite mode.
2. Navigate the files and press
◎
/
OK to open the selected file.
3. Press the Left/Right (
) button to move to previous/next file.
4. Press (Menu) to enter ‘Delete the Path’ function.
Note: ‘Delete the Path’ only remove the file path from the list of My Favorite. If you
need to delete the files, please select ‘File’ on the main menu, Then select the
file and press (Menu) button to enter ‘Copy & Delete’ function.
Setting
Change the default setting of projectional brightness, Projection methods, language,
and memory devices.
1. Brightness
It allows you to change the brightness according to the environment and the power
consumption.
Mode Brightness Battery Life Recommendation
Enhanced
Up to 100 lms 80 mins This mode is recommended
when external power supply
is available to maximize the
performance.
Normal
Up to 60 lms 100 mins The default mode for
optimizing the projection
performance and battery
capacity.
Eco
Up to 40 lms 120 mins This mode is recommended
when the projector is
operated under battery
mode to save power.
Page 21
User’s Manual
Note: The projector is automatically switched to Enhanced mode when It’s
powered by the power adapter.
2. Projection (Lens) mode
EN
Allow you to select the projection mode, depending upon how the projector is
mounted. Please see the detail operation on page 12.
3. Scene selection
It allows you to select the ideal mode for watching movie, photo slideshow, or
reading the text with balanced brightness, color, and contrast.
.
Cinema: ideal for watching movie
Normal: ideal for photo slideshow
Text: ideal for image with text
4. Memory Source
This function allows users to select the storage devices between internal memory,
Micro SD Card, and USB devices.
: Internal memory
: SD / SDHC / SDXC card
: USB Dongle
5. Language
This item allows users to select the displayed system language.
6. Auto Power Off
This item allows users to enable or disable the auto power off function of the
projector. If auto power off is turned ON, the projector will be automatically turned
off after the chosen period is due.
7. System
-
Factory Setting
Reset the projector to factory default setting.
-
Firmware Upgrade
Firmware upgrade information is available on our website.
-
Information
Shows firmware version: Txxxx / Axxxx
Page 22
User’s Manual
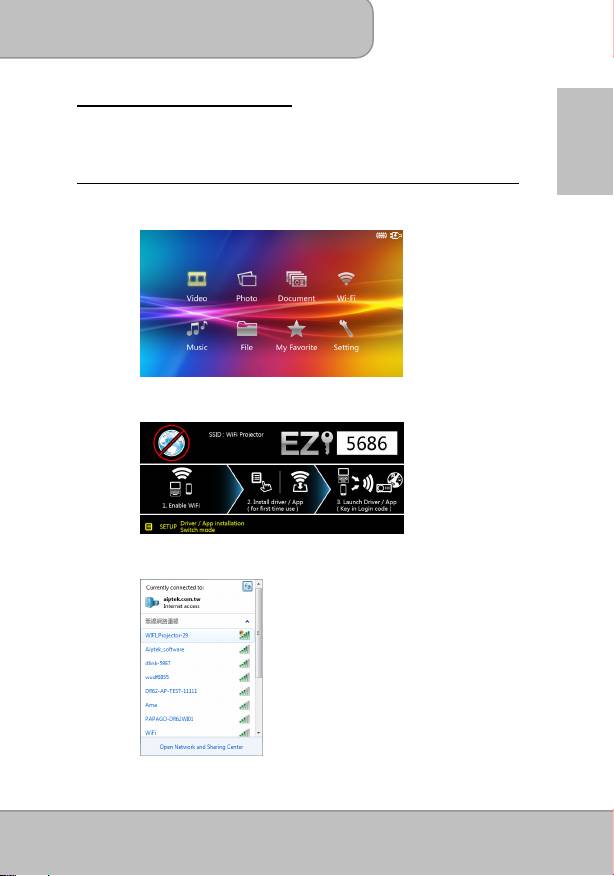
Enable Wireless Connection
For first-time use, please follow the steps below to install wireless application
software for your PC or smartphone.
EN
Install the wireless application software on your computer
1. Select and enter ‘
Wi-Fi
’ on the main menu to launch the wireless function of
the projector.
2. The W-Fi Display shows the wireless status (Wi-Fi connected or
disconnected) and password for connecting the projector.
3. Enable your WLAN of Notebook or PC. Select the access point labeled
‘
WiFi_projector-XX
’ to connect the projector Wireless network
Page 23
User’s Manual
Note: 1. Your computer must have wireless network function to detect the
connection.
2. Disconnect the Ethernet cable from your computer to avoid
affecting the wireless network connection.
EN
3. When you connect to the projector’s wireless network, you will
loss wireless connectivity with other wireless networks.
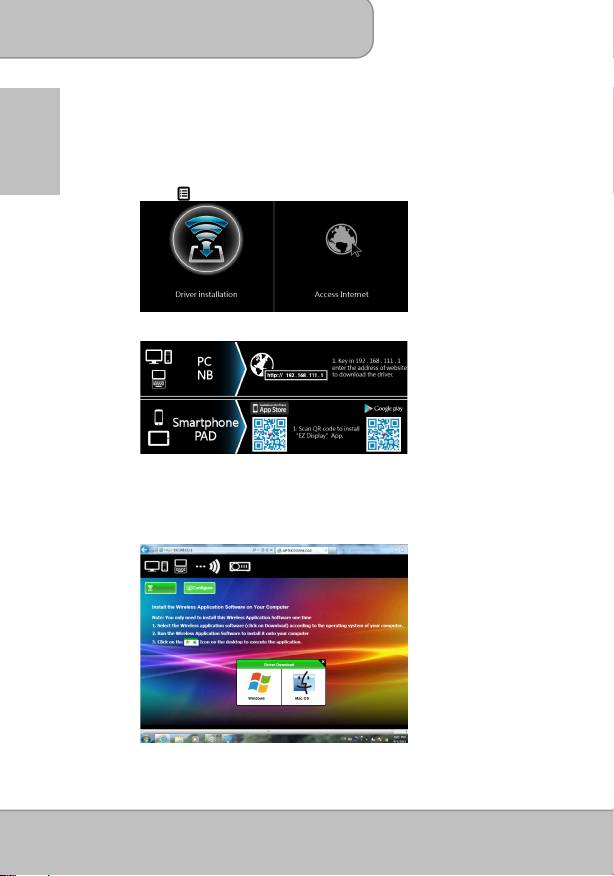
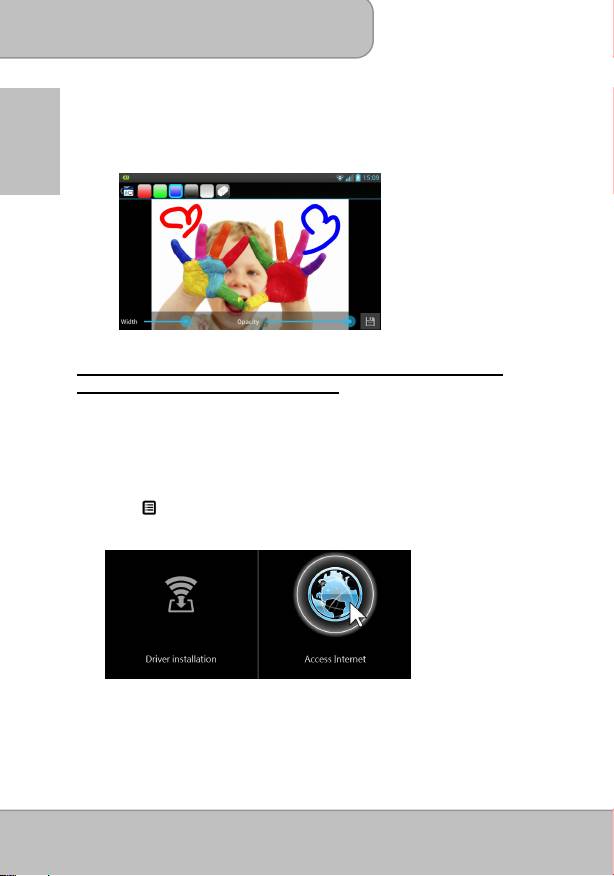
4. Press
(Menu) on the projector to enter the Driver/App Installation.
5. The screen shows the IP address and QR code for downloading Driver/App.
6. Open the Internet browser on your computer then enter the default IP
Address
http://192.168.111.1
in the browser’s address bar.
7. Select the driver for Windows or Mac OS depending on your PC and then
click the icon to download the driver.
Page 24
User’s Manual
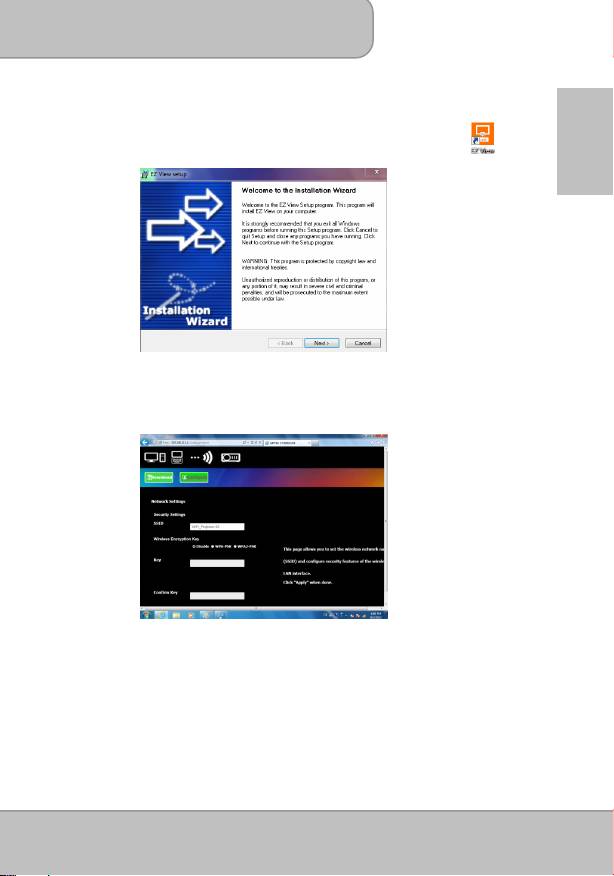
8. Double click the driver
EZ_View
to install. Click <Next> and follow
on-Screen instructions to complete the setup and reboot the computer.
When the installation is completed, an icon, labeled
EZ View
will
appear on your computer desktop.
EN
Note: To rename your projector network name (SSID) or change the wireless
security (password is disabled as default), you can type the projector's IP
address (192.168.111.1) into your web browser to open its configuration
page and find the settings to enter the new name or create the password.
Page 25

User’s Manual
Peer-to-Peer Wireless connection with the projector
Peer-to-peer wireless connection from your computer with the projector allows you
quickly start the presentation or watch a movie wirelessly from your PC, tablet, or
EN
smartphone but without the access to an available Wi-Fi network (without Internet
access). It’s recommended to use Home Network Mode (see page 32) when you
need Internet access for the projection.
Peer-to-Peer wireless projection from computer
1. Select and enter ‘
WiFi
’ on the main menu of the projector.
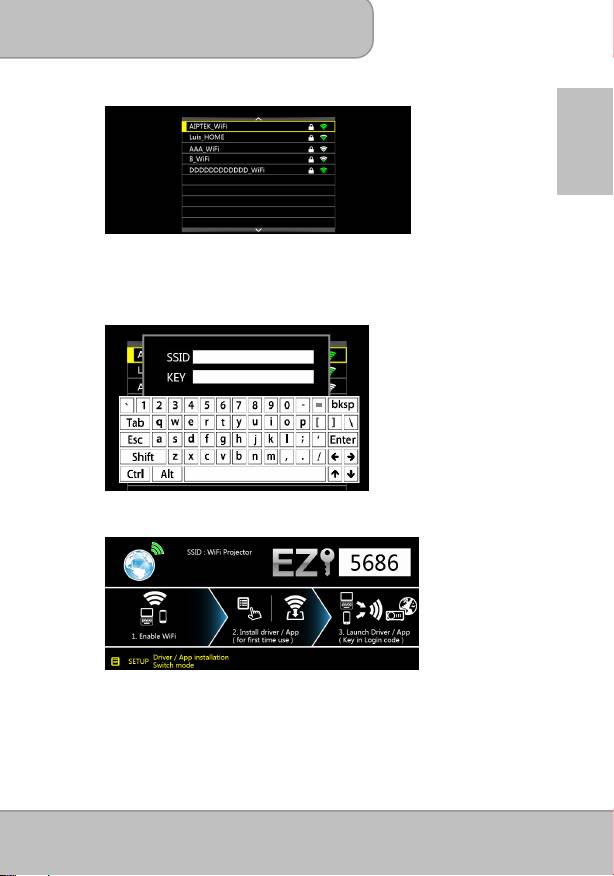
2. Make a note of the Login Code in 4 digits XXXX. You will need the
information to log in later.
3. Connect your computer to the projector Wireless network by selecting
WIFI-Projector-XX on the network list.
4. Double-click
EZ View
icon on your computer desktop to start the
application.
5. Enter the Login Code (see Step 2) and click <OK> to confirm.
Page 26
User’s Manual
6. After successfully logged in, the wireless projection between the computer
and the projector has been established.
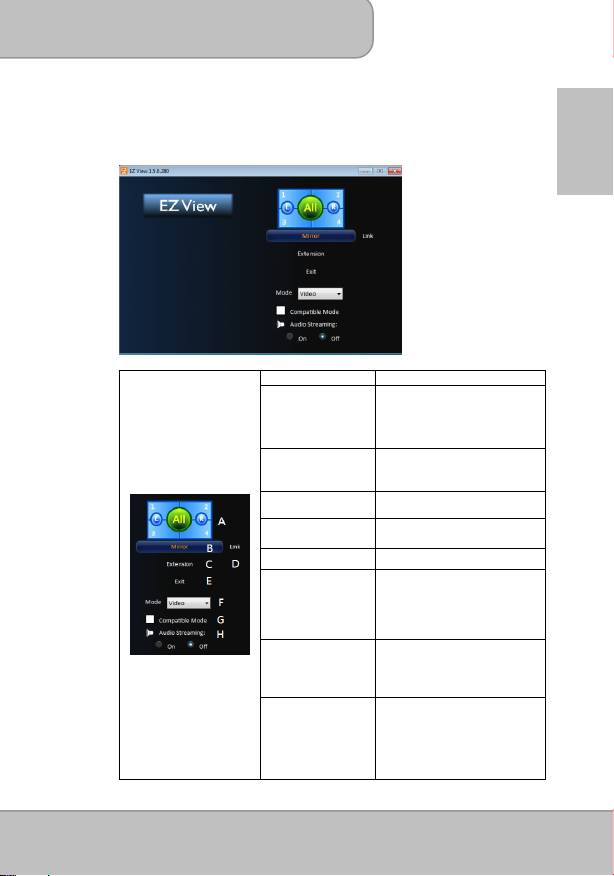
Advanced functions of EZ View
EN
Item Descriptions
1~4 :
Allow 4 different devices to
project in the same screen
A. Split screen
L, R :
Move the screen to the left
or right
All :
Return to full screen
Mirror mode displays the same
B. Mirror Mode
picture on the screen of the
computer.
Extend the screen from computer
C. Extend Mode
to the projector.
Link to the projector Download
D. Link
/Configure management page.
E. Exit Click to close the application.
Click to select the ideal mode for
watching movie or photo
slideshow
F. Mode
Video:
ideal for watching movie
Graphic
: ideal for photo
slideshow
Click to enhance 3rd party
software compatibility. (The
G. Compatible Mode
performance (frame rate) of
wireless streaming may be
reduced.)
Stream the Audio to the
projector’s speaker.
Note
: If you don’t like to hear the
H. Audio Streaming
sound from the computer at the
same time, disable the speaker
on the computer by choosing
‘mute’.
Page 27

User’s Manual
Install the wireless application software on Apple or Android
devices
EN
EZ View for Android smartphone and Apple iDevice
EZ View
is an application that runs on your Android smartphone or Apple iDevice
and transmits still images or presentations to the projector. The EZ View is only
used for a wireless connection. If you are connecting your phone to the projector
using a cable, you can use the built-in video out feature of your phone.
Installing EZ View from Google Play™ (For Android device)
1. Connect to the Internet and open the Google Play™ or Google Play™ web
page. ( Google Play™ is a trademark of Google Inc.)
2. In the search bar, type EZ View. (Or scan the QR code directly from the
installation page.)
3. Click the <INSTALL> button to download and install the EZ View app.
4. Follow the instructions to finish the installation.
Page 28
User’s Manual
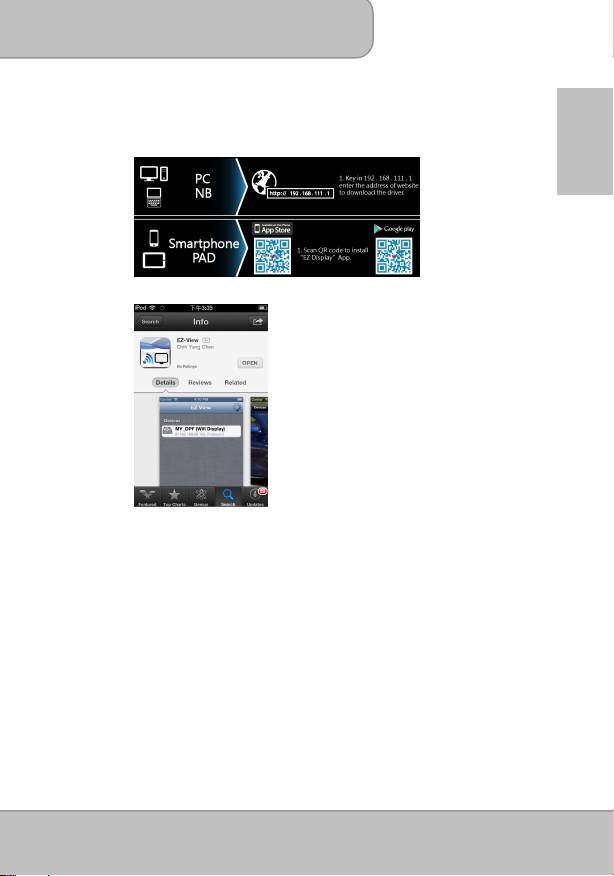
Installing EZ View from Apple App Store (For Apple i-device)
1. Connect your iPhone to the Internet and Launch the App Store.
2. In the search bar, type EZ View. (Or scan the QR code directly from the
installation page.)
EN
3. Click the <INSTALL> button to download and install the EZ View application.
Peer-to-Peer wireless connection from Android or Apple device to the
projector
Before you can transmit images to the projector using EZ View, you must connect
your Android smartphone or Apple i-device to the projector (peer-to-peer) or in the
same available wireless network.
1. Select and enter ‘Wi-Fi’ on the main menu to launch the wireless function of
the projector.
Page 29
User’s Manual
EN
2. The W-Fi Display shows the wireless status (Wi-Fi connected or
disconnected) and password for connecting the projector.
3. Enable your WLAN on smartphone. Select the access point labeled
‘WiFi_projector-XX’ to connect the projector Wireless network.
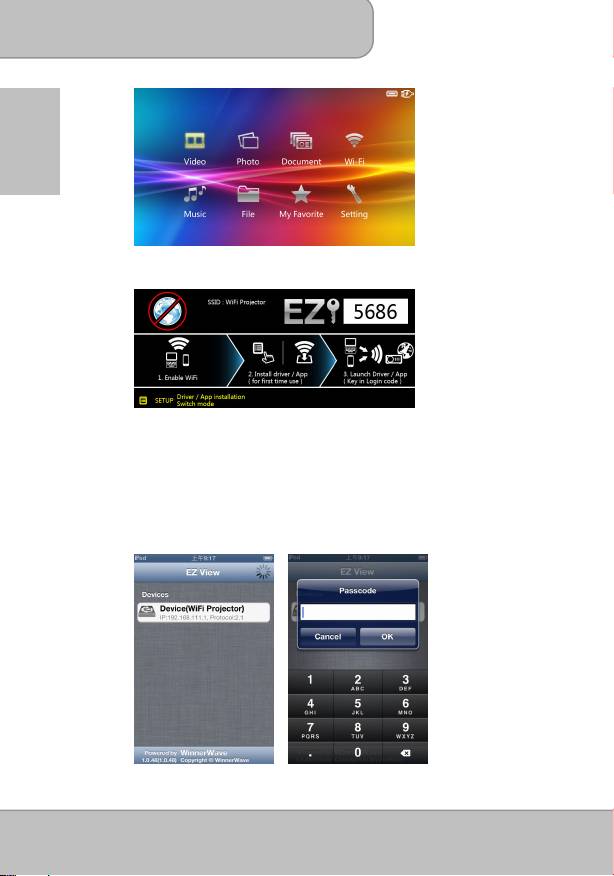
Opening EZ View and Logging into the projector
1. Open the EZ View application. EZ View will search for compatible devices.
2. Choose WiFi Projector and enter the Login password shown on the projector
screen.
Page 30
User’s Manual
4. Press <OK> to continue.
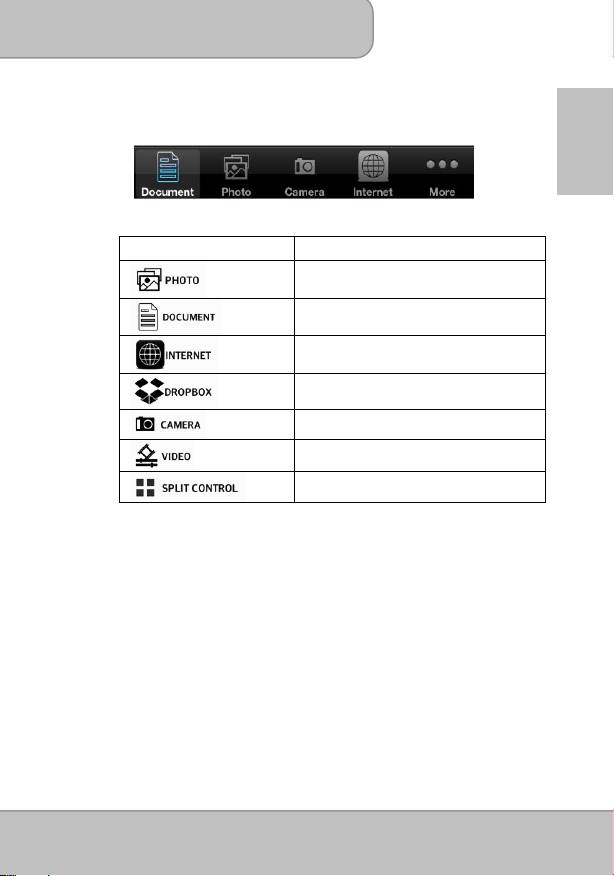
5. Select the type of files on your smartphone for projection.
EN
EZ View
app function
Description
Projecting Photos stored on your smartphone.
Projecting Office Documents and PDFs stored on
your smartphone.
Projecting Web pages. (
Home Network mode
only
)
* Please see page 31 to enable Client mode.
Streaming cloud server. (
Home Network mode
only
)
* Please see page 31 to enable Client mode.
Real-time project the image by iPhone or Android
phone camera through WiFi connection.
Stream video stored on your iOS and Android
devices to the projector.
Allow up to four devices be projected through one
projector in the same time.
®
Adding Content to EZ View using iTunes
(For Apple i-Device)
1. Attach your iPhone to your computer.
®
2. On your computer, launch iTunes
unless it automatically opened when you
attached your iPhone.
3. Click the iPhone or iPad device in the sidebar.
4. Click the Apps in the Settings panes.
5. Click EZ View to see all of the files loaded into EZ View.
6. Click the “Add” button and choose files to upload to EZ View. You can load
JPG files and Document files.
7. In the lower left hand corner, click the Sync button to transfer the files to your
iPhone.
Page 31
User’s Manual
Sketch the image from EZ View
A sketch tool is built in Photo / Document /Web modes, to let presenter make
note on the projected page. You can draw, highlight in color or erase by touch
EN
easily. All the sketched images can be saved in camera roll at once.
Connect the projector to available Wi-Fi network (Home
Network Mode) for Internet access
You are recommended to connect the projector to a Wi-Fi network so your computer,
tablet, and smartphone can at the same time have the Internet access. You only need
to key in the network key to set up the connection for the first time. The projector will
be automatically connected to the network when it enters the WiFi mode next time.
1. Select and enter ‘
Wi-Fi
’ on the main menu.
2. Press (Menu) to enter the following options. Select ‘Internet Access’ (Client
Mode) and confirm with
◎
“OK”.
Page 32
User’s Manual
3. Select the Wi-Fi network you would like to connect and confirm with
◎
“OK”.
EN
4. If wireless security is enabled on your Wi-Fi network, press
◎
“OK” to display the
keyboard and enter the password (network key) by using the navigation keys on
the projector or the remote control. After typing the password, press ‘Exit’ on the
projector or the remote control to quit the keyboard. Select ‘Connect’ and confirm
with
◎
“OK”.
5. Use ‘Exit’ button to return to WiFi Display. Now you can start the driver or App EZ
View to start the wireless projection.
6. To disconnect the wireless projection, simply close the driver or App and return
the
projector to main menu.
Page 33

User’s Manual
Note: Internet access (Home Network mode) performance is affected by a variety of
factors, such as the CPU performance of your smartphone/ notebook, the
distance between the access point, and walls/obstacles that obstruct direct
EN
line-of-sight. Cordless phones, bluetooth devices, microwaves, and anything
that may cause RF interference in the 2.4GHz frequency range can affect the
WLAN performance as well.
Therefore, once the internet speed drops or intermittent disconnects during
the projection, we recommend you to select another access point with a
stronger signal or disconnect the projector client from your access point
(disable internet access) to ensure the best experience of wireless projection.
Page 34
User’s Manual
Troubleshooting
If your projector does not seem to be functioning properly, check the items below before
you contact an authorized service center.
EN
Symptom Check Point
The projector does not
1. Check if the HDMI cable is plugged correctly.
work when connecting
2. Make sure the PC has been switched to projector
to a notebook or PC
display.
with cable.
The driver installation
1. Enable your WLAN of Notebook or PC and select the
web page can’t be
access point labeled ‘WiFi_projector-XX’ to connect with
opened from computer
the projector.
browser.
2. Disconnect the Ethernet cable from your computer to
avoid affecting the wireless network connection.
3. Open the Internet browser on your computer then enter
http://192.168.111.1 in the browser’s address bar.
The projector can’t be
1. Select ‘WiFi‘ on the Main Menu to enter the WiFi display
detected when running
mode.
EZ View app.
2. Enable your WLAN of PC or smartphone and select the
access point labeled ‘WiFi_projector-XX’ to connect with
the projector.
3. Disconnect the Ethernet cable from your computer to
avoid affecting the wireless network connection.
The projected image is
1. Use the projector in a darker environment.
too dark.
2. Increase the brightness by using the AC power adapter.
3. Scale down the projectional image size.
The projected image is
1. Adjust the focus. Please refer to “Adjusting the Focus”.
blurred.
2. Check if the lens is dirty.
The surface
Because of the high-luminance LED, it is normal that this
temperature of projector
projector generates heat in long-time use. It will not affect
is high.
the performance of the projector. Always keep the
ventilation slots free of dirt or obstructions and operate the
projector in a properly ventilated environment.
Recovering from
If the projector is running slow, freezing, crashing or
abnormal
locking up during the operation. Press the Power button
for 8 seconds to reboot your projector.
Page 35
User’s Manual
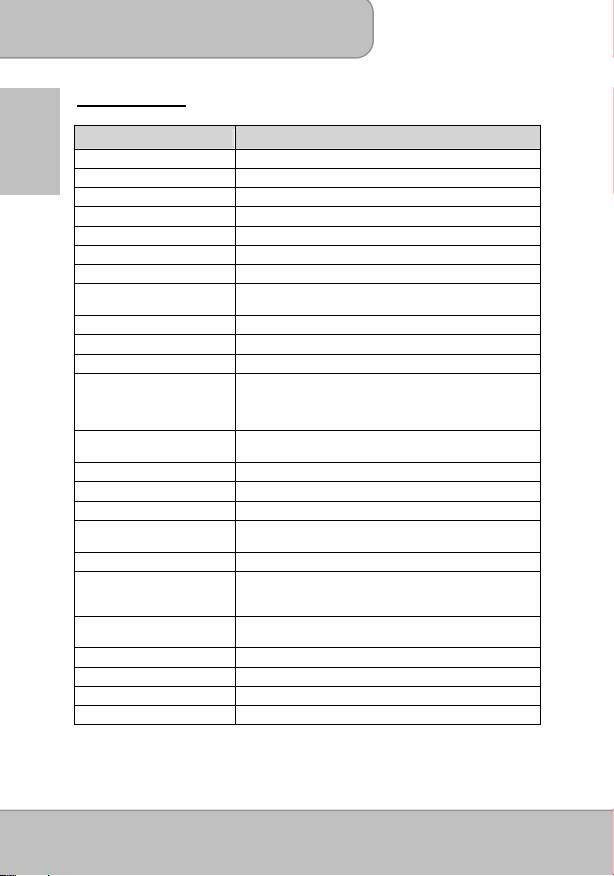
Specifications
Item Description
EN
Optical Technology
DLP
Light Source
RGB LED
Aspect ratio
16:9
Resolution
854 x 480 Pixels (WVGA)
Contrast Ratio
1000:1
Projection Image Size
36 cm ~ 300 cm (14” ~ 120”)
Projection Distance
50 cm ~ 425 cm (20” ~ 167”)
Throw Ratio
1.6 (Projection Distance/Width of Image)
(Diagonal: Distance)
Brightness
Up to 100 Lumens
Focus
Manual
Offset
100%
Photo: *.jpeg, *.jpg, *.bmp
Video: *.avi, *.mov, *.mp4, *.mpg
Playback Format
Audio: *.mp3, *.wav, *.ogg
Document: *.ppt, *.pptx, *.pdf, *.doc, *.docx, *.xls, *.xlsx
Module: IEEE 11n (1T1R)
WiFi
Standard: 802.11b/g/n
Internal Memory
2 GB (1.2 GB for storage)
Internal Speaker
Mono
Card Slot
SD / SDHC / SDXC card (up to 128 GB)
Power Supply
Input: 100 ~ 240V AC
Output: 12V, 2A DC
Battery Type
Embedded 7.4V / 2000 mAh Li-polymer battery
Battery Life
Enhanced mode: 80 min
Normal mode: 100 min
Eco mode: 120 min
Power Consumption
AC mode: 12 W
Battery mode: 8 W ~ 12 W
Dimensions ( L x W x H )
132 x 95 x 25 mm
Weight
285 g
Humidity
20 – 80%, 80% (Max.), non-condensing.
Operating Temperature
5°C – 35°C.
Page 36

Benutzerhandbuch
Willkommen
Vielen Dank für den Kauf dieses Produktes. Bevor Sie beginnen, empfehlen wir Ihnen
das schrittweise Lesen dieses Handbuchs, um die besten Ergebnisse mit Ihrem
neuen Pico Projektor zu erzielen. Wir wünschen Ihnen damit viel Freude.
Über das Produkt
Dies ist die neueste Generation der Pico Projektoren mit integrierter DLP Technologie.
Die DLP Technologie, die bei großen Kinoprojektoren eingesetzt wird, bietet kräftigere
Farben und einen hohen Kontrast. Der Pico Projektor bietet mit integrierterm WLAN
eine drahtlose Verbindung von Ihrem Notebook, Tablet oder Smartphone zum Pico
DE
Projektor, über die Bilder, Videos, Webseiten und Dokumente übertragen und Bilder
bis zu 120" (300 cm) Größe projiziert werden können. Mit der Unterstützung mehrerer
Mediendateien, Office und PDF Dokumenten, sowie den vielseitigen
Anschlussoptionen, einschließlich HDMI, MHL, AV Eingang, VGA, USB und SD
Kartensteckplatz, ist dieser Pico Projektor die ideale Lösung für die geschäftliche und
private mobile Nutzung.
Sicherheitshinweise
1. Das Gerät und das Verpackungsmaterial außerhalb der Reichweite von Kindern
halten.
2. Das Netzteil nicht in Kontakt mit tropfendem oder fließendem Wasser kommen
lassen und Hände vor der Benutzung abtrocknen. Keine mit Flüssigkeiten gefüllten
Gegenstände, wie z.B. Vasen usw. auf oder in die Nähe des Gerätes stellen.
3. Stellen Sie sicher, dass die verwendete Steckdose immer verfügbar und niemals
blockiert ist. Verwenden Sie im Notfall das Netzteil, um das Gerät vom Stromnetz zu
trennen.
4. Das Gerät von Flammen, wie z.B. Kerzen fernhalten und diese nicht in der Nähe
des Gerätes aufstellen.
5. Das Gerät mindestens 10 cm von anderen Gegenständen entfernt halten. Stellen
Sie sicher, dass die Lüftungsschlitze nicht durch Zeitungen, Tischdecken, Vorhänge
usw. blockiert werden.
6. Den Projektor zu Ihrer eigenen Sicherheit nicht während eines Gewitters oder
Blitzschlages verwenden.
7. Relative Luftfeuchtigkeit liegt bei 20% ~ 80%, nicht-kondensierend.
8. Der Akku ist im Gerät integriert. Nicht auseinander nehmen oder ändern. Der Akku
sollte nur von einer Fachkraft ausgetauscht werden.
9. Stellen Sie sicher, dass die Raumtemperatur zwischen 5 ~ 35°C liegt.
10. Warten Sie mit der Verwendung des Geräts etwas, wenn es von einem kalten an
einen warmen Ort gebracht wurde. Kondenswasser kann das Gerät unter
bestimmten Umständen zerstören. Sobald das Gerät Raumtemperatur erreicht hat,
kann es ohne Risiko verwendet werden.
11. Produkt mit Vorsicht handhaben. Kontakt mit scharfen Gegenständen vermeiden.
Von Gegenständen aus Metall fernhalten.
12. Den Projektor auf eine flache Unterlage stellen. Stöße oder ein Herunterfallen auf
den Boden führt wahrscheinlich zu Schäden des Produktes.
Seite 1
Benutzerhandbuch
13. Das Produkt nicht fallen lassen oder auseinander nehmen, da sonst die
Gewährleistung erlischt. Das Öffnen oder Entfernen von Abdeckungen kann Sie
gefährlichen Spannungen und anderen Risiken aussetzen. Alle Wartungsarbeiten
von Fachpersonal durchführen lassen.
14. Verwenden Sie ausschließlich vom Hersteller angebotenes Zubehör.
15. Sowohl das Produkt als auch das Benutzerhandbuch unterliegen fortlaufenden
Verbesserungen oder Ergänzungen ohne vorherige Mitteilung.
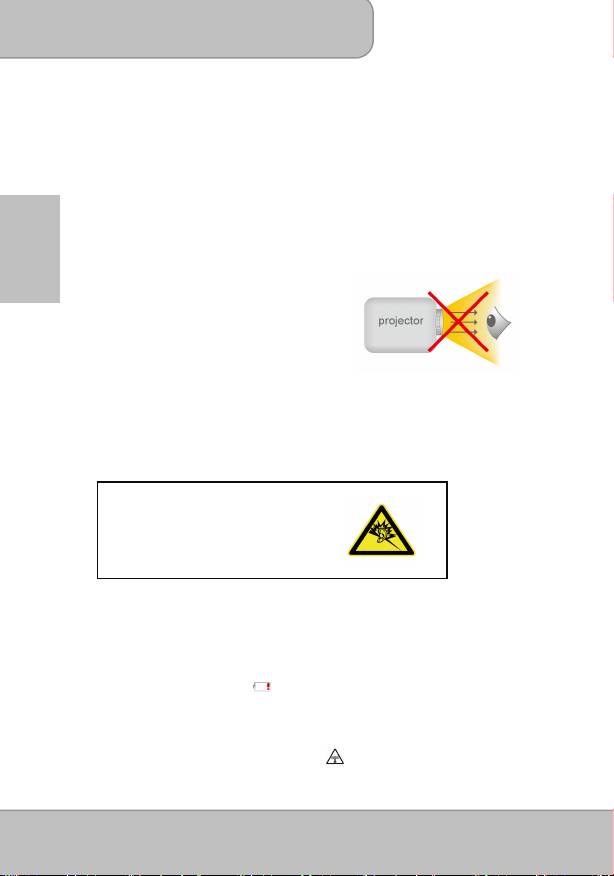
Pflege- und Sicherheitshinweise für Pico Projektoren
DE
1. Nicht direkt in das Objektiv des Projektors
sehen.
2. Dieses Produkt kann während des Betriebes
etwas warm werden, was normal ist.
3. Das Gerät nicht in einer sehr staubigen
Umgebung verwenden. Staubpartikel und
andere Fremdgegenstände können das
Gerät beschädigen.
4. Das Gerät keinen starken Vibrationen aussetzen. Dies könnte die internen Bauteile
beschädigen.
5. Verwenden Sie das beiliegende Netzteil (siehe Technische Daten):
Prüfen Sie, ob die Spannung der Stromversorgung der verfügbaren Spannung am
Einsatzort entspricht. Dieses Gerät entspricht dem angegebenen Spannungstyp.
Vermeiden von Hörschäden:
Das Anhören mit einer hohen
Lautstärke über einen längeren
Zeitraum kann Ihre Ohren schädigen.
Hinweis für längere Projektion
Der interne Akku unterstützt ungefähr 120 Min. Projektion. Wenn Sie länger
projizieren möchten, wird die Nutzung des Netzteils empfohlen.
Wenn der Akku zu schwach ist, um weiter betrieben werden zu können, wird die
Anzeige für schwachen Akku ( )anfangen zu blinken. Sie müssen das Produkt
aufladen, wenn das Symbol angezeigt wird.
Es ist normal, dass der Projektor wegen seiner hohen Leistung während des
Betriebes warm wird. Wenn der Projektor längere Zeit läuft und zu heiß wird,
erscheint das Symbol für hohe Temperatur ( ) auf dem Display. Das System wird
automatisch den Standbymodus aufrufen.
Seite 2

Benutzerhandbuch
FCC Konformitätserklärung
Dieses Gerät erfüllt die Anforderungen gemäß Abschnitt 15 der
FCC-Bestimmungen. Für den Betrieb sind folgende Bedingungen
zu beachten: (1) das Gerät darf keine schädlichen Interferenzen
erzeugen und muss (2) empfangene Interferenzen aufnehmen,
obwohl diese zu Betriebsstörungen führen können.
Dieses Gerät wurde getestet und entspricht den Grenzwerten digitaler Geräte der
Klasse B (siehe Abschnitt 15 der FCC-Bestimmungen). Diese Grenzwerte bieten einen
ausreichenden Schutz gegen Interferenzen bei häuslichen Installationen. Das Gerät
erzeugt und verwendet hochfrequente Schwingungen und kann sie ausstrahlen. Wenn
DE
es nicht nach den Anweisungen des Herstellers aufgestellt und betrieben wird, können
Störungen im Radio- und Fernsehempfang auftreten.
In Ausnahmefällen können bestimmte Installationen aber dennoch Störungen
verursachen. Sollte der Radio- und Fernsehempfang beeinträchtigt sein, was durch Ein-
und Ausschalten des Gerätes festgestellt werden kann, empfiehlt sich die Behebung der
Störung durch eine oder mehrere der folgenden Maßnahmen:
Richten Sie die Empfangsantenne neu aus.
Vergrößern Sie den Abstand zwischen Gerät und Empfänger.
Stecken Sie den Netzstecker des Geräts in eine andere Steckdose, damit das Gerät
und der Empfänger an verschiedene Stromkreise angeschlossen sind.
Bitten Sie Ihren Händler oder einen erfahrenen Radio- bzw. Fernsehtechniker um Hilfe.
Sie werden darauf hingewiesen, dass Geräte, an denen nicht von der für die Einhaltung
verantwortlichen Stelle ausdrücklich gebilligte Änderungen vorgenommen wurden, vom
Benutzer möglicherweise nicht betrieben werden dürfen.
Wenn die Zeit gekommen ist, Ihr
Produkt wegzuwerfen, recyceln Sie bitte
so viele Komponenten wie möglich.
Batterien und Akkus dürfen nicht
zusammen mit dem Hausmüll entsorgt
werden! Bitte geben Sie sie an einer
Recyclingstelle in Ihrer Nähe ab.
Zusammen leisten wir einen wertvollen
Beitrag zum Schutz unserer Umwelt.
Seite 3
