ABUS TVVR30004 Quick operating instructions – страница 2
Инструкция к ABUS TVVR30004 Quick operating instructions
Оглавление

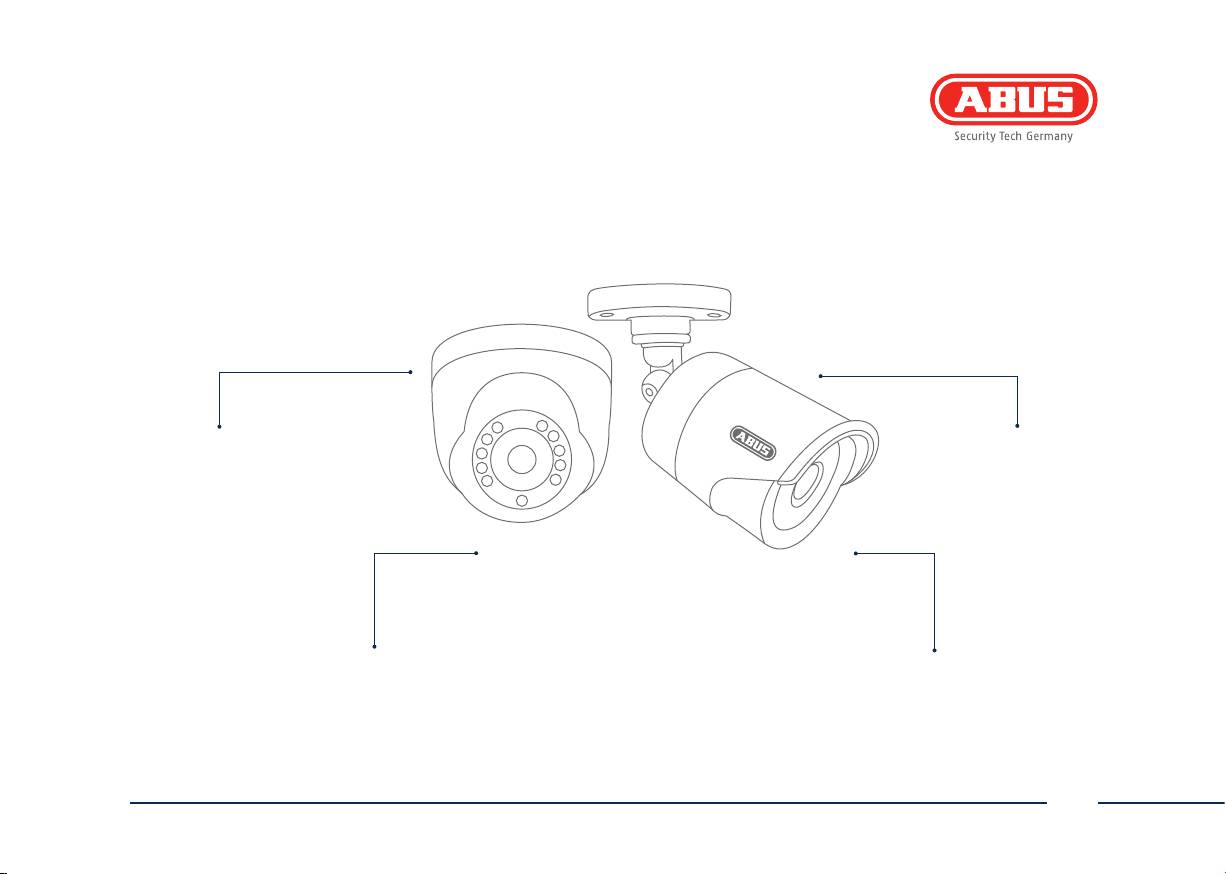
Scope of delivery
TVVR30104
TVVR30414
• 4-channel recorder incl. HDD
• 4-channel recorder incl. HDD
• 1x day/night vision outdoor camera
• 4x day/night vision outdoor dome cameras
• Universal power supply unit
• Universal power supply unit
• 1x20 m coaxial cable
• 4x20 m coaxial cable
• USB mouse
• USB mouse
• Quick guide
• Quick guide
• Manual
• Manual
• CD
• CD
TVVR30404
TVVR30004
TVVR30004
• 4-channel recorder incl. HDD
• 4-channel recorder
• 4x day/night vision outdoor cameras
• Power supply unit
• Universal power supply unit
• USB mouse
• 4x20 m coaxial cable
• Quick guide
• USB mouse
• Manual
• Quick guide
• CD
Manual
• Manual
• CD
21
English
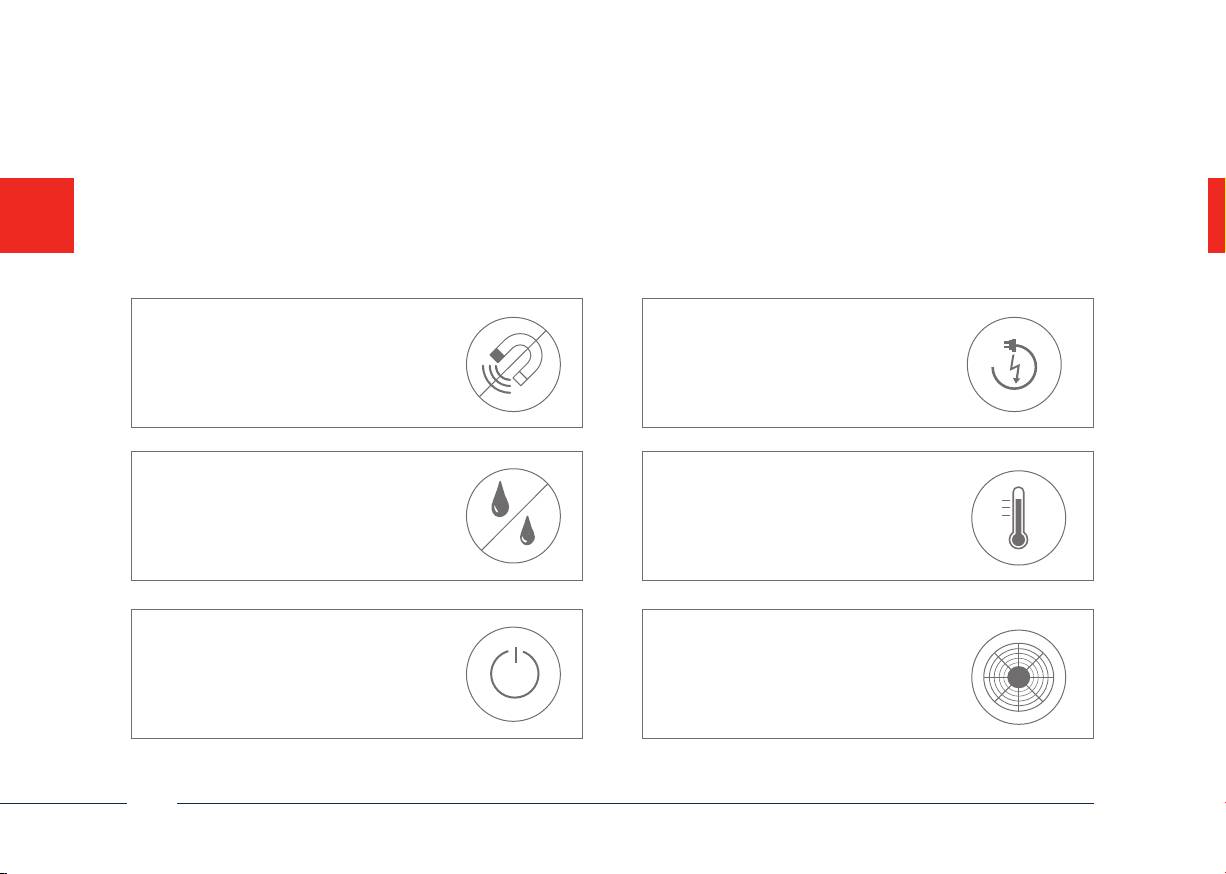
Warnings
Keep the recorder and camera away
Ensure an uninterrupted
from strong magnetic elds.
power supply.
Only store the recorder and camera
Keep liquids away from the recorder.
in the ambient conditions recom-
mended by the manufacturer.
Turn the recorder o before
Ensure that there is always
connecting or removing
sucient ventilation.
peripheral devices
22
English
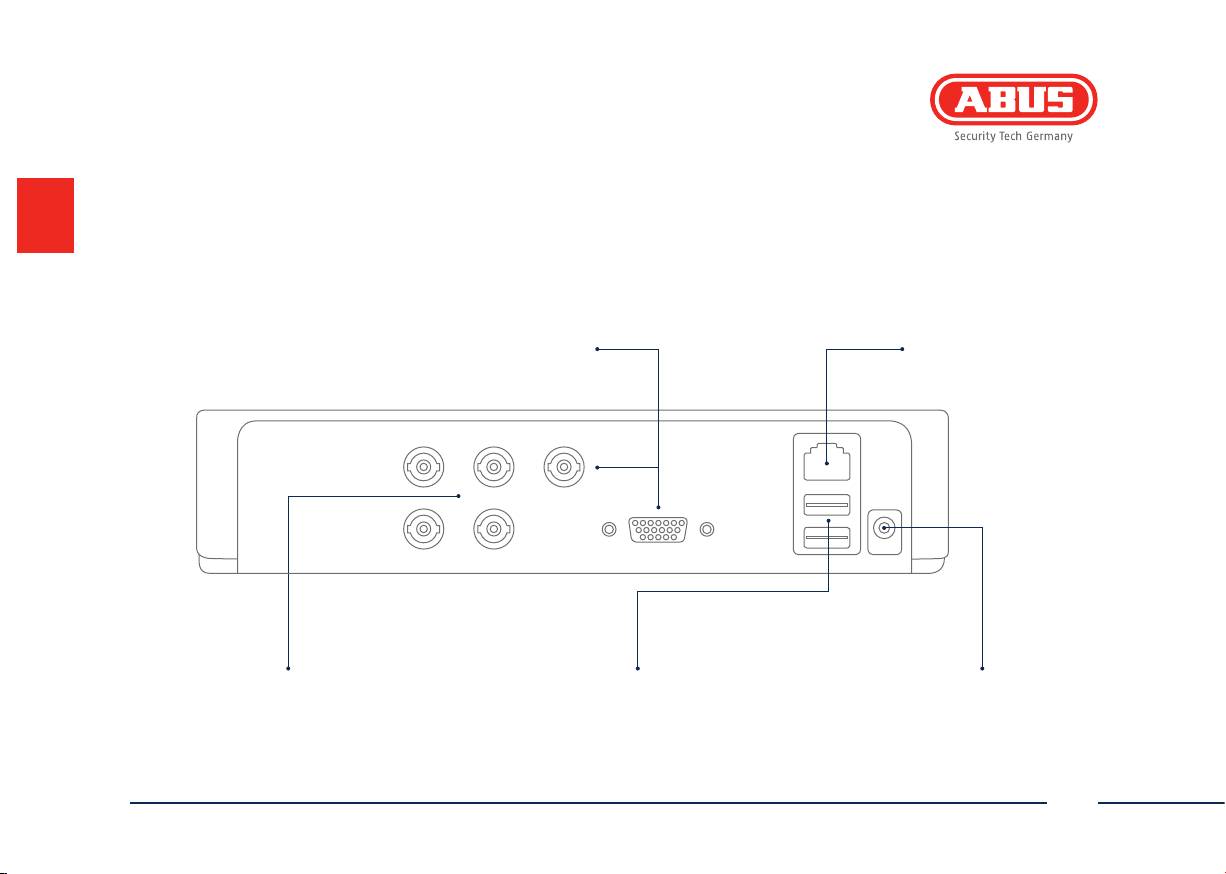
Connections
LAN
Video - OUT
RJ45 port for a
BNC plug for video output to connect to a
network connection
monitor as an alternative to VGA output
Video - In
USB
12 V
BNC input for analogue cameras
Connection for USB devices
12 V: 12 V DC power connection
23
English
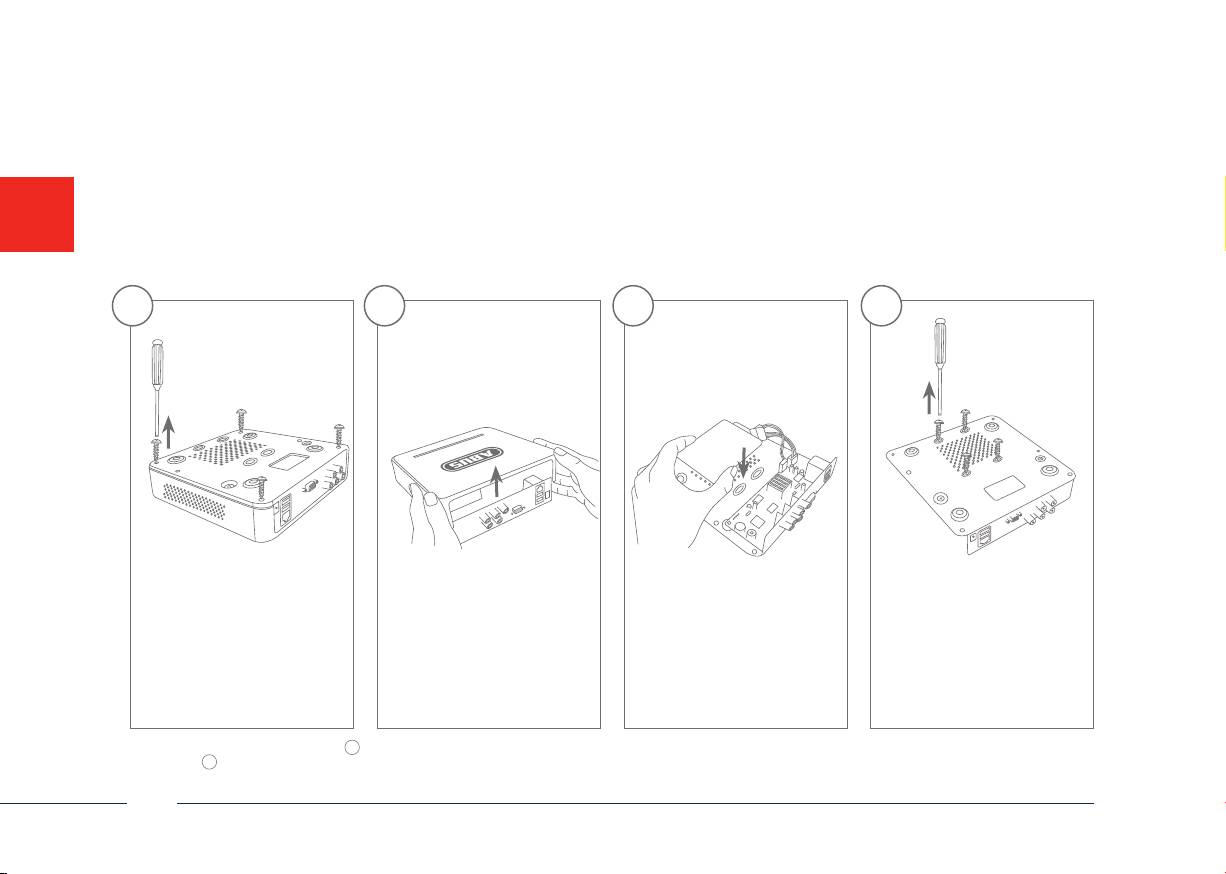
Hardware Installation
1 3 42
Remove the 4 screws on the
Open the box carefully. Align the hard disk drive
Secure the hard disk drive
underside of the recorder.
with the base plate of the
onto the underside of the
recorder.
recorder with the accompa-
nying screws.
Please ensure that you begin with step
1
for the hardware installation of TVVR30004. The hardware installation for the video surveillance kits TVVR30104, TVVR30404 and TVVR30414
starts at step
8
, as the hard disk drive is pre-installed for these models.
24
English
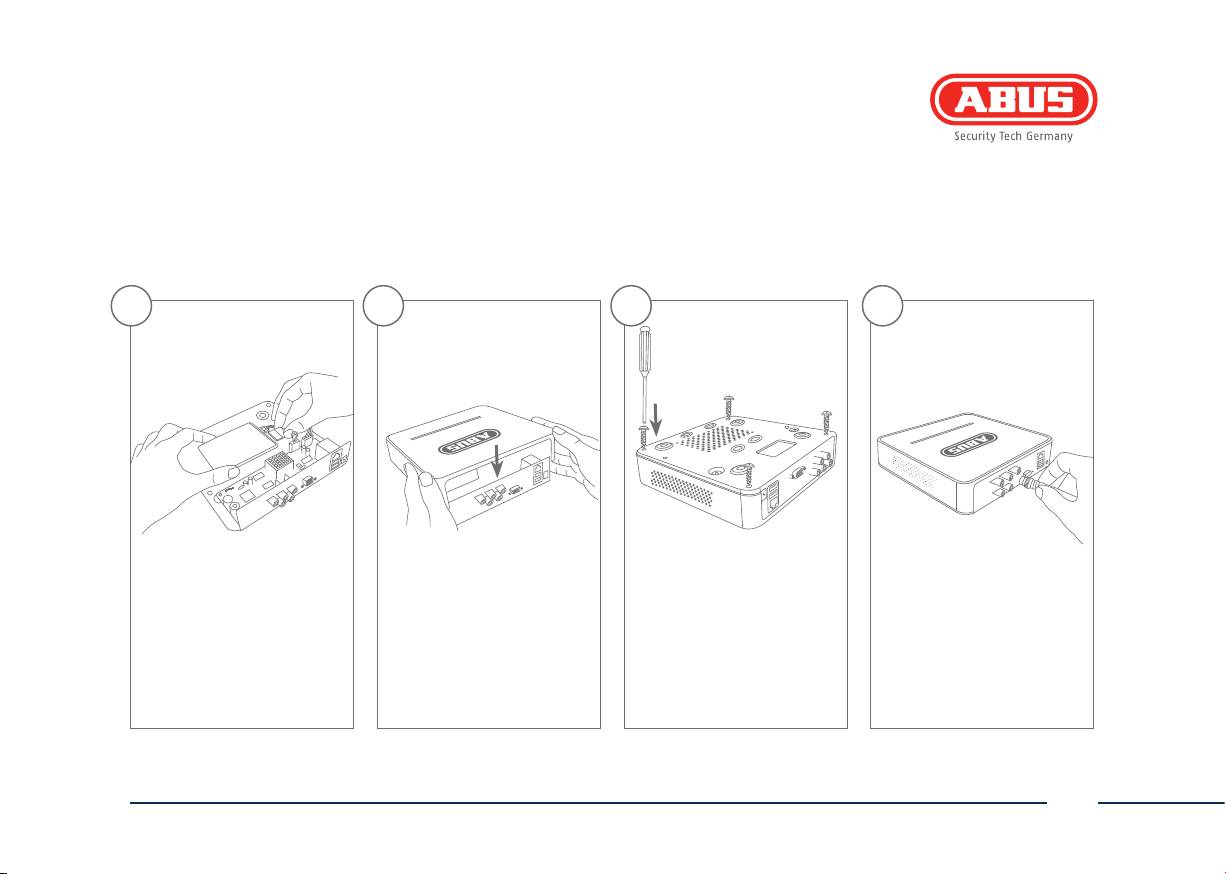
5 6 7 8
Connect the hard disk
Now place the box over the
Then secure the box and
Connect your cameras to
drive to the motherboard
base plate of the recorder.
the base plate with the 4
the recorder.
with the data cable (small
Ensure that the box is placed
screws.
connector) and the power
along the guide rails.
cable (large connector).
25
English

Tips for camera installation
Plug the recorder into the power supply.
The blue LED bar on top of the recorder
indicates that the device is on. You
can choose to turn o the light
on the LED bar via the menu.
26
English
Avoid backlight or direct sunlight
The camera must not be
installed on unstable surfaces
Please be aware that notice of video surveillance
Do not place cameras directly behind glass,
is required by law in public places
as this can result in reections
27
English
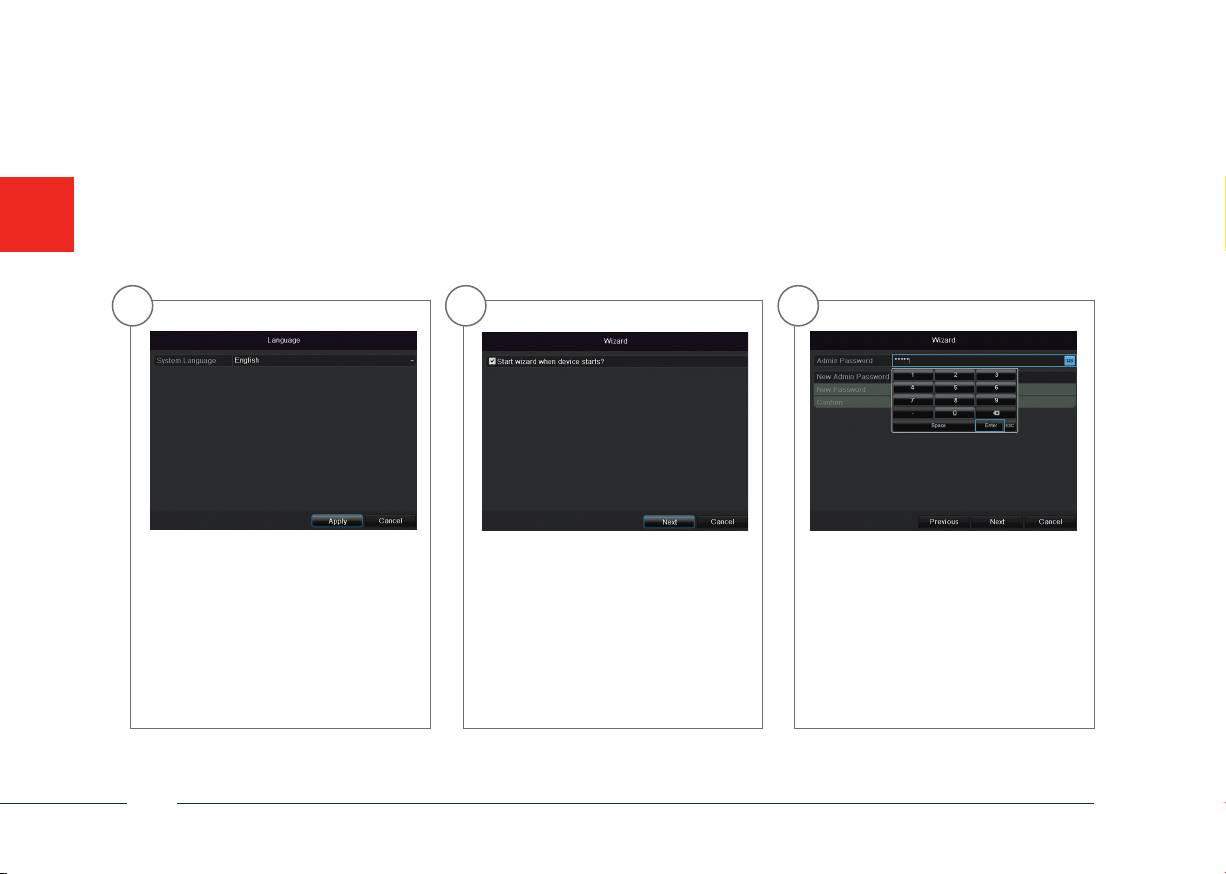
Soware Set-up
1 2 3
Select a language and click Next. In the Admin Password eld, enter
If you untick the box, then the setup
wizard will no longer run automati-
12345. Conrm with Enter.
cally at the next start-up. Click Next.
28
English
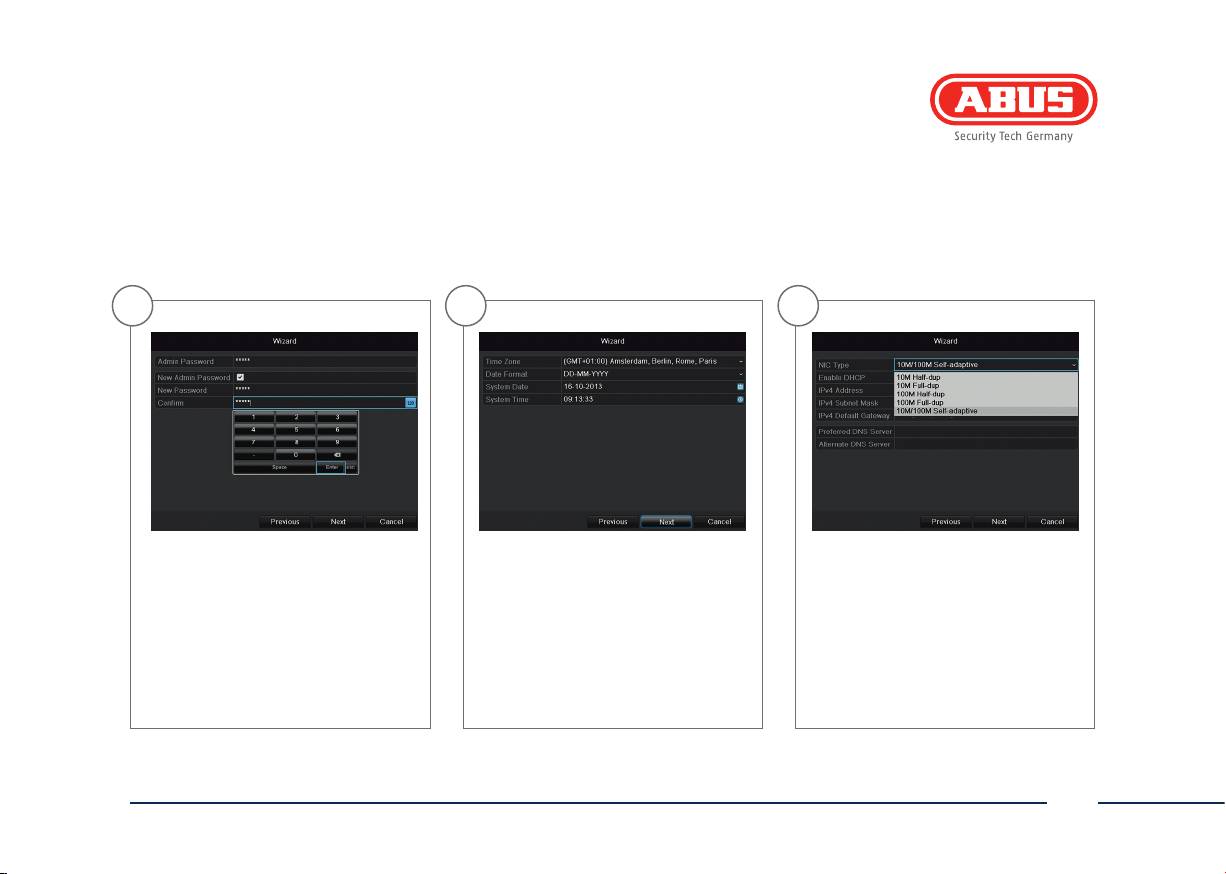
4 5 6
To change the password, tick the New
Specify time zone, date and system
Set the adapter speed tye ‚NIC type‘
Admin Password box. Enter the new
time. Continue by clicking Next.
manually. Default and recommended
password in the New Password and
setting is the automatic detection (Self
Conrm elds. Make a note of the
adaptive).
password and keep it in a safe place.
Click Next.
29
English
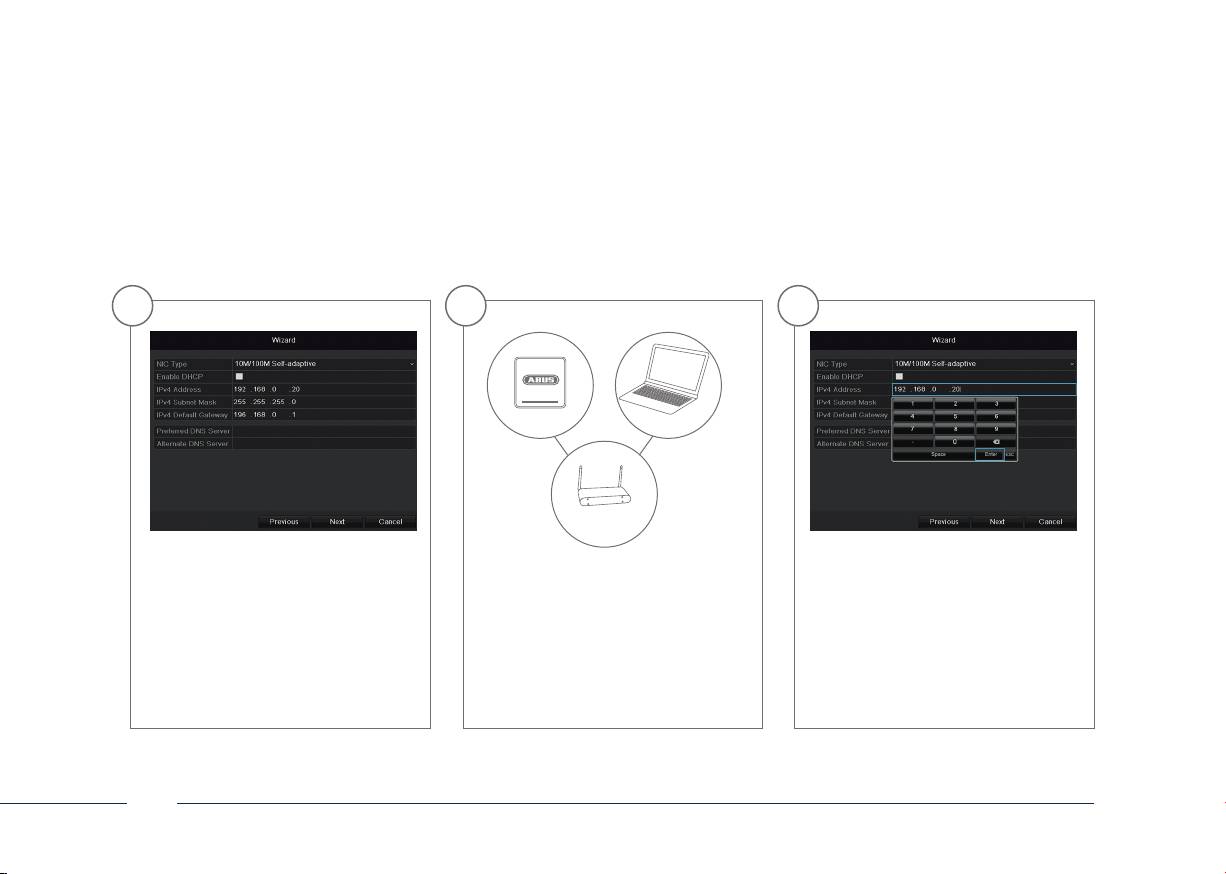
7 8 9
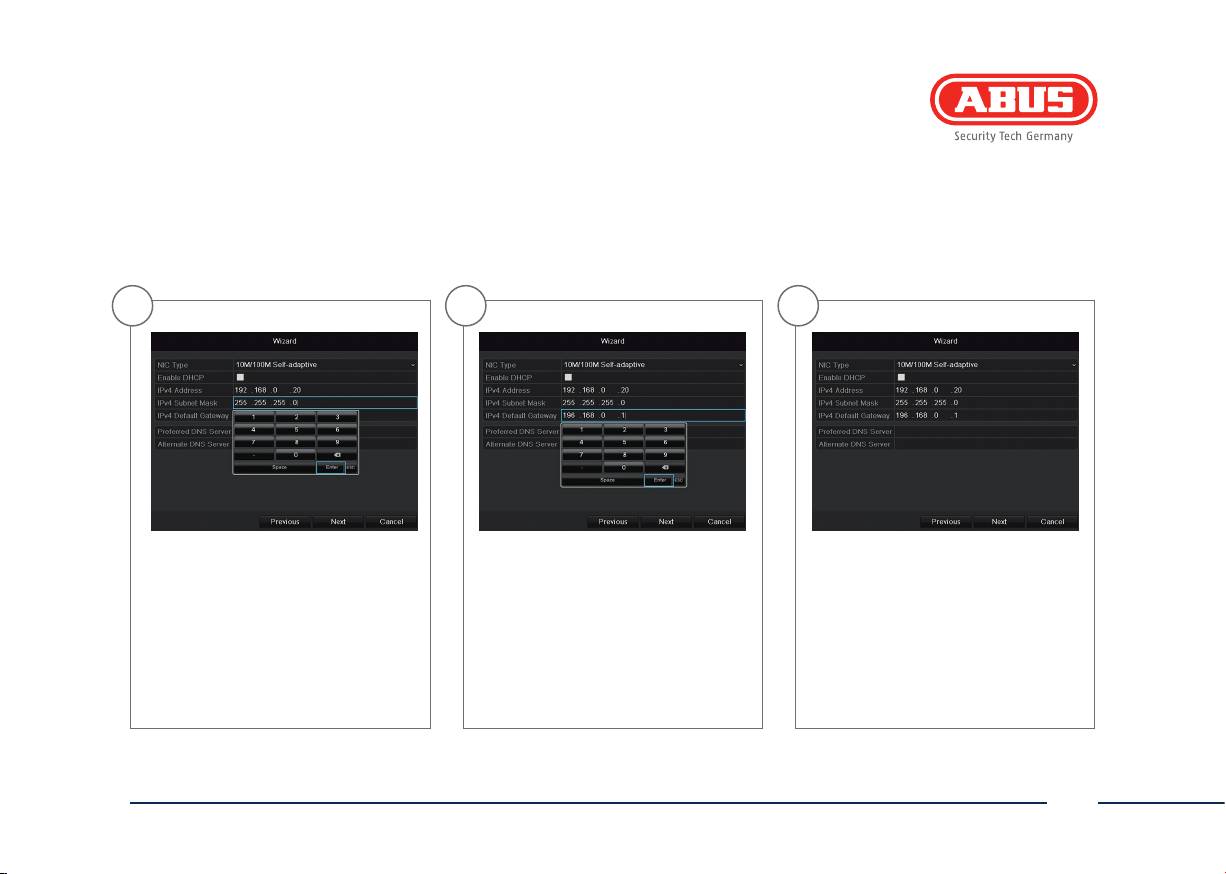
192.168.0.25192.168.0.20
192.168.0.1
To assign the address data automati-
If your router does not assign the
The rst three positions of the IP
cally, tick the DHCP box. The addresses
address data automatically, then enter
address must correspond to the de-
are then assigned automatically by
the data manually as shown in the
fault gateway value. The last position
the router (provided this function is
following steps. The Screenshots shows
species the device activated through
supported). In this case, proceed from
an example of devices to be connected
the default gateway (e.g. the recor-
point 13 onwards.
with corresponding IP addresses.
der), and is dened individually for
each device. For example, enter xxx.
xxx.xxx.64 for recorder 64.
30
English
10 11 12
The Subnet Mask is a network segment
Call up “Run” in the start menu.
The DNS Server translates an Internet
where IP addresses with identical net-
Enter “cmd” in the new window,
address into an IP address. Enter the
work addresses are used. The standard
then “ipcong” in the prompt
default gateway value under Prefer-
value here is usually 255.255.255.0.
which follows. Enter the default
red DNS Server.
gateway value in the recorder
screen.
31
English

13 14 15
All hard drives which are to be used for
Click Init, then conrm the successful
Chose the channel which shall be
recording must be initialized before-
initialisation with OK. Exit the screen
congured at Camera. Please note
hand. To initialise the hard drives, tick
by pressing OK, then go to the next
that you still have to congure the
the corresponding drive.
screen by pressing Next.
arming schadules in the recorder
menu. For further information please
read the user manual.
32
English
16 17 18
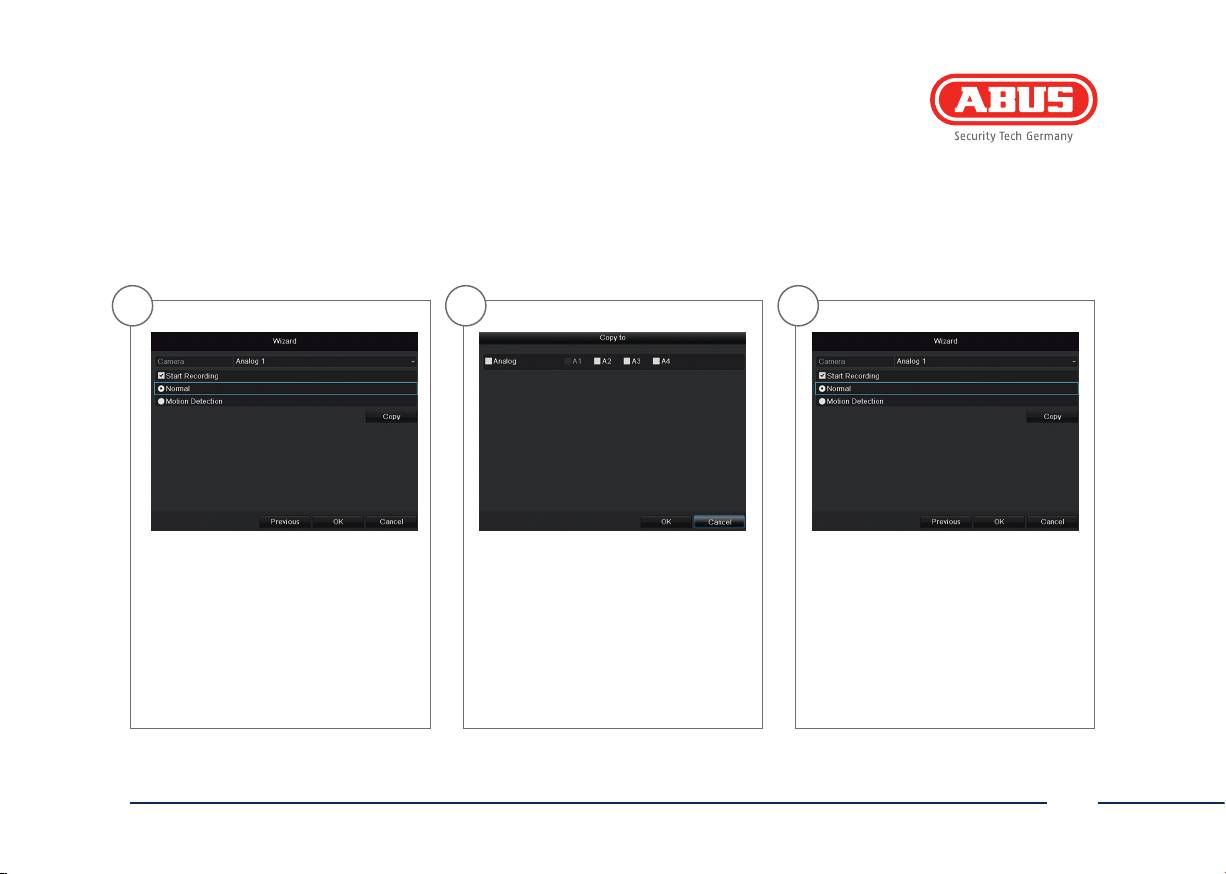
Please click in the checkbox Start Re-
For copying these settings to other
Click on OK to nish the initial set-up.
cording to activate the record. Choose
camera channels please click on
between a durable record (Normal) or
Copy. Click in the checkbox of the
a record with motion detection (Mo-
camera channels you want to
tion Detection). In the menu of the
transfer the settings to and click on
recorder you can dene areas and
OK to activate these settings.
the sensivity of the motion detection.
33
English


TVVR30004
Guide de démarrage rapide pour kit de vidéo surveillance: TVVR30004 | TVVR30104 | TVVR30404 | TVVR30414
Ce guide de démarrage rapide décrit les premières étapes d’installation de votre kit de vidéosurveillance.
Pour plus d’informations, consultez la notice d’utilisation jointe.

Chère cliente, cher client,
Nous vous remercions de l‘achat de ce produit. Ce
produit réalise les exigences des directives européennes
et nationales en vigueur.
La conformité est prouvée, les déclarations et documents
correspondants sont consultables auprès du fabricant
(ABUS Security-Center GmbH & Co. KG, Linker Kreuthweg
5, 86444 Ang). An de maintenir cet état et d’assurer
un usage sans danger, vous devez absolument respecter
ce mode d’emploi en tant qu’utilisateur!
Lisez avant la mise en service du produit le mode
d’emploi complet, respectez toutes les consignes de
commande et de sécurité! Tous les noms de rme et de
produit sont des marques du fabricant respectif. Tous
droits réservés.
Pour plus de renseignements, adressez-vous à votre
partenaire revendeur spécialisé.
36
Français

Étendue de la livraison
TVVR30104
TVVR30414
• Enregistreur 4 canaux avec HDD
• Enregistreur 4 canaux avec HDD
• 1 caméra extérieure jour/nuit
• 4 caméras dômes extérieures jour/nuit
• Bloc d‘alimentation universel
• Bloc d‘alimentation universel
• 1 câble coaxial de 20m
• 4 câble coaxial de 20m
• Souris USB
• Souris USB
• Guide de démarrage rapide
• Guide de démarrage rapide
• Instructions
• Instructions
• CD
• CD
TVVR30404
TVVR30004
TVVR30004
• Enregistreur 4 canaux avec HDD
• Enregistreur 4 canaux
• 4 caméras extérieures jour/nuit
• Bloc d’alimentation
• Bloc d‘alimentation universel
• Souris USB
• 4 câble coaxial de 20m
• Guide de démarrage rapide
• Souris USB
• Instructions
• Guide de démarrage rapide
• CD
Manual
• Instructions
• CD
37
Français

Avertissements
L’enregistreur et la caméra ne doivent
Veillez à ce que l’alimentation
pas être exposés à des champs
électrique ne soit pas interrompue.
magnétiques puissants.
Utilisez l’enregistreur et la caméra
Ne renversez pas de liquides
uniquement dans les conditions
sur l’enregistreur.
conseillées par le fabricant.
Éteignez l’enregistreur avant
Veillez à ce que la ventilation
de brancher ou de retirer
soit toujours susante.
des périphériques.
38
Français

Connexions
LAN
Video - OUT
connecteur RJ45 pour la
connecteur BNC pour sortie vidéo pour raccordement
connexion au réseau
d’un moniteur en tant qu’alternative à la sortie VGA
Video - In
USB
12 V
entrée BNC pour caméras analogiques
connexion pour appareils USB
branchement électrique 12 VCC
39
Français

Installation matérielle
1 3 42
Desserrez les 4 vis située
Ouvrez le boîtier avec
Alignez le disque dur sur
Fixez et vissez le disque dur
sur la face inférieure de
précaution.
le socle de l’enregistreur.
sur la face inférieure de
l’enregistreur.
l’enregistreur à l’aide des
vis jointes.
Veuillez noter que l’installation matérielle du TVVR30004 commence au point
1
. L’installation matérielle des kits de vidéosurveillance TVVR30104, TVVR30404 et TVVR30414 commence au
point
8
, car le disque dur de ces modèles est déjà monté.
40
Français
