Samsung PS50B530S2W – page 2
Manual for Samsung PS50B530S2W
English - 21
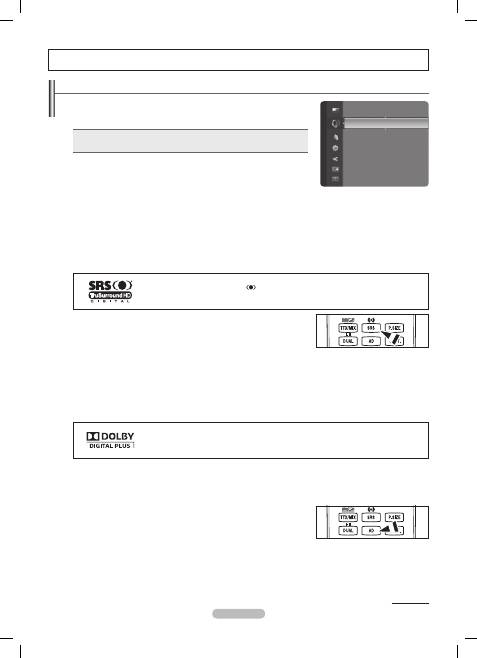
Changing the Sound Setting
Mode → Standard
❑
/
Music
/
Movie
/
Clear Voice
/
Custom
You can select the type of special sound effect to be used when watching a given
broadcast.
Press the
T
TOOLS
button to display
Tools
menu.
You can also configure the sound mode by selecting
Tools
→
Sound Mode
.
Equalizer
❑
The sound settings can be adjusted to suit your personal preferences.
Mode
•
: You can select a sound mode to suit your personal preferences.
Balance
•
: Controls the balance between the right and left speakers.
100Hz
•
/
300Hz
/
1KHz
/
3KHz
/
10KHz
(Bandwidth Adjustment): To adjust the level of different bandwidth frequencies
Reset
•
: Resets the equalizer settings to the default values.
SRS TruSurround HD → Off
❑
/
On
SRS TruSurround HD
is the combined technology of TruSurround and FOCUS, TruBass.
SRS TruSurround HD
is down mixing technology that makes the Surround Sound effect of virtual 5.1 channel via two speakers.
This function provide not only rich deep bass at a low-pitched sound but also improve the resolution at a high-pitched sound.
If the sound is abnormal while TV is playing music, please adjust the equalizer and
N
SRS TruSurround HD
(
Off
/
On
).
TruSurround HD
, SRS and the
symbol are trademarks of SRS Labs, Inc.
TruSurround HD
technology is incorporated under license from SRS Labs, Inc.
You can select these options simply by pressing the
O
SRS
button on the remote
control.
Audio Language
❑
(only digital channel)
You can change the default value for audio languages. Displays the language
information for the incoming stream.
You can only select the language among the actual languages being broadcast.
N
Audio Format → MPEG
❑
/
Dolby Digital
(only digital channel)
When sound is emitted from both the main speaker and the audio receiver, a sound echo may occur due to the decoding speed
difference between the main speaker and the audio receiver. In this case, use the TV Speaker function.
You can only select the language among the actual languages being broadcast.
N
Manufactured under license from Dolby Laboratories.
Dolby and the double-D symbol are trademarks of Dolby Laboratories.
Audio Description
❑
(only digital channel)
This is an auxiliary audio function that provides an additional audio track for visually challenged persons. This function handles the
Audio Stream for the AD (Audio Description), when it is sent along with the Main audio from the broadcaster. Users can turn the
Audio Description On or Off and control the volume.
You can select these options simply by pressing the
O
AD
button on the remote control.
Audio Description →
Off
/
On
Turn the audio description function on or off.
Volume
You can adjust the audio description volume.
Volume
N
is active when
Audio Description
is set to
On
.
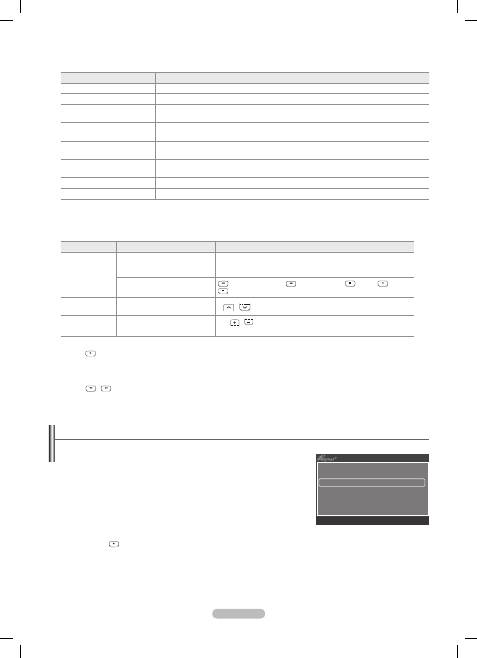
Sound Control
Continued...
\ZW
\ZW
Mode
: Custom
►
Equalizer
SRS TruSurround HD : Off
Audio Language
: ----
Audio Format
: ----
Audio Description
Auto Volume
: Off
Sound
BN68-02355H-Eng.indb 21
2009-08-28 �� 2:49:54
English - 22
Auto Volume → Off
❑
/
On
Each broadcasting station has its own signal conditions, and so it is not easy to adjust the volume every time the channel is
changed. This feature lets you automatically adjust the volume of the desired channel by lowering the sound output when the
modulation signal is high or by raising the sound output when the modulation signal is low.
Speaker Select → External Speaker
❑
/
TV Speaker
If you want to hear the sound through separate speakers, cancel the internal amplifier.
The
N
–
+
,
M
MUTE
buttons do not operate when the
Speaker Select
is set to
External Speaker
.
If you select
N
External Speaker
in the
Speaker Select
menu, the sound settings will be limited.
TV's Internal Speakers
Audio Out (Optical, L / R Out) to Sound System
TV / Ext. / AV / Component / PC / HDMI
TV / Ext. / AV / Component / PC / HDMI
TV Speaker
Speaker Output
Sound Output
External Speaker
Mute
Sound Output
Video No Signal
Mute
Mute
Sound Reset
❑
Reset All / Reset Sound Mode / Cancel
You can restore the Sound settings to the factory defaults.
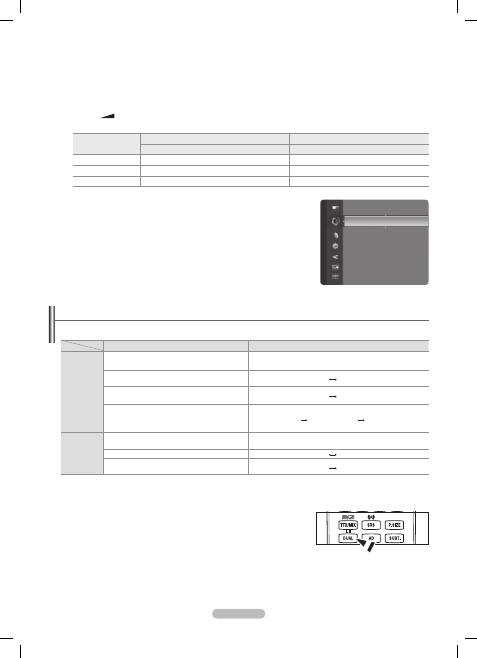
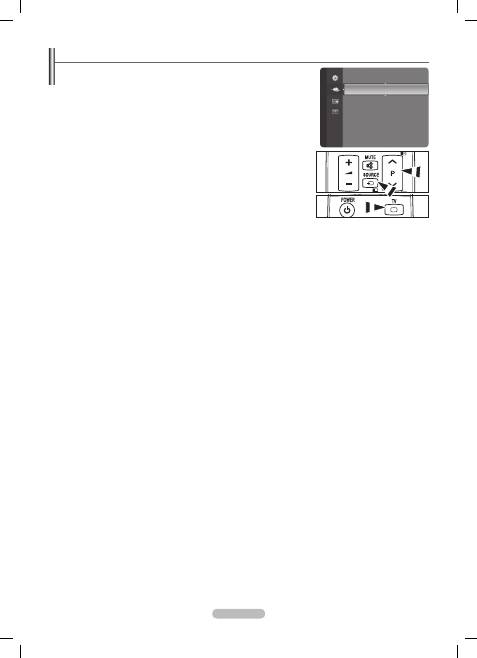
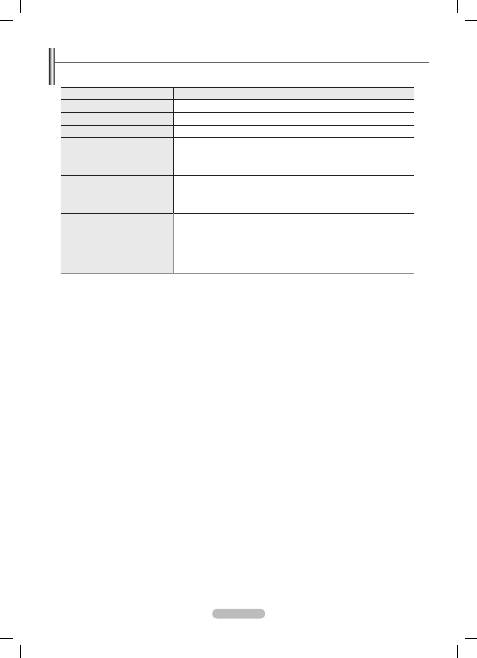
Selecting the Sound Mode
When you set to
Dual l ll
, the current sound mode is displayed on the screen.
Type of broadcast
On-screen indication
NICAM
Stereo
Regular broadcast
(Standard audio)
Mono
(Normal use)
Regular + NICAM Mono
NICAM
Mono
(Normal)
NICAM-Stereo
NICAM
Stereo
Mono
(Normal)
NICAM Dual-I/II
NICAM
Dual-1
NICAM
Dual-2
Mono
(Normal)
A2
Stereo
Regular broadcast
(Standard audio)
Mono
(Normal use)
Bilingual or DUAL-I/II
Dual I
Dual II
Stereo
Stereo
Mono
(Forced mono)
If the stereo signal is weak and an automatic switching occurs, then switch to the mono.
N
This function is only activated in stereo sound signal. It is deactivated in mono sound signal.
N
This function is only available in
N
TV
mode.
You can select these options simply by
O
pressing the
DUAL
button on the remote control.
\ZW
Auto Volume
: Off
Speaker Select
: TV Speaker
Sound Reset
►
Sound
BN68-02355H-Eng.indb 22
2009-08-28 �� 2:49:55
English - 23
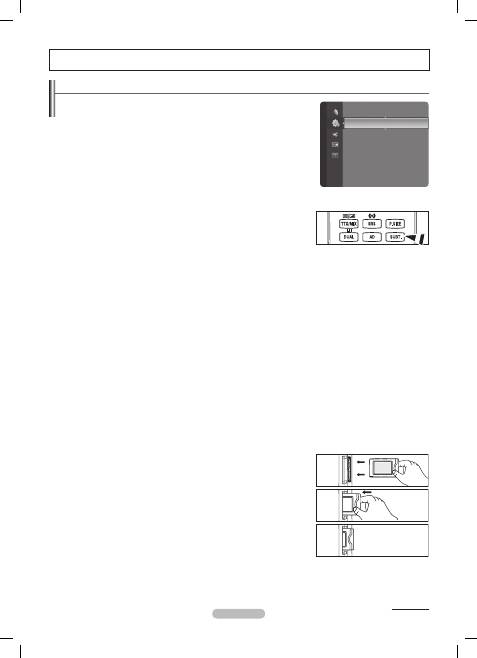
Configuring the Setup Menu
Menu Language
❑
You can set the menu language.
Broadcast
❑
Subtitle
You can activate and deactivate the subtitles. Use this menu to set the Subtitle Mode.
Normal
under the menu is the basic subtitle and
Hard of hearing
is the subtitle for a
hearing-impaired person.
Subtitle → Off / On
•
: Switches subtitles off or on.
Mode → Normal / Hard of hearing
•
: Sets the subtitle mode.
Subtitle Language
•
: Set the subtitle language.
If the programme you are watching does not support the
N
Hard of hearing
function,
Normal
automatically activates even though
Hard of hearing
mode is selected.
English is the default in cases where the selected language is unavailable in the
N
broadcast.
You can select these options simply by pressing the
O
SUBT.
button on the remote
control.
Digital Text → Disable / Enable
If the programme is broadcast with digital text, this feature is enabled.
MHEG (Multimedia and Hypermedia Information Coding Experts Group)
N
An International standard for data encoding systems used in multimedia and hypermedia. This is at a higher level than the
MPEG system which includes
data-linking hypermedia such as still images, character service, animation, graphic and video files as well as multimedia data.
MHEG is user runtime interaction technology and is being applied to various fields including VOD (Video-On-Demand), ITV
(Interactive TV), EC (Electronic Commerce), tele-education,
tele-conferencing, digital libraries and network games.
Teletext Language
You can set the Teletext language by selecting the language type.
English is the default in cases where the selected language is unavailable in the broadcast.
N
Preference
Primary Audio Language / Secondary Audio Language / Primary Subtitle Language / Secondary Subtitle Language /
•
Primary Teletext Language / Secondary Teletext Language
Using this feature, users can select one of the languages. The language selected here is the default when the user selects
a channel. If you change the language setting, the Subtitle Language, Audio Language, and the Teletext Language of the
Language menu are automatically changed to the selected language. The Subtitle Language, Audio Language, and the Teletext
Language of the Language menu show a list of languages supported by the current channel and the selection is highlighted. If
you change this language setting, the new selection is only valid for the current channel. The changed setting does not change
the setting of the Primary Subtitle Language, Primary Audio Language, or the Primary Teletext Language of the Preference
menu.
Common Interface
Installing the CI Card
•
1.
Purchase the CI CAM module by visiting your nearest dealer or by phone.
2.
Insert the CI CARD into the CAM in the direction of the arrow until it fits.
3.
Insert the CAM with the CI CARD installed into the common interface slot.
Insert the CAM in the direction of the arrow, right up to the end so that it is parallel
N
with the slot.
4.
Check if you can see a picture on a scrambled signal channel.
CI Menu
•
This enables the user to select from the CAM-provided menu.
Select the CI Menu based on the menu PC Card.
Application Info.
•
This contains information on CAM inserted in the CI slot and displays it.
The Application Info inserting is about the CI CARD. You can install the CAM anytime whether the TV is ON or OFF.
CAM is not supported in some countries and regions,check with your authorized dealer.
N
Function Description
Continued...
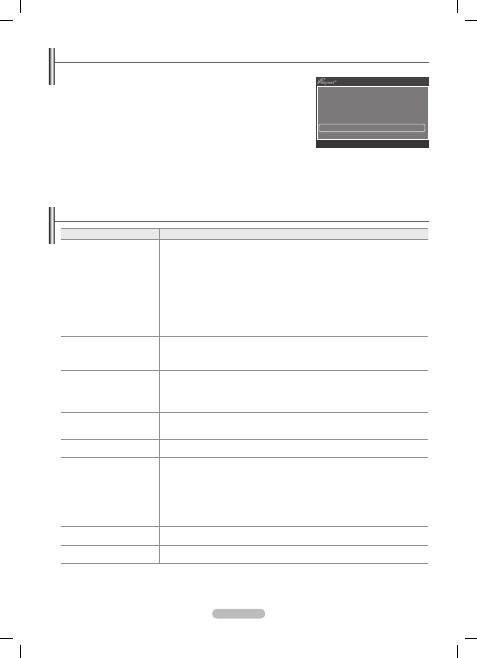
\ZW
Setup
Plug & Play
Menu Language : English
►
Time
Broadcast
Security
General
BN68-02355H-Eng.indb 23
2009-08-28 �� 2:49:55

English - 24
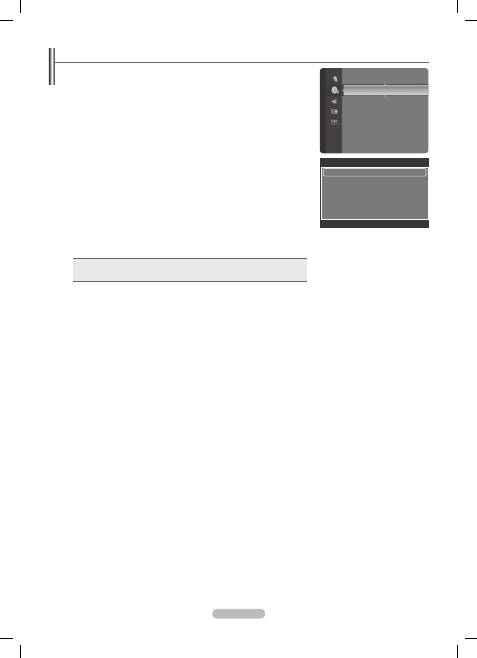
Security
❑
Child Lock
→
Off / On
This feature allows you to prevent unauthorized users, such as children, from watching unsuitable programmes by muting out video
and audio.
Before the setup screen appears, the PIN number input screen appears. Enter your 4 digit PIN number.
N
The default PIN number of a new TV set is
N
'0-0-0-0'. You can change the PIN by selecting
Change PIN
from the menu.
You can lock some channels in Channel List.
N
(refer to page 15)
Child Lock
N
is available only in TV mode.
Parental Lock
This feature allows you to prevent unauthorized users, such as children, from watching unsuitable programmes by a 4-digit PIN
(Personal Identification Number) code that is defined by the user.
Before the setup screen appears, the PIN number input screen appears. Enter your 4 digit PIN number.
N
The default PIN number of a new TV set is '0-0-0-0'. You can change the PIN by selecting
N
Change PIN
from the menu.
When the parental ratings are set, the
N
\
symbol is displayed.
Allow All
N
: Press to unlock all TV ratings.
Block All
: Press to lock all TV ratings
Change PIN
You can change your personal ID number that is required to set up the TV.
Before the setup screen appears, the PIN number input screen appears. Enter your 4 digit PIN number.
N
The default PIN number of a new TV set is
N
'0-0-0-0'.
If you forget the PIN code, press the remote control buttons in the following sequence, which resets the PIN to
N
'0-0-0-0':
POWER
(Off),
M
MUTE, 8, 2, 4, POWER
(On).
General
❑
Game Mode
→
Off / On
When connecting to a game console such as PlayStationTM or XboxTM, you can enjoy a more realistic gaming experience by
selecting the game menu.
When the Game Mode is On
•
Picture Mode
-
is automatically changed to
Standard
and users cannot change the mode.
Sound Mode
-
is automatically changed to
Custom
and users cannot change the mode. Adjust the sound using the equalizer.
The
-
Reset
in the
Sound
menu is activated.
Reset
function initializes the
Equalizer
settings to the factory default setting.
Game Mode
N
is not available in regular TV mode or
Game Mode
set to
Off
.
If the picture is poor when external device is connected to TV, check if
N
Game Mode
is
On
.
If you display the TV menu in
N
Game mode
, the screen shakes slightly.
The mark (
N
) appears on the screen which means that
Game Mode
is on with the selected source.
This function supports only game function.
N
Game mode
N
is not available in
PC
mode.
Energy Saving → Off / Low / Medium / High / Picture Off
This feature adjusts the brightness of the TV in order to reduce power consumption. When watching TV at night, set the
Energy Saving
mode option to
High
to reduce eye fatigue as well as power consumption.
If you select
Picture Off
, the screen is turned off and you can only hear the sound. Press any button to get out of
Picture Off
.
In the
N
Tools
menu,
Picture Off
function is not supported.
Press the
T
TOOLS
button to display
Tools
menu.
You can also set the Energy Saving option by selecting
Tools → Energy Saving
.
Melody → Off / Low / Medium / High
The TV power on / off melody sound can be adjusted.
The Melody does not play
N
When no sound is output from the TV because the
-
MUTE
button has been pressed.
When no sound is output from the TV because the
-
–
(Volume) button has been pressed.
When the TV is turned off by
-
Sleep Timer
function.
BN68-02355H-Eng.indb 24
2009-08-28 �� 2:49:55
English - 25
Setting the Time
Clock
❑
Setting the clock is necessary in order to use the various timer features of the TV.
The current time will appear every time you press the
N
INFO
button.
If you disconnect the power cord, you have to set the clock again.
N
Clock Mode
You can set up the current time manually or automatically.
Auto
•
: Set the current time automatically using the time from the digital broadcast.
Manual
•
: Set the current time to a manually specified time.
Clock Set
You can set the current time manually.
Set up this item when you have set
N
Clock Mode
to
Manual
.
You can set the
N
Day
,
Month
,
Year
,
Hour
,
Minute
directly by pressing the number
buttons on the remote control.
Sleep Timer → Off
❑
/
30 min
/
60 min
/
90 min
/
120 min
/
150 min
/
180 min
The sleep timer automatically shuts off the TV after a preset time.
The TV automatically switches to standby mode when the timer reaches 0.
N
To cancel the
N
Sleep Timer
function, select
Off
.
Press the
T
TOOLS
button to display
Tools
menu.
You can also set the sleep timer by selecting
Tools → Sleep Timer
.
Timer 1
❑
/
Timer 2
/
Timer 3
Three different on / off timer settings can be made.
On Time:
Set the hour, minute, and Activate/Inactivate.
(To activate timer with the setting you’ve chosen, set to
Activate
.)
Off Time:
Set the hour, minute, and Activate/Inactivate.
(To activate timer with the setting you’ve chosen, set to
Activate
.)
Volume:
Set the required volume level.
Antenna:
Select ATV or DTV.
Channel:
Select the desired channel.
Repeat:
Select Once, Everyday, Mon~Fri, Mon~Sat, Sat~Sun, or Manual.
When
N
Manual
is selected, press the ► button to select the desired day of the week. Press the
ENTER
E
button over the
desired day and the
c
mark will appear.
You must set the clock first.
N
You can set the hour, minute and channel by pressing the number buttons on the remote control.
N
Auto Power Off
N
When you set the timer On, the television will eventually turn off, if no controls are operated for 3 hours after the TV was turned on
by the timer. This function is only available in timer On mode and prevents overheating, which may occur if a TV is on for too long
time.
Setup
Plug & Play
Language
: English
Time
►
Game Mode
: Off
Child Lock
: On
Change PIN
Parental Lock
Subtitle
Teletext Language
: ----
Time
Clock
: -- : --
►
Sleep Timer
: Off
Timer 1
: Inactivated
Timer 2
: Inactivated
Timer 3
: Inactivated
U
Move
E
Enter
R
Return
BN68-02355H-Eng.indb 25
2009-08-28 �� 2:49:55
English - 26
Source List / Edit Name
Source List
❑
Use to select TV or other external input sources such as DVD players or Cable Box /
Satellite receivers (Set-Top Box) connected to the TV. Use to select the input source of
your choice.
TV
, Ext., AV, PC, Component, HDMI1, HDMI2/DVI, HDMI3.
You can choose only those external devices that are connected to the TV. In the
N
Source List
, connected inputs will be highlighted and sorted to the top. Inputs that
are not connected will be sorted to the bottom.
Using the Colour buttons on the remote with the Source list
N
Red
-
(Refresh): Refreshes the connecting external devices.
T
-
TOOLS
(Tools): Displays the
Edit Name
and
Information
menus.
Press the
O
SOURCE
button on the remote control to view an external signal source.
TV mode can be selected by pressing the
TV
button, number buttons (
0~9
), and the
P
<
/
>
button on the remote control.
Edit Name
❑
You can name the device connected to the input jacks to make your input source
selection easier.
VCR / DVD / Cable STB / Satellite STB / PVR STB / AV Receiver / Game / Camcorder / DVI PC / DVI / PC / TV / IPTV /
Blu-Ray / HD DVD / DMA
When a PC with a resolution of 1920x1080@60Hz is connected to the
N
HDMI IN 2 (DVI)
port, you should set the
HDMI2 / DVI
mode to
PC
in the
Edit Name
of the
Input
mode.
Source List
Edit Name
Input
\ZW
\ZW
BN68-02355H-Eng.indb 26
2009-08-28 �� 2:49:55
English - 27
Supported Program
Self Diagnosis
❑
Picture Test
, Sound Test, Signal Information
If you think you have the Picture, Sound, Signal problem, perform the test. You can check the problem state.
If you hear no sound from the TV’s speakers, before performing the sound test, make sure
N
Speaker Select
is set to
TV speaker
in the
Sound
menu.
The melody will be heard during the test even if
N
Speaker Select
is set to
External Speaker
or the sound is muted by pressing
the
M
MUTE
button.
If the signal strength meter indicates that the signal is weak, physically adjust your antenna to increase the signal strength.
N
Continue to adjust the antenna until you find the best position with the strongest signal.
Software Upgrade
❑
To keep your product up-to-date with new Digital Television features then software upgrades are periodically broadcast as part of
the normal Television signal. It will automatically detect these signals and display the software upgrade banner. You are given the
option to install the upgrade.
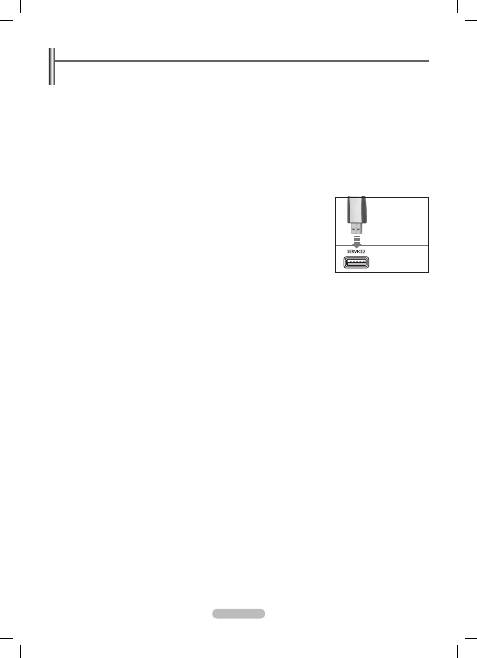
By USB
Insert a USB drive containing the firmware upgrade into TV. Please be careful to not disconnect
the power or remove the USB drive while upgrades are being applied. The TV will turn off and
turn on automatically after completing the firmware upgrade. Please check the firmware version
after the upgrades are complete. When software is upgraded, video and audio settings you
have made will return to their default (factory) settings. We recommend you write down your
settings so that you can easily reset them after the upgrade.
By Channel
Upgrades the software using the broadcasting signal.
Standby Mode Upgrade
To continue software upgrade with master power on, Select On by pressing the ▲ or ▼ button. 45 minutes after entering standby
mode, a manual upgrade is automatically conducted. Since the power of the unit is turned on internally, the screen may be on
slightly for the product. This phenomenon may continue for more than 1 hour until the software upgrade is completed.
Alternative Software
Replace the current software with the alternative.
HD Connection Guide
❑
The brief instruction on
How to get the best performance from your new HDTV
is displayed. We offer the connection method for
HD devices.
Contact Samsung
❑
You can know the Samsung Call center, website and information for product.
You can move the previous or next page by pressing the ▲ or ▼ button.
N
TV Panel
USB Drive
BN68-02355H-Eng.indb 27
2009-08-28 �� 2:49:56
English - 28
About Anynet+
Connecting Anynet+ Devices
Anynet+ is a function that enables you to control all connected Samsung devices that support Anynet+ with your Samsung TV’s remote.
The Anynet+ system can be used only with Samsung devices that have the Anynet+ feature. To be sure your Samsung device has this
feature, check if there is an Anynet+ logo on it.
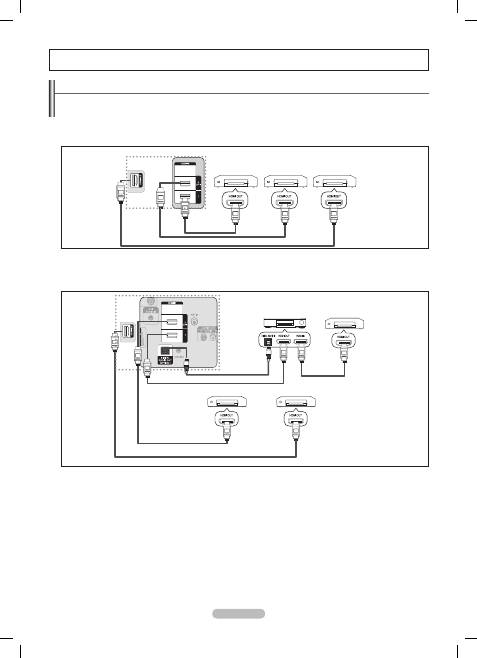
To connect to a TV
❑
1.
Connect the [HDMI 1], [HDMI 2(DVI)] or [HDMI 3] jack on the TV and the HDMI OUT jack of the corresponding Anynet+ device
using an HDMI cable.
To connect to Home Theater
❑
1.
Connect the [HDMI IN 1], [HDMI IN 2(DVI)], or [HDMI IN 3] jack on the TV and the HDMI OUT jack of the corresponding Anynet+
device using an HDMI cable.
2.
Connect the HDMI IN jack of the home theater and the HDMI OUT jack of the corresponding Anynet+ device using an HDMI cable.
Connect the Optical cable between the DIGITAL AUDIO OUT (OPTICAL) jack on your TV and the Digital Audio Input on the Home
N
Theater.
When following the connection above, the Optical jack only outputs 2 channel audio. You will only hear sound from the Home
N
Theater’s Front Left and Right speakers and the subwoofer. If you want to hear 5.1 channel audio, connect the DIGITAL AUDIO
OUT (OPTICAL) jack on the DVD player or Cable/Satellite Box (ie Anynet Device 1 or 2) directly to the Amplifi er or Home Theater,
not the TV.
Connect only one Home Theater.
N
You can connect an Anynet
N
+ device using the HDMI 1.3 cable. Some HDMI cables may not support Anynet+ functions.
Anynet
N
+ works when the AV device supporting Anynet+ is in the Standby or On status.
Anynet
N
+ supports up to 12 AV devices in total. Note that you can connect up to 3 devices of the same type.
Anynet+ Device 1
Anynet+ Device 2
Anynet+ Device 3
TV
HDMI 1.3 Cable
HDMI 1.3 Cable
HDMI 1.3 Cable
TV
Anynet+ Device 1
Anynet+ Device 2
Anynet+ Device 3
HDMI 1.3 Cable
HDMI 1.3 Cable
HDMI 1.3 Cable
HDMI 1.3 Cable
Home Theatre
Optical Cable
BN68-02355H-Eng.indb 28
2009-08-28 �� 2:49:57
English - 29
Setting Up Anynet+
Press the
T
TOOLS
button to display
Tools
menu.
You can also display Anynet+ menu by selecting
Tools
→
Anynet+(HDMI-CEC)
.
Setup
❑
Anynet+(HDMI-CEC) → Off
/
On
To use the Anynet+ Function,
Anynet+ (HDMI-CEC)
must be set to
On
.
When the
N
Anynet+ (HDMI-CEC)
function is disabled, all the Anynet+ related
operations are deactivated.
Auto Turn Off →
Yes
/
No
Setting an Anynet+ Device to turn Off Automatically when the TV is Turned Off.
The active source on the TV remote must be set to TV to use the Anynet
N
+ function.
If you set
N
Auto Turn Off
to
Yes
, connected external devices are also turned off when
the TV is turned off. If an external device is still recording, it may or may not turn off.
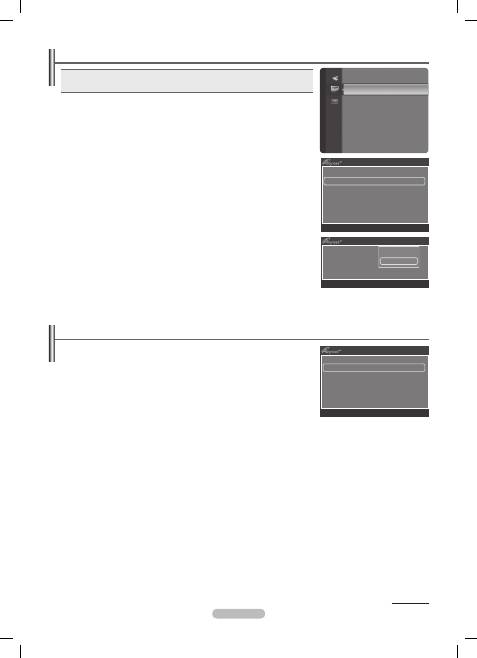
Scanning and Switching between Anynet+ Devices
1.
Press the
TOOLS
button. Press the
ENTER
E
button to select
Anynet+ (HDMI-CEC)
.
2.
Press the ▲ or ▼ button to select
Device List
, then press the
ENTER
E
button.
Anynet+ devices connected to the TV are listed. If you cannot find a device you want,
N
press the red button to scan for devices.
Only when you set
N
Anynet+ (HDMI-CEC)
to
On
in the
Setup
menu, the
Device List
menu appears.
3.
Press the ▲ or ▼ button to select to a particular device and press the
ENTER
E
button.
It is switched to the selected device.
Switching to the selected devices may take up to 2 minutes. You cannot cancel the
N
operation during the switching operation.
The time required to scan for devices is determined by the number of connected devices.
N
When the device scan is complete, the number of devices found are not displayed.
N
Although the TV automatically searches the device list when the TV is turned on via the power button, devices connected to the TV
N
when the TV is on or under some conditions are not automatically displayed in the device list. Press the red button to search for the
connected device.
If you have selected external input mode by pressing the
N
SOURCE
button, you cannot use the Anynet+ function. Make sure to
switch to an Anynet+ device by using the
Device List
.
Application
Anynet+ (HDMI-CEC)
►
Device List
Setup
U
Move
E
Enter
R
Return
View TV
Device List
Record
:
DVDR
DVDR MENU
DVDR INFO
Receiver
:
On
Setup
U
Move
E
Enter
R
Return
Anynet+ (HDMI-CEC)
: ON
Auto Turn Off
: Yes
U
Move
E
Enter
R
Return
Setup
Off
On
Continued...
BN68-02355H-Eng.indb 29
2009-08-28 �� 2:49:57
English - 30
Anynet
❑
+ Menu
The
Anynet+
menu changes depending on the type and status of the Anynet+ devices connected to the TV.
Anynet+ Menu
Description
View TV
Anynet+ mode changes to TV broadcast mode.
Device List
Shows the Anynet+ device list.
(device_name) MENU
Shows the connected device menus. E.g. If a DVD recorder is connected, the disc menu of the
DVD recorder will appear.
(device_name) INFO
Shows the play menu of the connected device. E.g. If a DVD recorder is connected, the play menu
of the DVD recorder will appear.
Record: (*recorder)
Starts recording immediately using the recorder.
(This is only available for devices that support the recording function.)
(*recorder) Reserve Recording
Enables reserving a recording for the recorder.
(This is only available for devices that support the recording reservation function.)
Stop Recording: (*recorder)
Stops recording.
Receiver
Sound is played through the receiver.
If more than one recording device is connected, they are displayed as (*recorder) and if only one recording device is connected, it
N
will be represented as (*device_name).
TV Remote Control Buttons Available in Anynet+ Mode
❑
Device Type
Operating Status
Available Buttons
Anynet+ Device
After switching to the device, when
the menu of the corresponding
device is displayed on the screen.
Numeric buttons
▲ / ▼ / ◄ / ►/
ENTER
E
buttons
Colour buttons /
EXIT
button
After switching to the device, while
playing a file
(Backward search) /
(Forward search)
(Stop) /
(Play) /
(Pause)
Device with built-
in Tuner
After switching to the device, when
you are watching a TV programme
P
/
button
Audio Device
When Receiver is activated
=
/ button
M
MUTE
button
The Anynet+ function only works when the active source on the TV remote control is set to TV.
N
The
N
button works only while in the recordable state.
You cannot control Anynet+ devices using the buttons on the TV. You can control Anynet+ devices only using the TV remote control.
N
The TV remote control may not work under certain conditions. In this case, reselect the Anynet+ device.
N
The Anynet+ functions do not operate with other manufacturers’ products.
N
The
N
,
operations may differ depending on the device.
Recording
You can make a recording of a TV programme using a Samsung recorder.
1.
Press the
TOOLS
button. Press the
ENTER
E
button to select
Anynet+ (HDMI-CEC)
.
2.
Press the ▲ or ▼ button to select
Recording: (device_name)
, then press the
ENTER
E
button. Recording begins.
When there is more than one Record device
N
When multiple recording devices are connected, the recording devices are listed.
Press the ▲ or ▼ button to select a recording device and press the
ENTER
E
button. Recording begins.
When the recording device is not displayed
N
Select
Device List
and press the red button to search devices.
You can record the source streams by selecting
N
Record: (device_name)
.
Pressing the
N
button will record whatever you are currently watching. If you are watching video from another device, the video
from the device is recorded.
Before recording, check whether the antenna jack is properly connected to the recording device. To properly connect an antenna to
N
a recording device, refer to the recording device’s users manual.
View TV
Device List
Record
:
DVDR
DVDR MENU
DVDR INFO
Receiver
:
On
Setup
U
Move
E
Enter
R
Return
BN68-02355H-Eng.indb 30
2009-08-28 �� 2:49:58
English - 31
Listening through a Receiver (Home theater)
You can listen to sound through a receiver instead of the TV speaker.
1.
Press the
TOOLS
button. Press the
ENTER
E
button to select
Anynet+ (HDMI-CEC)
.
2.
Press the ▲ or ▼ button to select
Receiver
. Press the ◄ or ► button to select
On
or
Off
.
If your receiver supports audio only, it may not appear in the device list.
N
The receiver will work when you have properly connected the Optical IN jack of the
N
receiver to the Optical Out jack of the TV.
When the receiver (home theater) is set to On, you can hear sound output from the
N
TV’s Optical jack. When the TV is displaying a DTV(air) signal, the TV will send out 5.1
channel sound to the Home theater receiver. When the source is a digital component
such as a DVD and is connected to the TV via HDMI, only 2 channel sound will be heard from the Home Theater receiver.
If there is a power interruption to the TV when the
N
Receiver
is set to
On
(by disconnecting the power cord or a power failure),
the
Speaker Select
may be set to
External Speaker
when you turn the TV on again. (see page 22)
Troubleshooting for Anynet+
Symptom
Solution
Anynet+ does not work.
Check if the device is an Anynet
•
+ device. The Anynet+ system supports Anynet+ devices only.
Connect only one receiver (home theater).
•
Check if the Anynet
•
+ device power cord is properly connected.
Check the Anynet
•
+ device’s Video/Audio/HDMI 1.3 cable connections.
Check whether
•
Anynet+
(HDMI-CEC)
is set to
On
in the Anynet+ setup menu.
Check whether the TV remote control is in TV mode.
•
Check whether it is Anynet
•
+ exclusive remote control.
Anynet
•
+ doesn’t work in certain situations. (Searching channels, Operating Plug & Play, etc.)
When connecting or removing the HDMI 1.3 cable, please make sure to search devices again
•
or turn your TV off and on again.
Check if the Anynet
•
+ Function of Anynet+ device is set on.
I want to start Anynet+.
Check if the Anynet+ device is properly connected to the TV and check if the
•
Anynet+
(HDMI-CEC)
is set to
On
in the Anynet+ Setup menu.
Press the
•
TV
button on the TV remote control to switch to TV. Then press the
TOOLS
button
to show the
Anynet+
menu and select a menu you want.
I want to exit Anynet+.
Select View TV in the Anynet
•
+ menu.
Press the
•
SOURCE
button on the TV remote control and select a device other than Anynet+
devices.
(Note that the channel button operates only when a tuner-embedded Anynet
•
+ device is not
connected.)
The message Connecting to
Anynet+ device...
appears on the screen.
You cannot use the remote control when you are configuring Anynet
•
+ or switching to a view
mode.
Use the remote control when the Anynet
•
+ setting or switching to view mode is complete.
The Anynet+ device does not
play.
You cannot use the play function when
•
Plug & Play
is in progress.
The connected device is not
displayed.
Check whether or not the device supports Anynet
•
+ functions.
Check whether or not the HDMI 1.3 cable is properly connected.
•
Check whether
•
Anynet+ (HDMI-CEC)
is set to
On
in the Anynet+ setup menu.
Search Anynet
•
+ devices again.
You can connect an Anynet
•
+ device using the HDMI 1.3 cable only. Some HDMI cables may
not support Anynet+ functions.
If it is terminated by an abnormal situation such as disconnecting the HDMI cable or power
•
cord or a power failure, please repeat the device scan.
The TV programme cannot be
recorded.
Check whether the antenna jack on the recording device is properly connected.
•
The TV sound is not output
through the receiver.
Connect the optical cable between TV and the receiver.
•
View TV
Device List
Record
:
DVDR
DVDR MENU
DVDR INFO
Receiver
◄
On
►
Setup
U
Move
L
Adjust
R
Return
BN68-02355H-Eng.indb 31
2009-08-28 �� 2:49:58
English - 32
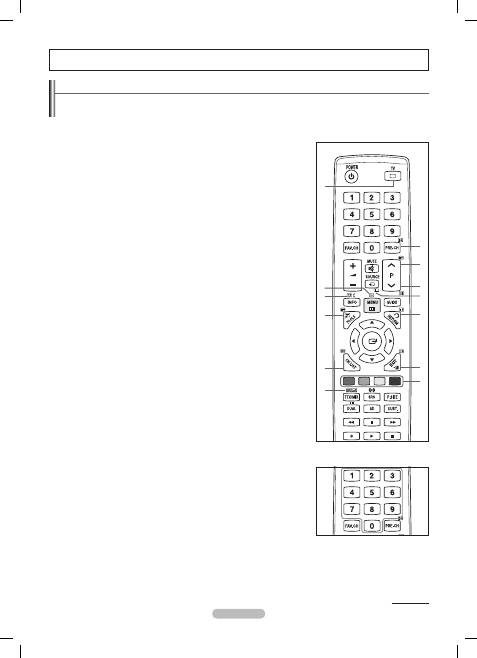
Teletext Feature
Most television stations provide written information services via Teletext. The index page of the teletext service gives you information on
how to use the service. In addition, you can select various options to suit your requirements by using the remote control buttons.
For teletext information to be displayed correctly, channel reception must be stable. Otherwise, information may be missing or some
N
pages may not be displayed.
1
:
(exit)
Exit from the teletext display.
2
6
(index)
Used to display the index (contents) page at any time while you are viewing teletext.
3
5
(reveal)
Used to display the hidden text (answers to quiz games, for example). To display normal
screen, press it again.
4
4
(size)
Press to display the double-size letters in the upper half of the screen. For lower half of
the screen, press it again. To display normal screen, press it once again.
5
8
(store)
Used to store the teletext pages.
6
/
(teletext on/mix)
Press to activate teletext mode after selecting the channel providing the teletext service.
Press it twice to overlap the teletext with the current broadcasting screen.
7
1
(sub-page)
Used to display the available sub-page.
8
2
(page up)
Used to display the next teletext page.
9
3
(page down)
Used to display the previous teletext page.
0
0
(mode)
Press to select the teletext mode (LIST/FLOF). If you press it in the LIST mode, it
switches into the List save mode. In the List save mode, you can save teletext page into
list using the
8
(store) button.
!
9
(hold)
Used to hold the display on a given page if the selected page is linked with several
secondary pages which follow on automatically. To resume, press it again.
@
7
(cancel)
Used to display the broadcast when searching for a page.
#
Colour buttons (red/green/yellow/blue)
If the FASTEXT system is used by a broadcasting company, the different topics covered
on a teletext page are colour-coded and can be selected by pressing the coloured
buttons. Press one of them corresponding to the required. The page is displayed
with other coloured information that can be selected in the same way. To display the
previous or next page, press the corresponding coloured button.
You can change teletext pages by pressing the numeric buttons on the remote control.
N
\ZW
1
3
4
5
6
2
7
8
9
0
!
@
#
\ZW
Recommendations for Use
Continued...
BN68-02355H-Eng.indb 32
2009-08-28 �� 2:49:58
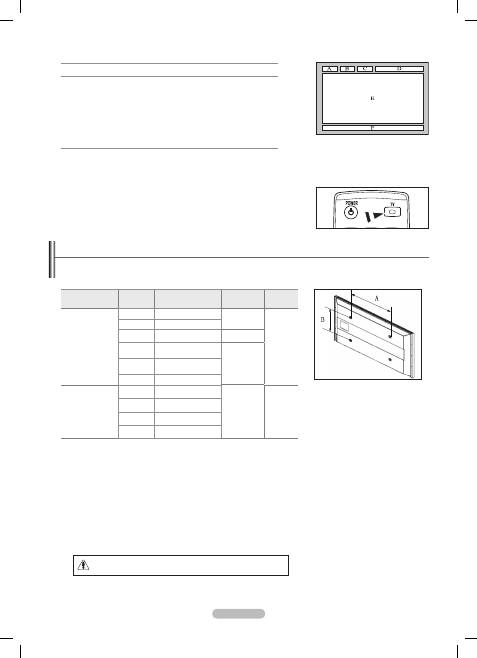
English - 33
The teletext pages are organized according to six categories
Part Contents
A
Selected page number.
B
Broadcasting channel identity.
C
Current page number or search indications.
D
Date and time.
E
Text.
F
Status information.
FASTEXT information.
Teletext information is often divided between several pages displayed in sequence,
N
which can be accessed by
Entering the page number
-
Selecting a title in a list
-
Selecting a coloured heading (FASTEXT system)
-
Press the
O
TV
button to exit from the teletext display.
Wall Mount Kit Specifications (VESA)
Install your wall mount on a solid wall perpendicular to the floor.
When attaching to other building materials, please contact your nearest dealer.
If installed on a ceiling or slanted wall, it may fall and result in severe personal injury.
Product Family
inch
VESA Spec. (A * B)
Standard
Screw
Quantity
LCD-TV
19" ~22"
100 * 100
M4
4
23"~29"
200 * 100
30"~40"
200 * 200
M6
46"~55"
400 * 400
M8
57"~70"
800 * 400
80" ~
1400 * 800
PDP-TV
42"~ 50"
400 * 400
M8
4
58"~ 63"
600 * 400
70" ~
800 * 400
80" ~
1400 * 800
We provided the standard dimensions for wall mount kits as shown in the table above.
N
When purchasing our wall mount kit, a detailed
N
installation manual and all parts necessary for assembly are provided.
Do not use screws longer than the standard dimension, as they may cause damage to the inside of the TV set.
N
For wall mounts that do not comply with the VESA standard screw specifications, the length of the screws may differ depending on
N
their specifications.
Do not use screws that do not comply with the VESA standard screw specifications.
N
Do not use fasten the screws too strongly, this may damage the product or cause the product to fall, leading to personal injury.
Samsung is not liable for these kinds of accidents.
Samsung is not liable for product damage or personal injury when a non-VESA or non-specified wall mount is used or the consumer
N
fails to follow the product installation instructions.
Our 57” and 63” models do not comply with VESA Specifications. Therefore, you should use our dedicated wall mount kit for this
N
model.
Do not exceed 15 degrees tilt when mounting this TV.
N
Do not install your Wall Mount Kit while your TV is turned on.
It may result in personal injury due to electric shock.
\ZW
BN68-02355H-Eng.indb 33
2009-08-28 �� 2:49:58
English - 34
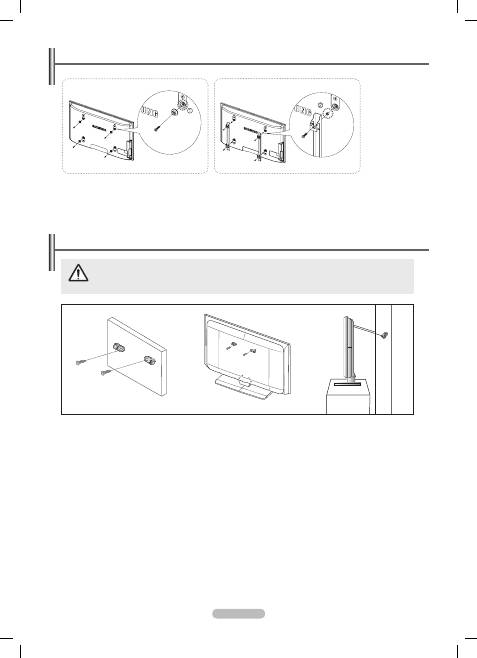
Preparing before installing Wall- Mount on the wall
1.
Install the Wall Mount with a torque range of 15kgf·cm or less. Use care as the parts can be damaged if the torque is out of the
specified range.
2.
Accessory Kit contains Holder–Ring
[
②
] for installing other company’s Wall-Mount on Samsung TV. (Case B)
Screw down the hole
N
[
①
] when installing wall-mount on the wall.
Case A.
Installing SAMSUNG Wall-Mount
Case B.
Installing other company’s Wall-Mount
Pulling, pushing, or climbing on the TV may cause the TV to fall. In particular, ensure your children do not hang
over or destabilize the TV; doing so may cause the TV to tip over, causing serious injuries or death. Follow all
safety precautions provided on the included Safety Flyer. For added stability, install the anti-fall device for safety
purposes, as follows.
To avoid the TV from falling
❑
1.
Put the screws into the clamps and firmly fasten them onto the wall. Confirm that the screws have been firmly installed onto the wall.
You may need additional material such as an anchor depending on the type of wall.
N
Since the necessary clamps, screws, and string are not supplied, please purchase these additionally.
N
2.
Remove the screws from the center back of the TV, put the screws into the clamps, and then fasten the screws onto the TV again.
Screws may not be supplied with the product.
N
3.
Connect the clamps fixed onto the TV and the clamps fixed onto the wall with a strong string and then tie the string tightly.
Install the TV near to the wall so that it does not fall backwards
N
.
It is safe to connect the string so that the clamps fixed on the wall are equal to or lower than the clamps fixed on the TV.
N
Untie the string before moving the TV.
N
4.
Verify all connections are properly secured. Periodically check connections for any sign of fatigue for failure. If you have any doubt
about the security of your connections,contact a professional installer.
경고
주의
경고
주의
Securing the TV to the Wall
Wall
Wall
BN68-02355H-Eng.indb 34
2009-08-28 �� 2:49:59
English - 35
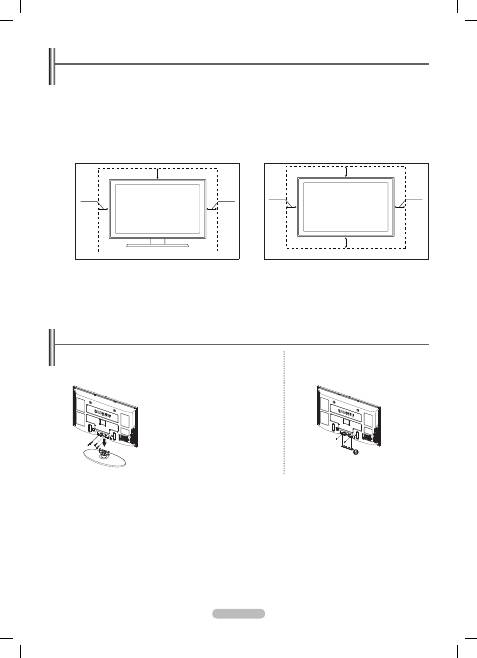
Securing the Installation Space
Keep the required distances between the product and other objects (e.g. walls) to ensure proper ventilation.
Failing to do so may result in fire or a problem with the product due to an increase in the internal temperature of the product.
Install the product so the required distances shown in the figure are kept.
When using a stand or wall-mount, use parts provided by Samsung Electronics only.
N
If you use parts provided by another manufacturer, it may result in a problem with the product or an injury due to the product
-
falling.
If you use parts provided by another manufacturer, it may result in a problem with the product or fire due to an increase in the
-
internal temperature of the product due to poor ventilation.
The appearance may differ depending on the product.
N
When installing the product with a stand
When installing the product with a wall-mount
10 cm
10 cm
10 cm
10 cm
10 cm
10 cm
10 cm
10 cm
10 cm
10 cm
10 cm
10 cm
10 cm
10 cm
How to assemble the Stand-Base
(depending on the model)
Using the 4 screws for securing the stand base and the monitor, firmly attach the
monitor to the stand base.
(The exterior of the set may be different than the picture.)
In case of installing your TV on the wall, close the
cover (
1
) on the stand-base connection part using
two screws for hiding.
Warning
Firmly secure the stand to the TV before moving
it, as the stand may fall and could cause serious
injury.
Two or more people should carry the TV.
N
Never lay the TV on the floor because of
possible damage to the screen.
Always store the TV upright.
BN68-02355H-Eng.indb 35
2009-08-28 �� 2:50:01

English - 36
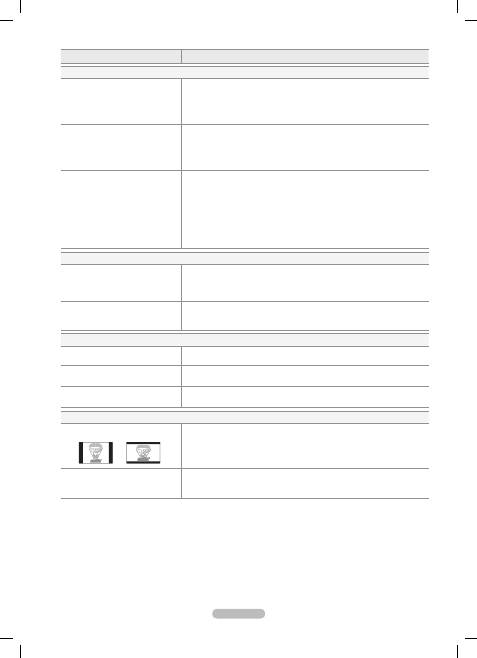
Troubleshooting
If you have any questions of TV, first refer to this list. If none of these troubleshooting tips apply, please visit ‘www.samsung.com’ site,
then click on Support or contact Call Center on list of last page.
Firmware Upgrade can be as first possible solution.
N
Problem
Possible Solution
Picture Quality
First of all, please perform the
Picture Test
to confirm that your TV is properly displaying test image.
* Go to
MENU
→
Support
→
Self Diagnosis
→
Picture Test
If the test image is properly displayed, the poor picture may caused by the source or signal.
TV image does not look as good as it
did in the store.
If you have an analog Cable/Set top box, upgrade to an Box.
•
Use HDMI or Component cables to deliver HD picture quality.
Cable/Satellite subscriber : Try HD (High Definition) stations from channel line up.
•
Antenna connection: Try HD stations after performing Auto program
•
Many HD channels are upscaled from SD (Standard Definition) contents.
N
Adjust Cable/Set top video output resolution to 1080i or 720p.
•
Picture is distorted: macroblock,small
block, dots,pixelization.
Compression of video contents may cause picture distortion especially on fast moving
•
pictures such as sports and action movies.
Low signal level or bad quality can cause picture distortion. This is not a TV issue.
•
Wrong or missing Colour with
Component connection.
Make sure the Component cables are connected to the correct jacks.
•
Incorrect or loose connections may cause Colour problems or the screen will be blank.
Poor Colour or brightness.
Adjust
•
Picture
options in the TV menu (
Picture
Mode
,
Colour
,
Brightness
,
Sharpness
).
Adjust
•
Energy Saving
option in
Setup
menu.
Try picture reset to view the default picture setting.
•
(Go to
MENU
→
Picture
→
Picture Reset
)
Dotted line on the edge of screen.
If picture size is set to
•
Just scan
, change to
16:9
.
Change cable/Set top box resolution.
•
Picture is black and white with AV
(Composite) input only.
Connect video cable (Yellow) to Green jack of component input 1 of the TV.
•
Picture freezes or is distorted when
changing channels or picture is
delayed.
If connected with cable box, please try to reset cable box. (reconnect AC cord and
•
wait until cable box reboots. It may take up to 20 minutes)
Set output resolution of cable box to 1080i or 720p
•
Sound Quality
First of all, please perform the
Sound Test
to confirm that your TV audio is properly operating.
* Go to
MENU
→
Support
→
Self Diagnosis
→
Sound Test
If the audio is
OK
, the sound problem may caused by the source or signal.
No sound or sound is too low at
maximum volume.
Please check the volume of device (Cable/Sat Box, DVD, Blu-ray etc) connected to
•
your TV.
Then, adjust the TV volume accordingly.
Picture is good but no sound.
Set the
•
Speaker Select
option to
TV speaker
in the sound menu.
Make sure audio cables from an external device are connected to correct audio input
•
jacks on the TV.
Check connected device's audio output option.
•
Ex) You may need to change your cable box' audio option to HDMI when you have
HDMI connected to your TV.
If you are using a DVI to HDMI cable, a separate audio cable is required.
•
Deactivate SRS function if you are setting the volume over 30 value.
•
Remove plug from headphone jack (if available on your TV).
•
Noise from speaker.
Check cable connections. Make sure a video cable is not connected to an audio input.
•
For Antenna/Cable connection, check signal strength. Low signal level may cause
•
sound distortion.
BN68-02355H-Eng.indb 36
2009-08-28 �� 2:50:02
English - 37
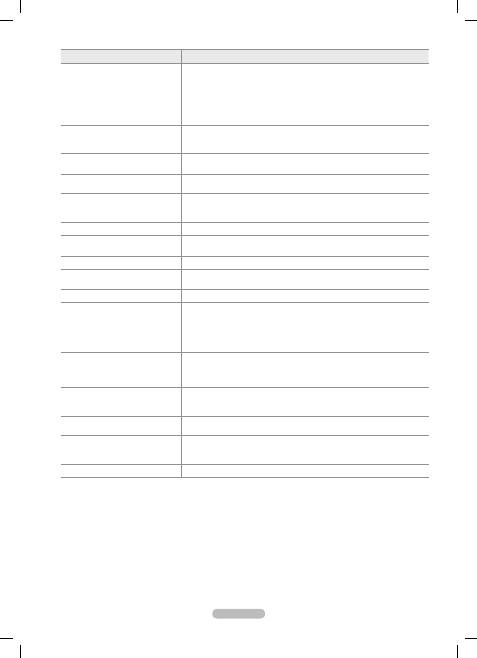
Problem
Possible Solution
No Picture, No Video
TV won't turn on.
Make sure the AC power cord is plugged in securely to the wall outlet and the TV.
•
Make sure the wall outlet is working.
•
Try pressing the Power button on the TV to make sure the remote is working properly.
•
If the TV turns on, it may be caused by Remote Control.
To fix the Remote problem, refer to "Remote control does not work" below.
TV turns off automatically.
Check if the
•
Sleep
Timer
is set to
On
in the
Setup
menu.
If connected the TV to your PC, check your PC power settings.
•
Make sure the AC power cord is plugged in securely to the wall outlet and the TV.
•
If there is no signal for about 10 ~ 15 minutes with Antenna/Cable connection, the TV
•
will turn off.
No picture/Video.
Check cable connections. (remove and reconnect all cables of TV and external
•
devices)
Set your external device's (Cable/Set top Box, DVD, Blu-ray etc) video output to
•
match the connections to the TV input. For example, external device's output : HDMI ,
TV's input : HDMI.
Make sure your connected device is powered on.
•
Make sure to select the TV's correct source by pressing the
•
SOURCE
button on the
remote control.
Reboot the connected device by reconnecting the device’s power cable.
•
RF (Cable/Antenna) Connection
Cannot receive all channels.
Make sure Antenna cable is connected securely.
•
Please try
•
Plug & Play
to add available channels to the channel list.
Go to
MENU
→
Setup
→
Plug & Play
and wait for all avaiable channels are stored.
Verify Antenna is positioned correctly.
•
Picture is distorted : macroblock,small
block,dots,pixelization.
Compression of video contents may cause picture distortion especially on fast moving
•
pictures such as sports and action movies.
Low signal level can cause picture distortion. This is not a TV issue.
•
PC Connection
“Not Supported Mode” message.
Set your PC's output resolution and frequency so it matches the resolutions supported
•
by the TV.
PC is always shown on source list even
if not connected.
This is normal; PC is always shown on the source list even though a PC is not
•
connected.
Video is OK but there is no audio with
HDMI connection.
Check the audio output setting on your PC.
•
Others
Picture is not shown in full screen.
Black bars on each side will be shown on HD channels when displaying upscaled SD
•
(4:3) contents.
Black bars on Top & Bottom will be shown on movies that have aspect ratios different
•
from your TV.
Adjust picture size option on your external device or TV to full screen.
•
Remote control does not work.
Replace the remote control batteries with correct polarity (+ -).
•
Clean the transmission window located on the top of the remote.
•
Try pointing the remote directly at the TV from 5~6 feet away.
•
BN68-02355H-Eng.indb 37
2009-08-28 �� 2:50:02
English - 38
Problem
Possible Solution
Plasma TV is making humming noise.
Plasma TVs typically make a soft humming sound. This is normal. It’s caused by the
•
electrical charges that are used to create the images on the screen.
If the humming sound is loud, you may have set the brightness on the TV too high.
•
Try setting the brightness lower.
You can also have loud humming if the back of your Plasma TV is too close to a wall
•
or other hard surface. Also try rerouting your connection cables.
Improper installation of wall mount can create excessive noise.
•
Image Retention (Burn In) Issue.
To minimize the possibility of screen burn, this unit is equipped with screen burn
•
reduction technology. Pixel Shift technology enables you to set picture movement up/
down (Vertical Line) and side to side (Horizontal Dot).
Can not control TV power or volume
with Cable/Set top box remote control.
Program the Cable/Set top remote control to operate the TV.
•
Refer to Cable/Sat user manual for SAMSUNG TV code.
“Not Supported Mode” message.
Check the supported resolution of the TV and adjust the external device's output
•
resolution accordingly. Refer to resolution settings in this manual.
Can not turn off the Light Effect on the
front bezel (Below SAMSUNG Logo)
Adjust the light effect option in the setup menu.
•
Options are :
Off
,
In Standby
,
In Watching
and
Always
Light Effect
•
is not available on all models
Plastic smell from TV.
This smell is normal and will dissipate over time.
•
TV Signal Strength is unavailable in the
Self Diagnostic Test menu.
This function is only available with digital channels with an Antenna (RF/Coax)
•
connection (
Air
or
Cable
).
TV is tilted to right or left side.
Remove the stand base from TV and reassemble.
•
Can not assemble stand base.
Make sure TV is placed on flat surface.
•
If can not remove screws from TV, please use magnetized screw driver.
Channel menu is grey out (unavailable).
Channel menu is only available when TV source is selected (
•
Antenna
or
Cable
).
Your settings are lost after 30 minutes
or every time TV is turned off.
If TV is in the
•
Store Demo
mode, it will reset audio and picture settings every
30 minutes.
Please change from
Store Demo
mode to
Home Use
mode in the
Plug & Play
procedure.
Press the
SOURCE
button to select
TV
mode, go to
MENU
→
Setup
→
Plug & Play
→
ENTER
Intermittent loss of audio or video.
Check cable connections and reconnect.
•
Can be caused by using overly rigid or thick cables.
•
Make sure the cables are flexible enough for long term use.
If wall mounting, we recommend using cables with 90 degree connectors.
You may see small particles if you
look closely at the edge of the bezel
surrounding the TV screen.
This is part of the product’s design and is not a defect.
•
PIP menu is not available.
PIP functionality is only available when you are watching an HDMI, PC or components
•
source.
‘Scramble signal’ or ‘No signal/Weak
signal’ with CAM CARD(CI/CI+)
Check that CAM has CI(CI+) Card installed into the common interface slot.
•
It is normal, the TV operate OTA(Over The Air) function itself to upgrade firmware
•
downloaded during watching.
Recurrent picture/sound issue
Check and change signal/source.
•
Some of above pictures and functions are available at specific models only.
N
BN68-02355H-Eng.indb 38
2009-08-28 �� 2:50:02
English - 39
Specifications
The descriptions and characteristics in this booklet are given for information purposes only and are subject to modification without
notice.
Model Name
PS50B530
Screen Size (Diagonal)
50 inch
PC Resolution (Optimum)
1920x1080 @ 60 Hz
Sound (Output)
10 W x 2
Dimension (WxHxD)
Body
With stand
1230 x 770 x 73 mm
1230 x 822 x 290 mm
Weight
Body
With stand
33 kg
38 kg
Environmental Considerations
Operating Temperature
Operating Humidity
Storage Temperature
Storage Humidity
50 °F to 104 °F (10 °C to 40 °C)
10% to 80%, non-condensing
-4 °F to 113 °F (-20 °C to 45 °C)
5% to 95%, non-condensing
This device is a Class B digital apparatus.
N
Design and specifications are subject to change without prior notice.
N
For the power supply and Power Consumption, refer to the label attached to the product.
N
BN68-02355H-Eng.indb 39
2009-08-28 �� 2:50:02
© 2009 Samsung Electronics Co., Ltd. All rights reserved.
Használati útmutató
Képernyőbeégés
Két óránál hosszabb ideig ne jelenítsen meg állóképet a plazmaképernyőn (pl. egy videojátékról vagy a készülékhez
csatlakoztatott számítógépről), mert ilyenkor a megjelenő képek tartósan a képernyőn maradhatnak. Ezt a jelenséget
képernyőbeégésnek is nevezik. A képernyőbeégés elkerülése érdekében állókép megjelenítésekor csökkentse a kép
fényerejét és kontrasztját.
Magasság
A Plazma TV csak 2000 méternél alacsonyabb területeken működtethető a megszokott módon. 2000 méter feletti területen a
készülék működése eltérhet a normálistól, ezért ilyen helyen ne helyezze üzembe, és ne működtesse azt.
A PDP TV-készülék felső részén keletkező hő
A készülék felső része huzamosabb használatot követően felmelegedhet, mivel a működés közben keletkező hő a készülék
felső részén kialakított szellőzőnyíláson keresztül távozik. Ez normális jelenség, nem utal meghibásodásra vagy egyéb
működési rendellenességre. Arra azonban ügyelni kell, hogy gyermekek ne érinthessék meg a készülék felső részét.
A készülék kattogó hangot ad.
A kattogó hangot okozhatja a készüléknek a környezeti hőmérséklet-ingadozások és a páratartalom-változások által előidézett
tágulása vagy zsugorodása. Ez általános jelenség, nem utal meghibásodásra vagy egyéb működési rendellenességre.
Cellahiba
A PDP-eljárást alkalmazó panel 2 360 000 (HD-szint) és 6 221 000 (FHD-szint) közötti számú képpontból áll. A panel
előállításához a gyártó magas szintű műszaki felkészültséget és felszereltséget alkalmaz. Előfordulhat azonban, hogy a képernyőn
ennek ellenére néhány világos és sötét képpont jelenik meg. Ezek a képpontok a készülék teljesítményét nem befolyásolják.
Ne üzemeltesse a televíziókészüléket 5 °C(41°F) alatti hőmérsékleten
A huzamosabb ideig megjelenített állóképek a PDP-paneljének maradandó károsodását okozhatják
A PDP-készülék huzamosabb ideig tartó, 4:3 képarányú módban történő használata esetén a kibocsátott
fényerősség eltérése miatt a képernyő közepén, valamint bal és jobb oldalán sávok alakulhatnak ki.
A DVD-filmek lejátszása és a játékprogramok is hasonló jelenséget okozhatnak. A garancia az ilyen
esetekben keletkezett károkra nem terjed ki.
A képernyőn megjelenő utókép
A PDP kialakításából eredően állóképek (pl. videojátékok) bizonyos időt meghaladó megjelenítését követően a képernyőn ún.
utókép jelenhet meg. A jelenség megelőzése érdekében állóképek megjelenítése esetén csökkentse a fényerőt és kontrasztot.
Garancia
- A garancia nem vonatkozik a monitor képernyőbeégésére.
- A garancia nem vonatkozik a képbeégésre.
Felszerelés
Ha a készüléket szélsőséges hőmérsékleti körülmények között, kifejezetten poros, magas páratartalmú vagy kémiai anyagoknak
kitett környezetben használja, vagy folyamatosan üzemelteti például repülőtéri vagy vasútállomási várótermekben, az üzembe
helyezés előtt kérje hivatalos szakember tanácsát. Ha ezt elmulasztja, azzal a készülék komoly károsodását okozhatja.
A digitális televízióval kapcsolatos figyelmeztetés
1.
A digitális TV-hez (DVB) kapcsolódó funkciók csak azokban az országokban, illetve régiókban elérhetők, ahol DVB-T
(MPEG2 és MPEG4 AVC) digitális földi jeleket sugároznak, illetve elérhető a kompatibilis DVB-C (MPEG2 és MPEG4
AAC) kábeltelevízió-szolgáltatás. A DVB-T vagy DVB-C jelek vételének lehetőségét illetően tájékozódjon a helyi
szolgáltatónál.
2.
A DVB-T nem más, mint az európai konzorciumnak a földfelszíni digitális televíziós műsorszórásra vonatkozó
szabványa, a DVB-C pedig a kábeles digitális műsorszórásra vonatkozó szabvány. Ebben a specifikációban nem
szerepel néhány megkülönböztetett funkció, például az EPG (elektronikus műsorújság), a VOD (igény szerinti
videoszolgáltatás) stb. Így ezek jelenleg nem támogatottak.
3. B
ár ez a TV-készülék megfelel a legújabb DVB-T és DVB-C szabványnak [2008. augusztus], nem garantált, hogy a
jövőben is meg fog felelni a mindenkori DVB-T földi digitális és a DVB-C kábeles digitális műsorszórásra vonatkozó
szabványoknak.
4.
Bizonyos kábeltelevízió-szolgáltatók külön díjat számolhatnak fel ezért a szolgáltatásért, az előfizetőnek pedig
szerződést kell kötnie a szolgáltatóval.
5.
Előfordulhat, hogy bizonyos digitális televízióval kapcsolatos funkciók egyes országokban vagy régiókban nem
elérhetők, és hogy a DVB-C nem minden szolgáltató esetén működik megfelelően.
6.
Amennyiben további információra van szüksége, kérjük, lépjen kapcsolatba a legközelebbi Samsung ügyfélszolgálattal.
Kapcsolatfelvétel: SAMSUNG WORLDWIDE
Ha a Samsung termékekkel kapcsolatban kérdése vagy megjegyzése van, vegye fel a kapcsolatot a SAMSUNG
ügyfélszolgálatával. (További információ a hátoldalon)
Magyar - 2
BN68-02355H_Hun.indb 1
2009-8-31 15:55:10
