I.R.I.S. IRISNotes Express 2: instruction
Class: Office Equipment
Type: Scanner
Manual for I.R.I.S. IRISNotes Express 2
Quick Start Guide
You write,
it types!
I.R.I.S. Products & Technologies
I.R.I.S. - Louvain-la-Neuve (Belgium)
I.R.I.S. AG - Aachen (Germany)
I.R.I.S. Inc. - Delray Beach (United States)
English
I.R.I.S. HK Ltd - Hong Kong (China)
J120502-2
Français
Nederlands
www.irislink.com
Deutsch
Español
Italiano
Português
© Copyright 2012 I.R.I.S. s.a./n.v.
Русский
All rights reserved for all countries. I.R.I.S., I.R.I.S.’ product names, I.R.I.S.’ logos and
I.R.I.S.’ product logos are I.R.I.S. trademarks. All other products and names men-
tioned are trademarks or registered trademarks from their respective owners.
765010457769
for Windows®
IRNExp2-cover QUG-EMEA.indd 1 2/05/12 16:55
Quick Start Guide
TM
This Quick Start Guide provides general guidelines for installing and using IRISNotes
TM
Express 2. For detailed instructions on IRISNotes
' full range of functionalities, please
refer to the user guide and help file provided with the installation CD-ROM.
TM
IRISNotes
is a pen and mobile note taker that can capture handwritten notes and drawings, as
well as edit, save and export them. Your handwritten notes can be instantly converted into
editable text in a wide range of languages.
Package contents
TM
- IRISNotes
installation CD-ROM
This CD-ROM contains the Easy Note Taker Application and MyScript
Notes Lite (PC only)
- Quick Start Guide
- Digital pen, receiver unit, retractable USB cable, two sets of batteries, three ink refills
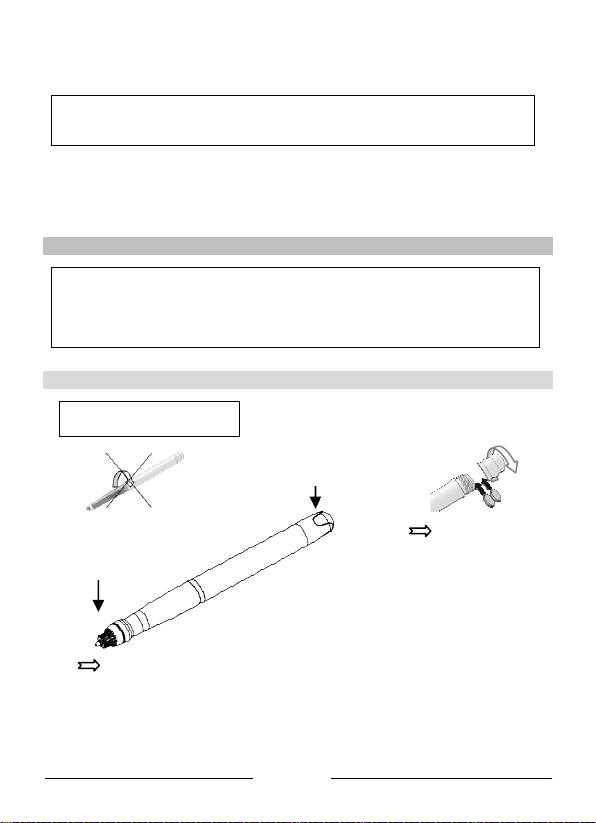
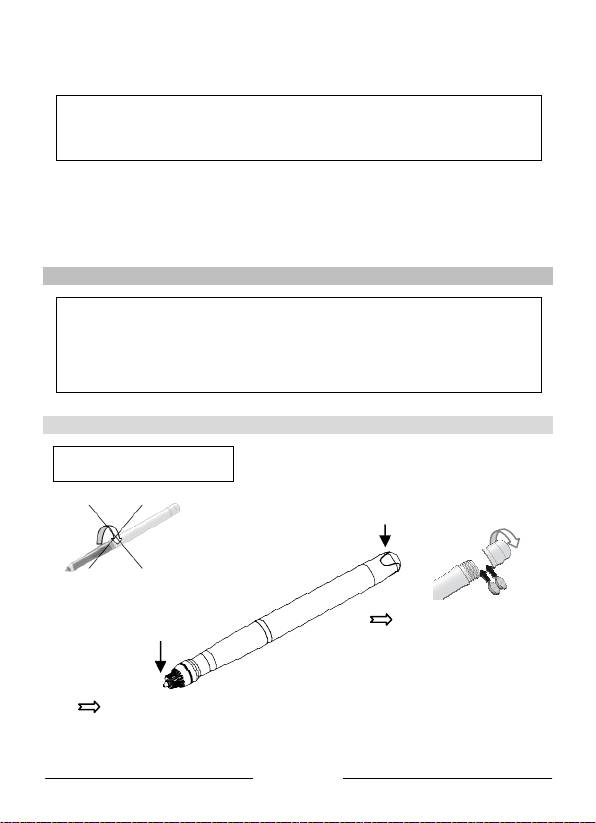
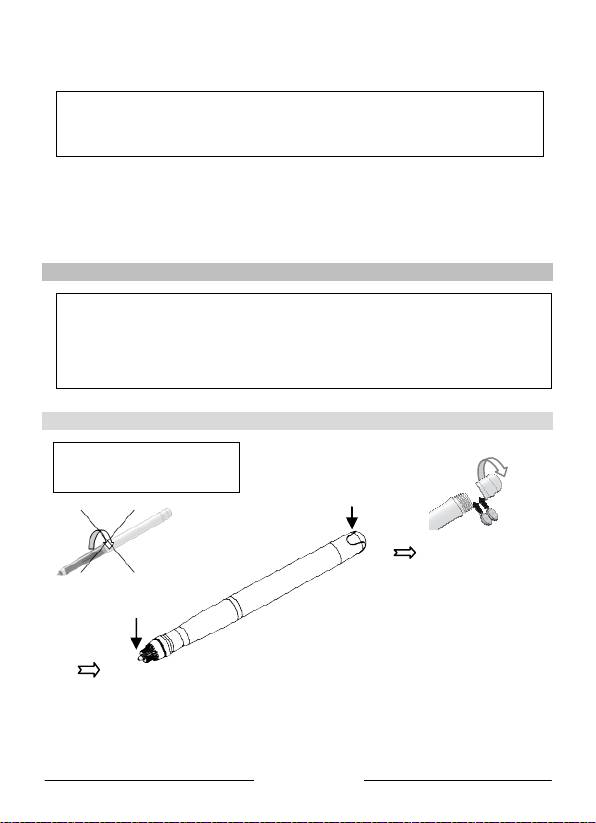
The digital pen
! Do not dismantle the pen.
This may damage it.
Batteries
Unscrew the battery
compartment cover and
insert 2 batteries
Pen tip
(GPSR41 or GP392)
with positive polarity
facing up
Slide an ink refill into the pen tip (standard M21 refill of 67.0mm long X 2.35mm)
and press it gently until it is correctly lodged.
English
To replace the ink refill (the pen cap serves as an ink refill
extractor):
- Firmly press the top of the cap against the tip of the pen and pull
the used ink refill out.
- Slide the new ink refill in.
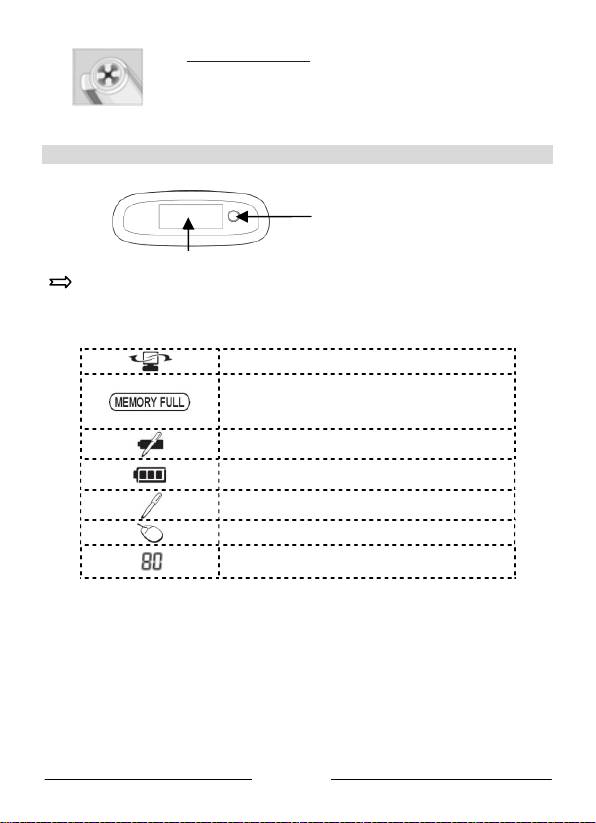
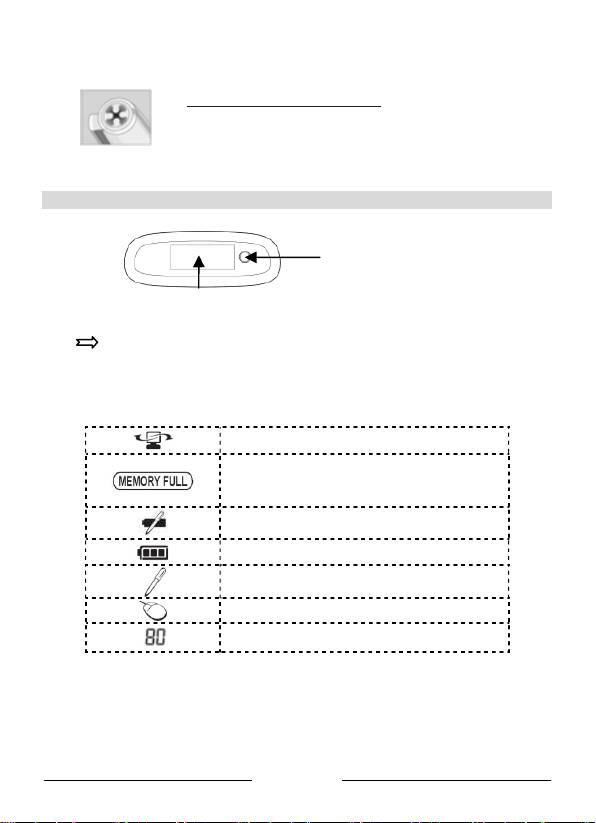
The receiver unit
ON/OFF button
Press for 5 seconds to turn
on
LCD screen
Charge the receiver unit at least 30 minutes before using the product (full charge time is
3.5 hours): plug the USB cable to the unit and connect it to your USB port.
The LCD screen displays the following status indications:
Receiver unit connected to PC
Memory FULL
(upload your files to your PC and delete them from
memory)
Pen low battery
Receiver unit low battery
Note mode
Mouse mode
Number of saved notes in memory
English
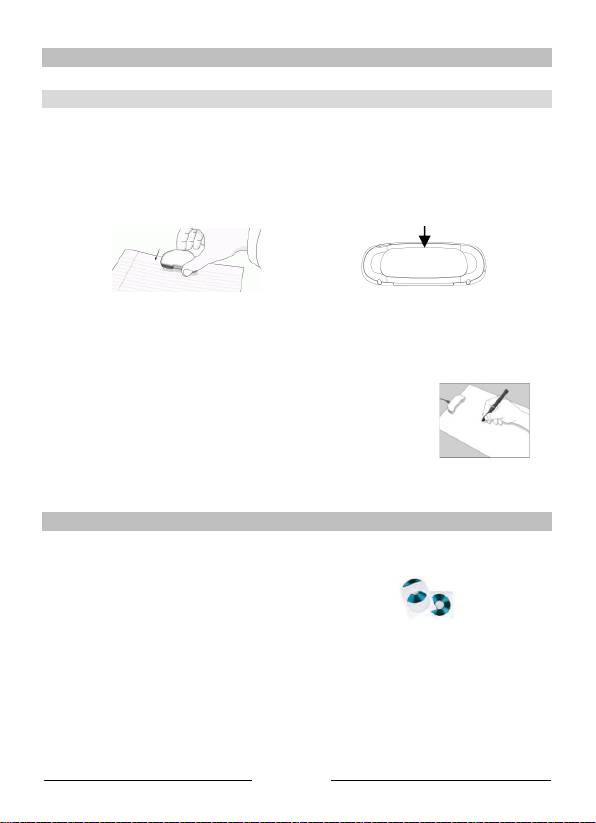
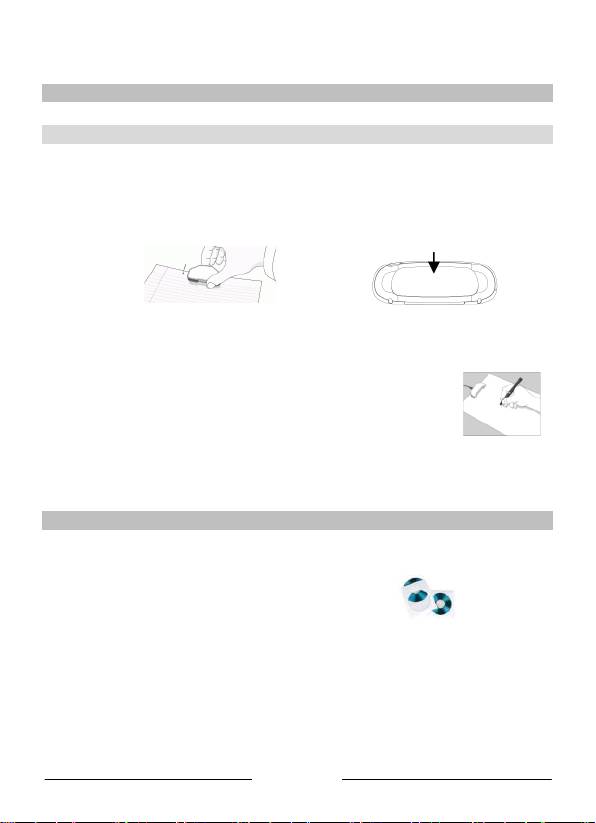
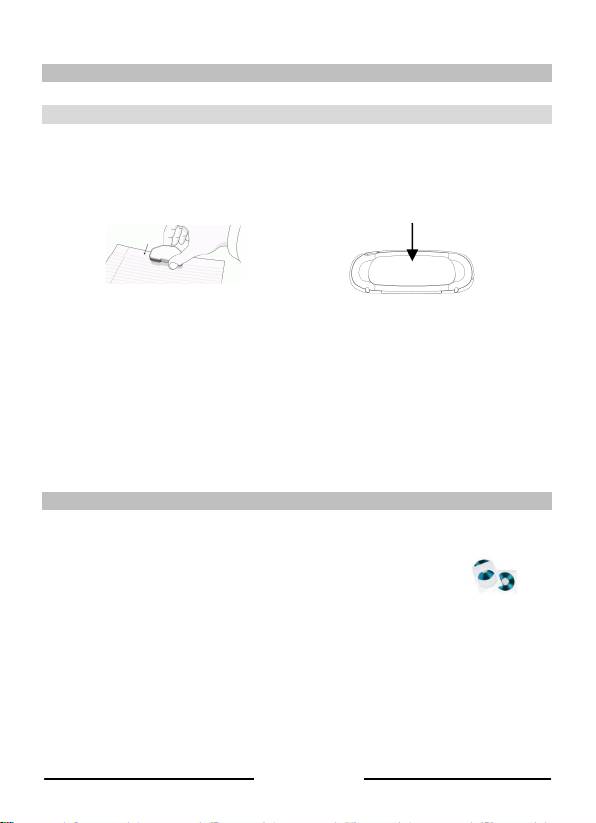
How to use the digital pen?
Writing n otes
Position the receiver unit at the top center of your A4 paper sheets. Press the power button for
about 5 seconds to power it on.
Fix the rece iver onto the edge of the
Use the paper clip
paper, face up
at the back of the receiver unit
Hold the pen firmly and write normally. Try to avoid line skew.
When you are done writing a note, press the power button once. This saves to the note to the
receiver memory. The device is now ready to start a new note. You can store up to 100 notes of
A4 size.
! Hold the pen properly:
! Do not place your hand between the pen and the receiver unit
! Keep your fingers away from the pen tip crystal cone
In order to transfer your notes to your Windows PC or Mac OS computer you must first install
the corresponding software.
Installing the software on a Windows PC
TM
1. To install the Easy Note Taker application, insert the IRISNotes
CD-ROM in your
CD-ROM drive and follow the on-screen instructions.
When the installation is complete, click on Finish.
The Easy Note Taker icon appears on your desktop.
TM
2. To install the MyScript Notes Lite application, explore the IRISNotes
CD-ROM with
Windows Explorer.
Open the Notes 2.2 Lite folder, then double-click on setup.exe to start the installation.
When the installation is complete, click on Finish, then remove the CD-ROM from the
CD-ROM drive.
English
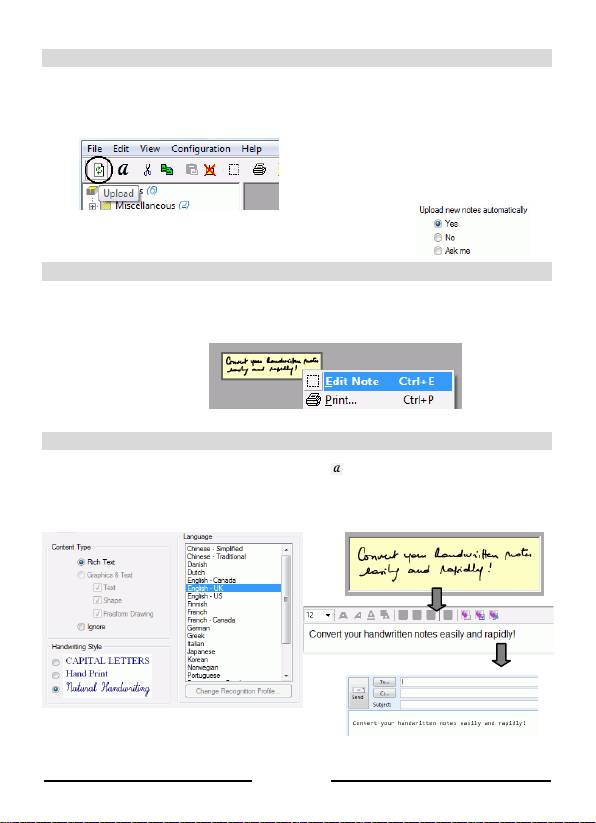
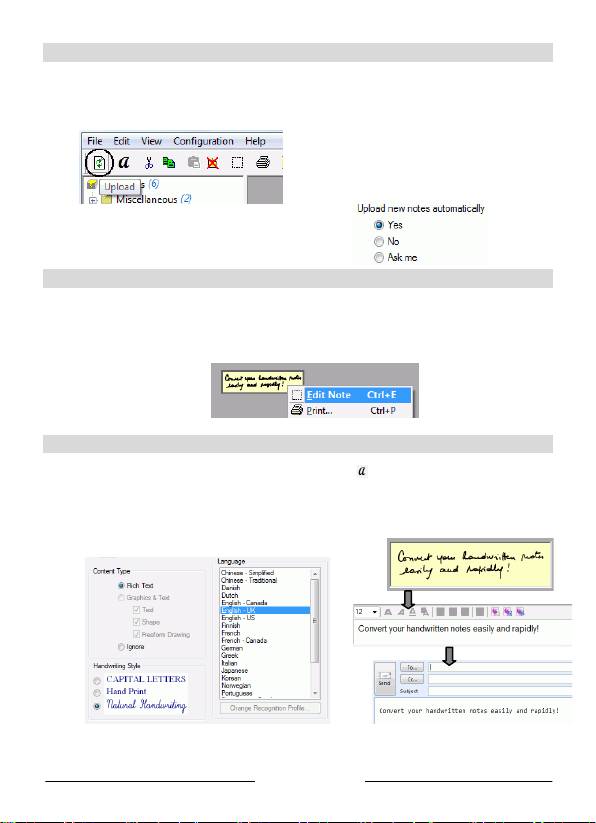
Uploading notes
- Connect the rec eiver unit to your PC (using the USB cable) and launch Easy Note Taker.
- In the Note Manager, click on Upload on the main toolbar. All the notes get uploaded
from the rec eiver to your PC and can be viewed on scree n.
You can select other preferenc es
for the upload. Select Preferences
from the Configuration menu and
get to the Mobile tab:
Managing notes
- The uploaded notes are available in the Mobile Notes folder. They can further
be edited using the Note Editor, sorted, saved,
exported and e-mailed as JPEG files.
Convertin g notes
- In the Note Manager, click on Convert to text on the main toolbar.
- Choose the conversion settings in MyScript Notes Lite. The conversion is performed
instantly.
- The resulting text can further be sent to other applications or sent by e-mail.
English
Installing the software on a Mac OS computer
TM
1. Insert the IRISNotes
CD-ROM in your CD-ROM drive, then double-click the
CD-ROM icon on the Desktop.
2. Double-click NoteTaker.pkg, and then follow the on-screen instructions.
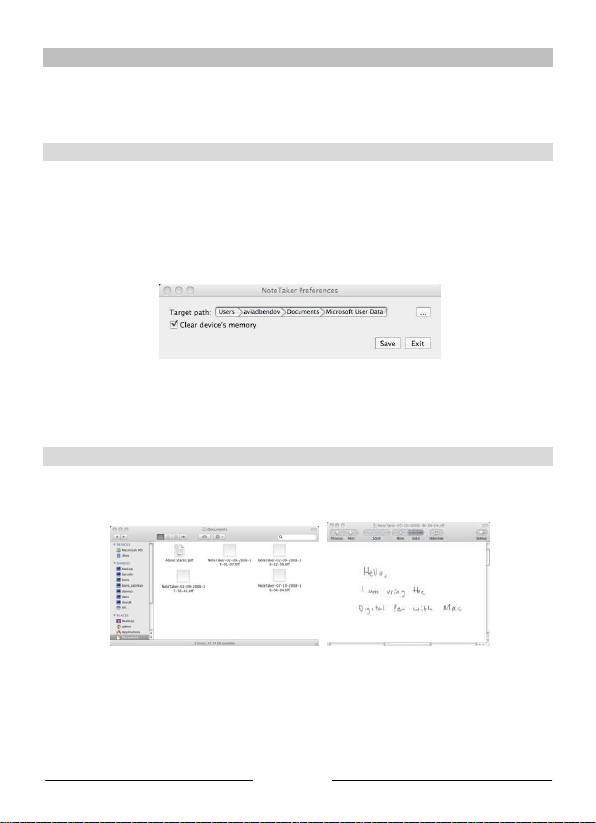
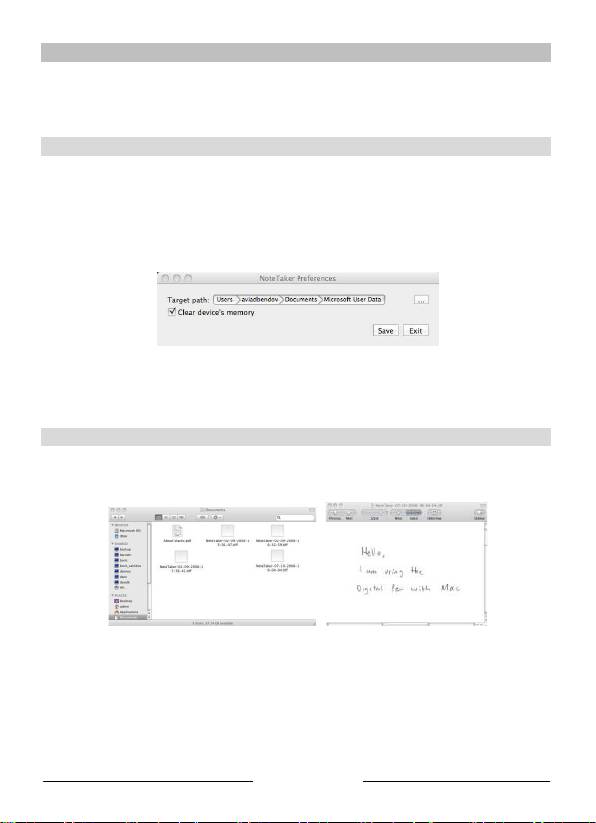
Set the upload preferences
When you use your digital pen to write text, everything you write is saved as a series of TIFF
(Tagged Image File Format) images in the Mobile NoteTaker memory. From there, they must be
uploaded to your Mac’s hard drive.
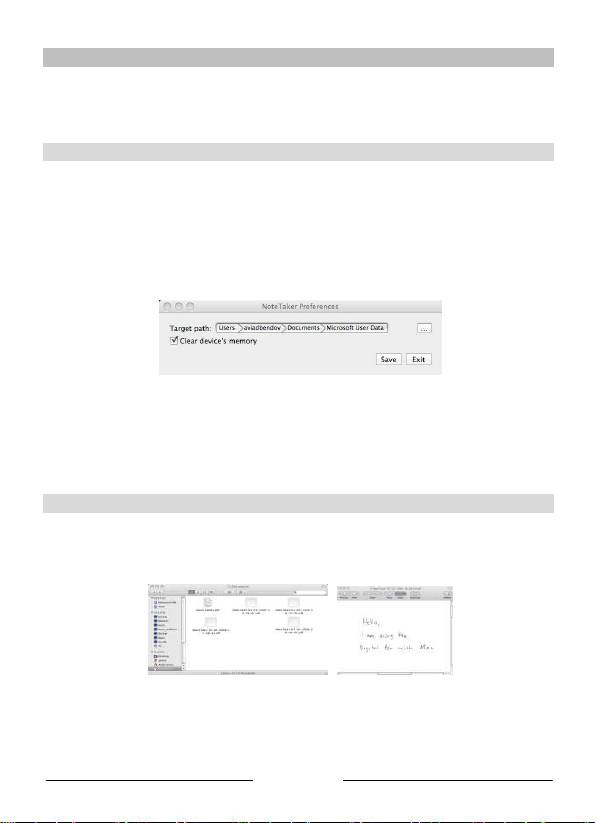
But before you do, first determine the upload settings in the NoteTaker Preference Tool:
- Click on the NoteTaker Preferences icon. The NoteTaker Preferences window opens:
- Click the browse icon (...) to determine where on your Mac you want to save the notes.
- Select the option Clear device’s memory if you want to erase the notes from memory
each time you transfer them.
- Then click Save to save the settings.
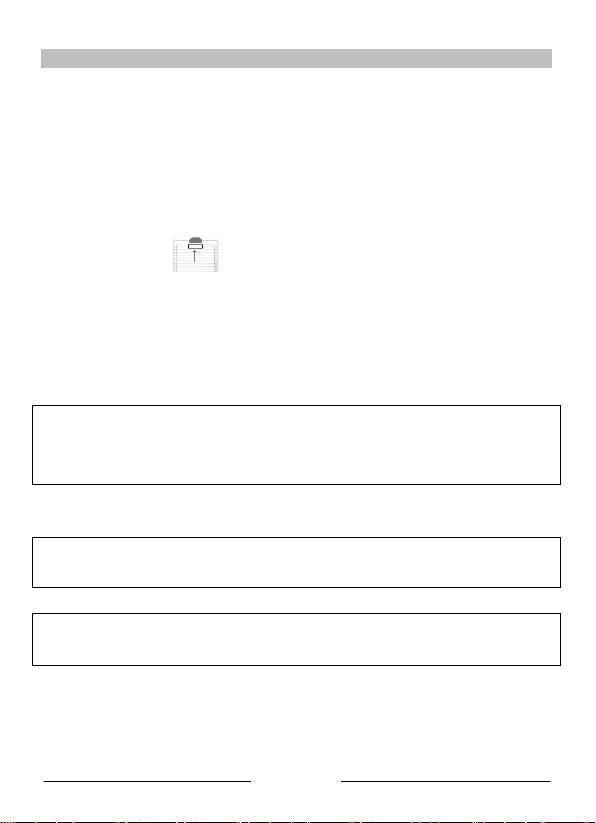
Uploading notes
Power on the receiver unit and connect it to your Mac. The notes are uploaded automatically.
They are saved in TIFF format. Double click on the desired TIFF file, in order to view the note.
Note that you cannot convert notes into editable text.
English
Using the pen in mouse mode (PC and Mac)
TM
You can also use the IRISNotes
pen as mouse. To switch to mouse mode:
PC
Mac
- Connect the receiver to your PC.
- Connect the receiver to your Mac.
- Hold the pen right in front of the
TM
- IRISNotes
switches
receiver, then press the power
automatically to mouse mode.
button once.
- Tap the pen on a piece of paper. The cursor is now being controlled by the pen.
- Hover the pen above a page to move the cursor.
- To click an object, point with the cursor to the object, then tap with the pen to click it.
- To right-click an object, point to it, then tap and hold the pen for an instant.
®
TM
Note: in Windows Vista
and Windows 7, you can also use the IRISNotes
pen to write
directly in Microsoft Office 2007 applications and higher. This also works on Mac OS 10.5 in
®
iWork
’08 applications and higher.
See www.irislink.com/support/userguides for more information.
TM
For detailed instructions on IRISNotes
, refer to:
- Easy Note Taker manual: available from Windows’ Start menu.
- MyScript Notes Lite help file: available from the software Help menu.
TM
Should you experience issues when using your IRISNotes
, consult the Frequently Asked
question on our website www.irislink.com/support/faq or contact Technical Support at
www.irislink.com/support.
English
Guide de démarrage rapide
Ce guide de démarrage rapide contient des instructions générales pour l'installation et
TM
l'utilisation d'IRISNotes
Express 2. Pour une explication détaillée de toutes les
TM
fonctionnalités d'IRISNotes
, veuillez consulter le guide de l'utilisateur ou le fichier
d'aide fourni avec le CD-ROM d'installation.
TM
IRISNotes
est un stylo et un outil de prise de note mobile permettant de capturer des dessins et
des notes manuscrites mais aussi de les modifier, les enregistrer et les exporter . Vos notes
manuscrites peuvent être instantanément converties en texte modifiable dans un large éventail de
langues.
Contenu du coffret
TM
- CD-ROM d'installation d'IRISNotes
Ce CD-ROM contient les application Easy Note Taker et MyScript
Notes Lite (PC uniquement)
- Guide de démarrage rapide
- Stylo numérique, récepteur, câble USB rétractable, deux jeux de piles, trois cartouches
d'encre
Stylo numérique
! Ne démontez pas le stylo. Cela
risquerait de l'endommager.
Piles
Pointe
Dévissez le couvercle du
du stylo
logement des piles et insérez
deux piles (GPSR41 ou
GP392) avec la borne positive
vers le haut
Insérez une cartouche d'encre dans la pointe du stylo (cartouche M21 standard de
67 mm X 2,35 mm) et appuyez doucement jusqu'à ce qu'elle soit correctement placée.
Français
Pour remplacer la cartouche d’encre (le capuchon du stylo sert à
extraire la cartouche) :
- Pressez fermeme nt le dessus du capuchon contre la pointe du stylo
et retirez la cartouche d'encre usagée.
- Insérez la nouvelle cartouche.
Récepteur
Bouton ON/OFF
Appuyez pendant 5 secondes pour
activer le dispositif
Chargez le récepteur pendant au moins 30 minutes avant d'utiliser le produit (le
temps de charge total dure 3,5 heures) : raccordez le câble USB au récepteur et au
port USB de l'ordinateur.
L'écran LCD affiche les messages de statut suivants :
Récepteur connecté à l'ordinateur
Memory FULL (Mémoire SATUREE) (téléchargez
vos fichiers sur l'ordinateur et effacez-les de la
mémoire)
Pile faible (stylo)
Pile faible (récepteur)
Mode Note
Mode Souris
Nombre de notes enregistrées en mémoire
Français
Ecran LCD
Utilisatio n du stylo numérique
Rédaction de no tes
Placez le récepteur au centre de la partie supérieure de vos feuilles A4. Appuyez sur le bouton de
marche/arrêt pendant 5 secondes pour l'activer.
Utilisez les attaches situées à
l’arrière du récepteur
Tenez fermement le stylo et écr ivez normalement. Evitez le désalignement.
Lorsque vous avez terminé de rédiger la note, appuyez à nouveau sur le bouton de marche/arrêt.
La note est ainsi enregistrée dans la mémoire du récepteur. Le dispositif est prêt pour la rédaction
d'une nouvelle note. Vous pouvez enregistrer jusqu'à 100 notes au format A4.
! Tenez le stylo correcte ment :
! Ne placez pas votre main entre le stylo et le récepteur.
! Evitez tout contact de vos doigts avec le cône en cristal de la pointe
du stylo.
Pour transférer les notes vers un ordinateur Windows ou Mac OS, vous devez d'abord installer le
logiciel correspondant.
Installation du logiciel s ur un ordinateur Windows
TM
1. Pour installer l'application Easy Note Taker, insérez le CD-ROM d'IRISNotes
dans le
lecteur de CD-ROM et suivez les instructions qui s'affichent à l'écran.
Au terme de l'installation, cliquez sur Terminer.
L’icône Easy Note Taker apparaît sur le Bureau.
2. Pour installer l'application MyScript Notes Lite , accédez au contenu du CD-ROM
TM
d'IRISNotes
dans l'Explorateur Windows.
Ouvrez le dossier Notes 2.2 Lite, puis double-cliquez sur setup.exe pour lancer
l'installation.
Au terme de l'installation, cliquez sur Terminer, puis retirez le CD-ROM du lecteur.
Français
Fixez le récepteur sur le bord du
papier, face vers le haut

Chargement des notes
- Raccordez le récepteur à votre ordinateur (à l'aide du câble USB) et lancez Easy Note
Taker.
- Dans Gestionnaire de Notes, cliquez sur Téléchargement (Upload) (Télécharger) dans
la barre d'outils principale. Toutes les notes sont téléchargées du réc epteur vers
l'ordinateur et peuvent être consultées à l'écran.
Vous pouvez sélectionner d'autres
préférences de téléchargement.
Sélectionnez Préférences dans le
menu Configuration et cliquez sur
l'onglet Portable :
Gestion des notes
- Les notes télécha rgées sont disponibles dans le dossier Notes Portables. Vous pouvez les
modifier à l'aide de l’Editeur de notes, les trier, les enregistrer, les exporter et les
envoyer par e-mail en tant que fichiers JPEG.
Conversion des notes
- Dans le Gestionnaire de Notes, cliquez sur Convertir en texte dans la barre d'outils
principale.
- Sélectionnez les paramètres de conversion dans MyScript Notes Lite. La conversion est
instantanée.
- Le texte qui en résulte peut être envoyé vers d'autres applications ou par e-mail.
Français
Installation du logiciel sur un ordinateur Mac OS
TM
1. Insérez le CD-ROM d'IRISNotes
dans le lecteur de CD-ROM, puis double-cliquez sur
l'icône du CD-ROM sur le Bureau.
2. Double-cliquez sur NoteTaker.pkg, puis suivez les instructions qui s'affichent à l'écran.
Configuration des préfér enc es de téléchargement
Lorsque vous utilisez votre stylo numérique pour écrire du texte, tout ce que vous écr ivez est
enregistré sous la forme d'images TIFF (Tagged Image File Format) dans la mémoire du Mobile
NoteTaker. Il faut ensuite les télécharger sur le disque dur de votre Mac.
Au préa lable, vous devez définir les paramètres de téléchargement dans l'outil NoteTaker
Preferences :
- Cliquez sur l'icône NoteTaker Preferences. La fenêtre NoteTaker Preferences s'ouvre :
- Cliquez sur l'icône Parcourir (...) pour définir l'emplacement dans lequel enregistrer les
notes sur votre Mac.
- Sélectionnez l'option Clear device’s memory (Effacer la mémoire du périphérique) si
vous souhaitez eff ace r les notes chaque fois que vous les avez transférées.
- Ensuite cliquez sur Save (Enregistrer) pour enregistrer les paramètres.
Téléchargem ent des notes
Mettez le récepteur sous tension et connectez-le à votre Mac. Les notes sont automatiquement
téléchargées. Elles sont enregistrées au format TIFF. Double-cliquez sur le fichier TIFF de votre
choix afin de visualiser la note.
Notez que vous ne pouvez pas convertir les notes en texte modifiable.
Français
Utilisation d'IRISNotes™ comme souris (PC et Mac)
Vous pouvez également utiliser le stylo IRISNotes™ comme souris. Pour activer le mode
Souris :
PC
Mac
- Connectez le récepteur à
- Connectez le récepteur à
l'ordinateur.
l’ordinateur.
TM
- Tenez le stylo devant le réc epteur
- IRISNotes
bascule
et appuyez une seule fois sur le
automatiquement en mode souris
bouton de marche/arrêt
- Tapez la pointe du stylo sur une feuille de papier. Le stylo contrôle désormais le
curseur.
- Faites passer le stylo au-dessus d'une page pour déplacer le curseur.
- Pour cliquer sur un objet, pointez sur l'objet avec le curseur puis tapez avec le stylo pour
le sélectionner.
- Pour effectuer un clic droit sur un objet, pointez sur celui-ci, tapez et maintenez le stylo
pendant un instant.
Remarque : dans Windows Vista
® et Windows 7, vous pouvez également utiliser le stylo
IRISNotes™ pour écrire directement dans les applications Microsoft Offi ce 2007 et ultérieures.
Il est également possible de l'utiliser avec le système d'exploitation Mac OS 10.5
dans les applications iWork® ’08 et ultérieures.
Pour plus d'informations, consultez la page www.irislink.com/support/userguides.
TM
Pour obtenir des instructions détaillées sur IRISNotes
, consultez la documentation suivante :
- Manuel Easy Note Taker : accessible à partir du menu Démarrer de Windows.
- Fichier d'aide MyScript Notes Lite : disponible dans le menu Help (Aide) du logiciel.
En cas de problèmes liés à l'utilisation d'IRISNotes™, consultez la page des questions
fréquentes (FAQ) sur le site www.irislink.com/support/faq ou contactez le support technique
via la page www.irislink.com/support.
Français
Snelstartgids
Deze Snelstartgids biedt algemene richtlijnen voor de installatie en het gebruik van
TM
IRISNotes
Express 2. Gedetailleerde instructies over het complete functiebereik van
TM
IRISNotes
vindt u in de gebruikershandleiding en het Help-bestand die op de installatie-
cd-rom zijn geleverd.
TM
IRISNotes
is een mobiel notitieblok met pen waarmee u niet alleen handgeschreven notities
en tekeningen kan vastleggen, maar ze ook kunt bewerken, opslaan en exporteren. Uw
handgeschreven notities kunnen onmiddellijk worden geconverteerd naar bewerkbare tekst in
een groot aantal talen.
Inhoud verpakking
TM
- IRISNotes
installatiecd-rom
Deze cd-rom bevat de toepassing Easy Note Taker en MyScript Notes Lite
(alleen voor PC)
- Snelstartgids
- Digitale pen, ontvangereenheid, intrekbare USB-kabel, twee sets batterijen, drie
inktpatronen.
De digitale pen
! Neem de pen niet uit elkaar.
Hierdoor kan de pen schade
oplopen.
Batterijen
Schoef het deksel van het
batterijvak los en
Pentip
plaats 2 batterijen
(GPSR41 of GP392)
waarbij de positieve pool
omhoog is gericht.
Schuif een inktpatroon in de top van de pen (standaard M21 patroon of 67 mm lang x
2,35 mm) en druk er voorzichtig op tot het patroon correct op zijn plaats zit.
Nederlands

Het inktpatroon vervangen (de pendop doet dienst als een soort tank
voor het verwijderen van het inktpatroon):
- Druk stevig op de bovenkant van de dop tegen de tip van de pen en
trek het lege inktpatroon uit.
- Schuif het nieuwe inktpatroon naar binnen.
De ontvangereenheid
Knop AAN/UIT
5 seconden indrukken voor
inschakelen
LCD-scherm
Laat de ontvangereenheid gedurende minstens 30 minuten opladen voordat u het product
gebruikt (de volledig oplaadduur bedraagt 3,5 uur). Sluit de USB-kabel aan op de
eenheid en sluit deze aan op de USB-poort van uw computer.
Het LCD-scherm toont de volgende statusaanwijzingen:
Ontvangereenheid aangesloten op pc
Geheugen VOL
(upload uw bestanden naar uw pc en verwijder ze
uit het geheugen)
Laag batterijvermogen pen
Laag batterijvermogen ontvangereenheid
Notitiemodus
Muismodus
Aantal opgeslagen notities in geheugen
Nederlands
Hoe de digitale pen gebruiken?
Notities maken
Plaats de ontvangereenheid bovenaan in het midden van uw A4-vellen. Houd de aan/uit-knop
gedurende 5 seconden ingedrukt om deze in te schakelen.
Bevestig de ontvanger op de rand van
Gebruik de paperclip op de
het papier met de voorzijde omhoog
achterkant van de ontvangereenheid
Houd de pen stevig vast en schrijf normaal. Probeer schuine lijnen te vermijden.
Zodra u klaar bent met een notitie, drukt u 1 keer op de aan/uit-knop. Hiermee wordt de notitie in
het geheugen van de ontvanger opgeslagen. Het apparaat is nu klaar om een nieuwe notitie te
maken. U kunt tot 100 notities van A4-formaat opslaan.
Houd de pen juist vast:
! Plaats uw hand niet tussen de pen en de ontvangereenheid
! Houd uw vingers uit de buurt van de kristallen kegel van de pentip
Om uw notities over te dragen naar uw Windows PC of Mac OS computer moet u eerst de
bijhorende software installeren.
De software installeren op een Windows PC
TM
1. Om de Easy Note Taker toepassing te installeren, plaats de IRISNotes
cd-rom in uw
cd-romstation en volg de instructies op het scherm..
Klik op Voltooien nadat de installatie is voltooid.
Het pictogram Easy Note Taker verschijnt op uw bureaublad.
TM
2. Om de MyScript Notes Lite toepassing te installeren, verken de IRISNotes
cd-rom
met Windows Verkenner.
Open de map Notes 2.2 Lite, en dubbelklik op setup.exe om de installatie te starten.
Klik op Voltooien nadat de installatie is voltooid, en verwijder de cd-rom uit het cd-
romstation.
Nederlands
Notities uploaden
- Sluit de ontvangereenheid aan op uw pc (met de USB-kabel) en start Easy Note Taker.
- Klik in Note Manager op Laden (Upload) in de hoofdwerkbalk. Alle notities worden
geüpload van de ontvanger naar uw pc en kunnen op het scherm worden weergegeven.
U kunt andere voorkeuren voor het
uploaden selecteren. Selecteer
Voorkeuren in het menu Configuratie en
open het tabblad Mobiel:
Notities beheren
- De geüploade notities zijn beschikbaar in de map Mobiele Nota’s. Ze kunnen verder
worden bewerkt met de Note Editor (Nota bewerken), gesorteerd, opgeslagen,
geëxporteerd en via e-mail worden verzonden als JPEG-bestanden.
Notities converteren
- Klik in het Not e Manager op Omzetten naar tekst in de hoofdwerkbalk.
- Kies de conversie-instellingen in MyScript Notes Lite. De conversie wordt onmiddellijk
uitgevoerd.
- De resulterende tekst kan verder worden verzonden naar andere toepassingen of via e-
mail worden verzonden.
Nederlands
De software op een MAC OS computer installeren
TM
1. Plaats de cd-rom IRISNotes
in uw cd-romstation en dubbelklik op het cd-
rompictogram op het Bureaublad.
2. Dubbelklik op NoteTaker.pkg, en volg de instructies op het scherm.
De voorkeuren voor uploaden instellen.
Wanneer u uw digitale pen gebruikt om tekst te schrijven, wordt alles wat u neerschrijft
opgeslagen als een reeks TIFF (Tagged Image File Format) bestanden in het geheugen van de
Mobile NoteTaker. Daar moeten ze dan naar de harde schijf van uw Mac worden geüpload.
Maar eerst moet u de uploadinstellingen in het NoteTaker Preference Tool instellen:
- Klik op het pictogram NoteTaker Prefer ence s. Het NoteTaker instellingenvenster wordt
geopend:
- Klik op het pictogram Bladeren (...) om te bepalen waar uw Mac de notities moet opslaan.
- Selecteer de optie Apparaatgeheugen wissen als u de notities bij elke overdracht uit het
brongeheugen wilt wissen.
- Klik daarna op Opslaan om de instellingen op te slaan.
Notities uploaden
Schakel de ontvanger in en sluit deze op uw Mac aan. De notities worden automatisch geüpload.
Ze worden in TIFF-formaat opgeslagen. Dubbelklik op het gewenste TIFF-bestand om de notitie
te bekijken.
U kunt uw notities echter niet convertere n in een bewerkbare tekst.
Nederlands
De pen in muismodus gebruiken (PC en Mac)
TM
U kunt de IRISNotes
pen ook als muis gebruiken. Om naar muismodus over te schakelen:
PC
Mac
- Sluit de ontvanger op uw PC aan.
- Sluit de ontvanger op uw Mac aan.
TM
- Houd de pen recht voor de
- IRISNotes
schakelt automatisch
ontvanger, druk dan een keer op
over naar muismodus.
de aan/uit-knop.
- Tik met de pen op een vel papier. De cursor wordt nu door de pen gestuurd.
- Beweeg de pen boven een pagina om de cursor te verplaatsen.
- Om een object aan te klikken, plaatst u de cursor boven het object en tikt u met de pen
erop.
- Om rec hts te klikken op een object, plaatst u de cursor boven het object, tikt u met de
pen erop en houdt u het object kort vast.
®
TM
Opmerking: in Windows Vista
en Windows 7 kunt u ook gebruik maken van de IRISNotes
pen om direct in Microsoft Office 2007 toepassingen en hoger te schrijven. Dit werkt ook met
®
Mac OS 10.5 in iWork
’08 toepassingen en hoger.
Zie www.irislink.com/support/userguides voor meer informatie.
TM
Raadpleeg het volgende voor gedetailleerde instructies over IRISNotes
:
- Handleiding Easy Note Taker: beschikbaar via het menu Start van Windows
- Help-bestand MyScript Notes Lite: beschikbaar via het Help-menu van de software
TM
Als u problemen ondervindt tijdens het gebruik van IRISNotes
, raadpleeg dan de
Frequently Asked question op onze website www.irislink.com/support/faq of neem contact
op met onze Technische Ondersteuning op www.irislink.com/support
Nederlands

Kurzanleitung
Diese Kurzanleitung enthält allgemeine Anleitungen zu Installation und Verwendung
von IRISNotes™ Express 2. Eine vollständige Beschreibung und Anleitung zu allen
Funktionen von IRISNotes™ finden Sie im Benutzerhandbuch und den Hilfedateien auf
der mitgelieferten Installations-CD-ROM.
IRISNotes™ ist ein Digitalstift, mit dem unterwegs handschriftliche Notizen und Zeichnungen
erfasst sowie bearbeitet, gespeichert und exportiert werden können. Ihre handschriftlichen
Notizen können umgehend in bearbeitbaren Text für zahlreiche Sprachen konvertiert werden.
Packungsinhalt
- IRISNotes™ Installations-CD-ROM.
Auf dieser CD-ROM befinden sich die Anwendungen Easy Note Taker und
MyScript Notes Lite (nur PC).
- Kurzanleitung
- Digitalstift, Empfänger, einziehbares USB-Kabel, 2 x Batterien, 3 Nachfüllminen
Der digitale Stift
Nehmen Sie den Stift nicht
auseinander! Dies kann zu
Beschädigungen führen.
Batterien
Drehen Sie die
Batteriefachabdeckung ab
Stiftspitze
Legen Sie 2 Batterien ein
(GPSR41 oder GP392)
Der positive Pol muss
nach oben zeigen
Schieben Sie eine Kugelschreibermine in die Stiftspitze ein (M 21 Standardersatzmine
67 x 2,35 mm) und drücken Sie die Mine sanft hinein, bis sie richtig sitzt.
Deutsch
