I.R.I.S. IRISCan Mouse: instruction
Class: Office Equipment
Type: Scanner
Manual for I.R.I.S. IRISCan Mouse
Quick User Guide
You swipe,
it scans.
English
Français
Nederlands
Deutsch
Español
Italiano
T140122-05
Português
Русский
Türkçe
Čeština
日本語
简体中文
繁體中文
한국어
for Windows®

English English
This Quick User Guide helps you get started with the IRIScan™ Mouse.
The descripons in this guide are based on the Windows® 7 Operang System. All informaon is subject
to change without prior noce.
For more informaon about the IRIScan™ Mouse features, refer to the applicaon’s Help le, the
complete User Guide on the CD-ROM or on www.irislink.com/support/userguides.
Introducon
The IRIScan™ Mouse is a mouse and scanner combined. With the scan funcon, you can scan documents by
sliding the mouse over them.
The scan results can be drag-and-dropped into le folders and applicaons, copy-pasted to applicaons,
saved as Word, PDF and XML les, shared via Mail, Facebook®, Twier®, Flickr® and sent to Evernote® and
Google® Translate.
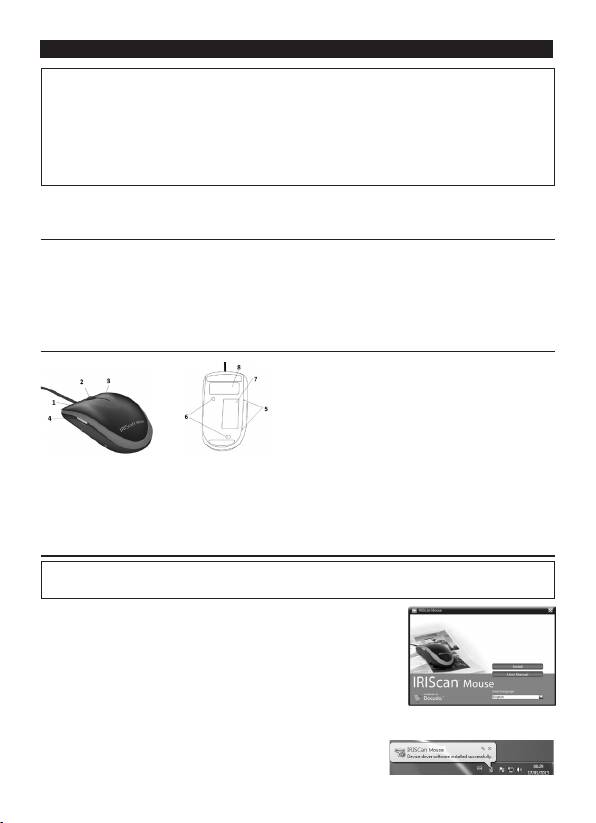
Hardware Overview
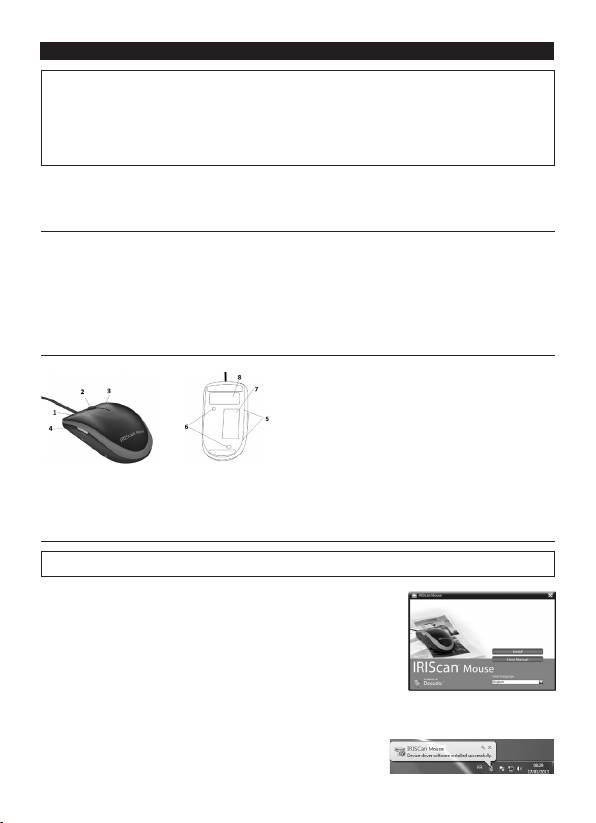
1. Le buon 6. Laser sensors
2. Wheel 7. Scan surface
3. Right buon
Remove the lm before scanning
4. Scan buon 8. Mouse label
5. Scan surface
indicators
Installing the IRIScan™ Mouse applicaon
Important: make sure you have the required administraon rights on your computer to do the installaon.
1. Insert the IRIScan™ Mouse disc in the CD-ROM drive of the computer.
The setup menu is displayed automacally. (If the menu does not start
run setup.exe from the disc.)
2. Select the installaon language. Then click Install.
Follow the on-screen instrucons.
3. Click Finish to complete the installaon.
4. Unplug your regular mouse. Plug in the IRIScan™ Mouse in a free USB port (USB 2.0 or higher).
The driver is installed automacally. If the driver is installed successfully, a balloon message appears on
the task bar.
English English
Using the IRIScan™ Mouse
Tip: to access the Help le before scanning, start the IRIScan™ Mouse applicaon. Click the icon in the
top le corner, then click Help.
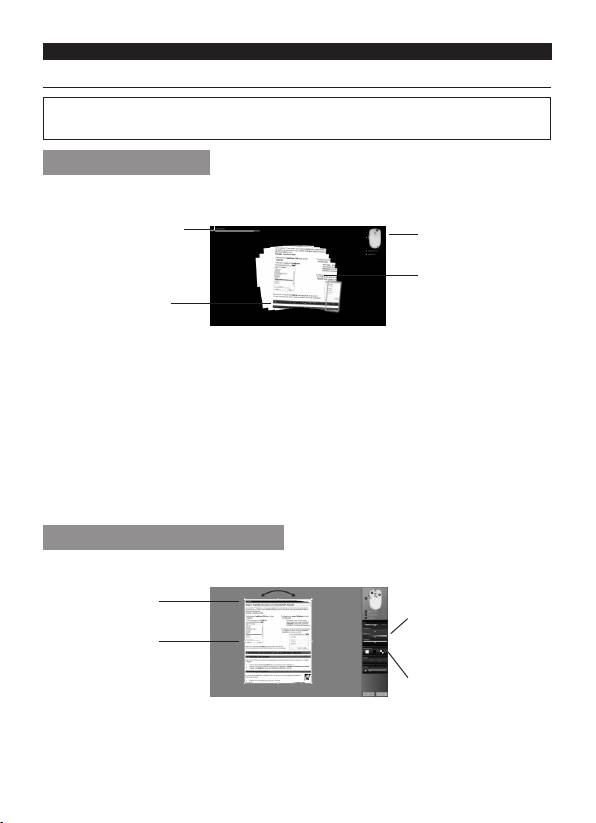
Step 1: Scan documents
1. Place the mouse on the documents you want to scan.
2. Press the Scan buon once to start IRIScan™ Mouse.
3. Move the mouse over the document to scan the desired area.
Remaining scan
Funcon descripon
memory
Scan image
Scan window
This indicates the
current scan area
4. To stop scanning, press the Scan buon again. This opens the Edit screen.
To cancel the scanning, press Esc on the keyboard.
Notes
• During scanning, IRIScan™ Mouse automacally zooms out and adjusts the view
accordingly. To check whether the image is scanned properly, use the mouse wheel to
zoom in/out the image. You can scan documents of up to A3 size.
• If you move the IRIScan™ Mouse too fast, the scan window turns yellow or red. Slow
down the scanning if needed.
• If the scanned images appears distorted, stop moving the IRIScan™ Mouse briey. The
image will be calibrated automacally.
• When the scanning is done, the scanned image is automacally cut into a rectangular
shape and aligned horizontally to the background.
Step 2: Edit the scanned documents
In the Edit screen you can edit the scanned documents.
Rotate the scan result
Adjust the colors, bright-
ness and contrast
Resize the scan area
using the handles
Adjust the background
When you are done, click OK to accept the sengs.
Note: when you click Cancel the scan result will not be saved to memory.
English English
Step 3: save and share the scanned documents
The documents you scan can be shared and saved in several ways.
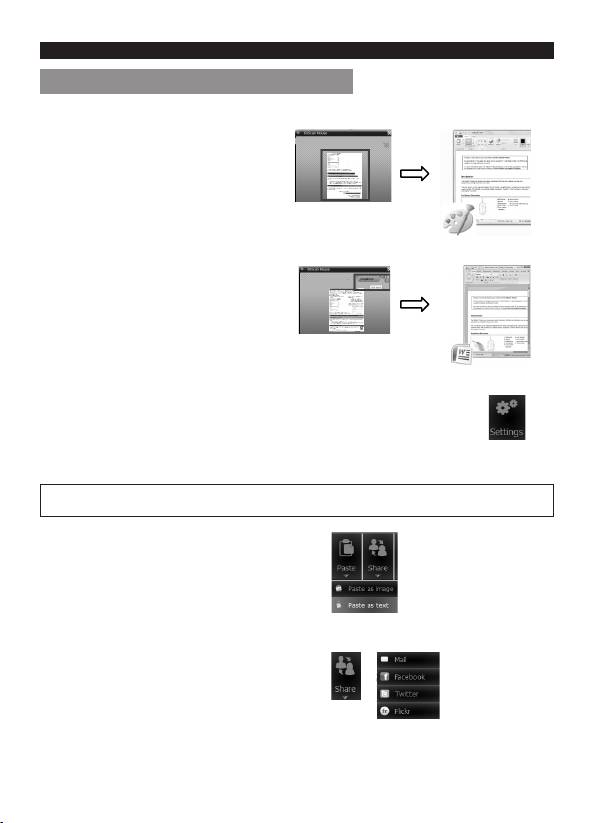
1. Drag-and-drop as image
1. Open an applicaon that supports images.
2. Drag-and-drop the image to the applicaon.
2. Drag-and-drop as text
IRIScan™ Mouse features I.R.I.S.’ powerful text recognion technology.
The default recognion language is set to English.
1. Open a rich text-compable applicaon (E.g. Word).
2. Drag-and-drop the Get Text icon to the applicaon.
The recognized text and its layout are recreated
in the applicaon.
To change the text recognion language:
• Click Sengs.
• Click Text Recognion.
• Select the required language(s) from the list.
You can select up to 3 languages simultaneously.
• Click OK to conrm.
Note: you can also drag-and-drop the scan results directly to the Desktop or to le folders.
3. Paste as image or text
1. Open the required applicaon.
2. Click Paste in IRIScan™ Mouse.
3. Then select Paste as image or Paste as text.
4. Share images via Mail, Facebook, Twier and Flickr.
1. Click Share.
2. Select the required applicaon.
Note that you need a valid Facebook, Twier and Flickr
account and an internet connecon to share documents
via these applicaons.

English English
5. Save in dierent output formats
1. Click Save.
2. Enter the le name and select a le type.
The supported le types are: png, jpeg, , bmp, pdf, xml and doc.
Notes: The image and pdf les you save can be hyper-compressed with the included IRISCompressor™.
When scanning tables, it is recommended to save them as xml les.
6. Send notes to Evernote or translate them with Google Translate
Evernote
1. Make sure the Evernote applicaon is installed on your computer.
2. Log in to your Evernote account.
3. In IRIScan™ Mouse click Apps > Evernote.
Your documents are uploaded to Evernote.
Google Translate
1. In IRIScan™ Mouse click Apps > Google Translate.
2. The recognized text in the scans is sent to Google Translate.
Note that an internet connecon is required.
Should you experience issues when using the IRIScan™ Mouse, consult the Frequently Asked
quesons on our website www.irislink.com/support/faq or contact Technical Support at
www.irislink.com/support.
Français Français
Ce guide de démarrage rapide a pour but de vous aider dans l'installaon et la mise en route de la souris
IRIScan™ Mouse.
Les explicaons fournies dans ce guide sont basées sur le système d'exploitaon Windows® 7. Toutes les
informaons du présent guide peuvent être modiées sans préavis.
Pour en savoir plus sur les fonconnalités de la souris IRIScan™ Mouse, consultez le chier d'aide de
l'applicaon ou le manuel de l'ulisateur complet sur le CD-ROM ou sur le site
www.irislink.com/support/userguides.
Introducon
IRIScan™ Mouse est une souris-scanneur tout-en-un. Grâce à la foncon de numérisaon, vous pouvez scanner
des documents en faisant glisser la souris sur ceux-ci.
Il est possible de faire glisser et déposer les résultats de la numérisaon dans des dossiers de chiers et des
applicaons, de les copier-coller dans des applicaons, de les enregistrer au format Word, PDF et XML les, de les
partager via e-mail, Facebook®, Twier®, Flickr® et de les envoyer vers Evernote® et Google® Translate.
Présentaon du matériel
1. Bouton de
6. Capteurs laser
gauche
2. Molee 7. Surface de numérisaon
3. Bouton de droite
Rerez le lm avant de numériser.
4. Bouton de
8. Equee de la souris
numérisaon
5. Voyants de
la surface de
numérisaon
Installaon de l'applicaon IRIScan™ Mouse
Important : assurez-vous de disposer des droits d'administrateur requis sur votre ordinateur pour procéder à
l'installaon.
1. Insérez le disque IRIScan™ Mouse dans le lecteur CD de l'ordinateur.
Le menu d'installaon s'ache automaquement. (S'il ne s'ache pas,
exécutez setup.exe à parr du disque.)
2. Séleconnez la langue d'installaon. Cliquez ensuite sur Install (Installer).
Suivez les instrucons achées à l'écran.
3. Cliquez sur Finish (Terminer) pour naliser l'installaon.
4. Débranchez votre souris habituelle. Connectez IRIScan™ Mouse à un port
USB libre (USB 2.0 ou ultérieur).
Le pilote est installé automaquement. Si le pilote a été correctement
installé, une info-bulle apparaît dans la barre des tâches.
