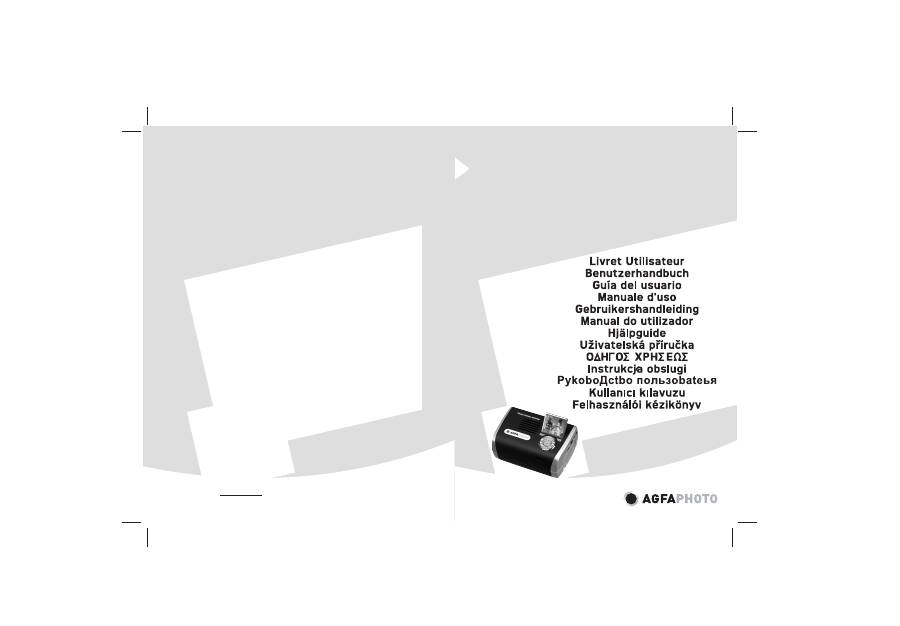
AGFA AP2700: instruction
Class: Household, kitchen appliances, electronics and equipment
Type: Printer
Manual for AGFA AP2700
User Guide
Photo Printer AP2700
*252780546B*
AgfaPhoto Holding GmbH, www.agfaphotoprinter.com,
AGFAPHOTO is used under license of Agfa-Gevaert AG,
produced for and sold by Sagem Communication, www.sagem.com

1
English
Welcome
Thank you for purchasing our new photo printer. With this high quality printer you can get the most out
of your digital photos. The Crystal Image and red-eye image optimising functions provide faultless print
and copy quality of your photos.
You will also find the following on the web site www.agfaphotoprinter.com:
• print drivers for PCs,
• a list of answers to frequently asked questions (FAQ).
A detailed user guide is supplied on the CD-ROM.
Safety instructions and recommendations
Do not install your photo printer in a humid room (bathroom, laundry, kitchen, etc.), or within
1.50 m of a tap or water source, or outside. The printer should be operated within an ambient
temperature range of 10°C to 35°C. Your printer should be used at an ambient temperature of
between 15°C and 35°C for optimum printing results.
Do not set up your printer in a dusty environment as dust deposits might adversely affect the print
quality of your photos.
Only use the power supply that is supplied (PF60N24AS0 of Shanghai Moons' Automation
Control Co., Ltd). Connect it to a mains outlet in compliance with the installation instructions in this
booklet and the indications stated on the identification label located on the unit (voltage, current
and frequency of the electricity network). As a precaution, in case of danger, the mains adapters
act as a disconnecting mechanism for the 230V power supply. They should be placed near the
device and should be easily accessible.
Never open the top cover when the printer is operating, as you risk breaking the film that may
result a printer malfunction.
After using the printer, wait a few moments after switching the printer off before opening it. To
avoid injury, never touch the print head.
Only use
AgfaPhoto
consumables, if not you are likely to damage the equipment and invalidate
the guarantee.
GI AP2700.book Page 1 Mercredi, 20. septembre 2006 4:15 16
2
The crossed-out waste bin stuck on the product means that the product belongs to the family of
electrical and electronic equipment.
In this respect, the European regulations ask you to dispose of it selectively:
- At sales points in the event of the purchase of similar equipment.
- At the collection points made available to you locally (drop-off centre, selective collection, etc.).
The CE marking certifies that the product meets the main requirements of the European
Parliament and Council directive 1999/5/CE on telecommunications terminal equipment,
regarding safety and health of users, and regarding electromagnetic interference.
The declaration of compliance can be consulted on the site
www.agfaphotoprinter.com
category "support", or can be requested at the following address:
AGFAPHOTO
is used under license of Agfa-Gevaert AG
AP2700 is produced for
Sagem Communication
and distributed or sold by
Sagem Communication
Sagem Communication - Customer relations department
4, rue du Petit Albi - 95800 Cergy Saint-Christophe - FRANCE
GI AP2700.book Page 2 Mercredi, 20. septembre 2006 4:15 16
3
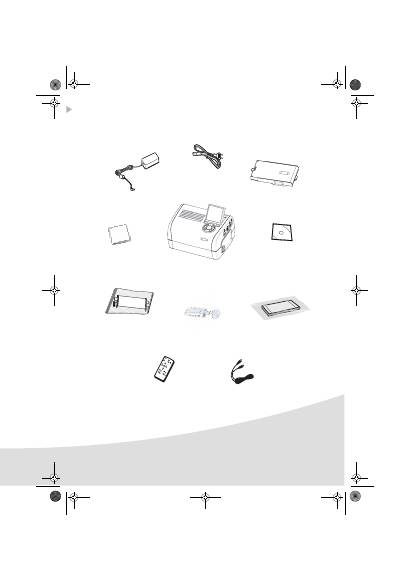
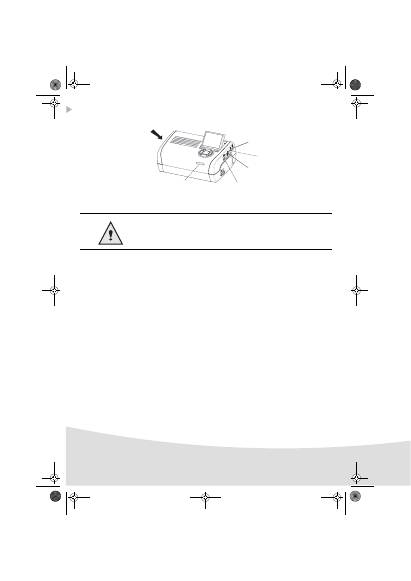
Your printer and its accessories
Place your set in front of you. Take out the various components for your printer and check that the
components shown below are present :
Mains lead
Power supply block
Photo printer
Paper tray
Ribbon
(depending on model)
CD-ROM
Installation guide
Remote control
(depending on model)
WiFi adapter
(depending on model)
Video cable
(depending on model)
Photo paper block
(depending on model)
GI AP2700.book Page 3 Mercredi, 20. septembre 2006 4:15 16
4
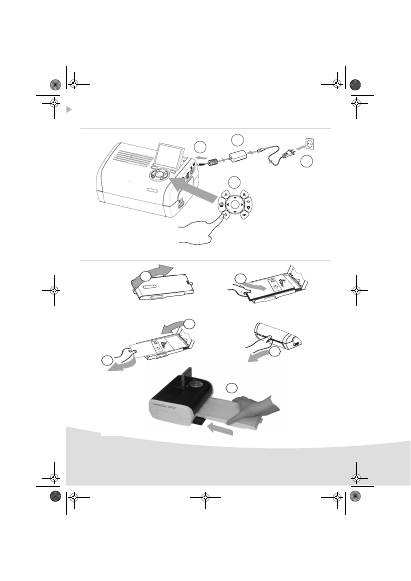
Connections
Before making the connections, please consult the safety instructions
at the start of the user booklet on the CD-ROM provided with your
printer.
IRDA
Infrared
Master USB
Adapters:
WiFi (Depending on option)
Pictbridge
Bluetooth (Depending on option)
Video output
Slave USB
PC link
Mains supply
Memory card
insertion slots
GI AP2700.book Page 4 Mercredi, 20. septembre 2006 4:15 16

5
Remarks:
To guarantee that the sheet of paper moves correctly while printing, make sure that
to allow at least 10 centimetres free space at the back of the printer.
Do not set up your printer in a dusty environment as dust deposits might adversely
affect the print quality of your photos.
10 cm
5 cm
Obstacle
GI AP2700.book Page 5 Mercredi, 20. septembre 2006 4:15 16
6
Setting up the printer
Powering up
Inserting paper
2
4
3
1
(3 s)
1
4
3
Rem
ove t
his
s
hee
t be
fo
re
p
utti
ng p
ap
er
in t
he
pa
pe
r cas
sette
.
Ve
ille
z
à re
tirer ce
tte feu
ille
d
e
pr
ote
cti
on
ava
nt to
ute
im
pr
ess
ion
.
En
tfern
en
S
ie
bitt
e d
as
Sc
hu
tzb
la
tt b
ev
or
Si
e d
ie F
oto
pa
pie
re i
ns
Pap
ierf
ach
ei
nle
gen
.
Q
uita
r est
a h
oja
an
tes
d
e p
on
er el
p
ap
el
en
la
b
an
dej
a
de
p
ap
el.
Ri
m
uo
vere q
ue
sto
fo
glio p
rim
a d
i in
se
rire l
a c
art
a n
ell’
ap
pos
ito
casse
tto
.
Ve
rw
ijd
er d
ez
e
sh
eet vo
or
da
t u
he
t p
ap
ier
in
d
e p
ap
ierca
ss
ette
pla
atst.
Retire e
st
a f
olh
a
de
pr
ot
ec
çã
o an
tes
de
co
lo
car o
pa
pe
l n
a
ca
ss
ete.
Ta
g b
ort d
ett
a p
ap
per i
nn
an
d
u fy
lle
r på
p
app
ers
kasset
te
n.
Vy
jm
te t
ent
ol
ist p
ed v
lož
en
ím p
ap
íru d
o z
ás
obn
íku
.
Ké
rjü
k tá
vo
lítsa e
l, m
iel
tt b
ete
szi
a
pap
írt
a ka
ze
ttá
ba
.
Pro
sz
o u
su
ni
ci
e teg
o
arku
sza p
rze
d w
o
en
ie
m
p
ap
ieru
d
o ka
se
ty
.
25
2 2
61
99
7A
5
6
Rem
ov
e t
his
sh
ee
t b
efo
re p
utti
ng
p
ape
r in
th
e
pa
pe
r ca
ss
ette
.
Ve
illez
à re
tirer cette fe
uill
e d
e
pro
tec
tio
n
av
an
t to
ute i
m
press
io
n.
En
tfern
en
S
ie
bitt
e d
as
S
ch
utz
blatt
bev
or
Sie
di
e F
oto
pap
ie
re i
ns
Pap
ierf
ach
ei
nleg
en
.
Q
uitar es
ta h
oja
an
tes d
e p
on
er el
p
ap
el
en
la
b
an
de
ja d
e p
ap
el.
Rim
uovere
que
sto
fo
glio
p
rim
a d
i in
se
rire l
a cart
a n
el
l’a
pp
osi
to
ca
ss
etto
.
Ve
rw
ijd
er d
eze
sh
eet v
oo
rd
at u
he
t p
ap
ie
r in
de
p
ap
iercas
set
te
plaat
st.
Re
tire
es
ta fo
lha
de
p
ro
tec
çã
o a
nte
s
dec
oloca
r o
pa
pe
l n
a
cassete.
Ta
g b
ort d
ett
a p
ap
per i
nn
an
d
u fy
ller
på
p
ap
pe
rsk
asse
tten
.
Vy
jm
te t
en
to
lis
t p
ed
v
lož
en
ím
p
ap
íru
d
o z
ás
ob
ník
u.
Ké
rjü
k tá
vo
lítsa
e
l, m
iel
tt be
tes
zi a
pa
pírt a
kaz
ett
áb
a.
Pros
z
o u
su
ni
cie
te
go
arku
sza
p
rze
d w
o
en
iem
pap
ieru
d
o k
asety
.
25
2 2
61
99
7A
2
GI AP2700.book Page 6 Mercredi, 20. septembre 2006 4:15 16
7
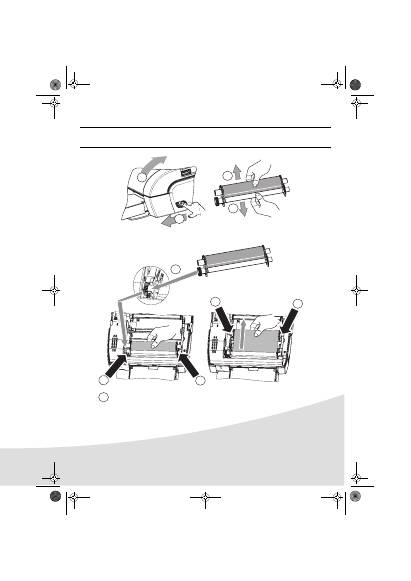
Installing the ribbon
Remark:
Use manufacturer consumables only. These are specially designed to provide
optimum print quality.
1
2
3
3
4
7
5
5
6
6
Tighten the ribbon on these spindles (6) and close the printer.
GI AP2700.book Page 7 Mercredi, 20. septembre 2006 4:15 16
8
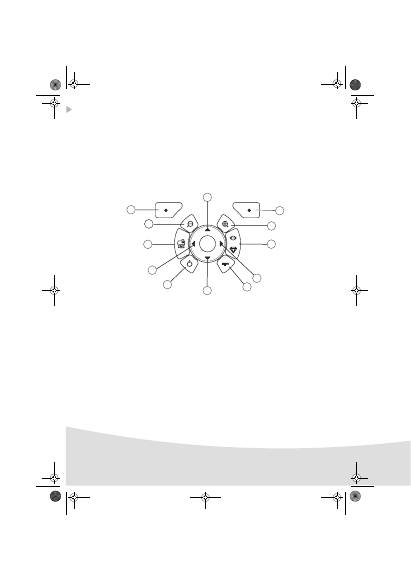
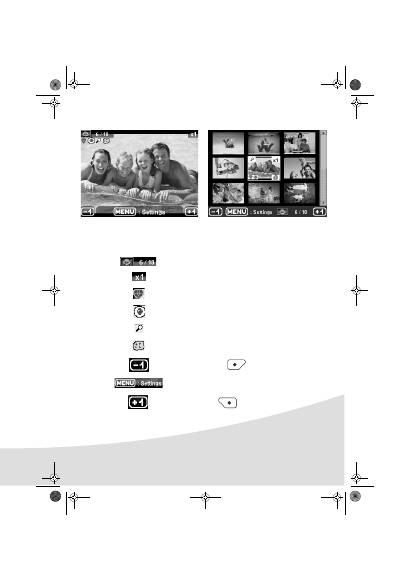
Description of the user interface
The interface is used to:
• choose photographs one at a time or switch into mosaic mode (9 photographs on screen),
• start the printout of a photograph directly,
• enable automatic improvement of the photograph prior to printout,
• set the "Format", "Preferences" and "Image setting" parameters according to your requirements,
• select several photographs and choose a different number of copies for each photograph to be
printed,
• zoom in on a photograph and print it.
Description of the keypad
No.
Key
1 / 5 / 7 / 9
Browser
2
Validate / Enter / Add a copy
3
Zoom +
4
Crystal image / Red eyes
6
Menu
8
On / Off
10
11
Zoom -
12
Back / Cancel / Remove a copy
2
12
3
1
11
10
9
4
5
8
6
7
1
GI AP2700.book Page 8 Mercredi, 20. septembre 2006 4:15 16
9
D
ESCRIPTION
OF
THE
GRAPHIC
USER
INTERFACE
.
2.4" LCD screen (1), to view your photographs
The icon...
indicates...
the photograph number
the number of copies selected
Crystal image function enabled
red eye function enabled
zoom applied to part of the image
modifications made to the image
remove a copy
selection key
access menus MENU key
add a copy
selection key
GI AP2700.book Page 9 Mercredi, 20. septembre 2006 4:15 16
10
P
RINTING
A
PHOTOGRAPH
FROM
A
MEMORY
CARD
Check that the consumables (paper and ribbon) are installed.
Check that your printer is plugged in and switched on.
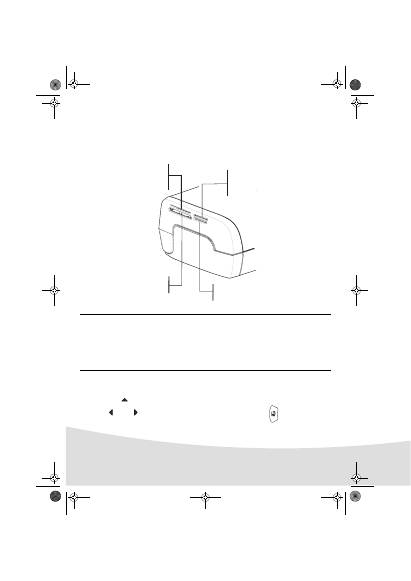
Insert your memory card into the correct slot, as shown on the diagram below.
Insert your memory card; after reading the card, the last photograph will be displayed on the LCD
screen.
Press the
key to display the first photograph on the card. Scroll through the photographs with
the
and
keys. After selecting the photograph, press the
key and follow the
instructions displayed on screen to print your photograph.
Remarks: SmartMedia
CONTACTS DOWNWARDS.
The memory cards do not go completely inside the read slot. NEVER USE FORCE.
Remove the card and check that you are inserting it the right way round into the
correct slot.
For further information, refer to the user booklet on the CD-ROM provided with your
printer.
Slot provided for
CompactFlash
format
Slot provided for
Smart Media (SM),
Carte xD formats
Slot provided for
Multi Media Card (MMC)
Standard Digital (SD)
formats
Slot provided for
Memory Stick (MS)
format
GI AP2700.book Page 10 Mercredi, 20. septembre 2006 4:15 16
11
Improving the print quality
Use the "Crystal Image" and "Red Eye" correction functions.
Crystal Image makes all the necessary settings and corrections related to picture sharpness, colour
management and contrast automatically to obtain the best print quality possible.
Furthermore, exposure defects will be corrected (for example, under-exposed photos will be made
lighter or the portions of photo with strong contrasts will be compensated for). The red-eye correction
function touches up "red eyes" on shots taken with the flash.
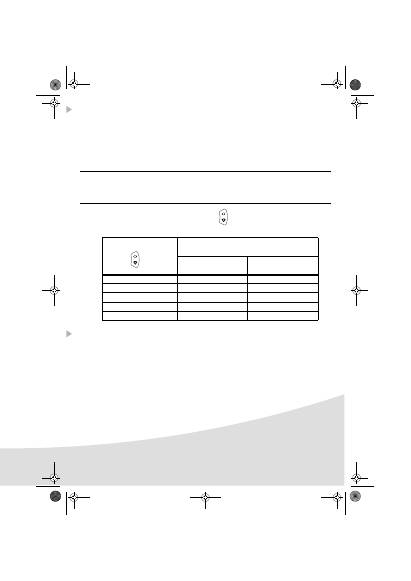
The following table shows the number of times that the
key must be pressed to enable or disable
the components of the "Crystal Image" function.
Other functions
New effects (special effects, sepia, B&W, negative, black & white and colour embossing,
solarisation, black & white and colour contour, charcoal).
Organisation of photographs (choice of location).
Slide show.
TV display.
Sudoku.
Screen background customisation.
Use of these functions is detailed in the user booklet on the CD-ROM provided
with your printer.
Remarks:
By default, the "Crystal Image" and "Red Eye" correction functions are disabled.
When printing from a personal computer, the "Crystal Image" and "Red Eye" correction
functions are not proposed.
Number of presses on the
key
"Crystal Image" and "Red Eye"
correction function status
"Crystal Image"
optimisation
"Red Eye" correction
0 (Default status)
Disabled
Disabled
1
Enabled
Disabled
2
Enabled
Enabled
3
Disabled
Enabled
4 (return to default status)
Disabled
Disabled
GI AP2700.book Page 11 Mercredi, 20. septembre 2006 4:15 16
12
Guarantee
GUARANTEE (UK Terms and Conditions)
In order to apply the guarantee, you should contact your dealer. Proof of purchase will be required. Should
malfunctioning arise, the dealer will advise you what to do.
If you bought your equipment from Sagem Communication directly, the following shall apply :
A) Sagem Communication undertakes to remedy by repair, free of charge for labour and replacement
parts, any defects in the equipment during a period of twelve (12) months from the date of original
delivery of the Equipment, where those defects are a result of faulty workmanship.
During this twelve month guarantee period, the defective equipment will be repaired free of charge;
the customer must however return the defective equipment at his/her own expense, to the address
given by Sagem Communication After Sales Department, the phone number of which can be found on
the delivery slip. Unless the customer has concluded with Sagem Communication a maintenance
contract in respect of the equipment which specifically provides for repairs to be carried out at the
customer’s premises, the repairs will not be carried out on the equipment at the customer’s premises.
The following sentence applies to purchases of equipment for the customer’s trade, business or
profession. Except as otherwise expressly provided in this Document and to the extent permitted by
law, Sagem Communication makes no representations or warranties, express or implied, statutory or
otherwise, and to such extent, all terms and conditions implied by law are hereby excluded.
This guarantee does not affect the Customer’s statutory rights.
B) Exclusions From Guarantee
Sagem Communication shall have no liability under the guarantee in respect of :
• damage, defects breakdown or malfunction due to :
-failure to properly follow the installation process and instructions for use; or
-an external cause to the equipment (including but not limited to, lightening, fire, shock or water
damage of any nature); or
-modifications made without the written approval of
Sagem Communication
; or
-a failure or neglect to maintain the equipment or inappropriate maintenance; or
-unsuitable operating conditions, particularly of temperature and humidity; or
-repair or maintenance of the equipment by persons not authorised by
Sagem Communication
.
• wear and tear from normal daily use of the equipment and its accessories
• damage due to insufficient or bad packaging of equipment when returned to Sagem
Communication
• supply of new versions of software
• work on any equipment or software modified or added without the prior written consent of Sagem
Communication malfunctions not resulting from the Equipment or from software installed in user
workstations for the purpose of use of the equipment
GI AP2700.book Page 12 Mercredi, 20. septembre 2006 4:15 16
13
• communication problems related to an unsuitable environment, including :
-problems related to access and/or connection to the Internet such as interruptions by access networks
or malfunction of the line used by the subscriber or his correspondent
-transmission faults (for example poor geographical coverage by radio transmitters, interference or
poor line quality)
-the local network fault (wiring, servers, workstations) or the failure of the transmission network
• the normal servicing (as defined in the user guide supplied with the equipment) as well as
malfunctioning due to servicing not being carried out, servicing costs are in any event always
borne by the customer.
C) In the cases set forth in § B) as well as after expiry of the twelve month guarantee period, the
customer must ask Sagem Communication for an estimate, and he/she must accept the estimate and
agree to pay the charges mentioned in it before returning the equipment to Sagem Communication.
The repair and delivery costs will be invoiced to the customer.
The foregoing shall apply unless otherwise agreed in writing with the customer and only for the UK.
If any provision of this guarantee shall be held to be in whole or in part invalid or illegal due to an
obligatory rule applicable to consumers pursuant to their national legislation, such invalidity or
illegality shall not impair or affect the remaining provisions or parts of this guarantee.
GI AP2700.book Page 13 Mercredi, 20. septembre 2006 4:15 16

14
GI AP2700.book Page 14 Mercredi, 20. septembre 2006 4:15 16
