Xerox WorkCentre M118-M118i Pomoc-14041: инструкция
Раздел: Офисная Техника
Тип: Мфу
Инструкция к Мфу Xerox WorkCentre M118-M118i Pomoc-14041


Xerox WorkCentre
®
M118/M118i
Copyright © 2005, 2004 Xerox Corporation. All rights reserved.
1
This guide includes instructions for:
■
Navigating Display Screens
on page 2
■
Network Setup Using DHCP
on page 2
■
Network Setup Using a Static IP Address
on page 3
■
Verifying Network Setup Using CentreWare Internet Services (IS)
on page 5
This setup guide provides instructions for connecting the Xerox WorkCentre M118/M118i on an Ethernet
TCP/IP network. It includes procedures for setting up the network connection using either of the following
methods:
■
DHCP
: Use this method to allow a DHCP server to automatically assign an IP address. This is the factory
default setting.
■
Static IP address
: Use this method to manually assign an IP address provided by the network
administrator.
Note
The
System Administrator Guide
provides detailed instructions for setting up a network connection. It also
provides setup procedures if you are using Novell IPX. The
System Administrator Guide
is located on the
Customer Documentation CD-ROM
and on the Xerox website.
Before You Begin
Before turning on the machine:
■
Confirm that an existing operational network utilizing TCP/IP is available.
■
Confirm that the Ethernet cable is plugged into the machine and is connected to an operational Ethernet
port on the network.
Note
The RJ45 Ethernet cable is not supplied by Xerox.
Network Connection Quick Setup Guide
Navigating Display Screens
Xerox WorkCentre M118/M118i
2
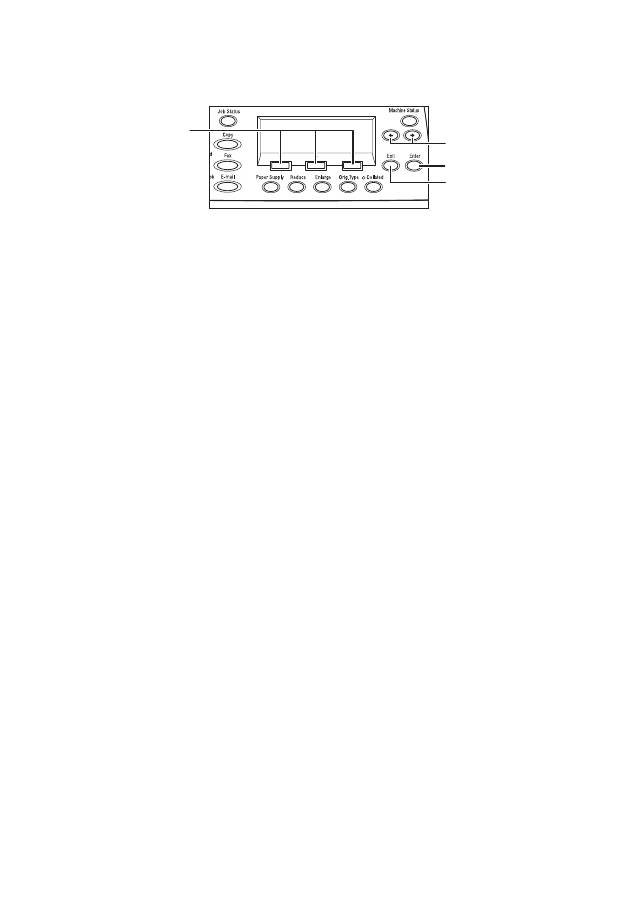
Navigating Display Screens
1.
Use the
Select
buttons to select items on the display and to scroll through menus.
2.
Use the
Right Arrow
and
Left Arrow
buttons to navigate screens or to move from one entry field
to another.
3.
Use the
Enter
button to accept the currently selected item on the display.
4.
Use the
Exit
button to return to the previous display screen.
Network Setup Using DHCP
When the machine starts up after power on, it automatically uses DHCP to obtain its network configuration
information. A DHCP server delivers an IP address as well as other configuration settings to the machine.
To set up the network connection using DHCP:
1.
Turn on the machine.
2.
After the machine starts up, it negotiates with the DHCP server for an IP address. Wait two minutes for the
network setup to complete, and then print the System Settings List:
a.
On the control panel, press the
Machine Status
button.
b.
Use the
Select
button below the display to highlight
Report/List
, and then press the
Enter
button.
c.
Press the
Right Arrow
button.
d.
Press the
Select
button until you see
System Settings
on the display, and then press the
Enter
button.
e.
Press the
Start
button to print the System Settings List.
3.
In the Communications Settings section of the System Settings List, confirm that an IP address has been
allocated and that it is an appropriate IP address for your network.
Note
If the IP address starts with 167.xxx.xxx.xxx, the DHCP server has not properly allocated an address or
DHCP is not enabled on your network. Contact your network administrator for assistance.
4.
Use CentreWare IS to verify the network setup. See
Verifying Network Setup Using
CentreWare Internet Services (IS)
on page 5.
1
2
3
4

Network Setup Using a Static IP Address
Xerox WorkCentre M118/M118i
3
Network Setup Using a Static IP Address
When the machine is powered on, it automatically uses DHCP to obtain its network configuration. To use a
static IP address, DHCP must be turned off and the IP address, gateway address, subnet mask, and
DNS Server address must be entered manually.
Pre-Requisites for Using a Static IP Address
Before you begin, obtain the following information from your network administrator:
Connecting the Machine Using a Static IP Address
1.
Turn on the machine.
2.
When the machine is Ready, press the
Log In/Out
button.
3.
Press the
Select
button below the display to select
System Settings
.
a.
Use the numeric keypad to enter the
Password
. The default password is
11111
.
b.
Press the
Select
button to select
Confirm
.
Turn DHCP Off
1.
Press the
Select
button to highlight
Print Settings
,
and then press the
Enter
button.
2.
Press the the
Enter
button to select
Network/Port
.
3.
Press the
Select
button until you see
TCP/IP Settings
on the display, and then press the
Enter
button.
4.
Select
Get IP Address
,
and then press the
Enter
button.
5.
Select
Manual
,
and then press the
Enter
button.
6.
Press the
Exit
button.
IP Address:
__________ . __________ . __________ . __________
Gateway Address:
__________ . __________ . __________ . __________
Subnet Mask:
__________ . __________ . __________ . __________
DNS Server Address:
__________ . __________ . __________ . __________

Network Setup Using a Static IP Address
Xerox WorkCentre M118/M118i
4
Set the IP Address
1.
Press the
Select
button until you see
IP Address
on the display,
and then press the
Enter
button.
2.
If there is an incorrect IP address in the field, press the
Clear
button to delete the address.
3.
Use the numeric key pad to enter the first number of the IP address, and then press the
Right Arrow
button
to move to the next field.
4.
Repeat Step 3 to enter the remaining numbers.
Note
If you are using a server name for the machine (instead of an IP address), you must enter the DNS
server information. Use CentreWare IS to set the DNS server address. See
Verifying Network Setup
Using CentreWare Internet Services (IS)
on page 5.
5.
Press the
Enter
button to accept the address.
6.
Press the
Exit
button.
Set the Gateway Address
1.
Press the
Select
button until you see
Gateway Address
on the display,
and then press the
Enter
button.
2.
Use the numeric key pad to enter the first number of the gateway address, and then press the
Right Arrow
button to move to the next field.
3.
Repeat Step 2 to enter the remaining numbers.
4.
Press the
Enter
button to accept the address.
5.
Press the
Exit
button.
Set the Subnet Mask
1.
Press the
Select
button until you see
Subnet Mask
on the display,
and then press the
Enter
button.
2.
Use the numeric key pad to enter the first number of the subnet mask, and then press the
Right Arrow
button to move to the next field.
3.
Repeat Step 2 to enter the remaining numbers.
4.
Press the
Enter
button to accept the subnet mask.
5.
Press the
Exit
button.
6.
Press the
Log In/Out
button to return to the main menu.

Verifying Network Setup Using CentreWare Internet Services (IS)
Xerox WorkCentre M118/M118i
5
Verifying Network Setup Using CentreWare Internet Services (IS)
CentreWare IS provides a simple interface that enables you to manage, configure, and monitor networked
printers from your desktop using an embedded web server. CentreWare IS gives administrators easy access to
printer status, configuration, and diagnostic functions. It also provides users with access to printer status and
special printing functions such as printing saved jobs. With CentreWare IS software, you can access and
manage your printers over a TCP/IP network using a web browser.
Note
To enter network configuration settings via CentreWare IS, your computer must be on the same subnet as
the Xerox WorkCentre M118/M118i. For additional information about using CentreWare IS, see the
User Guide
and the
System Administrator Guide
on the
Customer Documentation CD-ROM
or the
Xerox website.
To verify your network setup using CentreWare IS:
1.
At your computer, launch your web browser.
2.
Enter the machine’s IP address in the browser’s
Address
field (http://xxx.xxx.xxx.xxx).
3.
Click the
Properties
tab.
4.
Select the
Protocol Settings
folder on the left sidebar, and then select
TCP/IP
.
5.
If you are using a server name for the machine (instead of an IP address), enter the DNS server address in
the
DNS Address 1
field, and then click the
Apply New Settings
button at the bottom of the page.
6.
Enter the default user ID and password in the
Connect to
[
ip address
] dialog box, and then click the
OK
button.
■
Default user ID:
admin
■
Default password:
x-admin
.
The user ID and password should be changed after network setup is complete.
Оглавление
- Network Connection Quick Setup Guide
- Petit guide d'installation de l'option de connexion réseau
- Guida all'installazione rapida di connessione di rete
- Kurzanleitung: Netzwerkanschluss
- Guía de configuración rápida de conexión de red
- Guia de Configuração Rápida de Conexão da Rede
- P ř íru č ka rychlého nastavení p ř ipojení sít ě
- Skrócona instrukcja konfiguracji po łą cze ń sieciowych
- Gyorsútmutató a hálózati kapcsolat beállításához
- Ghid de Programare Rapid ă pentru Conectarea la Re ţ ea
- A ğ Ba ğ lant ı s ı H ı zl ı Kurulum K ı lavuzu
