Shure GLXD4 Wireless Receiver: инструкция
Раздел: Аксессуары для аудио
Тип:
Инструкция к Shure GLXD4 Wireless Receiver
GLXD4 Wireless Receiver
© 2013 Shure Incorporated
27A20555 (Rev. 1)
Printed in U.S.A.

IMPORTANT SAFETY INSTRUCTIONS
14. REFER all servicing to qualified service personnel. Servicing is required when the ap-
paratus has been damaged in any way, such as power supply cord or plug is damaged,
1. READ these instructions.
liquid has been spilled or objects have fallen into the apparatus, the apparatus has been
2. KEEP these instructions.
exposed to rain or moisture, does not operate normally, or has been dropped.
3. HEED all warnings.
15. DO NOT expose the apparatus to dripping and splashing. DO NOT put objects filled with
4. FOLLOW all instructions.
liquids, such as vases, on the apparatus.
5. DO NOT use this apparatus near water.
16. The MAINS plug or an appliance coupler shall remain readily operable.
6. CLEAN ONLY with dry cloth.
17. The airborne noise of the Apparatus does not exceed 70dB (A).
7. DO NOT block any ventilation openings. Allow sufficient distances for adequate ventila-
18. Apparatus with CLASS I construction shall be connected to a MAINS socket outlet with a
tion and install in accordance with the manufacturer’s instructions.
protective earthing connection.
8. DO NOT install near any heat sources such as open flames, radiators, heat registers,
19. To reduce the risk of fire or electric shock, do not expose this apparatus to rain or
stoves, or other apparatus (including amplifiers) that produce heat. Do not place any open
moisture.
flame sources on the product.
20. Do not attempt to modify this product. Doing so could result in personal injury and/or
9. DO NOT defeat the safety purpose of the polarized or groundingtype plug. A polarized
product failure.
plug has two blades with one wider than the other. A grounding type plug has two blades
21. Operate this product within its specified operating temperature range.
and a third grounding prong. The wider blade or the third prong are provided for your
safety. If the provided plug does not fit into your outlet, consult an electrician for replace-
This symbol indicates that dangerous voltage constituting a risk of
ment of the obsolete outlet.
electric shock is present within this unit.
10. PROTECT the power cord from being walked on or pinched, particularly at plugs, conve-
nience receptacles, and the point where they exit from the apparatus.
11. ONLY USE attachments/accessories specified by the manufacturer.
This symbol indicates that there are important operating and mainte-
12. USE only with a cart, stand, tripod, bracket, or table specified by the manu-
nance instructions in the literature accompanying this unit.
facturer, or sold with the apparatus. When a cart is used, use caution when
moving the cart/apparatus combination to avoid injury from tip-over.
13. UNPLUG this apparatus during lightning storms or when unused for long
WARNING: This product contains a chemical known to the State of California to cause cancer and birth
defects or other reproductive harm.
periods of time.
CONSIGNES DE SÉCURITÉ IMPORTANTES
13. DÉBRANCHER l'appareil pendant les orages ou quand il ne sera pas utilisé pendant
longtemps.
1. LIRE ces consignes.
14. CONFIER toute réparation à du personnel qualifié. Des réparations sont nécessaires
2. CONSERVER ces consignes.
si l'appareil est endommagé d'une façon quelconque, par exemple : cordon ou prise
3. OBSERVER tous les avertissements.
d'alimentation endommagé, liquide renversé ou objet tombé à l'intérieur de l'appareil,
4. SUIVRE toutes les consignes.
exposition de l'appareil à la pluie ou à l'humidité, appareil qui ne marche pas normale-
5. NE PAS utiliser cet appareil à proximité de l'eau.
ment ou que l'on a fait tomber.
6. NETTOYER UNIQUEMENT avec un chiffon sec.
15. NE PAS exposer cet appareil aux égouttures et aux éclaboussements. NE PAS poser
7. NE PAS obstruer les ouvertures de ventilation. Laisser des distances suffisantes pour
des objets contenant de l'eau, comme des vases, sur l'appareil.
permettre une ventilation adéquate et effectuer l'installation en respectant les instructions
16. La prise SECTEUR ou un coupleur d’appareil électrique doit rester facilement utilisable.
du fabricant.
17. Le bruit aérien de l'appareil ne dépasse pas 70 dB (A).
8. NE PAS installer à proximité d'une source de chaleur telle qu'une flamme nue, un
18. L'appareil de construction de CLASSE I doit être raccordé à une prise SECTEUR dotée
radiateur, une bouche de chaleur, un poêle ou d'autres appareils (dont les amplificateurs)
d'une protection par mise à la terre.
produisant de la chaleur. Ne placer aucune source à flamme nue sur le produit.
19. Pour réduire les risques d'incendie ou de choc électrique, ne pas exposer cet appareil à
9. NE PAS détériorer la sécurité de la fiche polarisée ou de la fiche de terre. Une fiche
la pluie ou à l'humidité.
polarisée comporte deux lames dont l'une est plus large que l'autre. Une fiche de terre
20. Ne pas essayer de modifier ce produit. Cela risque de causer des blessures et/ou la
comporte deux lames et une troisième broche de mise à la terre. La lame la plus large ou
défaillance du produit.
la troisième broche assure la sécurité de l'utilisateur. Si la fiche fournie ne s'adapte pas à
21. Utiliser ce produit dans sa plage de températures de fonctionnement spécifiée.
la prise électrique, demander à un électricien de remplacer la prise hors normes.
10. PROTÉGER le cordon d'alimentation afin que personne ne marche dessus et que rien ne
Ce symbole indique la présence d'une tension dangereuse dans
le pince, en particulier au niveau des fiches, des prises de courant et du point de sortie
l'appareil constituant un risque de choc électrique.
de l'appareil.
11. UTILISER UNIQUEMENT les accessoires spécifiés par le fabricant.
12. UTILISER uniquement avec un chariot, un pied, un trépied, un support ou
Ce symbole indique que la documentation fournie avec l'appareil con-
une table spécifié par le fabricant ou vendu avec l'appareil. Si un chariot
tient des instructions d'utilisation et d'entretien importantes.
est utilisé, déplacer l'ensemble chariot-appareil avec précaution afin de ne
pas le renverser, ce qui pourrait entraîner des blessures.
WICHTIGE SICHERHEITSHINWEISE
14. ALLE Reparatur- und Wartungsarbeiten von qualifiziertem Kundendienstpersonal
durchführen lassen. Kundendienst ist erforderlich, wenn das Gerät auf irgendwelche
1. Diese Hinweise LESEN.
Weise beschädigt wurde, z. B. wenn das Netzkabel oder der Netzstecker beschädigt
2. Diese Hinweise AUFBEWAHREN.
wurden, wenn Flüssigkeiten in das Gerät verschüttet wurden oder Fremdkörper
3. Alle Warnungen BEACHTEN.
hineinfielen, wenn das Gerät Regen oder Feuchtigkeit ausgesetzt war, nicht normal
4. Alle Hinweise BEFOLGEN.
funktioniert oder fallen gelassen wurde.
5. Dieses Gerät NICHT in Wassernähe VERWENDEN.
15. Dieses Gerät vor Tropf- und Spritzwasser SCHÜTZEN. KEINE mit Wasser gefüllten
6. NUR mit einem sauberen Tuch REINIGEN.
Gegenstände wie zum Beispiel Vasen auf das Gerät STELLEN.
7. KEINE Lüftungsöffnungen verdecken. Hinreichende Abstände für ausreichende Belüftung
16. Der Netzstecker oder eine Gerätesteckverbindung muss leicht zu betätigen sein.
vorsehen und gemäß den Anweisungen des Herstellers installieren.
17. Der Luftschall des Geräts überschreitet 70 dB (A) nicht.
8. NICHT in der Nähe von Wärmequellen wie zum Beispiel offenen Flammen, Heizkörpern,
18. Das Gerät mit Bauweise der KLASSE I muss mit einem Schukostecker mit Schutzleiter in
Wärmespeichern, Öfen oder anderen Hitze erzeugenden Geräten (einschließlich
eine Netzsteckdose mit Schutzleiter eingesteckt werden.
Verstärkern) installieren. Keine Quellen von offenen Flammen auf dem Produkt platzieren.
19. Dieses Gerät darf nicht Regen oder Feuchtigkeit ausgesetzt werden, um das Risiko von
9. Die Schutzfunktion des Schukosteckers NICHT umgehen. Ein Schukostecker verfügt
Bränden oder Stromschlägen zu verringern.
über zwei Steckerzinken sowie Schutzleiter. Bei dieser Steckerausführung dienen die
20. Nicht versuchen, dieses Produkt zu modifizieren. Ansonsten könnte es zu Verletzungen
Schutzleiter Ihrer Sicherheit. Wenn der mitgelieferte Stecker nicht in die Steckdose passt,
und/oder zum Produktausfall kommen.
einen Elektriker mit dem Austauschen der veralteten Steckdose beauftragen.
21. Dieses Produkt muss innerhalb des vorgeschriebenen Temperaturbereichs betrieben
10. VERHINDERN, dass das Netzkabel gequetscht oder darauf getreten wird, insbesondere
werden.
im Bereich der Stecker, Netzsteckdosen und an der Austrittsstelle vom Gerät.
11. NUR das vom Hersteller angegebene Zubehör und entsprechende Zusatzgeräte
Dieses Symbol zeigt an, dass gefährliche Spannungswerte, die ein
verwenden.
Stromschlagrisiko darstellen, innerhalb dieses Geräts auftreten.
12. NUR in Verbindung mit einem vom Hersteller angegebenen oder mit dem Gerät
verkauften Transportwagen, Stand, Stativ, Träger oder Tisch verwenden. Wenn ein
Dieses Symbol zeigt an, dass das diesem Gerät beiliegende Handbuch
Transportwagen verwendet wird, beim Verschieben der Transportwagen/Geräte-Einheit
wichtige Betriebs- und Wartungsanweisungen enthält.
vorsichtig vorgehen, um Verletzungen durch Umkippen zu verhüten.
13. Bei Gewitter oder wenn das Gerät lange Zeit nicht benutzt wird, das Netzkabel
HERAUSZIEHEN.
INSTRUCCIONES IMPORTANTES DE SEGURIDAD
13. DESENCHUFE el aparato durante las tormentas eléctricas, o si no va a ser utilizado por
un lapso prolongado.
1. LEA estas instrucciones.
14. TODA reparación debe ser llevada a cabo por técnicos calificados. El aparato requiere
2. CONSERVE estas instrucciones.
reparación si ha sufrido cualquier tipo de daño, incluyendo los daños al cordón o enchufe
3. PRESTE ATENCION a todas las advertencias.
eléctrico, si se derrama líquido sobre el aparato o si caen objetos en su interior, si ha sido
4. SIGA todas las instrucciones.
expuesto a la lluvia o la humedad, si no funciona de modo normal, o si se ha caído.
5. NO utilice este aparato cerca del agua.
15. NO exponga este aparato a chorros o salpicaduras de líquidos. NO coloque objetos
6. LIMPIE UNICAMENTE con un trapo seco.
llenos con líquido, tales como floreros, sobre el aparato.
7. NO obstruya ninguna de las aberturas de ventilación. Deje espacio suficiente para
16. El enchufe de alimentación o un acoplador para otros aparatos deberá permanecer en
proporcionar ventilación adecuada e instale los equipos según las instrucciones del
buenas condiciones de funcionamiento.
fabricante.
17. El nivel de ruido transmitido por el aire del aparato no excede de 70 dB(A).
8. NO instale el aparato cerca de fuentes de calor tales como llamas descubiertas, radiad-
18. Los aparatos de fabricación CLASE I deberán conectarse a un tomacorriente de ALI-
ores, registros de calefacción, estufas u otros aparatos (incluyendo amplificadores) que
MENTACION con clavija de puesta a tierra protectora.
produzcan calor. No coloque artículos con llamas descubiertas en el producto.
19. Para reducir el riesgo de causar un incendio o sacudidas eléctricas, no exponga este
9. NO anule la función de seguridad del enchufe polarizado o con clavija de puesta a tierra.
aparato a la lluvia ni a humedad.
Un enchufe polarizado tiene dos patas, una más ancha que la otra. Un enchufe con pu-
20. No intente modificar este producto. Hacerlo podría causar lesiones personales y/o la falla
esta a tierra tiene dos patas y una tercera clavija con puesta a tierra. La pata más ancha
del producto.
o la tercera clavija se proporciona para su seguridad. Si el tomacorriente no es del tipo
21. Utilice este producto únicamente dentro de la gama de temperaturas de funcionamiento
apropiado para el enchufe, consulte a un electricista para que sustituya el tomacorriente
especificadas.
de estilo anticuado.
10. PROTEJA el cable eléctrico para evitar que personas lo pisen o estrujen, particularmente
Este símbolo indica que la unidad contiene niveles de voltaje peligrosos
en sus enchufes, en los tomacorrientes y en el punto en el cual sale del aparato.
que representan un riesgo de choques eléctricos.
11. UTILICE únicamente los accesorios especificados por el fabricante.
12. UTILICE únicamente con un carro, pedestal, trípode, escuadra o mesa del
tipo especificado por el fabricante o vendido con el aparato. Si se usa un
Este símbolo indica que la literatura que acompaña a esta unidad con-
carro, el mismo debe moverse con sumo cuidado para evitar que se vuelque
tiene instrucciones importantes de funcionamiento y mantenimiento.
con el aparato.
ISTRUZIONI IMPORTANTI PER LA SICUREZZA
13. Durante i temporali o in caso di inutilizzo prolungato dell'apparecchio, SCOLLEGATELO
dalla presa di corrente.
1. LEGGETE queste istruzioni.
14. Per qualsiasi intervento, RIVOLGETEVI a personale di assistenza qualificato. È neces-
2. CONSERVATELE.
sario intervenire sull'apparecchio ogniqualvolta è stato danneggiato, in qualsiasi modo;
3. OSSERVATE tutte le avvertenze.
ad esempio la spina o il cavo di alimentazione sono danneggiati, si è versato liquido
4. SEGUITE tutte le istruzioni.
sull'apparecchio o sono caduti oggetti su di esso, l'apparecchio è stato esposto alla piog-
5. NON usate questo apparecchio vicino all'acqua.
gia o all'umidità, non funziona normalmente o è caduto.
6. PULITE l'apparecchio SOLO con un panno asciutto.
15. NON esponete l'apparecchio a sgocciolamenti o spruzzi. NON appoggiate
7. NON ostruite alcuna apertura per l'aria di raffreddamento. Consentite distanze sufficienti
sull'apparecchio oggetti pieni di liquidi, ad esempio vasi da fiori.
per un'adeguata ventilazione e installate l'apparecchio seguendo le istruzioni del costrut-
16. La spina ELETTRICA o l'accoppiatore per elettrodomestici deve restare prontamente
tore.
utilizzabile.
8. NON installate l'apparecchio accanto a fonti di calore, quali fiamme libere, radiatori, aper-
17. Il rumore aereo dell'apparecchio non supera i 70 dB (A).
ture per l'efflusso di aria calda, forni o altri apparecchi (amplificatori inclusi) che generano
18. L'apparecchio appartenente alla CLASSE I deve essere collegato ad una presa elettrica
calore. Non esponete il prodotto a fonti di calore non controllate.
dotata di messa a terra di protezione.
9. NON modificate la spina polarizzata o con spinotto di protezione per non alterarne
19. Per ridurre il rischio di incendio o folgorazione, non esponete questo apparecchio alla
la funzione di sicurezza. Una spina polarizzata è dotata di due lame, una più ampia
pioggia o all'umidità.
dell'altra. Una spina con spinotto è dotata di due lame e di un terzo polo di messa a terra.
20. Non tentate di modificare il prodotto. Tale operazione può causare infortuni e/o il guasto
La lama più ampia ed il terzo polo hanno lo scopo di tutelare la vostra incolumità. Se la
del prodotto stesso.
spina in dotazione non si adatta alla presa di corrente, rivolgetevi ad un elettricista per far
21. Utilizzate questo prodotto entro la gamma di temperatura operativa specificata.
eseguire le modifiche necessarie.
10. EVITATE di calpestare il cavo di alimentazione o di comprimerlo, specie in corrispon-
Questo simbolo indica la presenza di alta tensione all'interno
denza di spine, prese di corrente e punto di uscita dall'apparecchio.
dell'apparecchio, che comporta il rischio di folgorazione.
11. USATE ESCLUSIVAMENTE i dispositivi di collegamento e gli accessori
specificati dal costruttore.
12. USATE l'apparecchio solo con carrelli, sostegni, treppiedi, staffe o tavoli
Questo simbolo indica la presenza di istruzioni importanti per l'uso e la
specificati dal produttore o venduti unitamente all'apparecchio stesso. Se us-
manutenzione nella documentazione in dotazione all'apparecchio.
ate un carrello, fate attenzione quando lo spostate con l'apparecchio collocato
su di esso, per evitare infortuni causati da un eventuale ribaltamento del carrello stesso.
IMPORTANTES INSTRUÇÕES DE SEGURANÇA
13. DESLIGUE este aparelho da tomada elétrica durante tempestades com relâmpagos ou
quando não seja utilizado por longo período.
1. LEIA estas instruções.
14. DEIXE toda a manutenção sob a responsabilidade de uma equipe de manutenção
2. GUARDE estas instruções.
qualificada. É necessário realizar a manutenção quando por algum motivo o aparelho
3. PRESTE ATENÇÃO a todas as instruções.
tiver sido danificado de alguma forma, como por exemplo por dano do cabo de alimen-
4. SIGA todas as instruções.
tação elétrica ou do seu conector, por derramamento de líquido ou queda de objetos no
5. NÃO use este aparelho perto de água.
aparelho, se o aparelho tiver sido exposto à chuva ou à umidade, não esteja operando
6. LIMPE SOMENTE com um pano seco.
normalmente ou tenha sofrido queda.
7. NÃO bloqueie nenhuma das aberturas de ventilação. Deixe distâncias suficientes para
15. NÃO exponha o aparelho a respingos ou goteiras. NÃO coloque objetos cheios de
ventilação adequada e instale de acordo com as instruções do fabricante.
líquidos, tais como vasos, sobre o aparelho.
8. NÃO instale próximo de nenhuma fonte de calor, tais como fogo aceso, radiadores,
16. O plugue MAINS (rede elétrica) ou um acoplador de aparelho deve estar sempre pronto
bocais de aquecimento, fornos ou outros aparelhos que produzam calor (inclusive ampli-
para operação.
ficadores). Não coloque fontes de chamas sobre o produto.
17. O ruído aéreo do Aparelho não ultrapassa 70 dB (A).
9. NÃO inutilize as características de segurança do conector polarizado ou com pino de
18. O aparelho com construção CLASSE I deve estar conectado à tomada da rede elétrica
aterramento. Um conector polarizado possui duas lâminas com uma mais larga do que a
com ligação à terra.
outra. Um conector com pino de aterramento possui duas lâminas e um terceiro pino de
19. Para reduzir o risco de incêndio ou choque elétrico, não exponha este aparelho à chuva
aterramento. É fornecida uma lâmina mais larga ou o terceiro pino para a sua segurança.
ou umidade.
Se por acaso o conector não se encaixar na tomada, chame um eletricista para substituir
20. Não tente alterar este produto. Isso poderá resultar em lesão pessoal e/ou falha do
a tomada obsoleta.
produto.
10. PROTEJA o cabo de alimentação, evitando que seja pisado ou que enrosque, especial-
21. Opere este produto dentro da faixa de temperatura de operação especificada.
mente nos conectores, nas tomadas elétricas de emprego geral e no ponto onde elas
saem do aparelho.
Este símbolo indica que existe nesta unidade tensão perigosa que
11. USE SOMENTE acessórios/apetrechos especificados pelo fabricante.
apresenta risco de choque elétrico.
12. USE somente com um carrinho, pedestal, tripé, suporte ou mesa espe-
cificados pelo fabricante ou vendidos com o aparelho. Quando utilizar um
carrinho, tenha cuidado ao movimentar o conjunto aparelho/carrinho para
Este símbolo indica que existem instruções operação e manutenção
evitar danos com a queda do mesmo.
importantes na literatura que acompanha esta unidade.
ВАЖНЫЕ ИНСТРУКЦИИ ПО ТЕХНИКЕ БЕЗОПАСНОСТИ
13. ОТСОЕДИНЯЙТЕ прибор ОТ СЕТИ во время грозы или если он не используется
длительное время.
1. ПРОЧИТАЙТЕ эти инструкции.
14. ПОРУЧИТЕ все обслуживание квалифицированному техническому персоналу.
2. СОХРАНИТЕ эти инструкции.
Обслуживание требуется при каком-либо повреждении прибора, например, при
3. ОБРАЩАЙТЕ ВНИМАНИЕ на все предупреждения.
повреждении шнура питания или вилки, если на прибор была пролита жидкость или
4. СЛЕДУЙТЕ всем инструкциям.
на него упал какой-либо предмет, если прибор подвергся воздействию дождя или
5. НЕ пользуйтесь этим прибором вблизи воды.
сырости, не функционирует нормально или если он падал.
6. ЧИСТИТЕ ТОЛЬКО сухой тканью.
15. НЕ допускайте попадания на прибор капель или брызг. НЕ ставьте на прибор сосуды
7. НЕ закрывайте никакие вентиляционные отверстия. Оставляйте расстояния, нужные
с жидкостью, например, вазы.
для достаточной вентиляции, и выполняйте установку в соответствии с инструкциями
16. Вилка электропитания или штепсель прибора должны быть легко доступны.
изготовителя.
17. Уровень воздушного шума этого аппарата не превышает 70 дБ (A).
8. НЕ устанавливайте вблизи каких бы то ни было источников тепла — открытого
18. Аппараты конструкции КЛАССА I необходимо подсоединять к СЕТЕВОЙ розетке с
пламени, радиаторов, обогревателей, печей или других приборов (включая усилители),
защитным соединением для заземления.
выделяющих тепло. Не помещайте на изделие источники открытого пламени.
19. Чтобы уменьшить риск возгорания или поражения электрическим током, не
9. НЕ пренебрегайте защитными свойствами поляризованной или заземляющей вилки.
допускайте попадания на этот аппарат дождя или влаги.
Поляризованная вилка имеет два ножевых контакта, из которых один шире другого.
20. Не пытайтесь вносить изменения в это изделие. Это может привести к травме и (или)
Заземляющая вилка имеет два ножевых контакта и третий, заземляющий, штырь.
выходу изделия из строя.
Более широкий контакт или третий штырь предусматриваются для безопасности. Если
21. Эксплуатируйте это изделие в указанном диапазоне рабочих температур.
вилка прибора не подходит к вашей розетке, обратитесь к электрику для замены
розетки устаревшей конструкции.
Этот знак показывает, что внутри прибора имеется опасное
10. ЗАЩИТИТЕ силовой шнур, чтобы на него не наступали и чтобы он не был пережат,
напряжение, создающее риск электрического удара.
особенно в местах подсоединения к вилкам, розеткам и в месте выхода из прибора.
11. ИСПОЛЬЗУЙТЕ ТОЛЬКО те принадлежности и приспособления, которые
предусмотрены изготовителем.
Этот знак показывает, что в сопроводительной документации
12. ИСПОЛЬЗУЙТЕ только с тележкой, стендом, штативом, кронштейном или
к прибору есть важные указания по его эксплуатации и
столом, которые предусмотрены изготовителем или наглухо прикреплены к
обслуживанию.
прибору. При использовании тележки будьте осторожны, когда передвигаете
тележку вместе с прибором — переворачивание может привести к травме.
BELANGRIJKE VEILIGHEIDSINSTRUCTIES
13. HAAL de stekker van dit apparaat uit de contactdoos tijdens onweer/bliksem of wanneer
het lange tijd niet wordt gebruikt.
1. LEES deze instructies.
14. Laat onderhoud altijd UITVOEREN door bevoegd servicepersoneel. Onderhoud moet
2. BEWAAR deze instructies.
worden uitgevoerd wanneer het apparaat op enigerlei wijze is beschadigd, bijvoorbeeld
3. NEEM alle waarschuwingen in acht.
beschadiging van netsnoer of stekker, vloeistof of voorwerpen in het apparaat zijn
4. VOLG alle instructies op.
terechtgekomen, het apparaat is blootgesteld aan regen of vocht, niet naar behoren werkt
5. GEBRUIK dit apparaat NIET in de buurt van water.
of is gevallen.
6. REINIG UITSLUITEND met een droge doek.
15. STEL het apparaat NIET bloot aan druppelend en rondspattend vocht. PLAATS GEEN
7. DICHT GEEN ventilatieopeningen AF. Zorg dat er voldoende afstand wordt gehouden
voorwerpen gevuld met vloeistof, bijvoorbeeld een vaas, op het apparaat.
voor adequate ventilatie. Installeer het product volgens de instructies van de fabrikant.
16. De NETSTEKKER of een koppelstuk van het apparaat moet klaar voor gebruik zijn.
8. Plaats het apparaat NIET in de buurt van warmtebronnen, zoals vuur, radiatoren,
17. Het door het apparaat verspreide geluid mag niet meer zijn dan 70 dB(A).
warmteroosters, kachels of andere apparaten (waaronder versterkers) die warmte
18. Apparaten van een KLASSE I-constructie moeten worden aangesloten op een
genereren. Plaats geen vuurbronnen in de buurt van het product.
WANDCONTACTDOOS met beschermende aardaansluiting.
9. Zorg ervoor dat de beveiliging van de gepolariseerde stekker of randaardestekker
19. Stel dit apparaat niet bloot aan regen of vocht om het risico op brand of elektrische
INTACT blijft. Een gepolariseerde stekker heeft twee pennen waarbij er één breder is
schokken te verminderen.
dan de andere. Een randaardestekker heeft twee pennen en een extra aardaansluiting.
20. Probeer dit product niet te wijzigen. Anders kan lichamelijk letsel optreden en/of het
De breedste pen en de aardaansluiting zijn bedoeld om uw veiligheid te garanderen. Als
product defect raken.
de meegeleverde stekker niet in de contactdoos past, vraag een elektricien dan om de
21. Gebruik dit product binnen de gespecificeerde bedrijfstemperaturen.
verouderde contactdoos te vervangen.
10. BESCHERM het netsnoer tegen erop lopen of afknelling, vooral in de buurt van stekkers
Dit symbool geeft aan dat in deze eenheid een gevaarlijk spanning aan-
en uitgangen en op de plaats waar deze het apparaat verlaten.
wezig is met het risico op een elektrische schok.
11. GEBRUIK UITSLUITEND door de fabrikant gespecificeerde hulpstukken/accessoires.
12. GEBRUIK het apparaat UITSLUITEND in combinatie met een door de
fabrikant gespecificeerde wagen, standaard, driepoot, beugel of tafel of
Dit symbool geeft aan dat in de documentatie bij deze eenheid belangri-
met een meegeleverde ondersteuning. Wees bij gebruik van een wagen
jke bedienings- en onderhoudsinstructies zijn opgenomen.
voorzichtig tijdens verplaatsingen van de wagen/apparaat-combinatie om
letsel door omkantelen te voorkomen.

WARNING: Danger of explosion if battery incorrectly replaced.
AVERTISSEMENT : Danger d'explosion si l'accu est mal placé. N'utiliser
Operate only with Shure compatible batteries.
qu'avec des accus compatibles Shure.
WARNING: Battery packs shall not be exposed to excessive heat
AVERTISSEMENT : Les accus ne doivent pas être exposés à une chaleur
such as sunshine, fire, or the like.
excessive, p. ex. lumière du soleil, feu ou similaire.
WARNING
AVERTISSEMENT
• Battery packs may explode or release toxic materials. Risk
• Les accus risquent d'exploser ou d'émettre des matières toxiques.
of fire or burns. Do not open, crush, modify, disassemble,
Risque d'incendie ou de brûlures. Ne pas ouvrir, écraser, altérer,
heat above 140°F (60°C), or incinerate
démonter, chauffer au-dessus de 60 °C (140 °F) ou incinérer
• Follow instructions from manufacturer
• Suivre les instructions du fabricant
• Never put batteries in mouth. If swallowed, contact your
• Ne jamais mettre les accus dans la bouche. En cas d'ingestion,
physician or local poison control center
contacter un médecin ou le centre anti-poison local
• Do not short circuit; may cause burns or catch fire
• Ne pas court-circuiter ; cela risque de causer des brûlures ou un
incendie
• Do not charge or use battery packs with other than specified
Shure products
• Ne pas charger ou utiliser les accus avec des produits autres que les
produits Shure spécifiés
• Dispose of battery packs properly. Check with local vendor
for proper disposal of used battery packs
• Mettre les accus au rebut de manière appropriée. Vérifier auprès du
fournisseur local la manière appropriée de mettre au rebut les accus
Note:
usagés
• This equipment is intended to be used in professional audio
Remarque :
applications.
• Cet équipement est prévu pour être utilisé dans des applications
• EMC conformance is based on the use of supplied and
audio professionnelles.
recommended cable types. The use of other cable types
may degrade EMC performance.
• La conformité CEM est fondée sur l'utilisation des types de câble
fournis et recommandés. L’utilisation d'autres types de câble peut
• Use this battery charger only with the Shure charging
dégrader la performance CEM.
modules and battery packs for which it is designed. Use with
other than the specified modules and battery packs may
• Utiliser ce chargeur d'accus exclusivement avec les modules
increase the risk of fire or explosion.
chargeurs et les accus Shure pour lesquels il est conçu. L'utilisation
avec des modules et des accus autres que ceux spécifiés peut
• Changes or modifications not expressly approved by Shure
augmenter le risque d'incendie ou d'explosion.
Incorporated could void your authority to operate this
equipment.
• Tout changement ou modification n'ayant pas fait l'objet d'une
autorisation expresse de Shure Incorporated peut entraîner la nullité
Note: Use only with the included power supply or a Shure-
du droit d'utilisation de cet équipement.
approved equivalent.
Remarque : Utiliser exclusivement avec le bloc d'alimentation inclus ou un
produit équivalent approuvé par Shure.
ACHTUNG: Es besteht Explosionsgefahr, wenn die Batterie nicht
ADVERTENCIA: Si se sustituye la batería incorrectamente, se crea el
richtig ersetzt wird. Nur mit kompatiblen Shure-Batterien betreiben.
riesgo de causar una explosión. Funciona sólo con baterías compatibles
con dispositivos Shure.
ACHTUNG: Akkusätze dürfen keiner starken Hitze wie
Sonnenschein, Feuer oder dergleichen ausgesetzt werden.
ADVERTENCIA: Los conjuntos de baterías no deben exponerse al calor
excesivo causado por la luz del sol, las llamas o condiciones similares.
ACHTUNG
ADVERTENCIA
• Akkusätze können explodieren oder giftiges Material
freisetzen. Es besteht Feuer- und Verbrennungsgefahr.
• Los conjuntos de baterías pueden estallar o soltar materiales tóxicos.
Nicht öffnen, zusammenpressen, modifizieren,
Riesgo de incendio o quemaduras. No abra, triture, modifique,
auseinanderbauen, über 60 °C erhitzen oder verbrennen.
desarme, caliente a más de 60°C (140°F) ni incinere
• Die Anweisungen des Herstellers befolgen.
• Siga las instrucciones del fabricante
• Akkus niemals in den Mund nehmen. Bei Verschlucken
• Nunca ponga baterías en la boca. Si se tragan, acuda al médico o a
ärztlichen Rat einholen oder die Giftnotrufzentrale anrufen.
un centro local de control de envenenamiento
• Nicht kurzschließen; kann Verbrennungen verursachen oder
• No ponga en cortocircuito; esto puede causar quemaduras o
in Brand geraten.
incendios
• Akkusätze nicht mit anderen als den angegebenen Shure-
• Sólo se deben cargar o usar los conjuntos de baterías con los
Produkten aufladen bzw. verwenden.
productos Shure especificados
• Akkusätze vorschriftsmäßig entsorgen. Beim örtlichen
• Deseche los conjuntos de baterías de forma apropiada. Consulte
Verkäufer die vorschriftsmäßige Entsorgung gebrauchter
al vendedor local para desechar adecuadamente los conjuntos de
Akkusätze erfragen.
baterías usados
Hinweis:
Nota:
• Dieses Gerät ist für den Gebrauch bei Profi-
• Este equipo está previsto para usarse en aplicaciones de audio
Audioanwendungen vorgesehen.
profesional.
• Die Konformität in Bezug auf die elektromagnetische
• El cumplimiento de las normas de compatibilidad electromagnética
Verträglichkeit (EMV) beruht auf der Verwendung
(EMC) supone el uso de los tipos de cables suministrados y
der mitgelieferten und empfohlenen Kabeltypen.
recomendados. El uso de otros tipos de cables puede degradar el
Bei Verwendung anderer Kabeltypen kann die
rendimiento EMC.
elektromagnetische Verträglichkeit beeinträchtigt werden.
• Utilice este cargador de baterías sólo con los módulos de carga y
• Dieses Akkuladegerät nur für die Shure-Lademodule
conjuntos de baterías de Shure para los que está diseñado. El uso
und Akkusätze, für die es konzipiert ist, verwenden. Der
con módulos y conjuntos de baterías distintos a los especificados
Gebrauch für andere als die angegebenen Module und
puede aumentar el riesgo de incendio o explosión.
Akkusätze kann das Feuer- oder Explosionsrisiko erhöhen.
• Los cambios o modificaciones que no tengan la aprobación expresa
• Nicht ausdrücklich von Shure Incorporated genehmigte
de Shure Incorporated podrían anular su autoridad para usar este
Änderungen oder Modifikationen können den Entzug der
equipo.
Betriebsgenehmigung für das Gerät zur Folge haben.
Nota: Use sólo con la fuente de alimentación incluida o una equivalente
Hinweis: Das Gerät darf nur mit dem im Lieferumfang enthaltenen
aprobada por Shure.
Netzteil oder einem gleichwertigen, von Shure zugelassenen
Gerät verwendet werden.

AVVERTENZA: pericolo di esplosione in caso di errato posizionamento
ATENÇÃO: Existe perigo de explosão caso a bateria seja
della pila. Da utilizzare esclusivamente con pile compatibili Shure.
substituída incorretamente. Utilize apenas com baterias Shure
compatíveis.
AVVERTENZA: le pile non devono essere esposte a calore eccessivo (luce
del sole diretta, fuoco o simili).
ATENÇÃO: Baterias não devem ser expostas a calor excessivo
como luz do sol, fogo etc.
AVVERTENZA:
ATENÇÃO
• Le pile possono esplodere o rilasciare sostanze tossiche. Rischio di
incendio o ustioni. Non aprite, schiacciate, modificate, smontate né
• Baterias podem explodir ou liberar materiais tóxicos.
scaldate oltre i 60 °C.
Risco de incêndio ou queimaduras. Não abra, esmague,
modifique, desmonte, aqueça acima de 140°F (60°C) ou
• Seguite le istruzioni del produttore
incinere
• Non mettete le pile in bocca. Se ingerite, rivolgetevi al medico o al
• Siga as instruções do fabricante
centro antiveleni locale.
• Nunca ponha baterias na boca. Se engolida, procure um
• Non causate cortocircuiti, per evitare ustioni o incendi.
médico ou centro local de controle de veneno
• Caricate ed usate le pile esclusivamente con i prodotti Shure
• Não provoque curto-circuito; isto pode causar queimaduras
specificati.
ou incêndios
• Smaltite le pile in modo appropriato. Per lo smaltimento appropriato
• Não carregue ou use baterias diferentes dos produtos
delle pile usate, rivolgetevi al fornitore locale.
especificados pela Shure
Nota:
• Descarte as baterias apropriadamente. Verifique com o
fornecedor local a forma correta de descarte de baterias
• questo apparecchio è destinato all'uso nelle applicazioni audio
usadas
professionali.
• La conformità ai requisiti relativi alla compatibilità elettromagnetica
Observação:
dipende dall’uso dei cavi in dotazione e raccomandati. Utilizzando
• Este equipamento se destina a aplicações de áudio
altri tipi di cavi si possono compromettere le prestazioni relative alla
profissionais.
compatibilità elettromagnetica.
• A compatibilidade eletromagnética é baseada no uso
• Utilizzate questo caricabatteria solo con i moduli di carica e le pile
dos tipos de cabos recomendados e fornecidos com o
Shure per i quali è stato progettato. L'utilizzo con moduli e pile diversi
equipamento. O uso de outros tipos de cabos pode degradar
da quelli specificati può aumentare il rischio di incendio o esplosione.
o desempenho da compatibilidade eletromagnética.
• Modifiche di qualsiasi tipo non espressamente autorizzate dalla
• Utilize este carregador de bateria apenas com módulos de
Shure Incorporated potrebbero annullare il permesso di usare questo
carga e baterias da Shure para os quais foi projetado. O uso
apparecchio.
com módulos de carga e baterias diferentes do especificado
Nota: utilizzate unicamente con l'alimentatore in dotazione o con uno
pode aumentar o risco de incêndio ou explosão.
equivalente autorizzato da Shure.
• Alterações ou modificações não expressamente aprovadas
pela Shure Incorporated podem anular a autorização do
usuário para a operação deste equipamento.
Observação: Use somente com a fonte de alimentação inclusa ou
uma equivalente aprovada pela Shure.
ВНИМАНИЕ: Неправильная замена батарейки может привести к
взрыву. Используйте только батарейки, совместимые с Shure.
WAARSCHUWING: Explosiegevaar indien batterij door verkeerd
ВНИМАНИЕ: Не подвергайте батарейные блоки питания чрезмерному
exemplaar wordt vervangen. Alleen gebruiken met compatibele
нагреву от солнца, открытого пламени и т.п.
Shure-batterijen.
WAARSCHUWING: Batterijen mogen niet worden blootgesteld
ВНИМАНИЕ
aan grote hitte, zoals direct zonlicht, vuur, enzovoort.
• Батарейные блоки питания могут взрываться или выделять
токсичные материалы. Остерегайтесь ожогов или возгорания.
Батарейки нельзя вскрывать, раздавливать, модифицировать,
WAARSCHUWING
разбирать, нагревать выше 60 °C или сжигать.
• Batterijpakketten kunnen exploderen of giftige stoffen
• Следуйте инструкциям изготовителя
afgeven. Gevaar voor brand of verbranding. Niet openen,
indeuken, wijzigen, demonteren, tot boven 60 °C
• Ни в коем случае не берите батарейки в рот. При проглатывании
verwarmen of verbranden.
обратитесь к врачу или в местный токсикологический центр
• Volg de instructies van de fabrikant op.
• Не замыкайте батарейки накоротко; это может привести к
ожогам или возгоранию
• Stop nooit een batterij in uw mond. Neem bij doorslikken
contact op met een arts of de plaatselijke eerste hulp.
• Не заряжайте и не используйте батарейки ни в каких изделиях,
кроме указанных изделий Shure
• Niet kortsluiten; dit kan brandwonden of brand opleveren.
• Утилизируйте батарейки надлежащим образом. По вопросам
• Geen batterijpakketten opladen of gebruiken met andere
надлежащей утилизации использованных батареек обращайтесь
dan de gespecificeerde Shure-producten.
к местному поставщику
• Voer batterijpakketten op juiste wijze af. Raadpleeg de
plaatselijke verkoper voor de juiste afvoermethode voor
Примечание.
gebruikte batterijpakketten.
• Данное оборудование предназначается для использования в
профессиональных музыкальных выступлениях.
Opmerking:
• Данные о соответствии требованиям ЭМС основаны на
• Dit apparaat is bedoeld om in professionele
использовании входящих в комплект и рекомендуемых типов
audiotoepassingen te worden gebruikt.
кабелей. Использование кабелей других типов может ухудшить
• EMC-conformiteit wordt gebaseerd op het gebruik van
характеристики ЭМС.
meegeleverde en aanbevolen kabeltypen. Bij gebruik van
• Настоящее зарядное устройство следует использовать только с
andere kabeltypen kunnen de EMC-prestaties worden
теми зарядными модулями и батарейками Shure, для которых
aangetast.
оно предназначено. Использование устройства с другими
• Gebruik deze batterijlader uitsluitend met de laadmodules en
модулями и батарейками может привести к увеличению
batterijpakketten van Shure waarvoor hij is bedoeld. Gebruik
опасности возгорания или взрыва.
met andere dan de opgegeven modules en batterijpakketten
• Изменения или модификации, не получившие специального
kan het risico van brand of explosie vergroten.
утверждения Shure Incorporated, могут лишить вас права
• Wijzigingen of aanpassingen die niet expliciet zijn
эксплуатировать это оборудование.
goedgekeurd door Shure Incorporated, kunnen uw
bevoegdheid om het apparaat te gebruiken tenietdoen.
Примечание. Используйте только с блоком питания, входящим в
комплект, или эквивалентным устройством, утвержденным Shure.
Opmerking: Gebruik dit apparaat alleen met de bijgeleverde voed-
ing of een door Shure goedgekeurd equivalent.
System Overview
The new groundbreaking GLX-D Wireless Systems from Shure combine the leading edge of Automatic Frequency Management technology with best-in-
class intelligent lithium ion battery rechargeability, world-renown microphones and unparalleled design and construction. Available in a wide offering of
bodypack and handheld configurations - including vocal, headset and presenter systems as well as traditional guitar options. The revolutionary GLX-D
Wireless Systems define the newest standard for seamless ease of operation and exceptional digital audio clarity.
• Exceptional digital audio clarity
• RF back-channel for remote control of transmitter functions
• Operates in 2.4 GHz spectrum, available worldwide
• Globally-unlicensed 2.4 GHz frequency band allows operation of up to
8 compatible systems
• Rechargeable batteries deliver cost-efficiency and up to 16 hours of
runtime
• Automatic transmitter power-off to conserve battery life when
transmitter is not in use.
• Adjustable transmitter gain to optimize audio signal
• Automatically moves away from interference without audio interruption
Included Components
Optional Accessories
Shure Rechargeable Battery SB902
Car Battery Charger SBC-CAR
Micro USB Battery Charger SBC-USB
Stand Alone Single Battery
SBC-902
Charger
Power Supply PS42
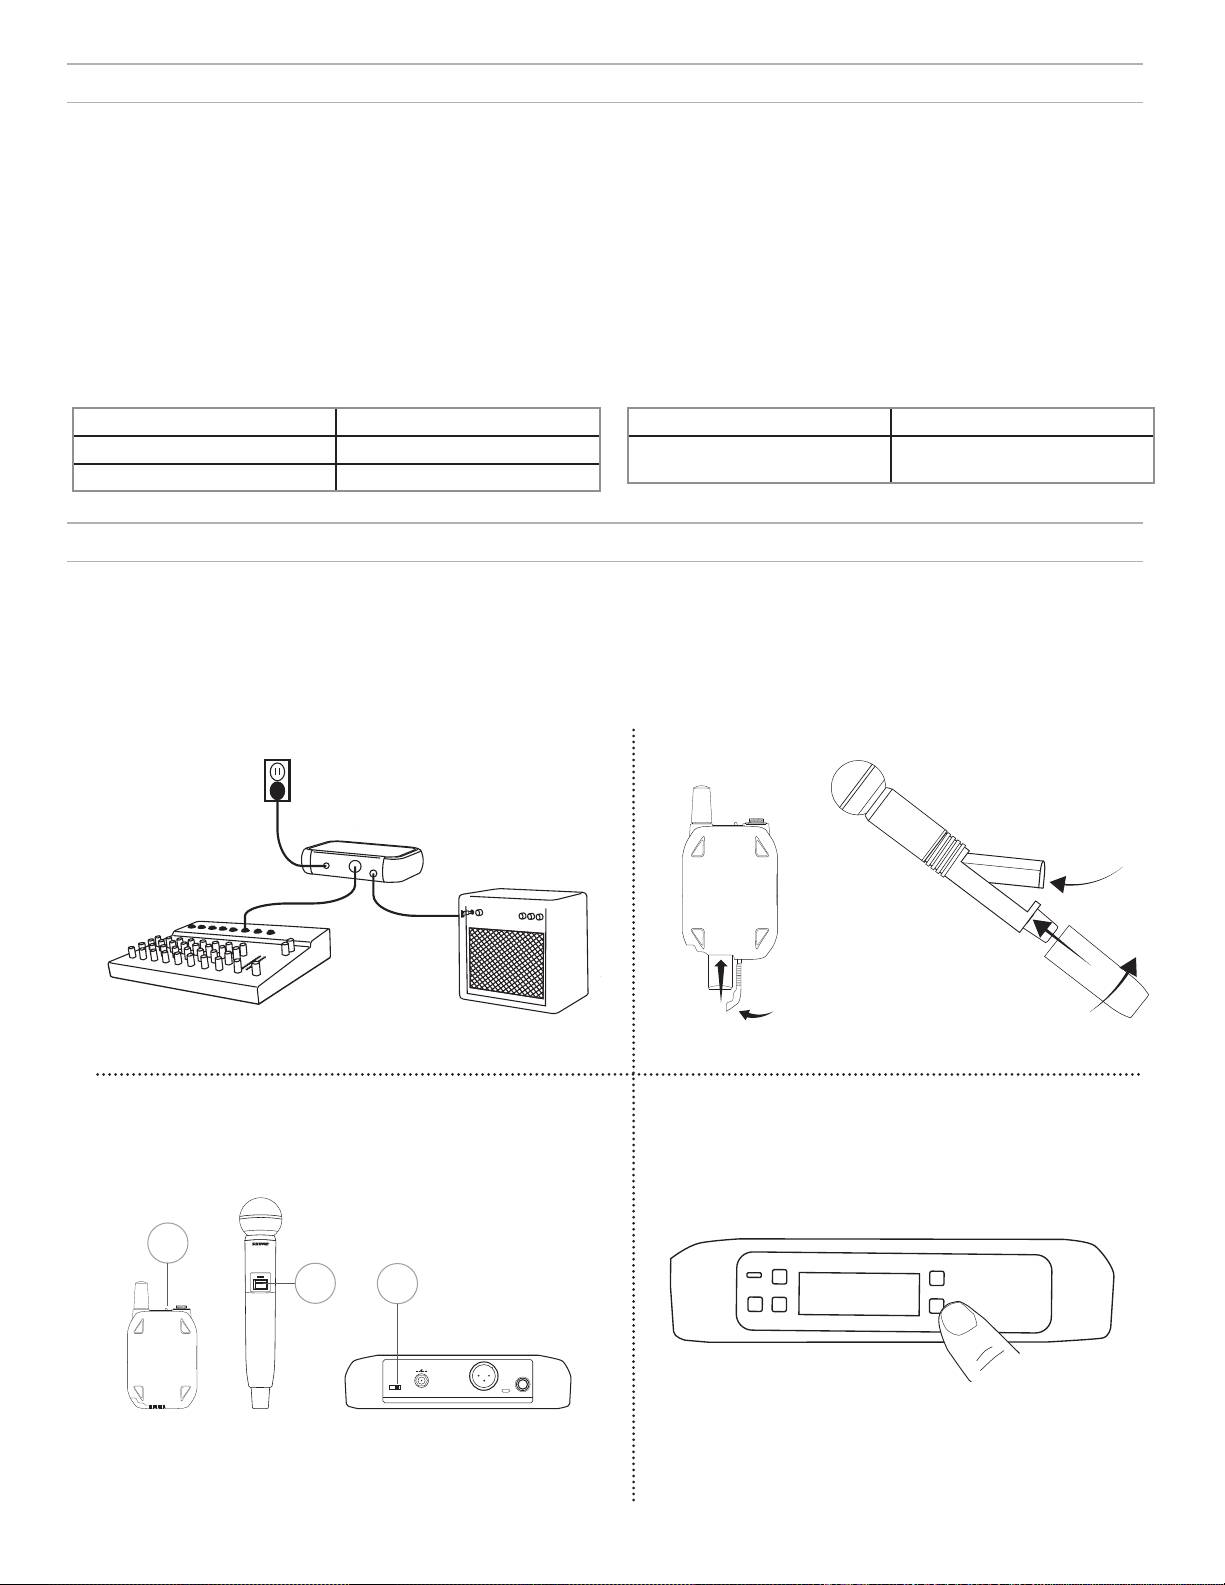
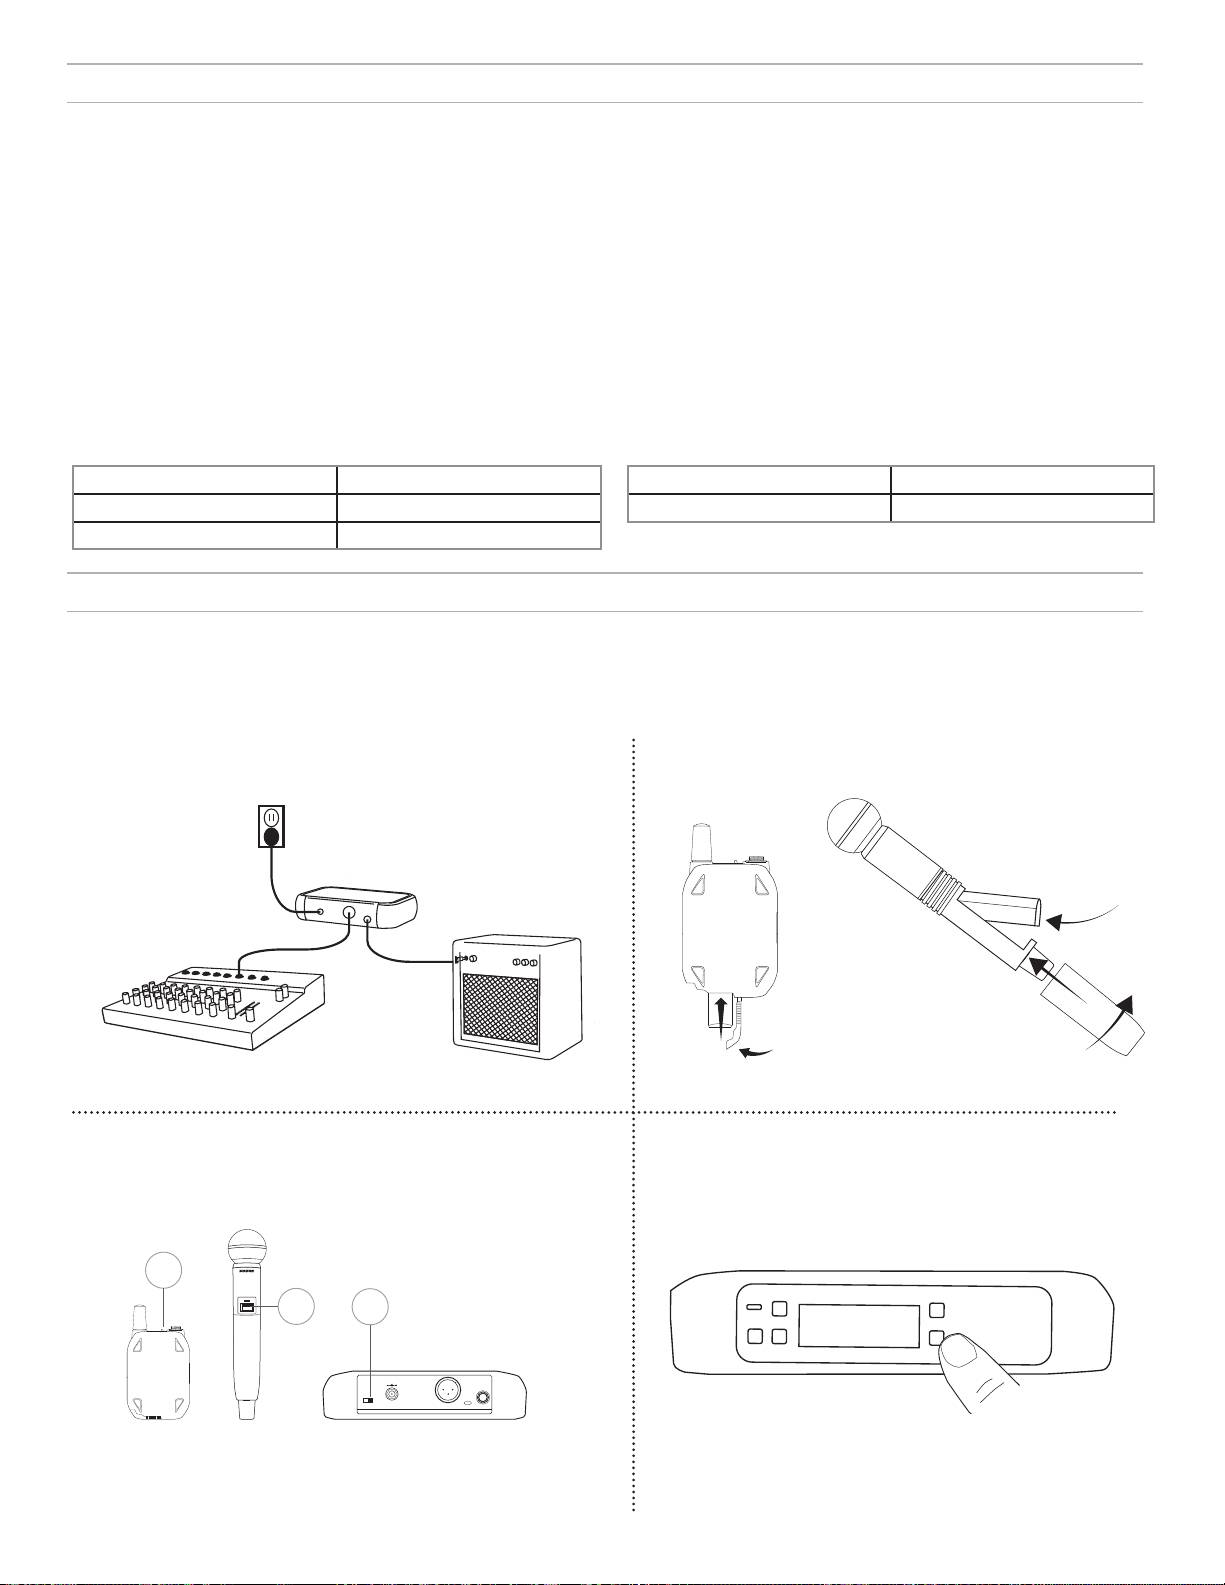
Quick Start
To reduce set up time, the transmitter and receiver automatically link to form an audio channel the first time they are powered on and never have to be
linked again.
Note: When setting up multiple receiver systems, turn on and link each transmitter/receiver pair one at a time to prevent cross-linking.
Step ①
Step ②
Connect power supply to the receiver and plug cord into an AC
Install charged transmitter batteries.
power source. Connect the audio output to an amplifier or mixer.
Step ③
Step ④
Turn on the transmitter and receiver. The blue RF LED will flash while
Check the audio and adjust the gain if necessary.
the transmitter and receiver form a link. When the link has successfully
formed, the RF LED will remain illuminated.
on
rf group
GLXD2
I
I
I
I
I
I
I
I
I
+
I
on
I
I
I
I
I
I
I
I
I
on
on
gain
link
channel
-
o / on power mic out instr out
Note: The transmitter and receiver will remain
linked for future usage. At power-up, the blue RF
LED will illuminate, skipping the linking step.
7
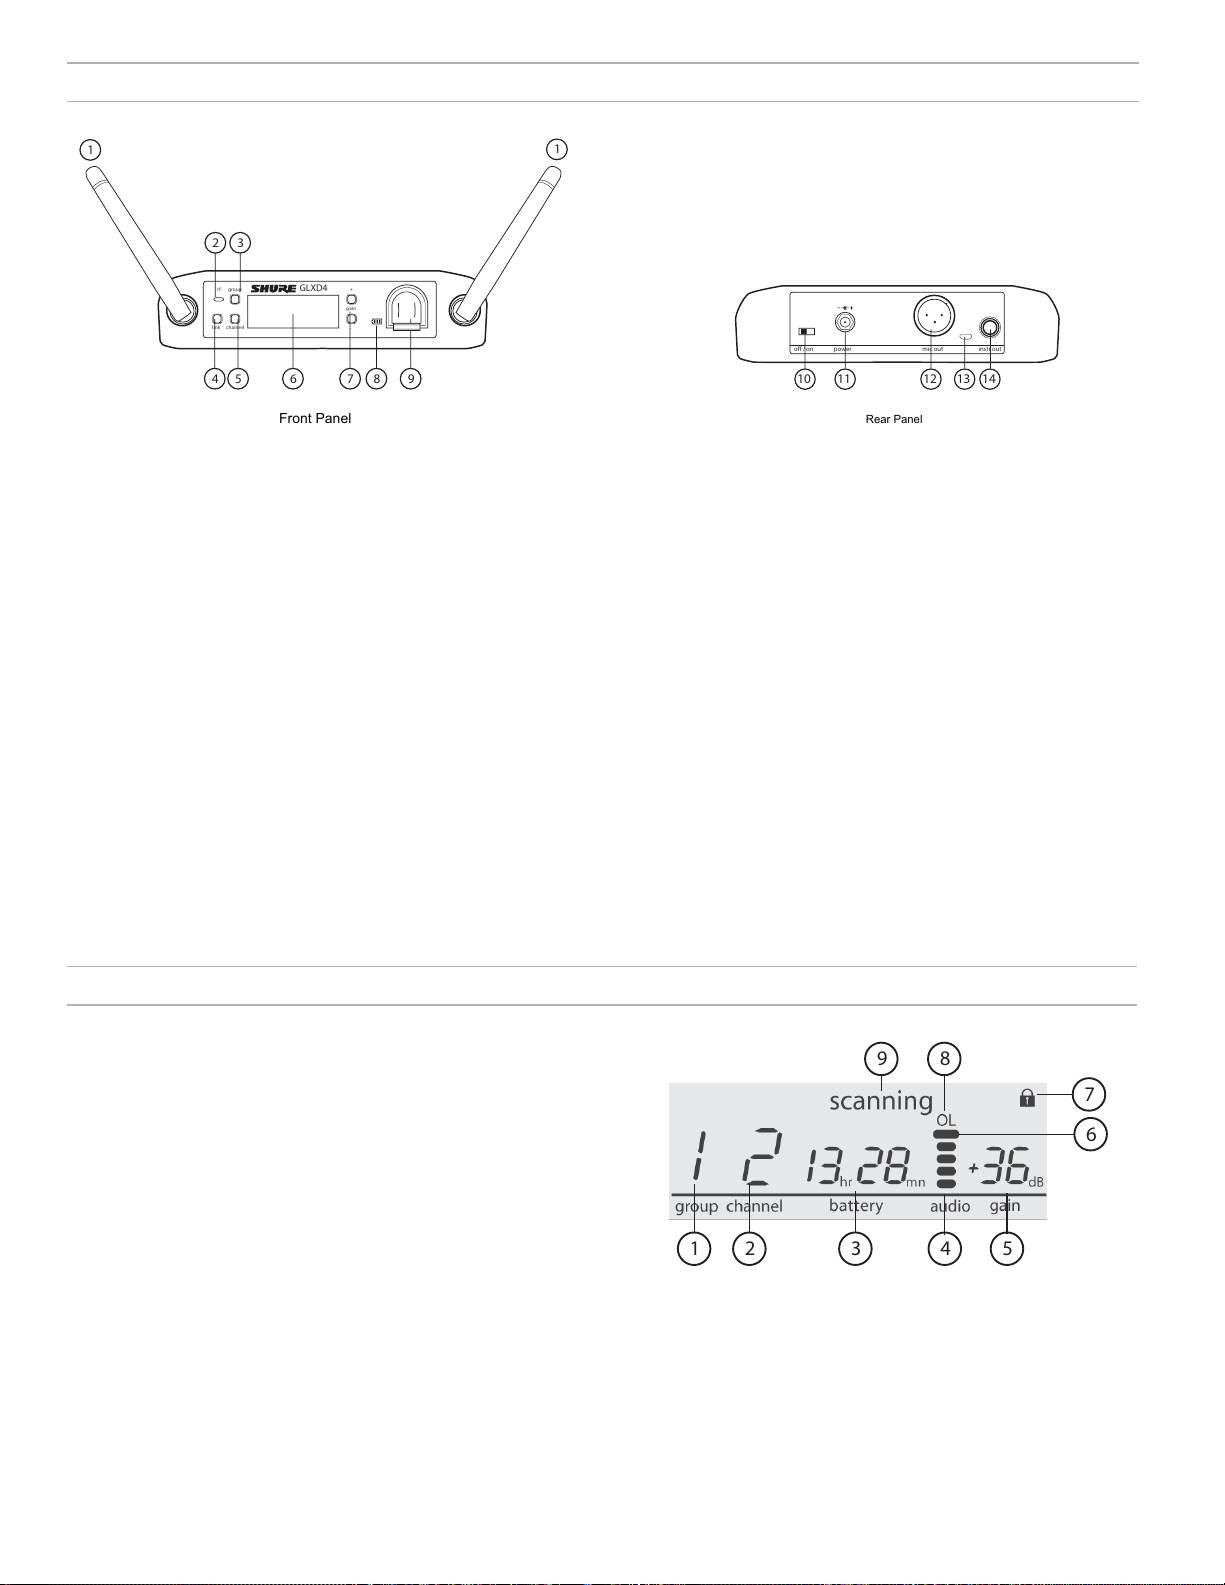
GLXD4 Receiver Controls and Connectors
Receiver Screen
① Group
Displays the selected group.
② Channel
Displays the selected channel.
③ Transmitter Battery Runtime
Displays remaining battery life in hours and minutes.
Alternatively displays the following battery status:
• CALC = battery life calculation
• Lo = battery life less than 15 minutes
• Err = replace battery
④ Audio Meter
Indicates audio signal level and peaks.
⑦ Transmitter Locked
⑤ Gain
Displayed when linked transmitter controls are locked.
Displays transmitter gain settings (dB).
⑧ Scanning
⑥ OL Indicator
Indicates a scan is in progress.
Indicates audio overload, reduce gain.
⑨ Auto
Indicates that the selected group has backup channels available.
8
rf group
GLXD4
+
gain
link
channel
-
Front Panel
o / on power mic out instr out
10 11 12 13 14
Rear Panel
① Antenna
⑧ Battery Charging Indicator
Carries the wireless signal, 2 per receiver.
Illuminates when battery is in charging bay:
• Red = battery charging
② RF Status LED
• Green Flashing = battery charge > 90%
• ON = Linked transmitter is on
• Green = battery charged
• Flashing = Searching for transmitter
• Amber Flashing = charging error, replace battery
• OFF = Linked transmitter off or transmitter unlinked
⑨ Battery Charging Bay
③ Group Button
Charges transmitter battery while receiver is powered.
Press and hold for two seconds to enable manual group edit.
⑩ Power Switch
④ Link Button
Powers the unit on and off.
Press to manually link receiver to a transmitter or to activate the
remote ID function
⑪ Power Supply Jack
Connect the supplied 15 V DC external power supply.
⑤ Channel
• Momentary press to start a channel scan
⑫ Mic Out
• Press and hold 2 seconds to enable manual channel edit
XLR microphone output jack supplies microphone-level audio output.
⑥ LCD Screen
⑬ USB Port
Displays receiver and transmitter status.
⑭ Instr Out
⑦ Gain Buttons
TRS ¼" (6.35mm) audio output. Connect to mixers, recorders, and
Press to increase or decrease transmitter gain in 1 dB increments.
amplifiers.
9
8
7
auto
6
1
2
3
4
5
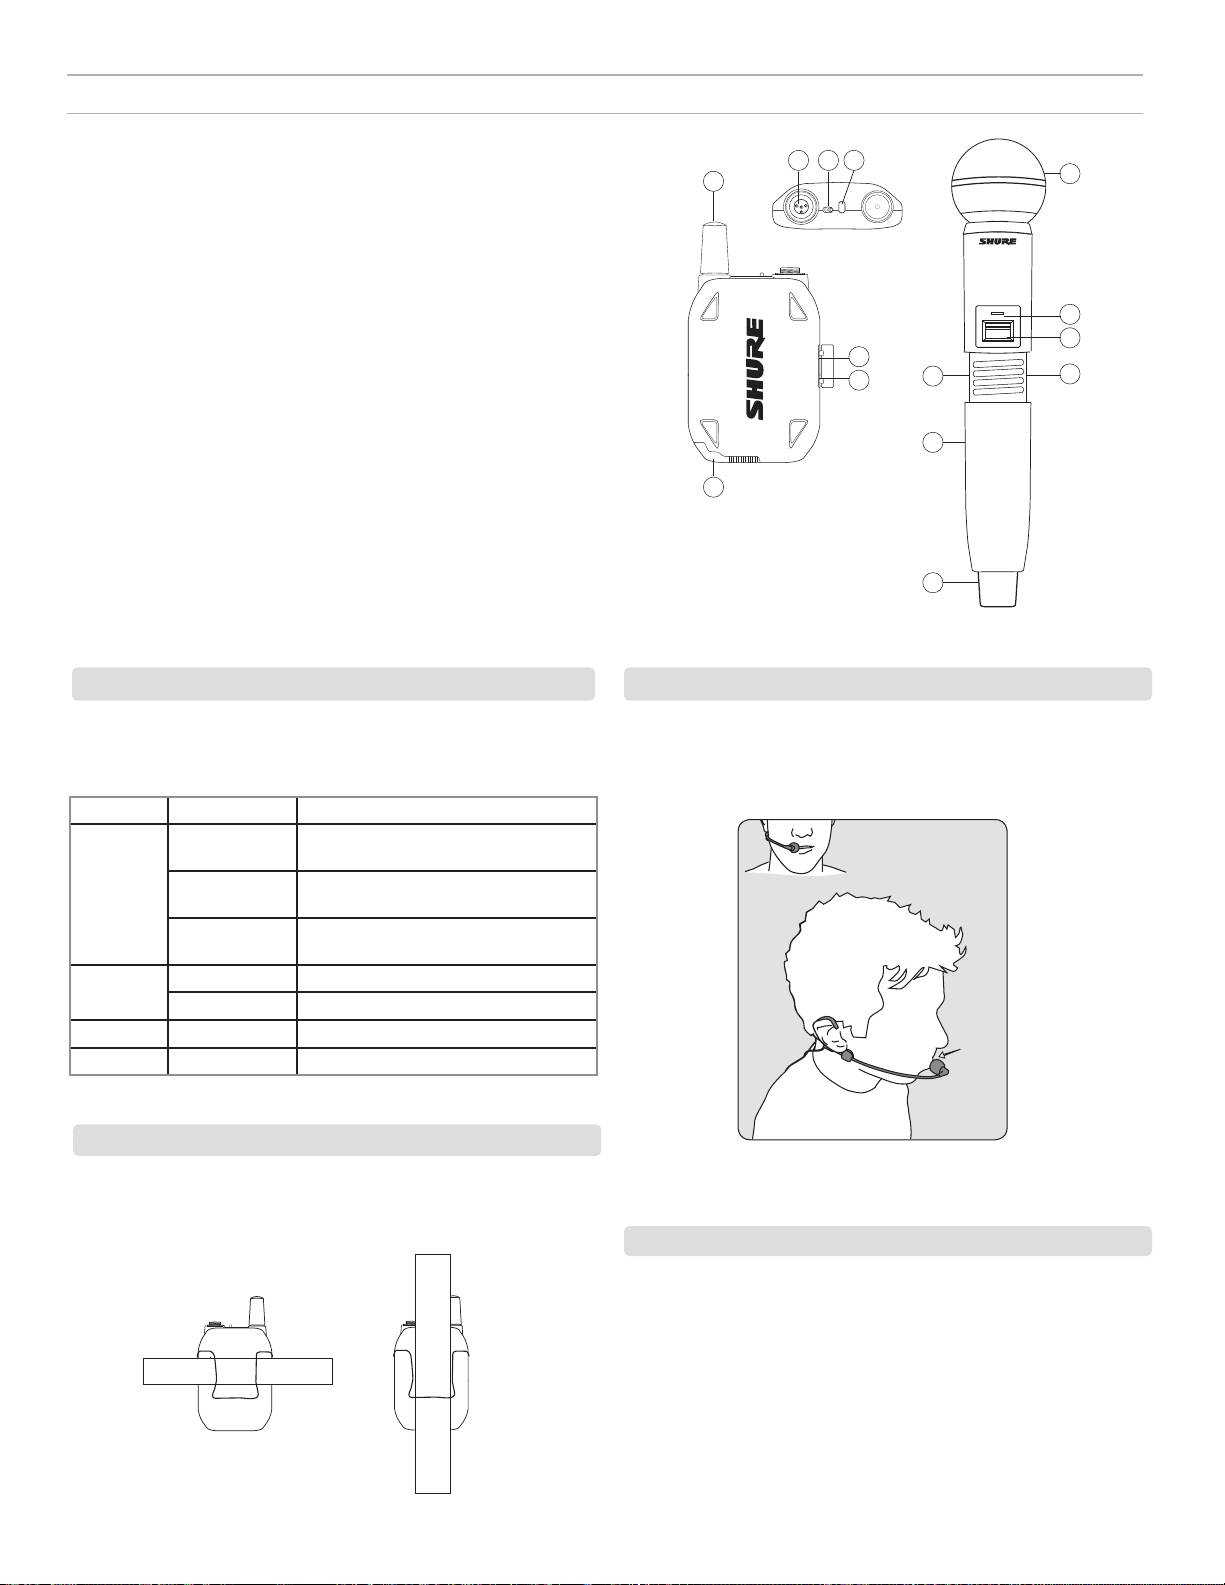
Transmitters
① Antenna
Carries wireless signal.
4
23
8
1
② Status LED
off on
LED color and state indicate transmitter status.
③ Power Switch
Turns the transmitter on/off.
④ TA4M Input Jack
GLXD2
on
2
Connects to a 4-Pin mini connector (TA4F) microphone or instrument
cable.
3
5
⑤ Micro USB Charging Port
6
5
6
Connect to USB battery charger.
⑥ Link Button
• Press and hold within 5 seconds of power-on to manually link with
7
receiver
• Press momentarily to activate Remote ID function
7
⑦ Battery Compartment
Holds 1 Shure rechargeable battery.
⑧ Microphone Cartridge
GLXD-2 transmitter models are available with the following cartridge
1
types: SM58, Beta 58, SM86, Beta 87A.
Transmitter Status LED
Wearing the Headworn Microphone
LED is green during normal operation.
• Position the headworn microphone 13 mm (1/2 in.) from the corner of
your mouth.
LED color or flashing indicates a change in transmitter status as shown in
the following table:
• Position lavalier and headworn microphones so that clothing, jewelry,
or other items do not bump or rub against the microphone.
Color State Status
Green Flashing (slow) transmitter attempting relink with
receiver
Flashing (fast) unlinked transmitter searching for
receiver
Flashes 3 times indicates locked transmitter when pow-
er switch is pressed
Red On battery life < 1 hour
Flashing battery life < 30 minutes
Red/Green Flashing remote ID active
Amber Flashing battery error, replace battery
Wearing the Bodypack Transmitter
Clip the transmitter to a belt or slide a guitar strap through the transmitter
clip as shown.
For best results, the belt should be pressed against the base of the clip.
Correct Microphone Placement
• Hold the microphone within 12 inches from the sound source.
• For a warmer sound with increased bass presence, move the
microphone closer to the sound source.
• Do not cover grille with hand.
9
13 mm
(.5 in.)
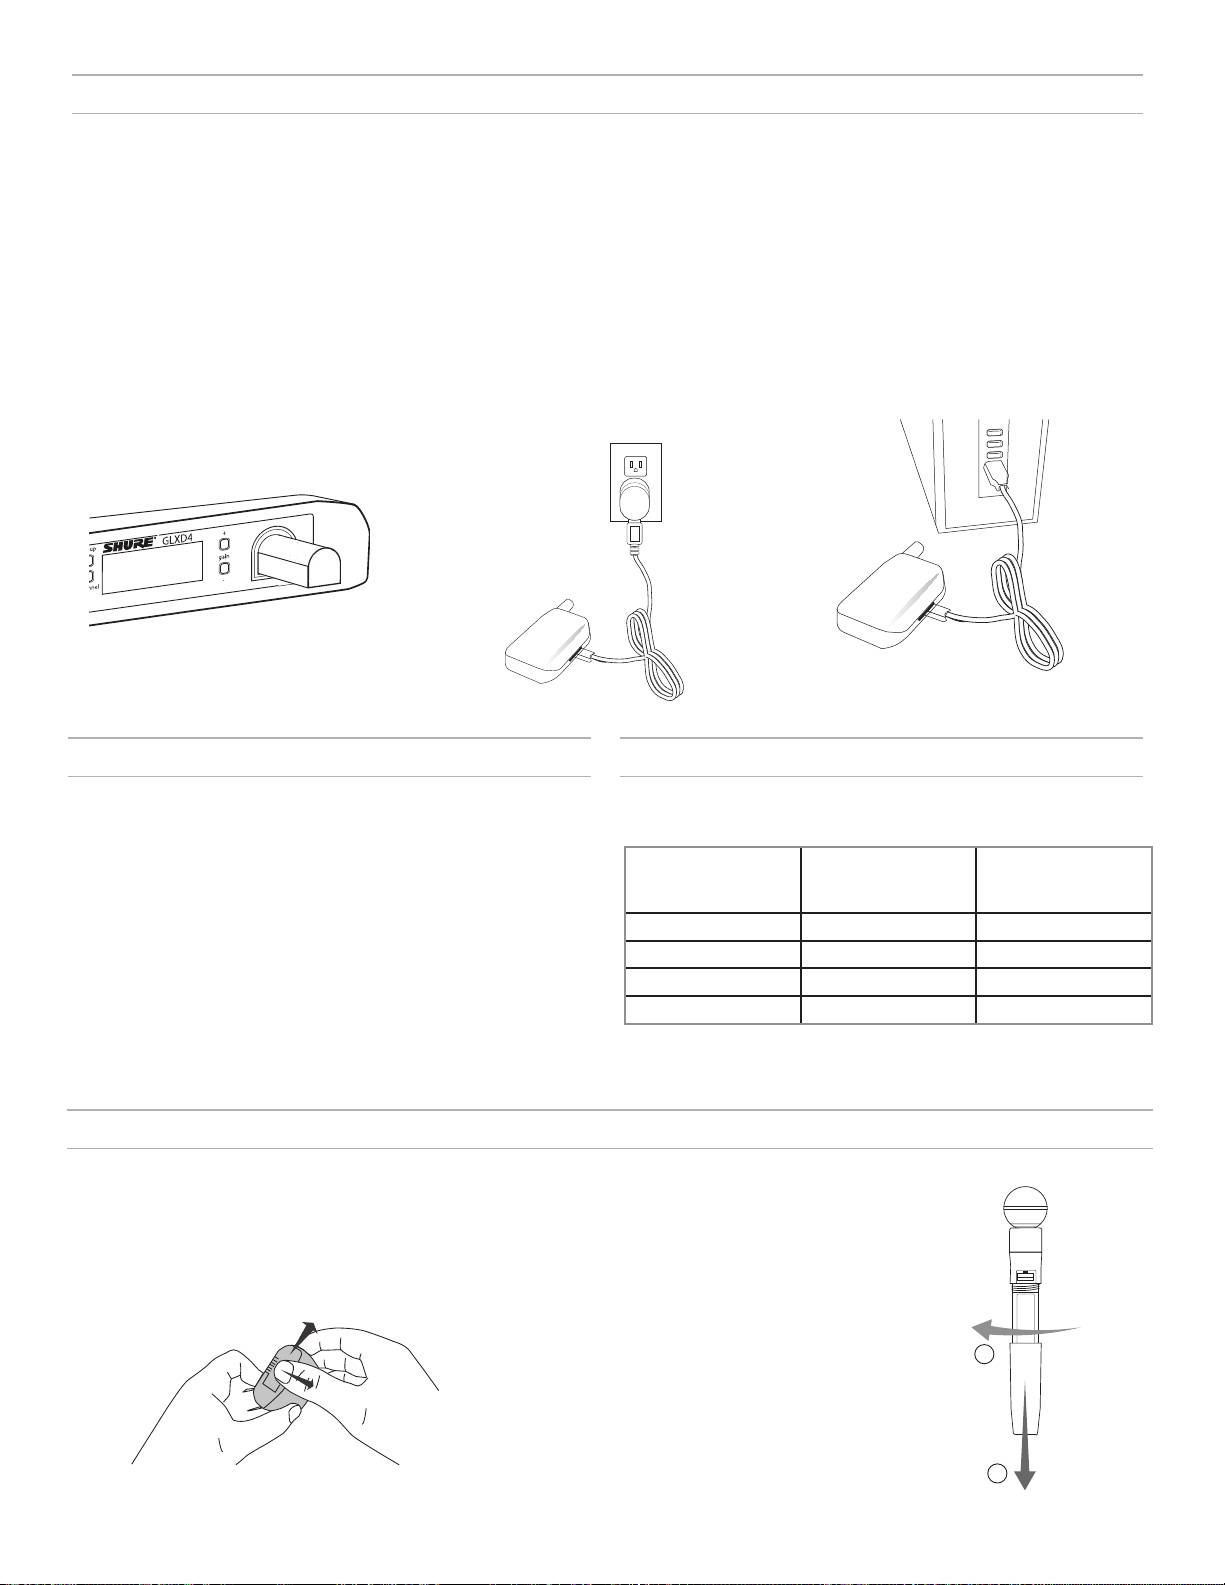
Batteries and Charging
GLX-D transmitters are powered by Shure SB902 lithium-ion rechargeable batteries. Advanced battery chemistry maximizes runtimes with zero memory
effects, eliminating the need to discharge batteries prior to charging.
When not in use, recommended battery storage temperature is 10°C (50°F) to 25°C (77°F).
Note: The transmitter will not pass RF or audio signals when connected to the charging cable.
The following battery charging options are available:
Receiver Charging Bay
Charging from an AC Power
Charging from a USB Port
The GLXD4 receiver has a built-in
Source
1. Plug the USB charging cable into the charging port
charging bay for the transmitter batteries.
1. Plug the charging cable into the
on the transmitter.
1. Insert the battery into the charging bay.
charging port on the transmitter.
2. Plug the cable into a standard USB port.
2. Monitor the battery charging indicator
2. Plug the charging cable into an AC
on the front panel until charging is
power source.
complete.
LED Status During Charging
Charging Times and Transmitter Runtimes
The following LED states indicate battery status when the transmitter is
Use the following table to determine approximate battery runtime based
connected to a charger:
on the duration of charging time. Times shown are in hours and minutes.
• Green = charging complete
Receiver Bay or
USB Connection
Transmitter Runtime
• Green Flashing = battery charge > 90%
AC Power Source
Charging
• Red = battery charging
Charging
• Amber Flashing = battery error, replace battery
0:15 0:30 up to 1:30
0:30 1:00 up to 3:00
1:00 2:00 up to 6:00
3:00 4:00 up to 16:00*
*Storage time or excessive heat will reduce maximum runtime.
Note: GLX-D transmitters automatically power-off after approximately 1 hour to
conserve battery life if the signal from a linked receiver is not detected.
Installing Transmitter Batteries
Bodypack Transmitter
Handheld Transmitter
1. Move the locking lever to the open position and slide the
1. Unscrew and remove the battery cover.
battery door open.
2. Place the battery into the transmitter.
2. Place the battery into the transmitter.
3. Replace and tighten the battery cover.
3. Close the battery door and slide the latch to lock.
1
2
10
Multiple Receiver Systems
If several channels of wireless audio are needed, up to 8 GLX-D receivers can operate simultaneously in the 2.4 GHz spectrum. For ease of set up,
available frequencies are divided into three groups based on the number of receivers supported.
All receivers in the system must be set to the same group. To select a group, determine the total number of receivers in the system (channel count), and
then select the appropriate group.
Note: To maximize the number of receivers on-air, Group 3 does not offer backup frequencies. Group 3 should only be used in controlled Wi-Fi environments to prevent
interference from unexpected Wi-Fi devices.
Group Channel Count Backup Frequencies Available? Notes
1 Up to 4 Yes Initial Factory Setting.
2 Up to 5 Yes Best Group to use if you experience interference.
3 Up to 8 No Only use Group 3 in controlled Wi-Fi environments because
there are no backup frequencies to avoid interference.
Note: If you experience interference, reduce transmitter to receiver distance and set all GLX-D systems to group 2, which is the most robust wireless group.
See "Tips to Improve Wireless System Performance" section for additional information.
Setting Up Receivers and Transmitters
Note: Before beginning, turn off all receivers and transmitters. Turn on and set up each receiver/transmitter
Note: Dashes appearing on the group and
pair individually to prevent cross-linking.
channel display during a channel scan indicate
that frequencies are not available in the
1. Turn on the first receiver.
selected group. Choose a group that supports
2. Press and hold the group button to select a group (if necessary) or if the group is already
more receivers and repeat the set up steps.
set, press the channel button to scan for the best available channel.
3. Turn on the first transmitter. The blue RF light will illuminate when a link is established.
Repeat steps 1-3 for each additional receiver and transmitter. Remember to set each receiver
-- --
to the same group.
group channel
Manually Linking a Transmitter to a Receiver
Use the manual linking option to change the transmitter linked to a receiver. For example, changing the linked transmitter from a bodypack to a
handheld.
1. Turn on the transmitter: Within 5 seconds, press and hold the LINK button until the transmitter LED begins to flash green.
2. Press and hold the link button on the receiver: The blue rf LED will flash, and then remain on when the link has been established.
3. Test the audio to verify the link and adjust the gain if necessary.
Combo Systems
A combo system is created by linking two transmitters to a single receiver. Only one transmitter can be active at a time to prevent cross interference.
Gain settings for each transmitter can be independently set and stored when the transmitter is active.
Important! Do not turn on and operate both linked transmitters at any time.
Turn off both transmitters before beginning.
1. Press the group button to select a group. The receiver automatically scans the selected group to find the best available channel.
2. Turn on transmitter 1 and link it to the receiver. Adjust the gain, and then turn off the transmitter.
3. Turn on transmitter 2 and link it to the receiver. Adjust the gain, and then turn off the transmitter.
11
2.4 GHz Spectrum Overview
GLX-D operates within the 2.4GHz ISM band which is utilized by Wi-Fi, Bluetooth, and other wireless devices. The benefit of 2.4GHz is that it’s a global
band that can be used anywhere in the world, license free.
Overcoming the Challenges of 2.4GHz
Coexisting with Wi-Fi
Challenging Wireless
The challenge of 2.4GHz is that Wi-Fi traffic can be
GLX-D avoids continuous Wi-Fi traffic by
Environments
unpredictable. GLX-D meets these challenges in
scanning the entire 2.4GHz environment and
Some environments are more difficult
the following ways:
selecting the 3 best frequencies to transmit
than others for 2.4 GHz wireless system
on. The result of this is reliable performance
• Prioritizes and transmits on the best 3
performance. The simplest solution in
for your GLX-D wireless system as well as
frequencies per channel (choosing from a
many cases is to reduce the transmitter
avoiding Wi-Fi transmissions which may be
pool of 6 frequencies across the 2.4GHz
to receiver distance such as placing the
important as well.
band)
receivers on the stage with a clear line
“Bursting” Wi-Fi is harder to detect as it is
of sight.
• Repeats the most important information such
periodic; however, because GLX-D repeats
that one frequency can be taken out entirely
Challenging environments include:
the most important information, even bursts at
without audio interruption
very high-levels don’t have an effect on your
• Outdoors
• Continuously scans during usage to rank
audio performance.
• Very high ceilings
all frequencies (both current and backup
frequencies)
• 3 or more GLX-D receivers in use
• Seamlessly moves away from interference to
• Strong Wi-Fi presence
backup frequencies without audio interruption
• Non-Shure 2.4 GHz systems in use
Tips and Methods to Improve Wireless System Performance
If you encounter interference or dropouts, try the following suggestions:
• Scan for the best available channel (press the channel button)
• Locate GLX-D receivers away from non-Shure 2.4 GHz receivers
• Reposition the receiver so there is nothing obstructing a line of sight
• Avoid placing transmitter and receiver where metal or other dense
to the transmitter (including the audience)
materials may be present
• Change all GLX-D systems to Group 2, which is the most robust
• Move the receiver to the top of the equipment rack
wireless group
• Recharge or replace the transmitter battery
• Keep the transmitter and receiver more than 2 meters (6 feet) apart
• Keep transmitters more than 2 meters (6 feet) apart - this is less
• Keep transmitter to receiver distance within 60 meters (200 feet) -
critical at shorter receiver to transmitter distances
place receivers on-stage within line of sight if possible
Note: If transmitters are within 6 inches of non-GLXD transmitters or
• Remove or relocate nearby sources of wireless interference, such as
microphone cartridges, audible noise is possible.
Wi-Fi devices or hotspots, cell phones, two-way radios, computers,
• During sound check, mark trouble spots and ask presenters or
media players, and digital signal processors
performers to avoid those areas
• Disable non-essential Wi-Fi/bluetooth devices and avoid heavy Wi-Fi
traffic activities such as downloading large files or viewing a movie.
2.4 GHz Frequency Tables
The following tables list receiver channels, frequencies, and latency for each group:
Group 1: Channels 1-4 (latency = 4.0 ms)
Group 2: Channels 1-5 (latency = 7.3 ms)
Group 3: Channels 1-8 (latency = 7.3 ms)
Group/Channel Frequencies
Group/Channel Frequencies
Group/Channel Frequencies
1/1 2424 2425 2442
2/1 2423 2424 2443
3/1 2415 2416 2443
2443 2462 2464
2444 2473 2474
3/2 2422 2423 2439
1/2 2418 2419 2448
2/2 2404 2405 2426
3/3 2426 2427 2457
2450 2469 2471
2427 2456 2457
3/4 2447 2448 2468
1/3 2411 2413 2430
2/3 2410 2411 2431
2431 2476 2477
2432 2448 2449
3/5 2409 2451 2452
1/4 2405 2406 2436
2/4 2417 2418 2451
3/6 2431 2462 2463
2437 2455 2457
2452 2468 2469
3/7 2404 2473 2474
2/5 2437 2438 2462
3/8 2435 2477 2478
2463 2477 2478
12
i
i
i
i
i
i
i
i
i
i
i
i
13
i
i
i
i
i
Operation
Gain Adjustment
Use the gain buttons on the receiver to increase or decrease the gain of a
linked transmitter:
rf group
I
I
I
I
I
I
+
• Turn on the linked transmitter and momentarily press the gain
I
I
I
I
I
I
I
I
I
I
I
I
I
buttons to adjust the gain in 1 dB increments
gain
• For faster gain adjustments, press and hold the gain buttons
link
channel
-
Tip: Monitor the audio and observe the receiver audio meter level while adjusting the
gain to prevent signal overload.
Locking and Unlocking the Controls
The controls of the receiver and transmitter can be locked to prevent accidental or unauthorized changes to settings.
Note: Locks are not affected by power cycles.
Locking the Receiver Controls
Locking the Transmitter Power Switch
i
i
i
i
i
i
i
i
i
i
Simultaneously press and hold the group and channel
Starting with the transmitter set to off, press and hold the LINK button while
i
i
i
i
buttons until LK appears on the LCD. Repeat to unlock.
turning on the transmitter. Continue to hold the link button until the lock icon
i
i
i
appears on the receiver LCD. Repeat sequence to unlock.
• LK is displayed if a locked control is pressed
Optionally, the transmitter power switch can be remotely locked from the receiver front
• UN is displayed momentarily to confirm the unlock
panel:
command
Simultaneously press and hold the group and link buttons for approximately 2 seconds
until the flashing lock icon appears on the receiver LCD. Repeat sequence to unlock.
Identifying Linked Transmitters and Receivers with Remote ID
Use the Remote ID feature to identify linked transmitter and receiver pairs in multiple receiver systems. When Remote ID is active, the receiver LCD will
blink and display ID. The status LED of the corresponding transmitter will alternately flash red and green for approximately 45 seconds.
To activate Remote ID:
1. Momentarily press the link button on the transmitter or receiver.
I
I
I
I
I
I
I
I
I
I
I
I
I
I
I
GLXD2
I
2. The LCD of the linked receiver will blink and display ID and the status
I
on
I
I
I
I
I
I
I
I
I
I
I
I
I
I
I
LED on the linked transmitter will flash red/green.
I
I
I
I
I
I
I
I
I
I
I
I
rf group
I
I
GLXD4
+
I
I
I
gain
3. To exit Remote ID mode, momentarily press the link button or allow the
link
channel
I
ID
I
I
-
I
I
I
I
function to timeout.
I
I
I
I
I
I
Manually Selecting a Group and Channel
Specific groups and channels can be assigned to the receiver instead of using the automatic scan function.
Note: Group 3 should only be used in controlled Wi-Fi environments to prevent interference from unexpected Wi-Fi devices.
Selecting a Group
Selecting a Channel
1. Press and hold the group button for 2 seconds until the group display
1. Press and hold the channel button for 2 seconds until the channel
flashes.
display flashes.
2. Press the group button to scroll through the available groups.
2. Press the channel button to scroll through the available channels.
3. The receiver will automatically save the selected group.
3. The receiver will automatically save the selected channel.
Note: A double dash symbol-- displayed on the receiver screen during a channel
scan indicates that there are no available channels within the selected group.
Choose a group with more channels and repeat set up steps.

Troubleshooting
Issue Indicator Status Solution
No sound or faint sound
Receiver RF LED on
• Verify all sound system connections or adjust gain as needed (see
Adjusting Gain).
• Verify that the receiver is connected to mixer/amplifier.
Receiver RF LED off
• Turn on transmitter.
• Make sure the batteries are installed correctly.
• Link transmitter and receiver (see Linking topic).
• Charge or change transmitter battery.
Receiver LCD screen off • Make sure AC adapter is securely plugged into electrical outlet.
• Make sure receiver is powered on.
Transmitter indicator LED flashing red Charge or change transmitter battery.
Transmitter plugged into charger. Disconnect transmitter from charger.
Audio artifacts or dropouts
rf LED flickering or off
• Change receiver and transmitter to a different group and/or channel.
• Identify nearby sources of interference (cell phones, Wi-Fi access points,
signal processor, etc...) and shutdown or remove source.
• Charge or change transmitter battery.
• Ensure that receiver and transmitter are positioned within system
parameters.
• System must be set up within recommended range and receiver kept
away from metallic surfaces.
• Transmitter must be used in line of sight from receiver for optimal sound.
Distortion OL indicator appears on receiver LCD Reduce transmitter gain (see Gain Adjustment).
Sound level variations
N/A Adjust transmitter gain as necessary (see Gain Adjustment).
when switching to different
sources
Receiver/transmitter won't
Transmitter LED flashing rapidly Controls locked. See Locking and Unlocking Controls.
turn off
Receiver gain control can-
N/A Check transmitter. Transmitter must be on to enable gain changes.
not be adjusted
Receiver controls cannot be
LK shown on receiver display when but-
Controls locked. See Locking and Unlocking Controls.
adjusted
tons are pressed
Transmitter ID function
Transmitter LED flashes green 3 times Controls locked. See Locking and Unlocking Controls.
does not respond
Transmitter information
N/A Linked transmitter is off or the receiver is not linked to a transmitter.
does not appear on the
Receiver LCD
Transmitter powers off after
Transmitter status LED off GLX-D transmitters automatically power-off after 1 hour to conserve battery
1 hour
life if the signal from a linked receiver is not detected. Make sure that linked
receiver is turned on.
Resetting Components
Use the reset function if it is necessary to restore the transmitter or receiver to their factory settings.
Resetting the Receiver
Resetting the Transmitter
Restores the receiver to the following factory settings:
Restores the transmitter to the following factory settings:
• Gain level = default
• Controls = unlocked
• Controls = unlocked
Press and hold the transmitter link button while turning on the transmitter
until power LED goes off.
Press and hold the link button while turning on the receiver power until
the LCD displays RE.
When the link button is released, the transmitter will automatically initiate
linking to find an available receiver. Press the link button on an available
Note: When reset is complete, the receiver will automatically initiate linking to search
receiver to relink.
for a transmitter. Press and hold the transmitter link button within five seconds of
powering-on to complete the link.
14
Specifications
Tuning Bandwidth
RF Output Power
2400–2483.5 MHz
10 mW E.I.R.P. max
Working Range
Operating Temperature Range
60 m (200 ft) typical
-18°C (0°F) to 57°C (135°F)
Note: Actual range depends on RF signal absorption, reflection and interference.
Note: Battery characteristics may limit this range.
Transmit Mode
Storage Temperature Range
Frequency Hopping
-29°C (-20°F) to 74°C (165°F)
Audio Frequency Response
Polarity
20 Hz – 20 kHz
Positive pressure on microphone diaphragm (or positive voltage applied
Note: Dependent on microphone type
to tip of WA302 phone plug) produces positive voltage on pin 2 (with re-
Dynamic Range
spect to pin 3 of low-impedance output) and the tip of the high impedance
120 dB, A-weighted
1/4-inch output.
RF Sensitivity
Battery Life
-88 dBm, typical
Up to 16 hours
Total Harmonic Distortion
0.2%, typical
GLXD4
Dimensions
Pin Assignments
40 x 183 x 117 mm (1.6 x 7.2 x 4.6 in.), H x W x D
XLR Output
1=ground, 2=hot, 3=cold
Weight
6.35 mm (1/4") connector
Tip=audio, Ring=no audio,
286 g (10.1 oz.) without batteries
Sleeve=ground
Housing
Molded Plastic
Receiver Antenna Input
Power Requirements
14 to 18 V DC (Tip positive with respect to ring), 550 mA
Impedance
Spurious Rejection
50 Ω
>35 dB, typical
Antenna Type
Gain Adjustment Range
½ Wave Sleeve Dipole, non-removable
-20 to 40 dB in 1 dB steps
Maximum Input Level
Phantom Power Protection
−20 dBm
Yes
Output Connections
22µF
Configuration
50 Ω
XLR Output
Impedance balanced
6.35 mm (1/4") output
Impedance balanced
50 Ω
22 µF
Impedance
XLR Output
100 Ω
22 µF
50 Ω
6.35 mm (1/4") output
100 Ω
2
1
3
(50 Ω, Unbalanced)
Maximum Audio Output Level
22µF
50 Ω
XLR connector (into 600 Ω load)
+1 dBV
6.35 mm (1/4") connector (into 3 kΩ load)
+8.5 dBV
15
GLXD1 GLXD2
Dimensions
Dimensions
90.4 x 64.5 x 22.9 mm (3.56 x 2.54 x 0.90 in.), H x W x D (without
Model A B C
antenna)
SM58 51 mm, 2.0 in. 252 mm, 9.9 in. 37 mm, 1.5 in.
Power Requirements
3.7 V Rechargeable Li-Ion
BETA 58 51 mm, 2.0 in. 252 mm, 9.9 in. 37 mm, 1.5 in.
Housing
SM86 49 mm, 1.9 in. 252 mm, 9.9 in. 37 mm, 1.5 in.
Cast Metal, Black Powdercoat
BETA 87A 51 mm, 2.0 in. 252 mm, 9.9 in. 37 mm, 1.5 in.
Input Impedance
900 kΩ
RF Output Power
B
10 mW E.I.R.P. max
Transmitter Input
A
GLXD2
on
C
Connector
4-Pin male mini connector (TA4M)
Configuration
Unbalanced
Maximum Input Level
1 kHz at 1% THD
+8.4 dBV (7.5 Vp-p)
Antenna Type
Weight
Internal Monopole
SM58
267 g (9.4 oz.) without batteries
Pin Assignments
BETA 58
221 g (7.8 oz.) without batteries
TA4M
SM86
275 g (9.1 oz.) without batteries
1
ground (cable shield)
BETA 87A
264 g (9.3 oz.) without batteries
2
+ 5 V Bias
3
audio
Housing
Molded Plastic
4
Tied through active load to ground (On
instrument adapter cable, pin 4 floats)
Power Requirements
3.7 V Rechargeable Li-Ion
RF Output Power
10 mW E.I.R.P. max
Maximum Input Level
SM58
146 dB SPL
BETA 58
147 dB SPL
SM86
143 dB SPL
BETA 87A
147 dB SPL
16

Certifications
This device complies with part 15 of the FCC Rules. Operation is subject to the following two conditions: (1) This device may not cause harmful
interference, and (2) this device must accept any interference received, including interference that may cause undesired operation.
This wireless system operates in the globally available ISM band 2400 MHz to 2483.5 MHz. The operation does not require a user license.
Meets requirements of the following standards: EN 300 328, EN 301 489 Parts 1 and 9, EN60065.
Meets essential requirements of the following European Directives:
• R&TTE Directive 99/5/EC
• WEEE Directive 2002/96/EC, as amended by 2008/34/EC
• RoHS Directive 2002/95/EC, as amended by 2008/35/EC
Note: Please follow your regional recycling scheme for batteries and electronic waste
Certified by IC in Canada under RSS-210 and RSS-GEN.
IC: 616A-GLXD1, 616A-GLXD2, 616A-GLXD4
Certified under FCC Part 15.
FCC ID: DD4GLXD1, DD4GLXD2, DD4GLXD4
This Class B digital apparatus complies with Canadian ICES-003. Cet appareil numérique de la classe B est conforme à la norme NMB-003 du Canada.
This device complies with Industry Canada licence-exempt RSS standard(s). Operation of this device is subject to the following two conditions: (1) this
device may not cause interference, and (2) this device must accept any interference, including interference that may cause undesired operation of the
device.
Le présent appareil est conforme aux CNR d'Industrie Canada applicables aux appareils radio exempts de licence. L'exploitation est autorisée aux deux
conditions suivantes : (1) l'appareil ne doit pas produire de brouillage, et (2) l'utilisateur de l'appareil doit accepter tout brouillage radioélectrique subi,
même si le brouillage est susceptible d'en compromettre le fonctionnement.
The CE Declaration of Conformity can be obtained from Shure Incorporated or any of its European representatives. For contact information please visit
www.shure.com
The CE Declaration of Conformity can be obtained from: www.shure.com/europe/compliance
Authorized European representative:
Shure Europe GmbH
Headquarters Europe, Middle East & Africa
Department: EMEA Approval
Jakob-Dieffenbacher-Str. 12
75031 Eppingen, Germany
Phone: 49-7262-92 49 0
Fax: 49-7262-92 49 11 4
Email: EMEAsupport@shure.de
Information to the user
This equipment has been tested and found to comply with the limits for a Class B digital device, pursuant to Part 15 of the FCC Rules. These limits are
designed to provide reasonable protection against harmful interference in a residential installation. This equipment generates uses and can radiate radio
frequency energy and, if not installed and used in accordance with the instructions, may cause harmful interference to radio communications. However,
there is no guarantee that interference will not occur in a particular installation. If this equipment does cause harmful interference to radio or television
reception, which can be determined by turning the equipment off and on, the user is encouraged to try to correct the interference by one or more of the
following measures:
• Reorient or relocate the receiving antenna.
• Increase the separation between the equipment and the receiver.
• Connect the equipment to an outlet on a circuit different from that to which the receiver is connected.
• Consult the dealer or an experienced radio/TV technician for help.
17
Présentation du système
Les nouveaux systèmes sans fil révolutionnaires GLX-D de Shure combinent le meilleur de la technologie concernant la gestion automatique des
fréquences et ce qui se fait de mieux en matière de batteries rechargeables intelligentes au lithium-ion. Et ce n'est pas tout, ils intègrent des micro-
phones de renommée mondiale et bénéficient d'un design et d'une qualité de fabrication incomparables. Ils sont disponibles dans une large gamme
de configurations à base d'émetteurs de ceinture et à main incluant des systèmes pour voix, avec micro serre-tête et pour conférencier ainsi que
des systèmes pour guitare traditionnels. Les systèmes sans fil révolutionnaires GLX-D représentent la toute nouvelle référence en matière de facilité
d'utilisation, tout en offrant un son numérique d'une clarté exceptionnelle.
• Clarté exceptionnelle du son numérique
• Canal RF d'arrière-plan pour la commande à distance des fonctions
de l'émetteur
• Fonctionne dans le spectre 2,4 GHz, disponible dans le monde entier
• La bande de fréquence de 2,4 GHz, libre dans le monde entier,
• Les accus rechargeables offrent une autonomie de fonctionnement
permet l'utilisation de 8 systèmes compatibles maximum
pouvant aller jusqu'à 16 heures tout en réduisant les coûts
• Extinction automatique de l'émetteur pour économiser les accus
• Gain d'émetteur réglable pour optimiser le signal audio
lorsqu'il n'est pas utilisé.
• Permet d'éviter automatiquement les interférences sans interruption
du son
Composants fournis
Accessoires en option
Accu rechargeable Shure SB902
Chargeur d'accu de voiture SBC-CAR
Chargeur d'accu USB micro SBC-USB
Chargeur 1 accu autonome SBC-902
Alimentation PS42
Mise en route rapide
Pour réduire la durée de configuration, l'émetteur et le récepteur sont liés automatiquement pour former un canal audio lors de leur mise sous tension
initiale et il n'est pas besoin de les lier à nouveau.
Remarque : Lors de la configuration de systèmes à plusieurs récepteurs, allumer et lier une par une chaque paire d'émetteur/récepteur pour éviter toute interliaison.
Étape ①
Étape ②
Connecter l'alimentation au récepteur et brancher le cordon dans
Installer les accus d'émetteur chargés.
une source d’alimentation c.a. Brancher la sortie audio à un
amplificateur ou un mélangeur.
Étape ③
Étape ④
Allumer l'émetteur et le récepteur. la LED RF bleue clignote lorsque
Vérifier l'audio et régler le gain si nécessaire.
l'émetteur et le récepteur établissent une liaison. Lorsque la liaison a
été établie avec succès, la LED RF reste allumée.
on
GLXD2
rf group
on
I
I
I
I
+
on
I
I
I
I
I
on
I
I
I
I
I
I
I
I
I
I
gain
link
channel
-
o / on power mic out instr out
Remarque : l'émetteur et le récepteur demeur-
ent liés pour une utilisation future. À la mise en
marche, la LED RF bleue s'allume directement,
sans passer par l'étape de liaison.
18
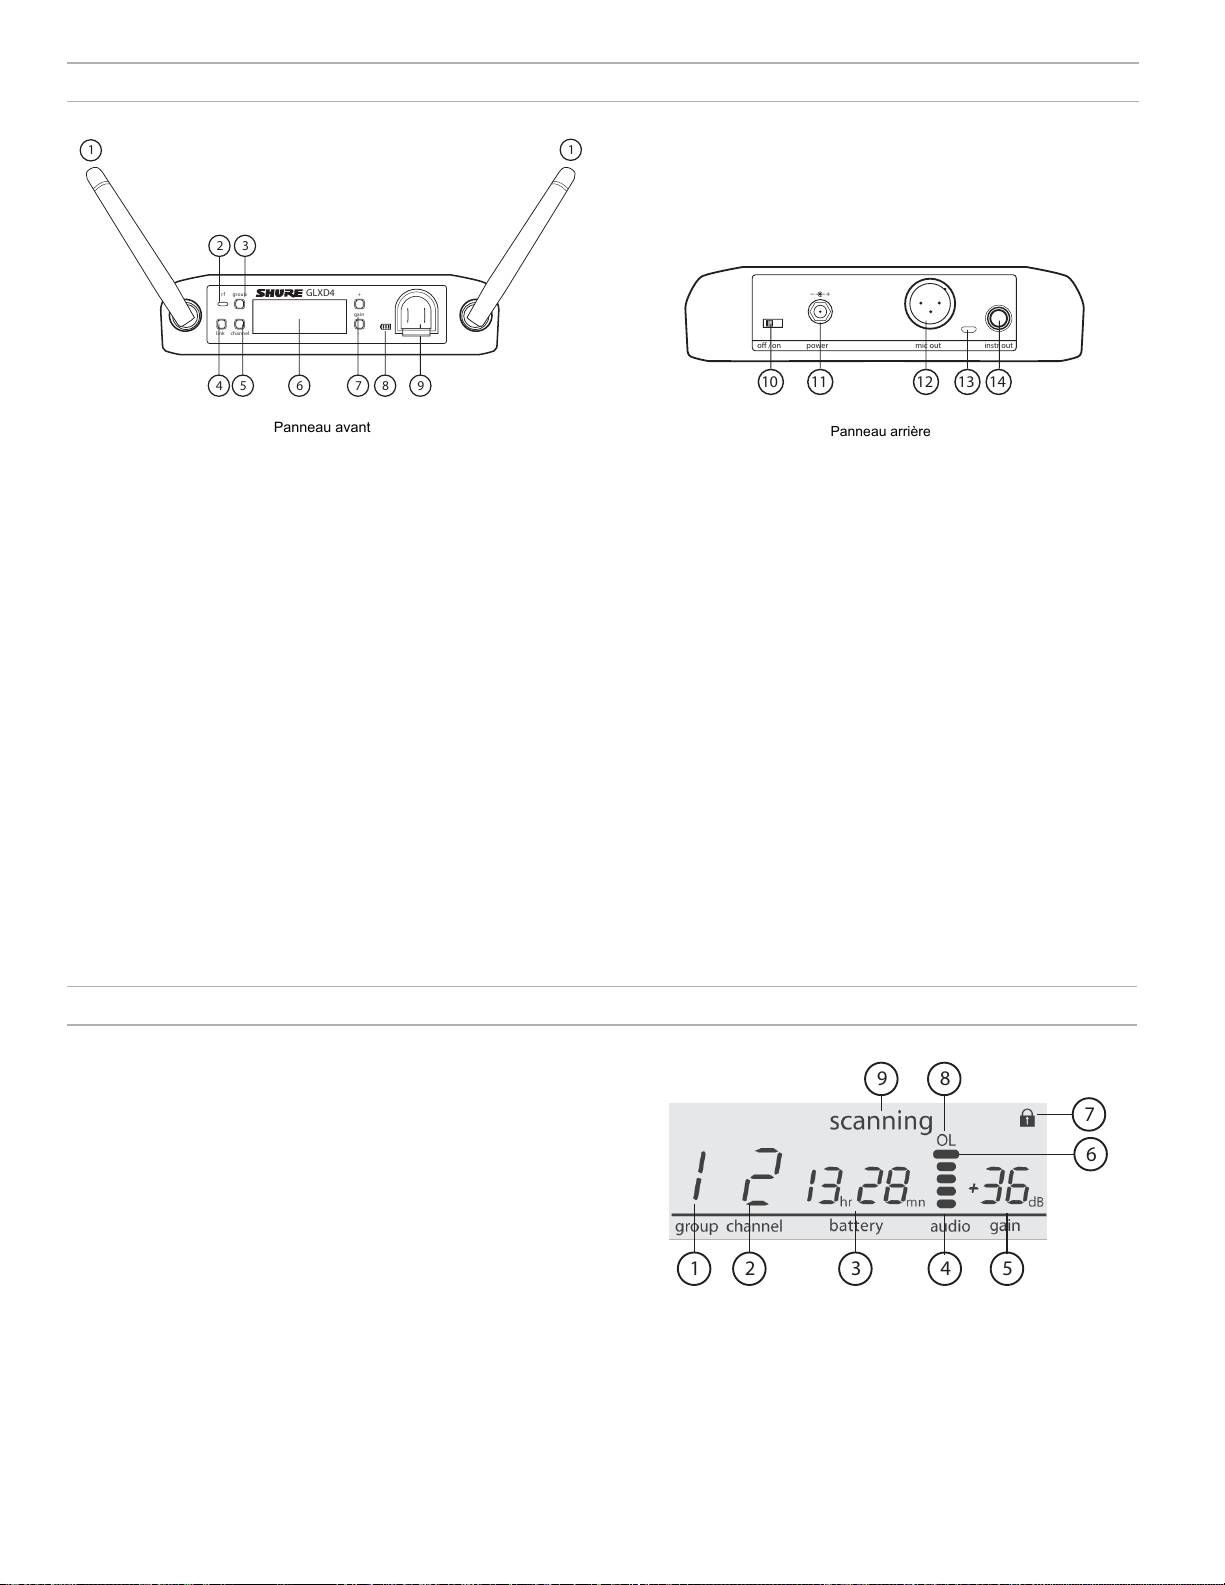
Commandes et connecteurs du récepteur GLXD4
Écran du récepteur
① Groupe
Affiche le groupe sélectionné.
② Canal
Affiche le canal sélectionné.
③ Durée de fonctionnement de l'accu de l'émetteur
Affiche l'autonomie restante de l'accu en heures et minutes.
Affiche en alternance les états d'accu suivants :
• CALC = calcul de l'autonomie de l'accu
• Lo = autonomie de l'accu inférieure à 15 minutes
• Err = remplacer l'accu
④ Vumètre audio
Indique le niveau du signal audio et les crêtes.
⑦ Émetteur verrouillé
⑤ Gain
Affiché quand les commandes de l'émetteur lié sont verrouillées.
Affiche les réglages de gain de l'émetteur (dB).
⑧ Scanning
⑥ Témoin OL
Indique qu'un scan de fréquences est en cours.
Indique une saturation audio ; réduire le gain.
⑨ Auto
Indique que le groupe sélectionné comporte des canaux de secours
disponibles.
19
rf group
GLXD4
+
gain
link
channel
-
Panneau avant
① Antenne
⑧ Témoin de chargement de l'accu
Transmet le signal sans fil ; 2 par récepteur.
S'allume quand l'accu se trouve dans la baie de charge :
• Rouge = chargement de l'accu en cours
② LED d'état RF
• Vert clignotant = charge de l'accu > 90 %
• Allumée = l'émetteur lié est allumé
• Vert = accu chargé
• Clignotante = recherche de l'émetteur en cours
• Jaune clignotant = erreur de chargement ; remplacer l'accu
• Éteinte = émetteur lié éteint ou non lié
⑨ Baie de charge d'accu
③ Bouton group
Charge l'accu de l'émetteur quand le récepteur est sous tension.
Appuyer dessus pendant deux secondes pour permettre la
modification manuelle des groupes.
⑩ Interrupteur d'alimentation
Met le système sous tension et hors tension.
④ Bouton link
Appuyer sur ce bouton pour établir manuellement la liaison
⑪ Connecteur d'alimentation
entre le récepteur et un émetteur ou bien pour activer la fonction
Connecte l’alimentation externe 15 V c.c. fournie.
d'identification à distance
⑫ Sortie micro
⑤ Canal
Le connecteur XLR de sortie microphone fournit une sortie audio
• Appuyer et relâcher pour lancer un balayage des canaux
niveau microphone.
• Appuyer dessus pendant deux secondes pour permettre la modifi-
⑬ Port USB
cation manuelle des canaux.
⑥ Écran LCD
⑭ Sortie instrument
Affiche l'état du récepteur et de l'émetteur.
Sortie audio TRS 6,35 mm (¼ po). Connecter à des mélangeurs,
enregistreurs et amplificateurs.
⑦ Boutons de gain
Appuyer pour augmenter ou réduire le gain de l'émetteur par pas de
1 dB.
o / on power mic out instr out
10 11 12 13 14
Panneau arrière
9
8
7
auto
6
1
2
3
4
5
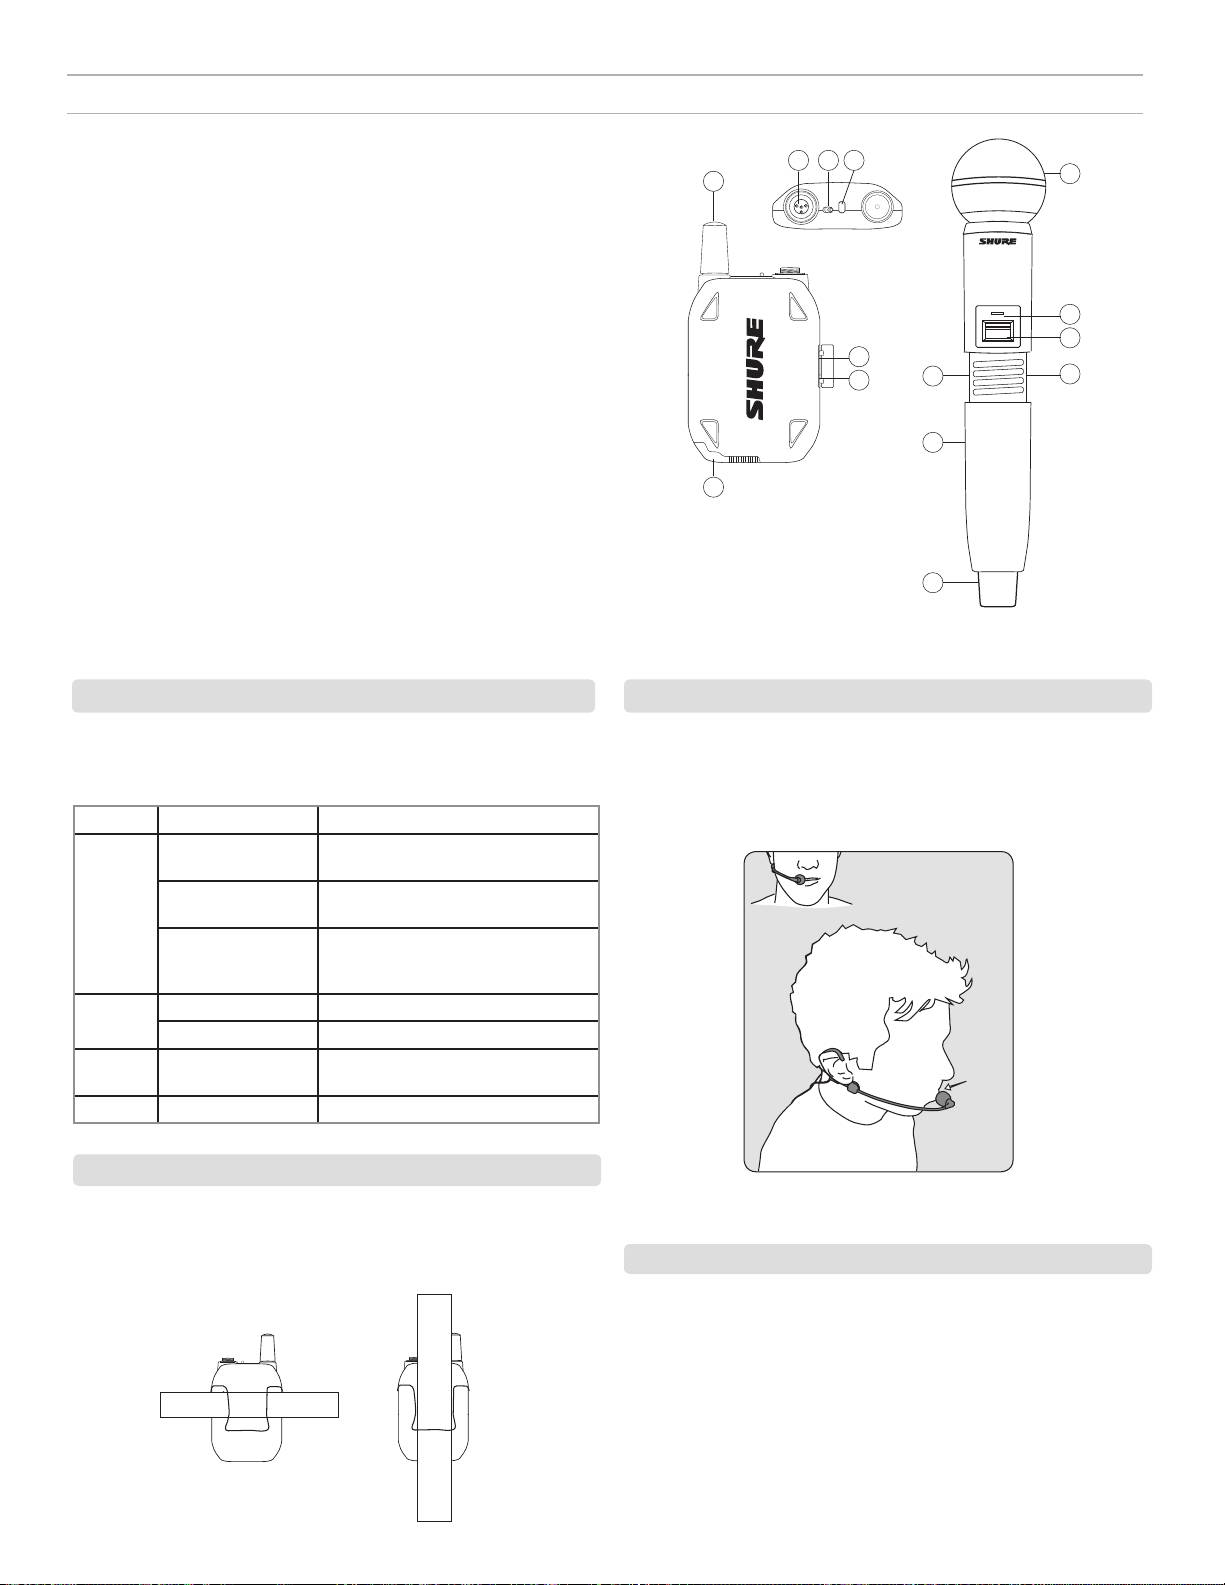
Émetteurs
① Antenne
Transmet le signal RF.
4
23
8
1
② LED d'état
off on
La couleur et le statut de la LED indiquent l'état de l'émetteur.
③ Interrupteur d'alimentation
Met l'émetteur sous tension et hors tension.
④ Connecteur d’entrée TA4M
GLXD2
on
2
Permet de connecter un microphone ou un câble d’instrument muni
d’un connecteur miniature à 4 broches (TA4F).
3
5
⑤ Port de charge micro USB
6
6
5
Connecter au chargeur d'accu USB.
⑥ Bouton link
• Appuyer sur ce bouton dans les 5 secondes qui suivent la mise
7
sous tension pour effectuer manuellement la liaison avec le
récepteur
7
• Appuyer et relâcher pour activer la fonction d'identification à
distance.
⑦ Compartiment accu
Contient un accu rechargeable Shure.
1
⑧ Capsule de microphone
Les modèles d'émetteur GLXD-2 sont disponibles avec les types de
capsules suivants : SM58, Beta 58, SM86, Beta 87A.
LED d'état de l'émetteur
Port du microphone sur casque
La LED est verte pendant le fonctionnement normal.
• Placer le microphone sur casque à 13 mm (1/2 po) du coin de la
bouche.
La LED change de couleur ou clignote pour indiquer un changement de
l'état de l'émetteur comme indiqué dans le tableau suivant :
• Positionner les micros-cravates et les microphones sur casque de
façon à éviter tout heurt ou frottement contre les vêtements, les
Couleur État État
bijoux ou d'autres éléments.
Vert Clignotant (lent) émetteur essayant de se lier à nou-
veau au récepteur
Clignotant (rapide) émetteur non lié recherchant le
récepteur
Clignote 3 fois indique le verrouillage de l’émetteur
quand on appuie sur l'interrupteur
d’alimentation
Rouge Marche autonomie de l'accu < 1 heure
Clignotant autonomie de l'accu < 30 minutes
Rouge/
Clignotant Identification à distance active
vert
Jaune Clignotant erreur de l'accu ; remplacer l'accu
Port de l’émetteur de poche
Accrocher l’émetteur à une ceinture ou glisser une sangle de guitare dans
l’attache de l’émetteur comme illustré.
Pour obtenir les meilleurs résultats, la ceinture doit être appuyée contre la
Placement correct du microphone
base de l’attache.
• Maintenir le microphone dans un rayon de 12 pouces autour de la
source sonore.
• Pour obtenir un son plus chaud avec une présence accrue des
basses, rapprocher le microphone de la source sonore.
• Ne pas couvrir la grille avec la main.
20
13 mm
(.5 in.)
