Sennheiser SR 2020-D: Using the components
Using the components: Sennheiser SR 2020-D
Tourguide2020_516509_0909_Sp6.book Seite 29 Montag, 22. März 2010 1:12 13
Using the components
Using the components
Switching the devices on/off
Notes:
• Remove the batteries or the accupack when the
bodypack transmitter/radio microphone will not
be used for extended periods of time.
• If no transmission is to take place, switch the
transmitters off in order to free up the frequency
range for other applications.
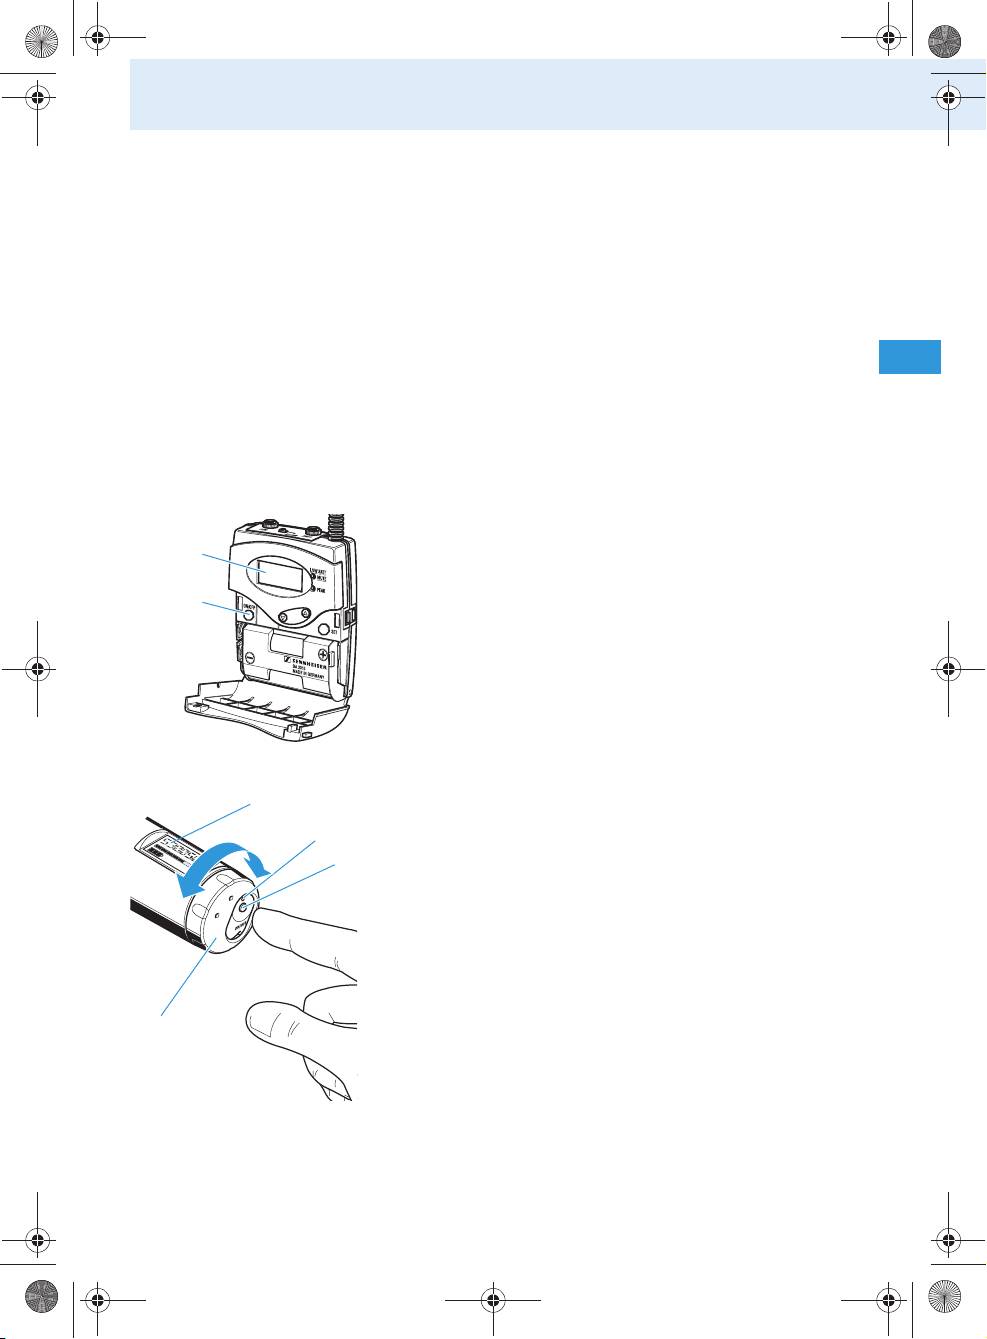
Switching the bodypack transmitter on/off
To switch the bodypack transmitter on:
Briefly press the ON/OFF button .
The display indicates the device name and then
switches to the standard display.
To switch the bodypack transmitter off:
Press and hold the ON/OFF button until “OFF”
appears on the display.
Switching the radio microphone on/off
To switch the radio microphone on:
Turn the protective cap so that the ON/OFF
button becomes accessible.
Press the ON/OFF button to switch the radio
microphone on.
The red LED lights up. The display indicates
the device name and then switches to the standard
display.
To switch the radio microphone off:
Press and hold the ON/OFF button until “OFF”
appears on the display.
The display and the red LED go off.
29
Tourguide2020_516509_0909_Sp6.book Seite 30 Montag, 22. März 2010 1:12 13
Using the components
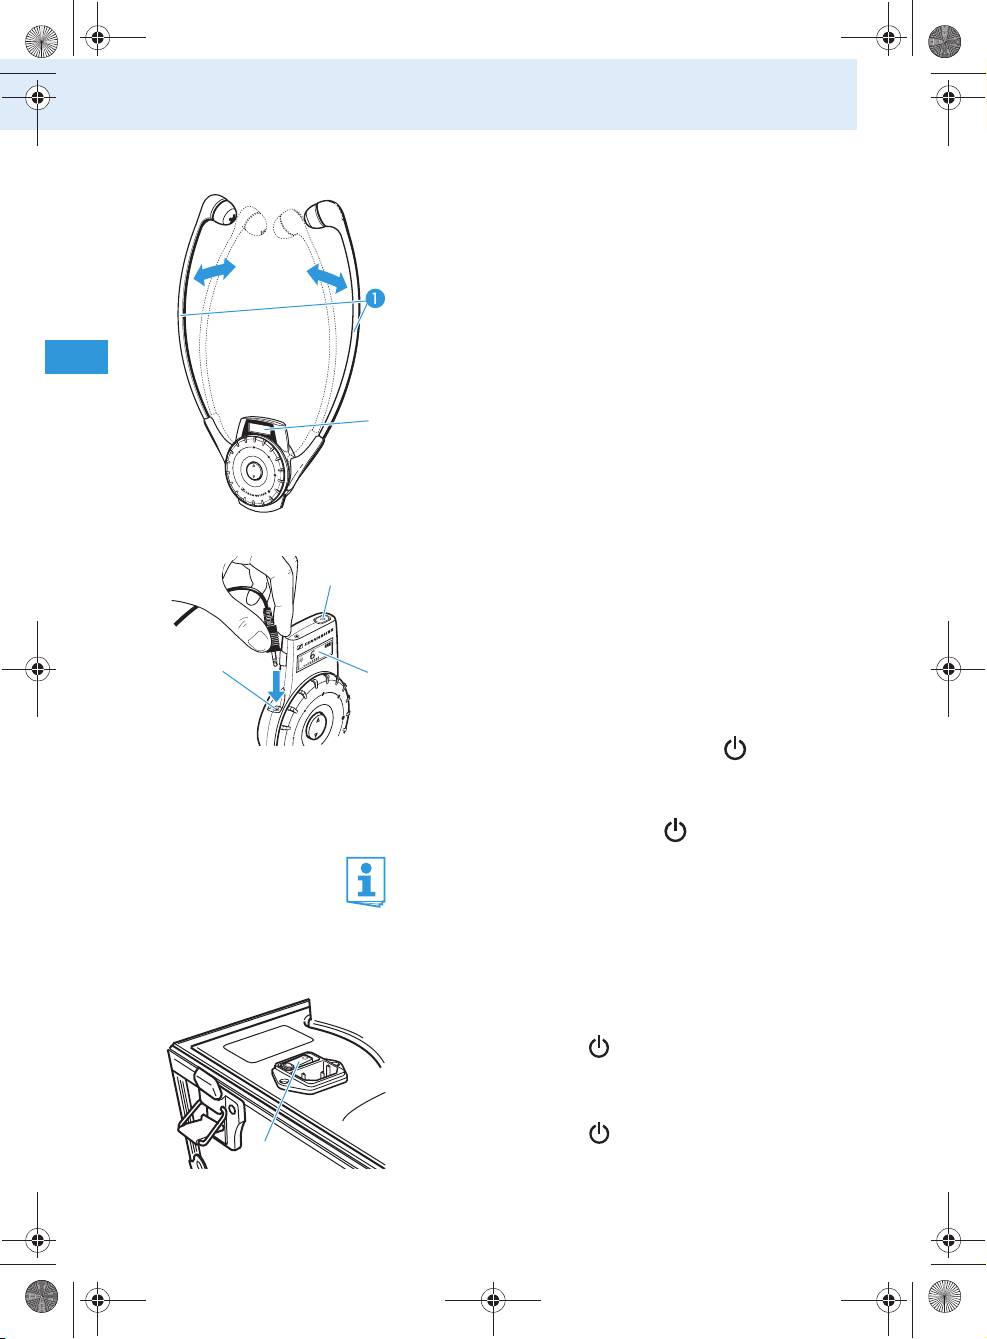
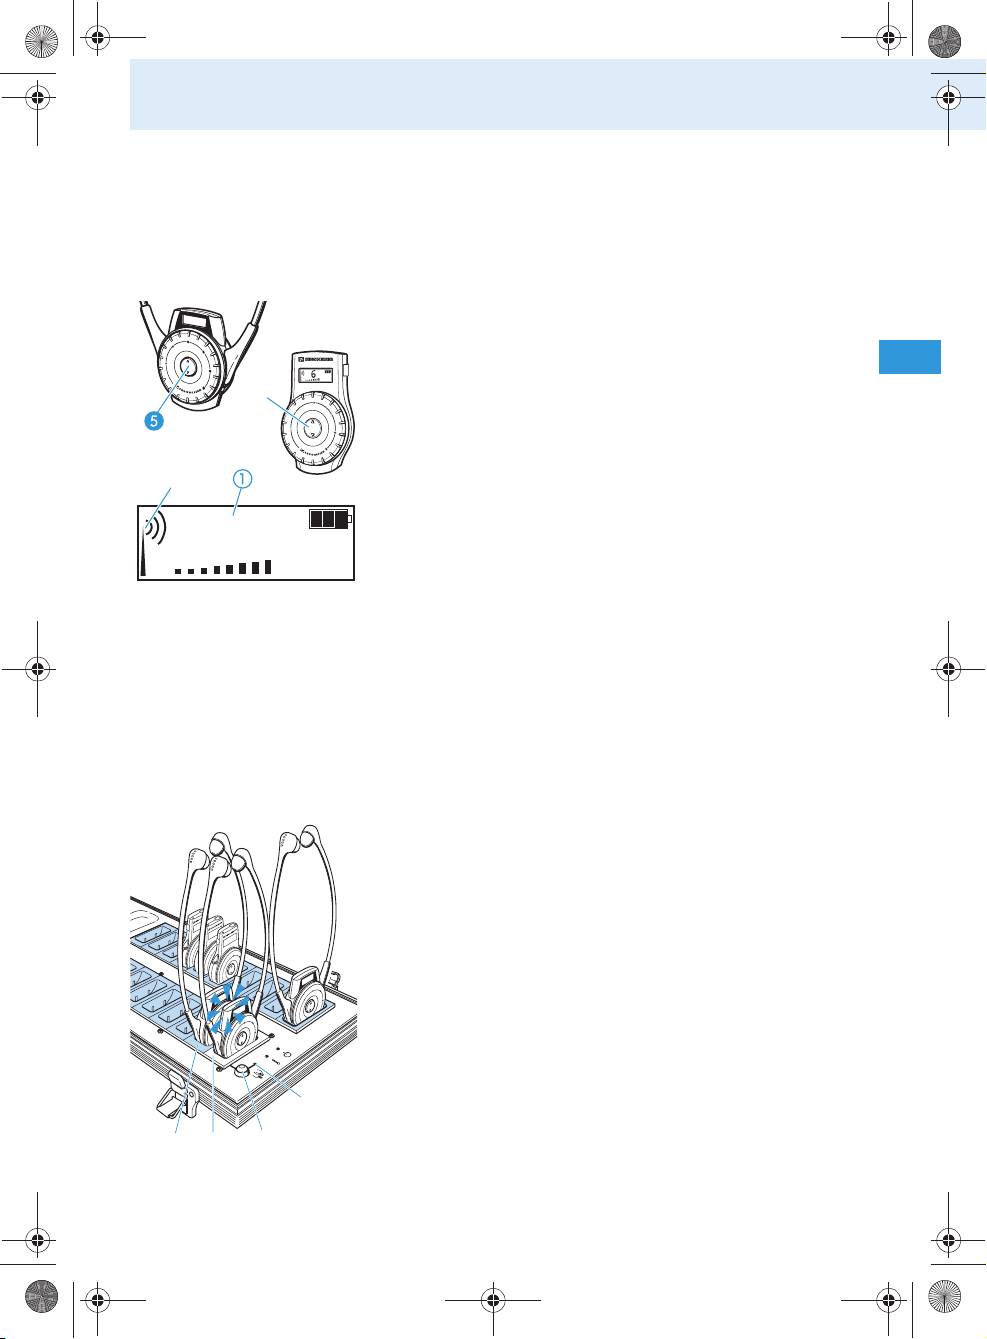
Automatically switching the HDE 2020 D on/off
The receiver automatically switches on when you pull
the earbows apart. The display switches on.
When you release the earbows, the receiver switches
to standby mode (audio deactivated) and then
switches off after 2minutes.
쐋
Switching the EK 2020 D on/off
You can connect an induction loop or any pair of head-
phones with a 3.5 mm mono or stereo jack plug to the
headphone socket of the EK 2020 D. The head-
phone impedance must be 32 Ω or higher.
Connect the 3.5 mm jack plug of your headphones
쐋
to the headphone socket of the EK 2020 D.
To switch the receiver on:
Briefly press the ON/OFF button .
The display switches on.
To switch the receiver off:
Press the ON/OFF button for 3 seconds.
When you unplug the headphones from the receiver
or switch off the transmitter, the receiver automati-
cally switches off after 5 minutes.
Switching the charging case on/off
To switch the charging case on:
Set the mains switch to the position “I”.
The LED POWER
lights up.
To switch the charging case off:
Set the mains switch to the position “0”.
The LED POWER goes off.
30
Tourguide2020_516509_0909_Sp6.book Seite 31 Montag, 22. März 2010 1:12 13
Using the components
Note:
When not using the charging case for extended
periods of time, switch it off and disconnect it from
the mains by pulling out the mains connector from
the wall socket.
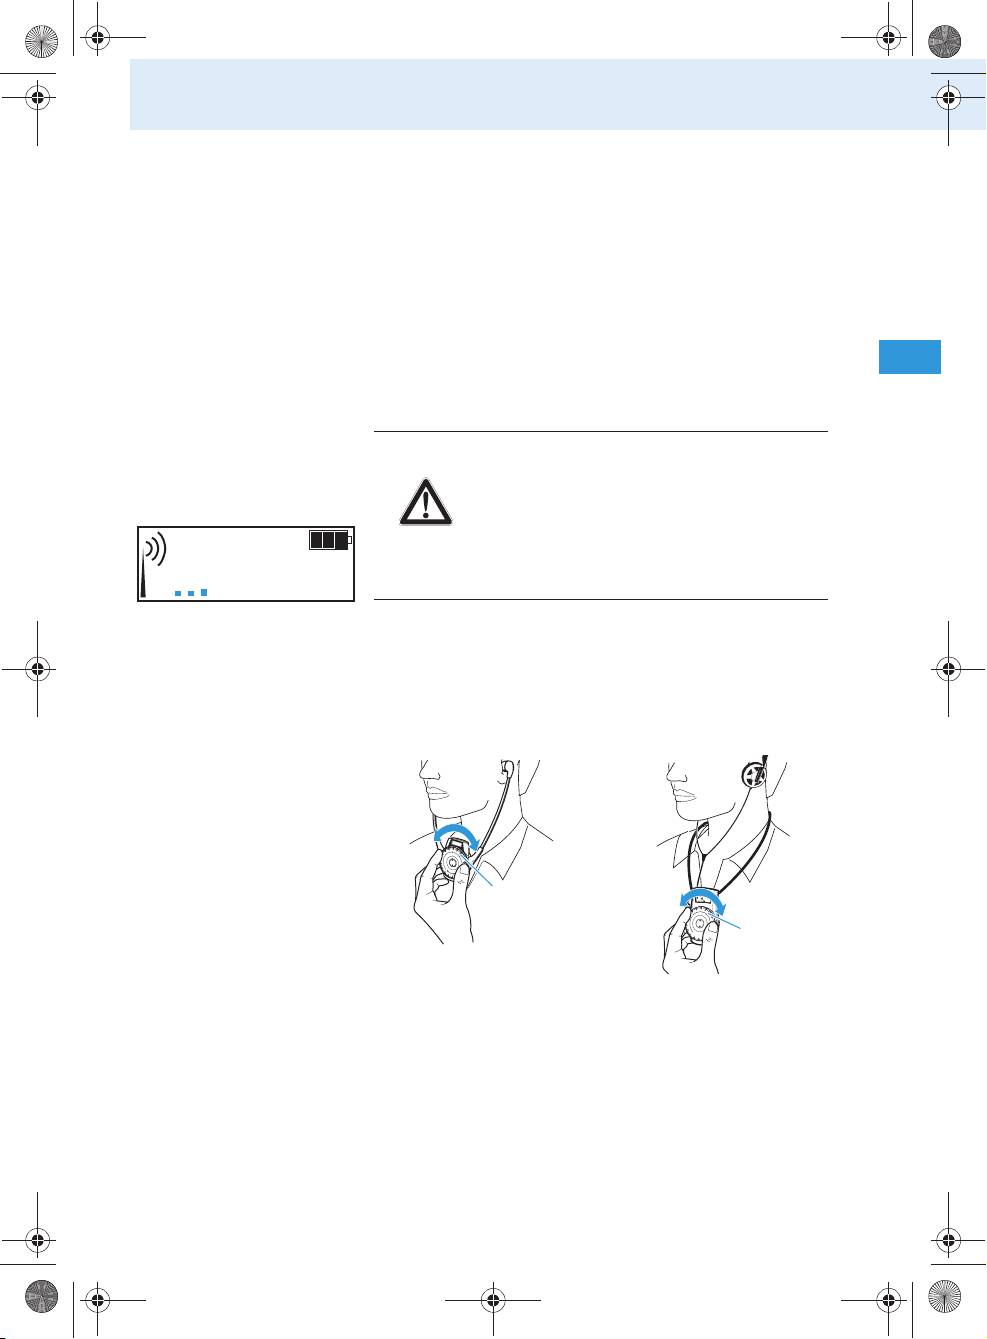
Adjusting the volume
Adjusting the volume on the receiver
CAUTION!
Danger of hearing damage!
Listening at high volume levels for long
periods can lead to permanent hearing
defects.
Adjust the volume to a low level
6
before using the receiver.
Use
• the volume control of the HDE 2020 D or
• the volume control of the EK 2020 D
to adjust the volume so that you can hear the
speaker’s voice loud and clear.
Note:
The volume control or has no end stop, i. e.
you can turn it endlessly to the left or right.
31
Tourguide2020_516509_0909_Sp6.book Seite 32 Montag, 22. März 2010 1:12 13
Using the components
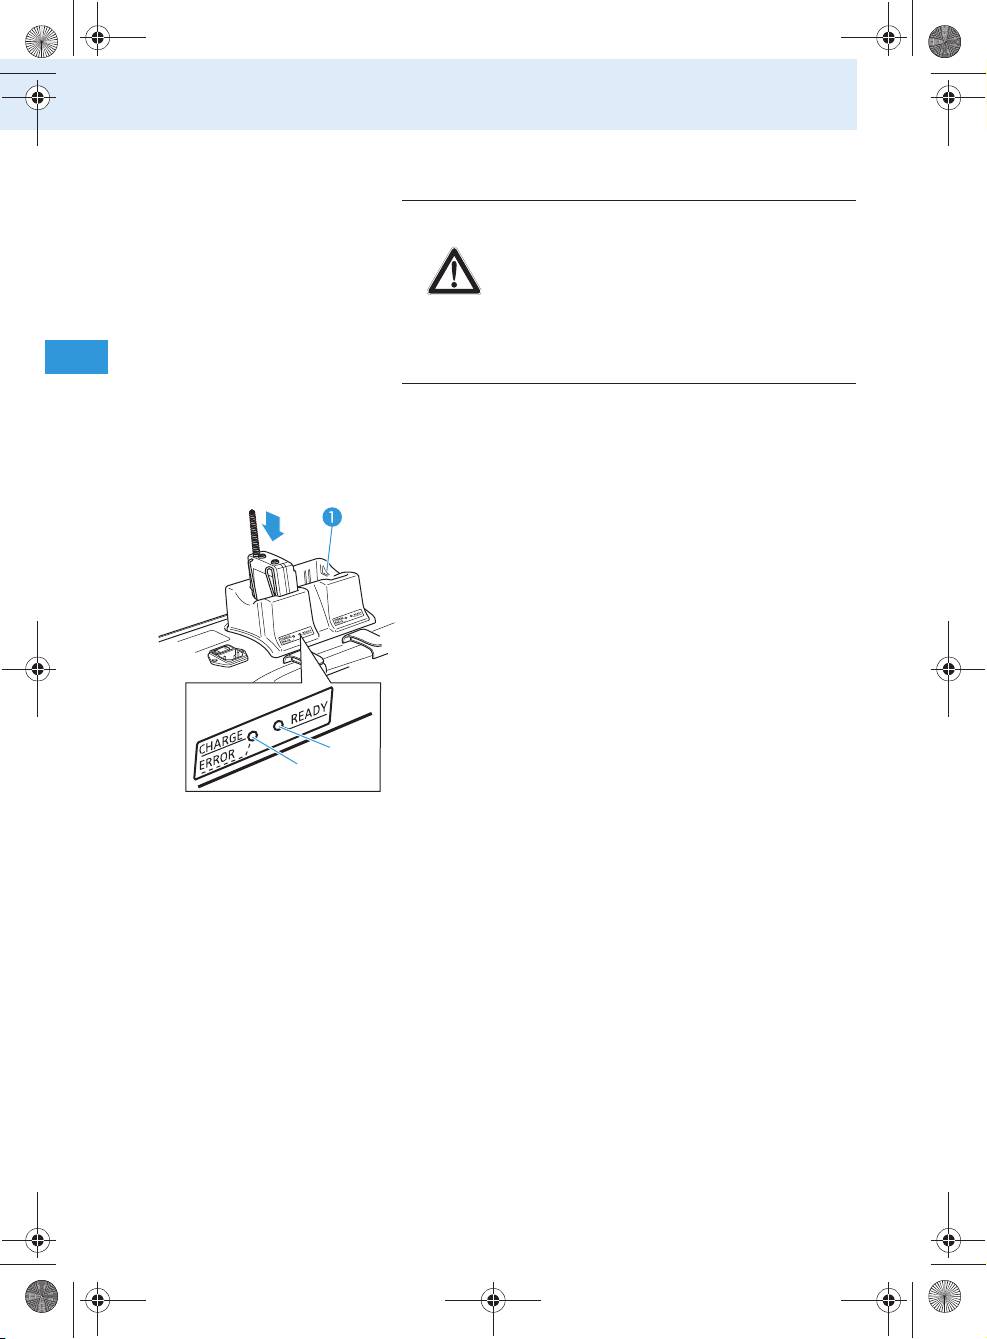
Charging the rechargeable batteries
CAUTION!
• Only use the charging case for charg-
ing the SK 2020 D bodypack transmit-
ter, the HDE 2020 D and EK 2020 D
receivers and the BA 2015 accupack.
• Never try to charge other rechargeable
batteries or non-rechargeable batter-
ies!
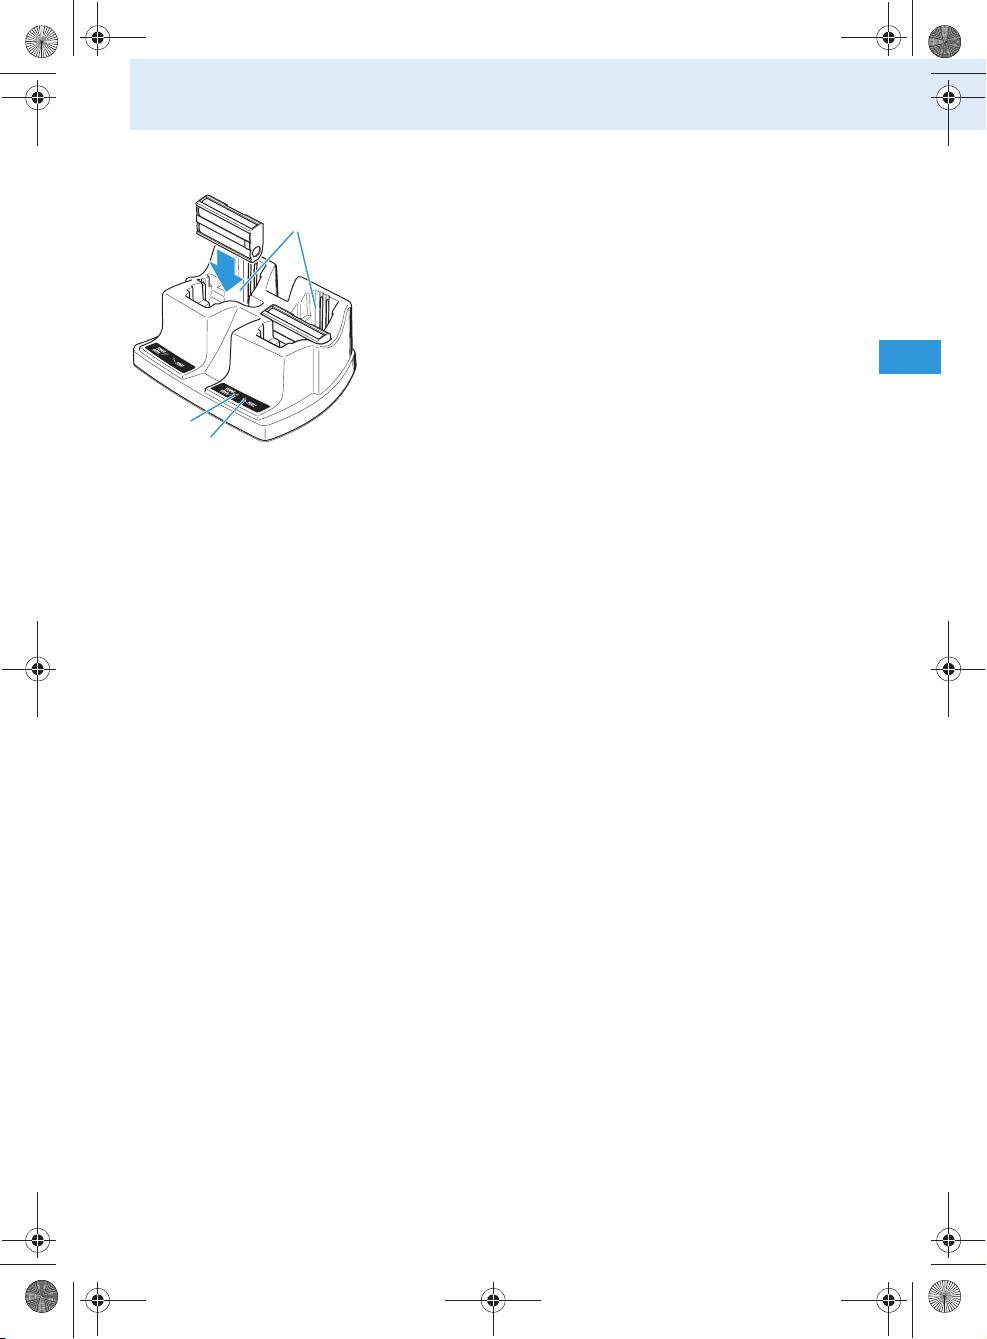
Charging the accupack in the bodypack transmitter
To charge the bodypack transmitter in the EZL 2020-
20 L charging case:
Place the transmitter with the accupack inserted
into the charging compartment for accupack/body-
pack transmitter as shown in the diagram on the
left
.
When placed into a charging compartment, the
bodypack transmitter automatically switches off.
The red LED CHARGE/ERROR of the charging
compartment lights up.
After the accupack has been fully charged, the green
LED READY lights up.
쐋
Notes:
• Charging a completely discharged accupack takes
approx. 3½ hours at room temperature.
• Alternatively, you can remove the accupack from
the bodypack transmitter and insert it into the
charging compartment for accupack/bodypack
transmitter as described in the following
section.
• The charging case has no error indication like the
one on the L 2015 charger (“red flashing LED”).
32
Tourguide2020_516509_0909_Sp6.book Seite 33 Montag, 22. März 2010 1:12 13
Using the components
Charging the BA 2015 accupack
To charge the accupack of the radio microphone or
bodypack transmitter:
Remove the accupack as described on page 26 or
page 27.
Place the accupack into the charging compartment
for accupack/bodypack transmitter as shown in
the diagram on the left.
The red LED CHARGE/ERROR of the charging
compartment lights up.
After the accupack has been fully charged, the green
쐋
LED READY lights up.
Notes:
• Charging a completely discharged accupack takes
approx. 3½ hours at room temperature. It is
normal for the accupacks to get hot during
charging.
• However, the charging process may take longer
if:
• the accupack is deep-discharged and first
has to be reconditioned by a deep discharge
recovery charge,
• the ambient temperature is close to or over
40°C, since, in order to protect the accupack,
the charging process will be interrupted until
the temperature has dropped to a safe level.
• For safety reasons, each charging process will be
interrupted after 4 hours.
• When not using the BA 2015 accupack for
extended periods of time, charge it about every
three to six months.
33
Tourguide2020_516509_0909_Sp6.book Seite 34 Montag, 22. März 2010 1:12 13
Using the components
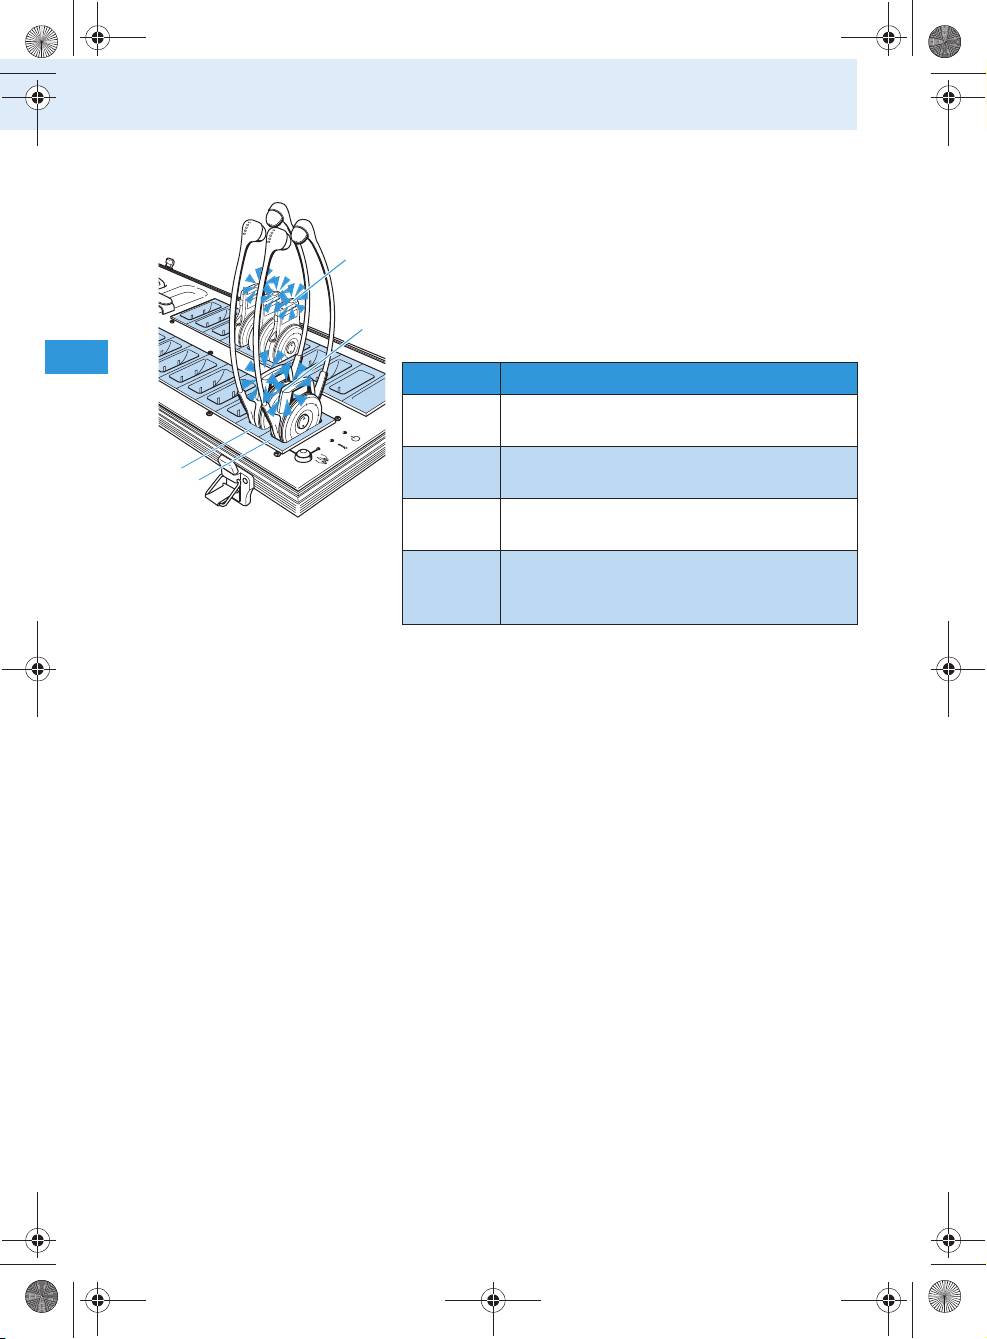
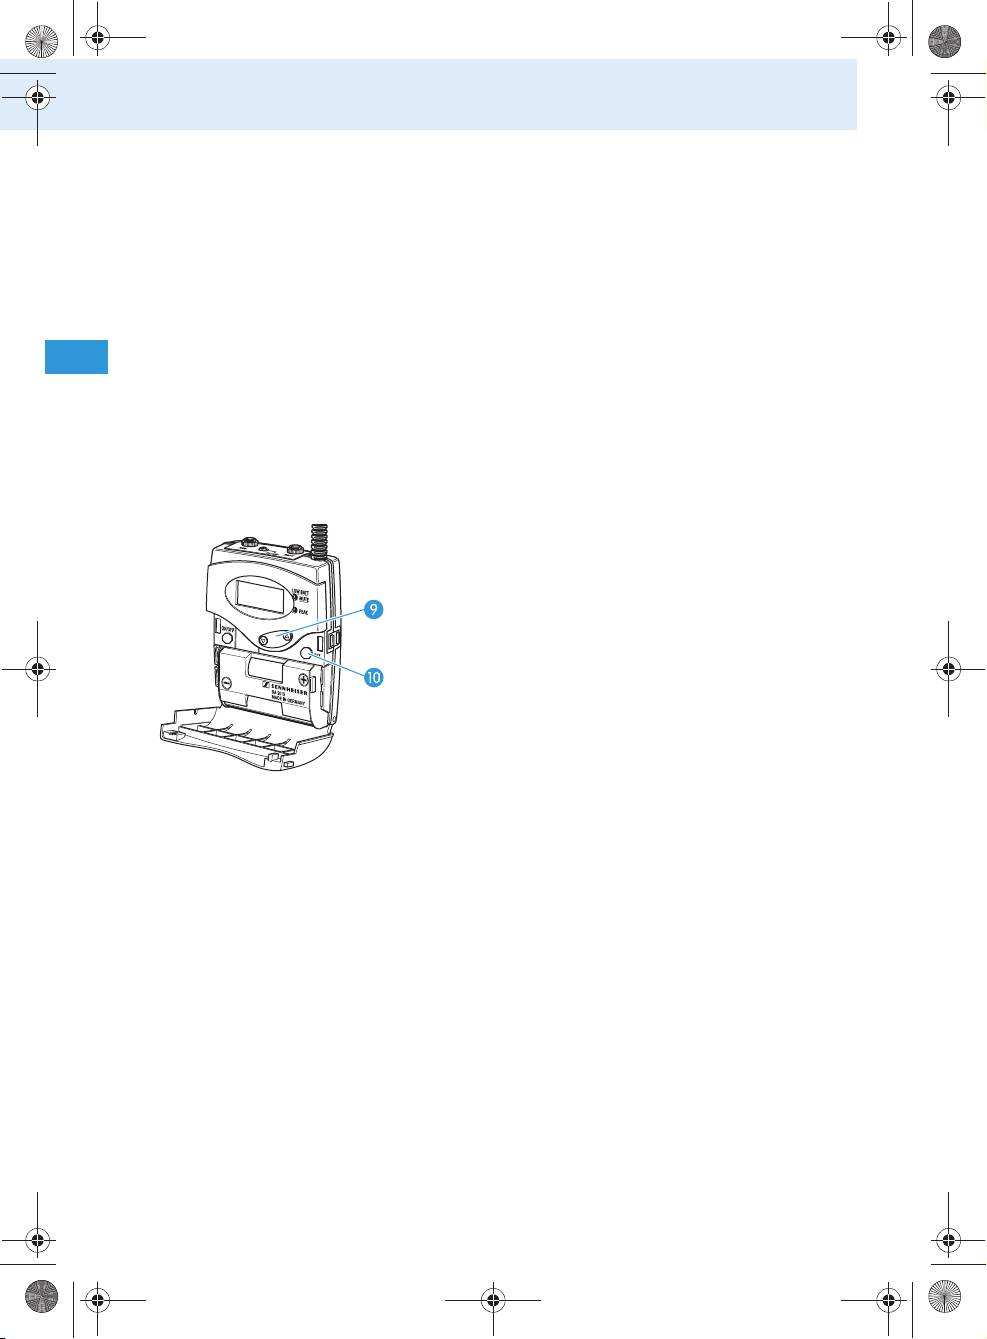
Charging the receivers’ built-in rechargeable batteries
Place the receiver into one of the charging com-
partments for receivers / (light blue in the
diagram).
•The LED of the HDE 2020 D or
•the LED of the EK 2020 D
lights up (see table).
LED colour Meaning
red The built-in rechargeable battery is
being charged.
green The built-in rechargeable battery is
fully charged.
red
The temperature of the built-in rechargeable
(flashing)
battery is over 40°C or below 3°C.
yellow/
The built-in rechargeable battery is defective.
orange
Interrupt the charging process and contact
your Sennheiser Service.
Notes:
• Charging a completely discharged rechargeable
battery of the HDE 2020 D takes approx. 2½ hours
at room temperature.
• Charging a completely discharged rechargeable
battery of the EK 2020 D takes approx. 5 hours at
room temperature.
•
However, the charging process may take longer if
:
• the rechargeable battery is deep discharged
and first has to be reconditioned by a deep
discharge recovery charge,
•
the temperature of the built-in rechargeable
battery is over 40°C or below 3°C, since, in order
to protect the rechargeable battery, the charg-
ing process will be interrupted until the tem-
perature is again within the permissible range
(the LED of the HDE 2020 D or the LED of
the EK 2020 D flashes red).
34
Tourguide2020_516509_0909_Sp6.book Seite 35 Montag, 22. März 2010 1:12 13
Using the components
• An additional temperature protection prevents
overheating inside the charging case. If the tem-
perature inside the charging case exceeds safety
limits, the charging process will be interrupted
and will only be restarted when the charging case
has cooled down.
• When not using the receivers for extended
periods of time, charge them about every six
months in order to prevent deep discharge
damage to the rechargeable batteries.
Setting a channel
To set the complete system to a certain channel,
proceed as follows:
1. Set the bodypack transmitter/radio microphone to
the desired channel (see next section).
2. Set one of the receivers to the same channel (see
“Setting the channel on the receiver” on page 37).
3. Automatically set all other receivers to the same
channel using the channel copy function (see
“Setting the receiver channel(s) using the chan-
nel copy function” on page 37).
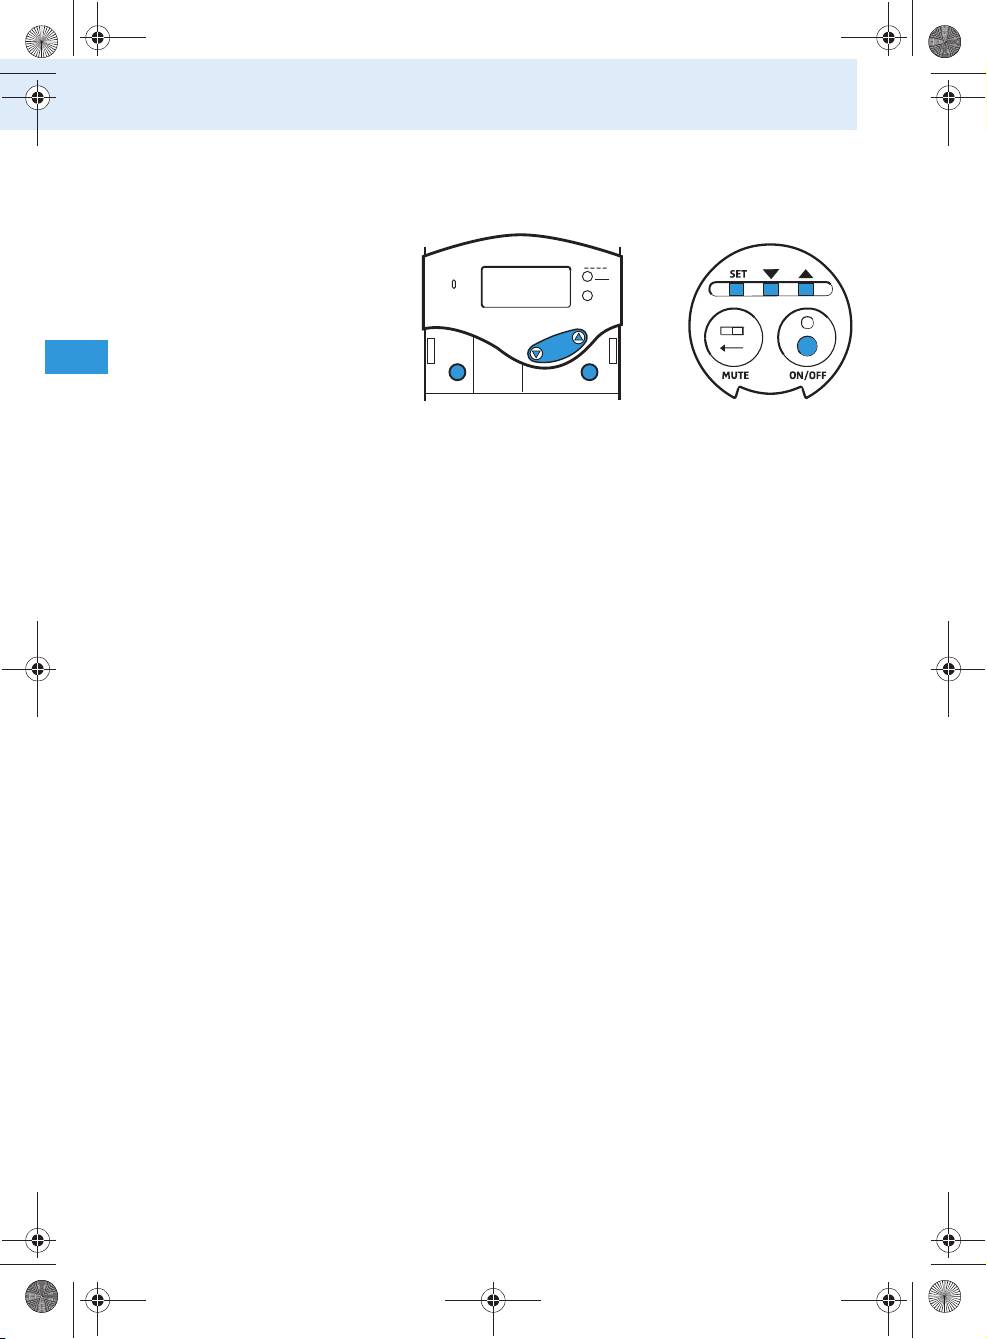
Setting the channel on the bodypack transmitter/
radio microphone
To set the bodypack transmitter or the radio micro-
phone to the desired channel, use the operating menu
of the device. An overview of the operating menus is
given from page 49 onwards.
35
Using the components
Make sure that the lock mode is deactivated
(see “Activating/deactivating the lock mode” on
page 45).
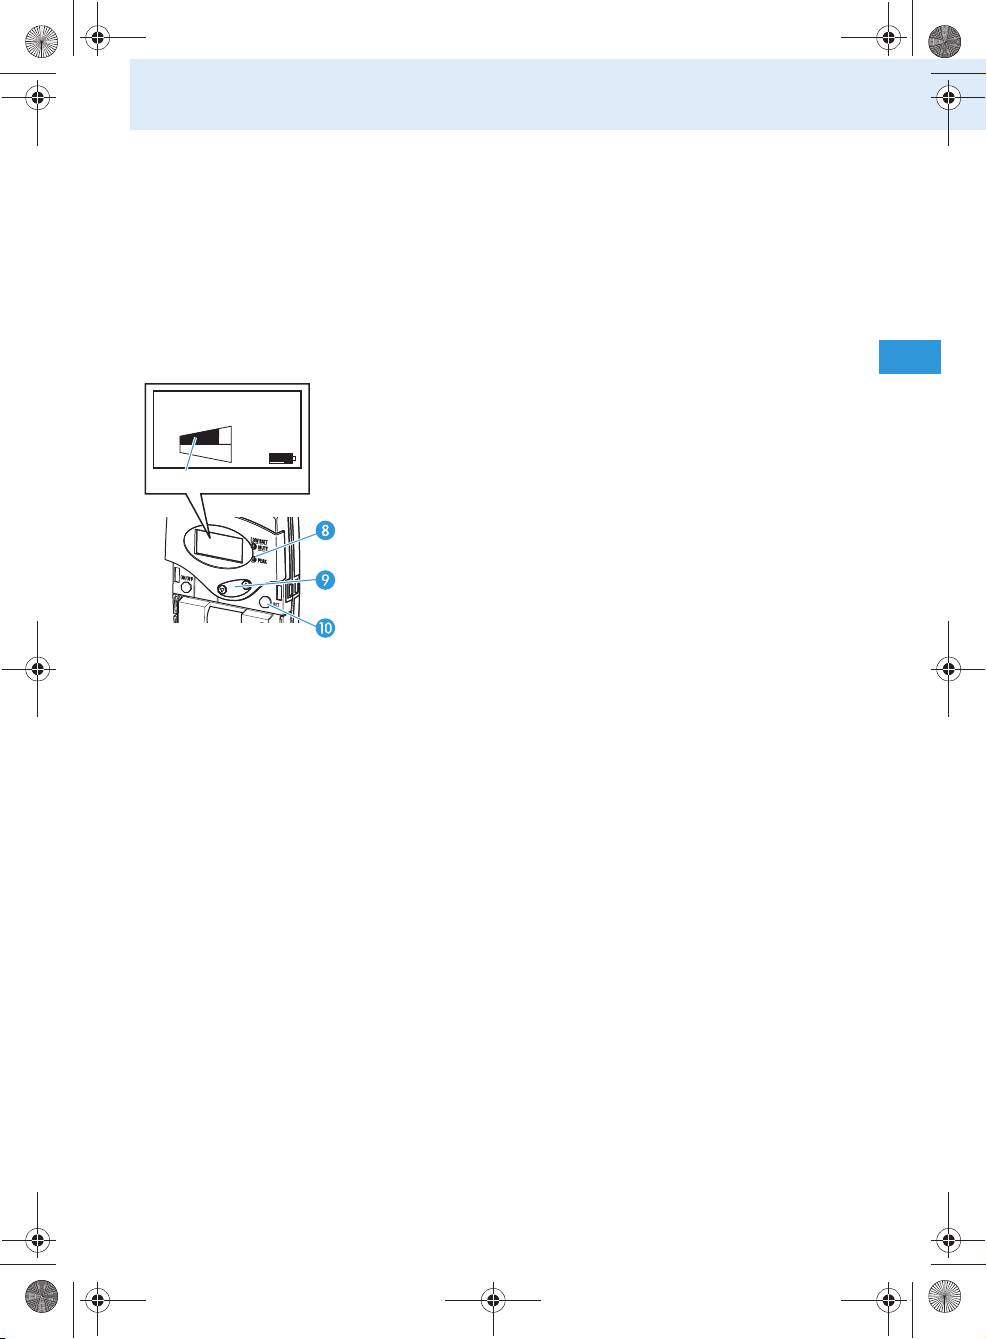
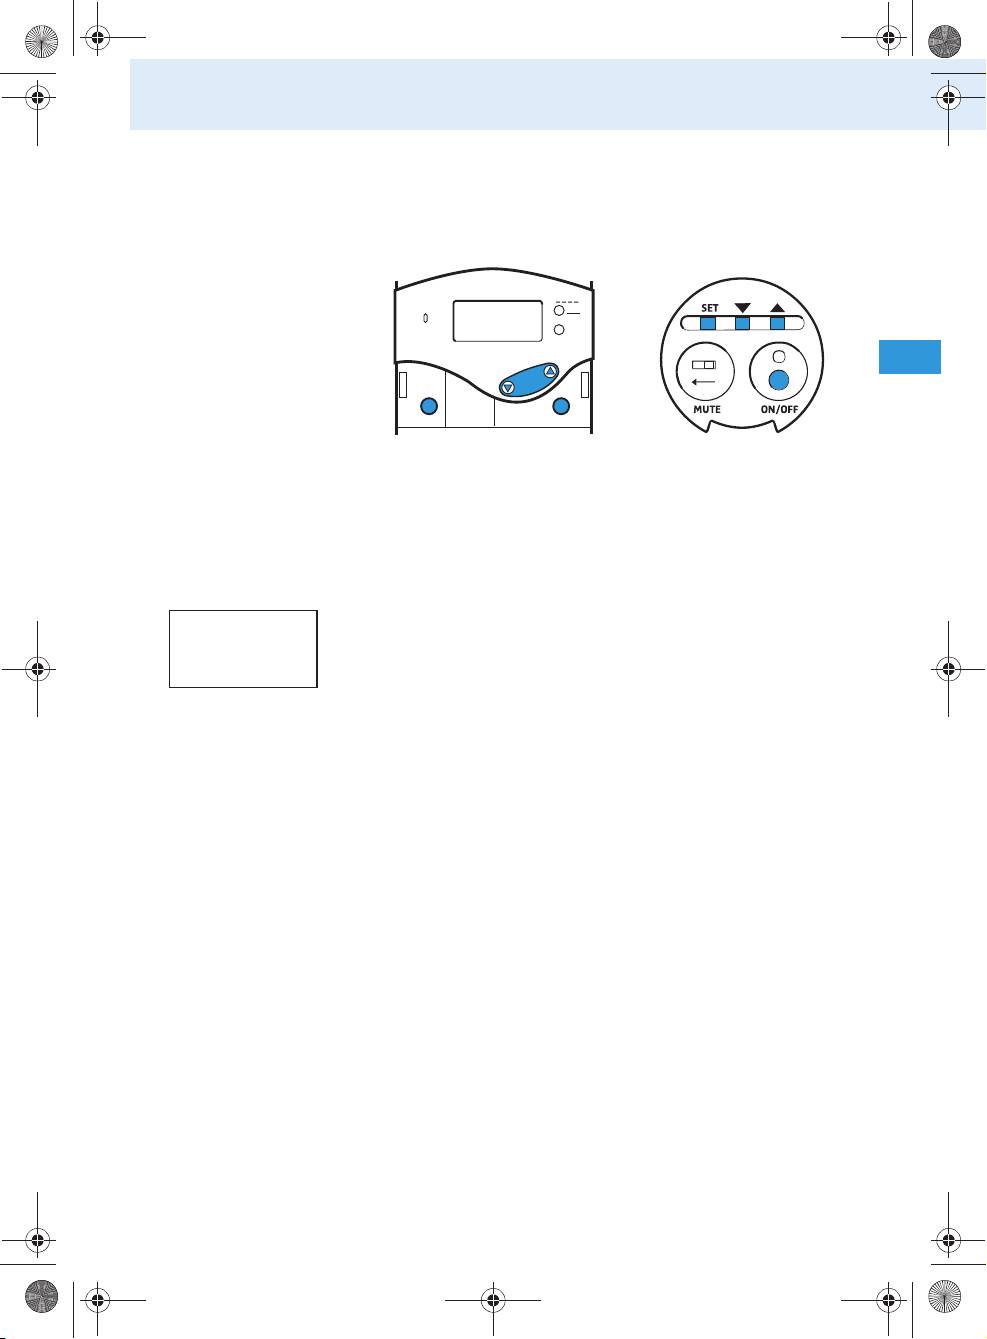
PEAK
ON/OFF
Press the SET button.
The operating menu appears and the first menu
item “CHAN” flashes on the display.
Press the SET button.
The current channel flashes on the display.
Press / to change the channel.
If you press , the display jumps to the next
channel; if you press , the display jumps to the
previous channel.
By pressing and holding the / buttons, the
display cycles continuously (repeat function).
Press the SET button to permanently store the
selected channel.
“STORED” briefly appears on the display. The body-
pack transmitter or the radio microphone now
transmits on the selected channel. The last menu
item selected is shown on the display.
To exit the operating menu:
Use / to select the “EXIT” menu item and press
the SET button.
The standard display is shown.
Or:
Press and hold the ON/OFF button until the stand-
ard display is shown.
36
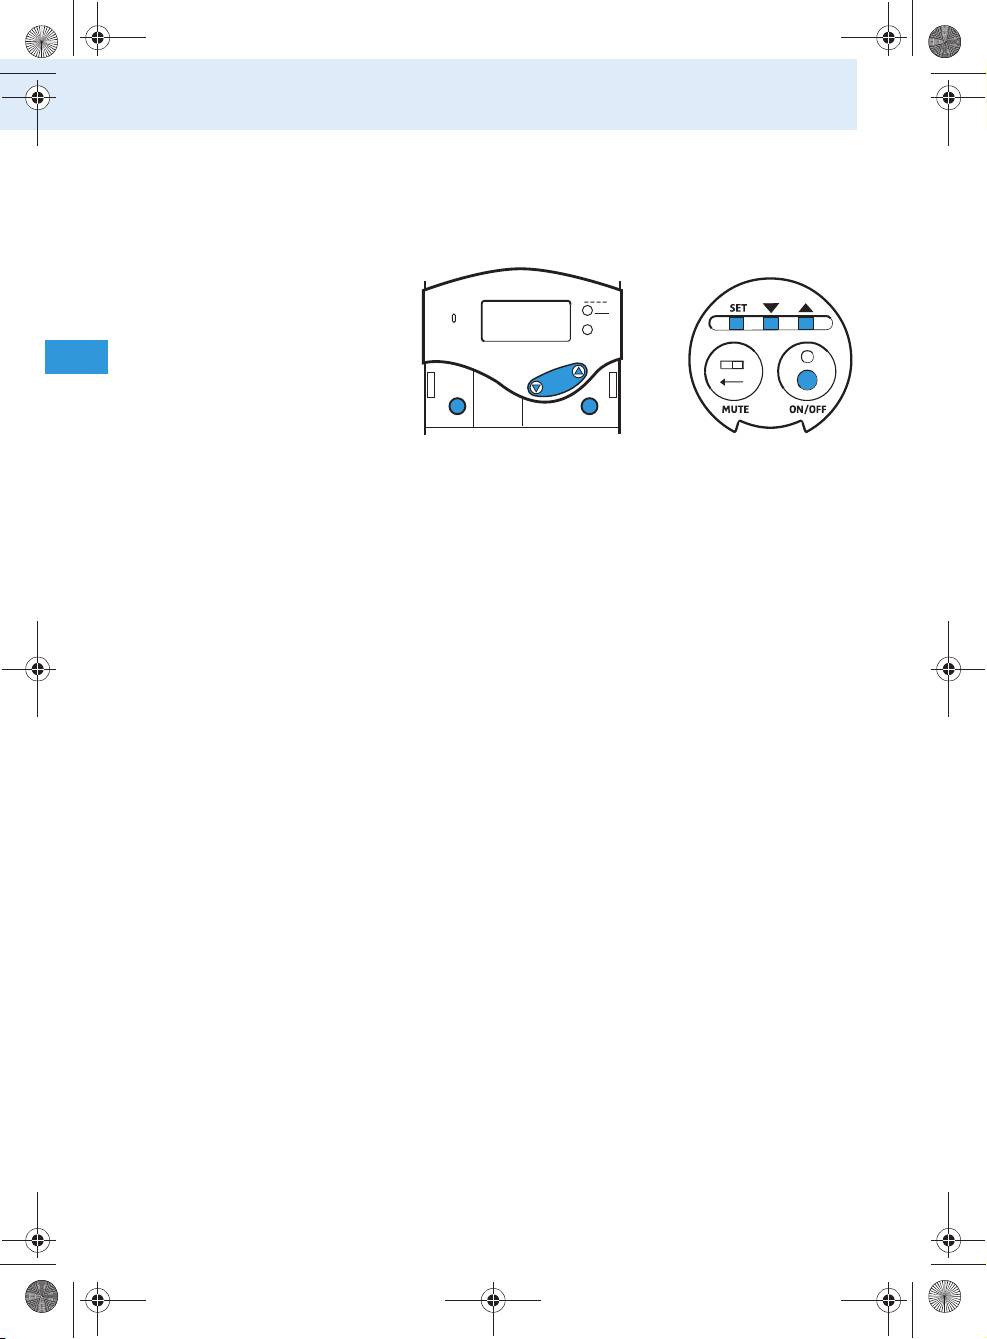
ON/OFF
SET
SET
Tourguide2020_516509_0909_Sp6.book Seite 36 Montag, 22. März 2010 1:12 13
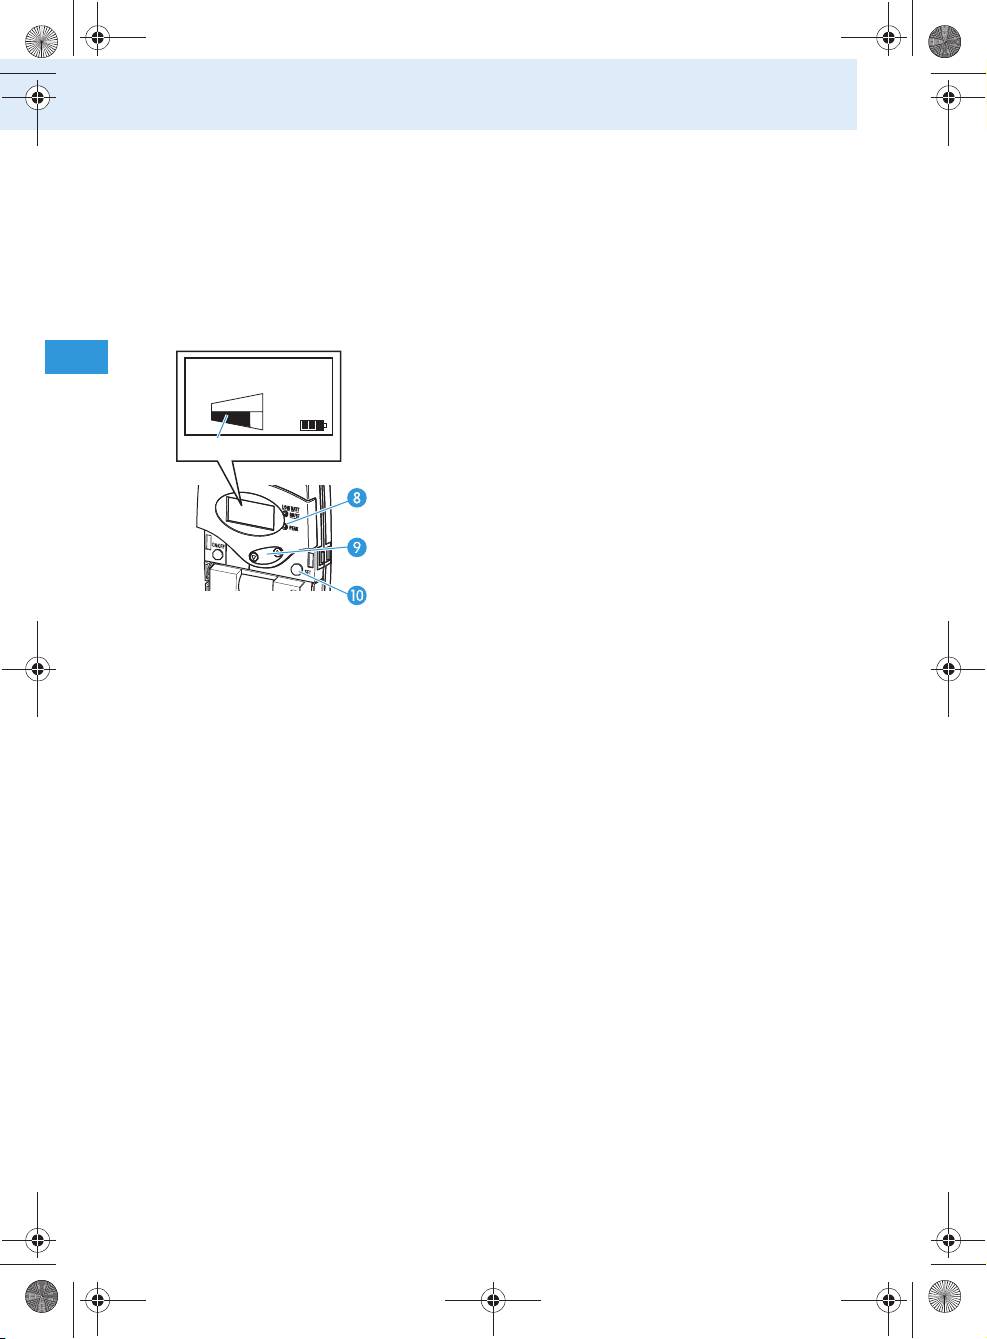
LOW B ATT
MUTE
Bodypack transmitter
Radio microphone
Tourguide2020_516509_0909_Sp6.book Seite 37 Montag, 22. März 2010 1:12 13
Using the components
Setting the channel on the receiver
In order for the receiver to receive the signal from
the bodypack transmitter or radio microphone, it has
to be set to the same channel.
To manually set the receiver channel:
Press
• the channel selection button / of the
HDE 2020 D or
• the channel selection button / of the
EK 2020 D.
The channel changes. The selected channel is
shown on the channel display .
If the bodypack transmitter or radio microphone
is transmitting on this channel, the RF signal
indication indicates the field strength of the
6
received RF signal.
Setting the receiver channel(s) using the channel
copy function
The channel copy function lets you simultaneously set
a maximum of 19 receivers in the charging case to the
same channel. This is achieved by copying the current
channel of the receiver placed into the charging com-
partment with channel copy function (master) to
all other receivers in the charging case.
Place all receivers which are to be set to the same
channel into the charging compartments for
receivers (slaves, light blue in the diagram) .
Switch on the receiver whose channel you want to
copy.
Place this receiver into the charging compartment
with channel copy function (master) .
The LED COPY AVAILABLE lights up green as long
as the channel copy function is available.
Press the COPY button to start the channel copy
function.
The displays of all receivers which are successfully
set to the same channel light up.
37
Tourguide2020_516509_0909_Sp6.book Seite 38 Montag, 22. März 2010 1:12 13
Using the components
Notes:
• If the receivers’ built-in rechargeable batteries
are not discharged, you can use the channel copy
function even when the charging case is not
connected to the mains.
• If you do not press the COPY button , the
receiver placed into the charging compartment
with channel copy function (master) will auto-
matically switch off after approx. 2 minutes.
Using several Tourguide systems simultaneously
If you are using the Tourguide System 2020 D to run
several guided tours simultaneously, the systems
could interfere with one another. To prevent this
happening, you have to set the systems to different
channels (a system consits of one bodypack trans-
mitter or one radio microphone and any number of
receivers).
38
Tourguide2020_516509_0909_Sp6.book Seite 39 Montag, 22. März 2010 1:12 13
Using the components
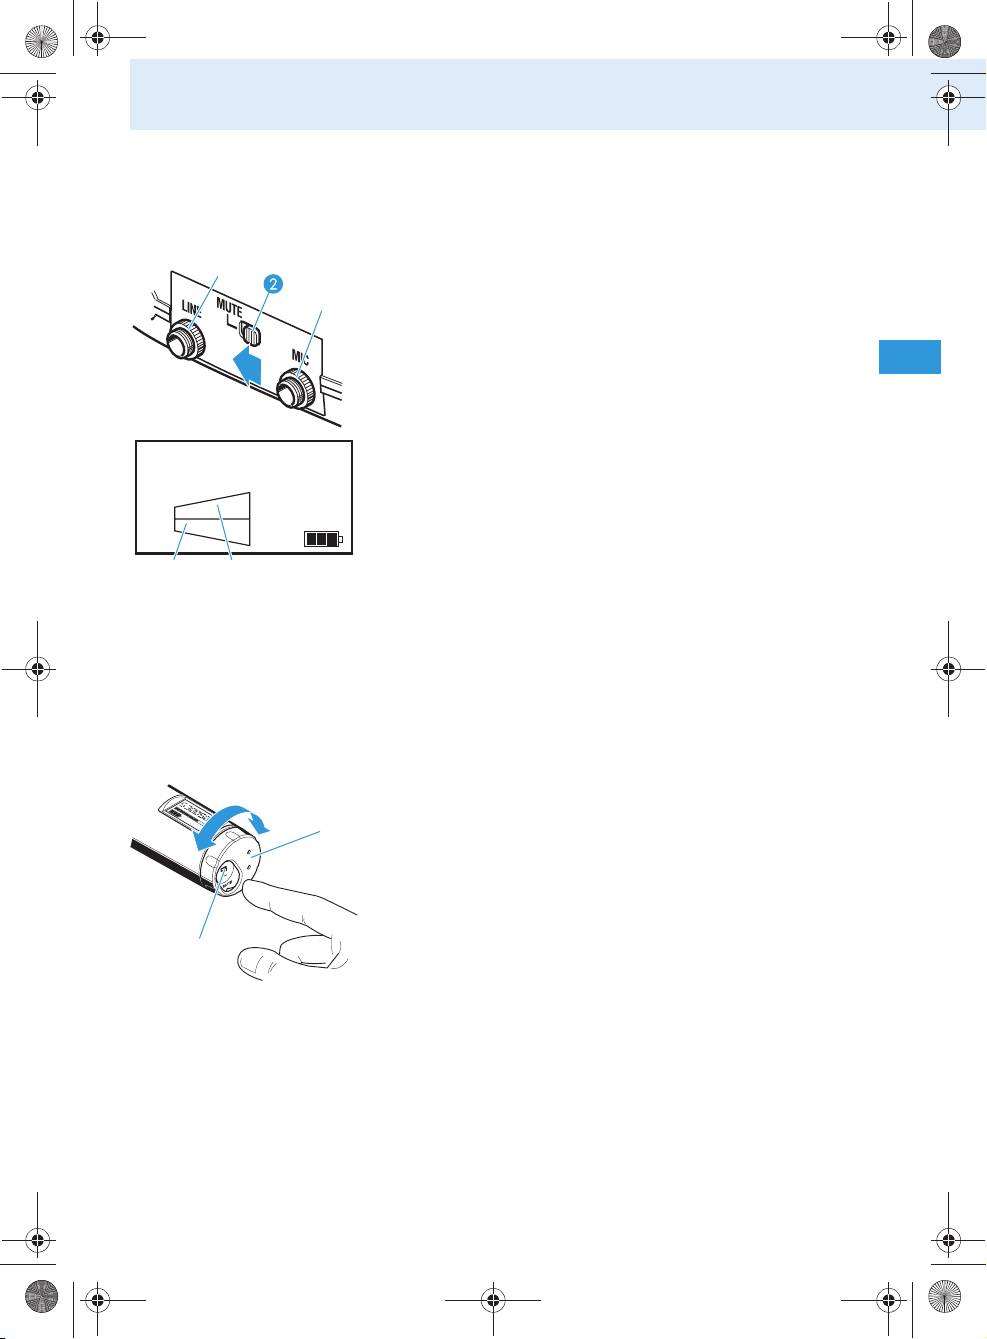
Muting the devices
Muting the bodypack transmitter
Slide the MUTE switch to the left, to “MUTE“.
The red LED LOW BATT/MUTE lights up perma-
쐋
nently. The MIC level display no longer shows
any deflection. The bodypack transmitter’s micro-
phone input is muted.
Note:
The muting function (MUTE) mutes the microphone
input but not the line input . This function
CH 03
enables a pre-recorded track to be played through
LINE
the line input without being disturbed by the tour
guide’s microphone. When the track has finished,
MIC
the guide can un-mute the microphone and con-
tinue talking.
To deactivate the muting function:
Slide the MUTE switch back to the right.
The red LED LOW BATT/MUTE goes off. The MIC
level display and the LINE level display indi-
cate the current levels.
Muting the radio microphone
Turn the protective cap so that the MUTE
switch becomes accessible.
Slide the MUTE switch in the direction of the
arrow.
“MUTE” appears on the display of the radio micro-
phone. After 5 minutes, “CH OFF” appears on the
display (see “Display of the energy saving mode”
on page 16).
To deactivate the muting function:
Slide the MUTE switch back in order to transmit
the audio signal again.
39
Tourguide2020_516509_0909_Sp6.book Seite 40 Montag, 22. März 2010 1:12 13
Using the components
Special bodypack transmitter/radio
microphone settings
The following special settings can only be made via
the bodypack transmitter’s/radio microphone’s oper-
ating menu. An overview of this operating menu is
given from page 49 onwards.
Switching the bodypack transmitter’s line
input on/off
You can connect an audio source such as a CD player,
MP3 player, etc. to the bodypack transmitter’s line
input. If you have connected an audio source, you then
have to switch on the line input as follows:
Press the SET button .
The operating menu appears and the first menu
item “CHAN” flashes on the display.
Repeatedly press the / rocker button in the
direction until “LINE” flashes on the display.
Press the SET button .
If the line input is switched off, “LINE.OFF” flashes
on the display; if the line input is switched on,
“LINE.ON” flashes on the display.
Press the / rocker button to change the
setting.
Press the SET button to permanently store the
setting.
“STORED” briefly appears on the display.
Adjust the sensitivity of the line input to match the
connected audio source as described in the follow-
ing section.
40
Tourguide2020_516509_0909_Sp6.book Seite 41 Montag, 22. März 2010 1:12 13
Using the components
Changing the sensitivity of the bodypack
transmitter’s line input
To adjust the sensitivity of the line input to match the
connected audio source:
Make sure that the line input is switched on (see
previous section).
Connect the external audio source, switch it on and
start playback.
Press the SET button .
CH 03
The operating menu appears and the first menu
LINE
item “CHAN” flashes on the display.
MIC
Repeatedly press the / rocker button until
“SENSIT” flashes on the display and the LINE level
display appears.
Press the SET button .
The current input sensitivity and the LINE level
display appear on the display.
Press the / rocker button to change the
input sensitivity so that the LINE level display
shows full deflection during the loudest passages,
but the yellow LED PEAK does not light up per-
manently.
Press the SET button to permanently store the
setting.
“STORED” briefly appears on the display, indicating
that the sensitivity of the line input has been
stored.
41
Tourguide2020_516509_0909_Sp6.book Seite 42 Montag, 22. März 2010 1:12 13
Using the components
Changing the sensitivity of the bodypack
transmitter’s microphone input
To adjust the sensitivity of the microphone input to
match the connected microphone:
Connect the microphone, position it correctly (refer
to the microphone’s instruction manual) and speak
into the microphone as usual.
Press the SET button .
CH 03
The operating menu appears and the first menu
LINE
item “CHAN” flashes on the display.
MIC
Repeatedly press the / rocker button until
“SENSIT” flashes on the display and the MIC level
display appears.
Press the SET button .
The current input sensitivity and the MIC level
display appear on the display.
Press the / rocker button to change the
input sensitivity so that the MIC level display
shows full deflection during the loudest passages,
but the yellow LED PEAK does not light up
permanently.
Press the SET button to permanently store the
setting.
“STORED” briefly appears on the display, indicating
that the sensitivity of the microphone input has
been stored.
42

Tourguide2020_516509_0909_Sp6.book Seite 43 Montag, 22. März 2010 1:12 13
Using the components
Adjusting the radio microphone’s input sensitivity
The input sensitivity is adjusted too high when close
talking distances or speakers with loud voices cause
overmodulation in the transmission link. When the
audio input level is excessively high, the audio level
display (AF) shows full deflection.
If, on the other had, the input sensitivity is adjusted
too low, the transmission link will be undermodulated,
which would result in a signal with high background
noise.
The input sensitivity is correctly adjusted when the
audio level display (AF) only shows full deflection only
during the loudest passages.
To adjust the sensitivity of the radio microphone:
Press the SET button .
-36. dB
The operating menu appears and the first menu
item “CHAN” flashes on the display.
Repeatedly press the / buttons / until
“SENSIT” flashes on the display and the audio level
display appears.
Press the SET button .
The current input sensitivity and the audio level
display appear on the display.
Press the / buttons / to change the setting
so that the audio level shows full deflection only
during the loudest passages.
Press the SET button to permanently store the
setting.
“STORED” briefly appears on the display. indicating
that the input sensitivity of the radio microphone
has been stored.
The following figures are a guide to the best settings:
• Presentation: –24 to –12 dB
• Interview: –12 to 0 dB
43
Using the components
Displaying the transmission frequency of the
bodypack transmitter/radio microphone
To display the transmission frequency assigned to the
current channel:
PEAK
ON/OFF
Press the SET button.
The operating menu appears and the first menu
item “CHAN” flashes on the display.
Repeatedly press / until “FREQ” flashes on the
display.
Press the SET button.
The transmission frequency assigned to the current
channel appears on the display. You cannot change
this transmission frequency.
Press the ON/OFF button or the SET button to
return to the operating menu.
44
ON/OFF
SET
SET
Tourguide2020_516509_0909_Sp6.book Seite 44 Montag, 22. März 2010 1:12 13
LOW B ATT
MUTE
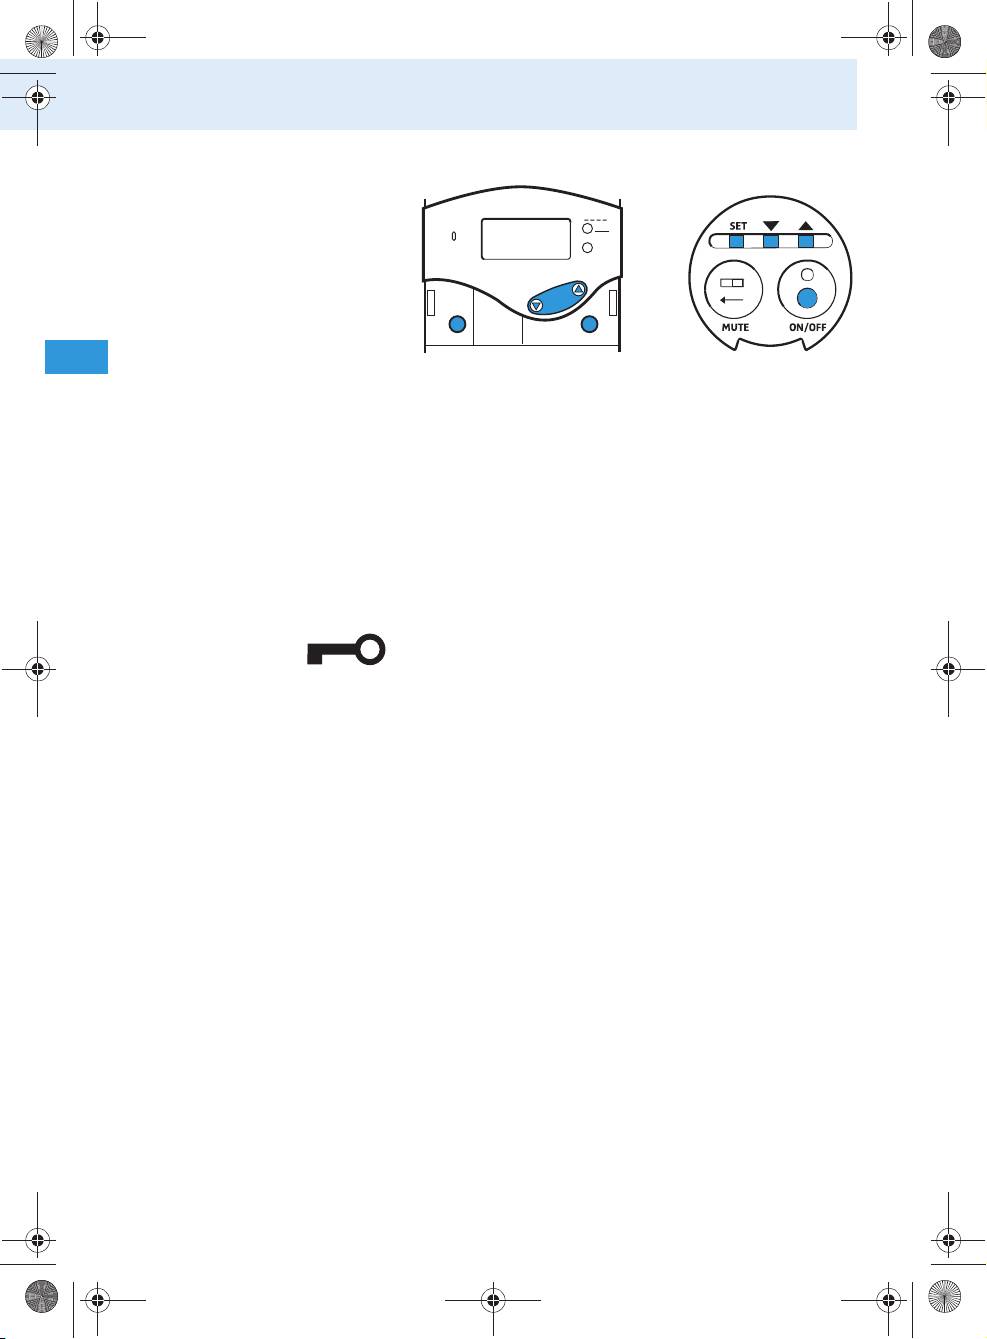
Bodypack transmitter
Radio microphone

Using the components
Loading the factory-preset default settings
To load the factory-preset default settings of the
bodypack transmitter/radio microphone:
PEAK
ON/OFF
Press the SET button.
The operating menu appears and the first menu
item “CHAN” flashes on the display.
Repeatedly press / until “RESET” flashes on the
display.
Press the SET button.
“RST.OK” flashes on the display.
Press the SET button to load the factory-preset
default settings.
“DONE” briefly appears on the display. The body-
pack transmitter/radio microphone is reset to the
following factory-preset default settings:
•Channel: 1
• Line input: switched off
(bodypack transmitter only)
• Input sensitivity:
– Line input: –24 dB
(bodypack transmitter only)
– Microphone input: –12 dB
• Lock mode: deactivated
• Infra-red service interface: deactivated
Activating/deactivating the lock mode
The lock mode prevents the bodypack transmitter/
radio microphone from being accidentally pro-
grammed or switched off during operation.
45
ON/OFF
SET
SET
Tourguide2020_516509_0909_Sp6.book Seite 45 Montag, 22. März 2010 1:12 13
LOW B ATT
MUTE
Bodypack transmitter
Radio microphone
Using the components
To activate the lock mode:
PEAK
ON/OFF
Press the SET button.
The operating menu appears. The first menu item
“CHAN” flashes.
Repeatedly press / until “LOCK” appears on the
display.
Press the SET button.
“LOC.OFF” flashes on the display.
Press /.
“LOC.ON” flashes on the display.
Press the SET button to activate the lock mode.
“STORED” briefly appears on the display, indicating
that the lock mode has been activated. The lock
mode icon is displayed on the standard display.
To deactivate the lock mode:
Press the SET button.
“LOC.ON” flashes on the display.
Press /.
“LOC.OFF” flashes on the display.
Press the SET button to deactivate the lock mode.
“STORED” briefly appears on the display, indicating
that the lock mode has been deactivated. The lock
mode icon is no longer displayed on the stan-
dard display.
46
ON/OFF
SET
SET
Tourguide2020_516509_0909_Sp6.book Seite 46 Montag, 22. März 2010 1:12 13
LOW B ATT
MUTE
Bodypack transmitter
Radio microphone
Using the components
Displaying the version number of the bodypack
transmitter/radio microphone
To display the version number of the operating
system installed:
PEAK
ON/OFF
Press the SET button.
The operating menu appears and the first menu
item “CHAN” flashes on the display.
Repeatedly press / until “SERVIC” flashes on
the display.
Press the SET button.
The version number is displayed.
47
ON/OFF
SET
SET
Tourguide2020_516509_0909_Sp6.book Seite 47 Montag, 22. März 2010 1:12 13
LOW B ATT
MUTE
Bodypack transmitter
Radio microphone
V 1.001
Tourguide2020_516509_0909_Sp6.book Seite 48 Montag, 22. März 2010 1:12 13
Using the components
The operating menu of the bodypack
transmitter/radio microphone
The bodypack transmitter’s/radio microphone’s oper-
ating menu contains the following menu items:
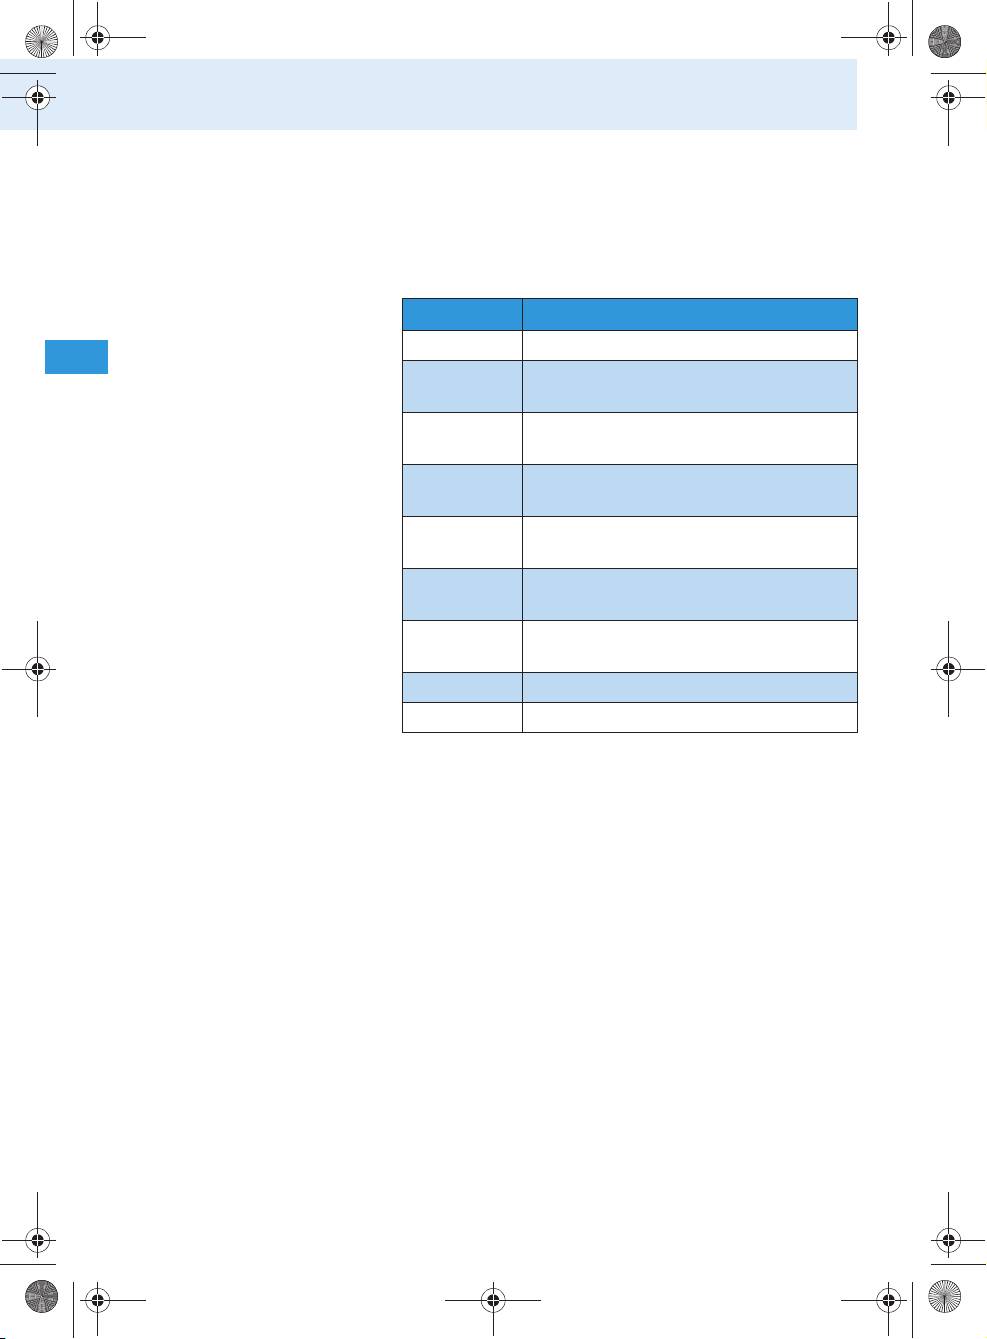
Menu item Meaning
CHAN Selects a channel (see page 35)
Switches the line input on/off
LINE*
(see page 40)
Changes the sensitivity of the line input
SENSIT (LINE)*
(see page 41)
Changes the sensitivity of the microphone
SENSIT (MIC)
input (see page 42)
Displays the frequency of the current
FREQ
channel (see page 44)
Loads the factory-preset default settings
RESET
(see page 45)
Activates/deactivates the lock mode
LOCK
(see page 45)
SERVIC Displays the version number (see page 47)
EXIT Exits the operating menu
*) only available with bodypack transmitter
48
Using the components
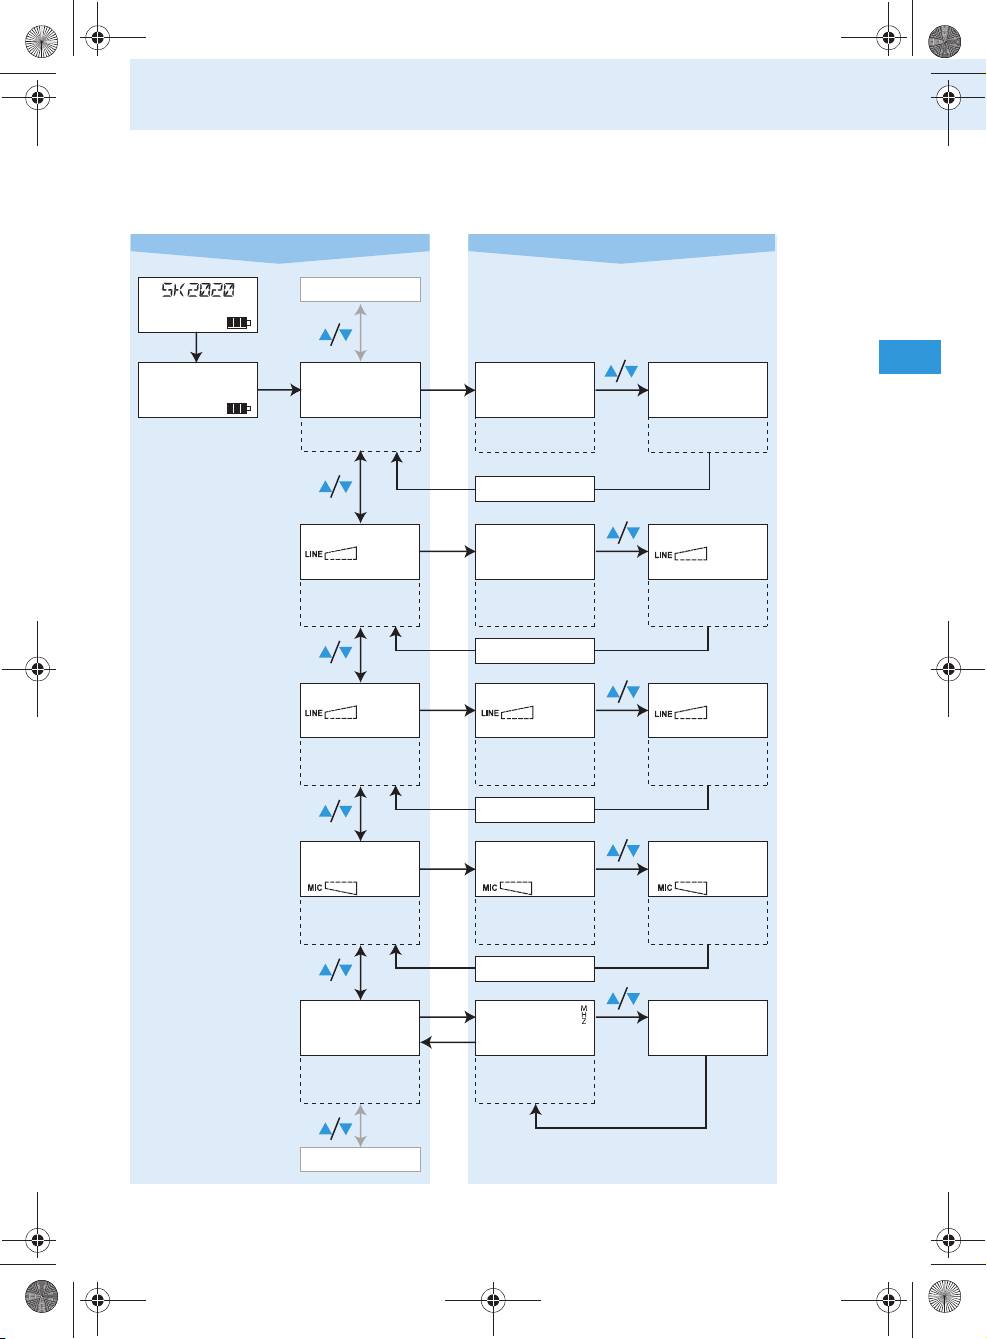
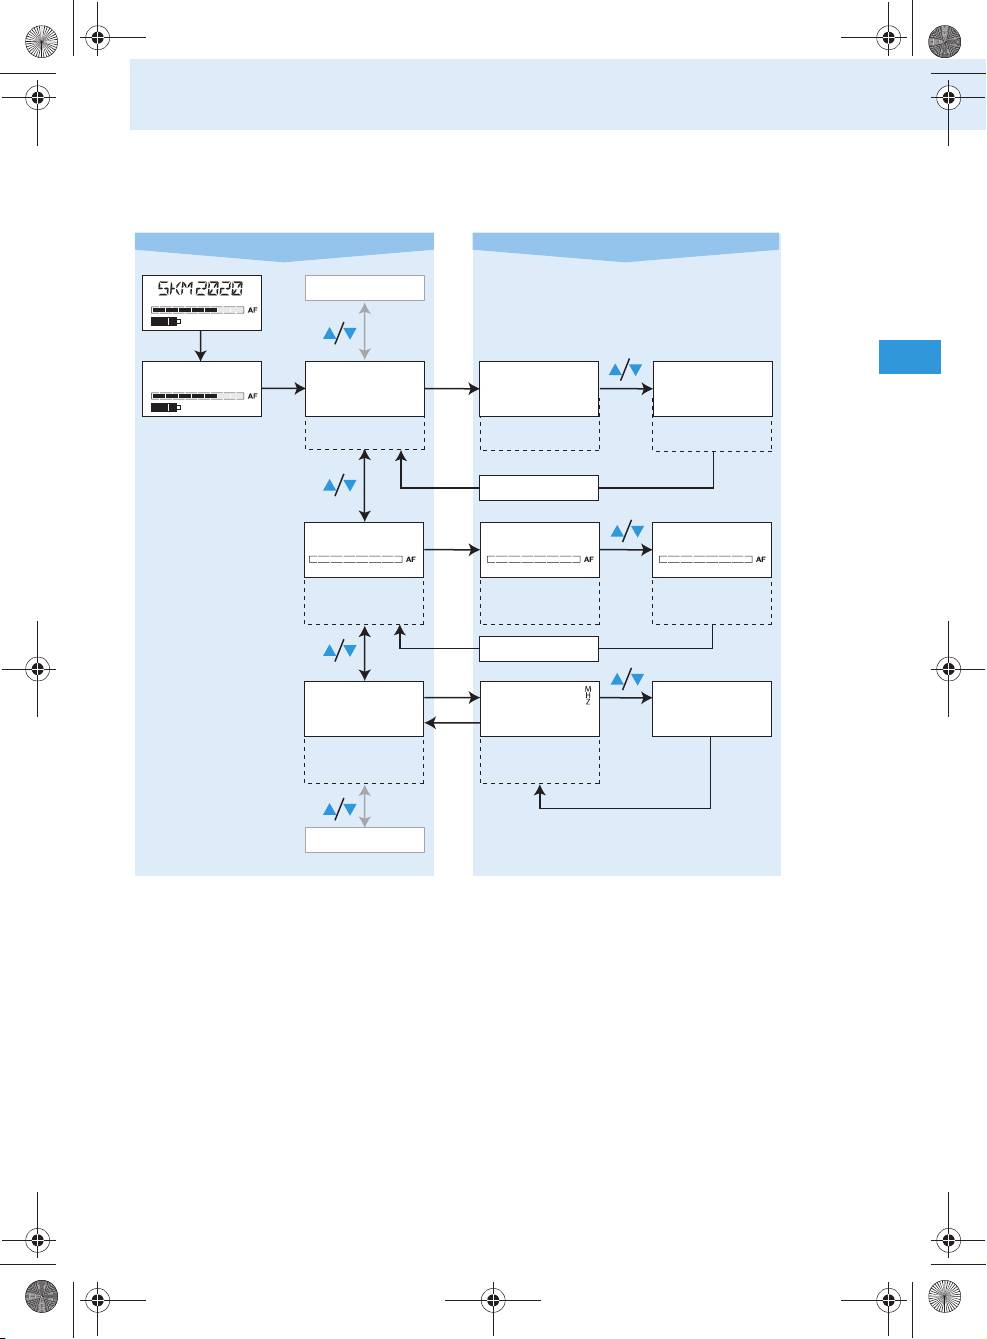
Overview of the bodypack transmitter’s operating menu
Use the ON/OFF button to cancel your entry in all areas of the operating menu.
Setting modeSelection mode
CHAN CH 01 CH 04
Selecting the
Current channel
channel
RESET
49
/
3 sec.
CH 01
SET
SET
:
01...06
Stores settings
SET
STORED
/
LINE LIN. OFF LIN. ON
SET
Switching the
Current setting
:
OFF, ON
line input on/off
Stores settings
SET
STORED
/
SENSIT -24. dB -06. dB
SET
Adjusting the
Current
:
0...-24
sensitivity of
sensitivity
Stores settings
the line input
setting
SET
STORED
/
Tourguide2020_516509_0909_Sp6.book Seite 49 Montag, 22. März 2010 1:12 13
EXIT
SENSIT -36. dB -06. dB
SET
Adjusting the
Current
:
0...-36
sensitivity of the
sensitivity
Stores settings
microphone input
setting
SET
STORED
SET
FREQ 863.124
LOCKED
ON/OFF
Displaying the
Current
transmission
SET
transmission
frequency
ESC
frequency
Tourguide2020_516509_0909_Sp6.book Seite 50 Montag, 22. März 2010 1:12 13
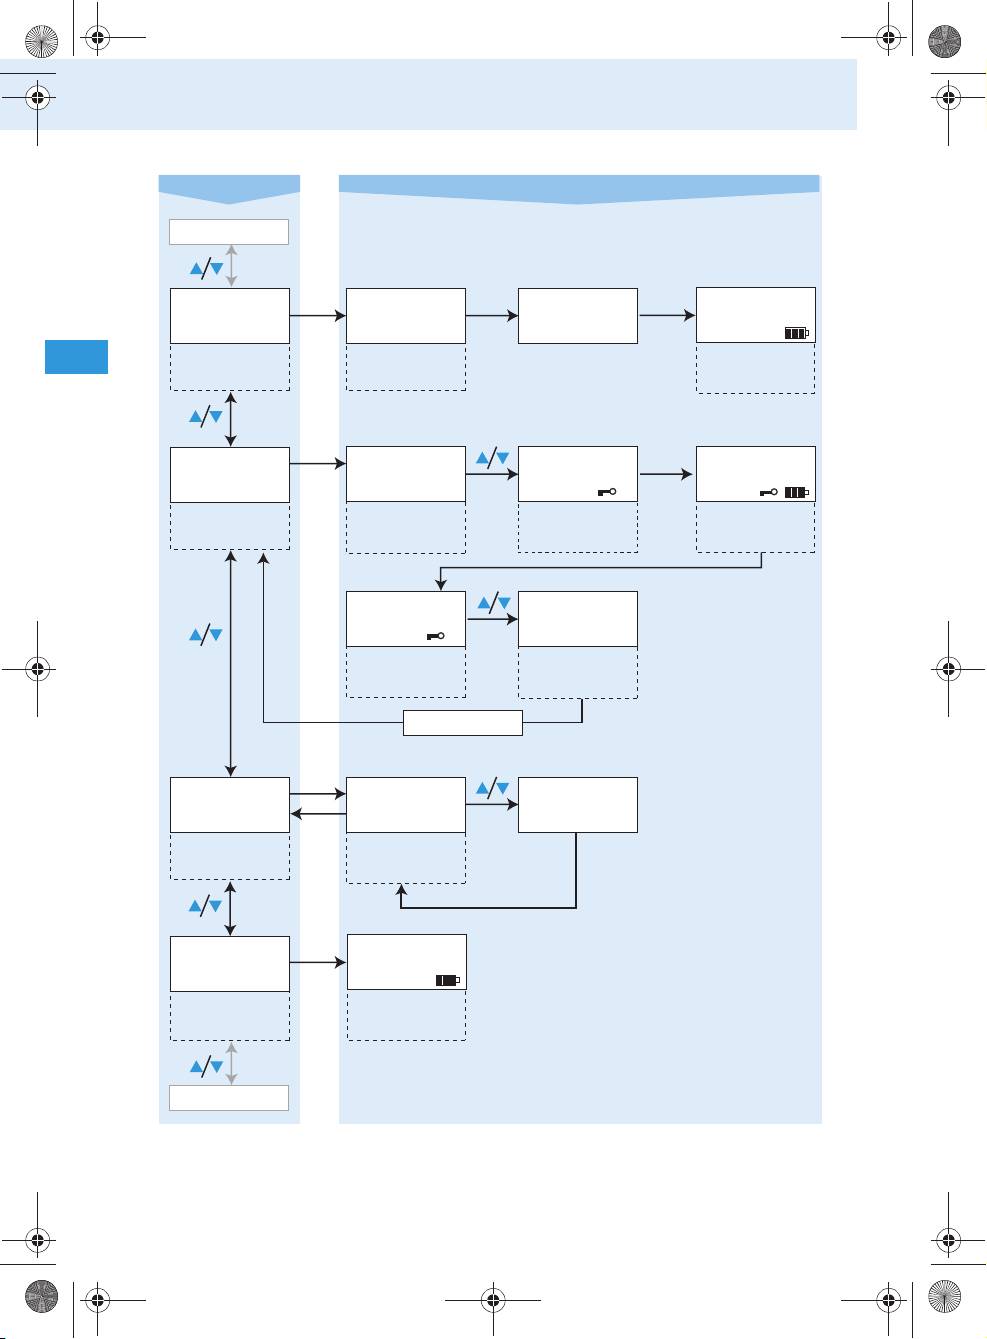
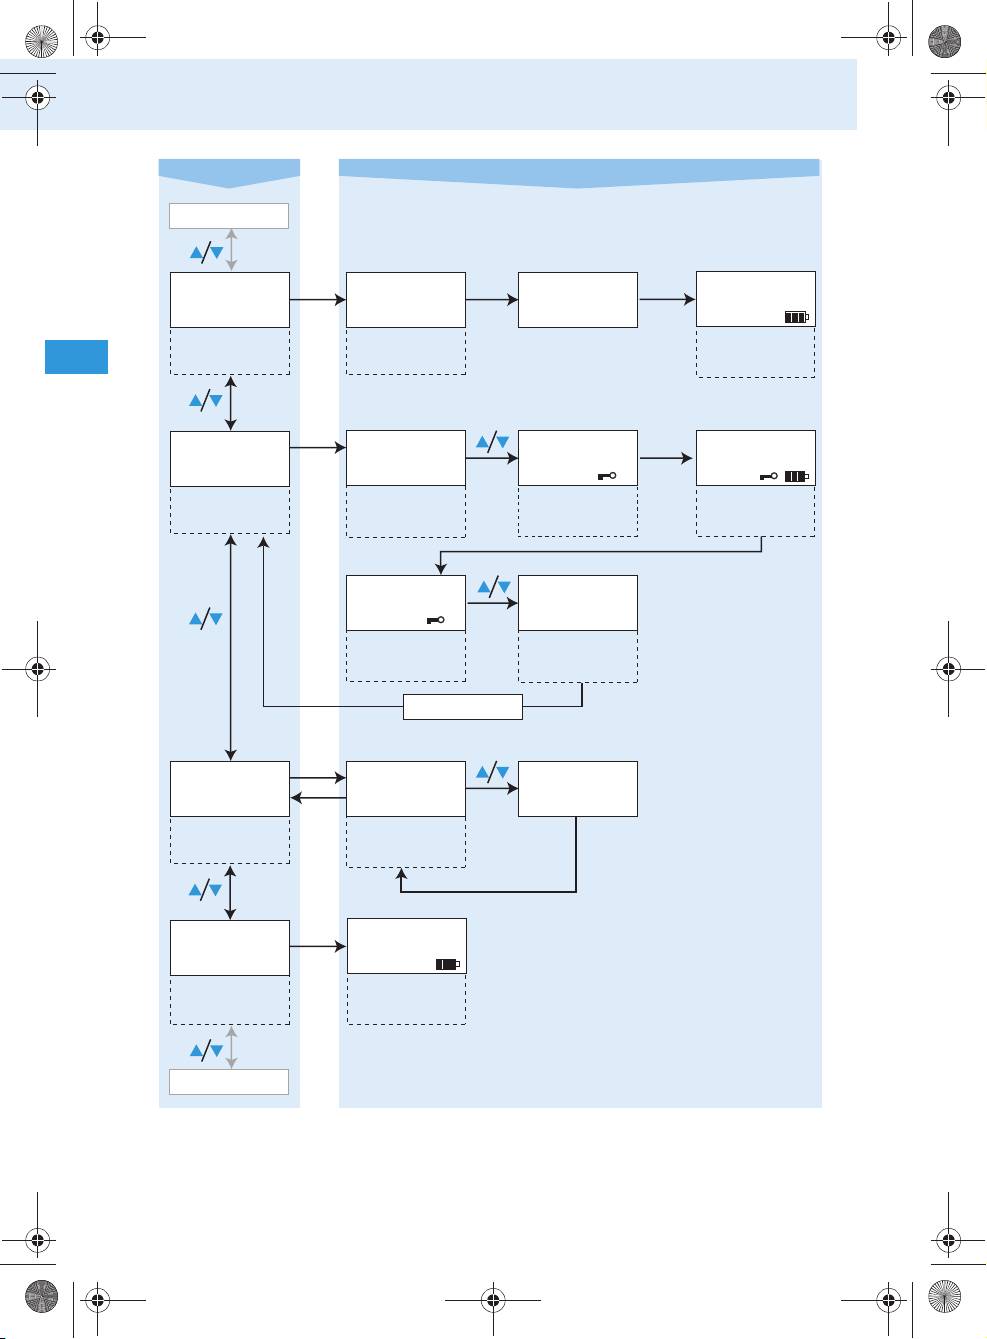
Using the components
Selection mode Setting mode
FREQ
RESET RST.OK DONE
SET
SET
CH 01
Loading the
Confirmation
Standard display
factory-preset
prompt
appears
default settings
SET
LOCK
LOC.OFF LOC.ON
SET
CH 01
Activating/
Current setting
Activating the
Standard display
deactivating
lock mode
appears
the lock mode
LOC.ON
LOC.OFF
Current setting
Deactivating the
lock mode
SET
STORED
SET
SERVIC
V 1.001 LOCKED
SET
Displaying the
Current version
ESC
version number
number
EXIT
SET
CH 01
Exiting the
Standard display
operating menu
appears
CHAN
50
Using the components
Overview of the radio microphone’s operating menu
Use the ON/OFF button to cancel your entry in all areas of the operating menu.
Selection mode Setting mode
CHAN CH 01 CH 04
Selecting the
Current channel
channel
51
/
EXIT
3 sec.
CH 01
SET
SET
:
01...06
Stores settings
SET
STORED
RESET
/
Tourguide2020_516509_0909_Sp6.book Seite 51 Montag, 22. März 2010 1:12 13
SENSIT -36. dB -06. dB
SET
Adjusting the
Current
:
0...-36
sensitivity of the
sensitivity
Stores settings
microphone input
setting
SET
STORED
SET
FREQ 863.124
LOCKED
ON/OFF
Displaying the
Current
SET
transmission
transmission
frequency
ESC
frequency
Tourguide2020_516509_0909_Sp6.book Seite 52 Montag, 22. März 2010 1:12 13
Using the components
Selection mode Setting mode
FREQ
RESET RST.OK DONE
SET
SET
CH 01
Loading the
Confirmation
Standard display
factory-preset
prompt
appears
default settings
SET
LOCK
LOC.OFF LOC.ON
SET
CH 01
Activating/
Current setting
Activating the
Standard display
deactivating
lock mode
appears
the lock mode
LOC.ON
LOC.OFF
Current setting
Deactivating the
lock mode
SET
STORED
SET
SERVIC
V 1.001 LOCKED
SET
Displaying the
Current version
ESC
version number
number
EXIT
SET
CH 01
Exiting the
Standard display
operating menu
appears
CHAN
52
Оглавление
- Inhalt
- Wichtige Sicherheitshinweise
- Systemumfang
- Übersicht über das System
- Bedienelemente
- Inbetriebnahme
- Der tägliche Gebrauch
- Pflege und Wartung
- Wenn Störungen auftreten
- Technische Daten
- Zubehör
- Herstellererklärung
- Stichwortverzeichnis
- Contents
- Important safety instructions
- System components
- Overview of the system
- The operating controls
- Putting the components into operation
- Using the components
- Care and maintenance
- If a problem occurs...
- Specifications
- Accessories
- Manufacturer declarations
- Index
- Оглавление
- Важные указания по безопасности
- Состав системы
- Обзор системы
- Органы управления
- Ввод в эксплуатацию
- Повседневная работа
- Уход и техническое обслуживание
- Если возникают помехи
- Технические характеристики
- Аксессуары
- Заявление изготовителя
- Предметный указатель
