Naim Audio NDX: инструкция
Раздел: Бытовая, кухонная техника, электроника и оборудование
Тип: Ресивер/Усилитель
Инструкция к Ресиверу/Усилителю Naim Audio NDX
NDX
QUICK START GUIDE • KURZANLEITUNG • GUIDE DE MISE EN ROUTE RAPIDE • SNELSTARTGIDS
GUÍA DE INICIO RÁPIDO • GUIDA RAPIDA • PRZEWODNIK SZYBKIEGO STARTU
КРАТКОЕ РУКОВОДСТВО ПОЛЬЗОВАТЕЛЯ • 快速入门指南 • 빠른 시작 가이드
ENGLISH • DEUTSCH • FRANÇAIS • NEDERLANDS • ESPAÑOL
ITALIANO • POLSKI • РОССИЮ • 中文 • 한국어
NDX Quick Start Guide English
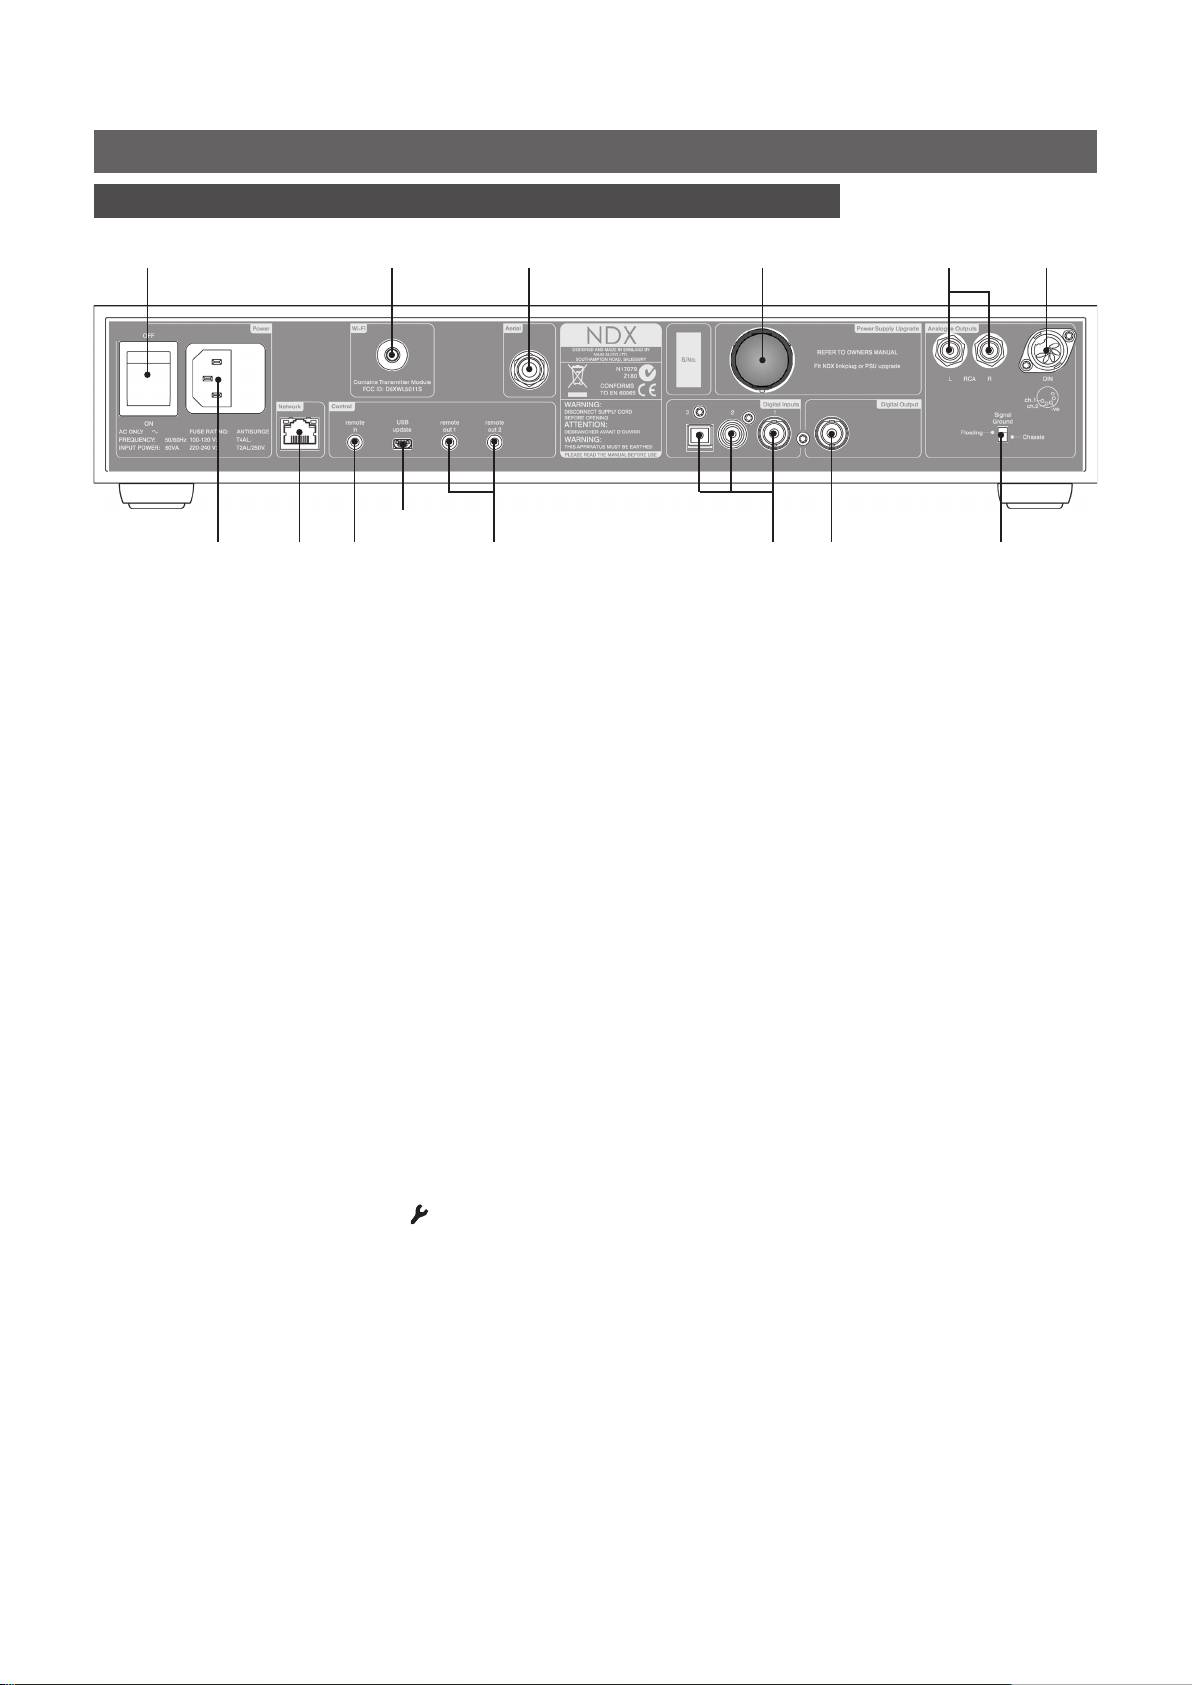
1 Installing and Connecting
wireless network
power supply
analogue
analogue
(Wi-Fi) antenna
DAB/FM aerial
upgrade socket
output
output
power switch
socket
socket
(link plug tted)
(phono)
(DIN)
USB update
interface
mains input
network
remote
remote
digital inputs
digital
signal ground
and fuse
socket
in
out 1 & 2
3, 2 & 1
output
switch
• Stand the NDX on an appropriate, stable surface. Make sure it is well ventilated.
• Check that the mains supply specified on the NDX rear panel is appropriate for your
territory. Connect the NDX to the mains using the supplied cable but do not switch it on until
Note: If your NDX is to be
all other connections have been made.
powered by an external
XPS or 555 PS power supply,
• Identify the Signal Ground Switch and select the “chassis” option unless the NDX is
remove the NDX power
connected in a hi-fi system incorporating another earthed source component (all Naim CD
supply upgrade socket
players, for example), or mains “hum” is audible through the loudspeakers when the NDX is
link plug and connect the
switched on.
external power supply using
the appropriate Burndy
• To play audio from a UPnP™ server or from internet radio stations, the NDX network socket
cable. Do not connect the
must be connected to a router using an Ethernet cable, or its Wi-Fi Antenna must be fitted.
NDX mains cable.
Internet radio also requires a high-speed internet connection.
• If the NDX DAB/FM module is fitted, a suitable aerial should be connected to the DAB/FM
Important: XPS power supplies
aerial socket. The DAB/FM module cannot operate without an aerial. Contact your local
with serial numbers below
Naim retailer or distributor for advice on selecting and installing an aerial.
188015 are not compatible
with the NDX and should not
• If the NDX is to play audio files stored on an iPod, iPhone or on USB memory hardware,
be used. Contact your local
connect it using an appropriate cable, if necessary, to the front panel USB socket.
retailer or distributor for more
information.
• If any external S/PDIF digital audio sources are to be used with the NDX, connect them,
using the appropriate BNC coaxial, phono coaxial or optical cables, to the digital inputs.
• Connect one of the NDX outputs to an appropriate preamplifier or external DAC input. The
NDX DIN output is the default active analogue output. To select an alternative analogue
output, press the handset setup key ( ) once the NDX is switched on and select Analogue
Outputs. Select Digital Output to activate the digital output.
• NDX control can be linked using System Automation to the control of some Naim
preamplifiers, CD players and the Naim DAC. System Automation enables for example,
preamplifier inputs to be selected via the NDX, or for n-Stream transport functions to control
a CD player. To take advantage of System Automation, connect one of the NDX Remote
Out sockets to a preamplifier, CD player or DAC Remote In socket. Use a cable terminated
with a 3.5mm jack plug at one end and a 3.5mm jack or phono plug as necessary at the
other end.
Note: NDX System Automation is switched off by default. A full description of its use can be
found in the NDX Reference Manual.
Full NDX installation and operational information can be found in the Reference Manual
available on line at www.naimaudio.com

NDX Quick Start Guide English
Note: The n-Stream app,
2 Switching On and Getting Started
available from the iTunes App
• Once all connections have been made, switch on the NDX using its rear panel power
Store, enables wireless touch
switch or the external power supply power switch. The NDX will display a welcome screen
screen control of the NDX
and select its Digital 1 input.
from an iPhone or iPod touch.
Note: If the NDX is left unused its display will switch off after a preset time. The “Auto-off” time
can be adjusted within the setup menus.
• The NDX display language can be changed. Enter setup mode by pressing the handset
Language 1/6
setup ( ) key, select Language and use the handset up (5) and down (6) keys to select
4English
the desired language. Press the ok/list key to confirm the selection. Leave setup mode by
Deutsch
pressing the exit key.
Nederlands
Français
• The NDX is configured when shipped to connect to wired TCP/IP networks automatically.
However, if your NDX has been previously used and its network configuration altered,
Setup 4/9
or your router requires nonstandard settings, it may not be able to do so. Refer to the
Language
Reference Manual if this appears to be the case.
Inputs
Analogue Outputs
4Network Settings
If a wireless network connection is to be used, the NDX will require configuration to join
the network. Press the handset setup key ( ) once the NDX is switched on and select
the Network Settings option to configure the NDX wireless settings. Refer to the Reference
Network Settings 1/5
Manual for more information if necessary.
4Name: NDX-C135
Wireless: Not Used
Status: Not Connected
• If necessary select the NDX input on the preamplifier or external DAC.
DHCP: Yes
3 Selecting Inputs
• NDX inputs can be selected by pressing the front panel input button, the handset up (5)
and down (6) keys or one of the handset input selection keys.
• If the FM/DAB module is fitted, sequentially pressing the handset radio key will scroll through
a group of inputs comprising FM, DAB and iRadio.
Note: The default handset input selection key assignments are described in the Reference
Manual. To modify the key assignments press the handset setup key ( ) then select the
Handset Buttons option.
• When the NDX is connected to a network with high speed internet access it will
Internet Radio 2/8
automatically download a list of available internet radio stations. When the iRadio input is
Added Stations
subsequently selected, a menu will be displayed that lists all the available stations sorted by
4Naim's Choice
location and genre. Use the handset up (5), down (6), left (3) and ok/list keys to browse
Location
the list and select stations.
Genre
• When the NDX UPnP™ input is selected, a list of available UPnP™ servers on the network will
UPnP 3/3
be displayed. Use the handset up (5), down (6), left (3) and ok/list keys to browse and
UnitiServe
select server content. Press the handset play/pause key ( ) to play the selected item. See
NAS
the UPnP™ Notes at the end of this section.
4PC
• When an iPod or USB memory device is connected to the front panel USB socket and the
USB input is selected, the NDX will display a menu and folder structure that reflects the
USB 4/18
device. Use the handset up (5), down (6), left (3) and ok/list keys to browse the folders
Brilliant Corners.wav
and select content. Press the handset play/pause key ( ) to play an audio file or the
Grace and Danger.wav
entire contents of a folder, album or playlist.
Nelly The Elephant.wav
4Solid Air.wav
Full NDX installation and operational information can be found in the Reference Manual
available on line at www.naimaudio.com
NDX Quick Start Guide English
• If the FM/DAB module is fitted, to search for FM stations select the FM input and press the
FM
handset previous ( ) or next ( ) keys. The search will stop each time a station is found
(providing the opportunity to save the station as a preset). To recommence the search
94.20 MHz
press the previous ( ) or next ( ) key again. Station information and scrolling text will be
displayed automatically if it is broadcast by the station.
• If the FM/DAB module is fitted the NDX DAB tuner must search for DAB stations before it can
DAB
be used. Select the DAB input and press the handset ok/list key to begin the search. When
the search is complete the NDX will play the first station. Further stations can be selected by
No Stations
pressing the handset previous ( ) or next ( ) keys.
Press list to rescan
• Favourite FM, DAB and iRadio stations can be stored as presets. To save the current station
as a preset, press the handset store key.
• Pressing the handset preset key will display a list of stored presets covering the three tuner
Presets 1/3
modes (iRadio only if the FM/DAB module is not fitted). Use the handset up (5), down (6)
4Store ‘94.20 MHz’
and ok/list keys to browse and select presets.
Rename A Preset
Delete A Preset
• When the FM, DAB, iRadio UPnP™ and iPod/USB inputs are selected the handset info
( ) key can be used to display supplementary information about the input or currently
playing media.
UPnP™ Notes: UPnP™ servers incorporate software that enables the NDX, or any other
UPnP™ compatible player, to access and play their stored audio over the network. A UPnP™
server might be a Naim HDX or UnitiServe hard disk player, or a home computer. Some
Network Attached Storage (NAS) drives also incorporate a UPnP™ application.
A variety of third party UPnP™ server applications are available that are compatible with
both Windows and OS X, however Windows Media™ Player version 11 or above incorporates
a built in UPnP™ server application.
In the case of the Windows UPnP™ server the following steps must be taken before music
can be streamed to the NDX:
• Ensure Windows Media™ Player version 11 or above is installed.
• Enable Windows Media™ Player file sharing. From the Media Player Options
dialogue Select Library > Configure Sharing… then select “Share my media”.
• Ensure the firewall is configured to allow file sharing.
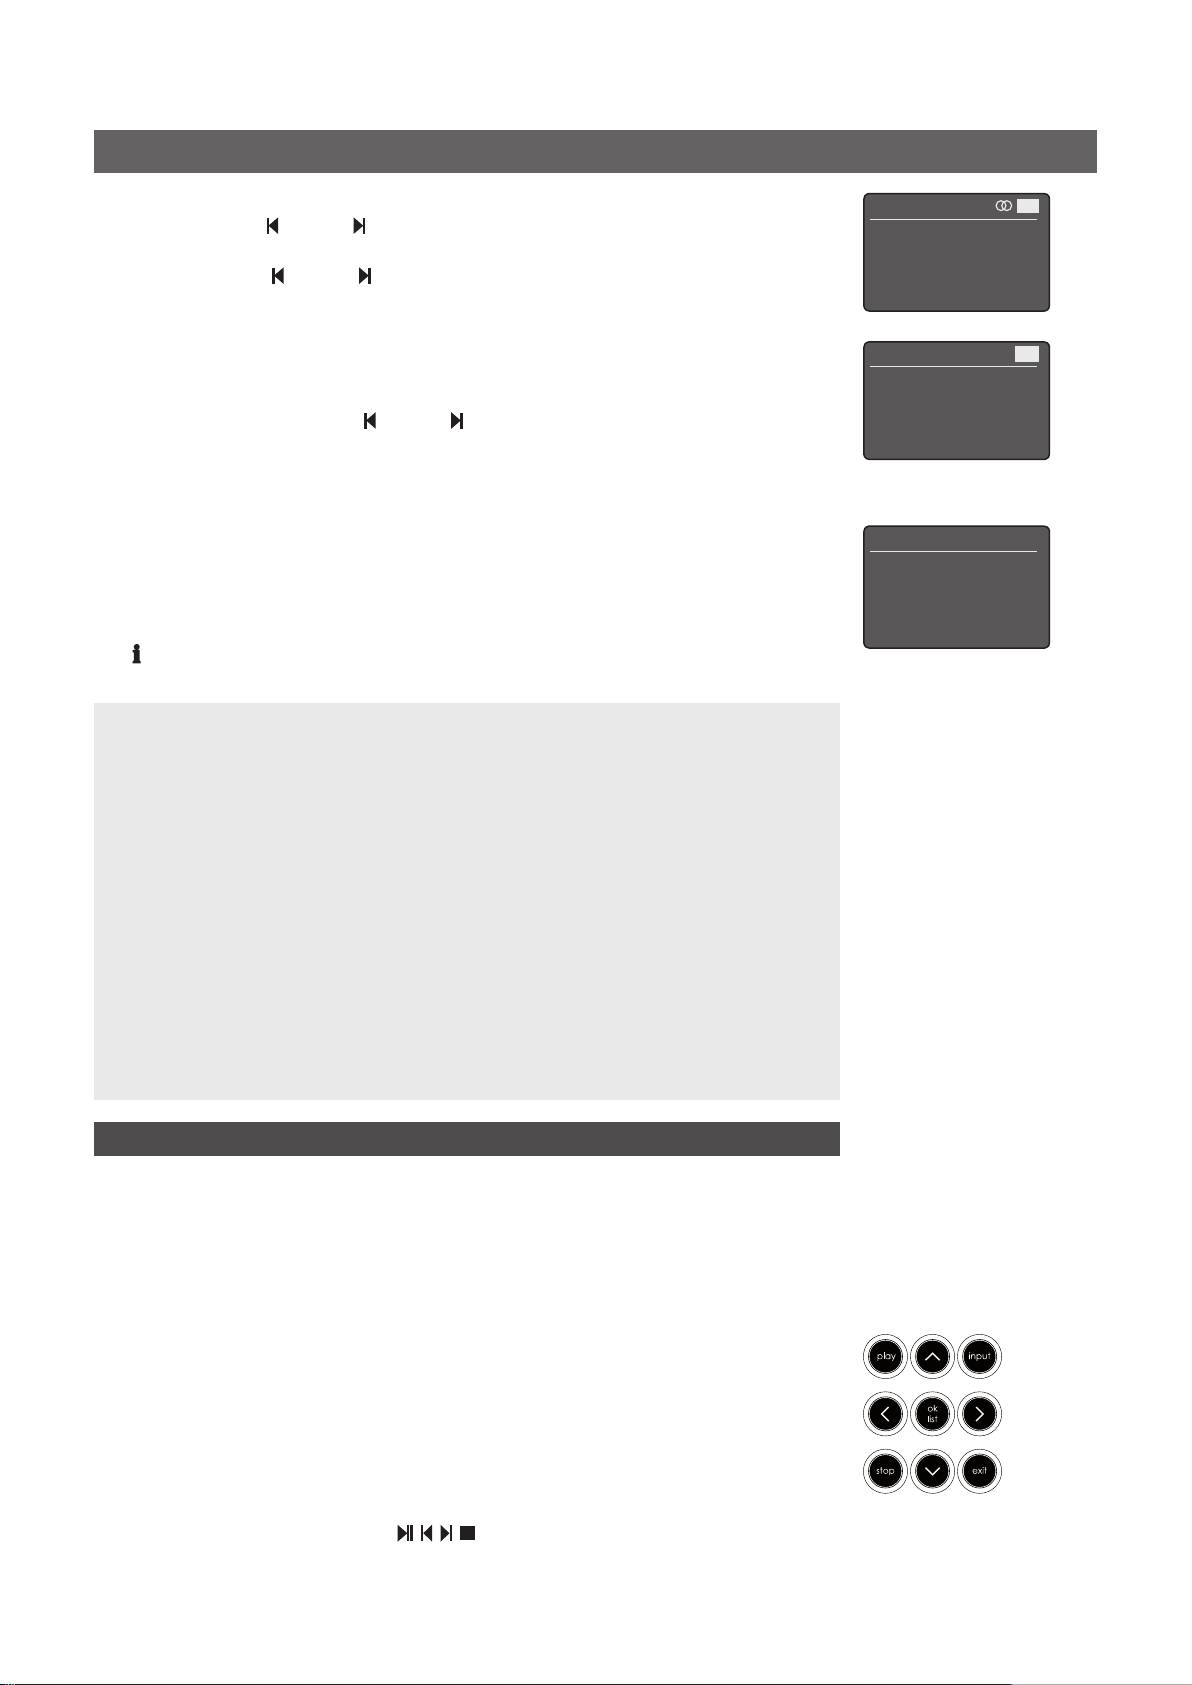
4 Using List Mode and Controlling Playback
• Pressing the front panel ok/list button or handset ok/list key will switch the NDX into list
mode and display a list of the available media items for the currently selected input.
Note: Exceptions to this list mode behaviour are the NDX’s FM radio and external inputs. When
the FM input is selected, pressing the list button or ok/list key will display a mono selection
option. When an external input is selected the ok/list button or key have no function.
• In list mode the NDX front panel buttons and handset keys provide list navigation. To scroll
up and down lists and select items press the up (5), down (6), left (3), right (4) and ok/
list buttons or keys. To return to normal display press the front panel ok/list or exit buttons or
the handset exit key. In most long item lists the handset numeric keys can be used to jump
through the list alphabetically.
• An item can be selected for listening or playback from list mode by navigating to the item
and selecting it by pressing ok/list or play. During playback from the iPod, USB or UPnP
inputs, the handset transport keys ( )can be used to control play/pause, next,
previous, or stop functions.
Full NDX installation and operational information can be found in the Reference Manual
available on line at www.naimaudio.com
NDX Quick Start Guide English
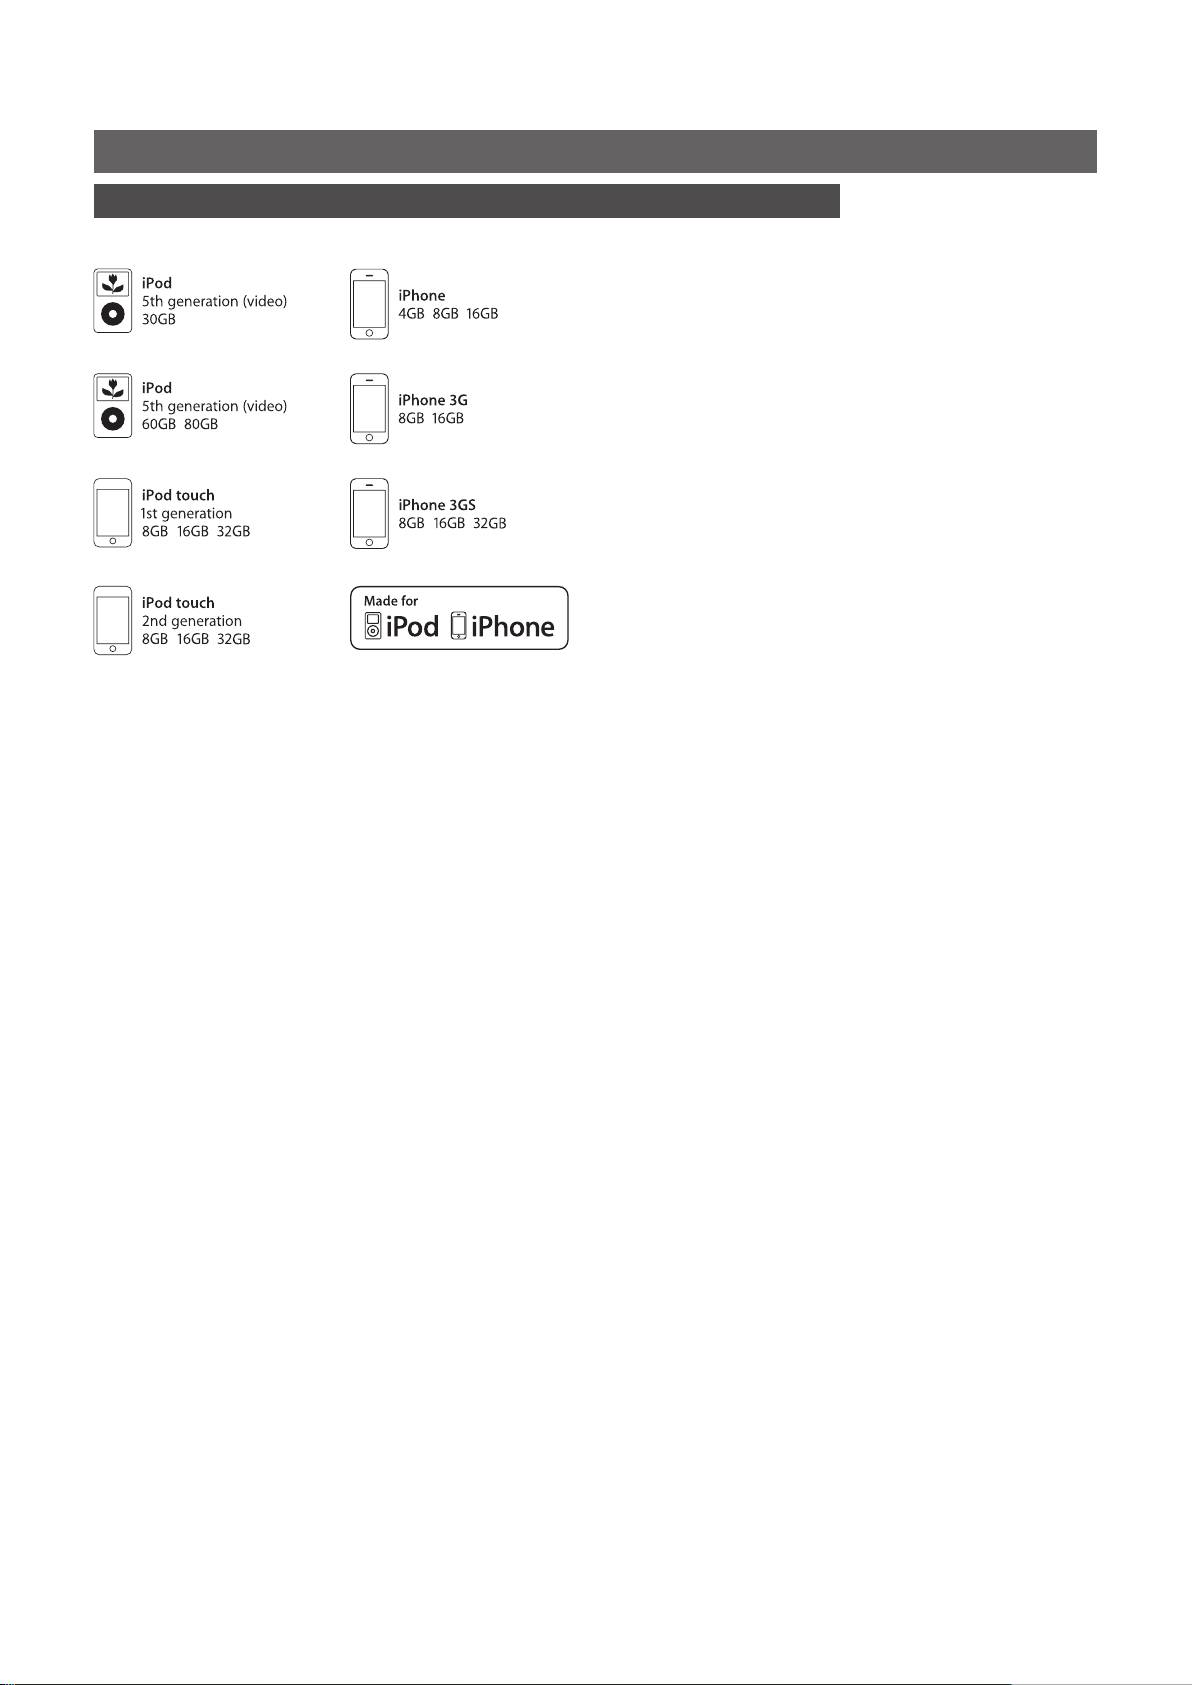
5 iPod and iPhone Compatibility
• The NDX is compatible with the iPod and iPhone models illustrated below.
“Made for iPod” and “Made for iPhone” mean that an electronic
accessory has been designed to connect specifically to iPod or iPhone
respectively and has been certified by the developer to meet Apple
performance standards. Apple is not responsible for the operation of this
device or its compliance with safety and regulatory standards.
iPod and iPhone are trademarks of Apple Inc., registered in the U.S. and
other countries.
Windows Media™ is a trademark of Microsoft Corporation.
UPnP™ is a trademark of the UPnP™ Forum.
Full NDX installation and operational information can be found in the Reference Manual
available on line at www.naimaudio.com
