Microlife AG1-40: инструкция
Раздел: Красота, здоровье, спорт. туризм, хобби
Тип: Тонометр
Инструкция к Тонометру Microlife AG1-40

Read the instructions carefully before using this device.
Veuillez lire attentivement les instructions avant d’utiliser ce produit.
Перед использованием прибора внимательно прочтите данное
руководство.
Leggere attentamente le istruzioni prima di usare il dispositivo.
Europe / Middle-East / Africa
Microlife AG
Espenstrasse 139
9443 Widnau / Switzerland
Tel. +41 / 71 727 70 30
Fax +41 / 71 727 70 39
Email admin@microlife.ch
www.microlife.com
Asia
Microlife Corporation.
9F, 431, RuiGang Road, NeiHu
Taipei, 114, Taiwan, R.O.C.
Tel. 886 2 8797-1288
Fax
.886 2 8797-1283
Email service@microlife.com.tw
www.microlife.com
North / Central / South America
Microlife USA, Inc.
1617 Gulf to Bay Blvd., 2nd Floor Ste A
Clearwater, FL 33755 / USA
Tel. +1 727 442 5353
Fax +1 727 442 5377
Email msa@microlifeusa.com
www.microlife.com
IB AG1-40 e-f-ru-it 2211
Microlife BP AG1-40
Aneroid Blood Pressure Kit
EN
Instruction Manual (1-13)
Tensiomètre anéroïde en trousse
FR
Mode d’emploi (16-31)
Прибор для измерения
RU
артериального давления
Руководство по пользованию
(32-45)
Misuratore di pressione ad aneroide palmare
IT
Manuale d’uso (46-61)
Aneroid Blood Pressure Kit
Instruction Manual

Table of contents
EN
1. Introduction
1.1. Features of the BP AG1-40
1.2. Important information about self-measurement
2. Important information on the subject of blood-pressure and its measurement
2.1. How does high/low blood-pressure arise?
2.2. Which values are normal?
2.3. What can be done, if regular high/low values are obtained?
3. The various components of the blood-pressure kit
4. Carrying out a measurement
4.1. Before the measurement
4.2. Common sources of error
4.3. Fitting the cuff
4.4. Manipulate the push-button valve
4.5. Measuring procedure
4.5.1. Putting the chestpiece under the cuff
4.5.2. Inflating the cuff
4.5.3. Systolic blood pressure reading
4.5.4. Diastolic blood pressure reading
4.5.5. Recording your readings
5. Malfunction / Troubleshooting
6. Care and maintenance, recalibration
7. Guarantee
8. Reference to standards
9. www.microlife.com
10. Technical specifications
1

1. Introduction
1.1. Features of the BP AG1-40
The aneroid blood pressure kit BP AG1-40 is a non-automated, mechanical blood-pressure
measuring device for use on the upper arm.
It offers proven reliability and superior performance at an economical price. With the advanced
non-stop pin mechanism and ergonomic bulb with complete valves, the BP AG1-40 ensure you
a precise and consistent measurement. The ergonomic palm manometer provides comfortable
handling and very good visibility of readings during measurement. Nevertheless, its durable nylon
cuff, high-grade bearing and aneroid bellow provide consistent operation. The entire unit stores
in a zippered Nylon bag for easy portability.
Before using, please read through this instruction manual carefully and then keep it in a safe
place. For further questions on the subject of blood-pressure and its measurement, please
contact your doctor.
Attention!
1.2. Important information about self-measurement
• Donotforget:self-measurement means control, not diagnosis or treatment. Unusual
values must always be discussed with your doctor. Under no circumstances should you alter
the dosages of any drugs prescribed by your doctor.
2. Important information on the subject of blood-pressure and its measurement
2.1. How does high/low blood-pressure arise?
The level of blood-pressure is determined in a part of the brain, the so-called circulatory centre,
and adapted to the respective situation by way of feedback via the nervous system.
To adjust the blood-pressure, the strength and frequency of the heart (Pulse), as well as the
width of circulatory blood vessels is altered. The latter is effected by way of fine muscles in the
blood-vessel walls.
2
Thelevelofarterialblood-pressurechangesperiodicallyduringtheheartactivity:Duringthe
«blood ejection» (Systole) the value is maximal (systolic blood-pressure value), at the end of the
heart’s «rest period» (Diastole) minimal (diastolic blood-pressure value).
The blood-pressure values must lie within certain normal ranges in order to prevent particular
diseases.
2.2. Which values are normal?
Blood pressure is too high if at rest, the diastolic pressure is above 90 mmHg and/or the systolic
blood-pressure is over 160 mmHg. In this case, please consult your doctor immediately. Long-
term values at this level endanger your health due to the associated advancing damage to the
blood vessels in your body.
Should the systolic blood-pressure values lie between 140 mmHg and 160 mmHg and/or the
diastolic blood-pressure values lie between 90 mmHg and 100 mmHg, likewise, please consult
your doctor. Furthermore, regular self-checks will be necessary.
With blood-pressure values that are too low, i.e. systolic values under 100 mmHg and/or diastolic
values under 60 mmHg, likewise, please consult your doctor.
Even with normal blood-pressure values, a regular self-check with your blood-pressure monitor
is recommended. In this way you can detect possible changes in your values early and react
appropriately.
If you are undergoing medical treatment to control your blood pressure, please keep a record of
the level of your blood pressure by carrying out regular self-measurements at specific times of
the day. Show these values to your doctor. Never use the results of your measurements to
alter independently the drug doses prescribed by your doctor.
3

Tableforclassifyingblood-pressurevalues(unitsmmHG)accordingtoWorldHealthOrganization:
Range Systolic Diastolic Measures
Blood-pressure Blood-pressure
Hypotension lower than 100 lower than 60 Check with your doctor
Normal range between 100 and 140 between 60 and 90 Self-check
Mild hypertension between 140 and 160 between 90 and 100 Consult your doctor
Moderate between 160 and 180 between 100 and 110 Consult your doctor
hypertension
Severe hypertension higher than 180 higher than 110 Consult your doctor
immediately
☞ Further information
• Ifyourvaluesaremostlystandardunderrestingconditionsbutexceptionallyhighundercon-
ditions of physical or psychological stress, it is possible that you are suffering from so-called
«labile hypertension». Please consult your doctor if you suspect that this might be the case.
• Correctlymeasureddiastolicblood-pressurevaluesabove120mmHgrequireimmediate
medical treatment.
2.3. What can be done, if regular increased/low values are obtained?
a) Please consult your doctor.
b) Increased blood-pressure values (various forms of hypertension) are associated long- and
medium term with considerable risks to health. This concerns the arterial blood vessels of
your body, which are endangered due to constriction caused by deposits in the vessel walls
(Arteriosclerosis). A deficient supply of blood to important organs (heart, brain, muscles) can
be the result. Furthermore, with long-term continuously increased blood-pressure values, the
heart will become structurally damaged.
c) There are many different causes of the appearance of high blood pressure. We differentiate
between the common primary (essential) hypertension, and secondary hypertension. The
latter group can be ascribed to specific organic malfunctions. Please consult your doctor for
information about the possible origins of your own increased blood pressure values.
4
d) There are measures which you can take, not only for reducing a medically established high
bloodpressure,butalsoforprevention.Thesemeasuresarepartofyourgeneralwayoflife:
A) Eating habits
• Striveforanormalweightcorrespondingtoyourage.Reduceoverweight!
• Avoidexcessiveconsumptionofcommonsalt.
• Avoidfattyfoods.
B) Previous illnesses
Followconsistentlyanymedicalinstructionsfortreatingpreviousillnesssuchas:
• Diabetes (Diabetes mellitus)
• Fat metabolism disorder
• Gout
C) Habits
• Giveupsmokingcompletely
• Drinkonlymoderateamountsofalcohol
• Restrictyourcaffeineconsumption(Coffee)
D) Physical constitution
• Afterapreliminarymedicalexamination,doregularsport.
• Choosesportswhichrequirestaminaandavoidthosewhichrequirestrength.
• Avoidreachingthelimitofyourperformance.
• Withpreviousillnessesand/oranageofover40years,pleaseconsultyourdoctorbefore
beginning your sporting activities. He will advise you regarding the type and extent of types
of sport that are possible for you.
5
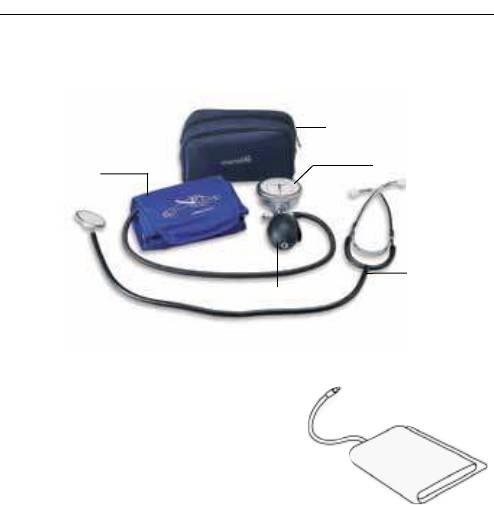
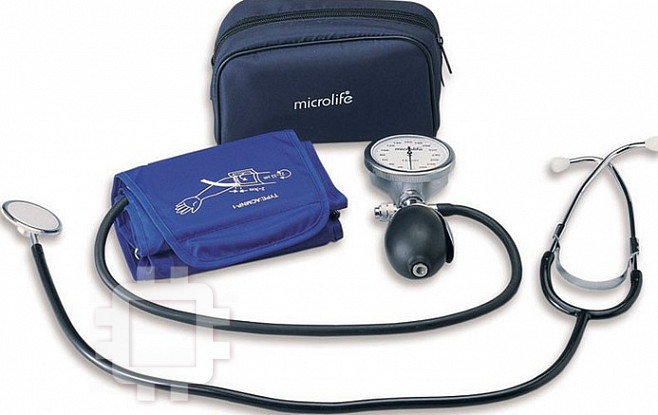
3. The various components of the Aneroid Blood Pressure Kit
TheillustrationshowstheBPAG1-40,consistingof:
a) Measuring unit
Soft bag
Manometer
Cuff
Stethoscope
Bulb & Valves
b) Cuff for arm circumference 25 - 40 cm
6

4. Carrying out a measurement
4.1. Before the measurement
• Avoideating,smokingaswellasallformsofexertiondirectlybeforethemeasurement.All
these factors influence the measurement result. Try and find time to relax by sitting in an
armchair in a quite atmosphere for about ten minutes before the measurement.
• Removeanygarmentthatfitscloselytoyourupperarm.
• Measurealwaysonthesamewrist(normallyleft).
• Attempttocarryoutthemeasurementsregularlyatthesametimeofday,sincetheblood-
pressure changes during the course of the day.
4.2. Common sources of error
Note:
Comparable blood-pressure measurements always require the same conditions!
These are normally always quiet conditions.
• Alleffortsbythepatienttosupportthearmcanincreasetheblood-pressure.Makesure
you are in a comfortable, relaxed position and do not activate any of the muscles in the
measurement arm during the measurement. Use a cushion for support if necessary.
• Ifthearmarteryliesconsiderablylower(higher)thantheheart,anerroneouslyhigher(lower)
blood-pressurewillbemeasured!(Each15cmdifferenceinheightresultsinameasurement
errorof10mmHg!)
• Cuffsthataretoonarrowortooshortresultinfalsemeasurementvalues.Selecting
the correct cuff is of extraordinary importance. The cuff size is dependent upon the
circumference of the arm (measured in the centre). The permissible range is printed on the
cuff. If this is not suitable for your use, please contact your dealer.
Note: Only use clinically approved Original-Cuffs!
• Aloosecufforasidewaysprotrudingair-pocketcausesfalsemeasurementvalues.
7
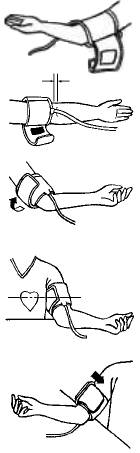
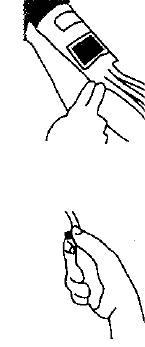
4.3. Fitting the cuff
a) Push the cuff over the left upper arm so that the tube
points in the direction of the lower arm.
b) Lay the cuff on the arm as illustrated. Make certain
that the lower edge of the cuff lies approximately
2 -3 cm
2 to 3 cm above the elbow and that the rubber tube
leaves the cuff on the inner side of the arm.
Important! The mark (ca. 3 cm long bar) must lie
exactly over the artery which runs down the inner
tube
side of the arm.
c) Tighten the free end of the cuff and close the cuff
with the closer.
d) There must be no free space between the arm and
the cuff as this would influence the result. Clothing
must not restrict the arm. Any piece of clothing which
does (e.g. a pullover) must be taken off.
e) Secure the cuff with the closer in such a way that it
lies comfortably and is not too tight. Lay the arm on
the table (palm upwards) so that the cuff is at the
same height as the heart. Make sure that the tube is
not kinked.
f) Remain seated quietly for two minutes before you
begin the measurement.
Comment
If it is not possible to fit the cuff to the left arm, it can also be placed on the right one. However
all measurements should be made using the same arm.
8
4.4. Manipulate the push-button valve
The special push-button valve of BP AG1-40 allow user to deflate the manometer gradually
by pushing the button of air release valve. Turn the screw to tight up the valve before inflating.
After the pressure is high enough, deflate the manometer by slightly press the button so that
the pressure reduces at 2 - 3 mmHg per second suitable for taking readings. Press the button
repeatedly until the deflation is completed. Press the button more hardly, the air goes out more
rapidly. Holding the button will defalte the manometer continously.
4.5. Measuring procedure
4.5.1. Put the chestpiece under the cuff
The chestpiece shall not be placed ON or INTO the cuff, it
shall be placed either under the cuff, or 1 - 2 cm below it. The
chestpiece is then placed correctly , when the Korrotkoff’s
sound appears strongest («loudest»).
Make sure the chestpiece is in contact with skin and above
the brachial artery. Wear the binaural (earpieces) properly to
check the Korotkoff’s sound during measurement.
Before using the stethoscope, be sure there is no crack on
the diaphragm, earpieces, and tubing. Any improper setup
or damage of the stethoscope will cause distorted sound or
poor sound transmission to make inaccurate reading.
4.5.2. Inflating the cuff
Close the air valve by turning the screw clockwise. Do not
over-tighten. Squeeze the inflation bulb with the hand at
a steady rate until the pointer on the gauge is 30 mmHg
above your normal systolic pressure value. If you are not
sure the value, inflate to 200 mmHg first.
9

4.5.3. Systolic blood pressure reading
Slightly and repeatedly push button of the valve and
hold stethoscope chestpiece over brachial artery. Proper
deflation rate is essential for an accurate reading, so you
should practice and master a recommended deflation rate
of 2 - 3 mmHg per second or a drop of one to two marks
on the pressure gauge each heartbeat. You should not
keep the cuff inflated any longer than necessary. As the
cuff begins to deflate, you must listen carefully with the
stethoscope. Note the reading on the gauge as soon as you
hear a faint, rhythmic tapping or thumping sounds. This is
the systolic blood pressure reading. Listen carefully and
familiarize yourself with pulse (Korotkoff’s) sound.
4.5.4. Diastolic blood pressure reading
Allow the pressure to continue dropping at the same deflation rate. When your diastolic blood
pressure value reached, the thumping sound stops. Deflate the cuff valve completely. Remove
the cuff from arm and stethoscope from ears.
4.5.5. Record your readings
Repeat the measurement at least two times. Do not forget to record your readings and the time
of the day measurement is made immediately after you finish measuring. A suitable time is first
thing in the morning, or just before evening meals. Remember that your physician is the only
person qualified to analyze your blood pressure.
☞ Further information
Measurements should not occur soon after each other, since otherwise, the results will be
falsified. Wait therefore for several minutes in a relaxed position, sitting or lying, before you
repeat a measurement.
10

5. Other possible malfunctions and their elimination
If problems occur when using the device, the following points should be checked and if
necessary,thecorrespondingmeasuresaretobetaken:
Malfunction
Remedy
The sound transmission is poor, distorted or
1. Check the earpieces if they are plugged or
there is extraneous noise.
cracked. If not, make sure they do not fit
poorly as worn.
2. Check the tube if it is broken or twisted.
3. Check the bell and diaphragm of chestpiece
if there is any crack.
4. Make sure the chestpiece is in proper
contact with skin and over brachial artery
during measuring.
Clean or replace any defective parts if
found to avoid inaccurate reading.
The pressure does not rise although the bulb
1. Make sure that the valve is closed.
is pumping.
2. Make sure the cuff is properly connected to
manometer.
3. Check if the cuff, tube and bulb is leaky.
Replace the defective parts if any.
The deflation rate can not be set to
1. Disassemble the bulb from manometer to
2 - 3 mmHg/ sec. by adjusting the air release
check if there is any blockage in the airway
valve.
of the valve. Clean the blockage and try
again. If it still does not work, replace it to
avoid inaccurate reading.
Pointer is not at 0 +/- 3 mmHg at rest.
1. Make sure that the valve is open for zero
check.
2. If still more than 3 mmHg deviation, contact
your dealer to recalibrate the manometer.
11

☞ Further information
The level of blood-pressure is subject to fluctuations even with healthy people. Important thereby
is, that comparable measurements always require the same conditions (rest condition)!
If, in spite of observing all these factors, the fluctuations are more than 15 mmHg, and/or you
hear irregular pulses on several occasions, please consult your doctor.
You must consult your specialist dealer or chemist if there are technical problems with the blood-
pressure instrument. Never attempt to repair the instrument yourself!
Anyunauthorisedopeningoftheinstrumentinvalidatesallguaranteeclaims!
6. Care and maintenance, recalibration
With proper care and maintenance, this blood-pressure measuring device will provide years of
satisfactoryservice.Followthegeneralrulesbelow:
• Donotdrop.
• Neverinflatebeyond300mmHg.
• Donotexposethedevicetoeitherextremetemparatures,humidity,ordirectsunlight.
• Nevercontactthecufffabricwithasharpinstrument,sincethiscouldcausedamage.
• Alwaysdeflatecuffcompletelybeforestorage.
• Donotdismantlemanometerunderanycircumstance.
• Storethewholedeviceinstoragebagprovided,tokeepallthepartsclean.
• Storagetemperaturecondition:-20°C to 70 °C at a relative air humidity of 85 % (non-
condensing).
• Wipeoffthemanometerandbulbwithadampcloth.Sterilizationisnotnecessary,since
the parts of manometer should not come into direct contact with the patient‘s body during
measurement.
• Removethebladderfirst,andwipethevelcro,bladderandtubeswithadampcloth.Thecuff
can be washed with soap and cold water. But do rinse the cuff with clear water and keep it
air dry.
12

Periodical recalibration
Sensitive measuring devices must from time to time be checked for accuracy. We therefore
recommend a periodical inspection of the static pressure display every 2 years.
Your specialist dealer would be pleased to provide more extensive information about this.
7. Guarantee
The blood-pressure monitor BP AG1-40 is guaranteed for 2 years from date of purchase. This
guarantee includes the instrument and the cuff. The guarantee does not apply to damage caused
by improper handling, accidents, not following the operating instructions or alterations made to
the instrument by third parties.
The guarantee is only valid upon presentation of the guarantee card filled out by the dealer.
Nameandcompanyaddressoftheresponsibledealer:
13

8. Reference to standards
Device standard: Device corresponds to the requirements of the
EN1060-1 /-2 / 1995
ANSI / AAMI SP09
This device complies with the requirements of the Medical Device Directive 93/42/EEC.
9. www.microlife.com
Detailed user information about our products as well as services can be found at
www.microlife.com
14

10. Technical specifications:
Weight: 520 g
Size: 170 x 65 x 105 mm
Storage temperature: –20 °C to +70 °C
Humidity: 85 % relative humidity maximum
Operation temperature: 0 °C to 46 °C
Measuring range: 0 to 300 mmHg
Measuring resolution: 2 mmHg
Pressure accuracy: within ±3 mmHg in 18 °C to 33 °C ;
within ±6 mmHg in 34 °C to 46 °C
Inflation source: a volume of at least 200cc to a pressure of
300 mmHg in 4 to 10 sec
Pressure reduction rate: 2 - 3 mmHg/sec.
Air leakage: <± 4 mmHg/min
Hysteresis error: within 0 mmHg to 4 mmHg
Accessories: 1. cuff (adult size with arm circumference of
25 - 40 cm) with inlaid latex bladder
2. bulb and valve
3. stethoscope
4 . soft bag
Technical alterations reserved.
15
Tensiomètre aneroïde en trousse
Mode d’emploi
16

Table des matières
FR
1. Introduction
1.1. Caractéristiques du BP AG1-40
1.2. Informations importantes pour prendre soi-même sa tension artérielle
2. Informations importantes concernant la tension artérielle et sa mesure
2.1. Quelle est l’origine d’une tension basse/haute?
2.2. Quelles sont les valeurs normales?
2.3. Que faire lorsque les valeurs déterminées sont régulièrement trop élevées/trop basses?
3. Les différents éléments du tensiomètre aneroïde en trousse
4. Prise de mesure
4.1. Avant d’effectuer une mesure
4.2. Sources fréquentes d’erreur
4.3. Mise en place du brassard
4.4. Manipulation de la valve à bouton poussoir
4.5. Procédure de mesure
4.5.1. Positionnement du pavillon par rapport au brassard
4.5.2. Gonflage du brassard
4.5.3. Lecture de la tension artérielle systolique
4.5.4. Lecture de la tension artérielle diastolique
4.5.5. Enregistrement des relevés
5. Dysfonctionnements / solutions
6. Entretien, précautions et réétalonnage
7. Garantie
8. Références aux normes
9. www.microlife.fr
10. Données techniques
17


