Edimax Technology AR-7064Mg+: инструкция
Раздел: Профоборудование
Тип: Аппарат
Инструкция к Аппарату Edimax Technology AR-7064Mg+

0
MIMO XR Wireless LAN
ADSL2+ Modem Router
Quick Installation Guide
Version 1.0

1
Content Table
===================================================
English
..............…………...............……………...
2
Č
eský
...................................................................
6
Deutsch
...............................................................
10
Español
..............................................................
14
Français
.............................................................
18
Italiano
...............................................................
22
Magyar
...............................................................
26
Nederlands
.........................................................
30
Polski
.................................................................
34
Português
..........................................................
38
Русский
.............................................................
42
Türkçe
................................................................
46
2
ENGLISH . .
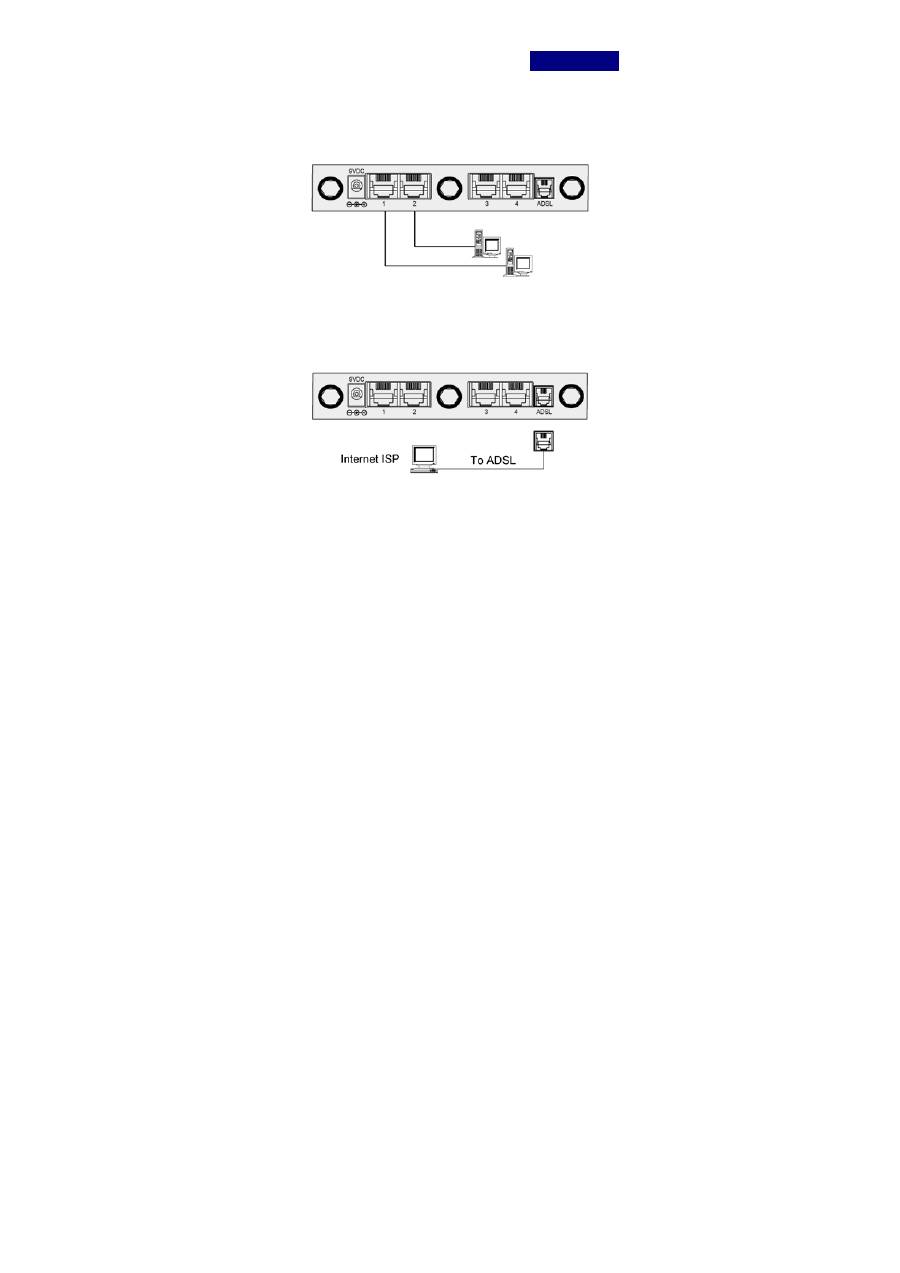
Installation & Setup
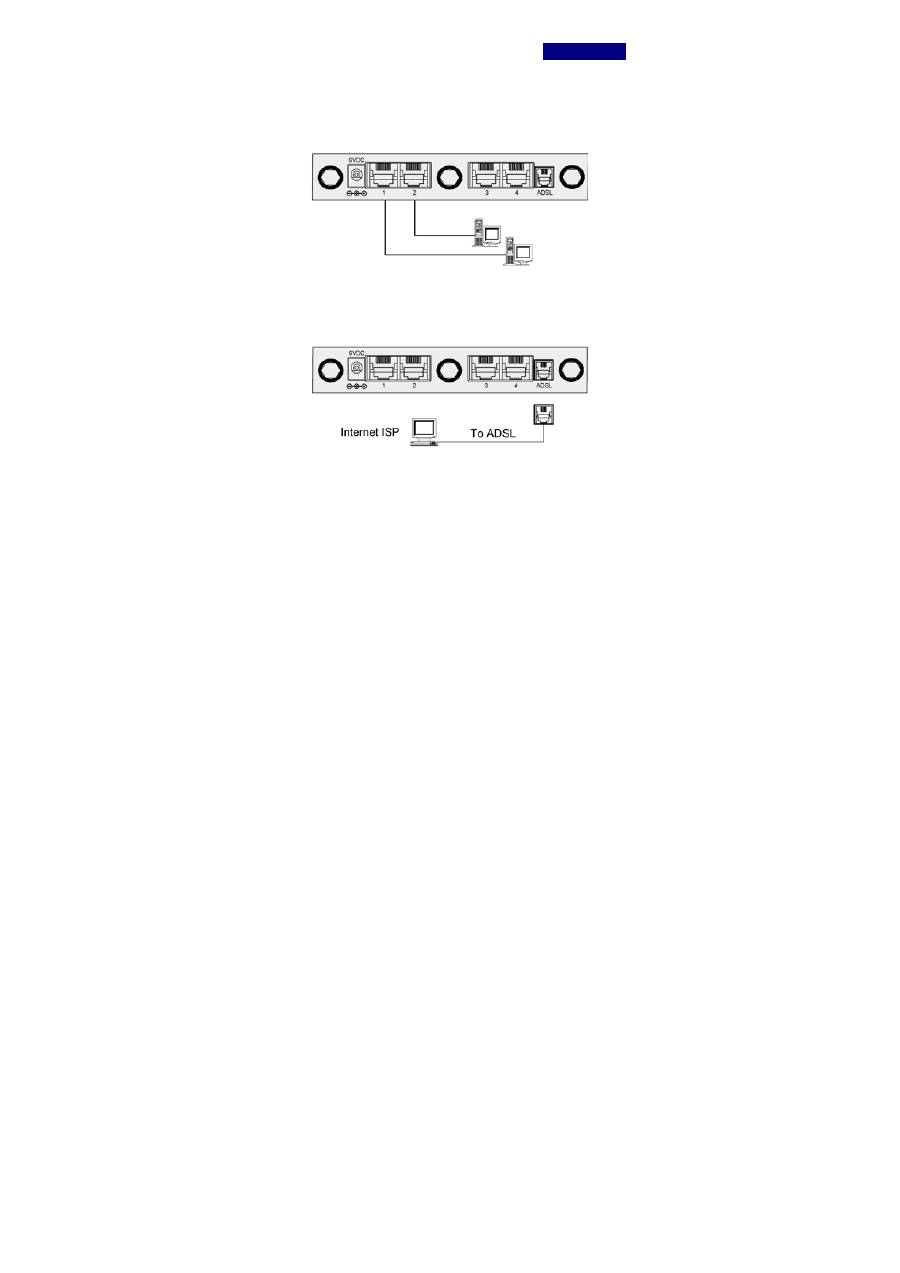
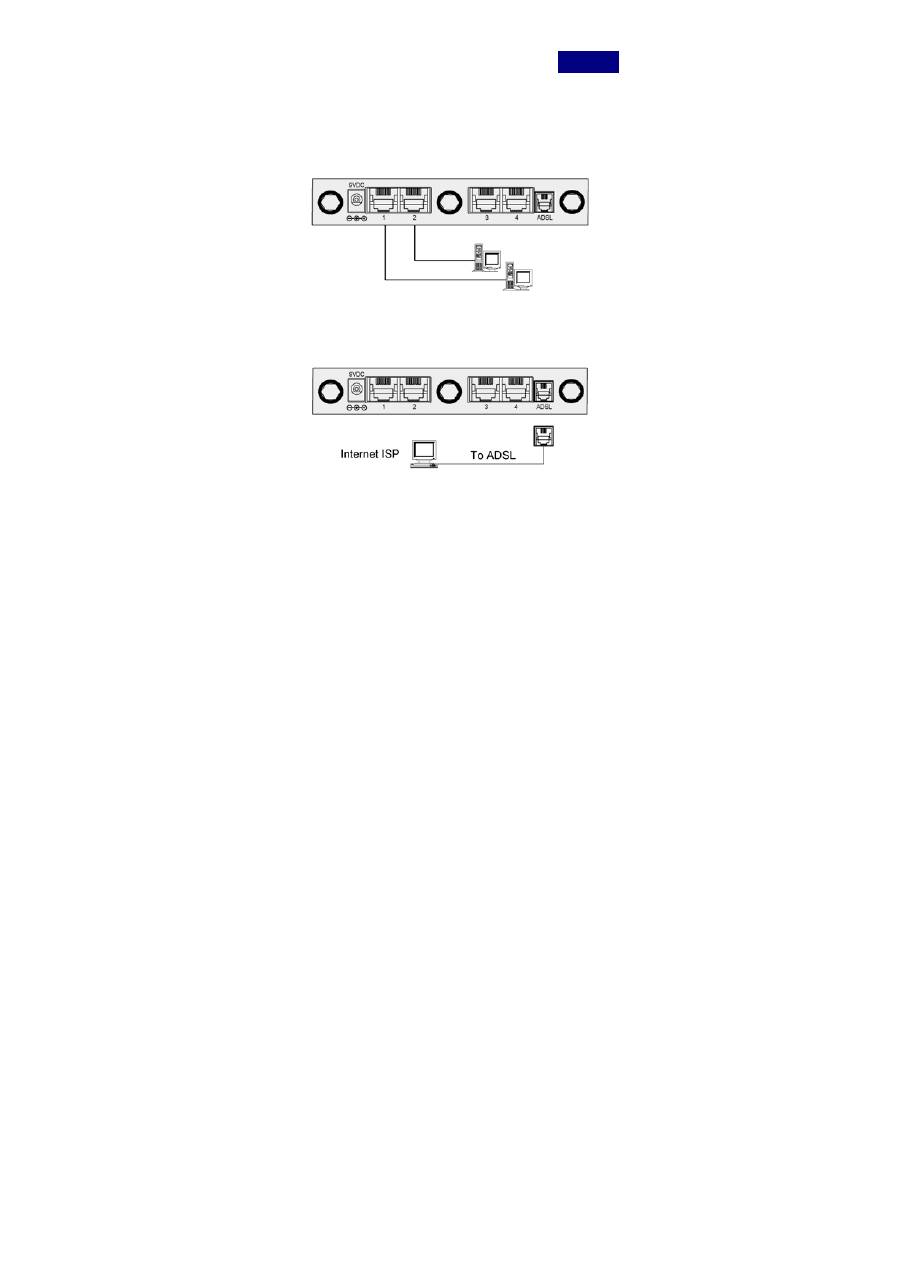
LAN Connection:
Connect an Ethernet cable from your PC's Ethernet port to
ADSL Router's LAN Port.
WAN Connection:
Connect the telephone cable from your home's telephone
jacks to the ADSL port of the Router.
Power Adapter Connection:
Connect the power adapter to the power inlet and turn the
power switch on from the front panel of the ADSL Router
3
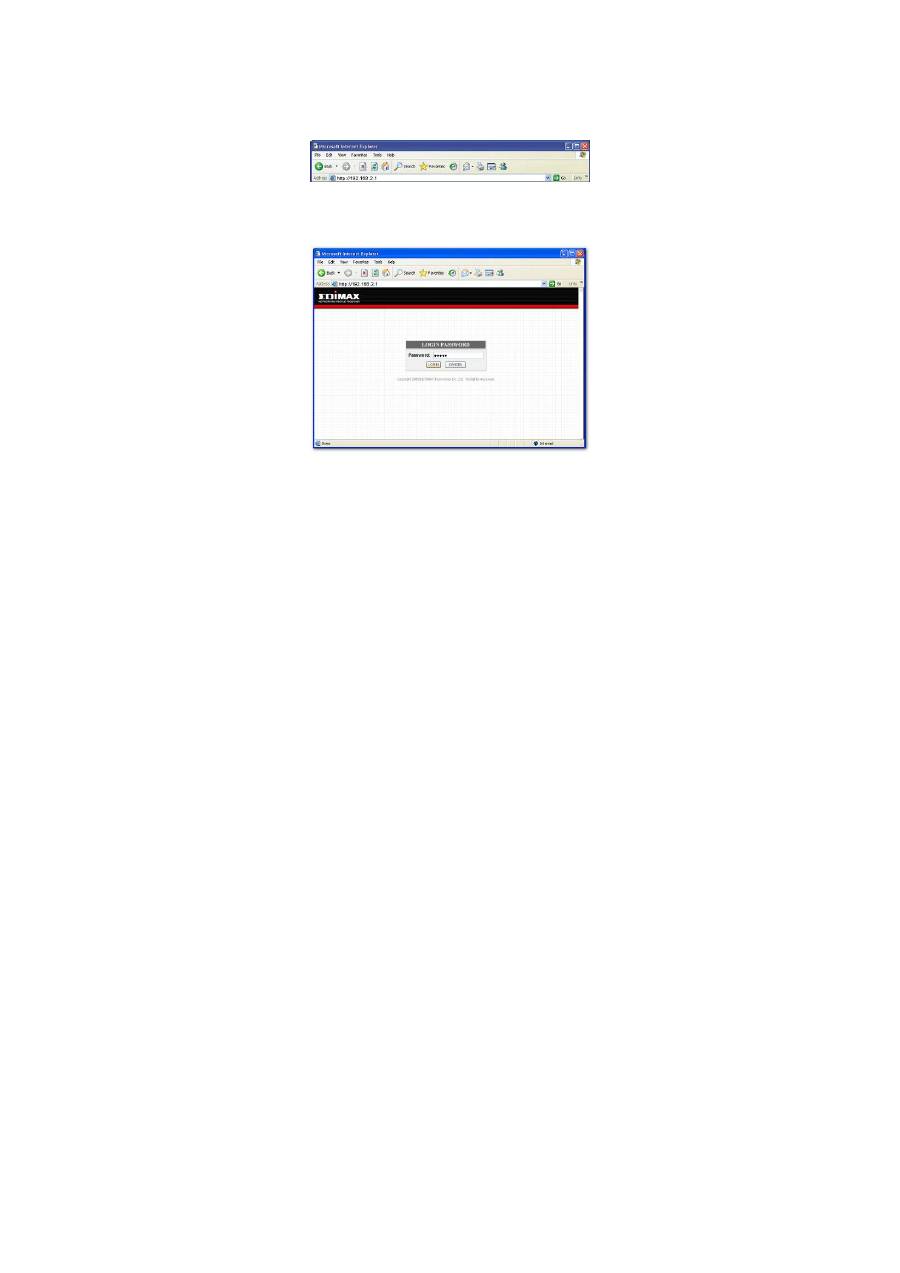
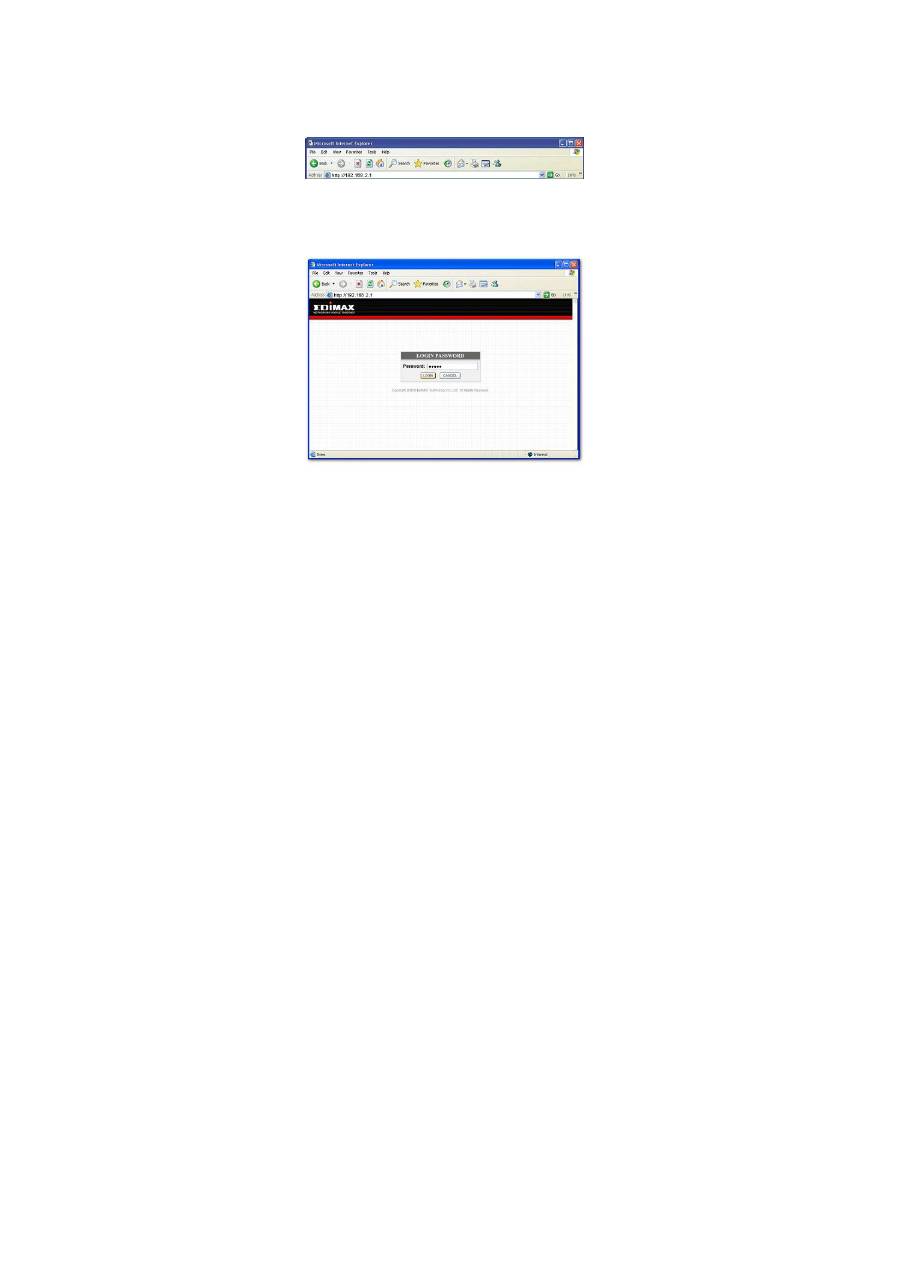
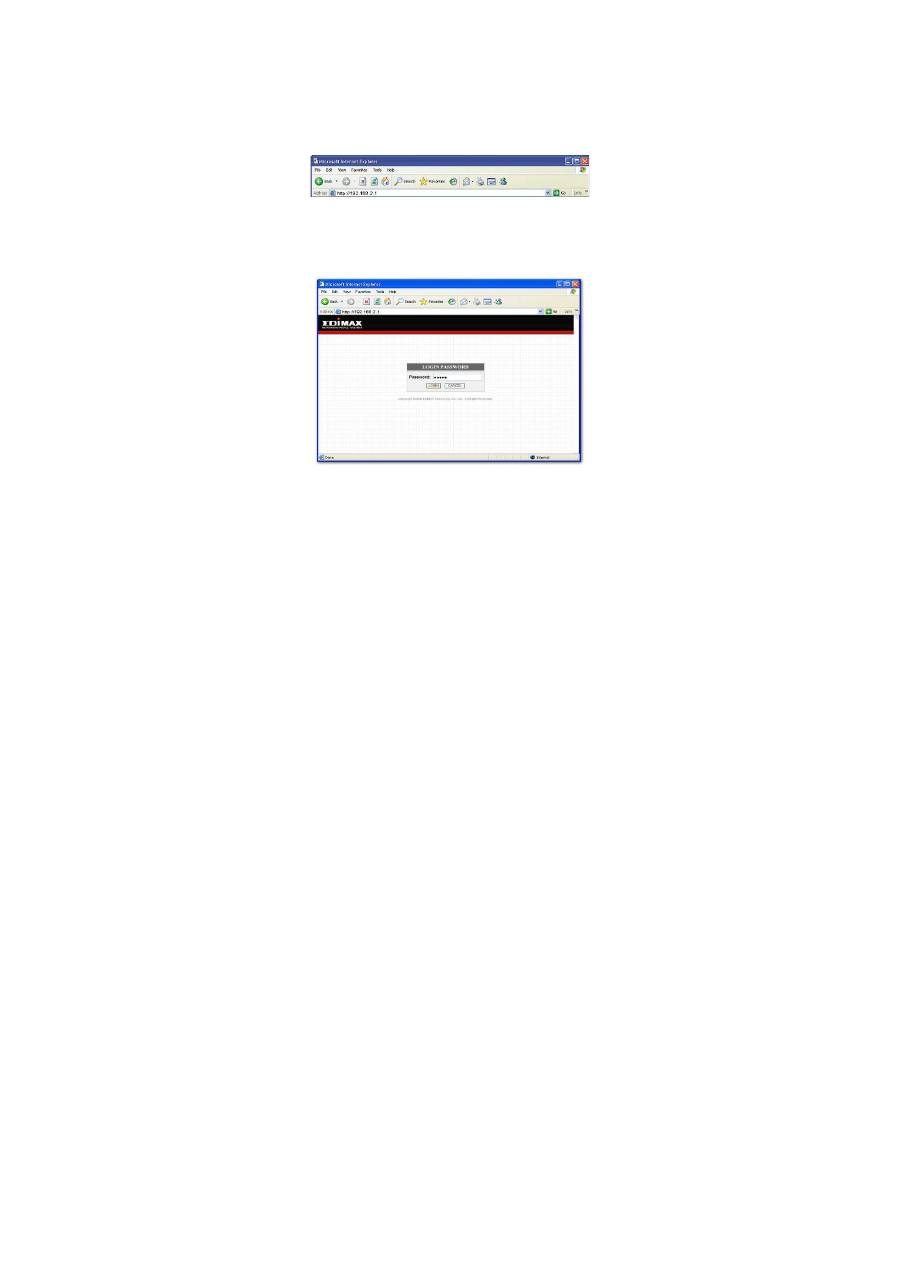
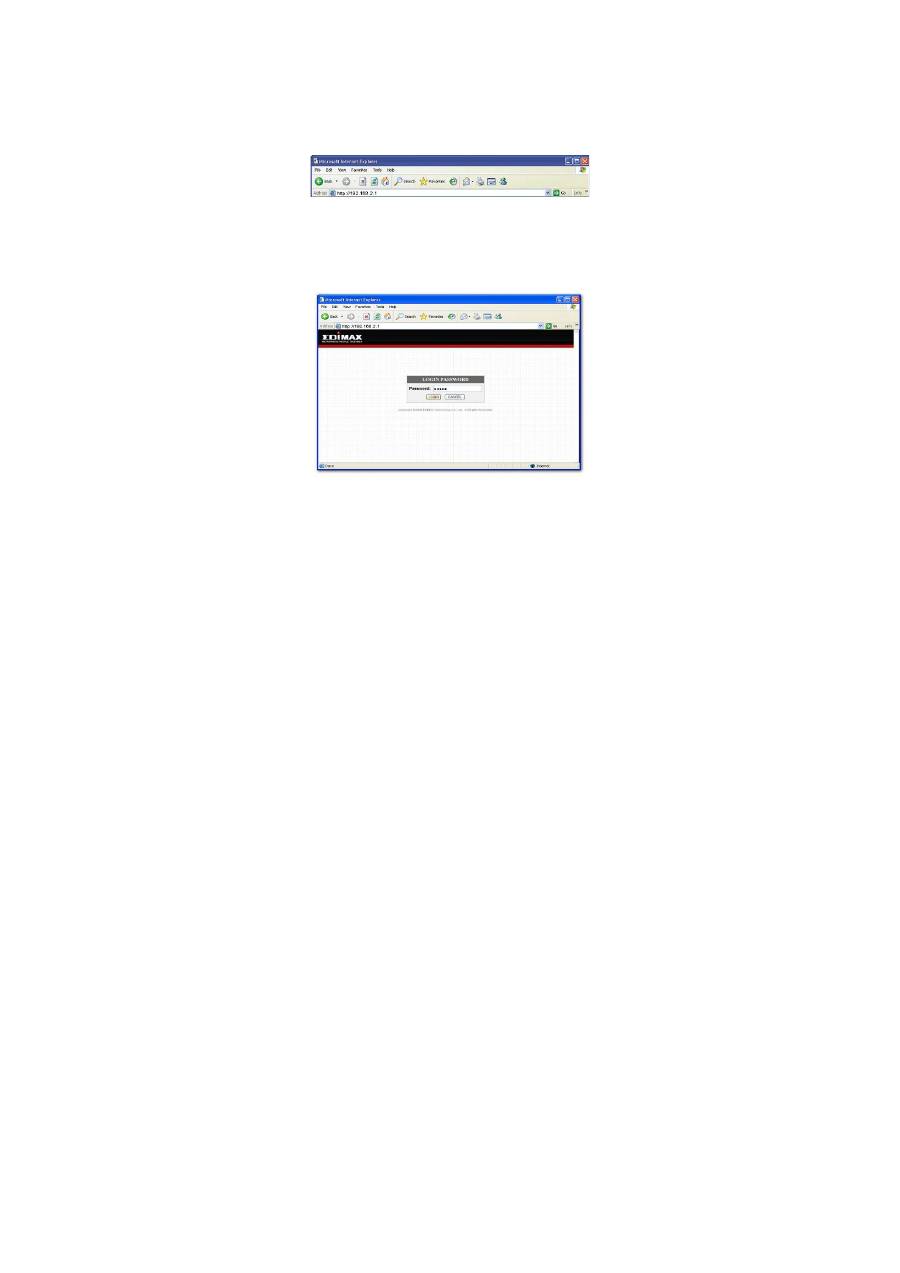
Configuring with Web Browser
1. Open web browser and type
http://192.168.2.1
in the
browser's address box. This number is the default IP
address for this device. Press Enter.
2. At the Password prompt, type 'admin'. You can
change these later if you wish. Click 'LOGIN'.
3. The Quick Setup facility enables you to enter the
Username and Password provided by your ISP.

4
4. To check VPI, VCI and encapsulation with your ISP
(you can found details in user's manual CD) such as:
‧
Australia / All Internet providers. VPI:8 VCI:35
‧
Czech / Czech Telecom. VPI:8 VCI:48
‧
Czech / Telenor Networks. VPI:8 VCI:48
‧
France / Wannadoo. VPI:8 VCI:35
‧
Israel / KPN PPPoE LLC. VPI:8 VCI:48
‧
Italian / Telecom Italia. VPI:8 VCI:35
‧
Morocco / IAM, Wanadoo. VPI:8 VCI:35
‧
Netherlands / KPN PPPoA VC-MuX. VPI:8 VCI:48
‧
Netherlands / BBeyond Bridge LLC. VPI:0 VCI:33
‧
Netherlands / BBeyond PPPoA VC-MuX. VPI:0 VCI:35
‧
Portugal / Todos os apresentador. VPI:0 VCI:35
‧
Switserland / Alle anbieter. VPI:1 VCI:32
‧
United Kingdom / British Telecom. VPI:0 VCI:38

5
Browse the User's Manual:
1.
Insert the Manual CD into your CD-ROM, and the CD
will be display with Auto-Run.
2.
Manual by HTML format.
(Recommend to use IE5.0 later and best view
1024X768)
Note :
Don't use any codes from Internet to upgrade this router,
it will cause the router to be lock-up and no way to recover.
6
Č eský .
Instalace & konfigurace
Spojení LAN:
P
ř
ipojit ethernetový kabel z portu Ethernet na po
č
íta
č
i k portu
LAN na routeru ADSL
from your PC's Ethernet port to
ADSL Router's LAN Port.
Spojení WAN:
P
ř
ipojit telefonický kabel zásuvky domácího telefonu k portu
ADSL na routeru
.
P
ř
ipojení napáje
č
e:
P
ř
ipojit napáje
č
k napájecí zásuvce a spustit za
ř
ízení pomocí
spína
č
e umíst
ě
ného na
č
elním panelu routeru ADSL.
7
Konfigurování za použití internetového prohlíže
č
e
1.
Otev
ř
ít prohlíže
č
a v adresním poli napsat:
http://192.168.2.1. Toto
č
íslo je adresou IP pro toto za
ř
ízení.
Stiskn
ě
te tla
č
ítko Enter
.
2.
V
ř
ádku heslo napsat "admin". Tyto údaje lze zm
ě
nit
v pozd
ě
jší dob
ě
, když takové p
ř
ání budete mít. Kliknut
„LOGIN.
.
3.
Funkce rychlé instalace umož
ň
uje napsání názvu uživatele
a hesla uvedeného dodavatelem internetových služeb
(ISP).

8
4.
Aby si ov
ěř
it VPI, VCI a kapsulování ISP (podrobné
informace jsou v p
ř
íru
č
ce uživatele na desce CD) jako
:
‧
Austrálie / Všichni dodavatele internetových služeb. VPI:8
VCI:35
VPI:8 VCI:35
‧
Č
esko / Czech Telecom
. VPI:8 VCI: 48
‧
Č
esko / Telenor Networks
. VPI:8 VCI: 48
‧
Francie / Wannadoo.
. VPI:8 VCI:35
‧
Izrael / KPN PPPoE LLC
. VPI:8 VCI:48
‧
Itálie
/ Telecom Italia
. VPI:8 VCI:35
‧
Maroko / IAM, Wanadoo.
. VPI:8 VCI:35
‧
Holandsko / KPN PPPoA VC-MuX
. VPI:8 VCI:48
‧
Holandsko / BBeyond Bridge LLC.
LLC. VPI:0 VCI:33
‧
Holandsko / BBeyond PPPoA VC-MuX
. VPI:0 VCI:35
‧
Portugalsko /
Všichni dodavatele
VPI:0 VCI:35
‧
Švýcarsko
/ Všichni dodavatele
VPI:1 VCI:32
‧
Spojené království / British Telecom
. VPI:0 VCI:38

9
Prohlížení p
ř
íru
č
ky uživatele
:
1. Umístit desku CD obsahující p
ř
íru
č
ku na podávacím za
ř
ízení
CD-ROM, a deska bude spušt
ě
ná v režimu trybie Auto-Run.
2.P
ř
íru
č
ka ve formátu HTML:
(Doporu
č
uje se používat IE 5.0 nebo nov
ě
jší a nativní rozlišení
1024X768).
Pozor:
Pro aktualizaci tohoto routeru nepoužívejte, prosím, žádný kódy
získané z Internetu, nebo
ť
zp
ů
sobí to blokádu routeru, která
znemožní jeho další používání.

10
DEUTSCH .
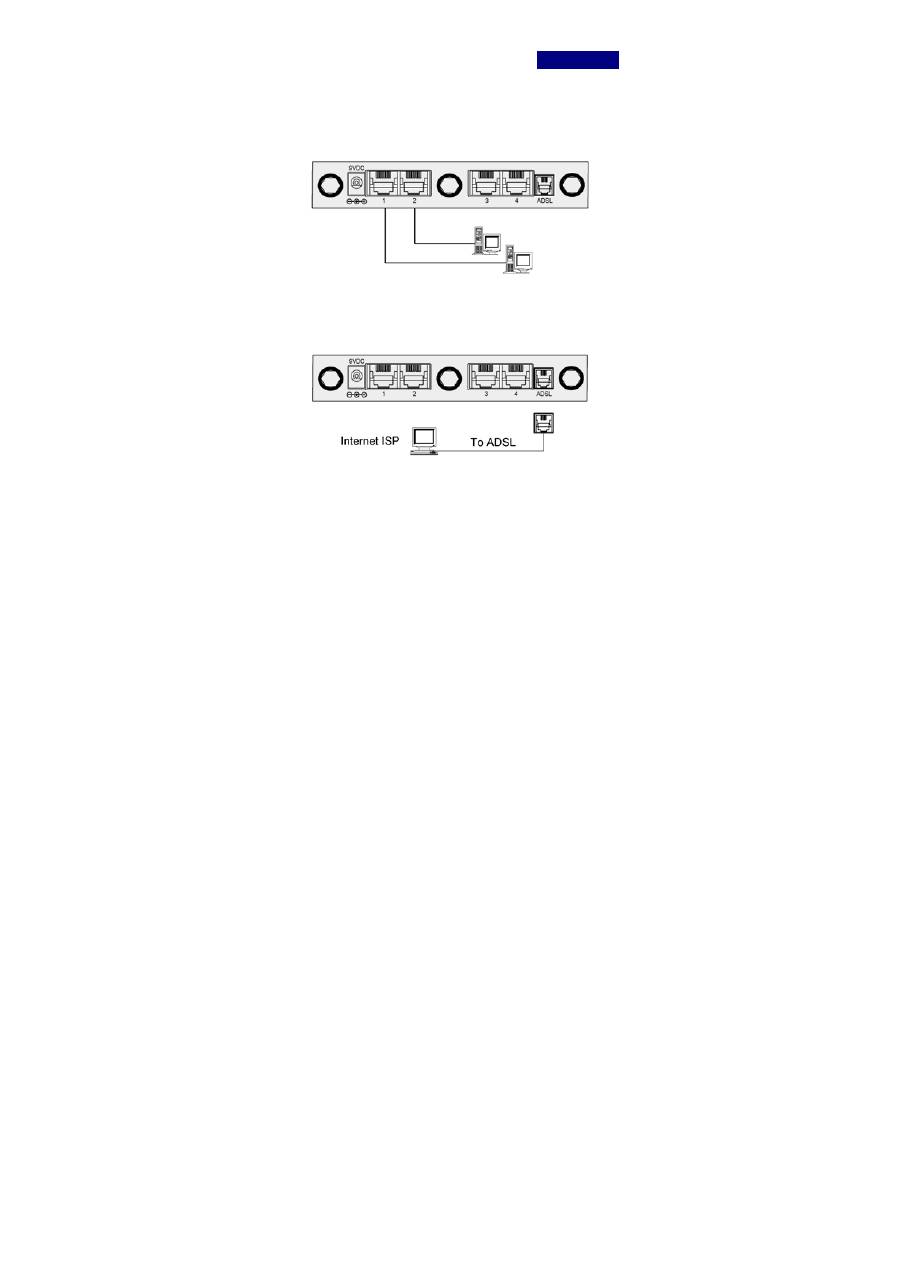
Installation und Einrichtung
LAN-Anschluss:
Verbinden Sie den Ethernet-Anschluss Ihres PC mithilfe
eines Ethernet-Kabels mit dem LAN-Anschluss am
ADSL-Router.
WAN-Anschluss:
Verbinden Sie die Telefonbuchsen in Ihrer Wohnung
mithilfe des Telefonkabels mit dem ADSL-Anschluss am
Router.
Netzadapter-Anschluss:
Schließen Sie den Netzadapter an den
Spannungsanschluss an und schalten Sie den
Ein-Aus-Schalter vorn am ADSL-Router ein.

11
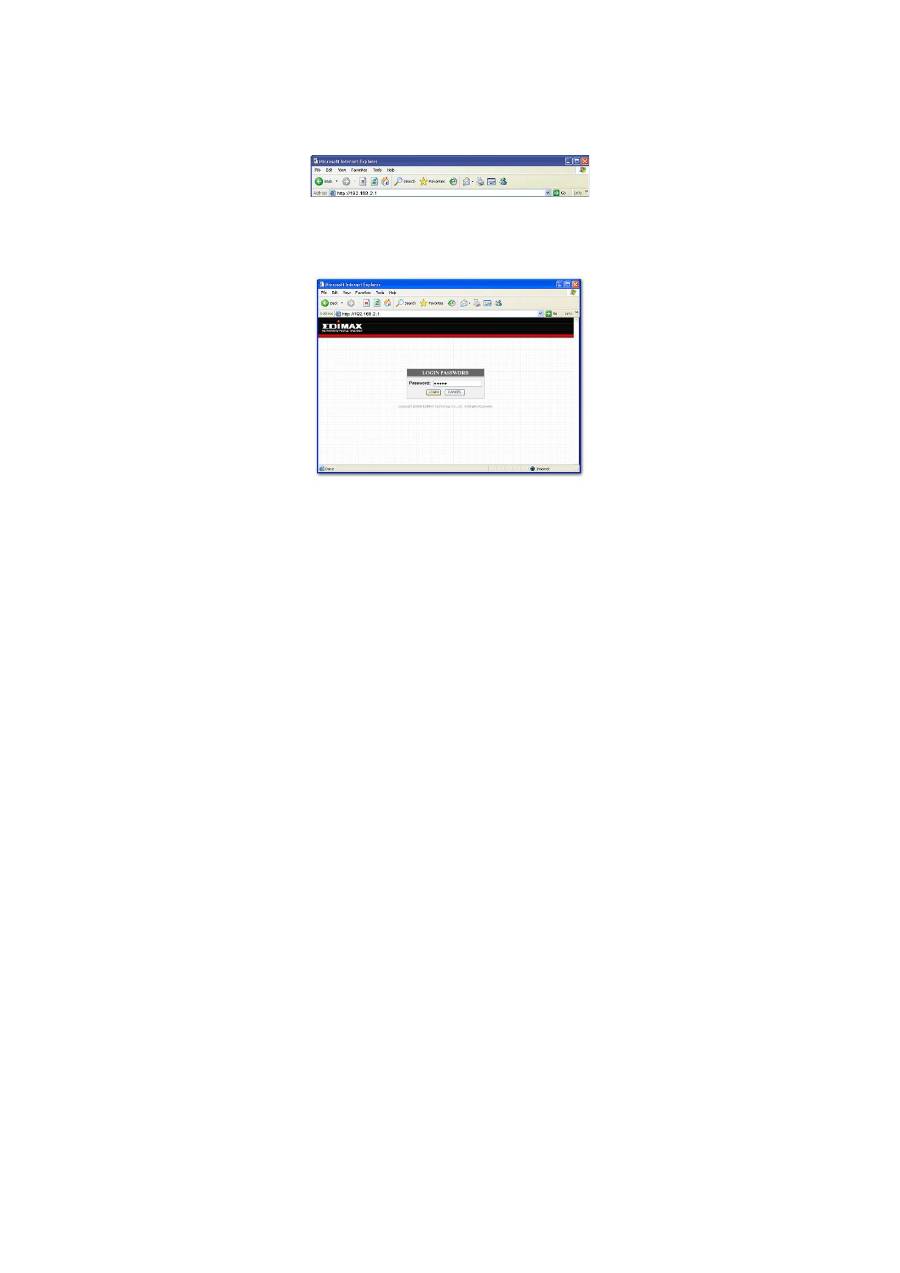
Konfiguration mit dem Webbrowser
1.
Starten Sie Ihren Webbrowser und geben Sie
http://192.168.2.1
im Adressfeld des Browsers ein.
Diese Nummer ist die voreingestellte IP-Adresse
für dieses Gerät. Drücken Sie auf Eingabe.
2.
Geben Sie „admin“ ein, wenn Sie zur Eingabe des
Kennworts aufgefordert werden. Sie können das
Kennwort später ändern. Klicken Sie auf „LOGIN“.
3.
Unter „Quick Setup“ können Sie den
Benutzernamen und das Kennwort eingeben, das
Sie von Ihrem Internetanbieter erhalten haben.

12
4.
Erkundigen Sie sich bei Ihrem Internetanbieter, ob
VPI, VCI und Kapselung verwendet werden
(Einzelheiten finden Sie im Benutzerhandbuch auf
der CD). Zum Beispiel:
‧
Australien / Alle Internetanbieter. VPI:8 VCI:35
‧
Tschechien / Tschechische Telekom. VPI:8 VCI: 48
‧
Tschechien / Telenor-Netze. VPI:8 VCI: 48
‧
Frankreich / Wannadoo. VPI:8 VCI:35
‧
Israel / KPN PPPoE LLC. VPI:8 VCI:48
‧
Italien / Telecom Italia. VPI:8 VCI:35
‧
Marokko / IAM, Wanadoo. VPI:8 VCI:35
‧
Niederlande / KPN PPPoA VC-MuX. VPI:8 VCI:48
‧
Niederlande / BBeyond Bridge LLC. VPI:0 VCI:33
‧
Niederlande / BBeyond PPPoA VC-MuX. VPI:0 VCI:35
‧
Portugal / Todos os fornecedores. VPI:0 VCI:35
‧
Schweiz / Alle Anbieter. VPI:1 VCI:32

13
‧
Großbritannien / British Telecom. VPI:0 VCI:38
Zum Lesen des Benutzerhandbuchs:
1.
Legen Sie die Handbuch-CD in Ihr CD-ROM-Laufwerk
ein. Der CD-Inhalt wird automatisch angezeigt.
2.
Das Handbuch liegt im HTML-Format vor.
(Es wird empfohlen, IE 5.0 und für eine optimale
Darstellung 1024x768 zu verwenden.)
Anmerkung:
Verwenden Sie keine Codes aus dem Internet zum
Aktualisieren dieses Routers. Dies kann zu einer Blockierung
des Routers führen, die nicht rückgängig zu machen ist.

14
ESPAÑOL .
Instalación y configuración
Conexión LAN:
Conecte un cable Ethernet desde el puerto Ethernet de
su PC al puerto LAN del router ADSL.
Conexión WAN:
Conecte el cable del teléfono desde las tomas para
teléfono de su casa al puerto ADSL del router.
Conexión del adaptador de corriente:
Conecte el adaptador a la toma de corriente y encienda
el interruptor del panel delantero del router ADSL.
15
Configuración con un navegador de Internet
1. Abra el navegador y escriba
http://192.168.2.1
en la
barra de direcciones. Este número es la dirección IP
predeterminada para este dispositivo. Pulse la tecla
Intro.
2. Cuando se le pregunte la contraseña (“Password”),
escriba “admin”. Podrá cambiarla más tarde si lo
desea. Haga clic en “LOGIN” para iniciar la sesión.
3. En la herramienta de configuración rápida (“Quick
Setup”), puede introducir el nombre de usuario y la
contraseña que le ha proporcionado su proveedor
de servicios de Internet.

16
4.
Para conocer los valores de identificador de ruta
virtual (VPI), identificador de circuito virtual (VCI) y
encapsulación, consulte a su proveedor de
servicios de Internet (en el CD con el manual de
usuario hay información detallada), como:
‧
Australia / Todos los proveedores de Internet. VPI:8
VCI:35
‧
República Checa / Czech Telecom. VPI:8 VCI: 48
‧
República Checa / Telenor Networks. VPI:8 VCI: 48
‧
Francia / Wanadoo. VPI:8 VCI:35
‧
Israel / KPN PPPoE LLC. VPI:8 VCI:48
‧
Italia / Telecom Italia. VPI:8 VCI:35
‧
Marruecos / IAM, Wanadoo. VPI:8 VCI:35
‧
Holanda / KPN PPPoA VC-MuX. VPI:8 VCI:48
‧
Holanda / BBeyond Bridge LLC. VPI:0 VCI:33
‧
Holanda / BBeyond PPPoA VC-MuX. VPI:0 VCI:35
‧
Portugal / Todos los proveedores. VPI:0 VCI:35

17
‧
Suiza / Todos los proveedores. VPI:1 VCI:32
‧
Reino Unido / British Telecom. VPI:0 VCI:38
Examine el manual del usuario:
1.
Inserte el CD del manual en la unidad de CD-ROM;
el CD se abrirá con la función de ejecución
automática.
2.
Manual en formato HTML.
(Se recomienda utilizar IE5.0 o posterior para una
visualización óptima a 1024 x 768)
Nota:
No utilice códigos de Internet para actualizar el router.
Podría provocar el bloqueo del router y sería imposible
recuperarlo.
18
FRANÇAIS .
Installation & Configuration
Connexion LAN :
Connectez un câble Ethernet depuis le port Ethernet de
votre ordinateur vers le port LAN du routeur ADSL.
Connexion WAN :
Connectez le câble téléphonique depuis la fiche
téléphonique de votre habitation vers le port ADSL du
routeur.
Connexion de l’adaptateur d’alimentation
Connectez l’adaptateur d’alimentation sur l’entrée
électrique et allumez le commutateur d’alimentation se
trouvant sur la face avant du routeur ADSL
19
Configuration via le navigateur Web
1. Ouvrez le navigateur Web et tapez
http://192.168.2.1
dans la
barre d’adresse de votre navigateur.
Il s’agit
de l’adresse IP par défaut pour cet appareil. Appuyez
sur Entrée.
2. A l’invite du mot de passe, tapez ‘admin’. Vous pouvez
modifier ce dernier plus tard si vous le souhaitez.
Cliquez sur ‘LOGIN’.
3. La fonction Quick Setup (configuration rapide) vous
permet d’introduire le nom d’utilisateur et le mot de
passe fournis par votre fournisseur d’accès à l’Internet.

20
4. Contrôlez le VPI, le VCI et l’encapsulation avec votre
fournisseur d’accès à l’Internet (vous trouverez plus de
détails à ce sujet sur le CD du manuel de l’utilisateur),
notamment :
y
Australie / Tous les fournisseurs d’accès à l’Internet. VPI :
8 VCI : 35
y
Tchéquie / Telecom tchèque. VPI : 8 VCI :
48
y
Tchéquie / Telenor Networks. VPI : 8 VCI :
48
y
France / Wannadoo. VPI : 8 VCI : 35
y
Israël / KPN PPPoE LLC. VPI : 8 VCI : 48
y
Italie / Telecom Italie. VPI : 8 VCI : 35
y
Maroc / IAM, Wanadoo. VPI : 8 VCI : 35
y
Pays-Bas / KPN PPPoA VC-MuX VPI : 8 VCI : 48
y
Pays-Bas / BBeyond Bridge LLC. VPI : 0 VCI : 33
y
Pays-Bas / BBeyond PPPoA VC-MuX. VPI : 0 VCI : 35
y
Portugal / Todos os apresentador. VPI : 0 VCI : 35
y
Suisse / Alle anbieter. VPI : 1 VCI : 32
y
Royaume-Uni / British Telecom. VPI : 0 VCI : 38

21
Parcourir le manuel de l’utilisateur :
1. Insérez le CD contenant le manuel dans votre lecteur
de CD-ROM et le CD s’affichera avec Auto-Run.
2
.
Manuel au format HTML.
(Utilisation de IE5.0 ou supérieur recommandée et
affichage optimal 1024X768)
Remarque :
N’utiliser aucun code provenant d’Internet pour mettre à jour ce
routeur, cela verrouillerait le routeur et il n’y aurait aucun
moyen pour le récupérer.
22
ITALIANO .
Installazione e impostazione
Connessione LAN:
Collegare un cavetto Ethernet dalla porta Ethernet del
PC alla porta LAN del router/modem ADSL.
Connessione WAN:
Collegare il cavo telefonico dalla presa a muro del
telefono alla porta ADSL del router.
Connessione dell’alimentatore:
Connettere l’alimentatore alla presa d’entrata e attivare il
commutatore d’accensione posto sul pannello anteriore
del Modem ADSL/Router.
23
Configurazione mediante il navigatore Web
1. Aprire il navigatore Web e immettere
http://192.168.2.1
nel riquadro degli indirizzi. Questo
numero rappresenta l’indirizzo IP per difetto di questo
dispositivo. Premere il pulsante <Enter>.
2. All’invito per l’immissione dell’identità utente/codice
segreto, battere ‘admin’. Se lo si desidera, si potranno
cambiare questi dati più tardi. Effettuare un clic su
‘LOGIN’.
3. L'Impostazione rapida consente l'immissione del nome
utente e del codice segreto impartiti dal fornitore
d'accesso (ISP).
