D-Link DAP-3220: инструкция
Раздел: Профоборудование
Тип: Аппарат
Инструкция к Аппарату D-Link DAP-3220
WIRELESS 108G EXTERIOR ACCESS POINT
DAP-3220
Quick Installation Guide+
Руководство по быстрой установке+
Guía de Instalación Rápida+
Guia de Instalação Rápida+
快速安裝指南+
Petunjuk Pemasangan Cepat+
Quick Installation Guide
DAP-3220
Wireless 108G Exterior Access Point

System Requirements
Minimum System Requirements:
• CD-ROM Drive
®
®
• Computers with Windows
, Macintosh
, or Linux-based
operating systems
• Installed Ethernet Adapter Internet Explorer version 6.0 or Netscape
™
Navigator
version 7.0 and above
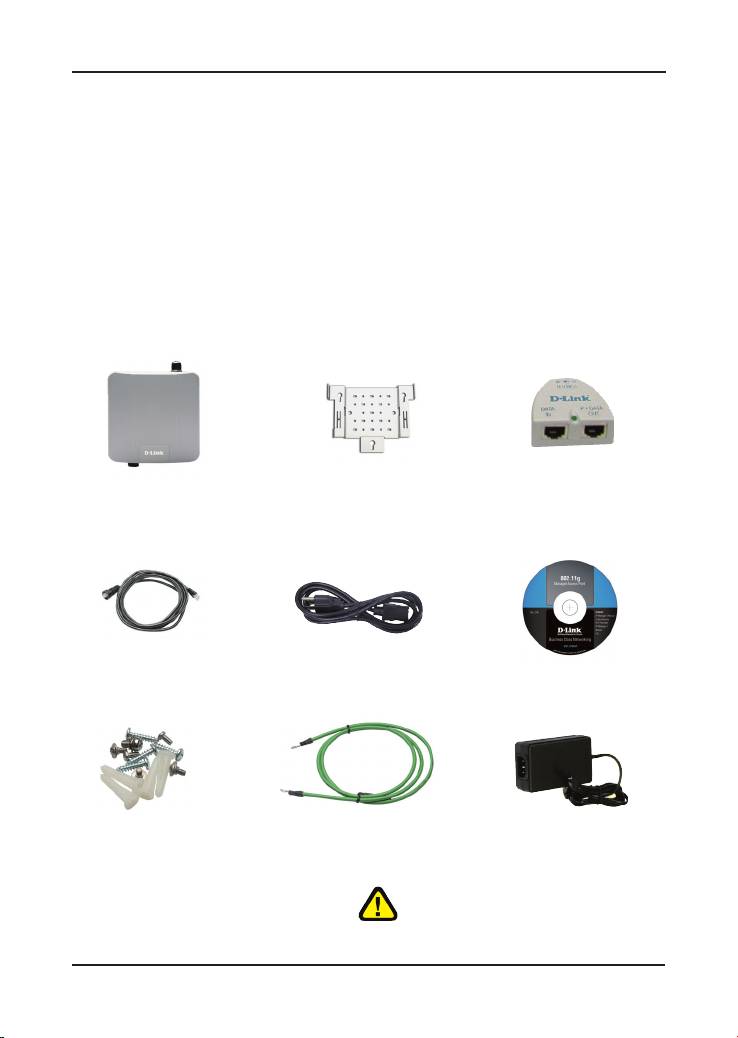
Package Contents
DAP-3220 Wireless 108 G
Mounting Plate
Power over Ethernet
Exterior Access Point
base unit
4m Ethernet Cable
Power cord
CD-ROM with Manual
Screws Grounding Wire
Power Adapter - DC 48V, 0.4A
Using a power adapter with a different
voltage rating will damage and void the
warranty of this product.
3

Before You Begin
It’s best to use a computer (with an Ethernet adapter) connected to a switch
to congure the DAP-3220. The default IP address for the DAP-3220 is
192.168.0.50 with a subnet mask of 255.255.255.0 on the wired Ethernet
side. You will need to assign your computer a static IP address within the
same range as the DAP-3220’s IP address for the purpose of conguring
the DAP-3220. If you need assistance assigning a static IP address
to your network adapter, please refer to the manual on the CD-ROM.
Important Information
This product should ONLY be installed by an experienced installer
who is familliar with local building and safety codes and where ever
applicable, is licensed by the appropriate authorities. Failure to do so
may void the D-Link product warranty and may expose the end user
or the service provider to legal and nancial liabilities. D-Link and its
resellers or distributors are not liable for injury, damage, or violation of
regulations associated with the installation of outdoor units or antennas.
A safety grounding system is necessary to protect your outdoor installation
from lightning strikes and the build-up of static electricity. The grounding
system must comply with the National Electrical Code and safety standards
that apply in your country. Always check with a qualied electrician if you
are in doubt as to whether your outdoor installation is properly grounded.
4

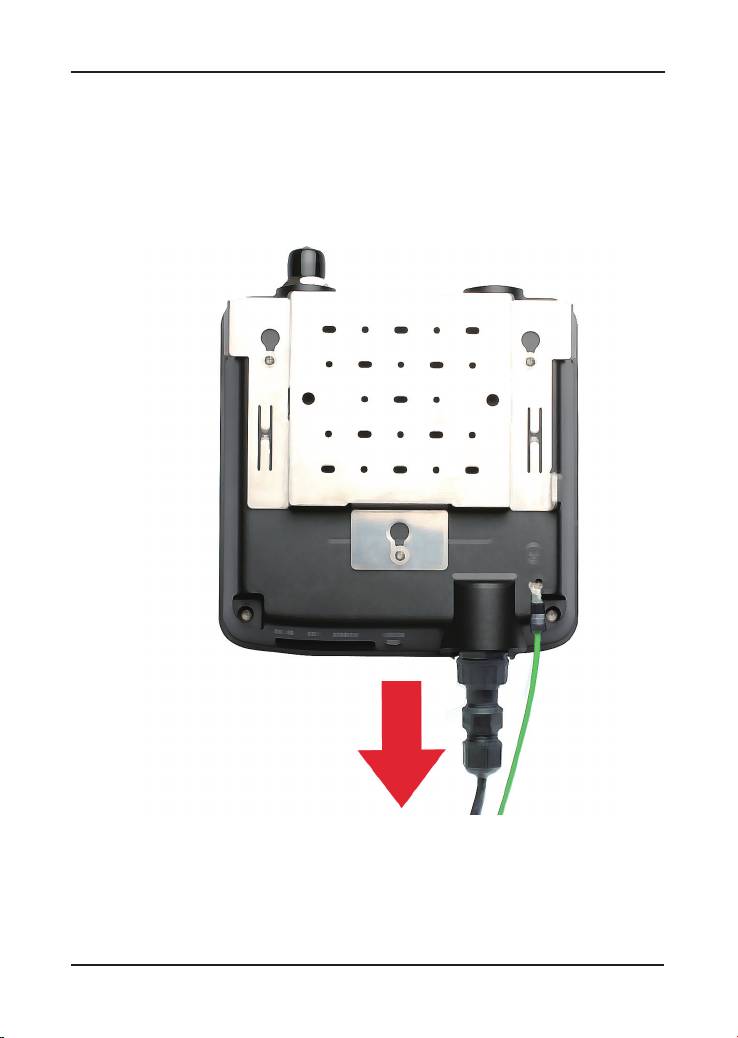
Physical Installation
C onn e c t t h e su p p l i e d
Ethernet cable with the
waterproof enclosure to
the Ethernet port on the
DAP-3220 and attach the
grounding wire.
5

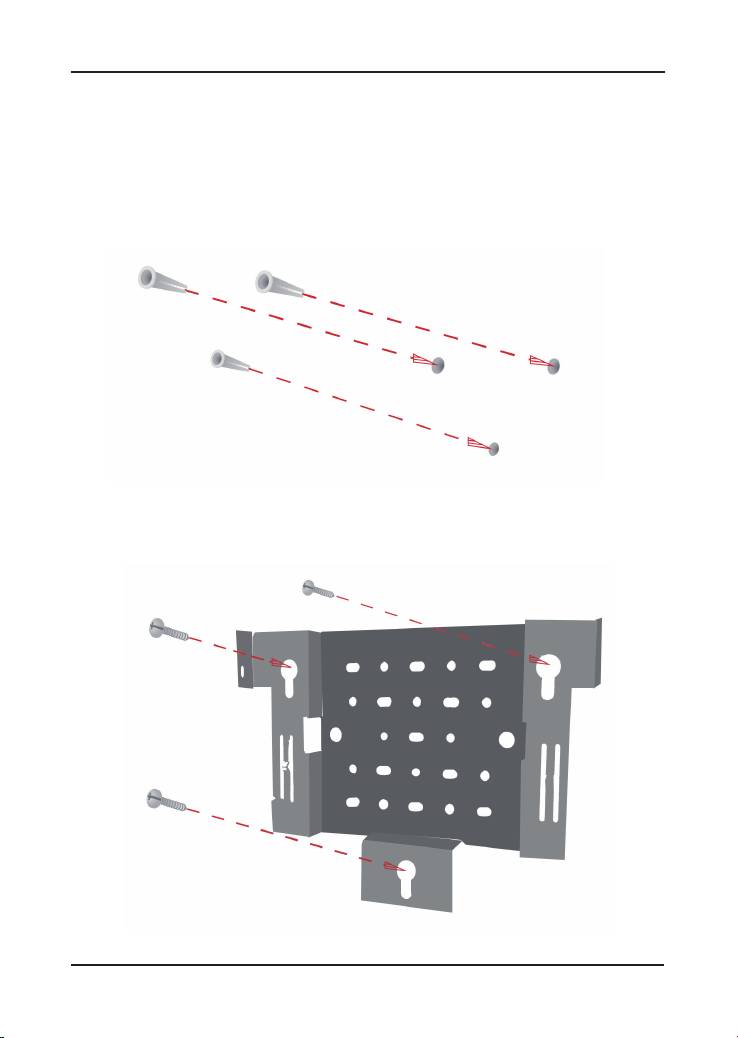
Mounting Plate Assembly
Step 1: Insert provided wall anchors in the wall where the mounting plate will be
attached.
Step 2: Use the provided screws to secure the mounting plate on the wall.
6

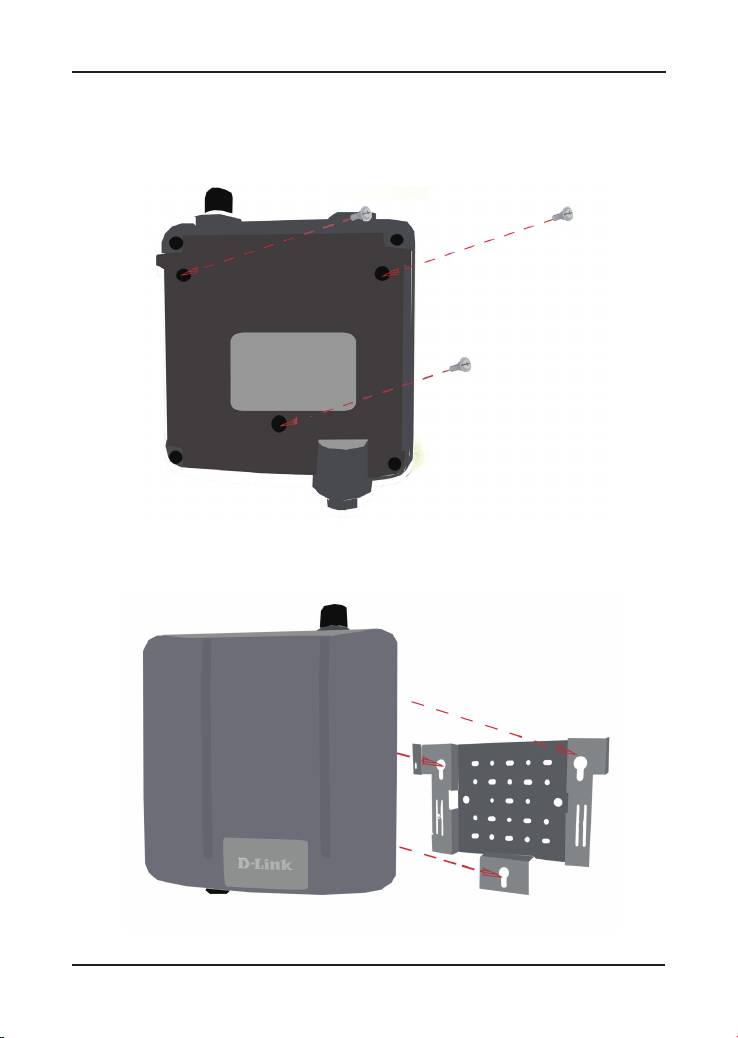
Step 3: Attach the remaining screws securely to the back of the
DAP-3220.
Step 4: Attach the DAP-3220 to the mounting plate.
7
Step 5: Slide the DAP-3220 down into the grooves on the mounting plate to secure
it to the plate.
8

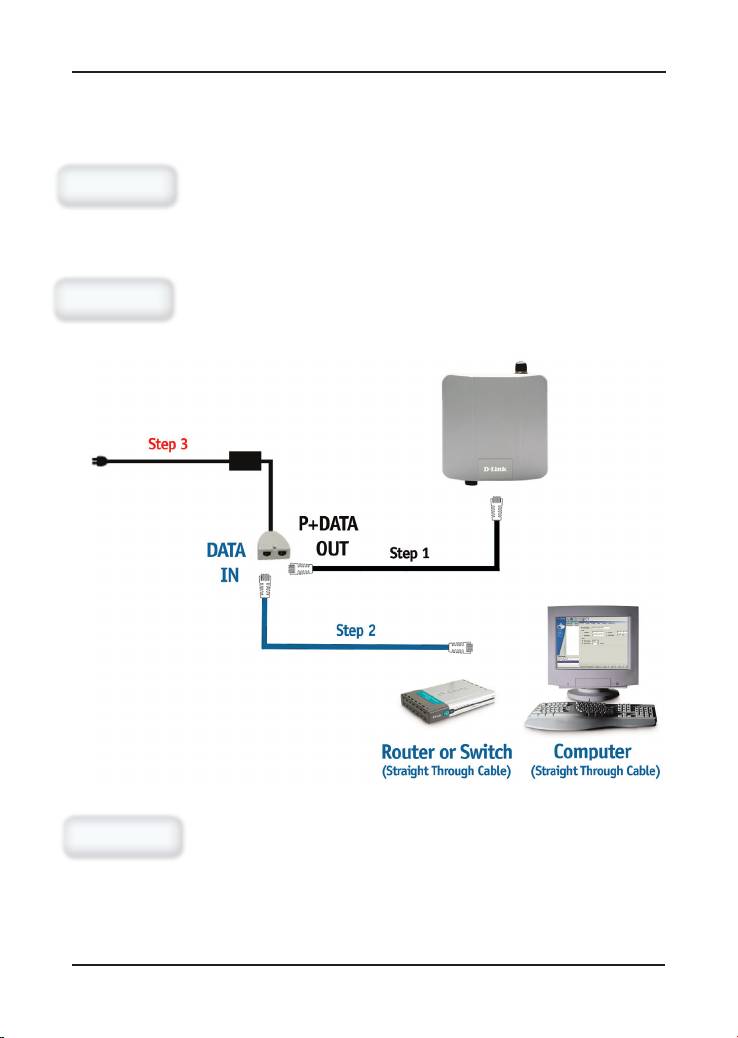
Installing the Hardware
Connect one end of an Etherne cable (included with your package)
Step 1
to the LAN port on the DAP-3220 and the other end of the Ethernet
cable to the port labeled P+DATA OUT on the PoE base unit.
Connect another Ethernet cable from the DATA IN port on the PoE
Step 2
base unit to your router/switch or to a PC.
Step 3
Attach the power adapter to the connector labeled POWER IN on the PoE base unit.
Attach the power cord to the power adapter and into an electrical outlet.
9
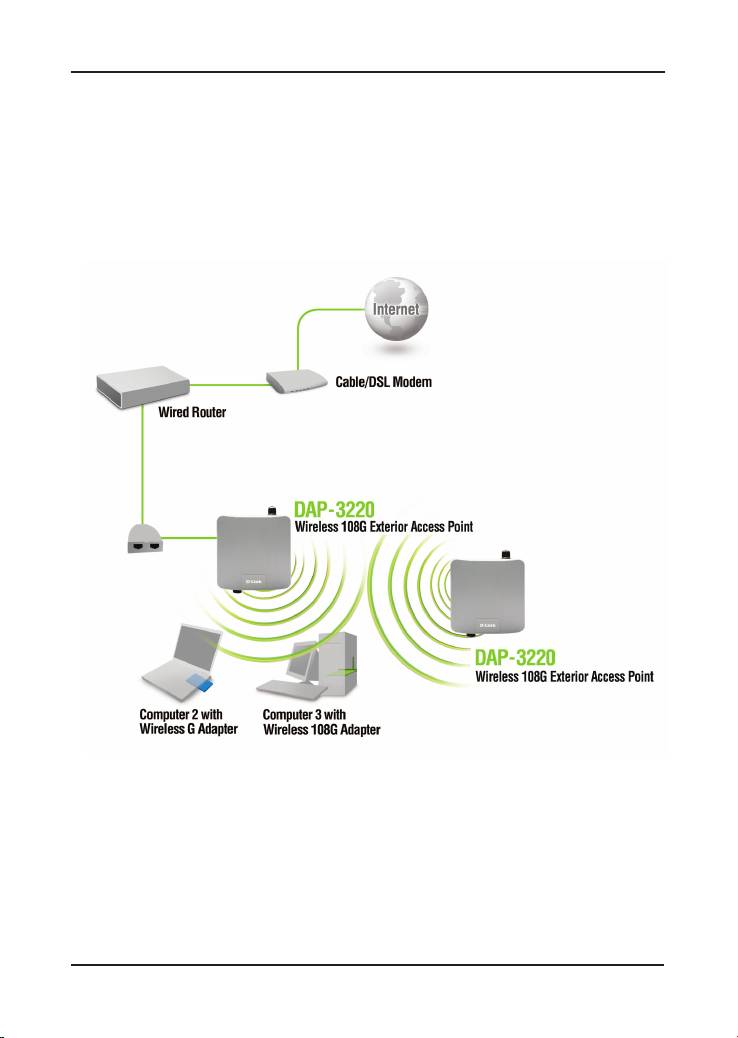
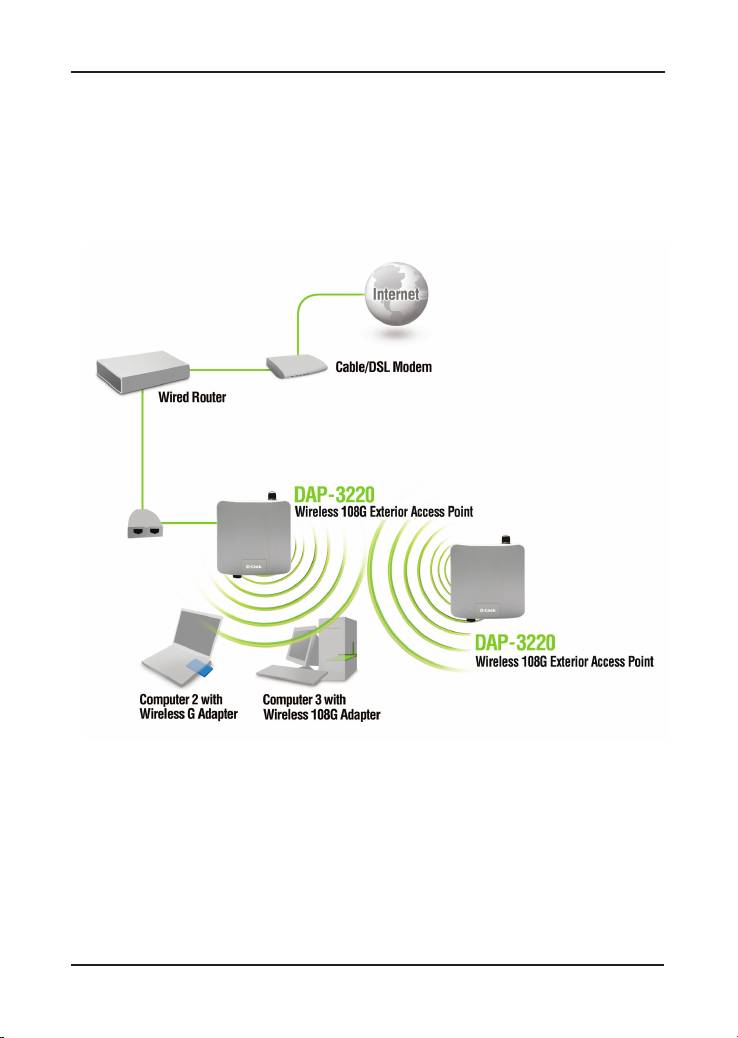
Your Setup is Complete
When you have completed the steps in this Installation Guide and congured your
DAP-3220 for your network, your network should look similar to this:
10
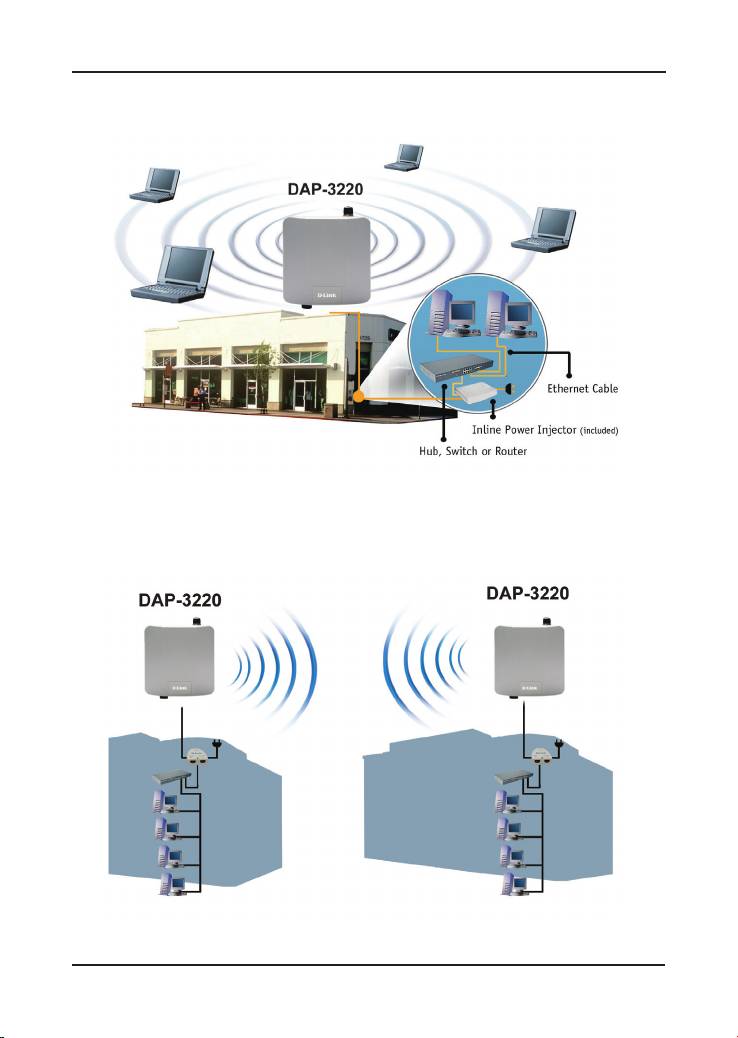
AP Mode:
Bridging Mode:
11

Technical Support
You can nd software updates and user documentation on the D-Link website.
Tech Support for customers in
Australia:
Tel: 1300-766-868
Monday to Friday 8:00am to 8:00pm EST
Saturday 9:00am to 1:00pm EST
http://www.dlink.com.au
e-mail: support@dlink.com.au
India:
Tel: 1800-222-002
Monday to Friday 9:30AM to 7:00PM
http://www.dlink.co.in/support/productsupport.aspx
Indonesia, Malaysia, Singapore and Thailand:
Tel: +62-21-5731610 (Indonesia)
Tel: 1800-882-880 (Malaysia)
Tel: +65 66229355 (Singapore)
Tel: +66-2-719-8978/9 (Thailand)
Monday to Friday 9:00am to 6:00pm
http://www.dlink.com.sg/support/
e-mail: support@dlink.com.sg
Korea:
Tel: +82-2-890-5496
Monday to Friday 9:00am to 6:00pm
http://www.d-link.co.kr
e-mail: lee@d-link.co.kr
New Zealand:
Tel: 0800-900-900
Monday to Friday 8:30am to 8:30pm
Saturday 9:00am to 5:00pm
http://www.dlink.co.nz
e-mail: support@dlink.co.nz

Technical Support
You can nd software updates and user documentation on the D-Link website.
Tech Support for customers in
Egypt:
Tel: +202-2919035 or +202-2919047
Sunday to Thursday 9:00am to 5:00pm
http://support.dlink-me.com
e-mail: amostafa@dlink-me.com
Iran:
Tel: +98-21-88822613
Sunday to Thursday 9:00am to 6:00pm
http://support.dlink-me.com
e-mail: support.ir@dlink-me.com
Israel:
Tel: +972-9-9715701
Sunday to Thursday 9:00am to 5:00pm
http://www.dlink.co.il/support/
e-mail: support@dlink.co.il
Pakistan:
Tel: +92-21-4548158 or +92-21-4548310
Sunday to Thursday 9:00am to 6:00pm
http://support.dlink-me.com
e-mail: support.pk@dlink-me.com
South Africa and Sub Sahara Region:
Tel: +27-12-665-2165
08600 DLINK (for South Africa only)
Monday to Friday 8:30am to 9:00pm South Africa Time
http://www.d-link.co.za
Turkey:
Tel: +90-212-2895659
Monday to Friday 9:00am to 6:00pm
http://www.dlink.com.tr
e-mail: turkiye@dlink-me.com
e-mail: support@d-link.co.za
U.A.E and North Africa:
Tel: +971-4-391-6480 (U.A.E)
Sunday to Wednesday 9:00am to 6:00pm GMT+4
Thursday 9:00am to 1:00pm GMT+4
http://support.dlink-me.com
e-mail: support@dlink-me.com
Руководство по быстрой установке
DAP-3220
Внешняя беспроводная точка доступа 108G
Системные требования
Минимальные системные требования:
• Привод CD-ROM
• Компьютеры с операционными системами Windows, Macintosh, или
Linux.
• Установленный адаптер Ethernet и Internet Explorer версии 6.0 или
Netscape Navigator версии 7.0 или выше.
Комплект поставки
Внешняя беспроводная
Настенное
Базовое устройство PoE
точка доступа 108G
крепление
DAP-3220
Кабель Ethernet
Шнур питания
CD-диск с руководством
длиной 4 м
пользователя
Набор болтов Провод
Адаптер питания 48V, 0.4A
заземления
Использование источника питания
с другим напряжением питания
может привести к выходу из строя
устройства и потере гарантии.
15

Прежде чем начать
Для настройки DAP-3220 лучше всего использовать компьютер (с
адаптером Ethernet), подключенный к коммутатору. По умолчанию
IP-адрес интерфейса Ethernet DAP-3220 равен 192.168.0.50, а
маска подсети 255.255.255.0. Необходимо присвоить компьютеру
статический IP-адрес из той же подсети, что и IP-адрес DAP-3220.
Подробные инструкции по настройке статического IP-адреса сетевого
адаптера смотрите в Руководстве пользователя на компакт-диске.
Важная информация
Данный продукт должен устанавливаться ТОЛЬКО опытным
инженером, знакомым со строительными нормами и правилами техники
безопасности, и где возможно, лицензированным соответствующим
центром сертификации. В противном случае, это может привести
к потере гарантии на продукт D-Link и юридической и финансовой
ответственности конечного пользователя или поставщика услуг.
D-Link и его посредники или дистрибьюторы не ответственны
за повреждение, выход из строя устройства или нарушения
норм, связанных с установкой внешних устройств или антенн.
Безопасная система заземления необходима для защиты внешнего
устройства от ударов молнии и накопившегося статического
электричества. Поэтому прямое заземление антенной мачты,
внешней точки доступа и модуля грозозащиты очень важно. При
установке внешней точки доступа на антенную мачту необходимо
подключить внешнюю точку доступа к той же заземляющей
системе и розетке сети питания. Система заземления должна
соответствовать национальным электротехническим нормам и
правилам техники безопасности, действующим в Вашей стране.
Всегда обращайтесь к квалифицированному инженеру-электрику,
если сомневаетесь, правильно ли заземлена внешняя точка доступа.
16
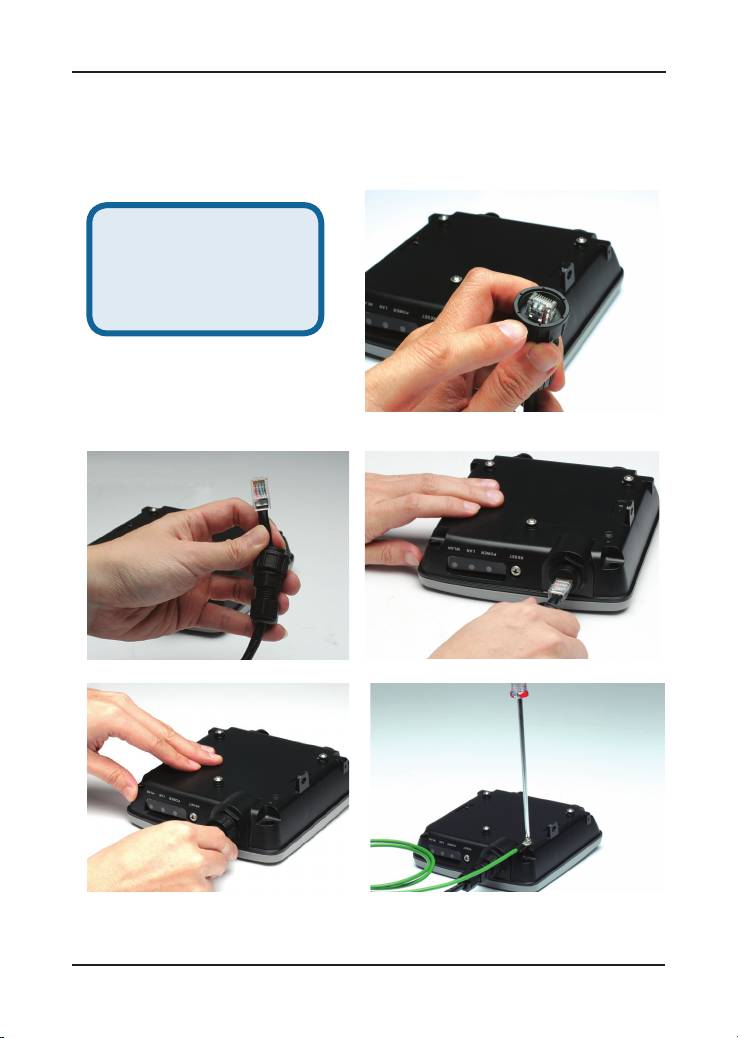
Физическая установка
Подключите прилагаемый
к а б е л ь E t h e r n e t с
в о д о н е п р о н и ц а е м о й
оболочкой к порту Ethernet
DAP-3220 и подсоедините
заземляющий провод.
17
Монтаж крепежной пластины
Шаг 1: Забейте дюбели в стену, где будет установлена крепежная
пластина.
Шаг 2: С помощью болтов, входящих в поставку, прикрепите крепежную
пластину к стене.
18
Шаг 3: Оставшиеся болты надежно закрепите на задней панели
DAP-3220.
Шаг 4: Прикрепите DAP-3220 к крепежной плате.
19

Шаг 5: Плавно опустите DAP-3220 в пазы крепежной пластины, чтобы
надежно ее закрепить.
20
Установка оборудования
Подсоедините один конец кабеля Ethernet (входит в комплект
Шаг 1
поставки) к Порту LAN на DAP-3220, а другой к порту
обозначенному как P+DATA OUT на базовом устройстве PoE.
Подсоедините другой кабель Ethernet к порту обозначенному
Шаг 2
как DATA IN на базовом устройстве PoE и к маршрутизатору/
коммутатору или компьютеру.
Шаг 3
Подключите адаптер питания ко входу POWER IN на базовом устройстве PoE.
Подсоедините шнур питания к адаптеру питания и к электро-сети.
21
Установка завершена!
После выполнения всех шагов этого руководства по установке и настройке
DAP-3220 для сети, сеть должна выглядеть подобным образом:
22

Режим точки доступа:
Режим моста:
23

Техническая поддержка
Обновления программного обеспечения и документация
доступны на Интернет-сайте D-Link.
D-Link предоставляет бесплатную поддержку для клиентов в
течение гарантийного срока.
Клиенты могут обратиться в группу технической поддержки
D-Link по телефону или через Интернет.
Техническая поддержка D-Link:
(495) 744-00-99
Техническая поддержка через Интернет
http://www.dlink.ru
email: support@dlink.ru

.OTES
Оглавление
- Quick Installation Guide
- Guía de instalación
- Guia de Instalação Rápida
- Petunjuk Pemasangan Cepat
