Cambridge Audio Azur 340A: инструкция
Раздел: Бытовая, кухонная техника, электроника и оборудование
Тип: Ресивер/Усилитель
Инструкция к Ресиверу/Усилителю Cambridge Audio Azur 340A

azur 340A
Integrated amplifier / HIFI-Verstärker / Amplificateur intégré / Amplificador integrado / Amplificatore
integrato / Geïntegreerde versterker / Integreret forstærker /
Встроенный усилитель
User’s manual / Bedienungsanleitung / Mode d'emploi / Manual del usuario / Manuale per l'utente /
Gebruikershandleiding / Brugermanual /
Руководство для пользователя

2
azur integrated amplifier
Thank you for purchasing this Cambridge Audio azur series amplifier. It
is the result of our most extensive ever research and development
program in over three decades of producing high quality audio products.
We hope that you will appreciate the results and enjoy many years of
listening pleasure.
About this amplifier
The design of a high quality but cost-effective audio amplifier presents
a major challenge. Providing first-class performance on an unlimited
budget is one matter; achieving the same performance within tight price
limits is quite another, and requires the expertise and experience that
Cambridge Audio brings to its product design process. We believe we
have succeeded in our aim of creating a first-class affordable amplifier.
The wide bandwidth of this amplifier is ideal for the new "better than CD"
high bandwidth sources such as DVD-audio and Super Audio CD.
The power amplifier stages follow the same basic architecture that
Cambridge Audio have used in previous award-winning amplifiers, with
refinements to match it to its exact application in the Azur 340A. The
power amplifier input circuitry uses dual differential pairs, linearly
buffered from the input to establish optimal operating conditions. A
carefully controlled amount of local negative feedback is used in this
stage to define the stability margins so that any reactive load may be
driven effortlessly.
The output stage uses large-area silicon devices, with exceptionally
rapid thermal compensation to maintain correct output stage conditions
and so prevent crossover distortion, even under widely varying drive
conditions.
The power amplifiers incorporate an electronic muting system that
reacts extremely quickly and allows the complete suppression of
switching clicks, such as may occur when changing inputs or turning the
amplifier on and off.
The power supply is a vital part of a power amplifier. The Azur 340A
power amplifiers are fed from a power supply of elegant simplicity that
avoids the complications and uncertainties of regulated supplies. A
toroidal transformer selected for low external magnetic field, is used in
conjunction with generously specified reservoir capacitors and optimally
placed decoupling components.
Close attention has been paid to the performance and quality of the
passive components used, both in the signal paths and for decoupling
purposes.
The Cambridge Audio Azur 340A incorporates tone controls that give
vernier control of the frequency response, allowing the correction of
dubious source material, and compensation for loudspeaker
inadequacies or problems with room acoustics. These tone controls can
be switched completely out of the audio path by use of the DIRECT
switch, to give the shortest possible audio path. Other features include
24-carat gold-plated phono sockets, a tape send/return loop, a
headphone socket, and a second set of switchable loudspeaker
outputs.
The Cambridge Audio Azur 340A has full protection against misuse and
possible faults. The overload and short-circuit protection systems
continuously monitor the voltage, current and temperature of the output
devices, allowing the protection to act positively in case of genuine need,
but never triggering spuriously.
INTRODUCTION

340A Integrated amplifer
azur integrated amplifier
3
Full temperature protection directly senses the device die temperatures
and shuts down the output if the amplifier overheats due to obstructed
ventilation or any other cause.
DC offset protection immediately isolates the amplifier from the
loudspeakers, by positively opening an output relay in the unlikely event
of an amplifier error.
Voltage clamping is built into the power amplifier output stages to safely
handle flyback transients from highly reactive loads.
A sophisticated microcontroller system handles the basic operation of
the amplifier, such as muting at switch-on and switch-off, protection and
so on.
Now we invite you to sit back, relax and enjoy!
Matthew Bramble
Technical Director
Introduction .................................................................................................2
Safety precautions ......................................................................................4
Important safety instructions..................................................................... 5
Rear panel connections .............................................................................6
Connecting.................................................................................................. 8
Operating instructions & controls........................................................... 10
Troubleshooting.........................................................................................14
Specifications............................................................................................14
Limited warranty....................................................................................... 15
CONTENTS
4
azur integrated amplifier
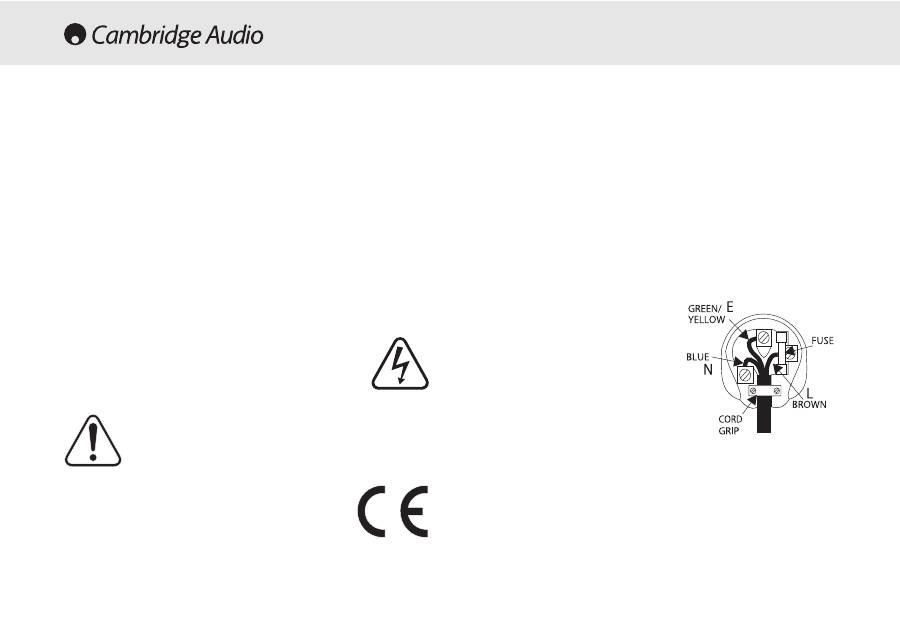
Plug fitting instructions (UK only)
The cord supplied with this appliance is factory fitted with a 13A mains plug fitted
with a 3A fuse inside. If it is necessary to change the fuse, it is important that a 3A
one is used. If the plug needs to be changed because it is not suitable for your
socket, or becomes damaged, it should be cut off and an appropriate plug fitted
following the wiring instructions below. The plug must then be disposed of safely,
as insertion into a 13A socket is likely to cause an electrical hazard. Should it be
necessary to fit a 3-pin BS mains plug to the power cord the wires should be fitted
as shown in this diagram. The colours of the wires in the mains lead of this
appliance may not correspond with the coloured markings identifying the
terminals in your plug. Connect them as follows:-
The wire which is coloured BLUE must be
connected to the terminal which is marked
with the letter 'N' or coloured BLACK.
The wire which is coloured BROWN must be
connected to the terminal which is marked
with the letter 'L' or coloured RED
The wire which is coloured GREEN/YELLOW
must be connected to the terminal which is
marked with the letter 'E' or coloured
GREEN.
If your model does not have an earth wire,
then disregard this instruction.
If a 13 Amp (BS 1363) plug is used, a 3 Amp fuse must be fitted, or if any other
type of plug is used a 3 Amp or 5 Amp fuse must be fitted, either in the plug or
adaptor, or on the distribution board.
Checking the power supply rating
For your own safety please read the following instructions carefully before
attempting to connect this unit to the mains.
Check that the rear of your unit indicates the correct supply voltage. If your mains
supply voltage is different, consult your dealer.
This unit is designed to operate only on the supply voltage and type that is
indicated on the rear panel of the unit. Connecting to other power sources may
damage the unit.
This equipment must be switched off when not in use and must not be used unless
correctly earthed. To reduce the risk of electric shock, do not remove the unit's
cover (or back). There are no user serviceable parts inside. Refer servicing to
qualified service personnel. If the power cord is fitted with a moulded mains plug
the unit must not be used if the plastic fuse carrier is not in place.
The lightning flash with the arrowhead symbol within an equilateral
triangle is intended to alert the user to the presence of uninsulated
'dangerous voltage' within the product's enclosure that may be of
sufficient magnitude to constitute a risk of electric shock to
persons.
The exclamation point within an equilateral triangle is intended to
alert the user to the presence of important operating and
maintenance instructions in the service literature relevant to this
appliance.
This product complies with European Low Voltage (73/23/EEC)
and Electromagnetic Compatibility (89/336/EEC) Directives
when used and installed according to this instruction manual. For
continued compliance only Cambridge Audio accessories should
be used with this product and servicing must be referred to
qualified service personnel.
SAFETY PRECAUTIONS

340A Integrated amplifer
azur integrated amplifier
5
Please take a moment to read these notes before installing your Azur
amplifier, they will enable you to get the best performance and prolong
the life of the product. We advise you follow all instructions, heed all
warnings and keep the instructions for future reference.
The unit is of Class 1 construction and must be connected to a Mains
socket outlet with a protective earthing connection.
The unit requires ventilation above and below. Do not situate it on a rug
or other soft surface and do not obstruct any air inlet or outlet grilles on
the underside and top cover. Do not place in an enclosed area such as
a bookcase or in the cabinet.
Do not install near any heat sources such as radiators, heat register,
stove, or other apparatus (including amplifiers) that produce heat.
Do not defeat the safety purpose of the polarized or grounding type plug.
A polarized plug has two blades with one wider than the other. A
grounding type plug has two blades and a third grounding prong. The
wide blade or third prong are provided for your safety. If the provided
plug does not fit your outlet, consult an electrician for replacement of
the obsolete outlet.
WARNING - To reduce the risk of fire or electric shock, do not expose this
unit to rain or moisture. This unit must not be exposed to dripping or
splashing water or other liquids. No objects filled with liquid, such as
vases, shall be placed on the unit. In the event, switch off immediately,
disconnect from the mains supply and contact your dealer for advice.
Ensure that small objects do not fall through any ventilation grille. If this
happens, switch off immediately, disconnect from the mains supply and
contact your dealer for advice.
Do not route the power cable so that it can be walked upon or damaged
by other items near it.
It is recommended that when bi-amping, the same type power amplifiers
are used.
This unit must be disconnectted from the mains socket to be turned off
completely. If you do not intend to use this unit for a long period of time,
unplug it from the mains socket. Unplug this unit during lightning
storms.
To clean the unit, wipe its case with a moist, lint-free cloth. Do not use
any cleaning fluids containing alcohol, ammonia or abrasives. Do not
spray an aerosol at or near the amplifier.
This unit is not user servicable, never attempt to repair, dissassemble or
reconstruct the unit if there seems to be a problem. Servicing is required
when the unit has been damaged in any way, such as power-supply cord
or plug is damaged, liquid has been spilled or objects have frallen into
it, the unit has been exposed to rain or moisture, does not operate
normally or has been dropped. A serious electric shock could result if
this precautionary measure is ignored.
This unit should be installed on a sturdy, level surface. Due to stray
magnetic fields turntables should not be located nearby due to
interference.
IMPORTANT SAFETY INSTRUCTIONS
6
azur integrated amplifier
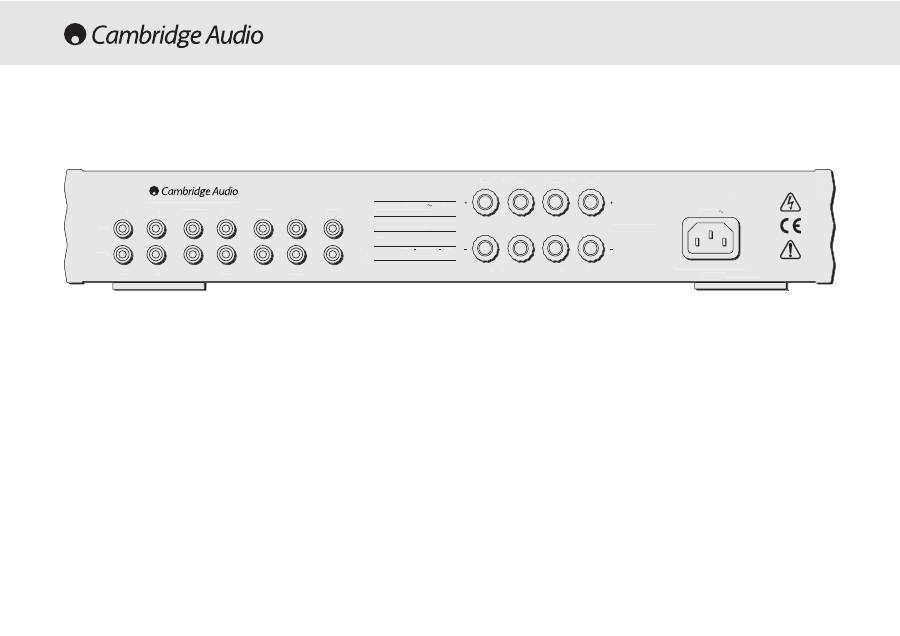
AC power socket
Once you have completed all connections to the amplifier, plug the AC
Power Cable into an appropriate mains socket. The amplifier is now
ready for use.
Loudspeaker connections
The 340A has two sets of Loudspeaker terminals on the rear panel,
speakers A and B. Speakers A are the main speaker terminals, speakers
B are the secondary switchable speaker terminals. Connect the wires
from your left channel loudspeaker to the LEFT + & - terminals, and
likewise the wires from the right channel loudspeaker to the RIGHT + &
- terminals. In each case the red terminal is the positive output, and the
black terminal is the negative input. Care should be taken to ensure no
stray strands of wire are shorting speaker outputs together.
Note: This amplifier has been designed for use with loudspeakers that
have a nominal impedance of between 4 and 8 ohms.
Please ensure that the speaker terminals have been tightened
adequately to provide a good electrical connection. It is possible for the
sound quality to be affected if the screw terminals are loose.
Tape mon
These sockets can be connected to a tape deck or to the analog sockets
on a MiniDisc or CD recorder. Connect an interconnect cable from the
recorder's Line Out sockets to the amplifier's Tape Monitor sockets. This
monitor doubles up as the standard tape/recording medium input.
Note: When connecting a source component that has both an input and
output i.e. a tape recorder, the output of should always be connected to
the Tape Mon input. This will eliminate howlround if the wrong input
channel is selected.
Power Rating:
230V AC 50Hz
Designed and Engineered in London, England
www.cambridge-audio.co.uk
Manufactured in an
ISO9002
approved facility
Power AC
Right
Left
Right
Left
Lef
t
B
A
Right
Lef
t
Right
B
A
Rec-Out
Tape In
AV / MD
DVD
Tuner / DAB
CD
Aux
Rec-Out
Tape I
n
AV / MD
DVD
Tuner / D
AB
CD
Aux
Right
Left
Right
Left
Impedance 4 - 8 ohms
Loudspeaker Terminals
Caution
Serial Number Label Removed
Risk of electric shock
Do not open
Caution
Risque de choc electrique
Ne pas ouvrir
Avis
Vorm offnen des gerates
Netzstecker ziehen
Achtung
azur 340A Integrated Amplifier
Max Power Consumption
:
345W
