Cambridge Audio Azur 340A: 340A Integrated amplifer
340A Integrated amplifer: Cambridge Audio Azur 340A

340A Integrated amplifer
azur integrated amplifier
5
Please take a moment to read these notes before installing your Azur
amplifier, they will enable you to get the best performance and prolong
the life of the product. We advise you follow all instructions, heed all
warnings and keep the instructions for future reference.
The unit is of Class 1 construction and must be connected to a Mains
socket outlet with a protective earthing connection.
The unit requires ventilation above and below. Do not situate it on a rug
or other soft surface and do not obstruct any air inlet or outlet grilles on
the underside and top cover. Do not place in an enclosed area such as
a bookcase or in the cabinet.
Do not install near any heat sources such as radiators, heat register,
stove, or other apparatus (including amplifiers) that produce heat.
Do not defeat the safety purpose of the polarized or grounding type plug.
A polarized plug has two blades with one wider than the other. A
grounding type plug has two blades and a third grounding prong. The
wide blade or third prong are provided for your safety. If the provided
plug does not fit your outlet, consult an electrician for replacement of
the obsolete outlet.
WARNING - To reduce the risk of fire or electric shock, do not expose this
unit to rain or moisture. This unit must not be exposed to dripping or
splashing water or other liquids. No objects filled with liquid, such as
vases, shall be placed on the unit. In the event, switch off immediately,
disconnect from the mains supply and contact your dealer for advice.
Ensure that small objects do not fall through any ventilation grille. If this
happens, switch off immediately, disconnect from the mains supply and
contact your dealer for advice.
Do not route the power cable so that it can be walked upon or damaged
by other items near it.
It is recommended that when bi-amping, the same type power amplifiers
are used.
This unit must be disconnectted from the mains socket to be turned off
completely. If you do not intend to use this unit for a long period of time,
unplug it from the mains socket. Unplug this unit during lightning
storms.
To clean the unit, wipe its case with a moist, lint-free cloth. Do not use
any cleaning fluids containing alcohol, ammonia or abrasives. Do not
spray an aerosol at or near the amplifier.
This unit is not user servicable, never attempt to repair, dissassemble or
reconstruct the unit if there seems to be a problem. Servicing is required
when the unit has been damaged in any way, such as power-supply cord
or plug is damaged, liquid has been spilled or objects have frallen into
it, the unit has been exposed to rain or moisture, does not operate
normally or has been dropped. A serious electric shock could result if
this precautionary measure is ignored.
This unit should be installed on a sturdy, level surface. Due to stray
magnetic fields turntables should not be located nearby due to
interference.
IMPORTANT SAFETY INSTRUCTIONS
6
azur integrated amplifier
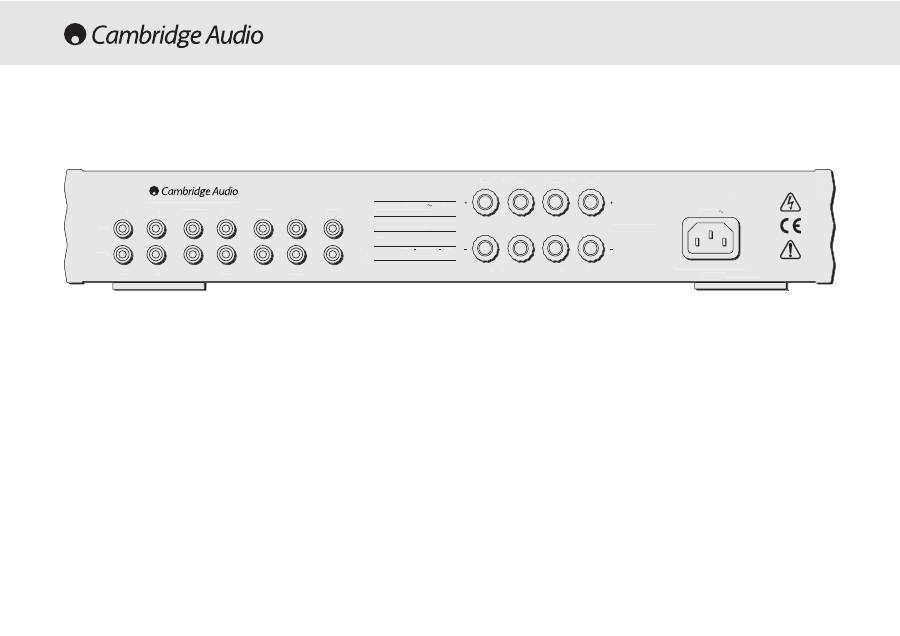
AC power socket
Once you have completed all connections to the amplifier, plug the AC
Power Cable into an appropriate mains socket. The amplifier is now
ready for use.
Loudspeaker connections
The 340A has two sets of Loudspeaker terminals on the rear panel,
speakers A and B. Speakers A are the main speaker terminals, speakers
B are the secondary switchable speaker terminals. Connect the wires
from your left channel loudspeaker to the LEFT + & - terminals, and
likewise the wires from the right channel loudspeaker to the RIGHT + &
- terminals. In each case the red terminal is the positive output, and the
black terminal is the negative input. Care should be taken to ensure no
stray strands of wire are shorting speaker outputs together.
Note: This amplifier has been designed for use with loudspeakers that
have a nominal impedance of between 4 and 8 ohms.
Please ensure that the speaker terminals have been tightened
adequately to provide a good electrical connection. It is possible for the
sound quality to be affected if the screw terminals are loose.
Tape mon
These sockets can be connected to a tape deck or to the analog sockets
on a MiniDisc or CD recorder. Connect an interconnect cable from the
recorder's Line Out sockets to the amplifier's Tape Monitor sockets. This
monitor doubles up as the standard tape/recording medium input.
Note: When connecting a source component that has both an input and
output i.e. a tape recorder, the output of should always be connected to
the Tape Mon input. This will eliminate howlround if the wrong input
channel is selected.
Power Rating:
230V AC 50Hz
Designed and Engineered in London, England
www.cambridge-audio.co.uk
Manufactured in an
ISO9002
approved facility
Power AC
Right
Left
Right
Left
Lef
t
B
A
Right
Lef
t
Right
B
A
Rec-Out
Tape In
AV / MD
DVD
Tuner / DAB
CD
Aux
Rec-Out
Tape I
n
AV / MD
DVD
Tuner / D
AB
CD
Aux
Right
Left
Right
Left
Impedance 4 - 8 ohms
Loudspeaker Terminals
Caution
Serial Number Label Removed
Risk of electric shock
Do not open
Caution
Risque de choc electrique
Ne pas ouvrir
Avis
Vorm offnen des gerates
Netzstecker ziehen
Achtung
azur 340A Integrated Amplifier
Max Power Consumption
:
345W
