Peg-Perego Pliko X-Lite: instruction
Class: Automotive Parts
Type:
Manual for Peg-Perego Pliko X-Lite
FI000603I62
Pliko
X-Lite
Istruzioni
d
ʼ
uso IT
Instructions for use EN
Notice
d
ʼ
emploi FR
Gebrauchsanleitung
DE
Instrucciones de uso ES
Instruções para uso PT
Gebruiksaanwijzing
NL
Brugsanvisning
DK
Käyttöohjeet
FI
Návod na použití CZ
Návod na použitie SK
Használati
útmutató
HU
Navodila za uporab SL
Инструкции
по
пользованию
RU
Kullanim
klavuzu
TR
ΟΔΗΓΙΕΣ
ΧΡΗΣΕΩΣ
EL
OK
A
click
A
B
C
3
2
1
4
5
6
B
C
A
7
8
9
11
10
12
A
B
3
2
1
1
2
3
15
16
17
13
14
18
1
2
3
20
19
24
22
23
21
A
A
B
Ganciomatic
System
GM
29
27
28
26
25
30
Ganciomatic
System
GM
B
A
Ganciomatic
System
GM
31
32 Pliko X-Lite+Primo Viaggio
33 Accessory
45 Accessory
34 Accessory
35 Accessory
36 Accessory
2
3
4
5
6
7
8
9
10
11
12
13
16
17
15
14
1
18
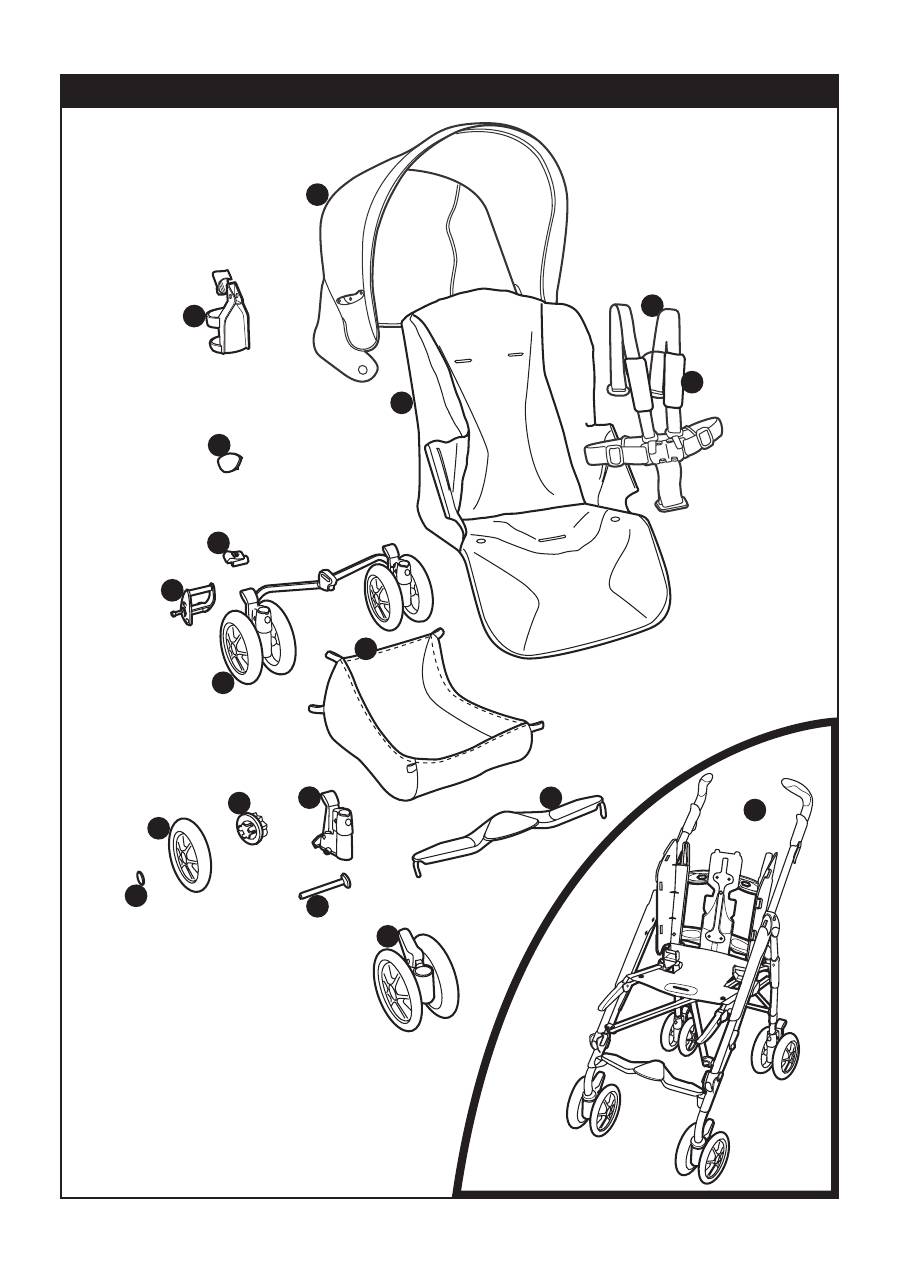
Pliko X-Lite

1
ITPLIX00NL65
2
IRTR0007GR
3
SPST5846DGR
SPST5846SGR
4
SPST5352GR
5
ASPI0043DN
ASPI0043SN
6
ARPI0415L31NGR
7
ARPI0277NGR
8
SPST4023N
9
SAPI5753GRN
10
SPST5468N
11
MMRP0718
12
SAPI5368JNGR
13
SAPI5365NGR
14
ERSHPC•
15
MUCI5P16GRN
16
BCAPXL•
17
BSAPXL•
18
BRSPPL•
IT• Ricambi disponibili in piú colori da specificare
nella richiesta.
EN• Spare parts available in different colours to be
specified when ordering.
FR• Pièces de rechange disponibles en plusieurs
couleurs à spécifier dans la demande.
DE• Ersatzteile in mehr Farben vorhanden, die in der
Anfrage spezifiziert werden müssen.
ES• Repuestos disponibles en otros colores que se
especificarán en el pedido.
PT• Peças de reposição disponíveis em cores
alternativas a serem especificadas no pedido.
NL• Reserveonderdelen verkrijgbaar in meerdere
kleuren, bij bestelling te specificeren.
DK• Reservedele kan leveres i flere farver som bør
specificeres ved bestillingen.
FI•
Varaosia saatavana eri värisinä: ilmoita väri
tilauksessa.
CZ• U náhradních díl
ů
, které jsou k dispozici ve více
barvách, je nutné na objednávce specifikovat
p
ř
íslušnou barvu.
SK• Pri náhradných dieloch, ktoré sú k dispozícii vo
viacerých farbách, je potrebné pri objednávke
špecifikova
ť
želanú farbu.
HU• A tartalék alkatrészek különböz
ő
színekben
elérhet
ő
k, melyeket rendeléskor kell kiválasztani.
SL• Rezervni deli so na voljo v ve
č
barvah, ki jih je
treba navesti pri naro
č
ilu.
RU•
Запчасти
имеются
различных
цветов
,
необходимый
указать
в
запросе
.
TR• Sipari
ş
te belirtilen de
ğ
i
ş
ik renklerdeki yedek
parçalari mevcuttur.
EL•
Ανταλλακτικά
διαθέσιμα
σε
διάψορα
χρώματα
.
Προσδιορίστε
όταν
παραγγείλετε
.
Pliko X-Lite
•
IMPORTANTE: leggere attentamente queste
istruzioni e conservarle per un futuro utilizzo.
La sicurezza del bambino potrebbe essere messa
a rischio se non si eseguono queste istruzioni.
• Peg Perego potrà apportare in qualunque
momento modifiche ai modelli descritti in questa
pubblicazione, per ragioni di natura tecnica o
commerciale.
Peg Perego S.p.A. è certificata ISO 9001
.
La certificazione offre ai clienti e
ai consumatori la garanzia di una
trasparenza e fiducia nel modo di lavorare
dell'impresa.
SERVIZIO ASSISTENZA
Se fortuitamente parti del modello vengono perse o
danneggiate, usare solo pezzi di ricambio originali
Peg Perego. Per eventuali riparazioni, sostituzioni,
informazioni sui prodotti, la vendita di ricambi
originali e accessori, contatta il Servizio Assistenza
Peg-Perego:
tel.:0039-039-60.88.213,
fax: 0039-039-33.09.992,
e-mail: assistenza@pegperego.it,
www.pegperego.com
La Peg Perego è a disposizione dei suoi Consumatori
per soddisfare al meglio ogni loro esigenza. Per
questo, conoscere il parere dei ns. Clienti, è per noi
estremamente importante e prezioso. Le saremo
quindi molto grati se, dopo aver utilizzato un
ns. prodotto, vorrà compilare il QUESTIONARIO
SODDISFAZIONE CONSUMATORE che troverà in
internet al seguente indirizzo: www.pegperego.com/
SSCo.html.it,
segnalando eventuali osservazioni o suggerimenti.
ISTRUZIONI D
ʼ
USO
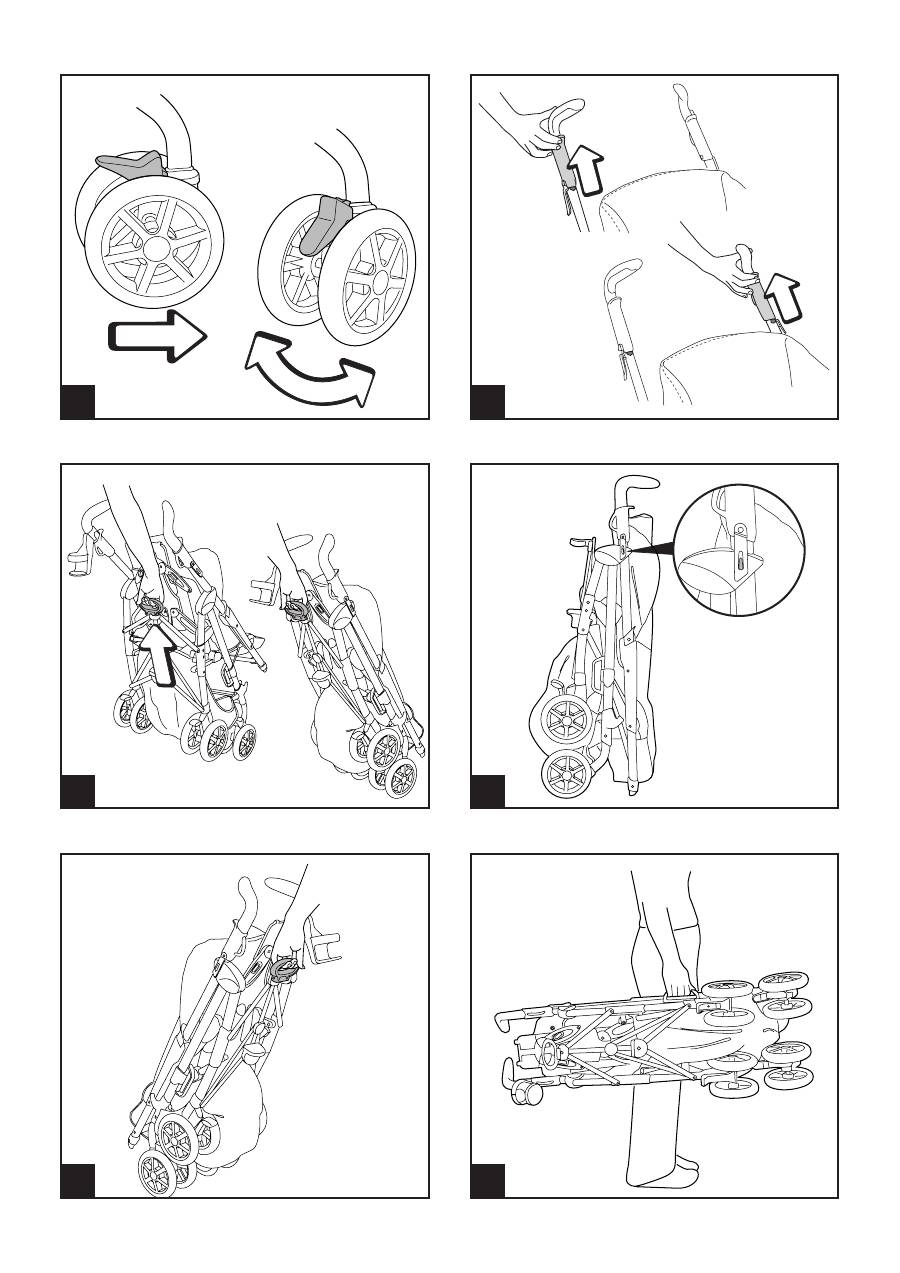
APERTURA
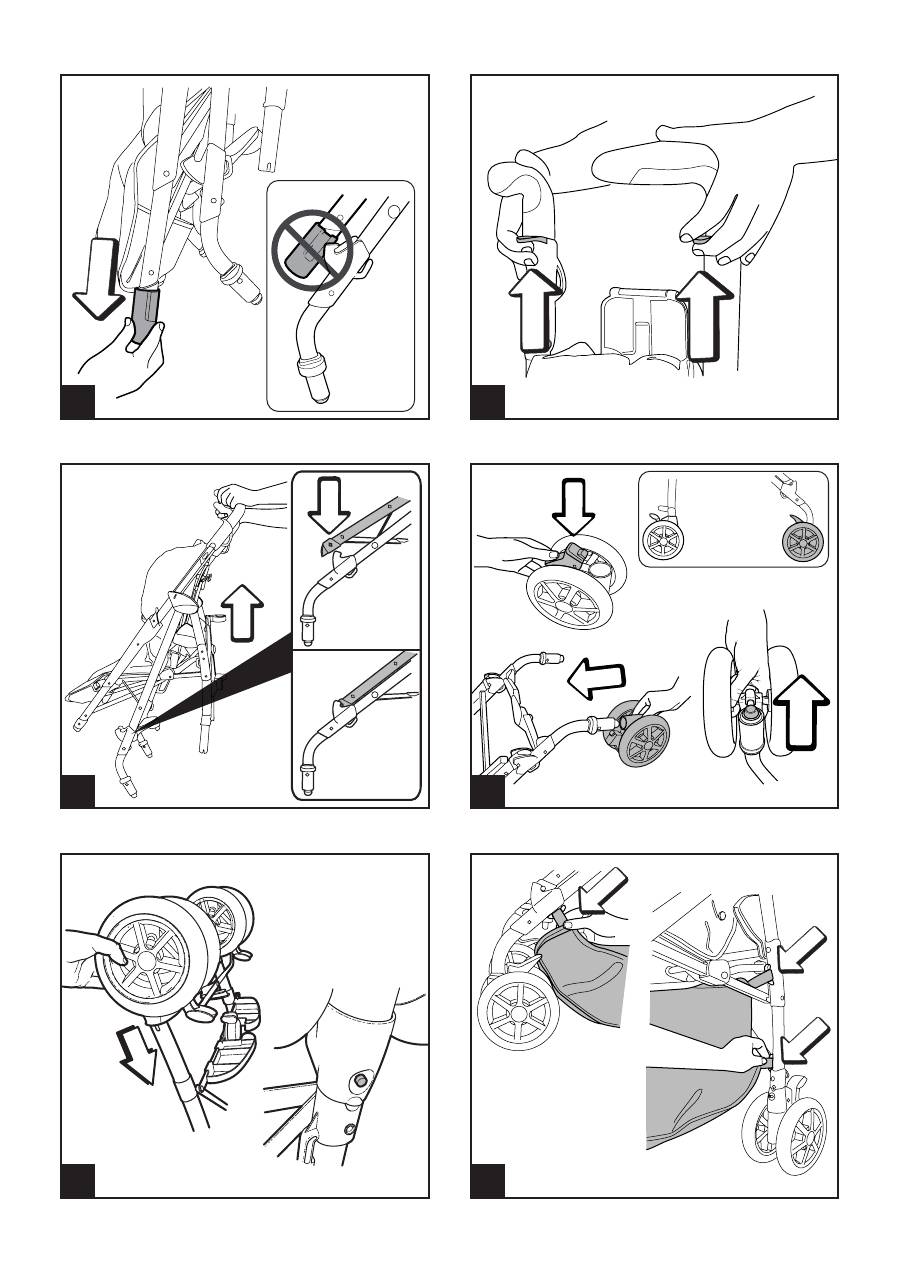
1• Prima di aprire il passeggino occorre togliere i
due tappi di protezione dei ganci come in figura,
altrimenti il passeggino non verrà correttamente
aperto.
2• Per aprire il passeggino, occorre tirare verso l
ʼ
alto
le due leve sui manici e
3• contemporaneamente sollevare il passeggino che
si aprirà automaticamente. Per verificare che il
passeggino sia correttamente aperto, controllare i
due ganci laterali (vedi figura).
ASSEMBLAGGIO DEL PASSEGGINO
4• Per montare le ruote anteriori, abbassare la leva A
e infilare la ruota come in figura fino al click.
5• Per montare le ruote posteriori infilare il gruppo
ruote come in figura fino al click.
6• Per montare il cestello, infilare le asole ai ganci
anteriori A e ai ganci posteriori B e C.
7• La figura mostra il cestello agganciato.
8• Il portabibite é applicabile alla maniglia sinistra o
destra del passeggino, grazie alle due fascette.
•
Per applicare il portabibite alla maniglia, allargare
la fascetta, tenendo il lato sagomato della fascetta
all'interno della maniglia in corrispondenza del
rilievo.
9• Infilare la fascetta nel portabibite fino al click.
Si consiglia di non inserire nel portabibite bevande
calde e con un peso superiore a 1 Kg (2,2 lbs).
IT•ITALIANO

CAPOTTINA
•
La capottina è dotata di cerniera per applicare
il parapioggia o la zanzariera con cerniera (vedi
Linea Accessori).
10• Per montare la capottina, spingere verso il basso
gli attacchi fino al click come in figura.
11• Abbottonare la capottina come in figura all
ʼ
interno
del bracciolo e allo schienale del passeggino.
12• Per tendere la capottina, spingere verso il basso
il compasso. La capottina può essere reclinata
seguendo l
ʼ
inclinazione dello schienale.
13• Per togliere la capottina, occorre sbottonarla
dal passeggino, allentare i compassi e alzare le
alette degli attacchi spingendo verso l'interno del
passeggino.
FRENO
14• Per frenare il passeggino, abbassare col piede
le leve posizionate sulle ruote posteriori come
in figura. Per sbloccare i freni, agire in senso
contrario. Da fermi, azionare sempre i freni del
passeggino.
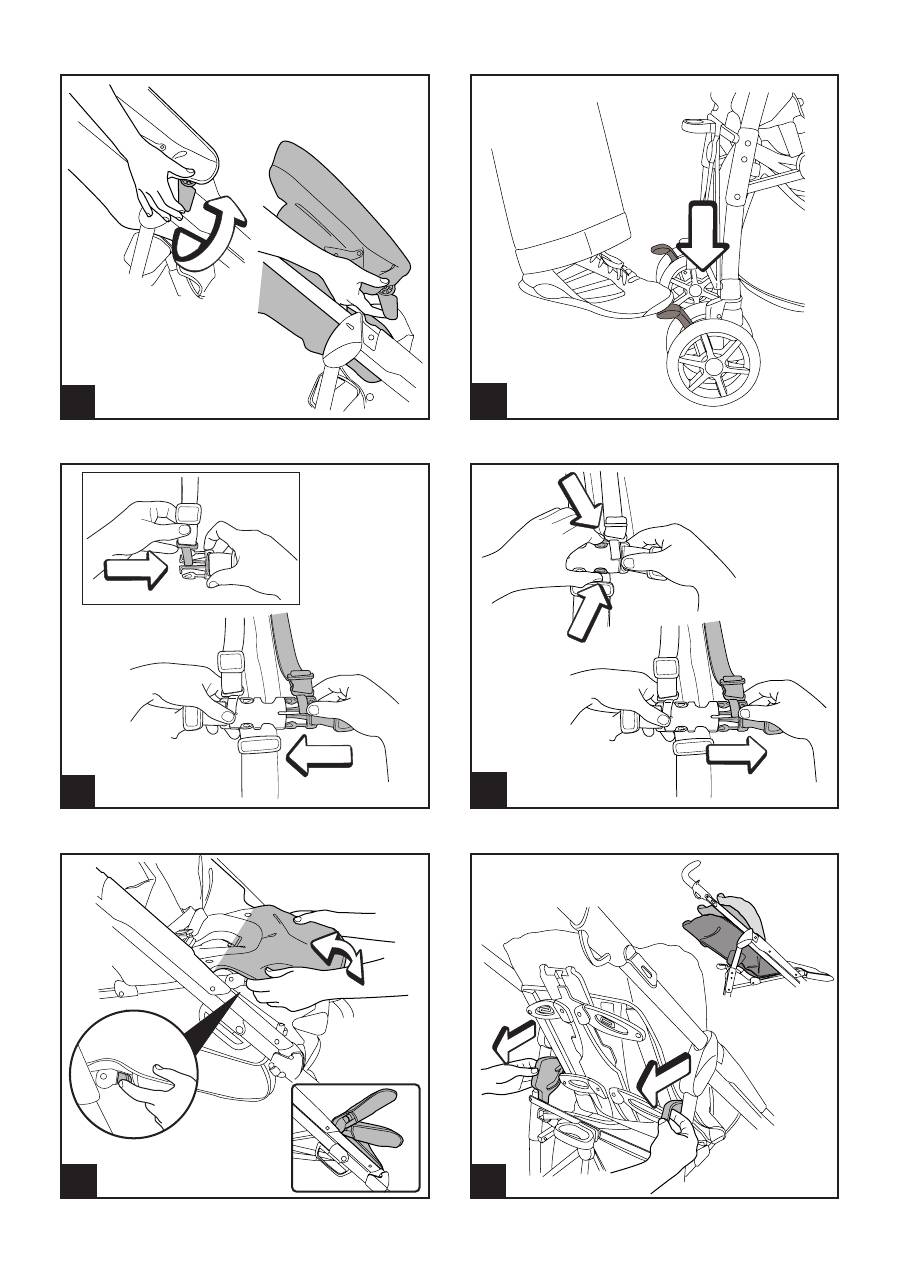
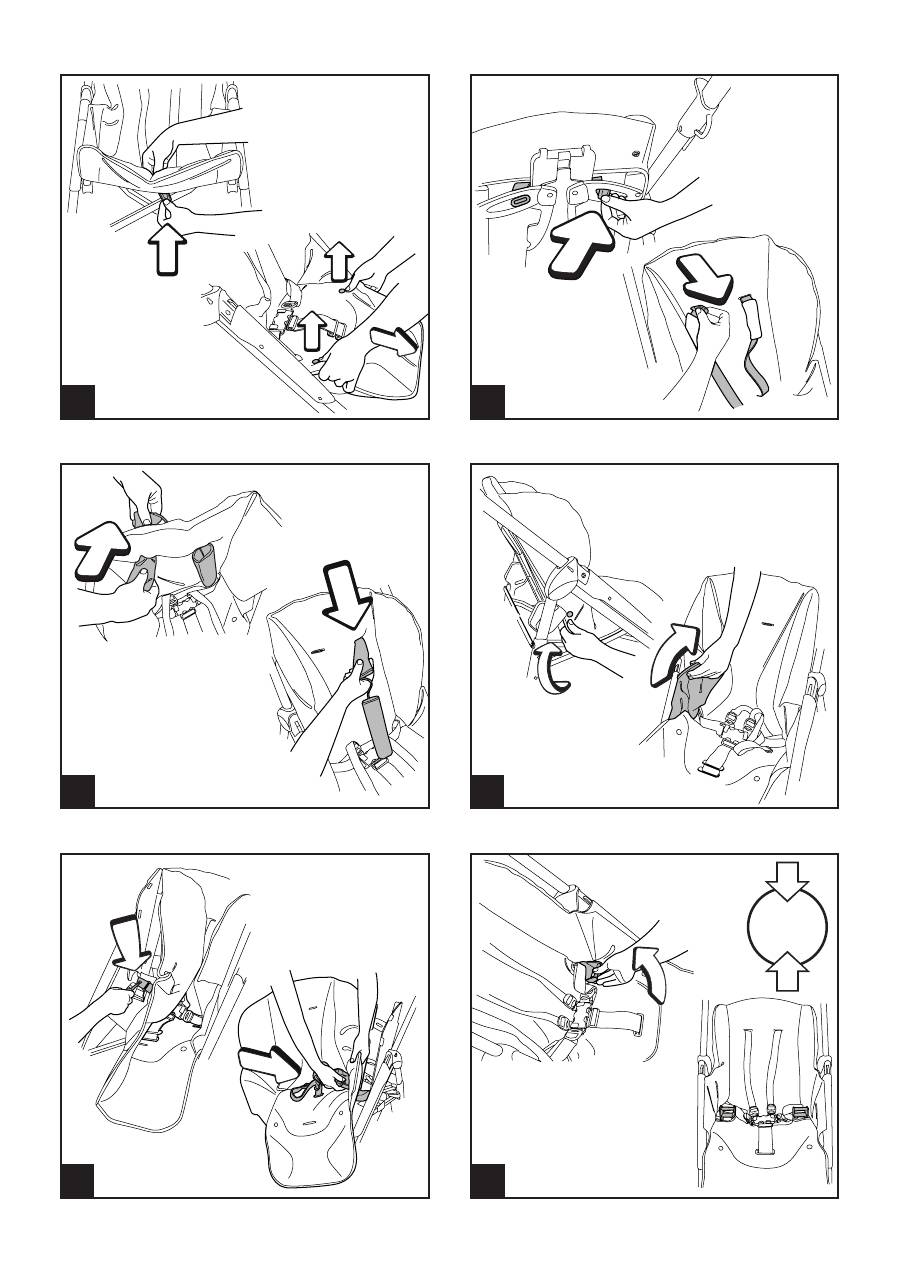
CINTURA DI SICUREZZA
15• A: Assicurarsi che la bretella sia correttamente
inserita spingendo come in figura. B: Agganciare
la cintura agendo come in figura.
16• Per sganciare la cintura, premere ai lati della fibbia
e contemporaneamente tirare verso l
ʼ
esterno, il
cinturino girovita.
REGOLAZIONE POGGIAGAMBE
17• Il poggiagambe é regolabile in tre posizioni. Per
abbassare il poggiagambe, tirare le due levette
laterali verso il basso e contemporaneamente
abbassarlo. Per alzare il poggiagambe, spingerlo
verso l
ʼ
alto fino al click.
REGOLAZIONE SCHIENALE
18• Lo schienale é reclinabile in tre posizioni. Per
abbassare lo schienale, impugnare con entrambe
le mani i due regola schienale e spingerli verso di
sè. Per alzarlo, spingere lo schienale verso l
ʼ
alto.
RUOTE PIROETTANTI
19• Per rendere le ruote anteriori piroettanti, occorre
abbassare la leva come in figura. Per renderle
fisse, agire sulla leva in senso contrario.
CHIUSURA
Prima di chiudere il passeggino, se é applicata la
capottina, allentare i compassi e se lo schienale é
abbassato, alzarlo.
20• É possibile chiudere il passeggino con una sola
mano: tirare verso l
ʼ
alto prima una leva e poi
l
ʼ
altra fino allo scatto.
21• Impugnare la maniglia centrale e tirarla verso
l
ʼ
alto fino alla chiusura come in figura.
22• Verificare la corretta chiusura del passeggino dal
gancio di sicurezza. Il passeggino chiuso rimane
in piedi da solo.
TRASPORTO
23• Il passeggino si può trasportare comodamente
(tenendo le ruote anteriori non piroettate)
impugnando la maniglia centrale come in figura.
24• Si può trasportare anche grazie alla maniglia
laterale come in figura.
SFODERABILITÀ
25• Per sfoderare il passeggino, sfilare lo spartigambe
della cintura di sicurezza da sotto la seduta.
Sganciare i bottoni della sacca dalla seduta e
sfilare la sacca dai ganci del poggiagambe.
26• Sfilare dal retro dello schienale le fibbie delle
bretelle della cintura di sicurezza e sfilare le
bretelle dai due spallacci.
27• Per sfilare gli spallacci, essendo attaccati tra di
loro, occorre sfilarli dalle fessure della sacca come
in figura.
28• Sganciare i bottoni della sacca lateralmente come
in figura. Sfilare la sacca lateralmente dal telaio,
tirando verso l'alto i laterali della sacca come in
figura.
29• Svitare il cinturino (solo da un lato) come in figura
tenendo il dito sotto al dado. Sfilare il cinturino
precedentemente svitato dal passeggino dalla
fessura della sacca come in figura.
•
Per rimontare la sacca al passeggino, procedere in
senso contrario facendo attenzione a riavvitare il
cinturino.
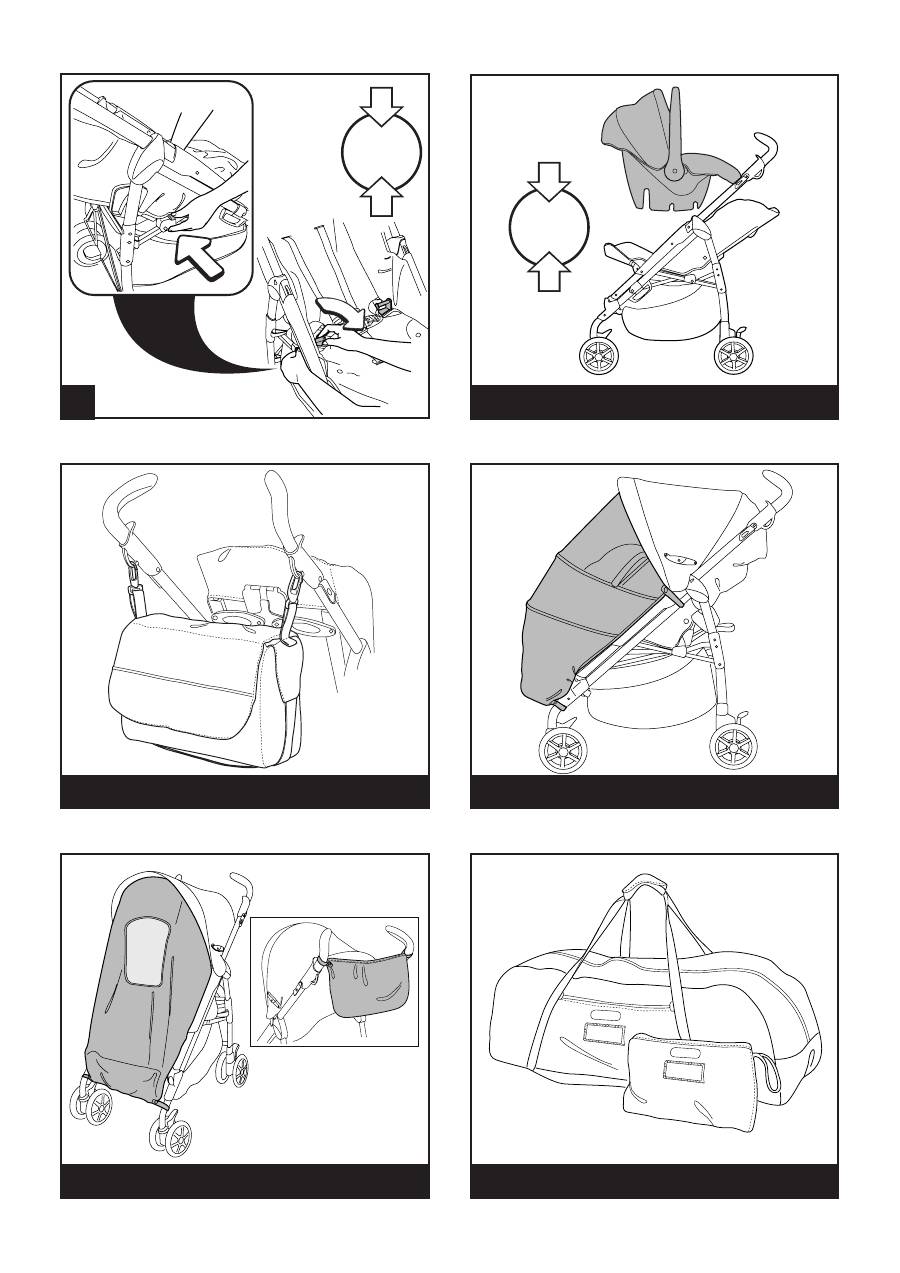
GANCIOMATIC SYSTEM
Il Ganciomatic System è il sistema pratico e veloce
che permette di agganciare al passeggino, grazie agli
attacchi Ganciomatic, il seggiolino auto Primo Viaggio,
anch
ʼ
esso dotato di Ganciomatic System, acquistabile
separatamente. Primo Viaggio si sgancia dalla sua
base (che rimane in auto) e si aggancia al passeggino
per trasportare, senza disturbare, il bambino.
ATTACCHI GANCIOMATIC DEL PASSEGGINO
30• Per alzare gli attacchi Ganciomatic del passeggino,
sollevare la sacca negli angoli della seduta e
ruotare verso l
ʼ
alto i due attacchi fino al click.
31• Per abbassare gli attacchi Ganciomatic del
passeggino, tirare verso l
ʼ
esterno la levetta e
contemporaneamente, ruotare verso il basso gli
attacchi come in figura.
PLIKO X-LITE + PRIMO VIAGGIO
32• Per agganciare il seggiolino auto al passeggino,
occorre:
-
frenare
il
passeggino;
-
togliere la capottina del passeggino;
-
abbassare completamente lo schienale del
passeggino;
-
alzare il poggiagambe del passeggino nella
posizione più alta;
-
alzare gli attacchi Ganciomatic del passeggino;
-
posizionare il seggiolino auto rivolto verso lo
schienale del passeggino facendo corrispondere
i ganci anteriori del seggiolino con gli attacchi
del passeggino, spingere poi il seggiolino verso il
basso fino al click.
•
Per sganciare il seggiolino auto dal passeggino
consultare il suo manuale istruzioni.
LINEA ACCESSORI
33• Borsa Cambio: Borsa con materassino per il
cambio del bebè, agganciabile al passeggino.
34• Parapioggia: Parapioggia con zip applicabile alla
capottina con zip
35• Zanzariera: Zanzariera con zip, applicabile alla
capottina con zip.
36• Borsa Viaggio: Pratica borsa per il trasporto aereo
del passeggino.
PULIZIA E MANUTENZIONE
Il vostro prodotto necessita un minimo di
manutenzione. Le operazioni di pulizia e manutenzione
devono essere effettuate solo da adulti.
• Si raccomanda di tenere pulite tutte le parti in
movimento e se occorre, lubrificarle con olio leggero.
• Asciugare le parti in metallo del prodotto per
prevenire la ruggine.
• Periodicamente pulire le parti in plastica con un
panno umido, non usare solventi o altri prodotti
simili.
• Spazzolare le parti in tessuto per allontanare la
polvere.
• Tenere pulite le ruote da polvere e sabbia.
• Proteggere il prodotto da agenti atmosferici, acqua,
pioggia o neve; l
ʼ
esposizione continua e prolungata
al sole potrebbe causare cambiamenti di colore in
molti materiali.
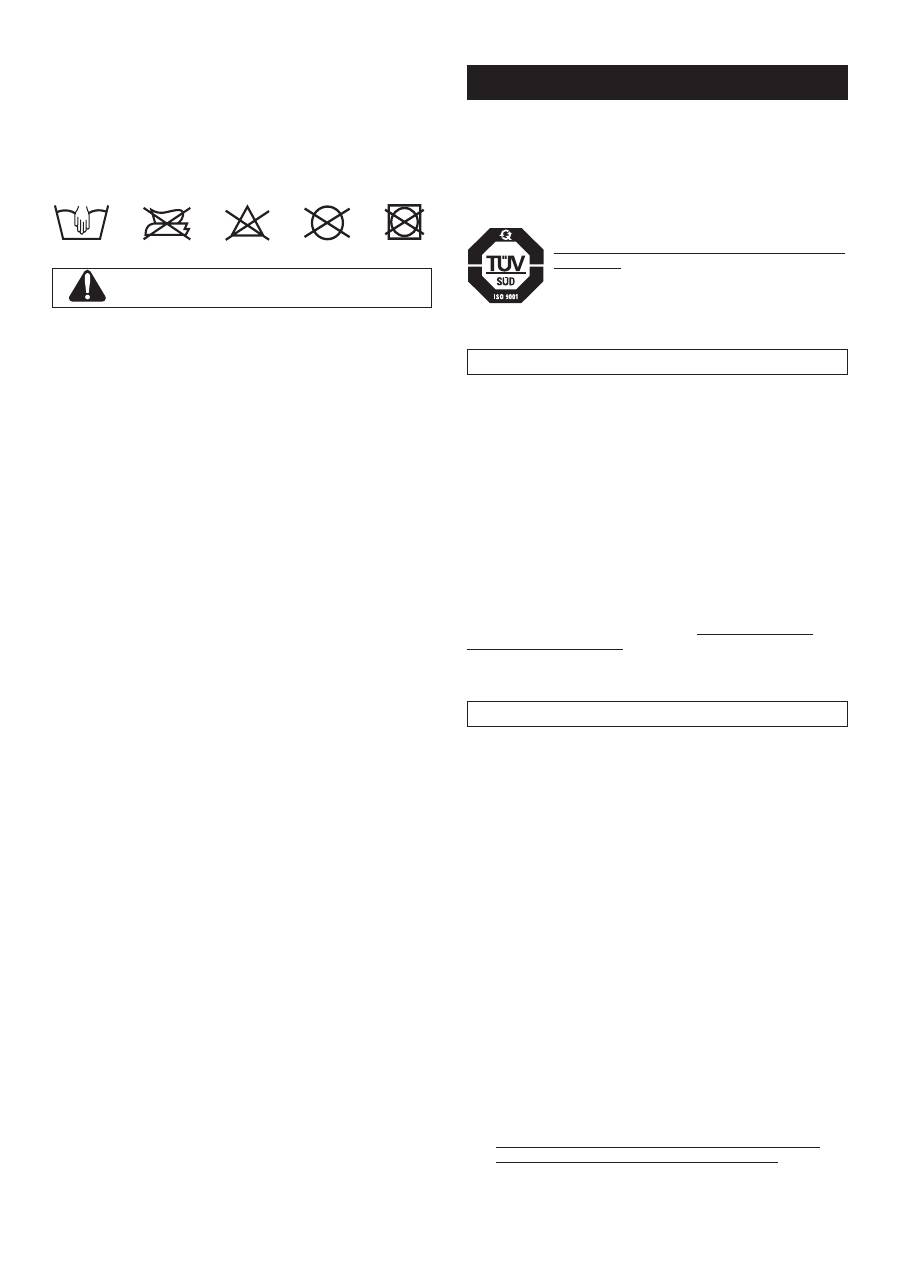
• Conservare il prodotto in un posto asciutto.
• Per il lavaggio della sacca, seguire le suguenti
indicazioni.
ATTENZIONE
• QUESTO VEICOLO È STATO PROGETTATO PER IL
TRASPORTO DI 1 BAMBINO NELLA SEDUTA.
• QUESTO VEICOLO E
ʼ
OMOLOGATO PER BAMBINI DA
6 MESI FINO A 15 KG NELLA SEDUTA. USATO COME
TRAVEL SYSTEM IN ABBINAMENTO AL SEGGIOLINO
AUTO DI GRUPPO 0+, QUESTO VEICOLO E
ʼ
INTESO
DALLA NASCITA.
• QUESTA SEDUTA NON E
ʼ
ADATTA A BAMBINI DI ETA
ʼ
INFERIORE A 6 MESI.
• USARE UN SISTEMA DI RITENUTA APPENA
IL BAMBINO È IN GRADO DI STARE SEDUTO
AUTONOMAMENTE.
• QUESTO VEICOLO E
ʼ
STATO PROGETTATO PER
ESSERE USATO IN COMBINAZIONE CON I PRODOTTI
PEG PEREGO GANCIOMATIC: PRIMO VIAGGIO, PRIMO
VIAGGIO SIP.
• LE OPERAZIONI DI ASSEMBLAGGIO E PREPARAZIONE
DELL
ʼ
ARTICOLO DEVONO ESSERE EFFETTUATE DA
ADULTI.
• NON UTILIZZATE IL PRODOTTO SE PRESENTA PARTI
MANCANTI O ROTTURE.
• UTILIZZATE SEMPRE LE CINTURE A CINQUE PUNTI;
UTILIZZATE SEMPRE LO SPARTIGAMBE DELLA
CINTURA IN COMBINAZIONE CON IL GIROVITA.
• POTREBBE ESSERE PERICOLOSO LASCIARE IL VOSTRO
BAMBINO INCUSTODITO.
• DA FERMI UTILIZZARE SEMPRE I FRENI.
• PRIMA DELL
ʼ
USO ASSICURARSI CHE TUTTI I
MECCANISMI DI AGGANCIO SIANO INGAGGIATI
CORRETTAMENTE.
• PRIMA DELL
ʼ
USO ASSICURARSI CHE IL SEGGIOLINO
AUTO O LA SEDUTA RIPORTATA SIANO
CORRETTAMENTE AGGANCIATI.
• EVITARE DI INTRODURRE LE DITA NEI MECCANISMI.
• PRESTARE ATTENZIONE ALLA PRESENZA DEL
BAMBINO QUANDO SI EFFETTUANO OPERAZIONI
DI REGOLAZIONE DEI MECCANISMI (MANIGLIONE,
SCHIENALE).
• OGNI CARICO APPESO AL MANIGLIONE O ALLE
MANIGLIE PUÒ RENDERE INSTABILE IL PRODOTTO;
SEGUIRE LE INDICAZIONI DEL COSTRUTTORE
RIGUARDO AI MASSIMI CARICHI UTILIZZABILI.
• IL FRONTALINO NON È PROGETTATO PER REGGERE
IL PESO DEL BAMBINO; IL FRONTALINO NON È
DISEGNATO PER MANTENERE IL BAMBINO NELLA
SEDUTA E NON SOSTITUISCE IL CINTURINO DI
SICUREZZA.
• NON INTRODURRE NEL CESTELLO CARICHI PER
UN PESO SUPERIORE A 5 KG. NON INSERIRE NEI
PORTABIBITE PESI SUPERIORI A QUANTO SPECIFICATO
NEL PORTABIBITE STESSO E MAI BEVANDE CALDE.
NON INSERIRE NELLE TASCHE DELLE CAPOTTE (SE
PRESENTI) PESI SUPERIORI A 0.2 KG.
• NON UTILIZZARE IL PRODOTTO IN VICINANZA DI
SCALE O GRADINI; NON UTILIZZARE VICINO A FONTI
DI CALORE, FIAMME LIBERE OD OGGETTI PERICOLOSI
A PORTATA DELLE BRACCIA DEL BAMBINO.
• POTREBBE ESSERE PERICOLOSO UTILIZZARE
ACCESSORI NON APPROVATI DAL COSTRUTTORE.
• QUESTO PRODOTTO NON E
ʼ
ADATTO PER IL JOGGING
O LA CORSA COI PATTINI.
•
IMPORTANT: read these instructions carefully
and keep them for future reference.
Failure to follow these instructions could put the
child
ʼ
s safety at risk.
• PEG PEREGO reserves the right to make any
necessary changes or improvements to the products
shown at any time without notice.
Peg Perego S.p.A. is an ISO 9001 certified
company.
The fact that we are certified provides
a guarantee of our honesty for our
customers, and fosters trust in the
company
ʼ
s way of working.
CUSTOMER SERVICE
If parts of the model are accidentally lost or damaged,
use only original Peg Perego spare parts. Contact
the Peg Perego Customer Service for all repair work,
replacements, information about products, and sale of
original spare parts and accessories, at the following:
tel.: 0039-039-60.88.213
fax: 0039-039-33.09.992
e-mail: assistenza@pegperego.it,
www.pegperego.com
Peg Perego is at the consumer's service, meeting
every need in the best way possible. This is why our
customers' opinions are so important and valuable
to us. We would be very grateful if you would kindly
fill in the CUSTOMER SATISFACTION QUESTIONNAIRE
after using one of our products. You will find the
questionnaire on the Internet at "www.pegperego.
com/SSCo.html.en-UK".
Please note any observations or suggestions you may
have on the questionnaire.
INSTRUCTIONS FOR USE
OPENING
1• Before opening the stroller remove the two
protective caps from the hooks as shown in
the figure. Otherwise, the stroller will not open
correctly.
2• To open the stroller, pull up the two levers on the
handles and
3• at the same time, lift the stroller, which will open
automatically. To make sure that the stroller has
been set up correctly, check the two side hooks
(see figure).
ASSEMBLYING THE STROLLER
4• To mount the front wheels, lower Lever A and slip
the wheels onto the axle, as shown in the figure.
Press until the wheels click into place.
5• To mount the rear wheels, insert the wheel unit as
indicated in the figure until you hear a click.
6• To mount the basket, slide the slots onto the front
hooks A and the rear hooks B and C.
7• The figure shows the mounted basket.
8• The drink-holder can be attached to the left or the
right handle of the stroller, using the two bands.
•
To attach the drink-holder to the handle, widen
the band, keeping the shaped side on the inside of
the handle, in line with the raised surface.
9• Slide the clamp in the drink-holder until it clicks.
Do not put hot drinks in the drink-holder, nor
items weighing more than 1 kg (2.2 lbs).
HOOD
•
The hood comes with a zipper, for attaching
EN•ENGLISH
the zip-on rain canopy or mosquito netting (see
Accessories Line).
10• To mount the hood, push the fittings down until
they click, as shown in the figure.
11• As shown in the figure, button the hood inside the
armrest and the backrest of the stroller.
12• To stretch out the hood, push the coupling
downward. The hood can be reclined by following
the inclination of the backrest.
13• To remove the hood, you must unbutton it from
the stroller, loosen the couplings and raise the
tabs of the fasteners, pushing towards the inside
of the stroller.
BRAKE
14• To apply the brakes, push down with one foot the
bars on the rear wheels, as shown in the figure.
To release the brakes, draw the bar up. Always set
the brakes on the stroller when it is not in motion.
SAFETY BELT
15• A: Make sure that the brace is properly inserted by
pushing as shown in the figure. B: Fasten the belt
as shown in the figure.
16• To unfasten the belt, press on the buckle sides
and pull out the waist strap.
ADJUSTING THE FOOTBOARD
17• The footboard can be adjusted to three different
positions. To lower the footboard, pull the two
small levers downward while lowering. To lift the
footboard, pull it up until it clicks into place.
ADJUSTING THE BACKREST
18• The backrest can be lowered to three different
positions. To lower the backrest, pull the two
adjustment levers towards you. To raise it, pull the
backrest upwards.
SWIVELLING WHEELS
19• To make the front wheels swivel, push down as
shown in the figure. To fix the wheels, pull up the
lever.
CLOSING
Before closing the stroller, loosen the braces if
the hood is attached, and raise the backrest if it is
lowered.
20• The stroller can be closed with one hand: pull first
one lever up and then the other until it releases.
21• Grip the central handle and pull it upward until it
closes, as shown in the figure.
22• Verify the correct closing of the stroller from the
safety hook. The folded stroller can stand upright.
TRANSPORT
23• The stroller can easily be carried (lock the
swivelling front wheels) by gripping the central
handle, as shown in the figure.
24• You can also use the side handle to carry it, as
shown in the figure.
REMOVABLE LINING
25• To remove the lining from the stroller, slip the
leg divider off the safety belt from under the seat.
Loosen the fabric sack buttons from the seat, and
slip the sack off the hooks on the footboard.
26• Slip the safety belt buckles off the back of the
backrest, and remove the straps from the two
shoulder fasteners.
27• The shoulder fasteners are attached to each
other. To remove them, slip them out through
the openings in the fabric sack, as shown in the
figure.
28• Loosen the buttons on the side of the fabric sack,
as shown in the figure.
29• Loosen the safety belt on one side only, as shown
in the figure, holding your finger under the nut.
Slip the loosened safety belt off the stroller
through the opening in the fabric sack, as shown
in the figure.
•
To remount the fabric sack on the stroller, follow
the directions given above in the reverse order,
making sure to fasten the safety belt properly.
GANCIOMATIC SYSTEM
The Ganciomatic System is the swift, practical
system that allows one to fasten to the stroller, with
Ganciomatic fasteners, the car seat Primo Viaggio,
which can be bought separately and is also equipped
with Ganciomatic System. Primo Viaggio can be
detached from its base (which stays in the car) and
attached to the Ganciomatic fasteners of the stroller to
transport your child without disturbing him/her.
STROLLER GANCIOMATIC HOOKS
30• To raise the Ganciomatic hooks on the stroller,
pull the sack up at the corners of the seat and
turn the two hooks upwards until they click into
place.
31• To lower the Ganciomatic hooks on the stroller,
pull the little lever outwards and turn the hooks
upwards at the same time, as shown in the figure.
PLIKO X-LITE + PRIMO VIAGGIO
32• To fasten the car seat to the stroller:
-
set the brake on the stroller;
-
remove the hood from the stroller;
-
completely lower the backrest on the stroller;
-
lift the footboard on the stroller to the highest
position;
-
raise the Ganciomatic hooks on the stroller;
-
turn the child car seat towards the backrest on the
stroller, lining up the front hooks on the car seat
with the hooks on the stroller. Push the car seat
downwards until it clicks into place.
•
See the user
ʼ
s manual for instructions on how to
detach the car seat from the stroller.
ACCESSORY LINE
33• Diaper-Changing Bag: Satchel with pad for
changing baby
ʼ
s diaper. Attaches to the stroller.
34• Rain Canopy: Rain canopy zips onto the hood.
35• Mosquito Netting: Mosquito netting zips onto the
hood.
36• Travel Bag: Practical duffle bag for transporting
the stroller by plane.
CLEANING & MAINTENANCE
Your product requires only minimal maintenance.
Cleaning and maintenance operations must be
performed only by adults.
• Be sure to keep all moving parts clean, lubricating
them with light oil if necessary.
• Dry off metal parts to prevent rusting.
• Regularly clean the plastic parts with a damp cloth.
Do not use solvents or similar products.
• Brush the fabric parts to remove dust.
• Remove any dust and sand from the wheels.
• Protect the product against smog, water, rain and
snow. Continued and extended exposure to sunlight
can change the colours of many materials.
• Store the product in a dry area.
• To wash the sack, follow the instructions below.
