Ardo A 1200 Inox: PREPARING THE MACHINE FOR USE How to unpack and remove the protection devices How to repack the machine
PREPARING THE MACHINE FOR USE How to unpack and remove the protection devices How to repack the machine: Ardo A 1200 Inox
Table of contents
- Contents
- NOTES AND USEFUL ADVICE FOR THE USER
- PREPARING THE MACHINE FOR USE How to unpack and remove the protection devices How to repack the machine
- Installing and levelling the machine Connecting to the water supply
- HOW TO REMOVE STAINS
- INTERNATIONAL CLOTHING CARE SYMBOLS
- DESCRIPTION OF THE WASHING MACHINE - CONTROL PANEL
- USING THE WASHING MACHINE
- ADDITIONAL FUNCTIONS (AVAILABLE ACCORDING TO MODEL)
- WASHING PROGRAMMES
- USE OF DETERGENTS
- MAINTENANCE
- TROUBLESHOOTING
- TECHNICAL DATA
✽ Under no circumstances should any
✽ Repairs to the washing machine must
repairs to the machine be attempted
only be carried out persons authorised
by unqualified persons as this could
to do so by the service centres. Only
result in serious damage and will
original spare parts may be used for
invalidate the guarantee.
repairs.
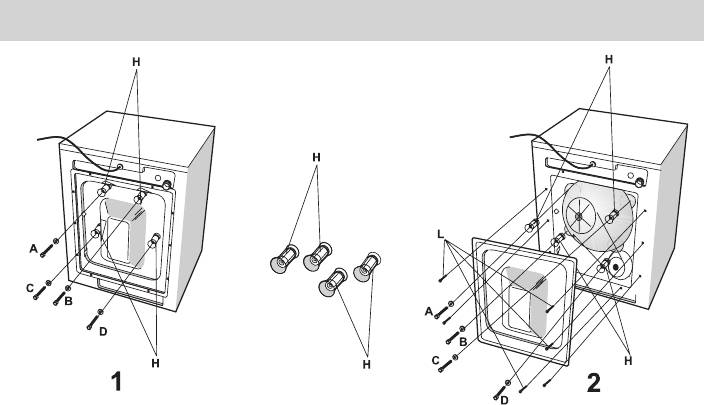
PREPARING THE MACHINE FOR USE
How to unpack and remove the protection devices
➘ Put the washing machine in its place of installation and remove the external packag-
ing.
➘ Unscrew the 4 protection screws anchoring the mobile parts marked with the letters A-B-
C-D in figures 1 and 2, and then remove them together with the plastic spacers H [fig. 2].
Insert the plugs supplied in the holes left by the screws.
➘ If the spacers remain in the machine, they can be removed by unscrewing the screws
indicated with the letter L in figure 2, and then finish by screwing the panel back in
place. The screws and spacers must be kept in a safe place for re-use when the
machine is moved in the future.
The spacers must be removed, in that if they are left in position they may cause
damage to the equipment.
➘ Lift the washing machine and remove the polystyrene base.
How to repack the machine
a) unscrew the 8 screws marked L from the rear panel and remove the panel.
b) insert the locking screws A-B-C-D in their respective holes.
c) insert the 4 spacers onto screws A-B-C-D of the panel.
d) locate the rear panel on the machine, ensure it is positioned correctly and then
tighten screws A-B-C-D.
e) replace and tighten the 8 rear panel screws marked L.
SM1
3


