ABUS TVVR41220 Operating instructions – page 4
Manual for ABUS TVVR41220 Operating instructions
Table of contents
- User guide
Device overview
61
Note
The illustrations for TVVR41200 and TVVR41210 are similar.
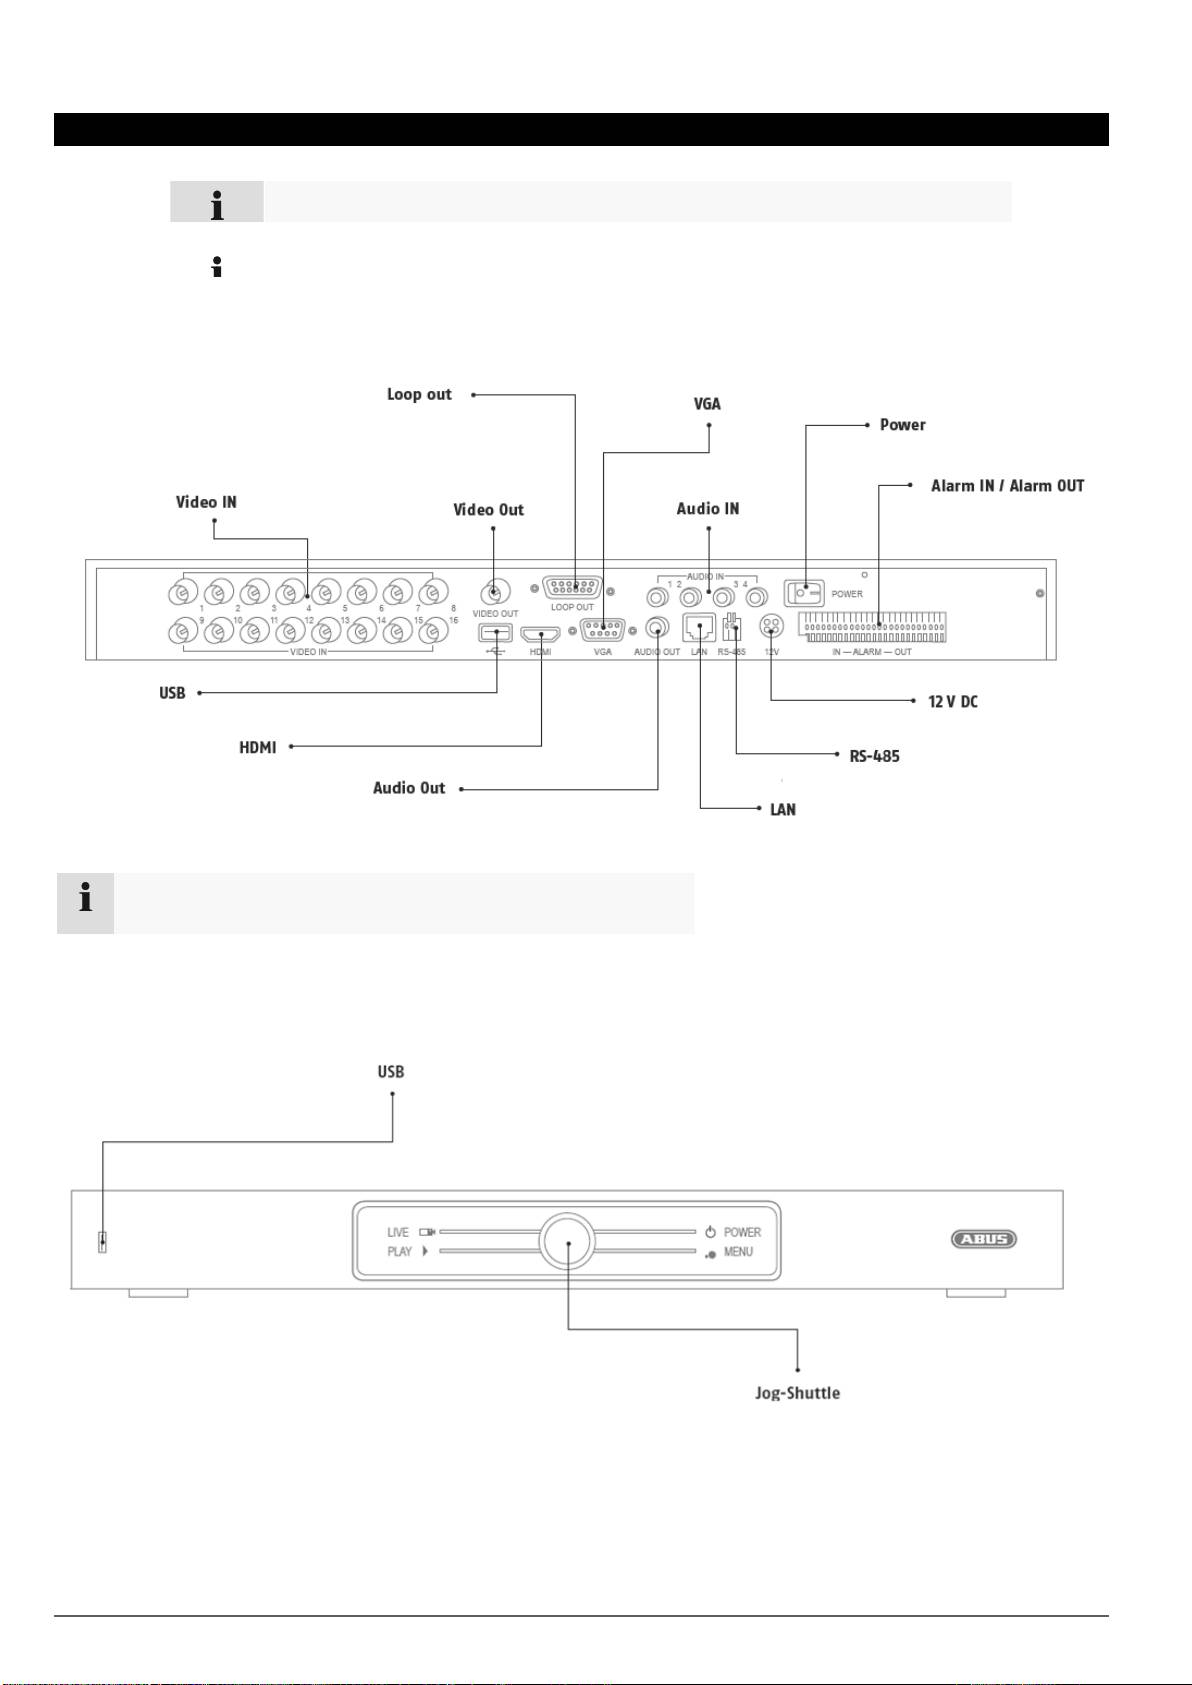
Front
See System operation on page 62.
Pay attention to the information in the separate quick guide, plus the notes on the
CD and in the accompanying documentation on “Web server control” and “Clients
Software”. These can be found on the Internet under www.abus.com.
Rearside

System operation
System operation
General information
The device can be controlled as follows:
Using the USB mouse
Connections on the rear of the device
62
Note
Pay attention to the overview on page 61.
Name
Function
VIDEO IN:
BNC input for analogue cameras
VIDEO OUT:
Spot output
LOOP OUT:
Each camera input is looped here and output
again
VGA:
VGA monitor connection (9-pin), video output
signal
AUDIO IN:
Cinch inputs
POWER ON/OFF:
On and off device switch
ALARM IN/OUT:
Max. 16 alarm inputs, max. 4 relay outputs
12 V DC
12 V DC connection for power supply
RS-485
Connection for PTZ cameras
LAN
RJ45 port for a network connection
AUDIO OUT:
Cinch audio output (synchronised with the
video output)
HDMI
HDMI monitor connection
USB
Connection for USB devices
SHUTTLE KNOB
For selecting the operating mode

Mouse operation
63
Note
Further descriptions in these operating instruc-
tions are made with the mouse.
The device is suitable for use with a USB mouse.
Connect the mouse to the USB port.
Button
Function
Left
Single-click:
Selection in the menu, activation of an input
field or a TAB, display of the Quick Set
menu
Double-click:
Switches between the screen display of
single and multiple images in the live view
and during playback
Click and drag:
In PTZ mode: Camera control
Set-up of alarm areas or zones
Right
Single-click:
Calls up the pop-up menu
Scroll
wheel
In the live view:
Shows previous / next camera
In menus:
Scrolls through the menus

Contents
Device overview ............................................................................................................................................................. 61
System operation ........................................................................................................................................................... 62
General information ....................................................................................................................................................... 62
Connections on the rear of the device ........................................................................................................................... 62
Mouse operation ............................................................................................................................................................ 63
Quick guide..................................................................................................................................................................... 67
Before you start .............................................................................................................................................................. 67
Installing the HDD .......................................................................................................................................................... 67
Establishing the connections ......................................................................................................................................... 67
Configuring the device ................................................................................................................................................... 67
Important safety information ........................................................................................................................................ 68
Explanation of symbols .................................................................................................................................................. 68
Proper use ..................................................................................................................................................................... 68
General information ....................................................................................................................................................... 68
Power supply ................................................................................................................................................................. 68
Overloading / overvoltage .............................................................................................................................................. 69
Cables ............................................................................................................................................................................ 69
Installation location / operating environment ................................................................................................................. 69
Remote control ............................................................................................................................................................... 69
Care and maintenance ................................................................................................................................................... 70
Accessories .................................................................................................................................................................... 70
Putting into operation ..................................................................................................................................................... 70
Children and the device ................................................................................................................................................. 70
Introduction .................................................................................................................................................................... 71
General information ....................................................................................................................................................... 71
Unpacking the device ..................................................................................................................................................... 71
Scope of delivery ........................................................................................................................................................... 71
On-screen keyboard ...................................................................................................................................................... 72
Starting the device ......................................................................................................................................................... 72
Switching off, locking and rebooting the device ............................................................................................................. 72
Status displays ............................................................................................................................................................... 73
General information ....................................................................................................................................................... 73
Display on the monitor ................................................................................................................................................... 73
Setup wizard ................................................................................................................................................................... 74
Setting up the system .................................................................................................................................................... 74
Setting up the administrator ........................................................................................................................................... 74
Time / Date .................................................................................................................................................................... 74
Network Settings ............................................................................................................................................................ 75
HDD Management ......................................................................................................................................................... 75
Camera recording .......................................................................................................................................................... 75
Live view ......................................................................................................................................................................... 76
Overview ........................................................................................................................................................................ 76
Status symbols .............................................................................................................................................................. 76
Pop-up menu for mouse operation ................................................................................................................................ 76
Selection bar in the camera image ................................................................................................................................ 77
Settings .......................................................................................................................................................................... 78
Setting the camera output ............................................................................................................................................. 78
Playback .......................................................................................................................................................................... 79
64

Contents
General information ....................................................................................................................................................... 79
Playback screen ............................................................................................................................................................ 79
Using the control panel .................................................................................................................................................. 79
Main menu ...................................................................................................................................................................... 81
Menu overview ............................................................................................................................................................... 81
Menu description ........................................................................................................................................................... 81
Menu description ........................................................................................................................................................... 82
Configuration.................................................................................................................................................................. 83
Overview ........................................................................................................................................................................ 83
General .......................................................................................................................................................................... 83
Terms and definitions .................................................................................................................................................... 84
Network layout ............................................................................................................................................................... 85
Network-configuration ................................................................................................................................................... 85
Warning .......................................................................................................................................................................... 89
User ................................................................................................................................................................................ 89
Camera ............................................................................................................................................................................ 91
OSD ............................................................................................................................................................................... 91
PTZ ................................................................................................................................................................................ 91
Motion ............................................................................................................................................................................ 92
Handling ......................................................................................................................................................................... 92
Private Zone ................................................................................................................................................................... 93
Tamper monitoring ......................................................................................................................................................... 94
Video signal loss ............................................................................................................................................................ 94
Setting up ....................................................................................................................................................................... 96
Schedule ........................................................................................................................................................................ 96
Record............................................................................................................................................................................ 97
TAB Substream .............................................................................................................................................................. 97
Advanced settings ......................................................................................................................................................... 98
Holidays ......................................................................................................................................................................... 98
HDDs .............................................................................................................................................................................. 99
Installing the HDD ......................................................................................................................................................... 99
HDD Management parameters ..................................................................................................................................... 99
HDD settings of the cameras ......................................................................................................................................... 99
S.M.A.R.T..................................................................................................................................................................... 100
Checking the HDD status............................................................................................................................................. 100
Recording ..................................................................................................................................................................... 101
Continous Recording ................................................................................................................................................... 102
Event ............................................................................................................................................................................ 102
Video Export ................................................................................................................................................................. 103
Duration........................................................................................................................................................................ 103
Event (event type ‘Motion’) .......................................................................................................................................... 104
Maintenance ................................................................................................................................................................. 105
System Info .................................................................................................................................................................. 105
Log Search ................................................................................................................................................................... 105
Import / Export ............................................................................................................................................................. 106
Upgrade ....................................................................................................................................................................... 106
Default .......................................................................................................................................................................... 107
Network ........................................................................................................................................................................ 107
Shutdown ...................................................................................................................................................................... 109
Troubleshooting ........................................................................................................................................................... 110
Device cleaning and care ............................................................................................................................................ 110
65

Contents
Note .............................................................................................................................................................................. 110
Technical data .............................................................................................................................................................. 111
Disposal ........................................................................................................................................................................ 113
Information on the EU directive on waste electrical and electronic equipment ........................................................... 113
Information on handling batteries ................................................................................................................................ 113
Important information on disposing of batteries .......................................................................................................... 113
Information on the European RoHS directive ............................................................................................................. 113
Glossary ........................................................................................................................................................................ 114
Overview of specialist terms ........................................................................................................................................ 114
Internal HDD ................................................................................................................................................................. 116
66
Quick guide
Quick guide
Before you start
The following preparatory steps must be made:
1. Pay attention to the general information, safety in-
formation and notes on setting up and connecting
the device (see page 62).
2. Check the contents of the package for completeness
and damages.
3. Insert the batteries into the remote control.
67
Note
Pay attention to the information in the separate
quick guide.
Installing the HDD
Warning
Switch off the device and disconnect it from the
mains power supply.
Pay attention to the required earthing of the de-
vice to avoid static discharge.
1. Install one or more HDDs (see the separate quick
guide).
2. First make a connection to the motherboard (small
connector).
3. Connect the power supply cable (large 5-pin con-
nector).
4. Check that the connections are secure.
5. Close the housing.
Note
Only use HDD’s that are approved for video re-
cording and 24/7 usage.
Establishing the connections
Note
Pay attention to the minimum radius when laying
cables. Do not kink the cable.
Configuring the device
1. Connect all cameras to the recorder.
2. Connect the monitor to the VGA, BNC- or HDMI
connection.
3. Connect the mouse to the USB port.
4. Connect the device to the mains power supply, it will
then start automatically.
Note
Pay attention to the information in the separate
quick guide.
Proceed through the individual steps in the setup
wizard (see page 74).
The following settings are configured in sequence:
Language selection for the user interface
Administrator setup
General settings (date, time etc.)
HDD management (initialisation etc.)
Network settings
Camera management
Note
Subsequent changes to the date and time can lead
to the loss of data!
Note
Check the ABUS homepage (www.abus.com) if
for this device any firmware updates are avail-
able and install these
Pay attention to the menu overview on page 81, plus
the notes and explanations on basic system opera-
tion on page.
Pay attention to the notes on the following:
Live view
P. 76
Playback
P. 79
Data export
P. 102
Troubleshooting
P. 109

Important safety information
Important safety information
Explanation of symbols
The following symbols are used in this manual and on the
device:
68
Symbol
Signal word
Meaning
Warning
Indicates a risk of injury or health
hazards.
Warning
Indicates a risk of injury or health
hazards caused by electrical
voltage.
Important
Indicates possible damage to the
device/accessories.
Note
Indicates important information.
The following labels are used in the text:
Meaning
1.…
2.…
Set of tasks or instructions with a defined se-
quence in the text
…
…
Set of points or warnings without a defined se-
quence in the text
Proper use
Only use the device for the purpose which it was de-
signed and built for. Any other use is considered inap-
propriate.
This device may only be used for the following pur-
pose(s):
This 4-channel/8-channel/16-channel analogue digital
recorder is used in combination with connected video
signal sources (analogue cameras) and video output
devices (CRT or TFT monitors) for object surveil-
lance.
Note
Data storage is subject to national data-protection
guidelines.
During installation, inform your customers regard-
ing the existence of these guidelines.
General information
Before using the device for the first time, read the follow-
ing instructions carefully and pay attention to all warn-
ings, even if you are already familiar with electronic de-
vices.
Warning
All guarantee claims become invalid for damages
caused by non-compliance with these operating
instructions.
We cannot be held liable for resulting damages.
Warning
We cannot be held liable in the event of material
or personal damage caused by improper opera-
tion or non-compliance with the safety information.
All guarantee claims are invalid in such cases.
Keep this manual in a safe place for future reference.
If you pass on or sell the device, you must also include
this user manual.
This device has been manufactured in accordance with
international safety standards.
Power supply
Only operate this device through a power source
which supplies the mains power specified on the type
plate.
If you are unsure of the power supply at the installa-
tion location, contact your power supply company.
Warning
Avoid data loss!
Always use an uninterruptible power supply (UPS)
with overvoltage protection.
Disconnect the device from the mains power supply
before carrying out maintenance or installation work.
The on/off switch does not completely disconnect the
device from the mains power supply.
To disconnect the device completely from the mains
power supply, the plug must be disconnected from
the mains socket. Therefore, the device should be
positioned so that direct and unobstructed access to
the mains socket is guaranteed at all times and the
plug can be disconnected immediately in an emer-
gency.

Important safety information
To avoid the possibility of fires, the plug should always be
disconnected from the network socket if the device is not
used for long periods. Disconnect the device from the
mains power supply before impending electrical storms,
or use an uninterruptible power supply.
69
Warning
Never open the device on your own! There is a
risk of electric shocks!
If it is necessary to open the device, consult
trained personnel or your local maintenance spe-
cialist.
The installation or modification of a HDD should only
be made by trained personnel or your local mainte-
nance specialist.
Warning
The installation of additional equipment or modifi-
cation of the device invalidates your guarantee if
not carried out by trained personnel.
We recommend having the HDD installed by a
maintenance specialist.
Your guarantee is invalidated in the event of im-
proper installation of the HDD.
Installation location / operating environ-
ment
Position the device on a firm, level surface and do not
place any heavy objects on the device.
The device is not designed for operation in rooms
subject to high temperatures or moisture (e.g. bath-
rooms), or in excessively dusty rooms.
Operating temperature and ambient humidity:
-10 °C to 55 °C, maximum 85% relative humidity. The
device may only be operated in moderate climate
conditions.
Ensure the following:
Sufficient ventilation must be present at all times (do
not place the device in a storage rack, on thick car-
pets, on a bed or anywhere where the ventilation
slots are covered. Make sure that a gap of at least
10 cm is present on all sides).
The device must not be exposed to direct heat
sources (e.g. heaters).
The device must not be exposed to direct sunlight or
strong artificial light.
The device must not be placed in close proximity to
magnetic fields (e.g. loudspeakers).
Naked flames (e.g. candles) must not be placed on or
Overloading / overvoltage
near the device.
Avoid overloading of mains sockets, extension cables
Contact with spraying or dripping water and aggres-
and adapters as this can result in fires or electric
sive liquids must be avoided.
shocks.
The device must not be operated in close proximity to
Use overvoltage protection to prevent damages
water, and must not be submerged under any cir-
caused by overvoltage (e.g. electrical storms).
cumstances (do not place objects containing water on
or near the device, such as vases or drinks).
Cables
Foreign objects must not penetrate the device.
Always hold cables by the connector, and do not pull
The device must not be exposed to strong variations
the cable itself.
in temperature, as this can lead to condensation and
electrical short circuits.
Never touch the mains cable with wet hands, as this
The device must not be exposed to excessive jolts or
can lead to a short circuit or electric shock.
vibrations.
Never position the device, furniture or other heavy
items on the cable. Ensure that the cable does not
Remote control
become kinked, especially on the connector and
sockets.
Remove all batteries if the device will not be used for
a sustained period, as these can leak and damage
Never knot the cable, and do not tie it to other cables.
the device.
All cables should be laid so that they cannot be
stepped on or cause an obstruction.
A damaged mains cable can cause a fire or electric
shock. Check the mains cable from time to time.
Never modify or manipulate the mains cable or plug.
Do not use plug adapters or extension cables that do
not conform to the applicable safety standards, and do
not make alterations to power supply cables or mains
cables.

Important safety information
Care and maintenance
Maintenance is necessary if the device has been dam-
aged. This includes damage to the plug, mains cable and
housing, penetration of the interior by liquids or foreign
objects, exposure to rain or moisture or when the device
does not work properly or has fallen.
Disconnect the device from the mains power supply
before maintenance (e.g. cleaning).
If smoke develops or unusual noises or odours are
detected, then switch off the device immediately and
pull the mains plug from the socket. In such cases,
the device should not be used until it has been in-
spected by a qualified technician.
Maintenance work should only be carried out by qual-
ified specialists.
Never open the housing on the device or accesso-
ries. There is a risk of fatal injury due to an electric
shock when the housing is opened.
Clean the device housing and remote control with a
damp cloth.
Do not use solvents, white spirit or thinners as these
can damage the surface of the device.
Do not use any of the following substances:
Salt water, insecticides, solvents containing chlorine
or acids (ammonium chloride) or scouring powder.
Gently rub the surface with a cotton cloth until it is
completely dry.
70
Warning
The device works under dangerous voltages. The
device must only be opened by authorised spe-
cialists. All maintenance and service work must be
carried out by authorised firms. Improper repairs
can expose device users to the risk of fatal injury.
Putting into operation
Observe all safety and operating instructions before
putting the device into operation for the first time.
Only open the housing to install the HDD.
Accessories
Only connect devices that are suitable for the intend-
ed purpose. Otherwise, hazardous situations or dam-
age to the device can occur.
Warning
When installing the device in an existing video
surveillance system, ensure that all devices are
disconnected from the mains power supply and
low-voltage circuit.
Warning
If in doubt, have a specialist technician carry out
assembly, installation and connection of the de-
vice.
Improper or unprofessional work on the mains
power supply or domestic installation puts both
you and other persons at risk.
Connect the installations so that the mains power
circuit and low-voltage circuit always run separate-
ly from each other. They should not be connected
at any point or become connected as a result of a
malfunction.
Children and the device
Do not allow children access to electrical devices.
Never allow children to use electrical devices without
supervision. Children may not be able to accurately
detect possible risks. Small parts can be life-
threatening if swallowed.
Keep batteries away from small children. Call for
medical assistance immediately if a battery is swal-
lowed.
Keep packaging materials away from children (dan-
ger of suffocation).
This device should not be used by children. If used
improperly, spring-loaded parts can be ejected and
cause injuries to children (e.g. eye injuries).

Introduction
Introduction
Dear customers,
This device complies with the requirements of the
applicable EU directives.
The declaration of conformity can be ordered from:
ABUS Security-Center GmbH & Co. KG
Linker Kreuthweg 5
86444 Affing
GERMANY
To maintain this status and to guarantee safe operation,
it is your obligation to observe these operating instruc-
tions!
Read the entire operating manual carefully before putting
the product into operation and pay attention to all operat-
ing and safety information!
All company names and product descriptions are trade-
marks of the corresponding owner. All rights reserved.
In the event of questions, please contact your local
maintenance specialist or dealer.
71
Disclaimer
These operating instructions have been produced
with the greatest care. Should you discover any
missing information or inaccuracies, please con-
tact us under the address shown on the back of
the manual. ABUS Security-Center GmbH does
not accept any liability for technical and typo-
graphical errors, and reserves the right to make
changes to the product and operating instructions
at any time and without prior warning. ABUS Se-
curity-Center GmbH is not liable or responsible for
direct or indirect damages resulting from the
equipment, performance and use of this product.
No forms of guarantee are accepted for the con-
tents of this document.
Unpacking the device
Handle the device with extreme care when unpacking it.
The packaging is made of reusable materials, and
should always be passed on for recycling.
We recommend the following:
Paper, plastic packaging, cardboard and corrugated
cardboard should be disposed of in the appropriate recy-
cling containers.
If recycling containers are not available in your local area,
then you can dispose of these materials as domestic
waste.
If the original packaging has been damaged, inspect the
device. If the device shows signs of damage, then return
it in the original packaging and contact the manufacturer.
Scope of delivery
ABUS 4-channel/8-channel/16-channel analogue di-
gital recorder
Power supply unit
3x power cable (DE, UK, AU)
SATA cable and screws for hard drive(s)
Bracket and screws for server cabinet
USB mouse
Quick guide
Manual
CD
General information
In order to use the device correctly, read this user man-
ual carefully and keep it in a safe place for later use.
This manual contains instructions on recorder operation
and maintenance. Consult an authorised specialist if the
device needs to be repaired.
On-screen keyboard
The on-screen keyboard appears after clicking on a text
entry field with the mouse:
The following screen keyboard appears during mere nu-
merical entry:
The keys have the same function as on a computer key-
board.
To enter the character, left-click the mouse.
To finish data entry, press Enter.
To delete the character in front of the cursor,
click on .
To switch between upper and lower case, click on the
framed a symbol. The current setting is displayed
above the keyboard.
To cancel the entry or exit the field, press ESC.
Starting the device
72
Important
The device must only be operated with the mains
power specified on the type plate.
For safety reasons, use an uninterruptible power
supply (UPS).
Switching off, locking and rebooting the
device
Click on “ShutDown” in the main menu. The overview
appears.
1. To switch off the device, select ShutDown and con-
firm by pressing Yes. The device is then switched
off.
Do not press any keys during the shutdown pro-
cedure.
Now pull out the plug of the power supply unit.
2. To lock the system, select the corresponding Lock
symbol on the left. The user interface is now locked
and a password must be entered to access the
menu.
3. To reboot the device, select the corresponding Re-
boot symbol on the right. The device is then reboot-
ed.
Switching on the device
Plug in the power supply unit to start the device.
When the device is connected to the power supply, it
starts up automatically.
1. The device carries out a self-test during the start-up
procedure.
2. The setup wizard appears. Exit the wizard to access
the live view.

Status displays
Status displays
General information
The following status displays indicate the current operat-
ing state:
LEDs on the front of the device
Acoustic signal tones
Icons (display elements) on the monitor
73
Note
Pay attention to the information in the separate
quick guide.
Display on the monitor
The device shows the date and time, camera name and
whether a recording is in progress.
Continuous recording: blue “R”
Motion detection recording yellow “R”
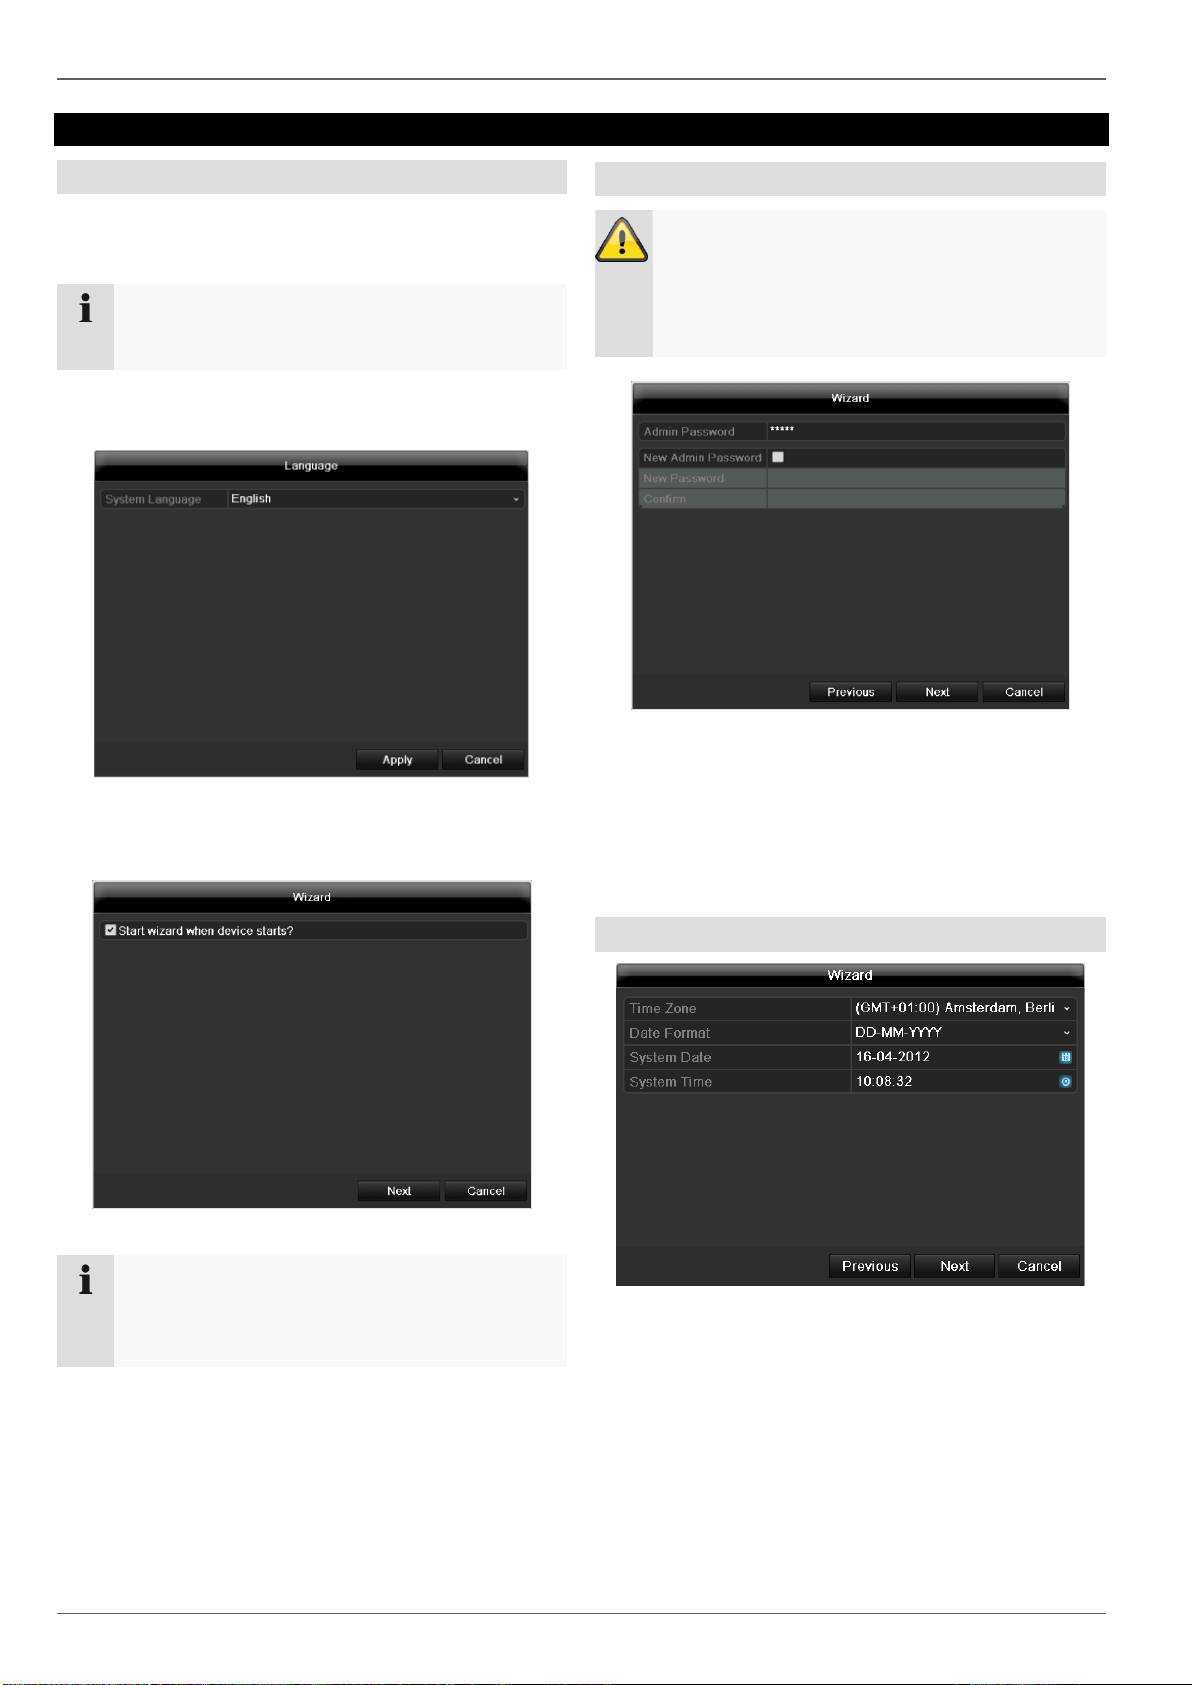
Setup wizard
Setup wizard
Setting up the system
The setup wizard guides you through the necessary
basic system settings. The DVR is then set up for record-
ing and surveillance.
74
Note
All detailed settings can be found in the device
menu (see overview on 81).
The language selection appears after switching on for the
first time:
1. Click the entry field and select the desired language
from the list. Click on Apply to continue. The follow-
ing query appears:
Click on Next to start the wizard.
Note
After the system is set up, you can untick the box.
The setup wizard is then no longer started auto-
matically.
Setting up the administrator
Warning
Note down the admin password.
The following password is preset
“1 2 3 4 5”
1. Click the entry field and enter your admin password.
2. To assign a new password, tick the box next to New
Admin Password.
3. Enter the new password and confirm in the field be-
low.
4. Click on Next.
Time / Date
Enter the system time (date and time). Click on Next to
accept the data.
Setup wizard
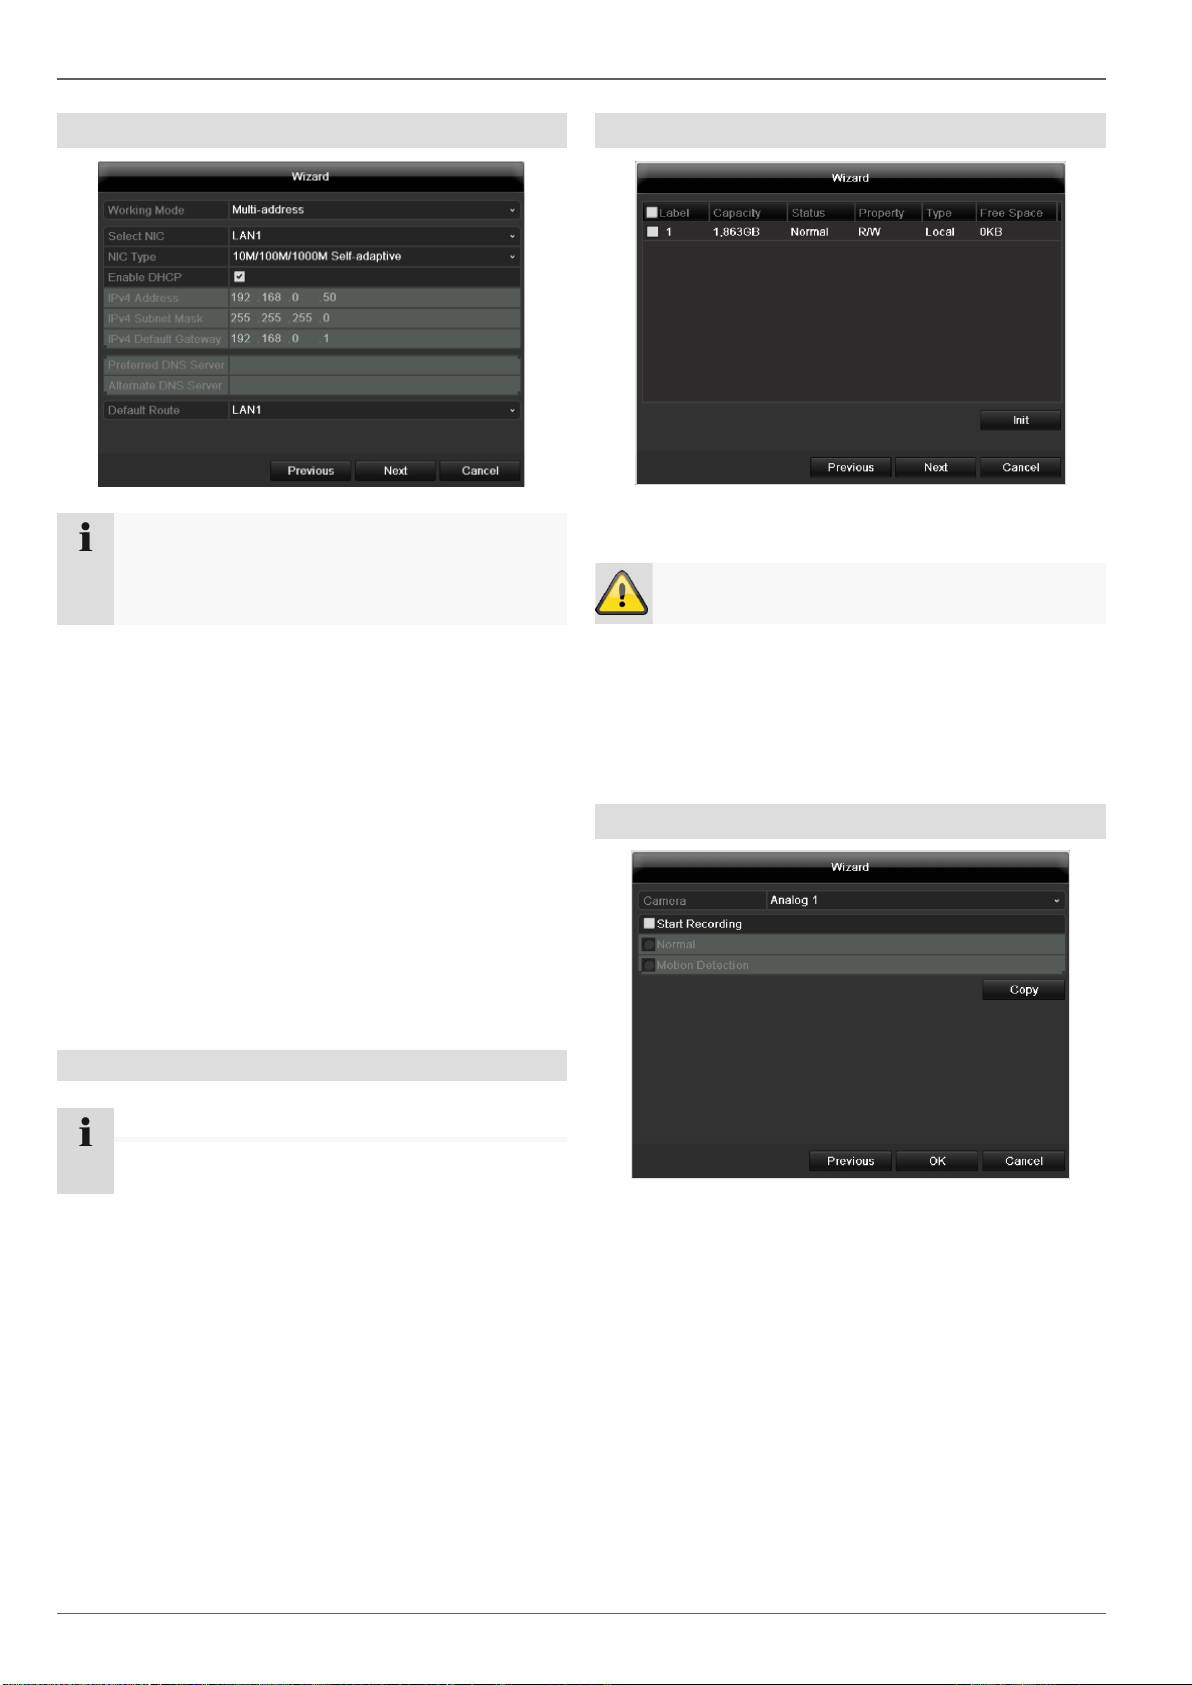
Network Settings
75
Note
To check whether DHCP can be selected (or if
you have to set the IP address and other settings
manually), consult your network administrator.
HDD Management
1. To set up a new hard disc, activate the “Check box”
with a left click and then click on Init.
1. DHCP activated: If DHCP is set up in the network
router, then tick the DHCP box. All network settings
are then made automatically.
2. DHCP not activated: Enter the data manually (IPv4
address, IPv4 subnet mask and IPv4default gateway
= IPv4 address of the router). You can also optional-
ly enter the address of the DNS server that you need
for sending the E-mail.
A typical address specification is as follows:
IPv4 address: 192.168.0.50
IPv4 Subnet mask: 255.255.255.0
IPv4 Default gateway: 192.168.0.1
Preferred DNS server: 192.168.0.1
Warning
All data on the drive is deleted!
2. Confirm the prompt by pressing OK. The HDD is
then set up for operation. The progress is displayed
on the status bar.
3. Exit the setting by pressing Next.
Camera recording
1. At “Camera” select a camera with which you would
like to record.
2. Activate the check box “Start recording”.
3. Select the type of recording. You can choose be-
tween “Time plan” and “Motion recognition”.
Arm the motion detection inside the camera for re-
cording motion.
4. Press Copy to take on the setting for other cameras.
For this, select the cameras that appear in the new
window. Activate the respective check box with a
mouse click.
5. Finalize the setting and end the installation assistant
with OK.
Note
When the device is accessed remotely via the in-
ternet, it should be given a fixed network address.
Live view
Live view
Overview
Status symbols
The live view starts automatically after the device is
The following symbols are displayed depending on
switched on.
the operating status of the device:
You can also go back to the live view by pressing the
Menu key repeatedly.
The following menus are found in the screen header:
Menu
Playback
PTZ
The view pop-up menu is found on the right. The time
and date are displayed on the right.
Click on the symbol to open the pop-up menu of the
multi view.
Click on one of the symbols to switch between the dif-
ferent views.
The signals of the connected cameras are displayed on
the main screen.
By double-clicking the left mouse key, you can dis-
play the camera image as a full-screen view or switch
back to the original view.
76
Symbol
Meaning
R
R
Yellow: Motion Recording
Recording at motion detection
Blue: Recording
Continuous recording
Pop-up menu for mouse operation
Note
Press the right mouse button when the cursor is
positioned on a live image.
The following settings can be made. The arrow pointing
to the right indicates that a sub-menu is opened for selec-
tion:
Menu
Opens the main menu
Single Screen
Full-screen view for selected cam-
era
Multi Screen
Various camera layouts
Previous Screen
Changing the presentation of the
previous camera
Next Screen
Displays the next camera(s)
Start Auto-Switch
Starts the camera sequence
Start Recording
Starts motion detection or the
schedule for the entire day
Quick Set
Setting for the output mode
All-day playback
Switches to playback mode
Live view
77
Note
Stop Auto-switch:
Specify the delay in the image sequence in the
display settings.
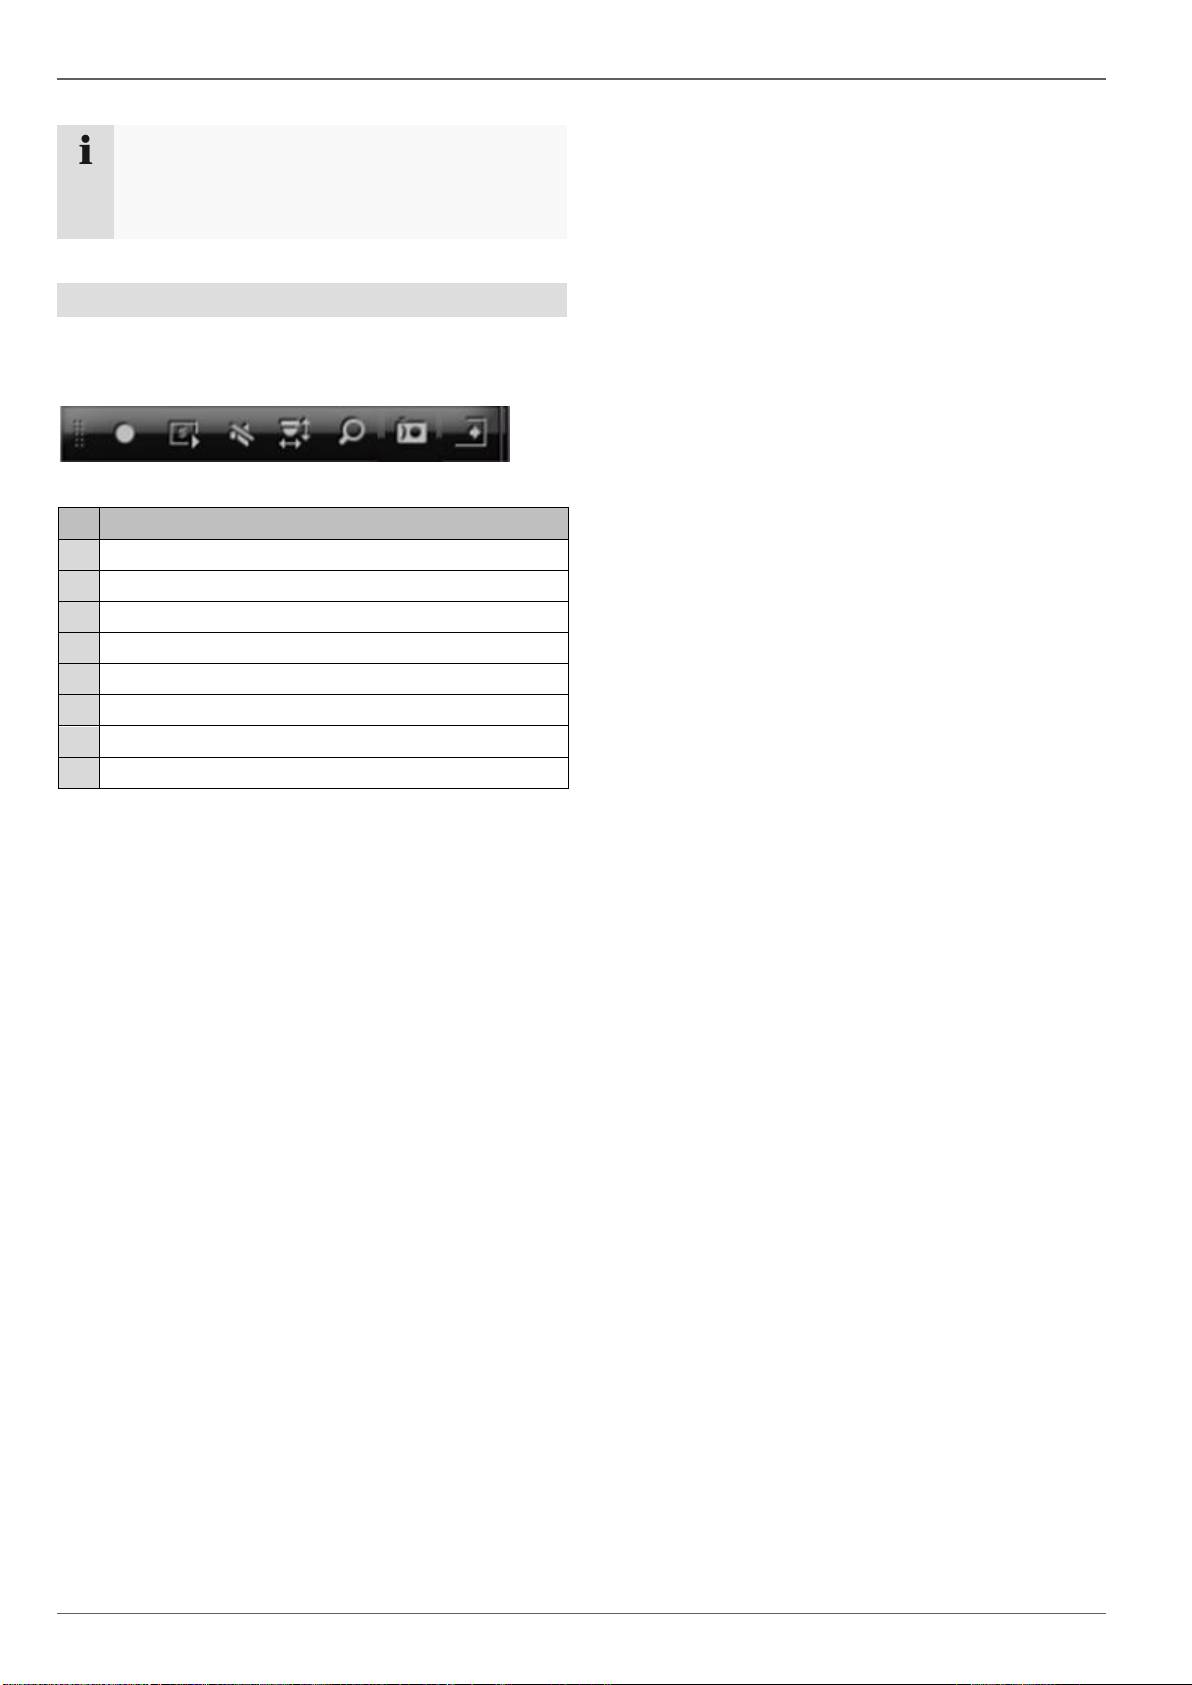
Selection bar in the camera image
Click on the camera image in single or multi view. A se-
lection bar appears:
(1) (2) (3) (4) (5) (6) (7) (8)
No.
Meaning/function
(1)
Area for moving the miniature bar
(2)
Activate/deactivate manual recording
(3)
Instant playback of the last 5 minutes
(4)
Audio
(5)
PTZ menu
(6)
Digital zoom
(7)
Image settings
(8)
Close the selection list
Live view
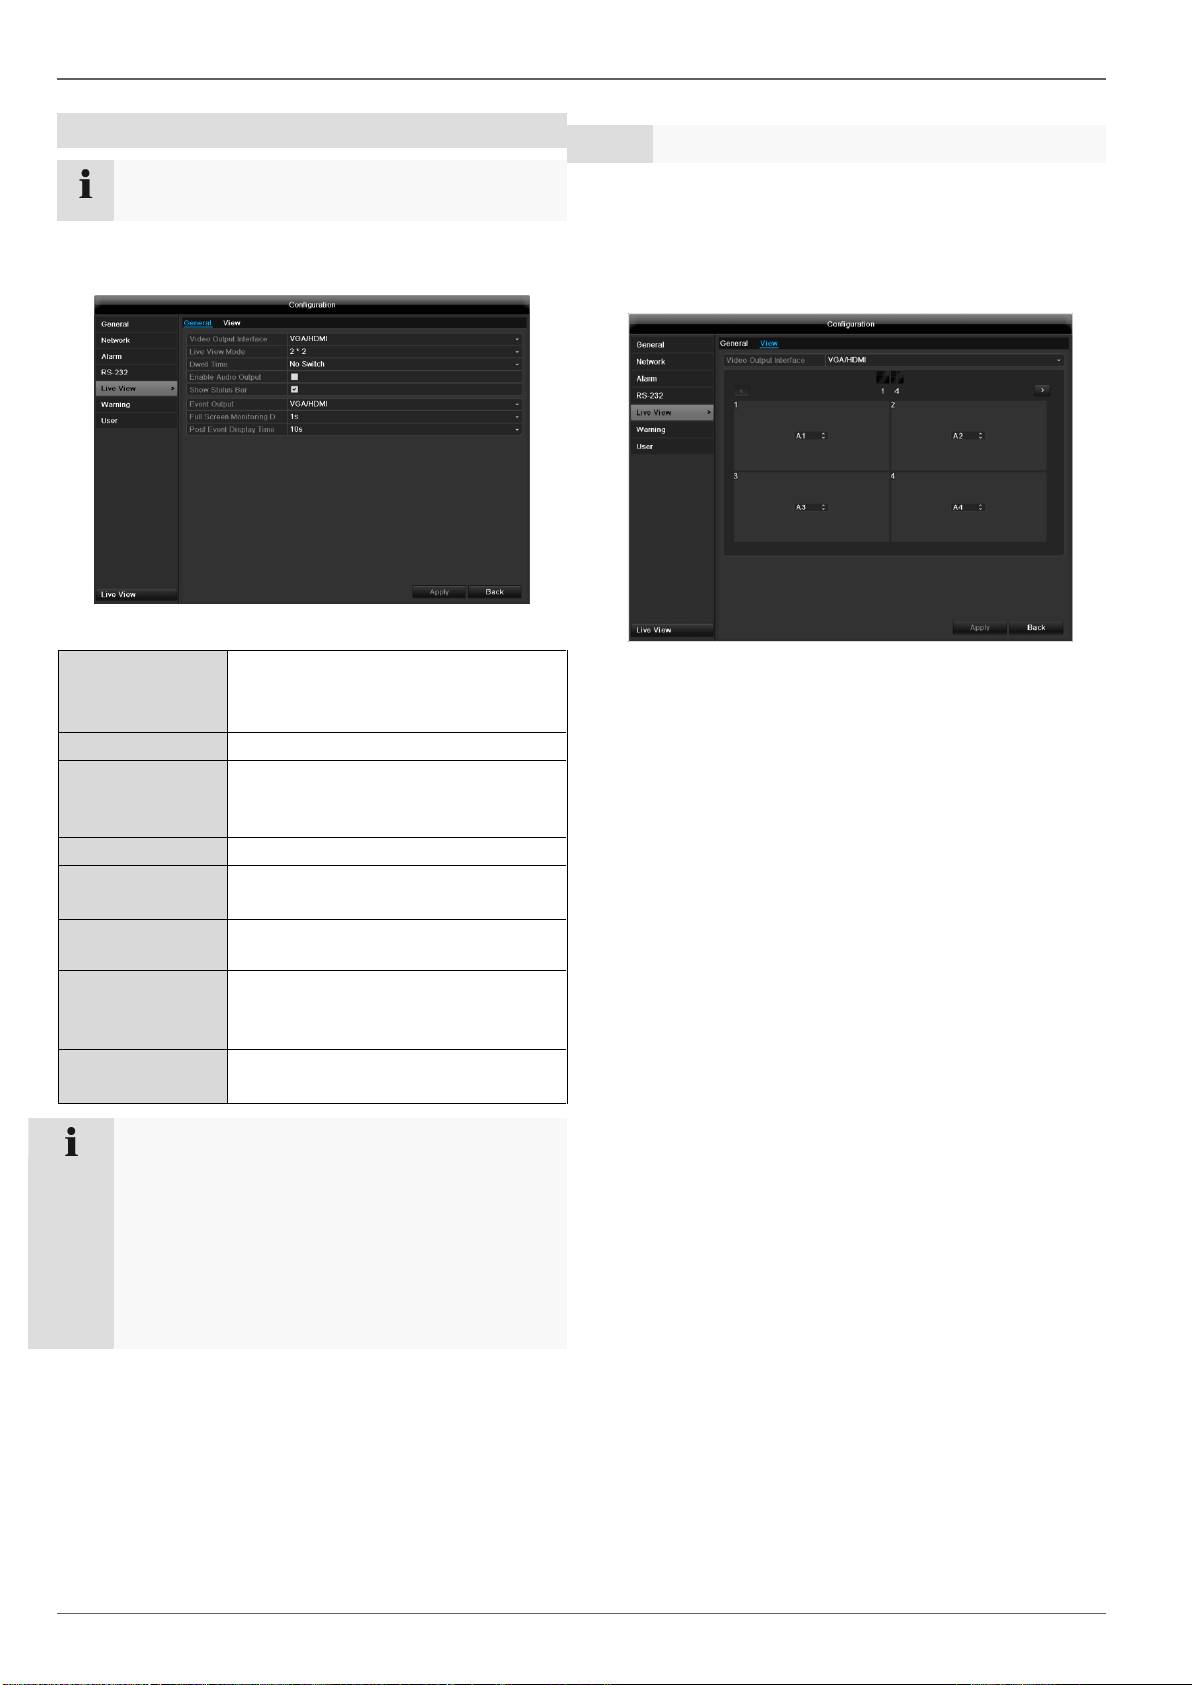
Settings
78
Note
The live view can be set as follows.
Open the main menu, then click on “Configuration”. Then
click on “Liveview”:
The following settings are available in the TAB “General”:
Video Output In-
terface
VGA/HDMI, Main CVBS
Select the connection where the set-
tings are changed
Live View Mode
Different camera layouts
Dwell Time
Switching time between the individu-
al cameras and the sequence dis-
play
Audio
Activate audio
Display status
bar
Activate/deactivate the status bar
Event Output
Allocate monitor for the output of
events
Full Screen
Monitoring Dura-
tion
in seconds, where the event on the
allocated monitor will be displayed.
Post Event Dis-
play Time
in seconds, the duration of the Pop-
up window when an event occurs.
NoteVGA monitor connected:
A connected VGA monitor automatically becomes
the main monitor where the audio output is also
assigned.
No HDMI monitor connected
If during the boot process of the DVR the HDMI cable is not
connected, the main video signal is displayed at VGA output .
Connect the HDMI cable and reboot the DVR in order to dis-
play the main video signal at the HDMI output.
Setting the camera output
You can display a maximum of 16 cameras simultane-
ously in the live view.
1. Click on the TAB “View”.
2. Select the display mode
(depends on the model)
1 x 1
2 x 2
1 + 5
1 + 7
3 x 3
4 x 4
3. The camera signal is assigned to the corresponding
image section using the navigation keys.
“X” means that this camera is not displayed.
4. Click on Apply to accept the settings.

Playback
Playback
General information
Playback can be made in three different ways:
Through the video search in the main menu
From the live view
Through the log file in the maintenance menu
79
Note
The buttons “previous file/day/event” are used dif-
ferently depending on the playback mode:
Normal playback:
By pressing the button the playback jumps to the
previous/next day.
Video Search:
By pressing the button the playback jumps to the
previous/next event day.
Video Export:
By pressing the button the playback jumps to the
previous/next file.
Note
It is possible to start a simultaneous playback with
up to 4 cameras.
Playback screen
Playback is controlled on the control panel:
No.
Area
Running playback with date and time
Used to select the camera for feedback
Calendar with recording type
Control panel with time bar (see right)
Using the control panel
The control panel (4) is used for controlling the running
playback. The symbols have the following meaning:
No.
Meaning / function
1
Start video clip
2
Add marking
3
Add user-defined marking
4
Manage markings
7
Backwards playback
8
Stop
9
Playback start / pause
10
Jump backward 30 seconds
11
Jump forward 30 seconds
12
Slow forward (slow motion) (1/16x - 1x)
13
Fast forward (1x - 16x)
14
Previous recording marking
15
Next marking
16
Time bar:
Click on the time bar with the mouse to contin-
ue playback from another point
To start playback from a specific time, click on
the slider and drag it to the required time
17
Recording type
Blue = Continuous recording
Red = Event recording
Green = Smart
18
Hides the control panel
19
Exits playback
3
2
1
4
5
(
1
7
)
(
1
8
)
(
1
9
)
(
7
)
(
8
)
(
9
)
(
1
0
)
(
1
1
)
(
1
2
)
(
1
3
)
(
1
4
)
(
1
5
)
(
1
6
)
(
2
)
(
3
)
(
4
)
(
5
)
(
6
)
(
1
)
2
5
6
7
8
9
1
4
1
6
1
7
1
9
2
0
1
8
1
4
1
5
8
1
1
1
2
1
3
1
0
9
Siehe Fehler! Kein gültiges Resultat für Tabel-
le. S. 4.
3
2
1
4
5
(
1
7
)
(
1
8
)
(
1
9
)
(
7
)
(
8
)
(
9
)
(
1
0
)
(
1
1
)
(
1
2
)
(
1
3
)
(
1
4
)
(
1
5
)
(
1
6
)
(
2
)
(
3
)
(
4
)
(
5
)
(
6
)
(
1
)
2
5
6
7
8
9
1
4
1
6
1
7
1
9
2
0
1
8
1
4
1
5
8
1
1
1
2
1
3
1
0
9
Siehe Fehler! Kein gültiges Resultat für Tabel-
le. S. 4.
3
2
1
4
5
(
1
7
)
(
1
8
)
(
1
9
)
(
7
)
(
8
)
(
9
)
(
1
0
)
(
1
1
)
(
1
2
)
(
1
3
)
(
1
4
)
(
1
5
)
(
1
6
)
(
2
)
(
3
)
(
4
)
(
5
)
(
6
)
(
1
)
2
5
6
7
8
9
1
4
1
6
1
7
1
9
2
0
1
8
1
4
1
5
8
1
1
1
2
1
3
1
0
9
Siehe Fehler! Kein gültiges Resultat für Tabel-
le. S. 4.
3
2
1
4
5
(
1
7
)
(
1
8
)
(
1
9
)
(
7
)
(
8
)
(
9
)
(
1
0
)
(
1
1
)
(
1
2
)
(
1
3
)
(
1
4
)
(
1
5
)
(
1
6
)
(
2
)
(
3
)
(
4
)
(
5
)
(
6
)
(
1
)
2
5
6
7
8
9
1
4
1
6
1
7
1
9
2
0
1
8
1
4
1
5
8
1
1
1
2
1
3
1
0
9
Siehe Fehler! Kein gültiges Resultat für Tabel-
le. S. 4.
3
2
1
4
5
(
1
7
)
(
1
8
)
(
1
9
)
(
7
)
(
8
)
(
9
)
(
1
0
)
(
1
1
)
(
1
2
)
(
1
3
)
(
1
4
)
(
1
5
)
(
1
6
)
(
2
)
(
3
)
(
4
)
(
5
)
(
6
)
(
1
)
2
5
6
7
8
9
1
4
1
6
1
7
1
9
2
0
1
8
1
4
1
5
8
1
1
1
2
1
3
1
0
9
Siehe Fehler! Kein gültiges Resultat für Tabel-
le. S. 4.
3
2
1
4
5
(
1
7
)
(
1
8
)
(
1
9
)
(
7
)
(
8
)
(
9
)
(
1
0
)
(
1
1
)
(
1
2
)
(
1
3
)
(
1
4
)
(
1
5
)
(
1
6
)
(
2
)
(
3
)
(
4
)
(
5
)
(
6
)
(
1
)
2
5
6
7
8
9
1
4
1
6
1
7
1
9
2
0
1
8
1
4
1
5
8
1
1
1
2
1
3
1
0
9
Siehe Fehler! Kein gültiges Resultat für Tabel-
le. S. 4.
3
2
1
4
5
(1
7)
(1
8)
(1
9)
(7
)
(8
)
(9
)
(1
0)
(1
1)
(1
2)
(1
3)
(1
4)
(1
5)
(1
6)
(2
)
(3
)
(4
)
(5
)
(6
)
(1
)
2
5
6
7
8
9
14
1
6
1
7
1
9
2
0
1
8
1
4
1
5
8
1
1
1
2
1
3
1
0
9
Siehe Fehler! Kein gültiges Resultat für Tabel-
le. S. 4.
(1)
2
1
4
5
(17)
(18)
(19)
(7)
(8)
(9)
(10)
(11)
(12)
(13)
(14)
(15)
(16)
(2)
(3)
(4)
(5)
(6)
(1)
2
5
6
7
8
9
14
16
17
19
20
18
14
15
8
11
12
13
10
9
Siehe Fehler! Kein gültiges Resultat für Tabel-
le. S. 4.
(2)
(3)
(4)
(5)
(6)
(7)
(8)
(9)
(10)
(11)
(12)
(13)
(14)
(15)
(16)
(17)
(18)
(19)

Playback
Please klick on ‚Tag management‘ (6):
In order to change the description of your marking,
click on the process symbol. To remove, click on the
delete symbol.
80
