Stanley D 200/8/6: инструкция
Раздел: Техника
Тип:
Инструкция к Stanley D 200/8/6
I
Manuale istruzioni
GB
Instruction manual for owner’s use
F
Manuel utilisateur
D
Betriebsanleitung
E
Manual de instrucciones
P
Manual de instruções
NL
Gebruiksaanwijzing
DK
Brugsanvisning
S
Instruktionsmanual
FIN
Käyttöohjeet
PL
RUS
N
Bruksanvisning
LT
EST
Kasutamisjuhend
LV

Manufactured under license by:
Nu Air Compressors And Tools S.p.A. - via Einaudi 6, 10070 Robassomero (TO) Italy
I
Conservare questo manuale d’istruzioni per poterlo consultare in futuro
GB
Preserve this handbook for future reference
F
Conserver le présent manuel pour pouvoir le consulter ultérieurement
D
Diese Bedienungsanleitung für späteres Nachschlagen sorgfältig aufbewahren
E
Conservar este manual de instrucciones para poder consultarlo en el futuro
P
Guardar este manual de instruções para o poder consultar no futuro
NL
Bewaar deze handleiding voor toekomstige raadpleging
DK
Opbevar denne brugsanvisning således, at det altid er muligt at indhente oplysninger på et senere tidspunkt
S
Förvara denna bruksanvisning för framtida konsultation
FIN
Säilytä ohjekirja voidaksesi etsiä siitä tarvittaessa ohjeita
GR
Φυλάξτετοπαρόνεγχειρίδιοοδηγιώνγιαμελλοντικήχρήση
PL
Przechowywaćniniejszypodręcznikinstrukcjiobsługitak,abymożnabyłokorzystaćzniegowprzyszłości
HR
Sačuvajteovajpriručniksuputamadabistegamoglikonzultiratiubudućnosti
SLO
Skrbnoshranitetapriročnik
H
Őrízzemegakézikönyvetajövőbenvalótanulmányozáshoz
CZ
Uložtetutopříručkuspokynypropoužitínavhodnémmístě,abystejimohlikdykolipoužít
SK
Uschovajtetútopríručkuspokynminaobsluhuprístrojatak,abystemohlidonejkedykoľveknahliadnúť
RUS
Сохраняйтеданноеруководствовтечениевсегопериодаэксплуатациикомпрессора
N
Du må oppbevare denne bruksanvisningen slik at du kan slå opp i den ved senere behov
TR
Bukullanımkılavuzunugelecektedanışmakiçinmuhafazaediniz
RO
Păstraţimanualuldeinstrucţiunipentrua-lputeacitişipeviitor
BG
Запазететоваръководствопоексплоатацията,задаможетедагоизползватеивбъдеще
SRB
Sačuvajteovajpriručniksuputstvimadabimoglidagakonsultujeteiubudućnosti
L T
Saglabātinstrukcijurokasgrāmatu,laivarētuizmantotnepieciešamībasgadījumā
EST
Hoidke käesolevat kasutusjuhendit alles, et saaksite seda tulevikus kasutada
L V
Išsaugotišiąinstrukcijųknygutętam,kadateityjegalėtumėtejojepasikonsultuoti
I
LEGENDA SEGNALETICA DI SICUREZZA SUI PRODOTTI
SLO
OPOZORILNI ZNAKI NA PROIZVODIH
GB
KEY TO PRODUCT SAFETY SIGNS
A TERMÉKEKEN TALÁLHATÓ BIZTONSÁGI JELZÉSEK
H
LISTÁJA
LEGENDE DES PICTOGRAMMES DE SECURITE
F
FIGURANT SUR LES PRODUITS
CZ
ERKLÄRUNG DER SICHERHEITSKENNZEICHNUNG AN
D
DEN PRODUKTEN
SK
INSCRIPCIÓN DE LA SEÑALIZACIÓN DE SEGURIDAD
E
COLOCADA EN LOS PRODUCTOS
RUS
LEGENDA DA SINALÉTICA DE SEGURANÇA NOS
P
N
SIKKERHETSTEGNFORKLARING PÅ PRODUKTENE
PRODUTOS
TR
VERKLARING WAARSCHUWINGSSYMBOLEN OP
NL
PRODUCTEN
LEGENDA INDICATOARELOR DE SECURITATE APLICATE
RO
SIGNATURFORKLARING TIL PRODUKTERNES
PE PRODUSE
DK
SIKKERHEDSSKILTNING
BG
FÖRKLARING TILL SÄKERHETSSYMBOLER PÅ
S
PRODUKTERNA
SRB
PROIZVODA
FIN
TUOTTEITA KOSKEVAT TURVAMERKIT
L T
GR
SAUGUMO SU GAMINIAIS
PL
LEGENDA ZNAKÓW OSTRZEGAWCZYCH NA WYROBACH
EST
OHUTUSNÕUDED
HR
ZNAKOVI ZA UPOZORENJE NA PROIZVODIMA
L V
PL Uwaga, grozi poparzeniem
HR Opasnost opekotina
SLO Nevarnost opeklin
H Figyelem,égetőfelületek
I Leggere attentamente il manuale d’istruzioni prima dell’uso
CZ Nebezpečíspálení!
GB Before use, read the handbook carefully
SK Nebezpečenstvopopálenia!
F Lire attentivement le Manuel Opérateur avant toute utilisation
RUSОпасностьожога
D Vor Inbetriebnahme Gebrauchsanleitung aufmerksam lesen
N Fare for å brenne seg
E Leer atentamente el manual de instrucciones antes de usar el equipo
TR Yanma tehlikesi
P Ler com atenção o manual de instruções antes do uso
RO Pericol de arsuri
NL Leesvóórgebruikaandachtigdehandleidingdoor
BG Опасностотизгаряния
DK Læs omhyggeligt instruktionsmanualen før brug
SRB Opasnost od opekotina
S Läs bruksanvisningen noggrant före användning
LT Nudegimo pavojus
FIN Lue käyttöopas huolellisesti ennen käyttöä
EST Süttivuse oht
GR Διαβάστεπροσεκτικάτοεγχειρίδιοοδηγιώννπριναπότηχρήση
LV Piesargietiesnoapdedzināšanā
PL Przedużyciemnależydokładniezapoznaćsięzinstrukcjamiobsługi
HR Prijeupotrebepažljivopročitajteuputezaupotrebo
SLO Pred uporabo, pazljivo preberite navodila za uporabo
H Használatelőttfigyelmesenolvassaelakézikönyvet
CZ Předzahájenímprácesipozorněpřečtětepříručkupropoužití.
SK Predpoužívanímvýrobkusipozorneprečítajtenávodnajehopoužitie
RUSПередтем,какприступитькработе,внимательнопрочитайте
I Attenzione corrente elettrica
инструкциюпоэксплуатации
GB Dangerous voltage
N Les nøye bruksanvisningen før bruk
F Attention: présence de courant électrique
TR Kullanımdanöncekullanımkılavuzunudikkatliceokuyunuz
D Achtung, elektrische Spannung
RO Citiţicuateniemanualuldeinstrucţiuniînaintedeutilizare!
E Atención,corrienteeléctrica
BG Внимателнопрочететеръководствотопоексплоатацияпредиупотреба
P Atenção corrente eléctrica
SRBPreupotrebepažljivopročitajtepriručniksuputstvima
NL Attentie, elektrische stroom
LT Priešimdamiesidarboatidžiaiperskaitykitenaudojimovadovėlį
DK Advarsel elektrisk strøm
EST Enne kasutamist lugege kasutamisjuhend tähelepanelikult läbi
S Varning-elektricitet
LV Uzmanīgiizlasietizmantošanasinstrukcijupirmsproduktalietošanas
FIN Huom.vaarallinenjännite
GR Προσοχήηλεκτρικόρεύμα
PL Uwaga,niebezpieczeństwoporażeniaprądemelektrycznym
HR Pažnja,električninapon
SLOPozor,električnanapetost
H Figyelem,elektromosáram
CZ Pozor-elektrickénapětí!
I Pericolo di scottature
SK Pozor-elektrickýprúd!
GB Warning, hot surfaces
RUSРискэлектрическогонапряжения
F Risque de brûlures
N Forsiktig elektrisk strøm
D Verbrennungsgefahr
TR Dikkatelektrikakımı
E Peligro de quemaduras
RO Atenţie!Pericolelectric
P Perigo de queimaduras
BG Внимание:електричекиток
NL Gevaar voor brandwonden
SRBPažnjaelektričnastruja
B Risiko for skoldning
LT Elektrosįtamposrizika
S Risk för brännskador
ESTEttevaatust-elektrivool
FIN Palovammavaara
LV Esietuzmanīgi-elektrībasplūsma
GR Κίνδυνοςεγκαυμάτων
I Pericolo avviamento automatico
GB Danger-automaticcontrol(closedloop)
F Risque de démarrage automatique
D Gefahr durch automatischen Anlauf
E Peligrodearranqueautomático
P Perigoarranqueautomático
NL Gevaar voor automatisch starten
DK Fare automatisk start
S Risk för automatisk start
FIN Automaattisen käynnistymisen vaara
GR Κίνδυνοςαυτόματηςεκκίνησης
PL Uwaga,niebezpieczeństwoautomatycznegouruchomieniasię
HR Opasnost kod automastkog uklapanja
SLO Nevarnost pri avtomatskem zagonu
H Automatikusbeindulásveszélye
CZ Nebezpečí-automatickéspouštění!
SK Nebezpečenstvo-automatickéspustenie!
RUSОпасностьавтоматическоговключения
N Fare for automatisk oppstart
TR Dikkatotomatikçalışmatehlikesi
RO Pericolpornireautomată
BG Опасностотавтоматичнопусканевход
SRB Opasnost od automatskog pokretanja
LT Automatinioįsijungimopavojus
EST Ohtlik-automaatilinekäivitus
LV Uzmanību-automātiskaiedarbināšanās
I Protezione obbligatoria dell’udito, della vista e delle vie respiratorie
GB Hearing, sight and respiratory protection must be worn
F Port obligatoire de protections auditives, oculaires et des voies respiratoires
D Gehörschutz, Augenschutz und Atemschutz sind obligatorisch vorgeschrieben
E Protecciónobligatoriadelosoídos,delavistaydelasvíasrespiratorias
P Protecçãoobrigatóriadoouvido,davistaedasviasrespiratórias
NL Verplichte bescherming van oren, ogen en luchtwegen
DK Obligatorisk beskyttelse af hørelse, syn og luftveje
S Hörselskydd, skyddsglasögon och andningsmask obligatoriskt
FIN Käytettävä kuulosuojaimia, suojalaseja ja hengityksensuojaimia
GR Υποχρεωτικόπροστατευτικόακοής,όρασηςκαιτουαναπνευστικούσυστήματος
PL Obowiązkowozabezpieczyćsłuch,wzrokidrogioddechowe
HR Obaveznazaštitaočiju,dišnihputevaisluha
SLO Obveznazaščitaoči,dihalinsluha
H Alégutak,alátásésahallásvédelmekötelező
CZ Povinnostchránitsluch,očiadýchacícesty.
SK Povinnáochranasluchu,zrakuadýchacíchciest!
RUSОбязательнаязащитаушей,лицаидыхательныхпутей
N Obligatorisk å ta i bruk hørselsvern, vernebriller og pustemaske
TR Mecburiişitme,görmevesolunumyollarıkoruması
RO Echipamentdeprotecţieobligatoriupentruurechi,ochişicăirespiratorii
BG Задължителнисредствазазащитанаслуха,зрениетоидихателнитепътища
SRBObaveznazaštitasluha,vidaidišnihputeva
LT Privalomaausų,veidoirkvėpavimotakųapsauga
EST Kuulmis-,nägemis-ninghingamisteedekaitseonkohustuslik.
LV Obligātadzirdes,redzesunelpošanasceļuaizsardzība
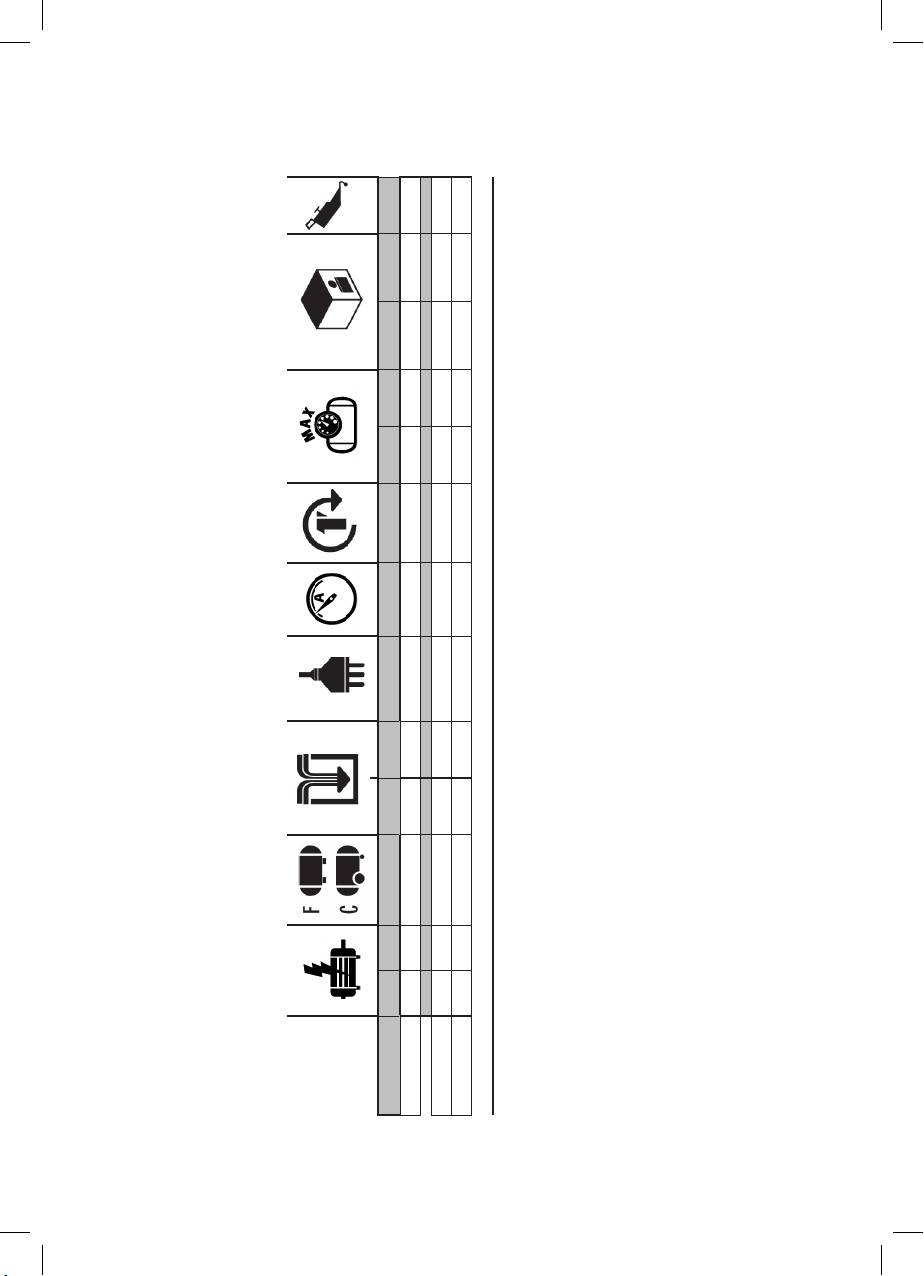
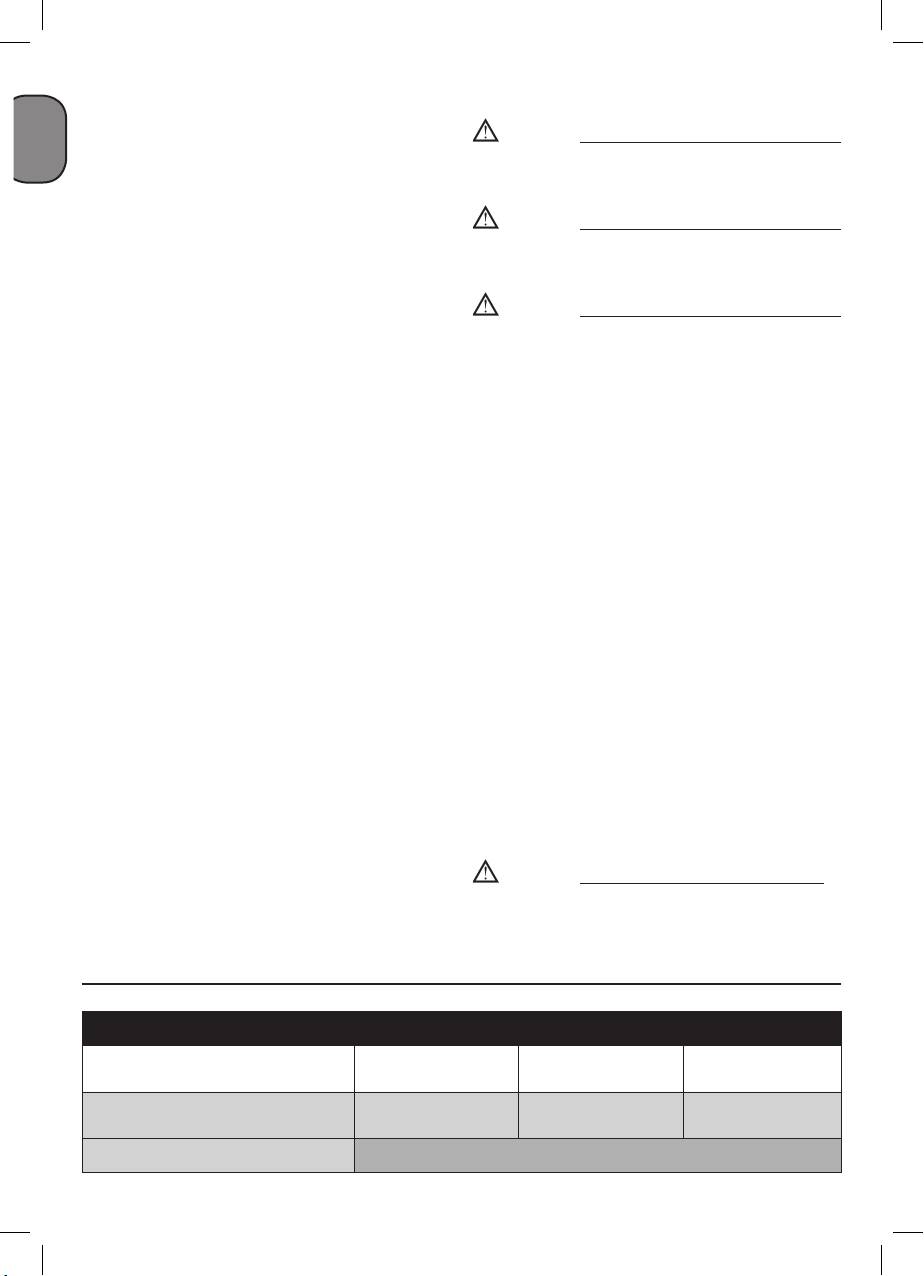
bar PSI kg LB g
-1
HP kW l l/min cfm 50 Hz A min
D 200/8/6 1.5 1.1 6 200 7 220/240-50 5.5 3400 8 116 9 20 no
D 200/8/24 1.5 1.1 24 200 7 220/240-50 5.5 3400 8 116 17 37.5 no
D 200/10/24 1.5 1.1 24 200 7 220/240-50 5.5 3400 10 145 17 37.5 no
5
1a
6
7
9
1
5
2
4
3
11
D 200/8/24 - D 200/10/24
1b
9
1
12
7
2
10 5
6
4
11
D 200/8/6
6
2a
2b
6
10
8
8
6
5
5 12 4
7
71
D 200/8/24 - D 200/10/24 D 200/8/6
3a
3b
ae bd c
3 314 3
14 13314
1413
4a 4b
315
16
3
7
5a
4
D 200/8/24
D 200/10/24
5b
16
17
4
17
15
D 200/8/6
8

Conservare questo manuale d’istruzioni per poterlo consultare in futuro.
I
spinadallapresaoperspostareilcompressore.
1. PRECAUZIONI D’USO
● Non lasciare esposto l’apparecchio agli agenti
Il valore di PRESSIONE ACUSTICA misurato
atmosferici.
a 4 metri equivale al valore di POTENZA
● Non trasportare il compressore con il serbatoio in
ACUSTICA dichiarato sull’etichetta gialla,
pressione.
posizionata sul compressore, meno 20 dB.
● Non eseguire saldature o lavorazioni meccaniche
sulserbatoio.Incasodidifettiocorrosionioccorre
COSE DA FARE
sostituirlocompletamente.
● Il compressore deve essere utilizzato in
● Non permettere l’uso del compressore a persone
ambienti idonei (ben aerati, con temperatura
inesperte. Tenere lontano dall’area di lavoro
ambiente compresa fra +5°C e +40°C) e mai in
bambinieanimali.
presenza di polveri, acidi, vapori, gas esplosivi
● Non posizionare oggetti infiammabili o oggetti in
o infiammabili.
nylon e stoffa vicino e/o sul compressore
● Mantenere sempre una distanza di sicurezza di
● Non pulire la macchina con liquidi infiammabili o
almeno 4 metri tra il compressore e la zona di
solventi. Impiegare solamente un panno umido
lavoro.
assicurandosi di avere scollegato la spina dalla
● Eventuali colorazioni che possono comparire sulla
presaelettrica.
protezione in plastica del compressore durante le
● L’uso del compressore è strettamente legato alla
operazioni di verniciatura, indicano una distanza
compressione dell’aria. Non usare la macchina
tropporavvicinata.
pernessunaltrotipodigas.
● Inserire la spina del cavo elettrico in una presa
● L’aria compressa prodotta da questa macchina non
idonea per forma, tensione e frequenza e
è utilizzabile in campo farmaceutico, alimentare o
conformeallenormativevigenti.
ospedaliero se non dopo particolari trattamenti e
● Utilizzare prolunghe del cavo elettrico di
non può essere utilizzata per riempire bombole
lunghezzamassimadi5metrieconsezionedel
daimmersione.
cavononinferiorea1.5mm².
● Si sconsiglia l’uso di prolunghe diverse per
lunghezza e sezione nonché adattatori e prese
COSE DA SAPERE
multiple.
● Usare sempre e soltanto l’interruttore I/O per
● Questo compressore è costruito per
spegnereilcompressore.
funzionare con un rapporto di intermittenza
● Usare sempre e solo la maniglia per spostare il
specificato sulla targhetta dati tecnici, (ad
compressore.
esempio S3-25 significa 2.5 minuti di lavoro e
● Il compressore in funzione deve essere sistemato
7.5minutidifermata)ondeevitareuneccessivo
suunappoggiostabile.
surriscaldamentodelmotoreelettrico.Nelcasociò
si dovesse verificare, interverrebbe la protezione
termica di cui il motore è dotato interrompendo
COSE DA NON FARE
automaticamente la corrente elettrica quando
latemperatura è troppoelevata.Alritorno delle
● Non dirigere mai il getto di aria verso persone,
condizioni normali di temperatura il motore si
animalioversoilpropriocorpo(Utilizzareocchiali
riavviaautomaticamente.
protettivi per protezione degli occhi da corpi
● Per agevolare il riavvio della macchina è
estraneisollevatidalgetto).
importante oltre alle operazioni indicate
● Non dirigere mai il getto di liquidi spruzzati
intervenire sul pulsante del pressostato
da utensili collegati al compressore verso il
riportandolo nella posizione spento e
compressorestesso.
nuovamente su acceso (paragrafo 5.4).
● Non usare l’apparecchio a piedi nudi o con mani
● La macchina è dotata di un pressostato dotato di
epiedibagnati.
una valvolina di scarico aria a chiusura ritardata
● Non tirare il cavo di alimentazione per staccare la
9

I
che facilita l’avviamento del motore e pertanto
● Durante l’operazione di montaggio di un utensile è
è normale a serbatoio vuoto l’uscita di un soffio
tassatival’interruzionedelflussod’ariainuscita.
d’ariadallamedesimaperqualchesecondo(solo
● L’utilizzo dell’aria compressa nei diversi usi previsti
per D 200/8/6).
(gonfiaggio, utensili pneumatici, verniciatura,
● Tuttiicompressorisonodotati diunavalvoladi
lavaggio con detergenti solo a base acquosa
sicurezza che interviene in caso di irregolare
ecc.)comportalaconoscenzaedilrispettodelle
funzionamento del pressostato garantendo la
normeprevisteneisingolicasi.
sicurezzadellamacchina.
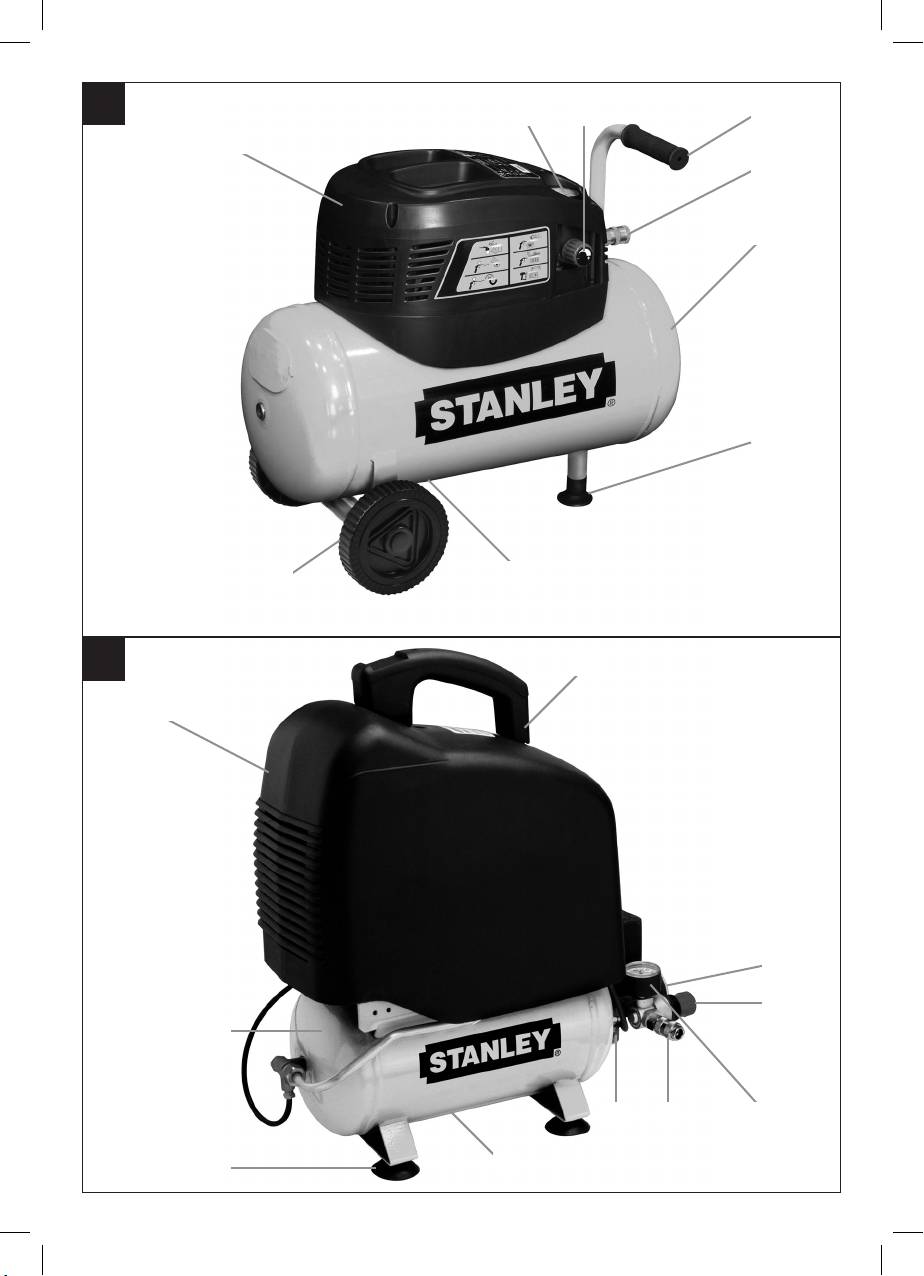
2. DESCRIZIONE
4. AVVERTENZE SUL
DELL'APPARECCHIO
COLLOCAMENTO
1. Convogliatore(shroud)
● Verificate che l'apparecchio non presenti danni
2. Serbatoioapressione
di trasporto. Comunicare tempestivamente gli
3. Ruota
eventuali danni rilevati all'impresa trasporti, che
4. Piedinodiappoggio
haprovvedutoallaconsegnadelcompressore.
5. Accoppiamentorapido(ariacompressa
● Il collocamento del compressore dovrebbe
regolata)
avvenirevicinoalconsumatore.
6. Manometro(indicalapressioneimpostata)
● Sono da evitare lunghe condutture dell'aria
7. Regolatoredipressione
e lunghe condutture di raccordo (cavi di
8. InterruttoreON/OFF
prolunga).
9. Impugnaturaditrasporto
● Verificatechel'ariaassorbitasiaasciuttaesenza
10. Valvoladisicurezza
polvere.
11. Rubinettospurgocondensaserbatoio
● Non collocare il compressore in una stanza
12. Manometro(indicalapressionedelserbatoio)
umidaobagnata.
13. Assale
● Il compressore deve venire usato soltanto
14. Tappo
in luoghi adatti (ben aerati, temperatura
15. Bullone
ambiente +5°C - +40°C). Il luogo deve essere
16. Dado
privo di polvere, acidi, vapori, gas esplosivi o
17. Rondella
infiammabili.
● Il compressore è adatto per l'uso in luoghi
3. SETTORE D'IMPIEGO
asciutti.L'usononèconcessonellezonedove
silavoraconspruzzid'acqua.
Il compressore serve per produrre aria compressa
perutensiliazionaticonariacompressa.
5. MONTAGGIO E MESSA IN
Tenete presente che i nostri apparecchi non
FUNZIONE
sonostati costruiti per l’impiego professionale,
artigianaleoindustriale.Nonciassumiamoalcuna
Attenzione!
garanzia quando l’apparecchio viene usato in
Prima della messa in esercizio montate
imprese commerciali, artigianali o industriali, o in
assolutamente l'apparecchio in modo
attivitàequivalenti.
completo!
L'apparecchio deve venire usato solamente per lo
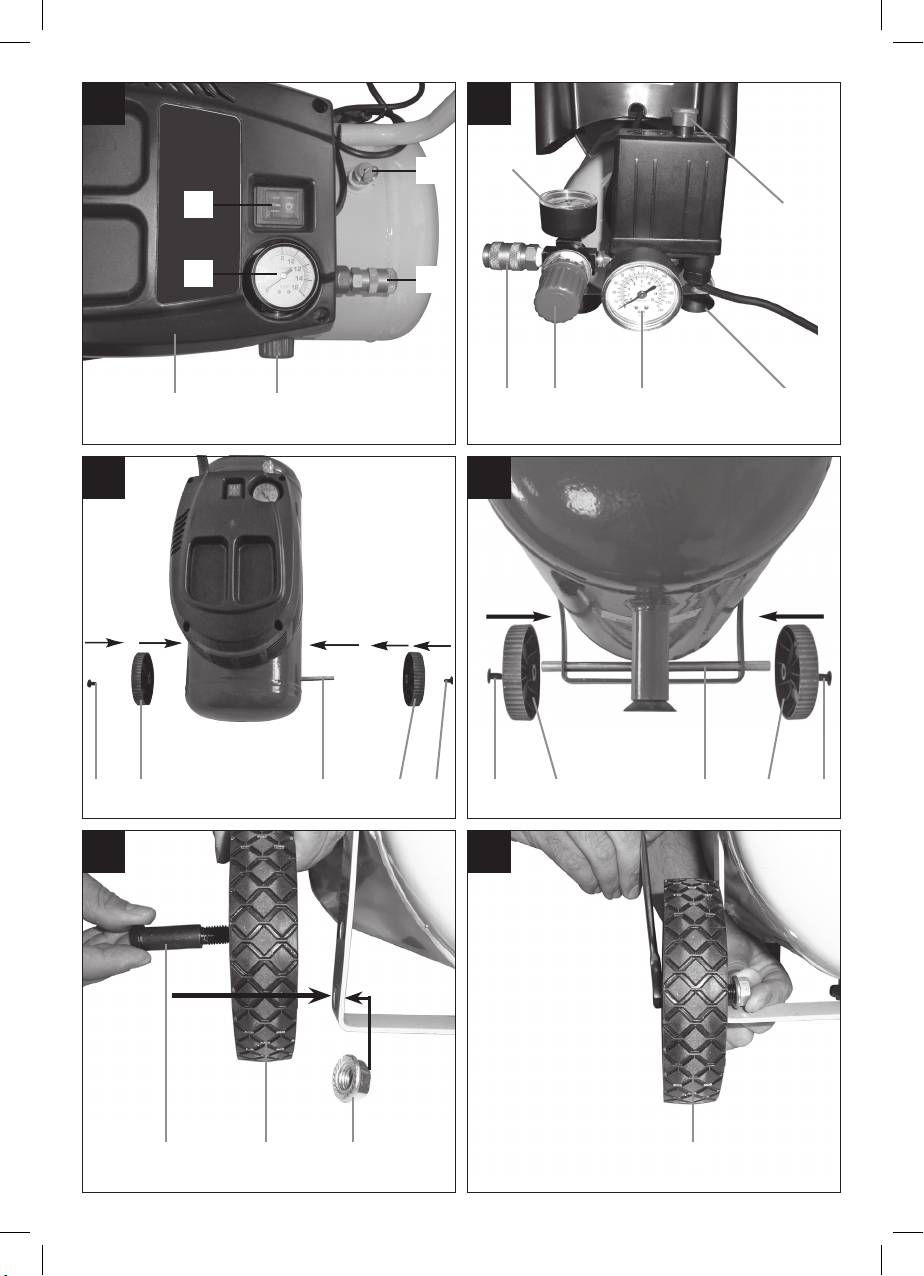
5.1 Montaggio ruote (Figg. 3÷4)
scopoacuièdestinato.Ognialtrotipodiusoche
Le ruote fornite devono essere montate secondo
esulidaquelloprevistononèunusoconforme.
quantoillustratonellefigure3e4.
L'utilizzatore/l'operatore, e non il costruttore, è
● Fig.3a&3b:montaggiokitruote-versioneA
responsabile dei danni e delle lesioni di ogni tipo
Montare in sequenza: a, b, c, d, e
chenerisultino.
● Fig.4a&4b:montaggiokitruote-versioneB
10

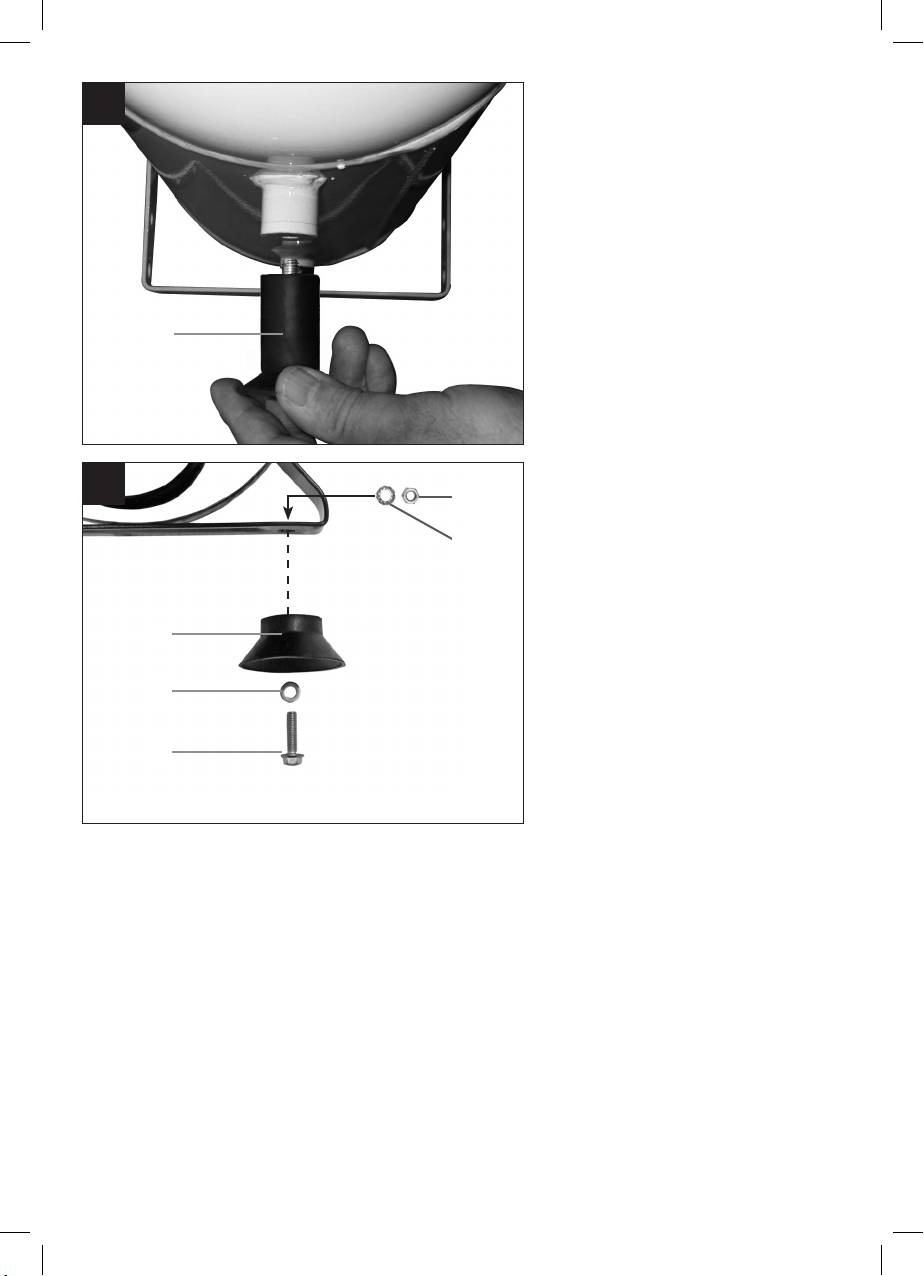
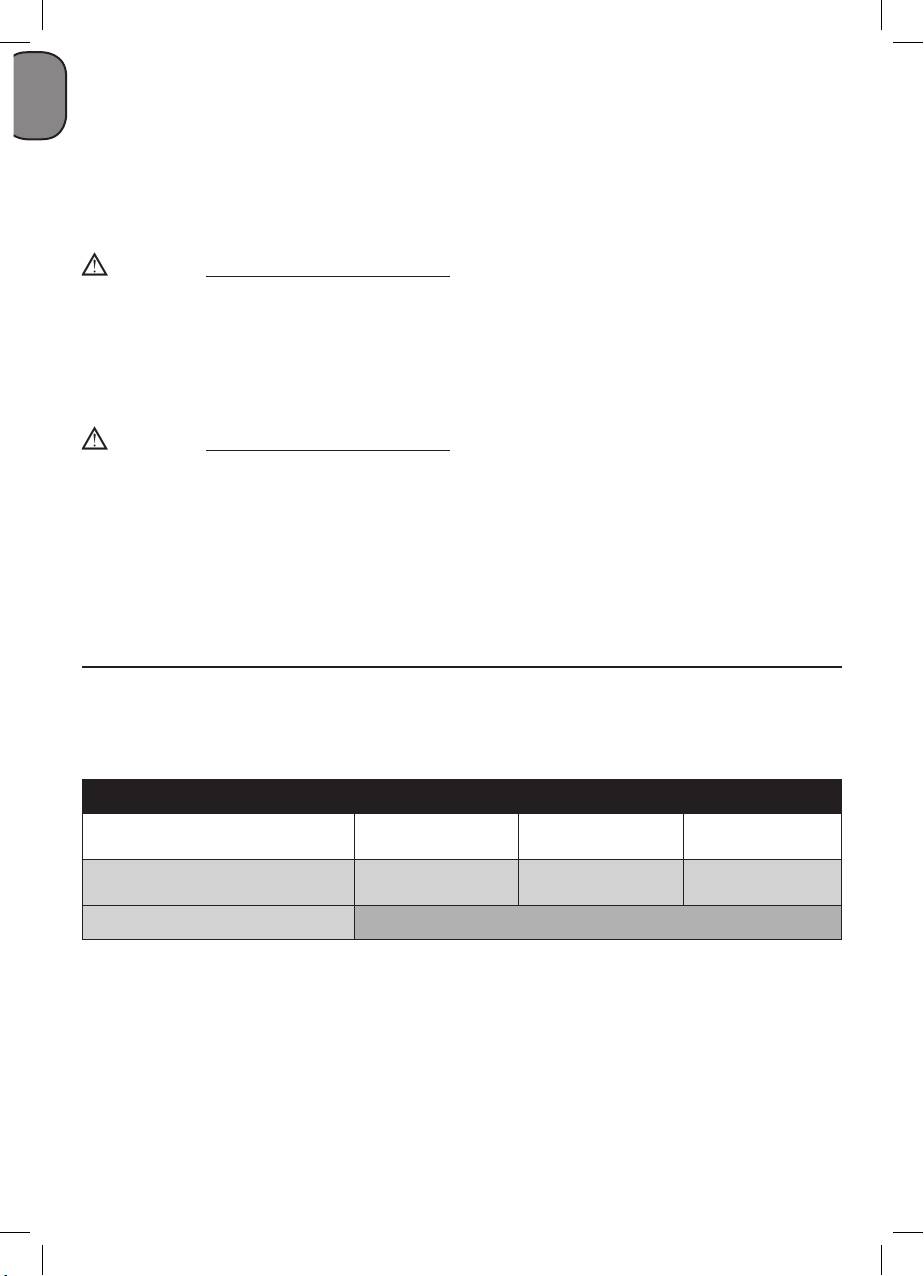
5.2 Montaggio del piedino di
6. PULIZIA E MANUTENZIONE
I
appoggio (rif. 4)
Attenzione!
Il piedino di appoggio (in gomma) deve essere
montatocomeillustratoinFig.5.
Prima di qualsiasi lavoro di pulizia e di
manutenzione staccate la spina dalla presa di
corrente.
5.3 Allacciamento alla rete
Il compressore è dotato di un cavo di alimentazione
Attenzione!
con spina con messa a terra. Quest'ultima può
Attendete fino a quando il compressore si sia
venire collegata a qualsiasi presa con messa a
completamente raffreddato! Pericolo di ustioni!
terra230V~50Hzprotettacon16A.Primadella
messa in esercizio fate attenzione che la tensione di
Attenzione!
rete corrisponda a quella di esercizio indicata sulla
Prima di ogni lavoro di pulizia e manutenzione si
targhetta delle caratteristiche dell'apparecchio. I
deve eliminare la pressione del serbatoio!
cavi lunghi di alimentazione nonché prolunghe,
avvolgicavi, ecc. causano un calo di tensione e
possono impedire l'avvio del motore. In caso di
6.1 Pulizia
bassetemperatureinferioria+5°Cl'avviodelmotore
● Tenete i dispositivi di protezione il più
puòesserepiùdifficile.
possibile liberi da polvere e sporco. Strofinate
l'apparecchio con un panno pulito o soffiatelo
conl'ariacompressaapressionebassa.
5.4 Interruttore ON/OFF (rif. 8)
● Consigliamodipulirel'apparecchiosubitodopo
5.4.1 D 200/8/24 - D 200/10/24 (Fig. 2a)
averlousato.
Peraccenderespostatel’interruttoreON/OFF(rif.8)
● Pulite l'apparecchio regolarmente con un
in posizione I.
panno asciutto ed un po' di sapone. Non
Perspegnere portate l’interruttore ON/OFF (rif. 8)
usate detergenti o solventi perché questi ultimi
in posizione O.
potrebbero danneggiare le parti in plastica
dell'apparecchio.Fateattenzionechenonpossa
5.4.2 D 200/8/6 (Fig. 2b)
penetraredell'acquaall'internodell'apparecchio.
Il compressore viene inserito tirando il pulsante
● Iltuboeglistrumentidispruzzodevonoessere
rosso(rif.8)in posizione I.
separatidal compressore primadellapulizia.Il
Per disinserire il compressore si deve premere il
compressore non deve venire pulito con acqua,
pulsanterosso(rif.8)in posizione O.
solventiecc.
5.5 Impostazione della pressione
6.2 Acqua di condensa
● Conil regolatore della pressione(rif. 7) si può
L'acqua di condensa deve essere scaricata ogni
impostarelapressionesulmanometro(rif.6).
giorno aprendo la valvola di scarico (rif. 11) (sul
● La pressione impostata può essere prelevata
fondodelrecipienteapressione).
sull'accoppiamentorapido(rif.5).
Attenzione!
5.6 Regolazione del pulsante
L'acqua di condensa del recipiente a pressione
Ilpulsanteèstatoregolatonellostabilimento.
contiene tracce di olio.
Smaltite l'acqua di condensa in modo rispettoso
5.6.1 D 200/8/6 - D 200/8/24
dell'ambiente in un apposito centro di raccolta.
Pressione d'accensione: 6 bar
Pressione di spegnimento: 8 bar
6.3 Valvola di sicurezza (rif. 10)
5.6.2 D 200/10/24
La valvola di sicurezza è impostata sulla massima
pressioneconsentitaperilrecipienteapressione.
Pressione d'accensione: 8 bar
Non è consentito modificare la regolazione della
Pressione di spegnimento: 10 bar
valvoladisicurezzaotogliereilsigillodipiombo.La
11
I
valvola di sicurezza deve essere attivata di quando
7. SMALTIMENTO E RICICLAGGIO
in quando in modo che funzioni correttamente in
L'apparecchio e i suoi accessori sono fatti di
casodinecessità.Tiratebrevementel'anellofinoa
materialidiversi,peres.metalloeplastica.
quandosisentel'ariacompressachefuoriesce.Poi
Consegnate i pezzi difettosi allo smaltimento di rifiuti
mollatedinuovol'anello.
speciali.Perinformazionirivolgeteviadunnegozio
specializzatooall'amministrazionecomunale!
6.4 Conservazione
Attenzione!
Staccate la spina dalla presa di corrente, sfiatate
l'apparecchio e tutti gli utensili ad aria compressa
ad esso collegato. Tenete il compressore in
modo tale che non possa essere messo in
funzione da persone non autorizzate.
Attenzione!
Tenere il compressore solo in un ambiente
asciutto e non accessibile per persone non
autorizzate. Non ribaltarlo, conservarlo solo
diritto!
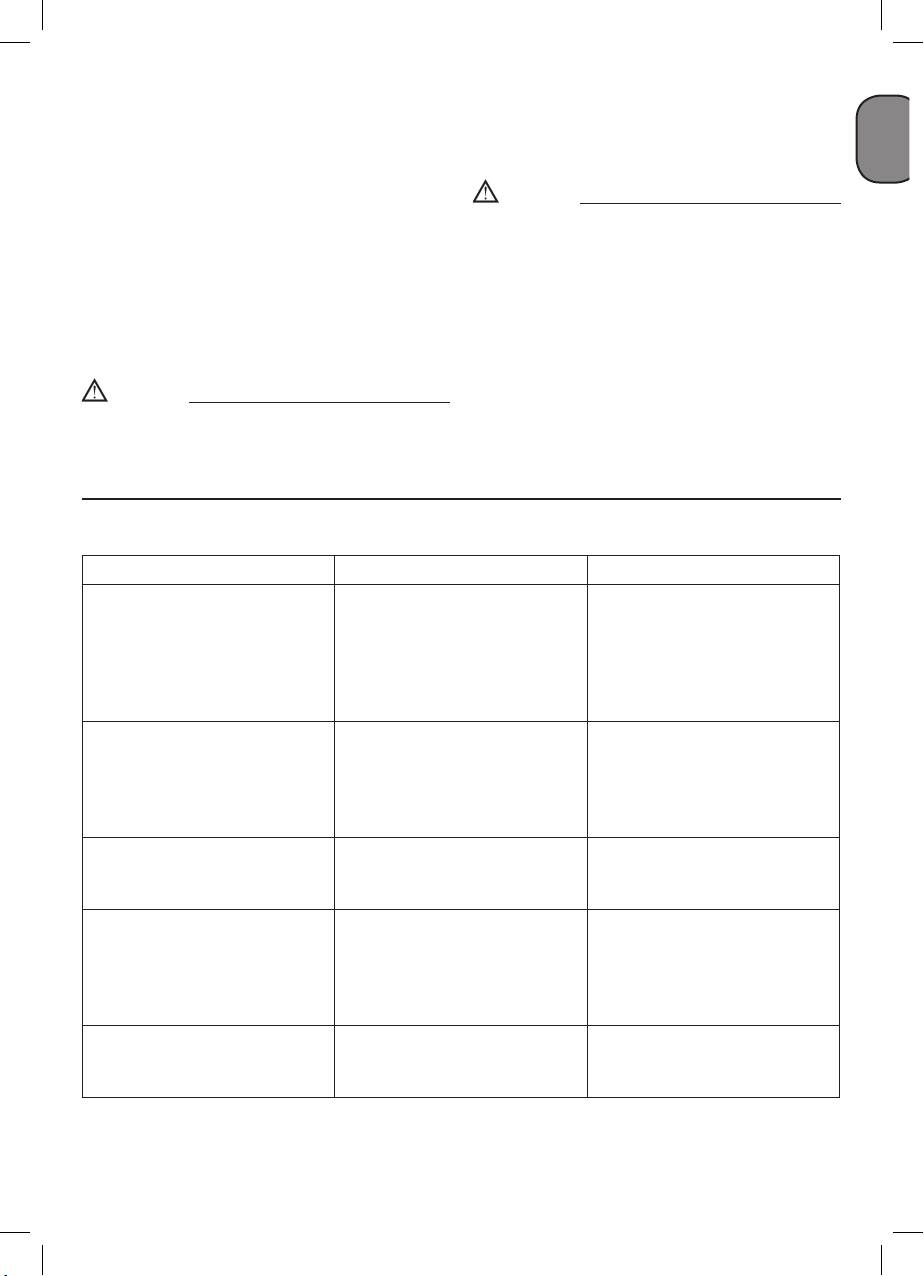
RIEPILOGO INTERVALLI DI MANUTENZIONE
DOPO LE PRIME
FUNZIONE
OGNI 100 ORE
100 ORE
Pulizia filtro aspirazione e/o
● ●
sostituzione dell’elemento filtrante
Scarico condensa serbatoio Periodicamente e a fine lavoro
12

8. POSSIBILI ANOMALIE E RELATIVI INTERVENTI AMMESSI
I
ANOMALIA CAUSA INTERVENTO
Perdita di aria dalla valvola del
Valvola di ritegno che, per usura
Svitare la testa esagonale della
pressostato a compressore
o sporcizia sulla battuta di
valvola di ritegno, pulire la
fermo.
tenuta, non svolge correttamente
sede ed il dischetto di gomma
lasuafunzione.
speciale(sostituireseusurato).
Rimontareeserrareconcura.
Diminuzionedirendimento.
Eccessiva richiesta di
Sostituire le guarnizioni dei
Avviamentifrequenti.Bassi
prestazioni verificare o eventuali
raccordi.pulireosostituireil
valoridipressione.
perditedaigiuntie/otubazioni.
filtro.
Possibile filtro di aspirazione
intasato.
Il compressore si arresta e
Intervento della protezione
Pulire i passaggi d’aria nel
riparte autonomamente dopo
termica, causa surriscaldamento
convogliatore.Areareillocale.
qualcheminuto.
delmotore.
Il compressore dopo alcuni
Intervento della protezione
Azionare l’interruttore di
tentatividiavviamentosiarresta.
termica causa surriscaldamento
marciaarresto.Areareillocale.
delmotore(disinserzionedella
Attendere alcuni minuti ed
spina durante la marcia, scarsa
il compressore si riavvierà
tensionedialimentazione).
autonomamente.
Il compressore non si arresta ed
Funzionamento non regolare
Staccare la spina e rivolgersi al
intervienelavalvoladisicurezza.
del compressore o rottura del
centroassistenza.
pressostato.
Qualsiasi altro intervento deve essere eseguito dai Centri di Assistenza autorizzati, richiedendo
ricambi originali. Manomettere la macchina può compromettere la sicurezza e comunque invalida
la relativa garanzia.
13

Preserve this handbook for future reference.
G
B
weatherconditions.
1. PRECAUTIONS
● Never transport the compressor with the receiver
An ACOUSTIC PRESSURE value of 4 m.
underpressure.
corresponds to the ACOUSTIC POWER
● Donotweldormachinethereceiver.Inthecase
value stated on the yellow label located on
offaultsorrusting,replacetheentirereceiver.
the compressor, minus 20 dB.
● Never allow inexpert persons to use the
compressor. Keep children and animals at a
distancefromtheworkarea.
THINGS TO DO
● Do not position flammable or nylon/fabric objects
● The compressor must be used in a suitable
closedtoand/oronthecompressor.
environment (well ventilated with an ambient
● Never clean the compressor with flammable liquids
temperature of between +5°C and +40°C)
orsolvents.Checkthatyouhaveunpluggedthe
and never in places affected by dust, acids,
compressorandcleanwithadampclothonly.
vapors, explosive or flammable gases.
● The compressor must be used only for air
● Always maintain a safety distance of at least 4
compression.Donotusethecompressorforany
meters between the compressor and the work
othertypeofgas.
area.
● Thecompressedairproducedbythecompressor
● Any coloring of the belt guards of the compressor
cannot not be used for pharmaceutical, food
during painting operations indicates that the
or medical purposes except after particular
distanceistooshort.
treatments and cannot be used to fill the air
● Insert the plug of the electric cable in a socket of
bottlesofscubadivers.
suitable shape, voltage and frequency complying
withcurrentregulations.
● Useextensioncableswithamaximumlengthof5
THINGS YOU SHOULD KNOW
metersandofsuitablecross-section.
● The use of extension cables of different length
● To avoid overheating of the electric motor,
and also of adapters and multiple sockets should
this compressor is designed for intermittent
beavoided.
operation as indicated on the technical
● Always use the switch I/O to switch off the
dataplate(forexample,S3-25means2.5minutes
compressor.
ON,7.5minutesOFF).Inthecaseofoverheating,
● Alwaysusethehandletomovethecompressor.
the thermal cutout of the motor trips, automatically
● When operating, the compressor must be placed
cutting off the power when the temperature is
onastable,horizontalsurface.
toohigh.Themotorrestartsautomaticallywhen
normaltemperatureconditionsarerestored.
● To facilitate restart of the compressor, in
THINGS NOT TO DO
addition to the operations indicated, it is
● Never direct the jet of air towards persons, animals
important to return the button of the pressure
or your body. (Always wear safety goggles to
switch to the OFF position and then to ON
protect your eyes against flying objects that may
again (paragraph 5.4).
beliftedbythejetofair).
● Thecompressorsarefittedwithapressureswitch
● Never direct the jet of liquids sprayed by tools
equipped with a delayed closing air discharge
connected to the compressor towards the
valve which facilitates start-up of the motor (D
compressor.
200/8/6only).Thereforeventingofair from this
● Never use the appliance with bare feet or wet
valve for a few seconds with the receiver empty is
handsorfeet.
normal.
● Never pull the power cable to disconnect the plug
● All the compressors are fitted with a safety valve
fromthesocketortomovethecompressor.
that is tripped in the case of malfunctioning of
● Never leave the appliance exposed to adverse
the pressure switch in order to assure machine
14

safety.
comply with the safety precautions to be adopted
● When fitting a tool, the flow of air in output must
foreachtypeofapplication(inflation,pneumatic
G
beswitchedoff.
tools, painting, washing with water-based
B
● When using compressed air, you must know and
detergentsonly,etc.).
2. LAYOUT
4. POINTS TO NOTE
1. Shroud
WHEN SETTING UP THE
2. Pressurevessel
COMPRESSOR
3. Wheel
● Examinethemachineforsignsoftransitdamage.
4. Supportingfoot
Report any damage immediately to the company
5. Quick-lockcoupling(regulatedcompressedair)
whichdeliveredthecompressor.
6. Pressuregauge(forreadingthepreset
● The compressor should be set up near the
pressurebymeansofregulator)
workingconsumer.
7. Pressureregulator
● Avoid long air lines and long supply lines
8. ON/OFFswitch
(extensions).
9. Transportationhandle
● Makesuretheintakeairisdryanddust-free.
10.Safetyvalve
● Do not set up the compressor in damp or wet
11. Receivercondensationdrainagetap
rooms.
12.Pressuregauge(forreadingthetankpressure)
● The compressor may only be used in suitable
13.Axle
rooms (with good ventilation and an ambient
14.Clip
temperature from +5°C to +40°C). There must
15.Bolt
be no dust, acids, vapors, explosive gases or
16.Nut
inflammablegasesintheroom.
17.Washer
● Thecompressorisdesignedtobeusedindry
rooms. It is prohibited to use the compressor
in areas where work is conducted with sprayed
3. SCOPE OF USE
water.
The compressor is designed for generating
compressed air for tools operated by compressed
5. ASSEMBLY AND STARTING
air.
Warning!
Please note that our equipment has not been
You must fully assemble the appliance before
designed for use in commercial, trade or industrial
using it for the first time.
applications. Our warranty will be voided if the
machine is used in commercial, trade or industrial
5.1 Fitting the wheels (Pic. 3 ÷ 4)
businessesorforequivalentpurposes.
FitthesuppliedwheelsasshowninPic.3&4:
● Pic.3a&3b:Assemblyofwheelkit-versionA
Themachineistobeusedonlyforits prescribed
Assembly by sequence: a, b, c, d, e
purpose.Anyotheruseisdeemedtobeacaseof
● Pic.4a&4b:Assemblyofwheelkit-versionB
misuse.Theuser/operatorandnotthemanufacturer
will be liable for any damage or injuries of any kind
causedasaresultofthis.
5.2 Fitting the supporting foot (ref. 4)
FitthesuppliedrubberstopperasshowninPic.5.
5.3 Voltage
The compressor is equipped with a mains cable
withshock-proofplug.Thiscanbeconnectedtoany
230V~50Hzshock-proofsocketwhichisprotected
15
by a 16 A fuse. Before you use the machine,
6. CLEANING AND MAINTENANCE
make sure that the mains voltage complies with
G
thespecificationsontheratingplate.Longsupply
Warning!
B
cables,extensions,cablereelsetc.causeadropin
Pull the power plug before doing any cleaning
voltageandcanimpedemotorstart-up.Inthecase
and maintenance work on the appliance.
oflowtemperaturesbelow+5°C,motorstart-upis
jeopardizedasaresultofstiffness.
Warning!
Wait until the compressor has completely cooled
5.4 On/Off switch (ref. 8)
down. Risk of burns!
5.4.1 D 200/8/24 - D 200/10/24 (Fig. 2a)
Warning!
Toswitch on the equipment set the On/Offswitch
Always depressurize the tank before carrying
(ref.8)topositionI.
out any cleaning and maintenance work.
Move the On/Off switch (ref. 8) to position O to
switchofftheequipment.
6.1 Cleaning
● Keep the safety devices free of dirt and dust
5.4.2 D 200/8/6 (Fig. 2b)
as far as possible. Wipe the equipment with a
Toswitchonthecompressor,pullouttheredknob
clean cloth or blow it with compressed air at low
(ref.8)to position I.
pressure.
To switch off the compressor, press the red knob
● We recommend that you clean the appliance
(ref.8)inagainto position O.
immediatelyafteryouuseit.
● Cleantheapplianceregularlywithadampcloth
5.5 Adjusting the pressure
andsomesoftsoap.Donotusecleaningagents
● You can adjust the pressure on the pressure
or solvents; these may be aggressive to the
gauge(ref.6)usingthepressureregulator(ref.
plastic parts in the appliance. Ensure that no
7).
watercangetintotheinterioroftheappliance.
● Thesetpressurecanbetakenfromthequicklock
● Youmustdisconnectthehoseandanyspraying
coupling(ref.5).
toolsfromthecompressorbefore cleaning. Do
not clean the compressor with water, solvents or
5.6 Setting the pressure switch
thelike.
Thepressureswitchissetatthefactory.
5.6.1 D 200/8/6 - D 200/8/24
6.2 Condensation water
Thecondensationwatermustbedrainedoffeach
Switch-onpressure6bar
daybyopeningthedrainvalve(ref.11)(onthefloor
Switch-offpressure8bar
ofthepressurevessel).
5.6.2 D 200/10/24
Warning!
Switch-onpressure8bar
Switch-offpressure10bar
The condensation water from the pressure
vessel will contain residual oil. Dispose of the
condensation water in an environmentally
MAINTENANCE RESUMPTIVE TABLE
AFTER THE FIRST
FUNCTION
EVERY 100 HOURS
100 HOURS
Cleaning of intake filter and/or
● ●
substitution of filtering element
Draining tank condensate Periodically and at the end of work
16
compatible manner at the appropriate collection
Switch off the compressor and make sure that it
point.
is secured in such a way that it cannot be started
G
up again by any unauthorized person.
B
6.3 Safety valve (ref. 10)
The safety valve has been set for the highest
Warning!
permitted pressure of the pressure vessel. It is
prohibited to adjust the safety valve or remove its
Store the compressor only in a dry location which
seal.Actuatethesafetyvalvefromtimetotimeto
is not accessible to unauthorized persons.
ensurethatitworkswhenrequired.Pulltheringwith
Always store upright, never tilted!
sufficient force until you can hear the compressed
airbeingreleased.Thenreleasetheringagain.
7. DISPOSAL AND RECYCLING
The unit and its accessories are made of various
6.4 Storage
typesofmaterial,suchasmetalandplastic.
Defective components must be disposed of as
Warning!
special waste. Ask your dealer or your local
Pull the mains plug out of the socket and
council.
ventilate the appliance and all connected
pneumatic tools.
8. POSSIBLE FAULTS AND RELATED PERMITTED REMEDIES
FAULT CAUSE REMEDY
Leakage of air from the valve
Check valve that, due to wear
Unscrew the hexagonal head
of the pressure switch with
or dirt on the seal, does not
of the check valve, clean the
thecompressoroff.
performitsfunctioncorrectly.
valve seat and the special
rubberdisk(replaceifworn).
Reassemble and tighten
carefully.
Reductionofperformance.
Excessive performance
Replace the seals of the
Frequentstart-up.Low
request, check for any leaks
tting,cleanorreplacethe
pressurevalues.
from the couplings and/or
lter.
pipes.Intakeltermaybe
clogged.
Thecompressorstopsand
Trippingofthethermalcutout
Clean the air ducts in the
restarts automatically after a
due to overheating of the
conveyor.Ventilatethework
fewminutes.
motor.
area.
After a few attempts to
Trippingofthethermalcutout
Activatetheon/offswitch.
restart,thecompressor.
due to overheating of the
Ventilatetheworkarea.
motor(removaloftheplug
Waitafewminutes.The
with the compressor running,
compressor will restart
lowpowervoltage).
independently.
Thecompressordoesnot
Irregular functioning of the
Remove the plug and contact
stop and the safety valve is
compressor or breakage of
theServiceCenter.
tripped.
thepressureswitch.
Any other type of operation must be carried out by authorized Service Centers, requesting
original parts. Tampering with the machine may impair its safety and in any case make the
warranty null and void.
17

Conserver le présent manuel pour pouvoir le consulter ultérieurement
liquides pulvérisés par des outils branchés sur le
1. PRECAUTIONS D’UTILISATION
compresseurlui-même.
F
La valeur de PRESSION ACOUSTIQUE mesurée
● Ne pas utiliser l’appareil, les pieds et/ou les mains
4 mt. équivaut à la valeur de PUISSANCE
mouillés.
ACOUSTIQUE déclarée sur l’étiquette jaune,
● Ne pas tirer le câble d’alimentation pour
positionnée sur le compresseur, moins de 20
débrancher la fiche de la prise électrique ou pour
dB.
déplacerlecompresseur.
● Ne pas laisser l’appareil exposé aux agents
A FAIRE
atmosphériques.
● Le compresseur doit être utilisé dans des
● Ne pas transporter le compresseur lorsque son
locaux appropriés (bien ventilés, avec
réservoirestsouspression.
une température ambiante comprise entre
● Ne pas soumettre le réservoir à des soudures ou
+5°C et +40°C) et totalement exempts de
àdesusinagesmécaniques.Encasdedéfauts
poussières, acides, vapeurs, gaz explosifs ou
oudecorrosion,ilfautleremplacerenbloc.
inflammables.
● Interdire l’utilisation du compresseur aux
● Toujoursrespecterunedistancedesécuritéd’au
personnesinexpérimentées.Veilleràcequeles
moins 3 mètres entre le compresseur et la zone
enfants et les animaux stationnent loin de la zone
detravail.
detravaildel’appareil.
● Leséventuellespigmentationspouvantapparaître
● Ne pas placer des objets inflammables ou en nylon
sur la protection en plastique du compresseur
ettissuàproximitéet/ousurlecompresseur.
pendant des opérations de peinture, indiquent
● Ne pas nettoyer la machine à l’aide de liquides
unedistancetropréduite.
inflammablesoudesolvants.Utiliseruniquement
● Introduire la fiche du câble électrique dans une
un chiffon humide, en veillant d’abord à ce que la
prise appropriée en termes de forme, de tension
fichesoitdébranchéedelapriseélectrique.
et de fréquence, conformément aux normes en
● L’utilisation du compresseur est strictement
vigueur.
limitéeàlacompressiondel’air.Nepasutiliser
● Utiliser des rallonges du câble électrique d’une
l’appareilavecd’autrestypesdegaz.
longueur maximum de 5 mètres et ayant une
● L’air comprimé produit par cet appareil n’est pas
sectionducâblenoninférieureà1,5mm².
utilisable dans les domaines pharmaceutique,
● L’utilisation de rallonges de longueur et section
alimentaire ou hospitalier, à moins qu’il ne
différentes, d’adaptateurs et de prises multiples,
soit ultérieurement soumis à des traitements
estfortementdéconseillée.
particuliers ; de même, il ne peut pas être utilisé
● Utiliser exclusivement l’interrupteur I/O pour
pour remplir les bouteilles utilisées dans la
mettrelecompresseurhorstension.
plongéesous-marine.
● Utiliser exclusivement la poignée pour déplacer le
compresseur.
CE QU’IL FAUT SAVOIR
● Lorsqu’il est en marche, le compresseur doit
être placé sur un support stable, en position
● Ce compresseur a été réalisé pour fonctionner
horizontale.
avec le rapport d’intermittence spécifié sur
la plaquette des caractéristiques techniques
(par exemple, S3-25 signifie 2,5 minutes de
A NE PAS FAIRE
fonctionnement et 7,5 minutes d’arrêt), afin
d’éviter une surchauffe excessive du moteur
● Ne jamais diriger le jet d’air vers des personnes,
électrique. Au cas où ce rapport ne serait pas
des animaux ou vers soi-même (porter des
respecté, la protection thermique dont le moteur est
lunettes de protection contre les risques de
pourvu interviendra automatiquement, en coupant
projections de corps étrangers soulevés par le
le courant électrique dès que la température
jet).
devient trop élevée. Le moteur redémarrera
● Ne pas diriger vers le compresseur le jet des
18

automatiquement dès le rétablissement des
compresseur D 200/8/6).
conditionsnormalesdefonctionnement.
● Touslescompresseurssontpourvusd’unclapet
● En plus des opérations indiquées ci-dessus,
de sécurité qui intervient en cas de fonctionnement
pour faciliter le redémarrage de l’appareil,
irrégulier du pressostat, en garantissant ainsi la
il est important d’agir sur le bouton du
sécuritédel’appareil.
F
pressostat, en le ramenant sur la position de
● Pendant l’opération de montage d’un outil, la
mise hors tension puis de nouveau sur celle
sortie du débit d’air doit être impérativement
de mise sous tension(paragraphe 5.4).
coupée.
● Les compresseurs sont équipées d’un pressostat
● L’utilisation de l’air comprimé pour les
muni d’un clapet d’évacuation de l’air à fermeture
différentes utilisations prévues (gonflage, outils
retardée, qui facilite le démarrage du moteur;
pneumatiques, peinture, lavage avec des
l’émission d’un souffle d’air depuis ce clapet
détergents à base aqueuse seulement, etc.),
durant quelques secondes, le réservoir vide,
comporte la connaissance et le respect des
estdonctoutàfaitnormale(seulementpourles
normesprescritesaucasparcas.
conformémentàsonaffectation.Chaqueutilisation
2. DESCRIPTION DE L’APPAREIL
allant au-delà de cette affectation est considérée
1. Recouvrementduboîtier
commenonconforme.Pourlesdommagesenré-
2. Réservoiràaircomprimé
sultant ou les blessures de tout genre, le producteur
3. Roue
décline toute responsabilité et l’opérateur/l’exploitant
4. Pied
estresponsable.
5. Accouplementrapide(aircompriméréglé)
6. Manomètre(pressionrégléelisible)
7. Manostatrégulateur
4.
INSTRUCTIONS D’IMPLANTATION
8. InterrupteurMarche/Arrêt
9. Poignéedetransport
● Vériez que l’appareil n’a pas été endommagé
10. Soupapedesécurité
pendant le transport. En cas d’avarie, informez
11. Robinetdevidangedel’eaudecondensation
immédiatement l’entreprise de transport qui a
du réservoir
livrélecompresseur.
12. Manomètre(pressionduréservoirlisible)
● Il est recommandable d’installer le compresseur à
13. Axe
proximitéduconsommateur.
14. Attache
● Evitez les tuyaux à air et les câbles d’alimentation
15. Boulon
(câblesderallonge)longs.
16. Écrou
● Veillez à ce que l’air aspiré soit sec et sans
17. Nettoyeur
poussière.
● N’installez pas le compresseur dans un local
humideoudétrempé.
● Le compresseur doit être utilisé uniquement
3. DOMAINE D’APPLICATION
dans des endroits adéquats (bonne ventilation,
Le compresseur sert à produire de l’air comprimé
températureambiante+5°C-+40°C).Ilnedoit
pourlesoutilsfonctionnantàl’aircomprimé.
y avoir dans la salle aucune poussière, aucun
acide, aucune vapeur, aucun gaz explosif ou
Veillez au fait que nos appareils, conformément à
inammable.
leur affectation, n’ont pas été construits, pour être
● Le compresseur doit être employé dans des
utilisés dans un environnement professionnel, in-
endroits secs. Il ne peut être utilisé dans des
dustrielouartisanal.Nousdéclinonstouterespon-
zones où l’on travaille avec des éclaboussures
sabilité sil’ appareil est utilisé professionnellement,
d’eau.
artisanalement ou dans des sociétés industrielles,
toutcommepourtouteactivitééquivalente.
La machine doit exclusivement être employée
19

5. MONTAGE ET MISE EN SERVICE
5.6 Réglage de l’interrupteur mano-
métrique
Attention !
L’interrupteurmanométriqueestajustéàl’usine.
Montez absolument l’appareil complètement
F
5.6.1 D 200/8/6 - D 200/8/24
avant de le mettre en service !
Pression de mise en circuit: 6 bar
5.1 Montage des roues (Fig. 3 - 4)
Pression de mise hors circuit: 8 bar
Lesrouesci-jointesdoiventêtremontéesconformé-
5.6.2 D 200/10/24
mentàlagure3-4.
Pression de mise en circuit: 8 bar
● Fig.3a-3b:AssemblageKitderoues-versionA
Pression de mise hors circuit: 10 bar
Assemblage par sequences: a, b, c, d, e
● Fig.4a-4b:AssemblageKitderoues-versionB
5.2
Montage du pied d’appui
(référence 4)
6. NETTOYAGE ET ENTRETIEN
L’amortisseurencaoutchoucci-jointdoitêtremonté
conformémentàlagure5.
Attention !
Retirez la prise du réseau avant chaque travail
5.3 Raccordement électrique
de réglage et de maintenance.
Le compresseur est équipé d’un câble réseau avec
cheàcontactdeprotection.Celui-cipeutêtrerac-
Attention !
cordé à chaque prise de courant de sécurité 230
Attendez jusqu’à ce que le compresseur ait re-
V~50Hzprotégéeparfusible16A.Veillez,avant
froidi ! Risque de brûlure !
la mise en service, à ce que la tension du secteur
et la tension de service soient les mêmes en vous
Attention !
reportant à la plaque signalétique de la machine.
Avant tous travaux de nettoyage et de mainte-
Les longs câbles d’alimentation tout comme les ral-
nance, mettre la chaudière hors circuit.
longes,tamboursdecâbleetc.quientraînentdes
chutes de tension et peuvent empêcher le démar-
6.1 Nettoyage
rage du moteur. Lorsque la température descend
● Maintenez les dispositifs de protection aussi pro-
endessousde5°C,lemoteurmarchedurementet
pres(sanspoussière)quepossible.Frottezl’ap-
peutnepasdémarrer.
pareilavecunchiffonpropreousoufezdessus
avecdel’aircompriméàbassepression.
5.4 Interrupteur marche/arrêt (réf. 8)
● Nous recommandons de nettoyer l’appareil direc-
5.4.1 D200/8/24-D200/10/24(g.2a)
tementaprèschaqueutilisation.
Mettezl’interrupteurMarche/Arrêt(référence8)en
● Nettoyez l’appareil régulièrement à l’aide d’un
position Ipourlamiseencircuit.
chiffon humide et un peu de savon. N’utilisez
Pour la mise hors circuit, mettre l’interrupteur Mar-
aucun produit de nettoyage ni détergent ; ils pour-
che/Arrêt(référence8)enpositionO.
raient endommager les pièces en matières plas-
tiquesde l’appareil. Veillez à cequ’aucuneeau
5.4.2 D200/8/6(g.2b)
n’entreàl’intérieurdel’appareil.
Le compresseur est mis en circuit en tirant le bouton
● Détachez le tuyau et les outils de pulvérisation du
rouge(référence8)enpositionI.
compresseuravantdecommencerlenettoyage.
Pour mettre le compresseur hors circuit, il faut ap-
Le compresseur ne doit pas être lavé à l’eau,
puyersurleboutonrouge(référence8)enposition
avec des solvants ou autres produits du même
O.
genre.
5.5 Réglage de pression
6.2 Eau condensée
●
Lerégulateurdepression(référence7)permetde
L’eau condensée doit être vidée chaque jour en
réglerlapressionsurlemanomètre(référence6).
ouvrantleclapetdepurged’eau(référence11)(au
● La pression réglée peut être prise au niveau du
fonddurécipientàpression).
raccordrapide(référence5).
20
