SilverStone F1 TS432U – страница 2
Инструкция к Системе Хранения Данных SilverStone F1 TS432U

ENGLISH
TS432U
Duplicator Mode User Guide
Operation
Main menu: Compare HDD
The “Compare HDD” function performs a comparison of data from the source hard drive to the data on the
target hard drive
1. Load the source and target HDD and select “Compare HDD” using the arrow button.
The following screen will be displayed:
2. Press ENT to confirm.
3. Press ENT and “Compare HDD” will commence. The system will auto-detect the hard drives.
During the “Compare HDD” process, the TS432U will display progress information
When the “Compare HDD” is completed, a job status screen will be displayed
20
Note:
When compare is complete, TS432U
will beep 5 times to indicate it is
finished, press ESC to stop the beep.
Note:
if the target drive differs from the source drive, the TS432U will beep and report each LBA that is
different. Please turn the TS432U off and compare each target drive individually to determine
which one is different.

ENGLISH
TS432U
Duplicator Mode User Guide
Operation
Main menu: ReScan Bus
The “ReScan Bus” function redetect for installed hard drives in the TS432U.
This can be used when you change drives without restarting the system.
1. Select “ReScan Bus” using the arrow button. The following screen will be displayed:
2. Press ENT to select. The system will prompt you to confirm that you wish to proceed.
3. Press ENT to begin “ReScan Bus”
4. When “ReScan Bus” is complete, the following screen will be displayed:
21

ENGLISH
TS432U
Duplicator Mode User Guide
Operation
Main menu: Source Size
The “Source Size” function is used to display the capacity of the source hard drive.
1. With the source HDD loaded, use the arrow buttons to select “Source Size”, the following screen will be
displayed.
2. Press ENT to display the capacity of the source hard drive
22
Main menu: Setup
The “Setup” menu contains configuration options for the TS432U.
It is suggested to use the factory defaults setting for optimum performance
1. Select “Setup” using the arrow button. The following screen will be displayed:
Note:
after changing any of the configuration options, press ENT to save the change.

ENGLISH
TS432U
Duplicator Mode User Guide
Operation
Main menu: Setup menu: 5-1 Auto Compare
“Auto Compare” automatically compares the source and target hard drive after every copy operation.
1. Select “Setup” using the arrow button. The following screen will be displayed:
2. Press ENT and use the arrow button to scroll to “Auto Compare”. The following screen will be displayed:
23
3. Press ENT to display the current configuration setting. (Default setting is “Disable”)
4. Use the arrow button to modify the setting.
Use the UP or Down buttons to enable or disable “Auto Compare”.
5. Press ENT to save the setting.

ENGLISH
TS432U
Duplicator Mode User Guide
Operation
Main menu: Setup menu: 5-2 Button Sound
“Button Sound” enables or disables beeping sound when a button is pressed.
1. Select “Setup” using the arrow button. The following screen will be displayed:
2. Press ENT and use the arrow button to scroll to “Button Sound”. The following screen will be displayed:
24
3. Press ENT to display the current configuration setting. (Default setting is “Off”)
4. Use the arrow button to modify the setting.
Use the UP or Down buttons to enable or disable “Button Sound”.
5. Press ENT to save the setting.
ENGLISH
TS432U
Duplicator Mode User Guide
Operation
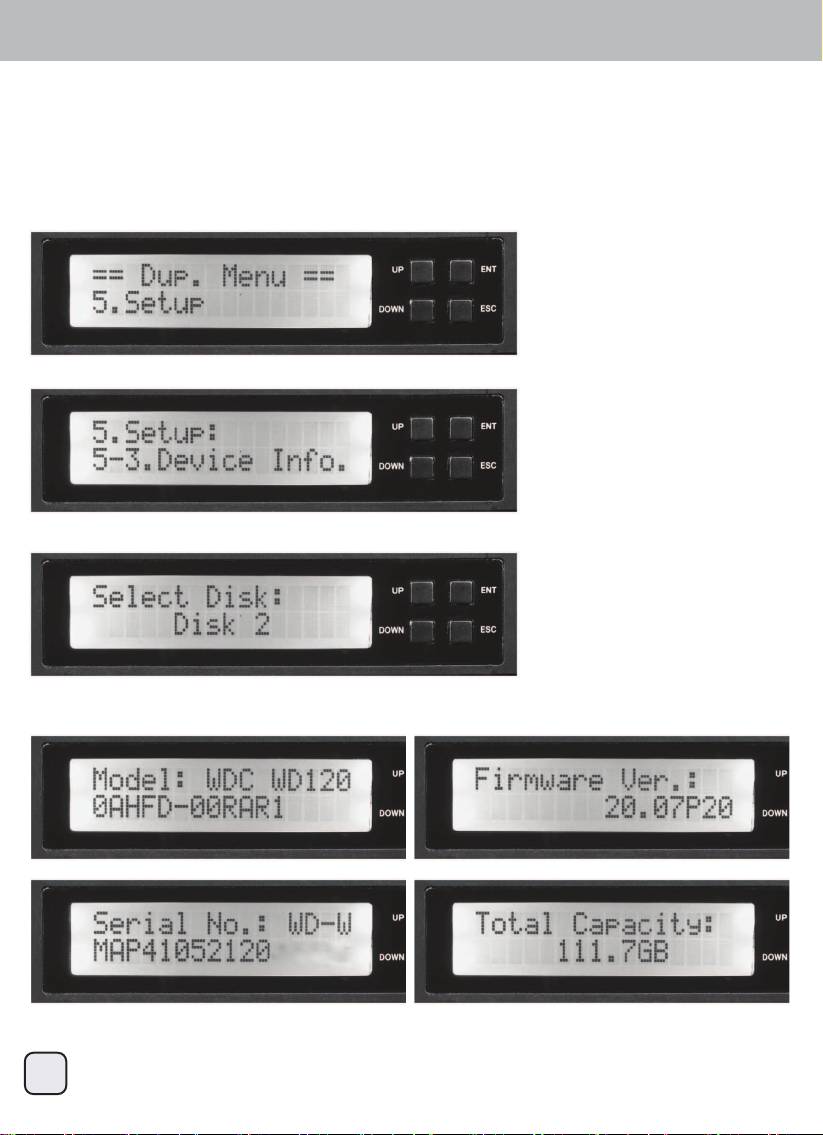
Main menu: Setup menu: 5-3 Device Info
This option display information about any hard drives connected to TS432U
1. Select “Setup” using the arrow button. The following screen will be displayed:
2. Press ENT and use the arrow button to scroll to “Device Info”. The following screen will be displayed:
25
3. Press ENT and use the arrow buttons to scroll and choose HDD. The following screen will be displayed
4. Press ENT to select. Use the arrow buttons to show additional information about selected hard drives.
The following screens will be displayed:
ENGLISH
TS432U
Duplicator Mode User Guide
Operation
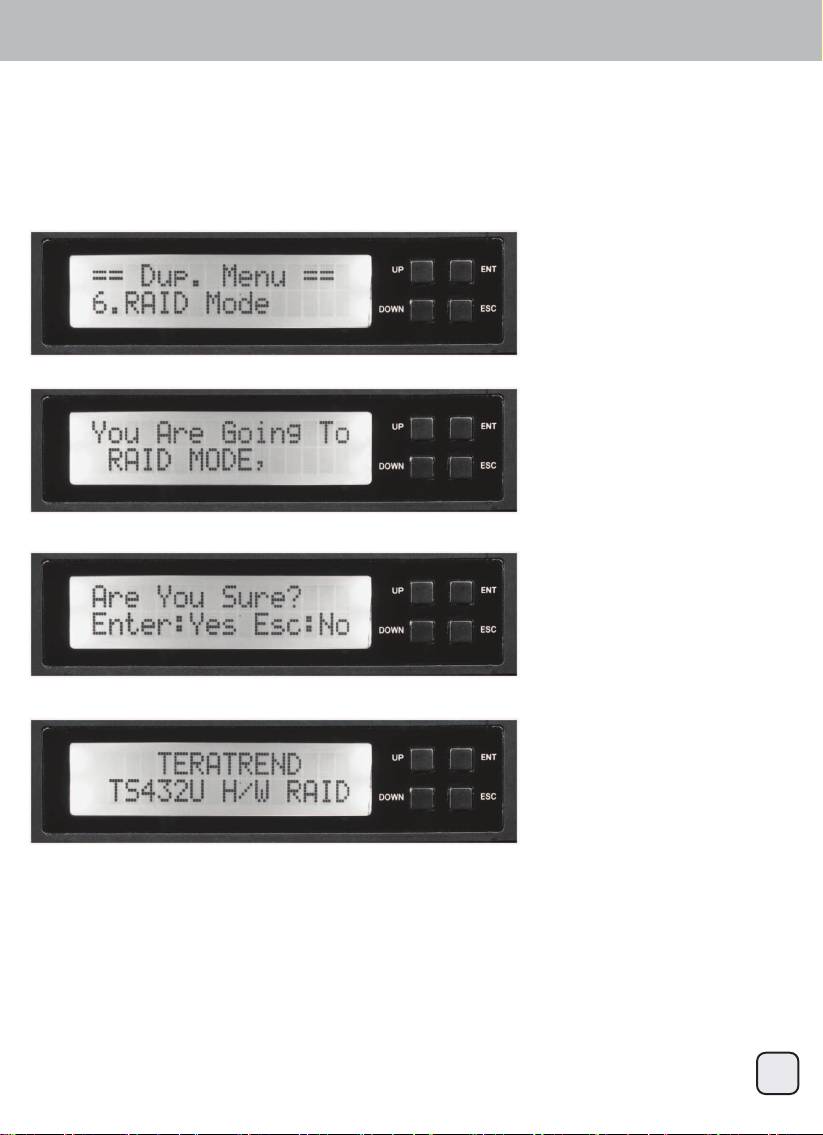
Main menu: RAID Mode
1. Select the “RAID Mode” using the arrow button. The following screen will appear:
2. Press ENT and use the arrow buttons to scroll to “RAID Mode”. The following screen will be displayed:
26
3. Press ENT to select. The system will prompt you for confirmation.
4. You are now in RAID mode.
ENGLISH
TS432U
Duplicator Mode User Guide
Operation
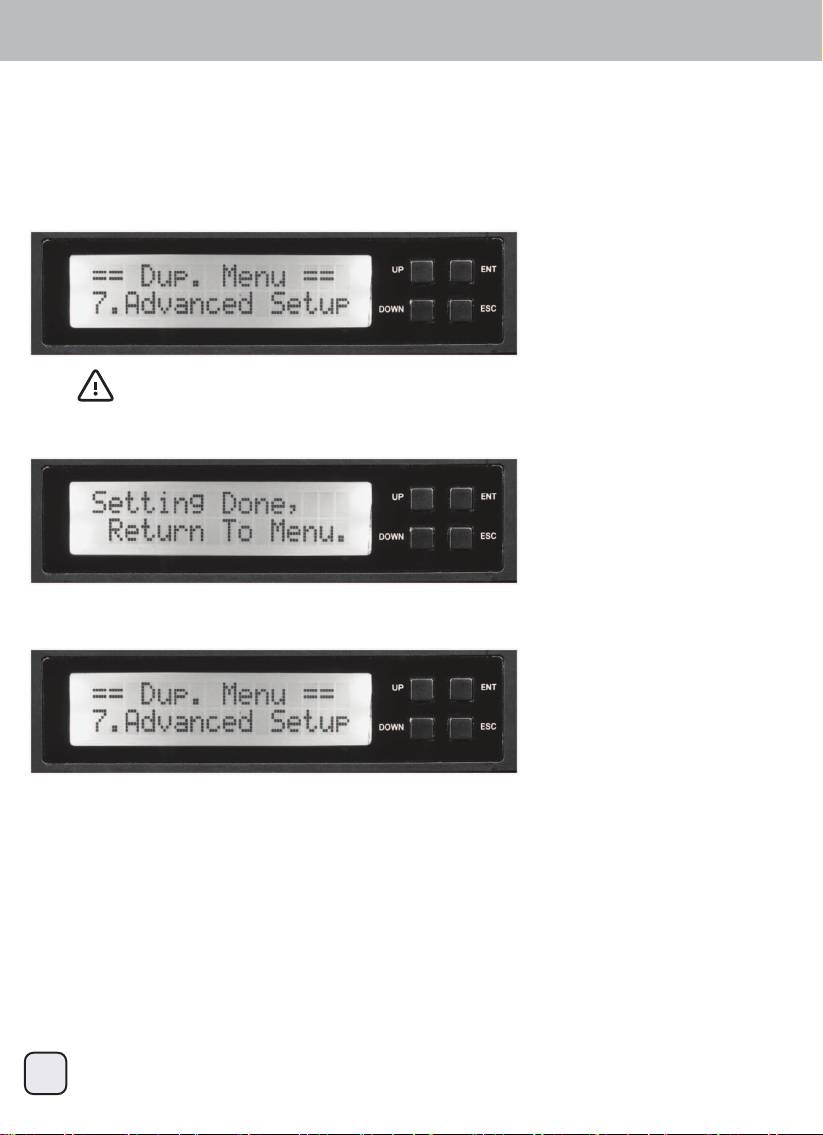
Main menu: Advanced Setup
The “Adv Setup” menu contains additional configuration option for the TS432U.
1. Select the “Advanced Setup” using the arrow button. The following screen will be displayed:
2. When the configuration changes have been saved, the following screen will be displayed:
27
Note:
after changing any of the configuration options, you must press ENT to save the changes. Once all changes
are complete, press ESC to exit the “Advanced Setup” menu. The following screen will be displayed:
ENGLISH
TS432U
Duplicator Mode User Guide
Operation
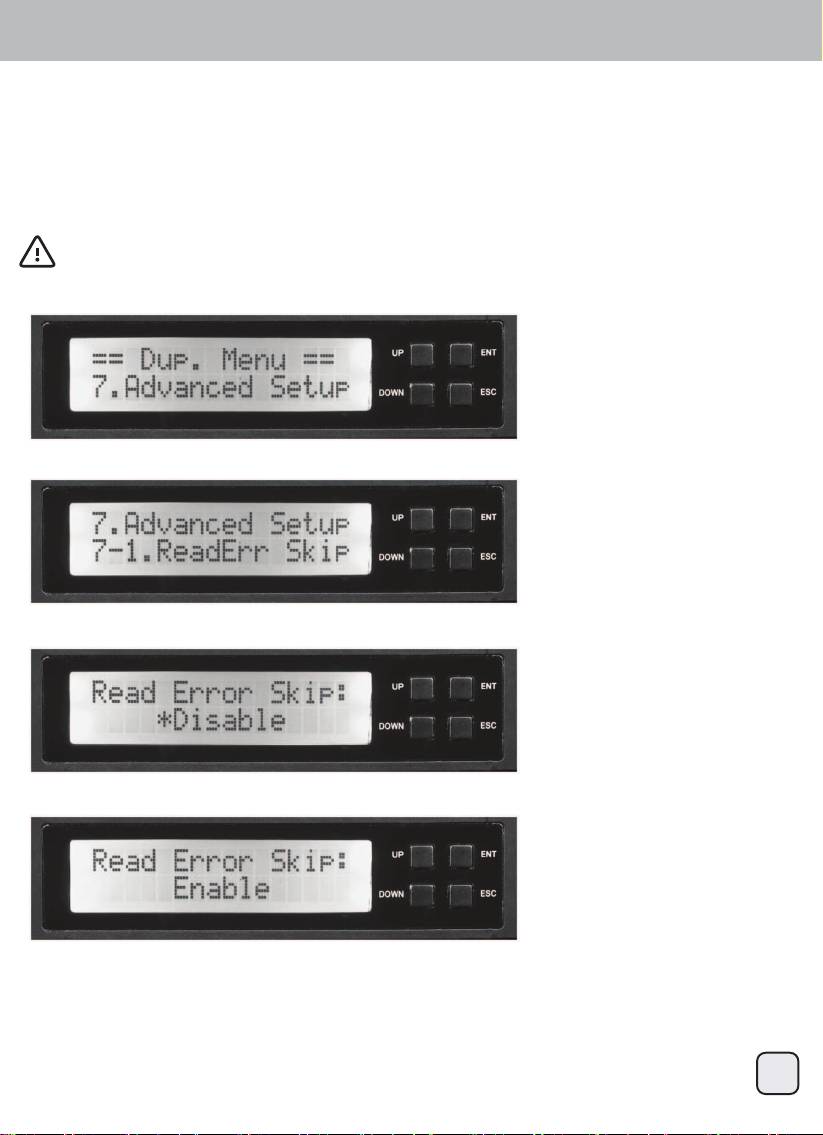
Main menu: Advanced Setup menu: 7-1 read error skip
This function can be enabled to ignore any error that occurs during duplication. By default, the TS432U will
halt the duplication operation when it encounters an unreadable area on the source hard disk and display an
error. Enabling this option will ignore and skip any bad sectors on the source hard dive.
1. Select the “Advanced Setup” using the arrow button. The following screen will be displayed:
2. Use the arrow buttons to scroll to “Read Err Skip “. The following screen will be displayed:
28
Warning: enabling this function may result in corrupt data on copied hard drives
3. Press ENT to display the current configuration setting. (Default setting is “Disable”)
4. Press the arrow buttons to modify the setting between “disable” or “enable”.
5. Press ENT to save.
ENGLISH
TS432U
Duplicator Mode User Guide
Operation
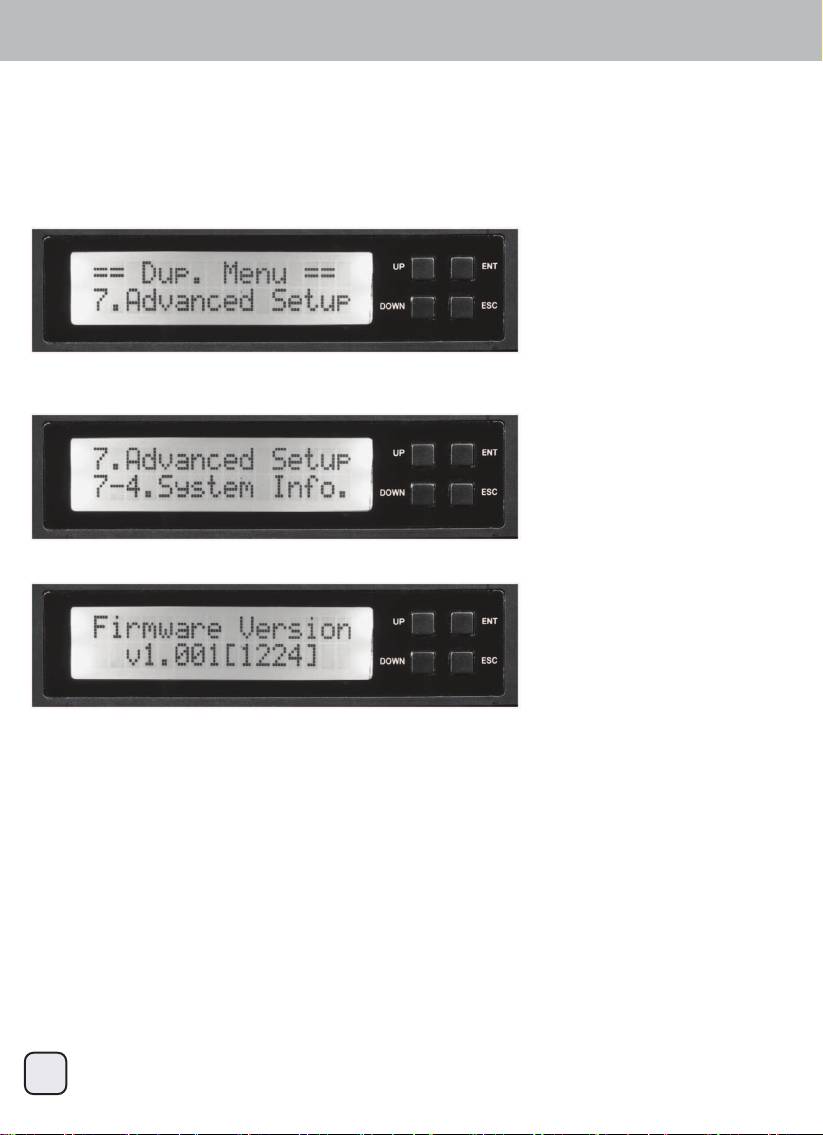
Main menu: Advanced Setup menu: 7-4. System Info
This function displayed information about the TS432U including the current firmware version
1. Select the “Advanced Setup” using the arrow button. The following screen will be displayed:
2. Use the arrow buttons to scroll to “System Info”. Press ENT to select “System Info”.
The following screen will be displayed:
29
3. Press ENT to display system information.

TS432U
Duplicator Mode User Guide
Overview
Changing to Duplicator Mode from RAID Mode
Während der normalen Startsequenz werden folgende Informationen angezeigt
Schalten Sie das Gerät ein
Drücken Sie zur Anzeige die Taste Up, Down, ESC oder ENT
Drücken Sie zum Bestätigen die ENT-Taste
Rufen Sie mit der ENT-Taste den Duplicator Mode auf
Nun befinden Sie sich im Duplicator Mode
30
TS432U
Duplicator Mode User Guide
Operation
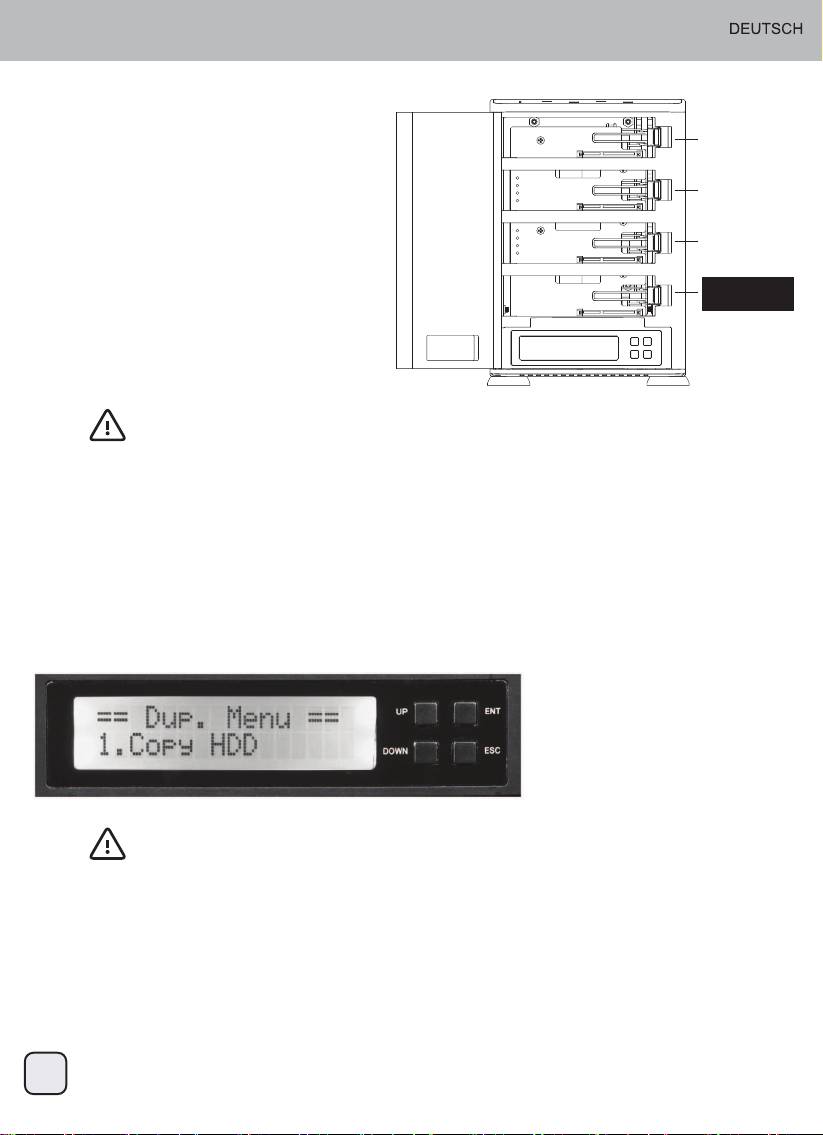
Loading hard drives
TARGET DISK1
1. Schließen Sie das Netzkabel des TS432U an
eine Steckdose an
TARGET DISK2
2. Stecken Sie die SATA-Festplatte, auf die Sie
kopieren möchten, in den Steckplatz
“SOURCE DISK 4”. Richten Sie den SATA-
TARGET DISK3
Port an der Festplatte am SATA-Anschluss im
Laufwerkseinschub aus
3. Stecken Sie die Ziel-SATA-Festplatten in die
Steckplätze “TARGET DISK1”, “TARGET
DISK2” oder “TARGET DISK3”. Richten Sie
UP ENT
DOWN ESC
den SATA-Port an der Festplatte am
SATA-Anschluss im Laufwerkseinschub aus
Hinweis:
Stellen Sie sicher, dass die Zielfestplatte mindestens die gleiche Kapazität wie die Quellfestplatte hat. Der
Duplikatorprozess startet nicht, falls die Zielfestplatte eine geringere Kapazität aufweist. Stellen Sie sicher,
dass der TS432U nicht per USB- oder eSATA-Ports mit einem PC verbunden ist
4. Schalten Sie den TS432U ein
5. Drücken Sie zur Auswahl des Duplicator Mode im Menü die Abwärtstaste, drücken Sie zum Fortfahren
ENT.Bestätigen Sie durch zwei weitere Betätigungen der ENT-Taste die Umschaltung in den Duplicator
Mode.
Das System erkennt die Festplatten automatisch. Nachdem die Festplatten erkannt wurden, erscheint ein
Bildschirm wie nachstehend abgebildet:
SOURCE DISK
Hinweis:
Stellen Sie sicher, dass die Zielfestplatte mindestens die gleiche Kapazität wie die Quellfestplatte hat.
31

TS432U
Duplicator Mode User Guide
Operation
Main menu: Copy HDD
Die “ Copy HDD”-Funktion kopiert alle Daten von der Quell- auf die Zielfestplatte.
1. Setzen Sie Quell- und Zielfestplatte in den TS432U ein. Das System erkennt die Festplatten automatisch.
Nachdem die Festplatten erkannt wurden, wird Folgendes angezeigt:
2. Drücken Sie ENT, “ Copy HDD” wird ausgeführt.
3. Während des “ Copy HDD”-Vorgangs zeigt der TS432U den Fortschritt an
Menge der noch nicht übertragenen Daten (in Gigabyte) und Restzeit werden angezeigt. Der Fortschritt
wird alle 15 bis 20 Sekunden aktualisiert
4. Sobald die Duplizierung abgeschlossen ist, erscheint der Auftragsstatus am Bildschirm
Hinweis:
Stellen Sie sicher, dass die Zielfest-
platte mindestens die gleiche Kapazität
wie die Quellfestplatte hat.
Note:
When copy is complete, TS432U will
beep 5 times to indicate it is finished,
press ESC to stop the beep.
32
TS432U
Duplicator Mode User Guide
Operation
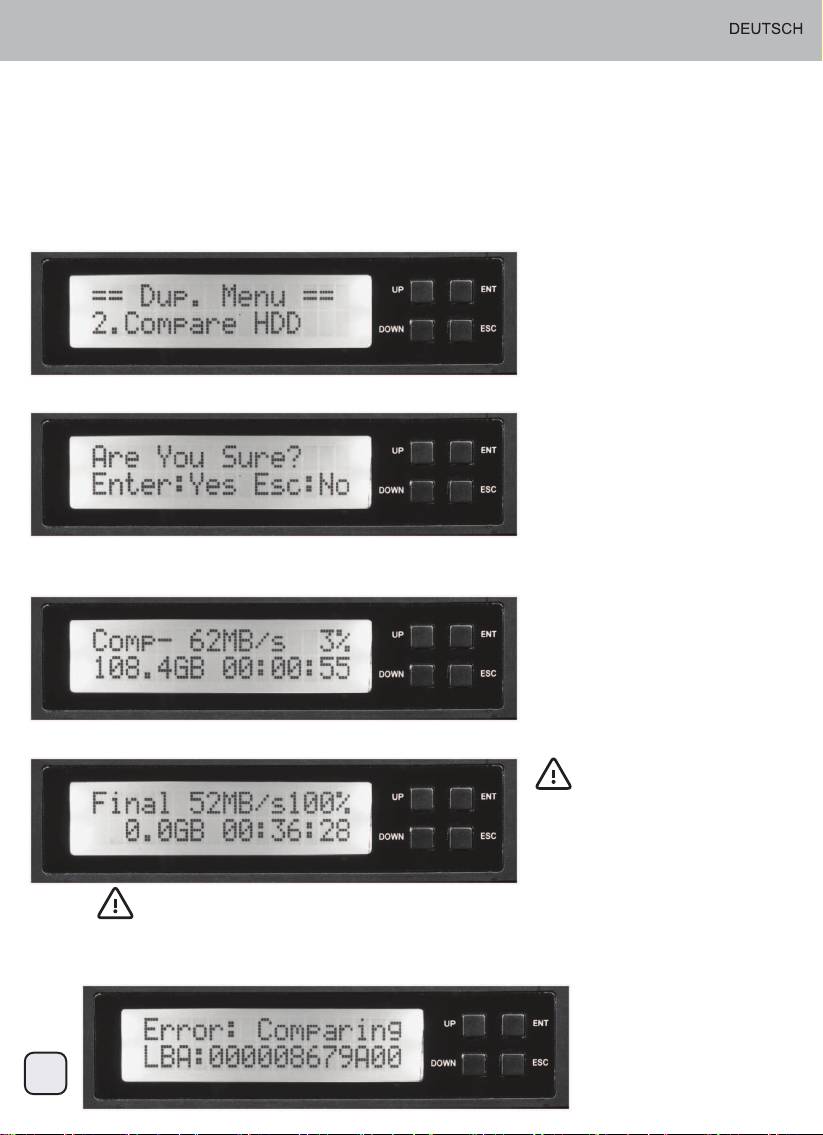
Main menu: Compare HDD
Die “ Compare HDD”-Funktion führt einen Vergleich der Daten von Quell- und Zielfestplatte durch
1. Setzen Sie Quell- und Zielfestplatte ein, wählen Sie mit der Pfeiltaste “ Compare HDD”. Der folgende
Bildschirm wird angezeigt:
2. Drücken Sie zum Bestätigen die ENT-Taste
3. Drücken Sie ENT, “ Compare HDD” wird ausgeführt. Das System erkennt die Festplatten automatisch.
Während des “ Compare HDD”-Vorgangs zeigt der TS432U den Fortschritt an
Wenn der Vorgang “ Compare HDD” abgeschlossen ist, erscheint der Auftragsstatus am Bildschirm
Note:
When compare is complete, TS432U
will beep 5 times to indicate it is
finished, press ESC to stop the beep.
Hinweis:
Falls sich die Ziel- von der Quellfestplatte unterscheidet, gibt der TS432U einen Signalton aus und
meldet jede verschiedenartige LBA. Bitte schalten Sie den TS432U aus und bestimmen anhand
des Vergleichs einzelner Zielfestplatten, welche sich unterscheidet.
33

TS432U
Duplicator Mode User Guide
Operation
Main menu: ReScan Bus
Die “ReScan Bus”-Funktion dient der erneuten Erkennung der im TS432U installierten Festplatten. Sie kann
genutzt werden, wenn Sie Festplatten austauschen, ohne das System neu zu starten.
1. Wählen Sie mit der Pfeiltaste “ReScan Bus”. Der folgende Bildschirm wird angezeigt:
2. Drücken Sie zur Auswahl ENT. Das System fordert Sie dazu auf, die Fortsetzung zu bestätigen.
3. Drücken Sie zum Starten der “ReScan Bus”-Funktion ENT
4. Wenn die “ReScan Bus”-Funktion abgeschlossen ist, erscheint der folgende Bildschirm:
34
TS432U
Duplicator Mode User Guide
Operation
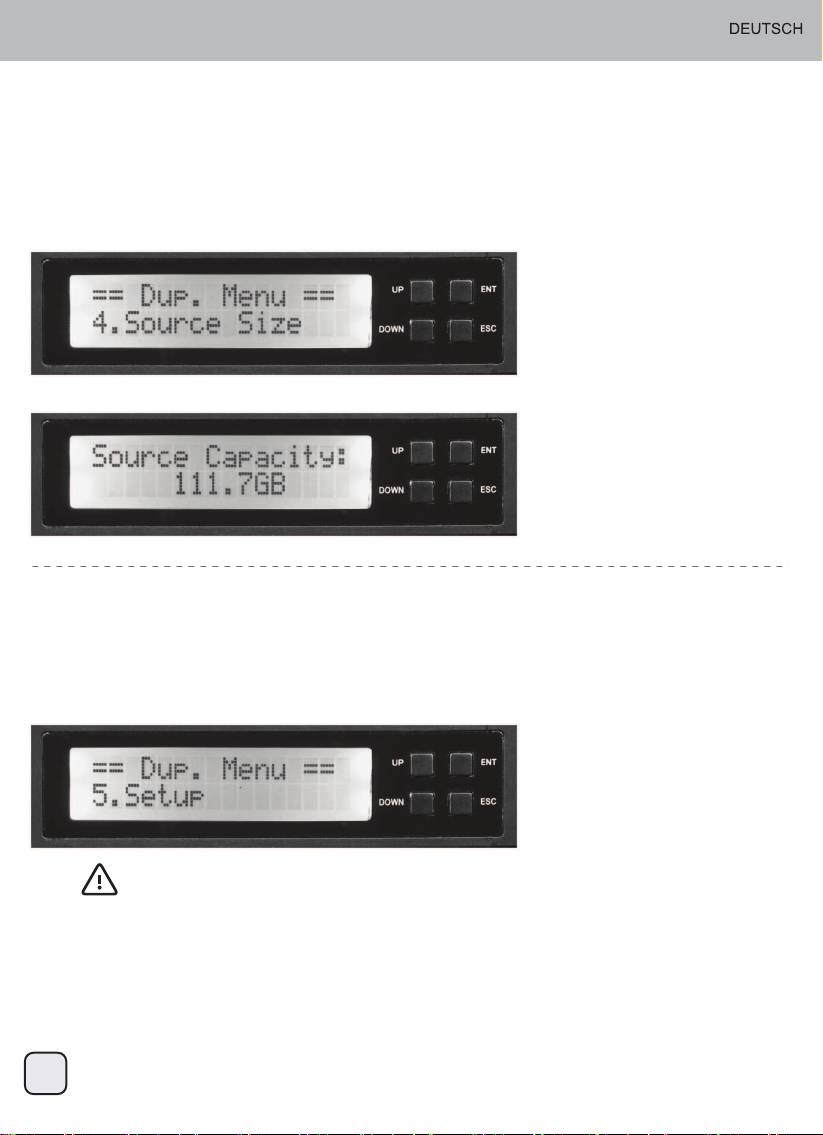
Main menu: Source Size
Die “ Source Size”-Funktion dient dazu, die Kapazität der Quellfestplatte anzuzeigen.
1. Wählen Sie bei eingesteckter Quellfestplatte mit der Pfeiltaste die Option “ Source Size”, der folgende
Bildschirm wird angezeigt.
2. Drücken Sie zum Anzeigen der Kapazität der Quellfestplatte ENT.
Main menu: Setup
Das “ Setup”-Menü enthält Konfigurationsoptionen zum TS432U.
Zur Erzielung optimaler Leistung sollten Sie die Werkseinstellungen verwenden
1. Wählen Sie mit der Pfeiltaste “ Setup”. Der folgende Bildschirm wird angezeigt:
Hinweis:
Drücken Sie nach Änderung einer Konfigurationsoption zum Speichern der Änderung ENT.
35

TS432U
Duplicator Mode User Guide
Operation
Main menu: Setup menu: 5-1 Auto Compare
“Auto Compare” vergleicht Quell- und Zielfestplatte automatisch nach jedem Kopiervorgang.
1. Wählen Sie mit der Pfeiltaste “Setup”. Der folgende Bildschirm wird angezeigt:
2. Drücken Sie ENT, wählen Sie mit der Pfeiltaste “Auto Compare”. Der folgende Bildschirm wird angezeigt:
3. Drücken Sie zur Anzeige der aktuellen Konfigurationseinstellung ENT. (Standardeinstellung ist “Disable”)
4. Modifizieren Sie die Einstellung mit der Pfeiltaste. Mit der Aufwärts- / Abwärtstaste können Sie “Auto-
Vergleich” de-/aktivieren.
5. Drücken Sie zum Speichern der Einstellung ENT.
36

TS432U
Duplicator Mode User Guide
Operation
Main menu: Setup menu: 5-2 Button Sound
“ Button Sound” de-/aktiviert den Signalton bei Betätigung einer Taste.
1. Wählen Sie mit der Pfeiltaste “Setup”. Der folgende Bildschirm wird angezeigt:
2. Drücken Sie ENT, wählen Sie mit der Pfeiltaste “Button Sound”. Der folgende Bildschirm wird angezeigt:
3. Drücken Sie zur Anzeige der aktuellen Konfigurationseinstellung ENT. (Standardeinstellung ist “Off”)
4. Modifizieren Sie die Einstellung mit der Pfeiltaste. Mit der Aufwärts- / Abwärtstaste können Sie “Tasten
ton” de-/aktivieren.
5. Drücken Sie zum Speichern der Einstellung ENT.
37

TS432U
Duplicator Mode User Guide
Operation
Main menu: Setup menu: 5-3 Device Info
Diese Option zeigt Informationen über die mit dem TS432U verbundenen Festplatten
1. Wählen Sie mit der Pfeiltaste “Setup”. Der folgende Bildschirm wird angezeigt:
2. Drücken Sie ENT, wählen Sie mit der Pfeiltaste “Device Info”. Der folgende Bildschirm wird angezeigt:
3. Drücken Sie ENT, drücken Sie zum Blättern und Auswählen der Festplatte die Pfeiltasten.
Der folgende Bildschirm wird angezeigt:
4. Drücken Sie zur Auswahl ENT. Zeigen Sie mit den Pfeiltasten zusätzliche Informationen zu den
ausgewählten Festplatten an. Die folgenden Bildschirme werden angezeigt:
38
TS432U
Duplicator Mode User Guide
Operation
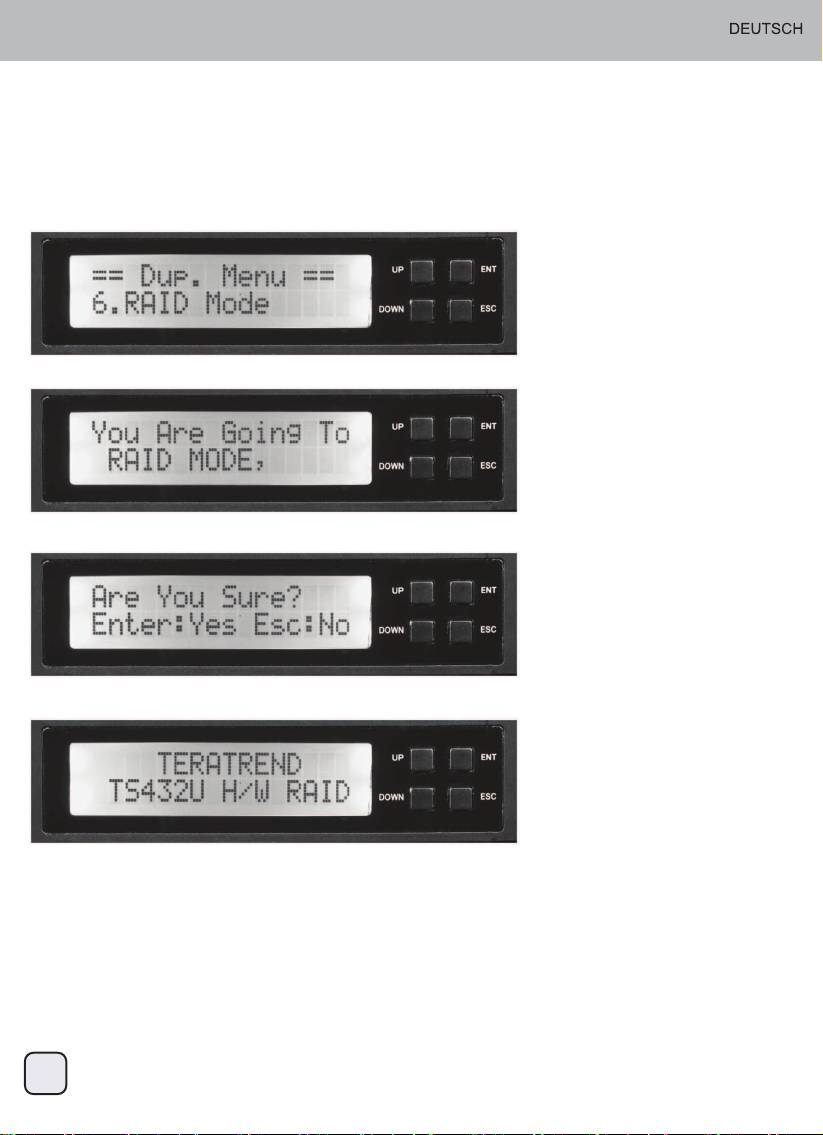
Main menu: RAID Mode
1. Wählen Sie mit der Pfeiltaste “RAID Mode”. Der folgende Bildschirm wird angezeigt:
2. Drücken Sie ENT, wählen Sie mit der Pfeiltaste “ RAID Mode”. Der folgende Bildschirm wird angezeigt:
3. Drücken Sie zur Auswahl ENT. Das System fordert Sie zur Bestätigung auf.
4. Nun befinden Sie sich im RAID-Mode.
39
