Hq 8445: инструкция
Раздел: Красота, здоровье, спорт. туризм, хобби
Тип: Электрическая Бритва
Инструкция к Электрической Бритве Hq 8445

3
ENGLISH 4
POLSKI 12
ROMÂNĂ 20
РУССКИЙ 28
ČESKY 37
MAGYAR 45
SLOVENSKY 53
УКРАЇНСЬКІЙ 61
HRVATSKI 69
EESTI 77
LATVISKI 85
LIETUVIŠKAI 93
SLOVENŠČINA 101
БЪЛГАРСКИ 109
SRPSKI 118
HQ8445
ENGLISH4
Important
Read these instructions for use carefully before
using the appliance and save them for future
reference.
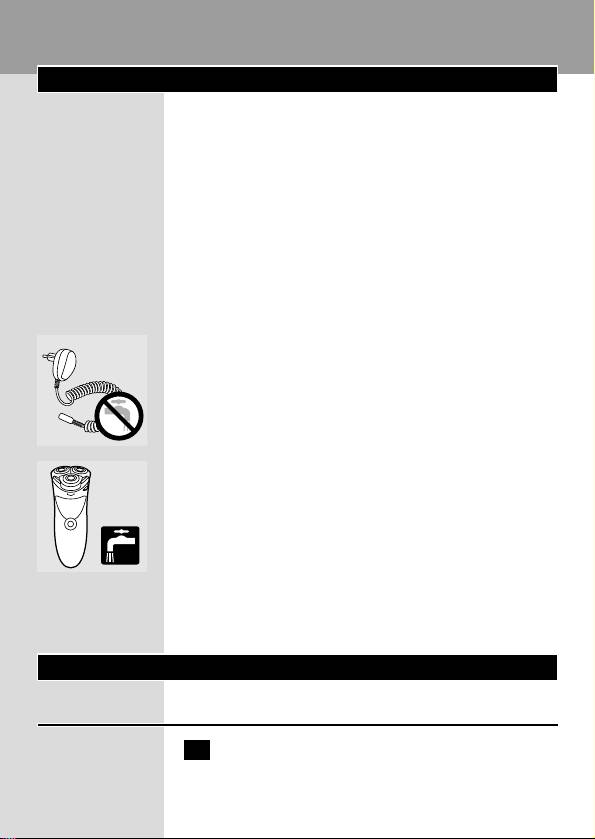
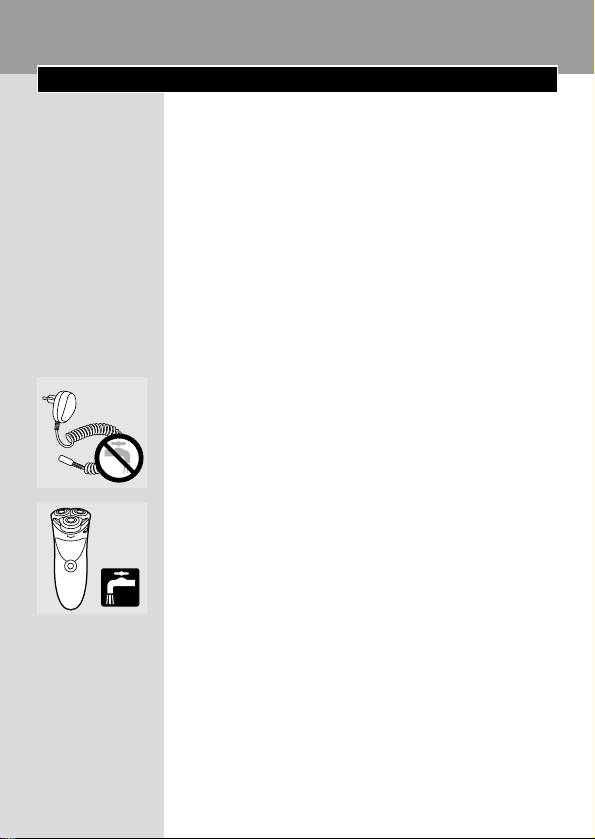
◗ Only use the powerplug supplied.
◗ The powerplug transforms 100-240 volts to a
safe low voltage of less than 24 volts.
◗ The powerplug contains a transformer. Do
not cut off the powerplug to replace it with
another plug, as this will cause a hazardous
situation.
◗ If the powerplug is damaged, always have it
replaced by one of the original type in order
to avoid a hazard.
◗ Make sure the powerplug does not get wet.
C
◗ Use and store the appliance at a temperature
between 5cC and 35cC.
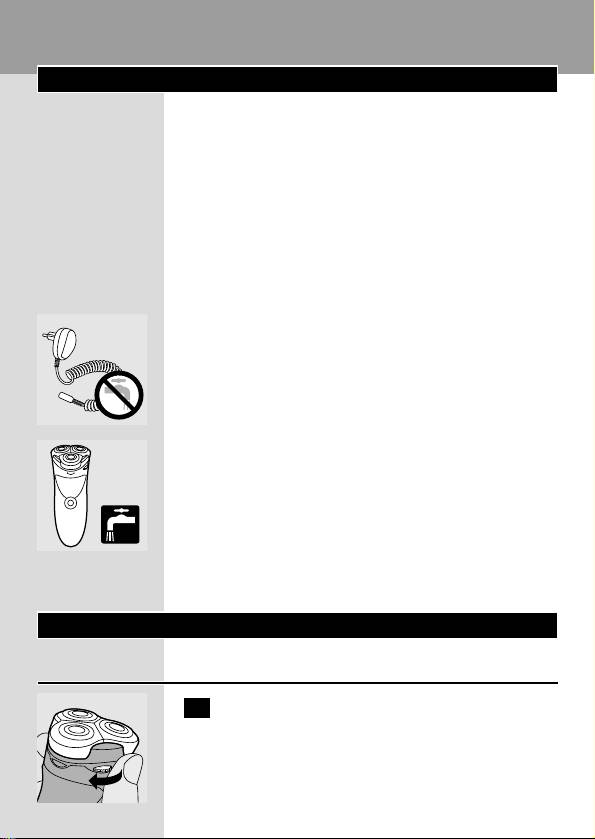
◗ The appliance complies with the
C
internationally approved IEC safety regulations
and can be safely cleaned under the tap.
Be careful with hot water. Always check if the
water is not too hot, to prevent your hands from
getting burnt.
◗ Noise level: Lc= 62 dB [A]
Using the appliance
Shaving
1 Put the powerplug in the wall socket.
ENGLISH 5
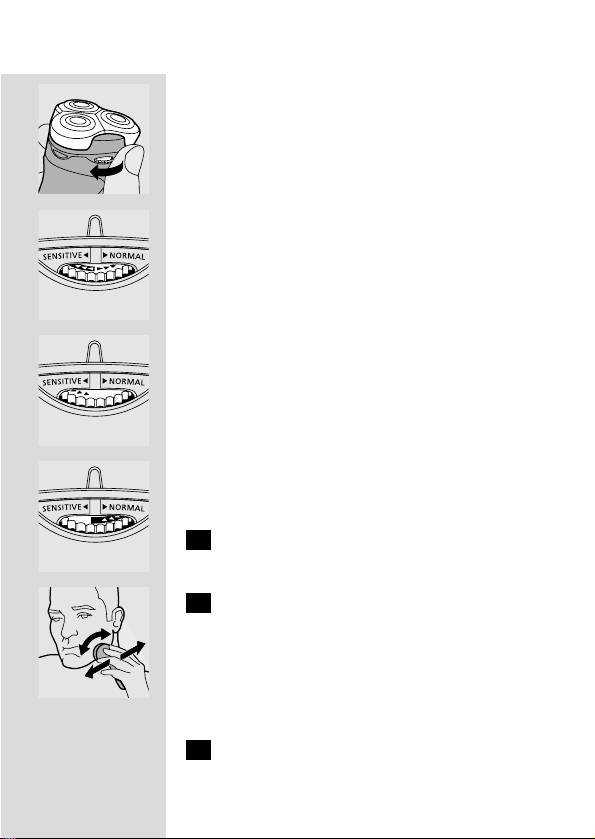
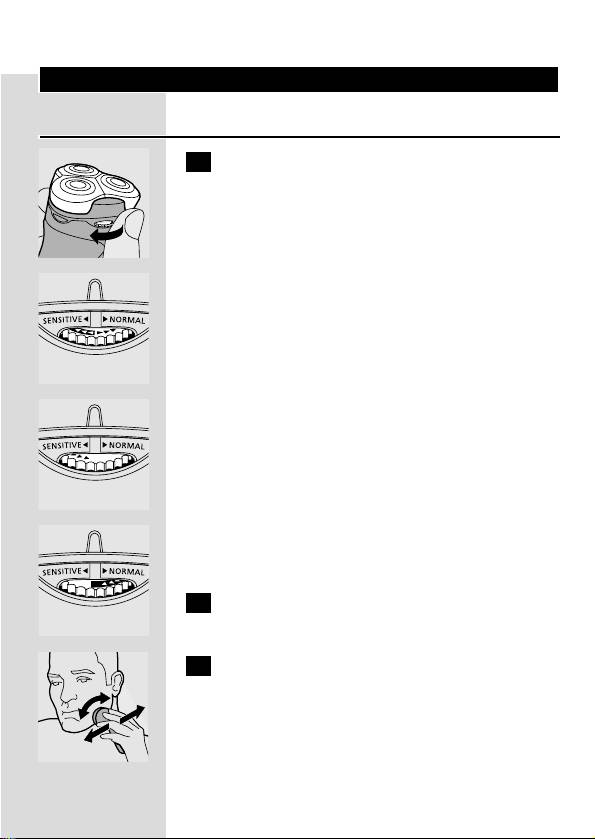
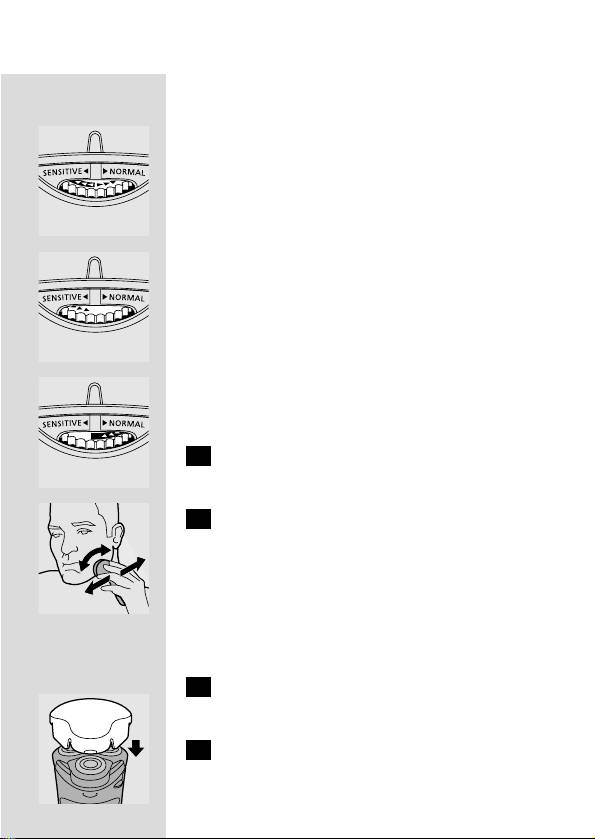
◗ The Personal Comfort Control system allows
C
you to adapt the shaver to your skin type.
- You can set the shaver to 'Normal' for a fast
and comfortable close shave.
- You can set the shaver to 'Sensitive' for a
comfortable close shave with optimal skin
comfort.
◗ The … position is the neutral position.
C
◗ The 'S' position is best suited for sensitive
C
skin.
◗ The 'N' position is best suited for normal
C
skin.
2 Switch the shaver on by pressing the on/off
button once.
3 Move the shaving heads quickly over your
C
skin, making both straight and circular
movements.
Shaving on a dry face gives the best results.
Your skin may need 2 or 3 weeks to get
accustomed to the Philishave system.
4 Switch the shaver off by pressing the on/off
button once.
S
N
ENGLISH6
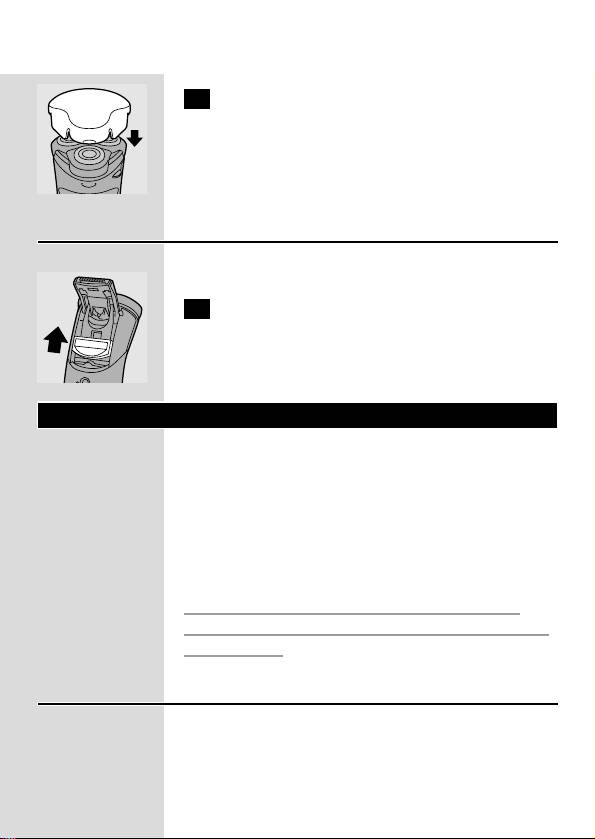
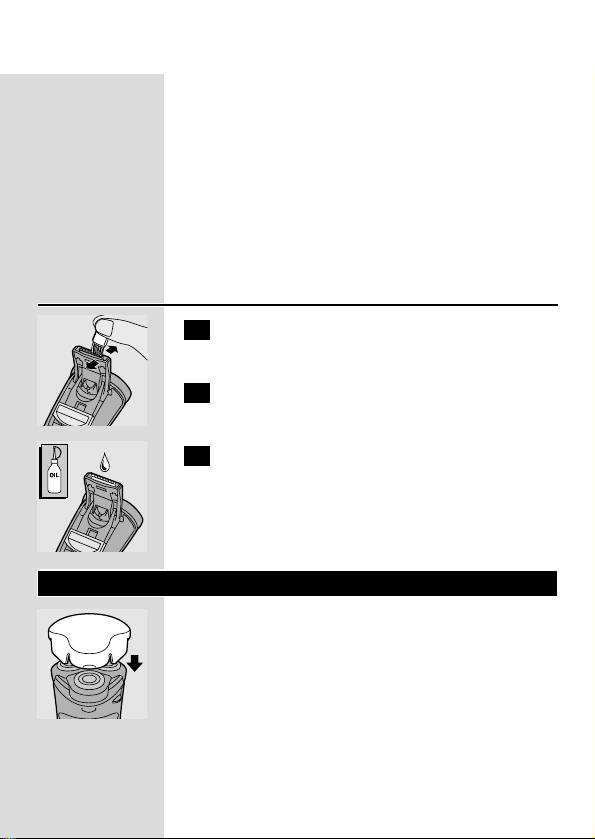
5 Put the protection cap on the shaver every
C
time you have used it in order to prevent
damage.
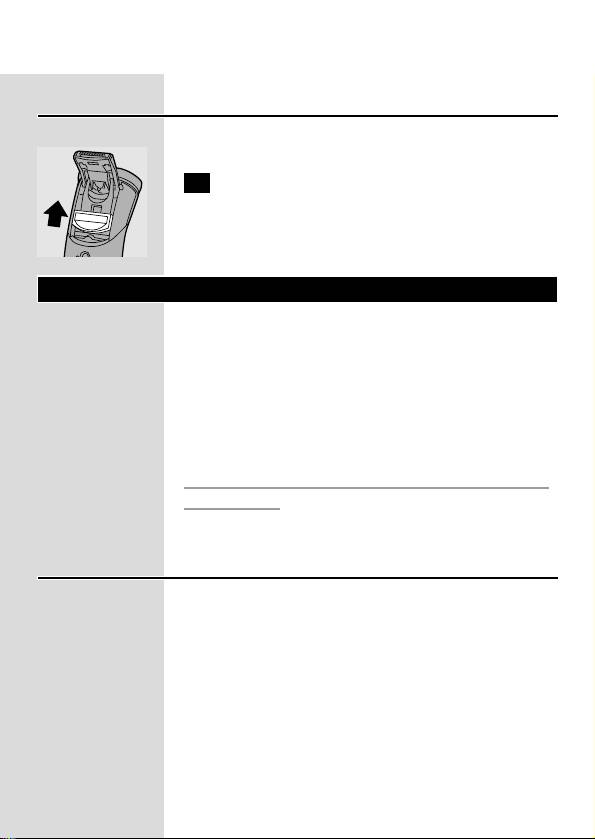
Trimming
For grooming sideburns and moustache.
1 Open the trimmer by pushing the slide
C
upwards.
The trimmer can be activated while the motor is
running.
Cleaning and maintenance
Regular cleaning guarantees better shaving
performance.
The easiest and most hygienic way to clean the
appliance is to rinse the shaving unit and the hair
chamber with hot water every time you have
used the shaver.
Be careful with hot water. Always check if the
water is not too hot, to prevent your hands from
getting burnt.
Every day: shaving unit and hair chamber
When you clean the appliance, it is not necessary
to take the shaving heads (cutters and guards)
apart. If you want to take them apart, be sure not
ENGLISH 7
to mix up the cutters and guards, since grinding of
the cutters in the guards only guarantees optimal
performance for each matching set. If you
accidentally mix up the sets, it could take several
weeks before optimal shaving performance is
restored.
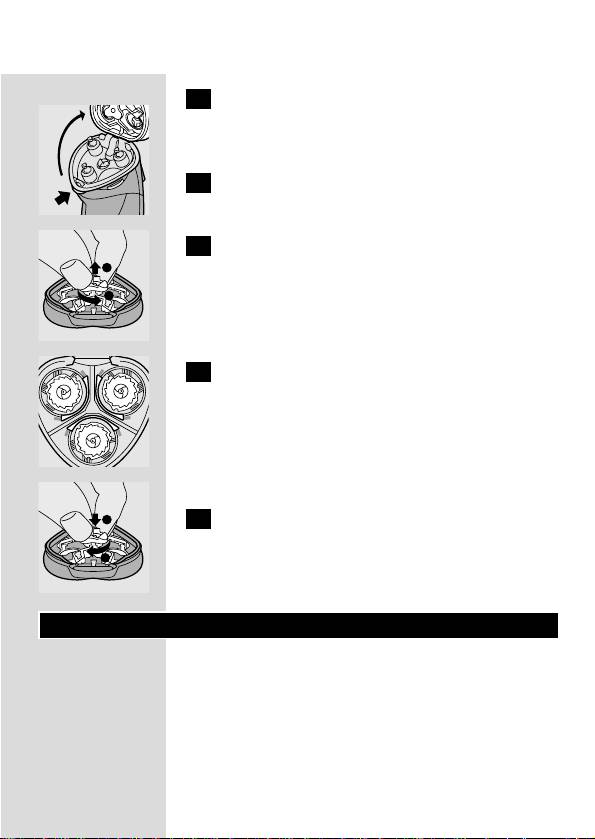
1 Switch the shaver off, remove the
powerplug from the wall socket and pull
the appliance plug out of the shaver.
2 Press the release button to open the
C
shaving unit.
3 Clean the shaving unit and the hair
C
chamber by rinsing them under a hot tap
for some time.
Make sure the inside of the shaving unit and the
hair chamber have been cleaned properly.
4 Rinse the outside of the appliance.
5 Close the shaving unit and shake off excess
water.
Never dry the shaving unit with a towel or tissue
as this may damage the shaving heads.
6 Open the shaving unit again and leave it
C
open to let the appliance dry completely.
◗ You can also clean the shaving unit and hair
chamber without water by using the brush
supplied.

ENGLISH8
- Carefully clean the top of the shaving unit with
the brush.
- Carefully clean the inside of the shaving unit
and the hair chamber with the brush.
Every six months: trimmer
1 Switch the shaver off, remove the
powerplug from the wall socket and pull
the appliance plug out of the shaver.
2 Clean the trimmer with the brush.
C
3 Lubricate the trimmer teeth with a drop
C
of sewing machine oil every six months.
Storage
◗ Put the protection cap on the shaver to
C
prevent damage.
◗ The appliance can be stored in the pouch
supplied.
Replacement
Replace the shaving heads every 2 years for
optimal shaving results.
Replace damaged or worn shaving heads with
HQ8 Philishave Sensotec shaving heads only.
ENGLISH 9
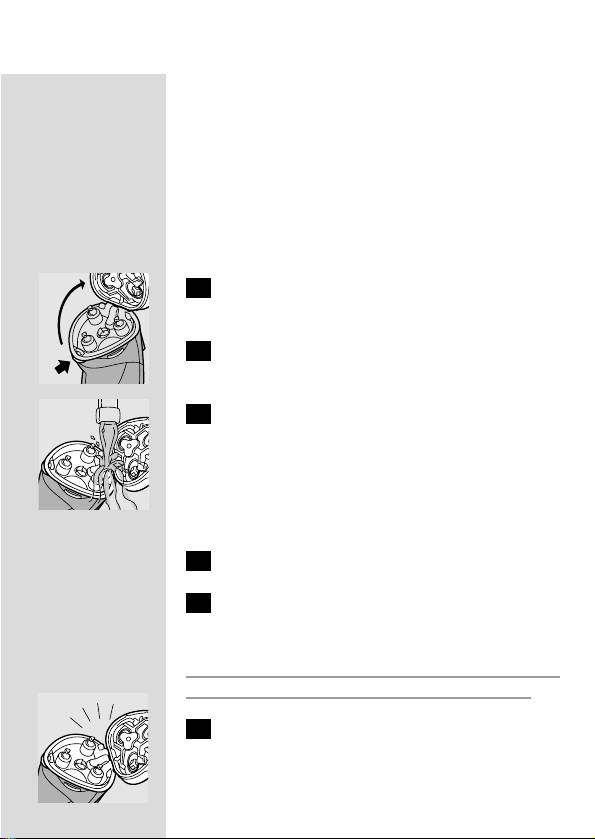
1 Switch the shaver off, remove the
powerplug from the wall socket and pull
the appliance plug out of the shaver.
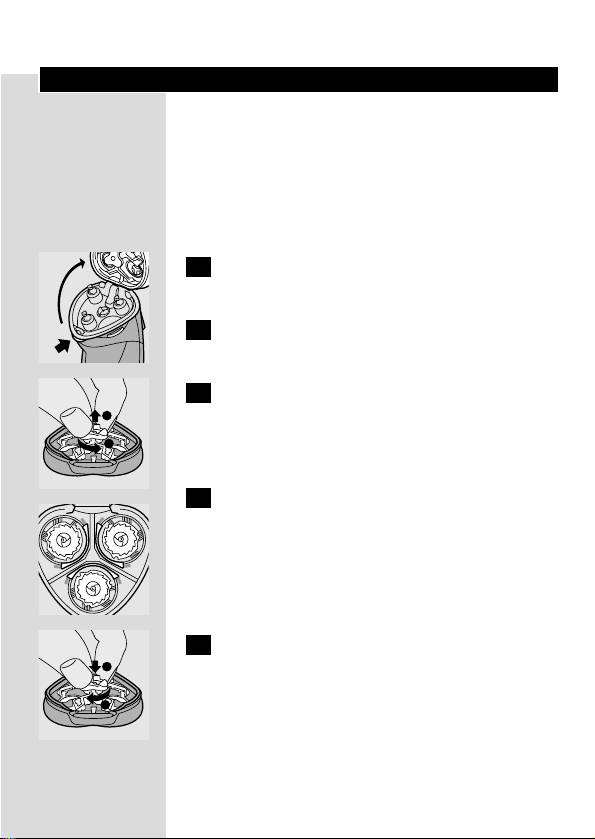
2 Press the release button to open the
C
shaving unit.
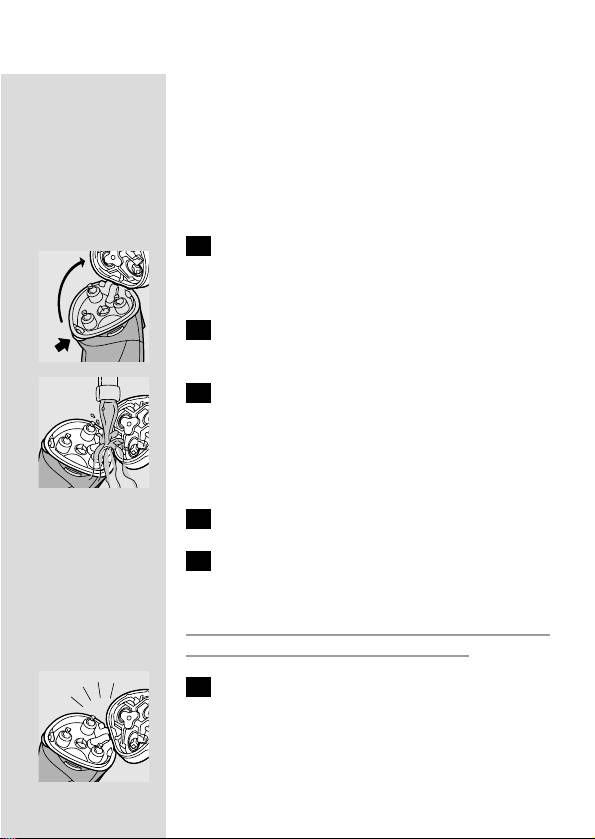
3 Turn the wheel anticlockwise and remove
C
the retaining frame.
4 Remove the shaving heads and place new
C
ones in the shaving unit in such a way that
the parts with the small holes point
towards the centre of the shaving unit.
Make sure that the projections of the shaving
heads fit exactly into the recesses.
5 Put the retaining frame back into the
C
shaving unit, press the wheel and turn it
clockwise.
Accessories
The following accessories are available:
- HQ8000 powerplug.
- HQ800 powerplug.
- HQ8 Philishave Sensotec shaving heads.
- HQ110 Philishave shaving head cleaner
(shaving head cleaning spray).
2
1
1
2

ENGLISH10
Guarantee & service
If you need information or if you have a problem,
please visit the Philips Web site at
www.philips.com or contact the Philips Customer
Care Centre in your country (you will find its
phone number in the worldwide guarantee
leaflet). If there is no Customer Care Centre in
your country, turn to your local Philips dealer or
contact the Service Department of Philips
Domestic Appliances and Personal Care BV.
Troubleshooting
1 Reduced shaving performance
B
Cause 1: the shaving heads are dirty.
B
The shaver has not been rinsed long enough or
the water used was not hot enough.
◗ Clean the shaver thoroughly before you
continue shaving (see chapter 'Cleaning and
maintenance').
B
Cause 2: long hairs are obstructing the shaving
heads.
◗ Clean the cutters and guards.
◗ Remove the retaining frame. Do not clean
C
more than one cutter and guard at a time,
since they are all matching sets. If you
accidentally mix up the cutters and guards, it
may take several weeks before optimal shaving
performance is restored.
◗ Remove the hairs with the brush supplied.
2
1

ENGLISH 11
◗ Put the shaving heads back into the shaving
unit. Put the retaining frame back into the
shaving unit, press the wheel and turn it
clockwise.
B
Cause 3: the shaving heads are damaged or worn.
◗ Remove the retaining frame.
◗ Remove the old shaving heads from the
shaving unit and replace them with new ones
Replace damaged or worn shaving heads with
HQ8 Philishave Sensotec shaving heads only.
◗ Put the retaining frame back into the shaving
unit, press the wheel and turn it clockwise.
POLSKI12
Ważne
Przed pierwszym użyciem urządzenia zapoznaj się
dokładnie z instrukcją jego obsługi i zachowaj ją na
przyszłość, do ewentualnej konsultacji.
◗ W celu naładowania akumulatorów używaj
wyłącznie załączonej do urządzenia ładowarki.
◗ Zasilacz przekształca napięcie 100-240 V na
bezpieczne niskie napięcie niższe niż 24 V.
◗ Wtyczka zasilacza zawiera transformator.
Odcięcie wtyczki celem wymiany jej na nową
może spowodować niebezpieczeństwo.
◗ Jeśli uszkodzona jest wtyczka przewodu
zasilającego, wówczas, aby uniknąć
niebezpieczeństwa należy zawsze zastąpić ją
wtyczką oryginalną
◗ Upewnij się, że wtyczka przewodu zasilającego
C
nie jest wilgotna
◗ Przechowuj urządzenie w temperaturze
pomiędzy 5cC oraz 35cC.
◗ Niniejsze urządzenie spełnia międzynarodowe,
C
zatwierdzone normy bezpieczeństwa IEC i
można je myć pod kranem.
Postępuj ostrożnie z gorącą wodą. Zawsze
sprawdzaj, czy jej temperatura jest odpowiednia
dla kontaktu z rękami.
◗ Poziom hałasu: Lc= 62 dB [A]
POLSKI 13
Korzystanie z urządzenia
Golenie
1 Podłącz ładowarkę do sieci.
◗ System Personal Comfort Control
C
dopasowuje golarkę do rodzaju skóry.
- Możesz ustawić golarkę w pozycji "Normal" w
celu szybkiego, dokładnego i wygodnego golenia.
- Możesz ustawić golarkę w pozycji "Sensitive", co
zapewni ci wygodne, dokładne golenie z
zachowaniem optymalnego komfortu dla skóry.
◗ Ustawieniem neutralnym jest pozycja ….
C
◗ Najlepszym ustawieniem dla skóry wrażliwej
C
jest pozycja "S".
◗ Najlepszym ustawieniem dla skóry mniej
C
wrażliwej jest pozycja "N".
2 Włącz golarkę, wciskając włącznik.
3 Przesuwaj głowice po skórze, wykonując
C
zarówno proste, jak i okrężne ruchy.
Najlepsze efekty golenia osiąga się na skórze
suchej.
Skóra Twojej twarzy potrzebuje pewnego czasu
(2-3 tygodni), by przyzwyczaić się do nowego
systemu golenia.
S
N

POLSKI14
4 Wyłącz golarkę przez jednokrotne
wciśnięcie przycisku off/on.
5 Po każdym użyciu golarki zakładaj na nią
C
pokrywkę ochronną.
Trymer
Służy do przystrzygania wąsów i bokobrodów.
1 Otwórz trymer przesuwając suwak do
C
góry.
Trymer może być używany po uprzednim
włączeniu urządzenia.
Czyszczenie i konserwacja
Regularne czyszczenie golarki gwarantuje lepsze
efekty golenia.
Najprostszym i najbardziej higienicznym
sposobem czyszczenia urządzenia jest opłukanie
gorącą wodą po każdym użyciu golarki modułu
golącego i komory na ścięte włosy.
Postępuj ostrożnie z gorącą wodą. Zawsze
sprawdzaj, czy jej temperatura jest odpowiednia
dla kontaktu z rękami.
Codziennie: część goląca i komora na ścięty
zarost
Podczas czyszczenia golarki nie trzeba zdejmować
części golących ( nożyków i osłonek). Jeśli je
POLSKI 15
wyjmiesz zwróć szczególną uwagę, żeby nie
pomieszać nożyków i osłonek. Jest to bardzo
ważne, ponieważ dopasowanie nożyków do
osłonek zapewnia optymalną skuteczność
działania każdego z zestawów. Jeżeli przypadkowo
osłonki i nożyki zostaną pomieszane, odzyskanie
przez golarkę dobrej jakości golenia może trwać
nawet kilka tygodni.
1 Wyłącz golarkę, wyjmij ładowarkę z
gniazdka ściennego oraz wtyczkę z golarki.
2 Wciśnij przycisk blokujący, aby otworzyć
C
element golący.
3 Przez jakiś czas płucz moduł golący i
C
komorę na ścięty zarost pod gorącą
bieżącą wodą.
Upewnij się, czy wnętrze części golącej oraz
komora na ścięty zarost zostały dobrze
wypłukane.
4 Spłucz zewnętrzną powierzchnię golarki.
5 Zamknij moduł golący i strząśnij pozostałą
wodę.
Nidy nie wycieraj modułu golącego ręcznikiem lub
chusteczką - możesz uszkodzić głowice golące.
6 Otwórz ponownie część golącą i pozostaw
C
ją tak do wyschnięcia.
POLSKI16
◗ Część golącą i komorę na ścięty zarost można
też czyścić na sucho, za pomocą szczoteczki
dołączonej do golarki jako element
wyposażenia.
- Ostrożnie oczyść szczoteczką wierzch części
golącej.
- Oczyść szczoteczką wnętrze części golącej oraz
komorę na ścięty zarost.
Co pół roku: trymer
1 Wyłącz golarkę, wyjmij ładowarkę z
gniazdka ściennego oraz wtyczkę z golarki.
2 Wyczyść trymer szczoteczką.
C
3 Co 6 miesięcy należy naoliwić ząbki
C
trymera kroplą oleju maszynowego.
Przechowywanie
◗ Załóż na golarkę ochronną pokrywę, by
C
uniknąć uszkodzenia.
◗ Urządzenie może być przechowywane w
załączonym pokrowcu.
POLSKI 17
Wymiana
Aby uzyskać najlepsze rezultaty, wymieniaj co dwa
lata głowice golące.
Uszkodzone lub zużyte głowice należy
zastępować wyłącznie głowicami Philishave HQ8
Sensotec.
1 Wyłącz golarkę, wyjmij zasilacz z gniazda
ściennego oraz wtyczkę z golarki.
2 Wciśnij przycisk blokujący, aby otworzyć
C
element golący.
3 Obróć kółeczka w kierunku przeciwnym
C
do ruchu wskazówek zegara i zdejmij
głowice golące z ramki zabezpieczającej.
4 Zdejmij zużyte głowice golące i na część
C
golącą załóż nowe, tak aby elementy
zawierające małe otwory skierowane były
w kierunku środka części golącej.
Upewnij się, czy części wystające głowic pasują
dokładnie w zagłębienia.
5 Załóż ponownie obsadę na moduł golący,
C
wciśnij kółko i obróć nim w kierunku
zgodnym z kierunkiem wskazówek zegara.
2
1
1
2

POLSKI18
Akcesoria
Dostępne są następujące akcesoria:
- HQ8000 Ładowarka
- Zasilacz HQ800
- HQ8 Głowice golące Philishave Sensotec.
- HQ110 Philishave Head Cleaner
(spray do czyszczenia głowic golących).
Gwarancja i serwis
Jeśli potrzebne Ci są informacje lub napotykasz
jakiś problem, skontaktuj się z Biurem Obsługi
Klienta (numer telefonu znajdziesz w Karcie
Gwarancyjnej), lub też z najbliższym punktem
serwisowym sprzętu AGD, autoryzowanym przez
firmę Philips. Możesz również odwiedzić naszą
stronę internetową: www.philips.pl
Rozwiązywanie problemów
1 Zmniejszona wydajność golenia
B
Przyczyna 1: głowice golące są zanieczyszczone.
B
Golarka nie była dostatecznie długo płukana lub
woda nie była wystarczająco ciepła.
◗ Przed przejściem do golenia dokładnie oczyść
golarkę (patrz: rozdział "Czyszczenie i
konserwacja").
B
Przyczyna 2: długie włoski blokują głowice golące.
◗ Wyczyść osłonki i nożyki.

POLSKI 19
◗ Wyjmij blaszkę zabezpieczającą. Nie myj
C
jednorazowo więcej niż jednego ostrza i
jednej głowicy, ponieważ tworzą one
dopasowane do siebie zestawy. Jeśli
przypadkowo zakłócisz układ ostrzy i głowic,
minie kilka tygodni, zanim ponownie
przywrócisz optymalną skuteczność golenia
(elementy dopasują się).
◗ Usuń włoski załączoną do golarki szczoteczką.
◗ Załóż ponownie obsadę na moduł golący,
wciśnij kółko i obróć nim w kierunku
zgodnym z kierunkiem ruchu wskazówek
zegara.
B
Przyczyna 3: głowice golące są uszkodzone lub
zużyte.
◗ Wyjmij ramkę zabezpieczającą.
◗ Wyjmij stare głowice z części golącej i zastąp
je nowymi
Uszkodzone lub zużyte głowice należy
zastępować wyłącznie głowicami Philishave HQ8
Sensotec.
◗ Załóż ponownie obsadę na moduł golący,
wciśnij kółko i obróć nim w kierunku
zgodnym z kierunkiem ruchu wskazówek
zegara.
2
1
20 ROMÂNĂ
Important
Citiţi aceste instrucţiuni cu atenţie înainte de
utilizarea aparatului şi păstraţi-le pentru consultări
ulterioare.
◗ Folosiţi doar încărcătorul furnizat.
◗ Încărcătorul transformă o tensiune de 100-
240 volţi într-o tensiune sigură sub 24 volţi.
◗ Încărcătorul este dotat cu un transformator.
Nu încercaţi să înlocuiţi fişa de conectare
pentru a evita provocarea unor accidente.
◗ Dacă încărcătorul se deteriorează, înlocuiţi-l
întotdeauna cu unul original pentru a evita
orice accident.
◗ Evitaţi contactul încărcătorului cu apa.
C
◗ Depozitaţi aparatul la o temperatură între 5-
35cC.
◗ Aparatul corespunde normelor de securitate
C
internaţionale IEC şi poate fi curăţat sub jet
de apă.
Aveţi grijă ca apa să nu fie foarte fierbinte pentru
a nu vă arde.
◗ Nivel de zgomot: Lc = 62 dB [A]
Utilizarea aparatului
Bărbierire
1 Puneţi încărcătorul în priza de perete.
◗ Sistemul Personal Comfort Control adaptează
C
aparatul de ras la tipul dumneavoastră de
piele.
ROMÂNĂ
21
- Puteţi regla aparatul de ras pe "Normal" pentru
o bărbierire netedă, rapidă şi confortabilă.
- Puteţi regla aparatul de ras pe "Sensibil" pentru
o bărbierire netedă, cu un confort optim al
pielii.
◗ Poziţia … este o poziţie neutră.
C
◗ Poziţia 'S' este poziţia potrivită pentru pielea
C
sensibilă.
◗ Poziţia 'N' este poziţia potrivită pentru pielea
C
normală.
2 Porniţi aparatul apăsând o dată pe butonul
pornire/oprire.
3 Faceţi rapid mişcări drepte şi circulare cu
C
capetele de bărbierire pe suprafaţa pielii.
Bărbierirea pe o piele uscată asigură cele mai
bune rezultate.
Pielea dumneavoastră ar putea necesita 2-3
săptămâni până să se obişnuiască cu sistemul
Philishave.
4 Opriţi aparatul de ras apăsând butonul
pornire/oprire o dată.
5 Puneţi întotdeauna capacul de protecţie
C
deasupra aparatului de ras pentru a evita
deteriorarea acestuia.
S
N
22
ROMÂNĂ
Dispozitiv de tundere
Pentru îngrijirea perciunilor şi a mustăţii.
1 Deschideţi dispozitivul de tundere
C
împingând în sus butonul culisant.
Dispozitivul de tundere poate fi activat în timp ce
motorul funcţionează.
Curăţare şi întreţinere
O curăţare regulată asigură cele mai bune
rezultate de bărbierire.
Modul cel mai simplu şi mai igienic de a curăţa
aparatul este să clătiţi unitatea de bărbierire şi
compartimentul de colectare a părului după
fiecare utilizare.
Aveţi grijă ca apa să nu fie foarte fierbinte pentru
a nu vă arde.
În fiecare zi: unitatea de bărbierire şi
compartimentul pentru păr
Când curăţaţi aparatul nu este necesar să scoateţi
capetele de bărbierire (cuţite şi site de protecţie)
din aparat. Dacă doriţi să le scoateţi, aveţi grijă să
nu amestecaţi cuţitele şi sitele deoarece numai
potrivirea lor corectă garantează performanţe
optime pentru fiecare set. Dacă din greşeală le
amestecaţi, poate dura câteva săptămâni până ce
veţi obţine rezultatele anterioare.
