Blaser 10x42 Primus Binoculars: 5 5
5 5: Blaser 10x42 Primus Binoculars
Service
Um unnötige Kosten und Verzöge-
5
rungen zu vermeiden, lesen Sie zuerst
alle Anwenderinformationen in dieser
Bedienungsanleitung, bevor Sie Ihr
Deutsch
Blaser Fernglas einsenden. Wenn eine
Reparatur notwendig ist, schicken Sie Ihr
Fernglas unter Beachtung folgender An-
weisungen an Ihren autorisierten Blaser
Fachhändler:
1. Packen Sie Ihr Fernglas mit ausrei-
chend Verpackungsmaterial ein, um
Beschädigungen zu vermeiden.
2. Legen Sie eine detaillierte Beschrei-
bung des Problems mit einer Kopie
des originalen Kaufbelegs bei.
3. Senden Sie Ihr Fernglas an Ihren au-
torisierten Blaser Fachhändler. Eine
Liste der Blaser Fachhändler nden Sie
unter: http://www.blaser.de
5 5
10 11

Produktgarantie
Blaser Jagdwaen GmbH, Ziegelstadel1,
Für die Durchführung von Garantie-
88316 Isny im Allgäu (nachfolgend „Her-
arbeiten hat der Kunde das Produkt samt
steller“) garantiert dem Endkunden
Originalkaufbeleg an einen autorisierten
(nachfolgend „Kunde“) nach Maßgabe
Fachhändler zu übergeben.
Deutsch
der nachfolgenden Bestimmungen, dass
(www.blaser.de unter „Fachhändlersuche“).
die an den Kunden gelieferte Blaser Optik
(nachfolgend „Produkt“) zum Einsatz für
Ansprüche aus dieser Garantie sind aus-
Jagdzwecke innerhalb eines Zeitraums
drücklich ausgeschlossen, wenn
von 10 Jahren ab Verkaufsdatum (Garan-
– das Produkt Schäden oder Verschleiß-
tiefrist) frei von Material- oder Verarbei-
erscheinungen aufweist, die durch
tungsfehlern sein wird.
einen von der normalen Bestimmung
und den Vorgaben des Herstellers (ge-
Die Garantie wird ausschließlich gewährt,
mäß Benutzerhandbuch) abweichen-
wenn der Kunde das Produkt innerhalb
den Gebrauch verursacht sind,
von 30 Kalendertagen ab Verkaufsdatum
– das Produkt Merkmale aufweist, die
online unter
auf Reparaturen oder sonstige Eingrie
www.blaser.de/produkt-registrierung
durch vom Hersteller nicht autorisierte
registriert.
Werkstätten schließen lassen,
– in das Produkt nicht vom Hersteller au-
Die Garantie wird zudem nur für den
torisiertes Zubehör eingebaut wurde,
Ersterwerber gewährleistet. Veräußert
– die Fabrikationsnummer entfernt oder
dieser das Produkt innerhalb der Ga-
unkenntlich gemacht wurde.
rantiefrist an einen Dritten weiter, so
greift diese freiwillig gewährte Garantie
Die Kosten der Einsendung und Rück-
nicht mehr. Die Garantie bezieht sich
sendung des Produkts übernimmt der
ausschließlich auf das Fernglasgehäuse.
Hersteller.
Die Garantie erstreckt sich nicht auf be-
Hat jedoch der zuständige Fachhändler
wegliche Teile des Fernglases (Augenmu-
dem Kunden für die Einsendung ein be-
scheln).
stimmtes Frachtunternehmen genannt
und nutzt der Kunde ein anderes Fracht-
Die geltend gemachten Fehler wird der
unternehmen, kommt der Hersteller für
Hersteller nach eigenem Ermessen auf
die Kosten der Einsendung nicht auf.
seine Kosten durch Reparatur (Material
und Arbeitszeit) oder Lieferung neuer
Diese Garantie unterliegt dem Recht der
oder generalüberholter Teile beheben.
Bundesrepublik Deutschland.
Ausgebaute, fehlerhafte Teile gehen in
das Eigentum des Herstellers über.
Stand 01/2017
12 13
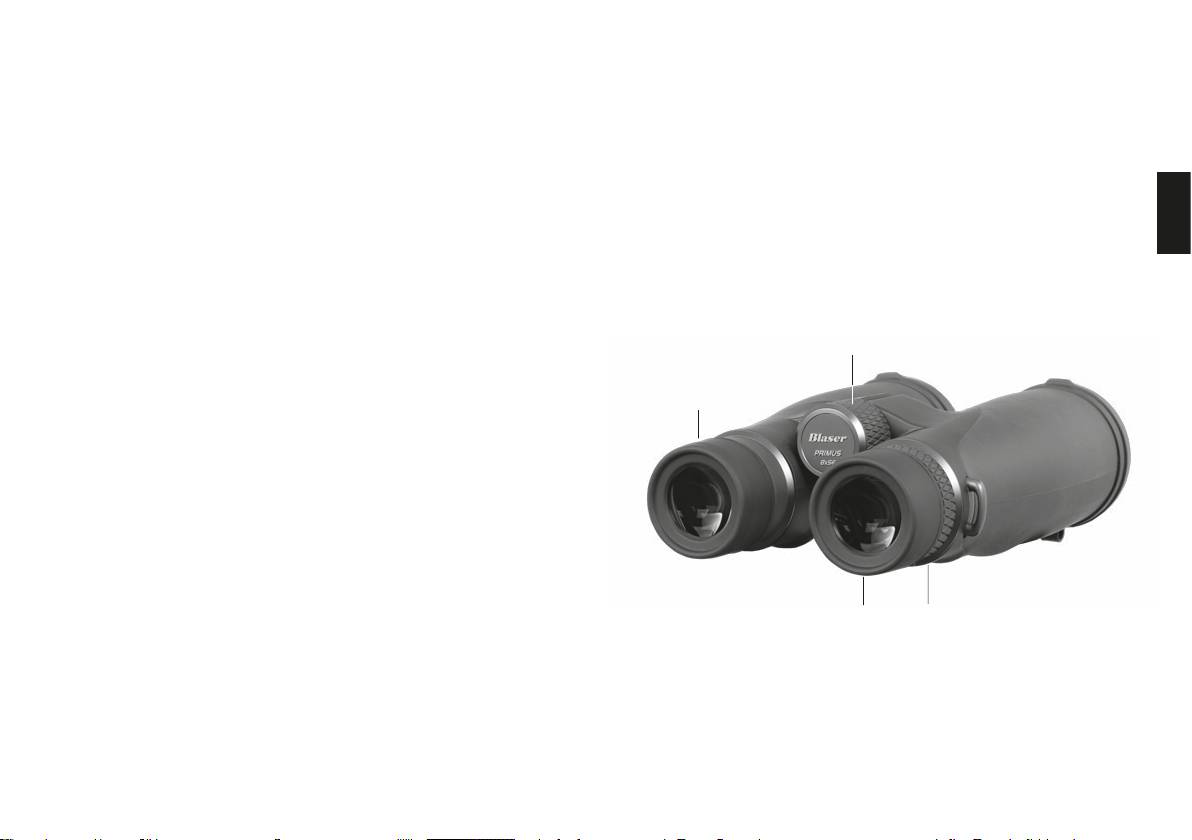
Control elements
We are pleased that, with the purchase of
1. Eyepieces with eyecups
your Blaser binoculars, you have chosen
2. Dioptre adjustment ring
high-performance optics “Made in Ger-
3. Central focusing wheel
many”. These instructions support you
in utilizing the full performance range of
Scope of supply:
your Blaser binoculars to the last detail.
Binoculars, pre-installed carrying strap, eyepiece and lens cap, transport case,
Therefore, please read these instructions
Blaser Jagdwaen GmbH
instruction manual and lens cleaning cloth
carefully before using your new binocu-
Ziegelstadel 1
English
lars.
88316 Isny im Allgäu
We hope you enjoy your new Blaser
www.blaser.de
binoculars!
Contents
3
Page
Control elements ........................................................15
Adjustment of the binoculars .............................................16
1
Adjustment of the distance between the eyepieces (pupil distance) ........16
Adjustment of the eyecups ............................................16
Use without glasses ..................................................16
Use with glasses .....................................................16
Adjustment of the focus ...............................................17
Maintenance tips ........................................................17
Fitting the carrying strap .................................................18
Service .................................................................23
Product warranty ........................................................24
1
2
14 15
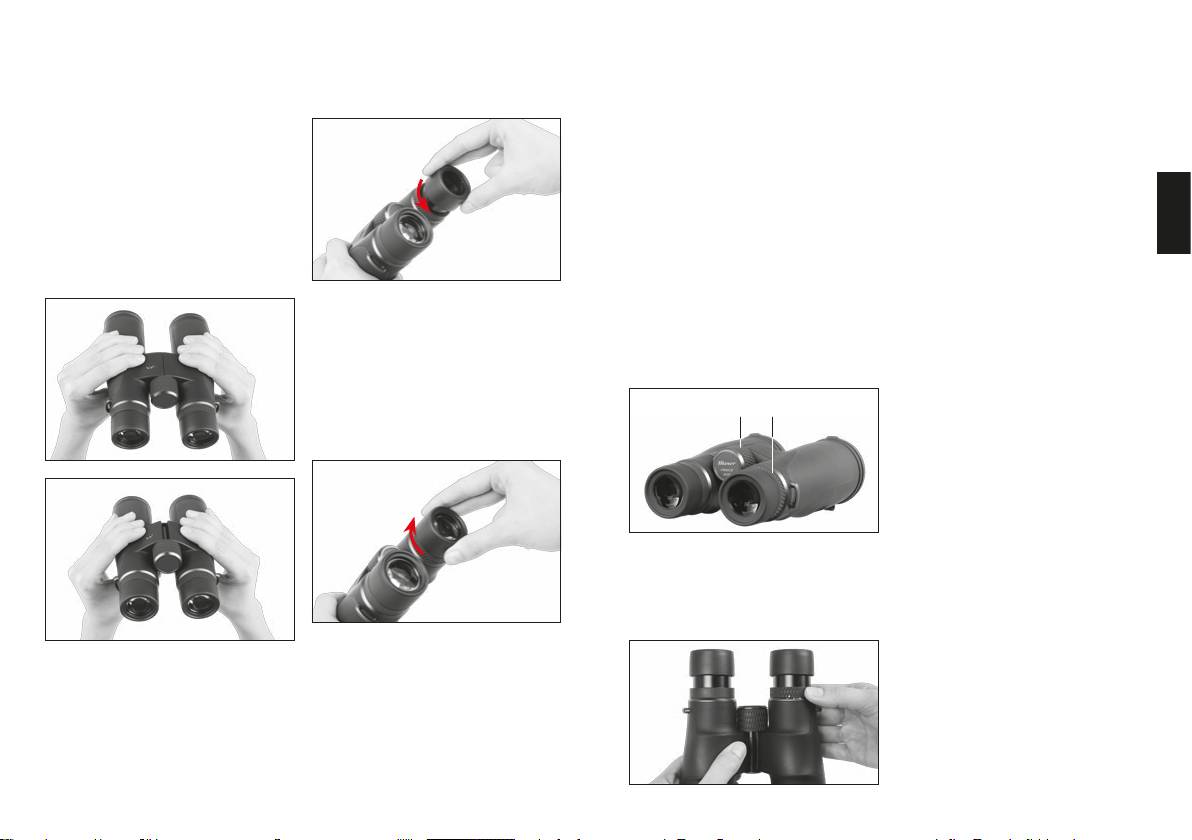
Adjustment of the binoculars
Adjustment of the distance
Use without glasses
Adjustment of the focus
set the focus correctly for the left eye
between the eyepieces
By turning the focusing wheel [3], every
using the focusing wheel [3], keeping
The distance between the eyes is dierent
object can be set from the minimum
the right eye closed. Then set the correct
from person to person. In order to achieve
focusing distance (approx. 2m) to being
focus for the right eye using the dioptre
an optimum visual eld, the distance be-
focused to innity.
adjustment ring [2], keeping the left eye
tween the eyepieces must be set individ-
closed.
ually. For this purpose, the two halves of
Dioptre compensation
the binoculars are pushed together or
Since the eyes of many people supply
DANGER:
English
extended around the centre axis until one
various eyesight values, this dierence
Never look at the sun through the bin-
collective, circular image without shadows
can be compensated for by means of the
oculars, as doing so can cause serious
is shown from the images of both lenses.
dioptre adjustment ring [2].
injuries to the eye.
For the use without glasses, the eyecups
Adjustment for an identical vision on
Maintenance tips
of both eyepieces are unscrewed to the
both eyes
Smudges on the lenses may impair the
left (counter-clockwise). Three dierent
Turn the dioptre adjustment ring to zero
sharpness of your Blaser binoculars. We
latching graduations provide the constant
position.
therefore recommend removing nger
adjustment of the correct distance from
prints, dust and other impurities of the
the eyes to the eyepiece lenses.
lens and eyepiece surfaces using a soft
3 2
hair pencil and/or the lens cloth supplied.
Use with glasses
The housing of the binoculars can be
cleaned with a damp cloth. Please use
the optical cleaning cloth supplied exclu-
sively for cleaning the lenses.
Adjustment for varying visual acuity
between both eyes
When looking at a more distant object
(approx. 100m) through the binoculars,
Wearers of glasses turn the eyecups of
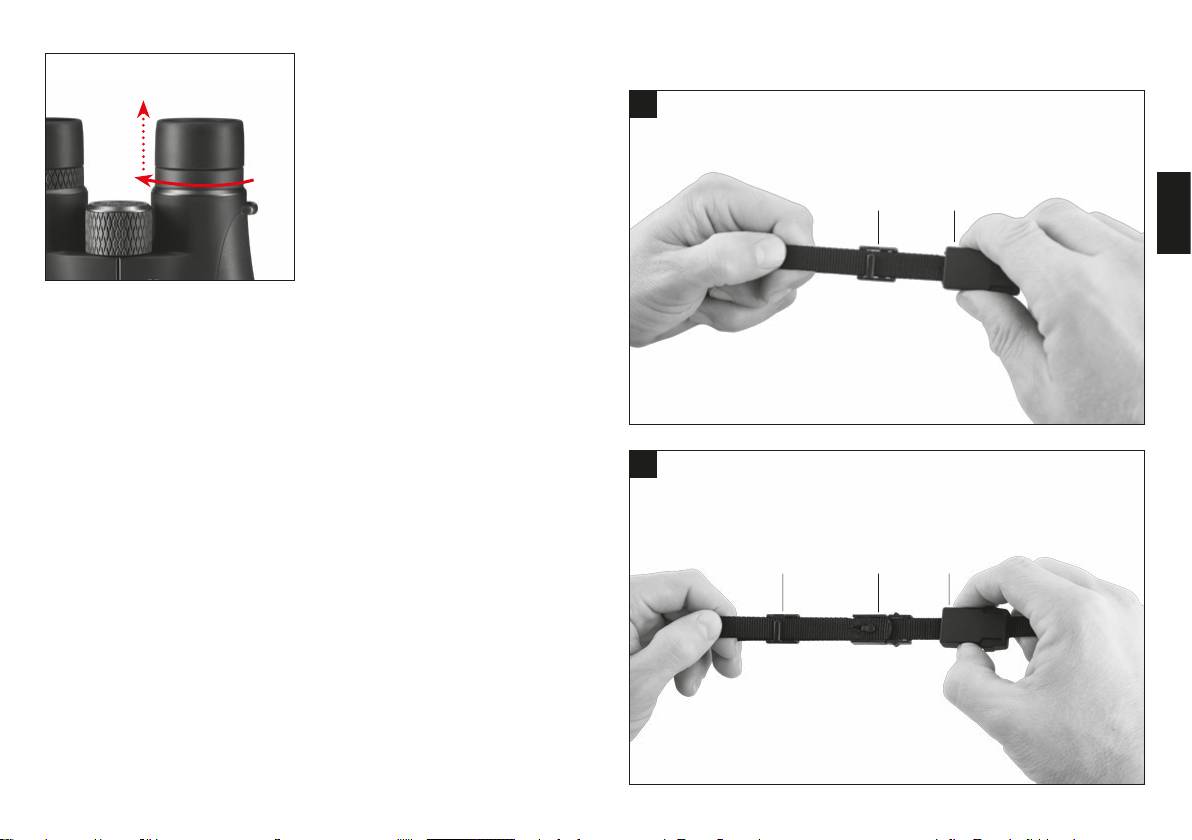
Adjustment of the eyecups
both eyepiece lenses in up to the stop
For setting the correct distance of the
(delivery condition). This setting enables a
eyes to the ocular lenses, the binoculars
view across the entire eld of vision with-
of the Blaser Primus series feature eye-
out being “cut o” at the edge.
cups.
16 17
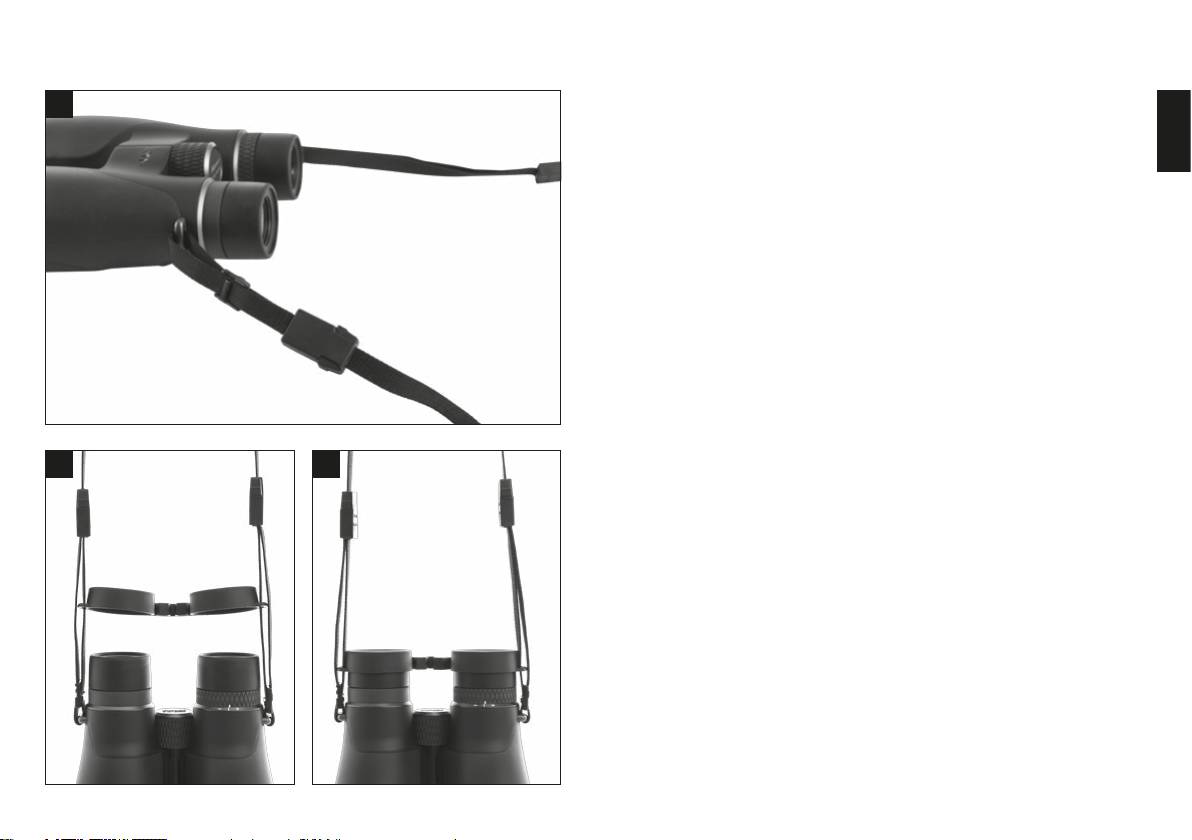
Fitting the carrying strap
The Blaser carrying strap included in the
1
scope of supply can be tted both with
the eyepiece cap attached to one side
and to both sides.
1. Hold strap, pull at the housing front
[3], and fully remove interior holder [2]
1
3
from the housing (Fig. 1).
English
2. First loosen the strap from the interior
holder [2], then from the hold-down
clamp [1] (Fig. 2).
3. Lead the loose strap through the lug of
For cleaning heavy soiling caused by dust
the eyepiece cap and that of the bin-
and sand, the eyecups can be easily re-
oculars. The eyepiece caps can be at-
moved.
tached to one side on the left or right,
or to both sides (Fig. 3).
1. Screw in the eyecup fully in clockwise
4. Then lead the strap through the hold-
direction and unscrew it via a slight
down clamp [1] again and x it to the
resistance.
interior holder [2] (Fig. 4).
2. Then remove the eyecup towards the
5. Fully slip the housing [3] over the inte-
top against a slight resistance. Just
rior holder [2] again and repeat xing
1
rinse with running water, let it dry o,
the carrying strap to the other side of
and install it again.
the binoculars (Fig. 5).
Always keep your binoculars in a
well-ventilated, dry and cool place. Wipe
the wet binoculars before storing them in
1
2 3
the case. Protect your binoculars against
shocks and falls.
18 19
